
KP6 - Hi-Fi System Russound - Free user manual and instructions
Find the device manual for free KP6 Russound in PDF.


| Product Type | Multi-Zone Audio Keypad |
| Brand | Russound |
| Model | KP6 |
| Dimensions (W x H x D) | 4.5 x 2.5 x 1.2 inches |
| Weight | 0.5 lbs |
| Power Supply | 12V DC, 500mA |
| Display | 2-line backlit LCD |
| Control Type | Keypad with dedicated buttons |
| Number of Zones | 6 |
| Supported Sources | Up to 6 audio sources (via Russound A-Bus) |
| Volume Control | Rotary encoder with mute |
| Tone Controls | Bass and treble adjustment |
| IR Input | 1 x 3.5mm IR input |
| RS-232 Port | 1 x RJ45 for control system integration |
| Ethernet | Not available |
| Firmware Update | Via USB or RS-232 |
| Mounting | In-wall or surface mount with included brackets |
| Color | White or black (selectable) |
| Operating Temperature | 32°F to 104°F (0°C to 40°C) |
| Certifications | FCC, CE, RoHS |
| Included Items | Keypad, mounting frame, screws, quickstart guide |
Frequently Asked Questions - KP6 Russound
User questions about KP6 Russound
0 question about this device. Answer the ones you know or ask your own.
Ask a new question about this device
Download the instructions for your Hi-Fi System in PDF format for free! Find your manual KP6 - Russound and take your electronic device back in hand. On this page are published all the documents necessary for the use of your device. KP6 by Russound.
USER MANUAL KP6 Russound
Source Label Installation
Note: Source labels must be inserted prior to installing the trim plate on the keypad.
- Determine the system's source names and numbers (e.g., CD, Source 1).
- Select the corresponding source name label from the included label sheets. Left-side labels are used for sources 1, 3 and 5; right-side labels are used for sources 2, 4 and 6.
- Slide the label into the window slot until the source name is centered in the window.
User Options Mode
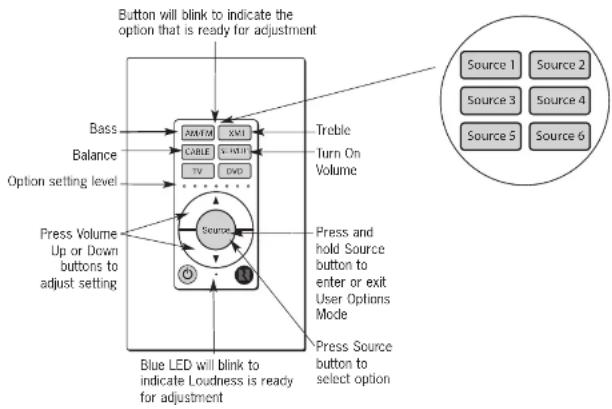
The User Options Mode allows the user to adjust the audio properties of a particular zone. The audio features that can be adjusted are: Bass, Treble, Balance, Turn On Volume and Loudness.
To enter the User Options Mode, press and hold the Source button when the zone is on. To exit the mode, press and hold the Source button again (or wait for a 9-second timeout).
The first four source buttons double as indicators for audio feature selection. When entering the User Options Mode, the top left
| Rusound KP6/KP4 Source Labels | |||
| CD 1 | CD | SERVER 1 | CABLE |
| CD 2 | DVD | SERVER 2 | VCR |
| AM/FM | TAPE | SERVER 3 | DVR |
| AM/FM 1 | SAT | iPod | XM 2 |
| AM/FM 2 | XM 1 | RADIO | SIRIUS |
(Source 1) button will temporarily blink to indicate "Bass" is ready for adjustment. Subsequent presses of the Source button toggle through Treble (Source 2), Balance (Source 3), Turn On Volume (Source 4), and Loudness (blue LED).
Once an option is selected, the volume up/down buttons are used to adjust settings. The volume indicator LEDs temporarily light to indicate the option setting. When Loudness is turned on, the blue LED lights solid.
flowchart
graph TD
    A["Button will blink to indicate the option that is ready for adjustment"] --> B["Bass"]
    B --> C["CABLE"]
    C --> D["TV"]
    D --> E["××××××××××××××××××××××××××××××××××××××××××××××××××××××××××××××××××××××××××××××××××××××××"]
    C --> F["Blue LED will blink to indicate Loudness is ready for adjustment"]
    F --> G["Press Source button to select option"]
    G --> H["Press and hold Source button to enter or exit User Options Mode"]
    H --> I["Source"]
    I --> J["Turn On Volume"]
    J --> K["Treble"]
    K --> L["Balance"]
    L --> M["Option setting level"]
    M --> N["Press Volume Up or Down buttons to adjust setting"]
Technical Specifications
Dimensions: 1.85"W x 2.7"D x 1.47"H
(4.7 x 6.9 x 3.7 cm)
Fits 1 Gang UL/CSA Approved 18 ci
Junction Box
Weight: 4.0 oz. (113 g)
Power Requirements: 12 VDC 180mA
CAT-5 Connection: 110 punchdown
Warranty Repair
The Russound KP6/4 is fully guaranteed against all defects in materials and workmanship for two (21 years from the date of purchase. During this period, Russound will replace any defective parts and correct any defect in workmanship without charge for other parts or labor.
For this warranty to apply, the unit must be installed and used according to its written instructions. If service is necessary, it must be performed by Russound. The unit must be returned to Russound at the owner's expense and with prior written permission. Accidental damage and shipping damage are not considered defects, nor is damage resulting from abuse or from servicing by an agency or person not specifically authorized in writing by Russound.
This Warranty does not cover: Damage caused by abuse, accident, misuse, negligence, or improper installation or operation; Power surges and lightning strikes; Normal wear and maintenance; Products that have been altered or modified; Any product whose identifying number, decal, serial number, etc. has been altered, defaced or removed.
Russound sells products only through authorized Dealers and Distributors to ensure that customers obtain proper support and service. Any Russound product purchased from an unauthorized dealer or other source, including retailers, mail order sellers and online sellers will not be honored or serviced under existing Russound warranty policy. Any sale of products by an unauthorized source or other manner not authorized by Russound shall void the warranty on the applicable product.
Damage to or destruction of components due to application of excessive power voids the warranty on those parts. In these cases, repairs will be made on the basis of the retail value of the parts and floor. To return for repairs, the unit must be shipped to Russoud at the owner's expense, along with a note explaining the nature of service required. Be sure to pack the unit in a corrugated container with at least three (3) inches of resilient material to protect the unit from damage in transit. Before returning a unit for repair, call Russoud at 16031 659 5170 for a Return Authorization number. Write this number on the shipping label and ship to: Russoud, ATITIC Service, 5 Forces Road, Newmarket, NH 03857
Due to continual efforts to improve product quality as new technology and techniques become available, Russell/FMP, Inc. reserves the right to revise system specifications without notice.
All trademarks are properly of their respective owners.
Russound
5 Forbes Road, Newmarket, NH 03857
tel 603.659.5170 • fax 603.659.5389
mail: techarussound.com www.russond.coc
www.huaanha.com
28-1201 07/29/05
KP6/KP4 Keypad
The KP6/KP4 keypad is an in-wall Decora® style, single-gang keypad designed for individual zone control of CAM66/CAS44 distributed audio systems (wall plate not included). It has amber backlit, soft-touch volume, power and source select buttons. The KP6 keypad supports the KPSC keypad to add source control and numeric control capability.
KP6 Keypad Front Panel
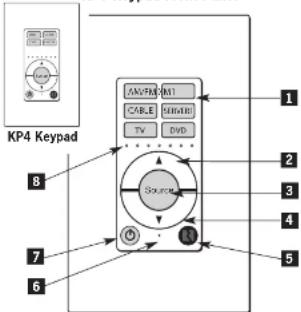
1 SOURCE NAME - Clear window with replaceable source name labels. Current source selected is backlit amber.
2 VOLUME UP - Raises the volume for the room and adjusts user option features.
3 SOURCE SELECT - Scrolls through the available sources. Press and hold brings up the USER MENU for Loudness, Bass, Treble, etc.
4 VOLUME DOWN - Lowers the volume for the room and adjusts user option feature.
5 IR RECEIVER - Receives IR signals and passes them to the controller and source equipment. Also used when the keypad is operated using the CA System remote controls.
6 IR CONFIRMATION/LOUDNESS LED - Blue LED blinks to confirm IR signal reception, and remains lighted when Loudness feature is enabled.
7 POWER - Turns room ON or OFF when pressed once; when OFF, press and hold to turn off all rooms; remains lit as system indicator.
8 VOLUME LEVEL - Volume level indicator LEDs light up from left to right to indicate volume level. Also indicates user option adjustments.
KP6/KP4 Side Panel
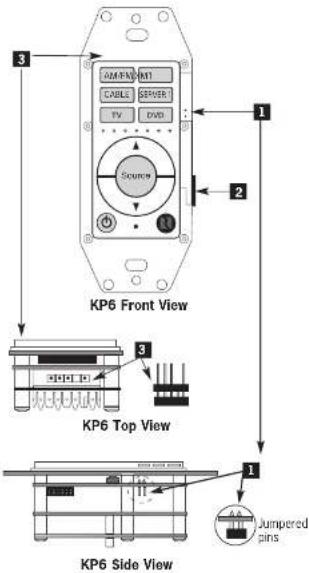
The KP5/KP4 OS update jumper and KPSC 12-pin header are located on the right side of the keypad (when facing front). These are covered when a trim plate is installed.
1 OS UPDATE/RUN JUMPER -The pins are jumpered only when performing an OS update on the keypad, and removed during normal operation.
2 KPSC PORT (KP6 only) - 12-pn header for connection to KPSC source control keypad.
3 OS UPDATE PORT - Used to update the KP6/KP4 keypad operating system firmware. If an update is released, it will be available online through the Document Center on www.russound.com. Look in the "Firmware and Downloads" section under Multi-Zone product type. The Advanced Programming Cable is available from Russound, Part #2500-521065.
KP6/KP4 Back Panel
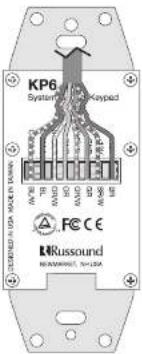
The KP6/KP4 keypad uses a 110-punchdown terminal on the back panel to provide a simple installation and strong connection for CAT-5 cable's eight conductors. Punchdown terminals require the use of a punchdown tool. Attach the CAT-5 cable to the 110-punchdown terminal on the KP6/KP4 keypad as shown, matching the conductor colors to the connection color guide. The keypad will not operate properly if the terminations deviate from the required connection order.
Take care when using an impact 110 punchdown tool, as this may overspread the contact points. Be sure to use the lowest setting. Use of the impact tool may propel stray bits of wire and jacket into the keypad's chassis and possibly cause a short in the circuitry. Gently shake or blow air through the keypad chassis to remove stray wire before the keypad is installed into the junction box.
Keypad Installation
-
Check whether or not you can route the wire to the location you have chosen.
-
To install a single-gang keypad, you will need to use a UL/CSA approved plastic single gang (18 cft) electrical box
- Route CAT-5 wire to the junction box from the CA system controller.
- Use a 110 punchdown tool to connect each wire to its corresponding color labeled on the punchdown terminal.
- Mount the keypad in the electrical box, add the source name labels and attach the trim plate.
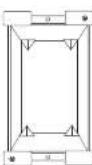
Electrical Box
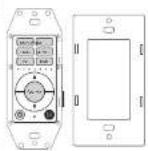
KP6
Keypad

Trim Plate
KP6 Keypad to CA Controller Connection
Each keypad connects to a Keypad Port on the back of the controller (CA46G controller shown below). Connections are made using CAT-5 cable with an RJ45 connector (wring scheme shown below).
An SA-ZX3 Keypad Splitter can be used to add additional key-pads to each zone.
CAT-5 to KP6 Connection
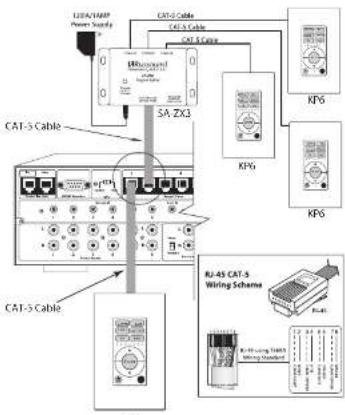
KP6
Safety Instructions
- Read Instructions - All the safety and operating instructions should be read before the appliance is operated.
- Retain instructions - The safety and operating instructions should be retained for future reference.
- Heed Warrings - All warnings on the appliance in the operating instructions should be adhered to.
- Follow Instructions - All operating and user instructions should be follow-up.
- Water and Moisture - The appliance should not be used near water, for example, near a bathtub, washbowl, kitchen sink, laundry tub, in a wet basement, or near a swimming pool.
- Wall Mounting - The appliance should be mounted to a wall only as recommended by the manufacturer.
- Ventilation The appliance should be situated so that its location or position does not interfere with its proper ventilation. For example, the appliance should not be situated on a bed, sofa, rug, or similar surface that may block the ventilation openings, or placed in a built-in installation, such as a bookcase or cabinet that may impede the flow of air through the ventilation openings.
- Heat - The appliance should be situated away from heat sources such as radiators, heat registers, stoves, or other appliances (including amplifiers) that produce heat.
- Power Sources - The appliance should be connected to a power supply only of the type described in the operating instructions or as marked on the appliance.
- Grounding or Polarization - Precaution should be taken so that the grounding or polarization means of an appliance is not detected.
- Object and Liquid Entry - Care should be taken so that objects do not fall and liquids are not spilled into the enclosure through the operations
- Damage Requiring Service - The appliance should be serviced by qualified service personnel when:
A. Objects have fallen, found has been spilled into the appliance; or
B. The appliance has been exposed to rain; or
C. The appliance does not appear to operate normally: or
D. The appliance has been dropped or the enclosure is damaged.
- Servicing. The user should not attempt to service the appliance beyond that described in the operating instructions. All other servicing should be referred to qualified service personnel.
Precautions:
- Power - WARNING: BEFORE TURNING ON THE POWER FOR THE FIRST TIME. READ THE FOLLOWING SECTION CAREFULLY.
- Do Not Touch The Unit With Wet Hands - Do not handle the unit when your hands are wet or damp. If water or any other liquid enters the unit's cabinet, take it to a qualified service person for inspection.
- Care - From time to time you should wipe off the front panel of the cabinet with a soft cloth. Do not use rough material, thinners, alcohol or other chemical solvents or cloths since this may damage the finish or remove the panel lettering.
Brand : Russound
Model : KP6
Category : Hi-Fi System