
SRF-HM01V - Radio SONY - Free user manual and instructions
Find the device manual for free SRF-HM01V SONY in PDF.


| Product Type | Portable AM/FM Radio |
| Model | Sony SRF-HM01V |
| Frequency Range FM | 87.5 - 108 MHz |
| Frequency Range AM | 530 - 1710 kHz |
| Speaker Size | 4.0 cm diameter |
| Output Power | 150 mW |
| Preset Stations | 30 (15 FM + 15 AM) |
| Tuning Method | Digital PLL |
| Headphone Jack | 3.5 mm stereo |
| Power Supply | 2 x AA batteries (1.5 V each) |
| Battery Life | Approx. 30 hours (using alkaline batteries) |
| Dimensions (W x H x D) | 100 x 60 x 28 mm |
| Weight | 140 g (without batteries) |
| Material | ABS plastic |
| Handle | Retractable handle for carrying |
| Additional Features | Auto scan, sleep timer, battery indicator |
| Cleaning | Wipe with a soft dry cloth; do not use solvents |
| Safety | Do not expose to moisture or extreme temperatures |
| Spare Parts | Batteries, headphones (not included) |
| Repairability | User replaceable batteries; for other repairs consult service center |
Frequently Asked Questions - SRF-HM01V SONY
User questions about SRF-HM01V SONY
0 question about this device. Answer the ones you know or ask your own.
Ask a new question about this device
Download the instructions for your Radio in PDF format for free! Find your manual SRF-HM01V - SONY and take your electronic device back in hand. On this page are published all the documents necessary for the use of your device. SRF-HM01V by SONY.
USER MANUAL SRF-HM01V SONY
TV/WEATHER/FM Stereo/AM PLL Synthesized Headphone Radio
Operating Instructions
SRF-HM01V
WOLKTOO
TV/WEATHER/FM/AM WALKMAN
Sony Corporation © 2002 Printed in China
|
http://www.sony.net/
OWNER'S RECORD
The model number is located on the rear of the left side of the headphones and serial number inside the battery compartment. Record the serial number in the space provide below. Refer to these numbers whenever you call upon your Sony dealer regarding this product.
Model No. SRF-HM01V Serial No.
For customers in the USA
Please register this product on line at
http://www.sony.com/productregistration. Proper registration will enable us to send you periodic mailings about new products, services, and other important announcements. Registering your product will also allow us to contact you in the unlikely event that the product needs adjustment or modification. Thank you.

WARNING
You are cautioned that any changes or modifications not expressly approved in this manual could void your authority to operate this equipment.
This device complies with Part 15 of the FCC Rules. Operation is subject to the condition that this device does not cause harmful interference.
Trade Name: SONY
Model name: SRF-HM01V
Tested To Comply With FCC Standards
FOR HOME OR OFFICE USE
If you have any questions about the product, you may call: Sony Direct Response Center 1-(800)-222-7669 or write to: Sony Direct Response Center 12451 Gateway Blvd. Fort Myers, FL 33913
Declaration of Conformity
Trade Name: SONY
Model: SRF-HM01V
Responsible Party: Sony Electronics Inc. Address: 680 Kinderkamack Road, Oradell, NJ 07649 USA Telephone Number: 201-930-6972
This device complies with Part 15 of the FCC Rules. Operation is subject to the following two conditions: (1) This device may not cause harmful interference, and (2) this device must accept any interference received, including interference that may cause undesired operation.
Features
• PLL synthesized tuning 4 band radio.
- A total of 30 stations can be preset, 5 TV stations, 5 WEATHER stations, 15 FM stations and 5 AM stations.
• TV/WEATHER/FM SENS (sensitivity) DX/LOCAL selector for better reception.
- MEGA BASS for dynamic bass sound system.
• Light reflector to reflect car lights at night for your safety.
• Water-resistant body for all weathers operation.
Precautions
- Operate the unit only on 1.5V DC with one size AAA (R03) battery.
- Avoid exposure to temperature extremes, direct sunlight, moisture, sand, dust or mechanical shock. Never leave in a car parked under the sun.
- Should any solid object or liquid fall into the unit, remove the battery and have the unit checked by a qualified personnel before operating it any further.
• In vehicles or buildings, radio reception may be difficult or noisy. Try - listening near a window.
- To clean the casing, use a soft cloth dampened with a mild detergent solution.
Notes on Headphones
Road safety
Do not use headphones while driving, cycling, or operating any motorized vehicle. It may create a traffic hazard and is illegal in many areas. It can also be potentially dangerous to play your headphones at high volume while walking, especially at pedestrian crossings. You should exercise extreme caution or discontinue use in potentially hazardous situations.
Preventing hearing damage
Avoid using headphones at high volume. Hearing experts advise against continuous, loud and extended play. If you experience a ringing in your ears, reduce volume or discontinue use
Caring for others
Keep the volume at a moderate level. This will allow you to hear outside sounds and to be considerate to people around you.
Cautions on Water-resistance
This unit is designed so that it can be used with slight exposure to rain, snow and other forms of moisture, but there are several points on which caution should be observed.
- Do not allow it to come into contact with large amounts of water
- Do not immerse it in water
- If water should get on it or if it should fall into water, take it out immediately and wipe it off with a dry cloth. To prevent the battery from corroding, wipe out the interior of the battery compartment as follows:
- Open or close the battery compartment with dry hands in a place without exposure to any water.
– Wipe off the battery and the inside of the battery compartment. Give special attention to the contacts so that no water remains on them.
Warning
If there is lightning when you are using the unit, take off the headphones immediately.
If you have any questions or problems concerning your unit, please consult your nearest Sony dealer.
The preset stations may be initialized, if a maintenance service is
Please keep a copy of your settings in case you want to preset them again.
Specifications
Time display: 12-hour system
Frequency range
Band Range Channel step
| TV 2 - 13 ch 1 channel | ||
| WEATHER 1 - 7 ch | 1 channel | |
| FM | 87.5 - 108 MHz | 0.1 MHz |
| AM | 530 - 1 710 kHz | 10 kHz |
| 531 - 1 710 kHz | 9 kHz | |
Headphone type: Dynamic
Power output: 7 mW + 7 mW (at 10 % harmonic distortion)
Power requirements: 1.5V DC, one size AAA (R03) battery
Mass: Approx. 136 g (4.7 oz) incl. a battery
Design and specifications are subject to change without notice.
Installing the Battery
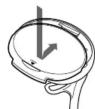
1 Open the battery compartment lid and install one battery (not supplied).
When the battery is first installed, "AM 12:00" flashes in the display. Once the current time is set, the flashing stops. (See "Setting the Clock")

* The attached packing is used to ensure water-resistance for the battery compartment. Therefore, make sure to close the battery compartment lid securely.
2 To close the lid, press the center of the lid firmly and push it back to its original position as illustrated.
Battery Life (Approx. hours)
(JEITA*)
| TV | WEATHER | FM | AM | |
| Sony alkaline size AAA (LR03) battery | 33 | 33 | 37 | 57 |
| Sony size AAA (R03) battery | 14 | 14 | 16 | 26 |
* Measured by JEITA (Japan Electronics and Information Technology Industries Association) standards.
The actual battery life may vary depending on the circumstance of the unit.
When to replace the battery
You can check the remaining battery power that appears in the display. The indicators are as follows:
Indicator

Full strength

Weakening

Used up. The unit will sound a long beep and then turn off. Replace the battery with a new one. When you set POWER to ON after installing the new battery, the indicator changes to "☐"
10
Note on replacing the battery
Do not take more than 10 minutes to replace the battery, otherwise, the clock setting, preset stations and the AM channel step will be initialized Should that happen, reset the functions.
Notes on battery
- Do not charge the dry battery.
- Do not carry the dry battery together with coins or other metallic objects. It can generate heat if the positive and negative terminals of the battery accidentally come into contact with metallic objects. - When you are not going to use the unit for a long time, remove the battery to avoid damage from battery leakage and corrosion.

Setting the Clock
The clock time display of this unit is a 12-hour system. When the battery is first installed, "AM 12:00" flashes
1 Set POWER to OFF to turn off the power.
2 Hold down MEGA BASS/CLOCK for more than 2 seconds until "AM 12" starts flashing.

3 Press TUNE + or - to adjust the hour, then press MEGA BASS/CLOCK.
If you hold down TUNE + or -, the digit changes rapidly. "AM 12:00" = midnight, "PM 12:00" = noon.

4 Repeat step 3 above to adjust the minute. "I" starts flashing and the clock starts operating
To set the current time exactly to the second, adjust the minute and then press MEGA BASS/CLOCK to synchronize with a time signal (such as the telephone time signal).
Note
If you do not press TUNE + or -, or MEGA BASS/CLOCK within one minute, the clock setting mode will be canceled.
Changing AM Channel Step
The AM channel step differs depending on areas. The channel step of this unit is factory-set to 10kHz . Change the settings as shown below to be able to listen to the radio.
Area Channel step
North and South American countries 10 kHz
Other countries 9 kHz
Note
When the AM channel step is changed, only the preset stations on the AM band will be initialized.
1 Set POWER to OFF to turn off the power
2 While holding down MODE, hold down TUNE + or - for more than 5 seconds. The channel step will change and "9" kHz (or "10" kHz) will flash for 3 seconds in the display. If you proceed to step 2 again, the channel step changes again.
Playing the Radio — Manual Tuning
1 Set POWER to ON to turn on the power.
2 If "PRESET" is displayed, press MODE so that "PRESET" disappears.

Pressing MODE will switch over between manual tuning mode and preset tuning mode.
3 Press BAND to select the band. Each press changes the band as follows: → AM FM-TV WEATHER →
4 Press TUNE + or - to select the desired frequency. If you hold down TUNE + or -, the frequency or channel changes rapidly. When the frequency matches the broadcast frequency, the broadcast will be received.
5 Adjust the volume using VOL. To turn off the radio, set POWER to OFF.
Improving Radio Reception
TV/WEATHER/FM: Set TV/WB/FM SENS to LOCAL if interference is prevalent when radio wave intensity is dramatically stronger. Under normal conditions, set to DX.
AM: Move around to obtain better reception.
Obtaining Powerful Bass Sound
Press MEGA BASS/CLOCK. "MB" appears in the display

If the sound is distorted, or if you want to reduce the bass tone, press MEGA BASS/CLOCK again to turn off this function. The MEGA BASS setting is not canceled even if the radio is turned off
Presetting your Favorite
Stations — Preset Tuning
You can preset up to 5 stations each for TV, WEATHER and AM, and 15 stations for FM. Also, you can delete the preset station whether it is factory-set or preset by yourself.
Presetting a Station
1 Follow steps 1 to 5 in "Playing the Radio" and manually tune in to the station you wish to preset.
2 Hold down ENTER until the preset number flashes. If there is a preset number that has no preset station, that preset number flashes. When all the preset numbers are set to certain stations (factory-set), "1" flashes and "PRESET" appears.

3 Press TUNE + or – to select the number you wish to preset, then press ENTER
When you select the preset number using TUNE + or -, "PRESET" appears if that number has a preset station. If it has no preset station, only the number flashes and "PRESET" does not appear. When you press ENTER, the selected preset number lights up in the display.
Example: Display window when you preset FM 90.0 MHz in preset number 2.

To preset another station, repeat these steps.
To change the preset station, preset a new station. The previous station will be canceled.
Note
If you do not press TUNE + or -, or ENTER within one minute, the preset tuning mode will be canceled.
Tuning in to a Preset Station
1 Set POWER to ON to turn on the power.
2 Press MODE so that "PRESET" and preset number appear.
3 Select the band with BAND
4 Press TUNE + or - to select the desired preset number
5 Adjust the volume using VOL
To turn off the radio, set POWER to OFF
Note
If you hold down MODE for more than 2 seconds, the unit enters the preset station deleting mode. Press MODE again to return to the previous mode.
Deleting a Preset Station
1 Follow steps 1 and 2 in "Tuning in to a Preset Station".
2 Select the band with BAND
3 Press TUNE + or - to select the preset number to be deleted.
4 Hold down MODE for more than 2 seconds until "PRESET", "dEL" and the preset number flash.

5 While the letters and the preset number are flashing, press ENTER
The station set to the preset number just before the deleted station will be displayed. To delete other stations, except stores 2 to 5.
To delete other stations, repeat steps 2 to 5. If all the preset stations are deleted, "PRESET -" appears in the display.
To cancel deleting, press MODE while "PRESET", "dEL" and the preset number are flashing.
- TV/WEATHER/FM Stereo/AM PLL Synthesized Headphone Radio
- OWNER'S RECORD
- WARNING
- Features
- Precautions
- Notes on Headphones
- Road safety
- Preventing hearing damage
- Caring for others
- Cautions on Water-resistance
- Specifications
- Installing the Battery
- When to replace the battery
- Note on replacing the battery
- Notes on battery
- Setting the Clock
- Changing AM Channel Step
- Playing the Radio — Manual Tuning
- Improving Radio Reception
- Obtaining Powerful Bass Sound
- Presetting your Favorite
- Stations — Preset Tuning
Brand : SONY
Model : SRF-HM01V
Category : Radio