
RoboVac 25C - Robot vacuum Anker - Free user manual and instructions
Find the device manual for free RoboVac 25C Anker in PDF.


| Product Type | Robotic Vacuum Cleaner |
| Brand | Anker |
| Model | RoboVac 25C |
| Dimensions (LxWxH) | 12.8 x 12.8 x 2.9 inches (32.5 x 32.5 x 7.4 cm) |
| Weight | 5.6 lbs (2.54 kg) |
| Power Supply | Rechargeable Li-ion 2600 mAh battery |
| Charging Time | Approx. 4-5 hours |
| Run Time | Up to 100 minutes (standard mode) |
| Suction Power | 1300 Pa (max) |
| Cleaning Modes | Auto, Spot, Edge, Boost IQ |
| Navigation System | Drop sensors, anti-collision, anti-tangle |
| Filtration | High-efficiency filter (washable) |
| Dustbin Capacity | 0.6 L |
| App Control | Compatible with Amazon Alexa, Google Assistant (via eufyHome app) |
| Remote Control | Included (with battery) |
| Noise Level | < 60 dB (standard mode) |
| Surface Compatibility | Hard floor, low-pile carpet |
| Self-charging | Yes (auto-return to charging dock) |
| Spare Parts | Optional: replacement filters, side brushes, main brush, battery |
| Maintenance | Clean dustbin after each use; wash filter every 2 weeks; replace filter every 3-6 months |
| Safety Features | Drop detection, anti-tangle brush, bumper sensors |
Frequently Asked Questions - RoboVac 25C Anker
User questions about RoboVac 25C Anker
0 question about this device. Answer the ones you know or ask your own.
Ask a new question about this device
Download the instructions for your Robot vacuum in PDF format for free! Find your manual RoboVac 25C - Anker and take your electronic device back in hand. On this page are published all the documents necessary for the use of your device. RoboVac 25C by Anker.
USER MANUAL RoboVac 25C Anker
For FAQs and more information, please visit:
www.eufylife.com
Owner's Manual
RoboVac
Table of Contents
02 Important Safety Instructions
06 About Your RoboVac
What's in the Box
RoboVac Anatomy
Buttons & Indicators
10 Using Your RoboVac
Important Tips Before Use
Preparation
Charge Your RoboVac
Use Your RoboVac with the EufyHome App
Start / Stop Cleaning
Select a Cleaning Mode
Use the Boundary Strip
Use Your RoboVac with Amazon Alexa /
the Google Assistant
22 Cleaning and Maintenance
Clean the Dust Collector and Filters
Clean the Rolling Brush
Clean the Side Brushes
Replace the Side Brushes
Clean the Sensors and Charging Pins
Clean the Swivel Wheel
27 Troubleshooting
Wi-Fi Connection
31 Specifications
31 Customer Service
Thank you for purchasing RoboVac. Read all instructions before using this product, and keep it properly for future reference.
English
Important Safety Instructions
To reduce the risk of injury or damage, read these safety instructions carefully and keep them at hand when setting up, using, and maintaining this device.

WARNING SYMBOLS USED
This is the safety alert symbol. This symbol alerts you to potential hazards that could result in property damage and/or serious bodily harm or death.
- This device can be used by children aged from 8 years and above and persons with reduced physical, sensory or mental capabilities or lack of experience and knowledge if they have been given supervision or instruction concerning use of this device in a safe way and understand the hazards involved.
• Children should be supervised to ensure they do not play with this device. - Cleaning and maintenance shall not be performed by children without adult supervision.
- This device is only to be used with the power supply unit provided.
- The plug must be removed from the socket-outlet before cleaning or maintaining this device.
- This device contains the battery that is only replaceable by skilled persons.
- This device must be disconnected from the supply mains when removing the battery.
- For the purposes of recharging the battery, only use the detachable power supply unit provided with this device.
- The battery must be removed from this device before this device is disposed of. To remove the battery from this device, first remove the screws on the bottom, then remove the main PCB and unscrew the battery cover using a screwdriver. Remove the battery by disconnecting the quick connector.
02
English
- The used battery should be placed in a sealed plastic bag and disposed of safely according to local environmental regulations.
- The external flexible cable or cord of the power supply unit cannot be replaced; if the cord is damaged, the power supply unit shall be disposed of.
• This device is for indoor use only. - This device is not a toy. Do not sit or stand on this device. Small children and pets should be supervised when this device is operating.
- Store and operate this device in room temperature environments only.
- Clean with a cloth dampened with water only.
- Do not use this device to pick up anything that is burning or smoking.
- Do not use this device to pick up spills of bleach, paint, chemicals, or anything wet.
- Before using this device, pick up objects like clothing and loose paper. Lift up cords for blinds or curtains, and move power cords and fragile objects out of the way. If this device passes over a power cord and drags it, an object could be pulled off a table or shelf.
- If the room to be cleaned has a balcony, a physical barrier should be used to prevent access to the balcony and to ensure safe operation.
- Do not place anything on top of this device.
- Be aware that this device moves around on its own. Take care when walking in the area where this device is operating to avoid stepping on it.
- Do not operate this device in areas with exposed electrical outlets on the floor.
- Do not expose the electronics of this device, its battery, or the integrated Charging Base. There are no user-serviceable parts inside.
03
English
- Do not use this device on an unfinished, unsealed, waxed or rough floor. It may result in damage to the floor and this device. Use only on hard floor surfaces or low-pile carpet.
- This device has been designed to be used on floors without scratching them. We still recommend that you test this device on a small area of the room to be cleaned to ensure no scratches are made before cleaning the whole room.
Notice

This symbol on the device or its packaging indicates: Do not dispose of electrical appliances as unsorted municipal waste; use separate collection facilities. Contact your local authority for information regarding the collection systems available. If electrical appliances are disposed of in landfills or dumps, hazardous substances can leak into the groundwater and get into the food chain, damaging your health and well-being. When replacing old appliances with new ones, the retailer is legally obliged to take back your old appliance for disposal at least free of charge.
FCC Statement
This device complies with Part 15 of the FCC Rules. Operation is subject to the following two conditions: (1) This device may not cause harmful interference, and (2) this device must accept any interference received, including interference that may cause undesired operation.
Warning: Changes or modifications not expressly approved by the party responsible for compliance could void the user's authority to operate the equipment.
Note: This equipment has been tested and found to comply with the limits for a Class B digital device, pursuant to Part 15 of the FCC Rules. These limits are designed to provide reasonable protection against harmful interference in a residential installation.
This equipment generates, uses, and can radiate radio frequency energy and, if not installed and used in accordance with the instructions, may cause harmful interference to radio communications. However, there is no guarantee that interference will not occur in a particular installation. If this equipment does cause harmful interference to radio or television reception, which can be determined by turning the equipment off and on, the user is encouraged to try to correct the interference by one or more of the following measures: (1) Reorient or relocate the receiving antenna. (2) Increase the separation
04
English
between the equipment and receiver. (3) Connect the equipment into an outlet on a circuit different from that to which the receiver is connected. (4) Consult the dealer or an experienced radio / TV technician for help.
FCC Radiation Exposure Statement
This equipment complies with FCC radiation exposure limits set forth for an uncontrolled environment. This equipment should be installed and operated with minimum distance 20 cm between the radiator & your body.
IC Statement
This device complies with industry Canada licence-exempt RSS standard(s). Operation is subject to the following two conditions: (1) this device may not cause interference, and (2) this device must accept any interference, including interference that may cause undesired operation of the device.
Declaration of Conformity
This product complies with the radio interference requirements of the European Community. Hereby, Anker Innovations Limited declares that the radio equipment type T2117/T2123 is in compliance with Directive 2014/S3/EU. The full text of the EU declaration of conformity is available at the following internet address: https://www.eufylife.com/.
Maximum output power: 14 dBm
Frequency band: 2.4G band (2.4000GHz - 2.4835GHz)
Contains FCC ID: 2ANDL-TYWE15 IC ID: 23243-TYWE15
Trademark Notice
• Amazon, Echo, Alexa and all related logos are trademarks of Amazon.com, Inc. or its affiliates.
• Apple and the Apple logo are trademarks of Apple Inc., registered in the U.S. and other countries. App Store is a service mark of Apple Inc., registered in the U.S. and other countries.
• Google Play and the Google Play logo are trademarks of Google Inc.
• Google Home is a trademark of Google Inc.
05
English
About Your RoboVac
What's in the Box
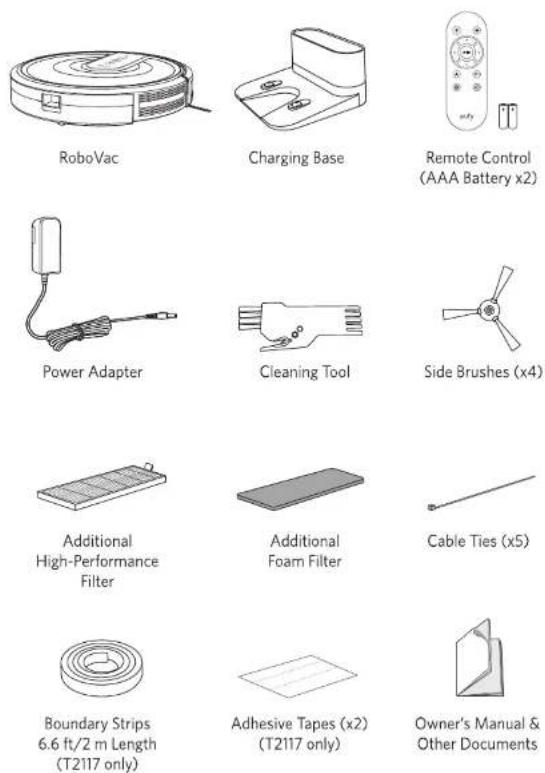
06
English
RoboVac Anatomy
Top & Side

Bottom

07
English
Dust Collector

flowchart
graph TD
    A["Pre-filter"] --> B["High-perfor"]
    B --> C["Foam filter"]
Suction Inlet

Charging Base
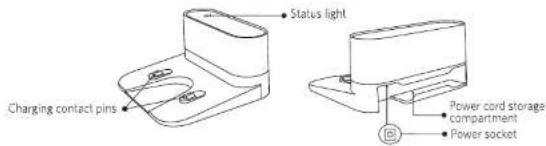
08
English
Remote Control

1 Return RoboVac to Charging Base
2 Adjust suction power level in Auto and Quick Cleaning modes
3 Start Auto cleaning / Stop cleaning
4 Control cleaning direction manually
5 Start Auto cleaning
6 Start Edge cleaning
7 Start Spot cleaning
8 Start Quick cleaning

Install 2 AAA batteries before using the remote control for the first time. Make sure the positive and negative ends are facing the correct polarity direction as marked in the battery compartment.
Buttons & Indicators
| → | Start/Stop CleaningReset the Wi-Fi Connection (Press and hold for 10 seconds until RoboVac beeps)Solid Blue: standby or cleaningFlashing/Solid red: errorRefer to the "Troubleshooting>Error Tone" section in this manual for solutions. | |
| ◎ | Spot CleaningFlashing blue: Spot Mode | |
| ♥ | Return to Charging BaseFlashing blue: returning to charging baseFlashing orange: low power and returning to charging baseBreathing orange (when docked to charging base): chargingSolid blue (when docked to charging base): fully charged |
09
English

- When you use the Find My Robot function via the EufyHome app, all three LED indicators flash blue and RoboVac beeps once.
To conserve power, all LED indicators automatically turn off when: - RoboVac is not docked to the Charging Base and has been inactive for 10 minutes;
- RoboVac is fully charged for 10 minutes.
| (Wi-Fi Status Light) | Status |
| Slowly flashing blue | Waiting for connection |
| Rapidly flashing blue | Connecting with your wireless router |
| Solid blue | Connected to your wireless router |
Using Your RoboVac
Important Tips Before Use

a

b

©
d

e

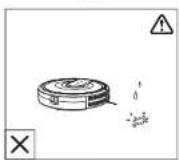
Remove power cords and small objects from the floor that may entangle RoboVac. You can use the supplied cable ties to organize your wires and power cords.
b Fold tasseled edges of area rugs underneath to prevent tangling RoboVac. Avoid cleaning very dark-colored high-pile rugs or rugs thicker than 1.02 in/26 mm as they may cause RoboVac to malfunction.
10
English
C Keep RoboVac away from spaces lower than 2.87 in/73 mm to prevent RoboVac from getting stuck. If necessary, place a physical barrier to block off the problem areas.
d Keep RoboVac away from wet areas
e RoboVac may climb on top of objects less than 0.63 in/16 mm in height. Remove these objects if possible.
f Anti-drop sensors prevent RoboVac from tumbling down stairs and steep drops. They may work less effectively if dirty or used on reflective/very dark-colored floors. It is recommended to apply Boundary Strips (T2117 only) or physical barriers to block off areas where RoboVac may fall.

Place physical barriers or Boundary Strips in front of fireplaces and areas that may cause damage to RoboVac if entered.
Preparation
1 Install the side brushes before use.
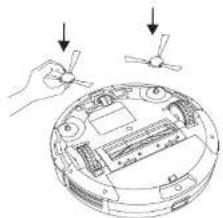
natural_image
Diagram showing a hand holding a small device next to a circular device with internal components and a propeller, no text or symbols present.2 Turn on the main power switch on the bottom of RoboVac,
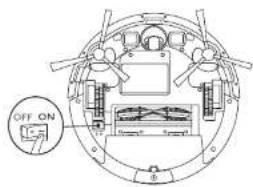

Remove the sticker next to the power switch, and the foam blocks beside the bumper before use.
11
English
3 Place the Charging Base on a hard, level surface and against a wall.
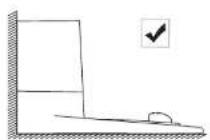

4 Remove objects within 3 ft/1 m of the left and right side and within 6 ft/2 m of the front of the Charging Base.

5 Connect the round connector of the adapter into the power socket on the Charging Base and the other end into a wall outlet.
- When the Charging Base connects to AC power, the LED indicator on the Charging Base is SOLID WHITE.

- Install the Charging Base in a location that RoboVac can easily access. It is recommended to place the Charging Base against a wall, and on a hard-level surface rather than on rugs or carpets. - Always keep the Charging Base plugged in, otherwise RoboVac will not automatically return to it.
Charge Your RoboVac
- RoboVac has a pre-installed rechargeable battery that has to be fully charged before use.
- RoboVac returns to the Charging Base at the end of a cleaning cycle or when its battery is running low.
12

English
Method 1: Attach RoboVac to the Charging Base by aligning its charging pins with the charging pins on the base.

natural_image
Line drawing of a toilet and vacuum cleaner (no text or symbols)Method 2: Press 🚙️ on RoboVac or on the remote control to return RoboVac to the Charging Base.

Turn off the main power switch if RoboVac will not be used for a long period of time. To preserve the battery's lifespan, recharge at least once every 6 months.
Use Your RoboVac with the EufyHome App
To enjoy all available features, it is recommended to control your RoboVac via the EufyHome app.
Before you start, make sure that:
- Your smartphone or tablet is connected to a Wi-Fi network.
- Your smartphone or tablet is running iOS 8.0 (or above) or Android 4.4 (or above).
• The 2.4GHz band wireless signal is enabled on your wireless router,
• The Wi-Fi status light on RoboVac is slowly flashing blue.
13
English
- RoboVac is attached to the Charging Base to ensure it has enough power during setup.


- Download the EufyHome app from the App Store (iOS devices) or Google Play (Android devices).
- Open the app and create a user account.
3 Tap the "+" icon in the top right corner to add RoboVac to your EufyHome account. -
Follow the instructions in the app to set up the Wi-Fi connection.
-
After connecting successfully, you can control RoboVac via the app.
- With the app, you can select a cleaning mode, set the time, schedule a cleaning, view the system status, receive notifications and access additional features.
Wi-Fi Status Light
| Slowly flashing blue | Waiting for connection | |
| Rapidly flashing blue | Connecting with your wireless router | |
| Solid blue | Connected to your wireless router |

- If you have any problems during the Wi-Fi setup process, refer to the "Troubleshooting >Wi-Fi connection" section in this Manual.
If RoboVac gets stuck in any space, top Find My Robot in the app to find the machine. This function is available in the app only.
Reset the Wi-Fi Connection
Press and hold ▶ on RoboVac for 10 seconds until RoboVac beeps to reset the Wi-Fi connection if necessary.
- You will hear a beep when the Wi-Fi connection has been reset and the Wi-Fi status light will slowly flash blue. Now you can follow the Wi-Fi instructions in the EufyHome app to set up the Wi-Fi connection.
English
Schedule Cleaning
With the EulyHome app, you can schedule RoboVac to start cleaning at a particular time.
- You can set the time and customize the cleaning schedules from Sunday to Saturday on the EufyHome app. This function is available in the app only.
Start / Stop Cleaning
- Make sure the main power switch on the bottom of RoboVac is turned on before use. - You can also start or stop cleaning via the EufyHome app.
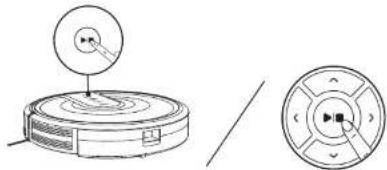
- Press ▶■ on RoboVac or A / ▶■ on the remote control to start cleaning in Auto Mode.

- Press ▶ on RoboVac or on the remote control to stop cleaning.
natural_image
Technical line drawing of a circular device with a pointer and internal components, alongside a cross-sectional view (no text or symbols)Select a Cleaning Mode
You can also select a cleaning mode via the EufyHome app.
English
1. Auto cleaning
RoboVac optimizes its cleaning path by selecting different cleaning modes automatically until cleaning is complete. This is the most commonly used cleaning mode.
Press ▶■ on RoboVac or A/▶■ on the remote control to start cleaning in Auto Mode.


RoboVac will return to the Charging Base automatically when the battery level becomes low or when RoboVac finishes cleaning.
By default, RoboVac starts in Auto cleaning mode when it is turned on.
BoostIQ™ Feature
When the BoostIQ™ feature is enabled, RoboVac will automatically increase the suction power if it detects stronger power is needed to ensure the best clean. BoostIQ™ is ideal for cleaning thicker carpets and hard-to-sweep messes, which will reduce the total cleaning time, but increase the noise level. If the vacuuming noise caused by BoostIQ™ disturbs you, you can disable this feature. This feature only works in Auto and Quick cleaning modes.
In Auto or Quick cleaning mode, press ⚙ on the remote control repeatedly to adjust the suction power level.
• The corresponding icon is displayed on the remote control.
| Suction Power Level | Beeps |
| Standard power | ● |
| Boost!QTM(Default, automatically switches between Standard and Enhanced power) | ●● |
| Maximum power | ●●● |

When RoboVac starts cleaning in Auto or Quick mode the next time, it will clean according to the suction power level you previously selected.
English
2. Spot cleaning
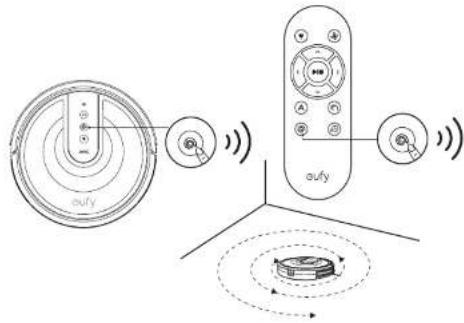
RoboVac intensively cleans a specific area in a spiral pattern, useful if there is a concentrated area of dust or debris. In Spot mode, RoboVac will stop cleaning after 2 minutes.
Press 📷 on RoboVac or on the remote control to start cleaning in Spot Mode.
3. Edge cleaning
RoboVac reduces its speed when it detects a wall and then follows the wall to ensure the edge is cleaned thoroughly. In Edge mode, RoboVac will clean for 20 minutes and return to the Charging Base.
Press 📄 on the remote control to start cleaning in Edge Mode.

English
4. Quick cleaning
RoboVac will automatically stop cleaning after 30 minutes and return to the Charging Base in this mode. If any small room or area needs to be cleaned, it is recommended to select this mode to save time and power.
Press 30 on the remote control to start quick cleaning mode.

5. Manual cleaning
You can direct RoboVac to clean a particular area by using the directional buttons on the remote control.

18
English
Use the Boundary Strip (T2117 Only)
With the Boundary Strip, you can keep RoboVac away from any area or item you do not want RoboVac to clean. RoboVac will recognize the Boundary Strip and will not cross into the blocked-off area.
- Identify the area or item you do not want RoboVac to get close to.
- If necessary, use scissors to cut the Boundary Strip to a shorter length. Be sure to correctly measure the length before cutting.

natural_image
Pure electrical circuit lines without any symbols- Apply the supplied strips of adhesive tape to lay the Boundary Strip flat on the floor. Make sure the strip is placed FLAT on the floor or under an area rug.
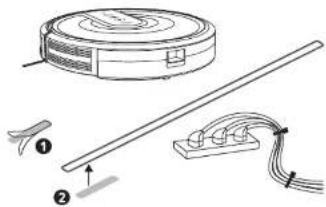

- If the Boundary Strip is rolled up, remove and then re-apply on the floor with adhesive tape. Otherwise the Boundary Strip may not work well.
- Make sure the Boundary Strip is placed on the same surface plane RoboVac is used on.
- Be careful not to damage the floor when using adhesive tape. It is not recommended for use on carpets.
- Keep the Boundary Strip away from objects that emit excessive heat.
Use Your RoboVac with Amazon Alexa / the Google Assistant
Amazon Alexa or the Google Assistant is a smart voice control device that enables you to control RoboVac with your voice.
19
English
Before you start, make sure that:
- RoboVac is attached to the Charging Base to ensure there is enough power.
• RoboVac is connected with the EufyHome app. - You have an Alexa-enabled device (i.e. eufy Genie, Amazon Echo, Echo Dot and Amazon Tap, Echo Show, Echo Spot) or a device enabled with the Google Assistant (i.e. Google Home, Google Home Mini). These devices are sold separately.
- The Amazon Alexa app or Google Home app is already installed on your smart device, and you have created an account.

Actual usage may be different from the instructions in this user manual due to updates of the Amazon Alexa and/or the Google Home app. Always follow the instructions in this app to connect to RoboVac.
To control RoboVac with Amazon Alexa
The Amazon Alexa service is currently available in English and German only. More languages may be available later with the update of the service.
1 Open the Amazon Alexa app and select "Skills" from the menu
2 On the Skills screen, search for "EufyHome - RoboVac".
3 Once you have found the "EufyHome - RoboVac" skill, tap Enable.
4 Login with your EufyHome account so that Alexa can control your RoboVac.
5 Say simple commands to Alexa.
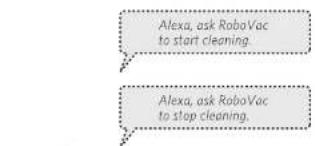

English
To control RoboVac with the Google Assistant
RoboVac now works with the Google Assistant on devices like the Google Home.
The Google Assistant service is currently available in English and German only. More languages may be available later with the update of the service.
1 Open the Google Home app.
2 Say "Ok Google, talk to RoboVac" to the Google Assistant-enabled device to initiate the Google action for RoboVac.
3 Follow the instructions in the Google Home app to authorize the Google Assistant with your EufyHome account.
4 To control RoboVac with your voice, say simple commands to Google Assistant.

For more information about how RoboVac works with Amazon Alexa / the Google Assistant, visit https://www.eufylife.com and go to PRODUCTS>Cleaning>RoboVac 25C / RoboVac 35C for details.
English
Cleaning and Maintenance
For optimal performance, follow the instructions below to clean and maintain RoboVac regularly. The cleaning/replacement frequency will depend on your usage habits of RoboVac.
Recommended cleaning/replacement frequency
| RoboVac Part | Cleaning Frequency | Replacement Frequency |
| Dust Collector | After each use | - |
| Filters | Once every week | Every 2 months |
| Rolling Brush | Once every week | Every 6-12 months |
| Side Brushes | Once every month | Every 3-6 months (or when visibly worn) |
| Brush Guard | Once every month | Every 3-6 months (or when the silicone rubber strip on the brush guard becomes visibly worn) |
| Sensors | Once every month | - |
| Charging Pins | Once every month | - |
| Swivel Wheel | Once every month | - |
Clean the Dust Collector and Filters
1 Press the dust collector release button to pull the dust collector out.
2 Open and empty the dust collector.
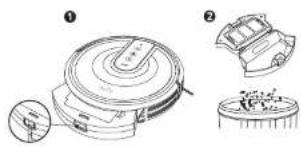
natural_image
Technical line drawing of a mechanical device with two views: top shows internal components, bottom shows a cross-section (no text or symbols)3 Remove the pre-filter by pulling the hooks as shown.

flowchart
graph LR
    A["Container with side panel"] --> B["Assembly"]
    B --> C["Final Packaging"]
22
English
4 Take out the foam filter and high-performance filter.

5 Clean the dust collector and filters with a vacuum cleaner or a cleaning brush.

6 Put the filters and pre-filter back together in the dust collector.

natural_image
Diagram showing a vehicle's internal components and assembly process (no text or symbols)7 Push the dust collector back into the main unit.
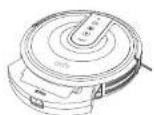
You can wash the dust collector, pre-filter and foam filter with water. Be sure to air-dry them thoroughly before reassembling. Do not wash the high-performance filter with water, as it may damage the filter and reduce the suction power.
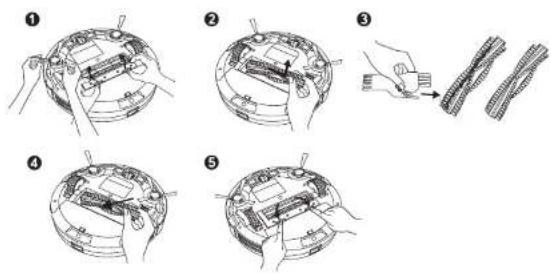
Clean the Rolling Brush
1 Pull on the release tabs to unlock the brush guard as shown.
2 Lift the rolling brush to remove.
3 Clean the rolling brush with the provided cleaning tool or a vacuum cleaner.
4 Reinstall the rolling brush by inserting the fixed protruding end first and then clicking into place.
23
English
5 Press down to snap the brush guard into place.
Clean the Side Brushes
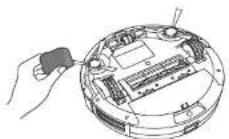
Foreign substances, such as hair, can easily get tangled in the side brushes, and dirt may adhere to them. Be sure to clean them regularly.
1 Remove the side brushes.

2 Carefully unwind and pull off any hair or string that is wrapped between the main unit and the side brushes.
3 Use a cloth dampened with warm water to remove dust from the brushes or to gently reshape them.
24
English

Only use the side brushes when they are completely dry.
Replace the Side Brushes
The side brushes may become bent or damaged after being used for a period of time. Follow the instructions below to replace them.
Pull off the old side brushes and snap the new ones into place.

natural_image
Two-step diagram showing hand positioning of a device on a circular base, with arrows indicating movement (no text or symbols)Clean the Sensors and Charging Pins
To maintain the best performance, clean the drop sensors and charging pins regularly.
- Dust off the drop sensors and charging contact pins using a cloth or cleaning brush.

natural_image
Technical line drawing of a mechanical assembly with circular components and a separate view of a device (no text or symbols present)25
English
Clean the Swivel Wheel
Hair or dust particles can easily get entangled in the swivel wheel. Be sure to clean the swivel wheel periodically and as needed.

1 Pull out the swivel wheel.

2 Clean any hair or debris wrapped around the wheel or entangled inside the wheel cavity.
3 Reinstall the wheel and push in until it clicks into place.

- You can clean the swivel wheel with water. - Use the swivel wheel only when it is completely dry.
English
Troubleshooting
| Problems | Solutions |
| RoboVac cannot be activated. | Make sure the main power switch is in the ON position.Make sure the battery is fully charged.Replace the batteries (2 AAA) in the remote control.Make sure the remote control is within range (16 ft/5 m) of RoboVac.If you still have trouble, turn off the main power switch and then turn it back on. |
| The remote control does not work. | Replace the batteries in the remote control.Make sure RoboVac is turned on and fully charged. |
| RoboVac stops working suddenly. | Check if RoboVac is trapped or stuck on an obstacle.Check if the battery level is too low.If you still have trouble, turn off the main power switch, wait for 2 seconds, and then turn it back on. |
| You cannot schedule cleanings. | Make sure the main power switch on the bottom of RoboVac is turned on.You can set the time of day and scheduled cleaning time via the Eufy-lome app.Make sure the scheduled time has been set correctly.Check if RoboVac's power is too low to start cleaning.Cleaning schedules are erased when RoboVac is powered off.If RoboVac is powered on without Internet access, cleaning schedules will not synchronize and must be reset via the app. |
| Suction power is weak. | Check if any obstructions are blocking the suction inlet.Empty the dust collector.Clean the filters with a vacuum cleaner or a cleaning brush.Check if the filters are wet due to water or other liquid on the floor. Air-dry the filters completely before use. |
| RoboVac cannot be charged. | Check if the indicator on the Charging Base lights up. If not, contact the eufy service center to repair or replace the Charging Base.Dust off the charging contact pins with a dry cloth.Check if you can hear a beep when RoboVac is docked onto the Charging Base. If not, contact the eufy service center to repair or replace the Charging Base. |
| RoboVac cannot return to the Charging Base. | Remove objects within 3 ft/1 m to the left and right side and within 6 ft/2 m of the front of the Charging Base.When RoboVac is in the vicinity of the Charging Base, it will return more quickly. However, if the Charging Base is located far away, RoboVac will need more time to return. Please be patient as it works its way back.Clean the charging contact pins. |
English
| Problems | Solutions |
| The rolling brush does not rotate. | Clean the rolling brush.Check if the rolling brush and brush guard have been installed properly. |
| RoboVac's movements or travel path are abnormal. | Clean the sensors carefully with a dry cloth.Restart RoboVac by turning the power switch off and on. |
| RoboVac cannot connect to a Wi-Fi network. | Make sure your Wi-Fi router supports the 2.4GHz and 802.1lb/g/n bands; the 5GHz band is not supported. For details, refer to the "Troubleshooting > Wi-Fi connection" section in this manual. |
| You cannot control RoboVac with Amazon Alexa. | Check if there are any Internet connection problems.Check whether you have installed the Amazon Alexa app onto your smart device and enabled "EufyHome - RoboVac" Skill in the Amazon Alexa app. For details, refer to the "Use Your RoboVac with Amazon Alexa / the Google Assistant" section in this manual.Make sure you have an EufyHome account.Make sure you are using correct Alexa voice-commands.The "EufyHome - RoboVac" Skill for Alexa is currently only available in English. |
| You cannot control RoboVac with the Google Assistant. | Check if there are any Internet connection problems.Check if you have installed the Google Home app onto your smart device and initiated the "EufyHome" action in the Google Home app. For details, refer to the "Use Your RoboVac with Amazon Alexa / the Google Assistant" section in this manual.Check if you are using the proper commands when talking to the Google Assistant. When making your request, first say the wake words "Ok Google".Repeat your question. Speak clearly to the Google Assistant. |
Error Tones
When RoboVac is in trouble, it will emit a series of short or long beeps and the red indicator on the ▶■ button will be solid or flashing.
Flashing red indicator light
| Error Tone | Cause | Solution |
| One beep | RoboVac is stuck and one of the wheels is not making contact with the floor (hanging in mid-air). RoboVac may be in an extremely large room and the bumper is not registering obstacles. | Restart cleaning in a new location. |
| Two beeps | RoboVac's bumper is stuck. | Tap RoboVac's bumper several times to dislodge any debris that may be trapped underneath. |
28
English
| Error Tone | Cause | Solution |
| Three beeps | RoboVac's drop sensors are dirty.RoboVac is stuck on the ledge of a staircase and cannot reverse. | Clean the drop sensors gently with a dry cloth.Place RoboVac in a new location.Use a physical barrier to block off the problem area. |
| Four beeps | RoboVac's power level is too low. | Manually charge RoboVac for at least 5 hours. |
Solid red indicator light
| Error Tone | Cause | Solution |
| One beep | RoboVac's left/right wheel is stuck. | Turn off RoboVac and remove any hair or debris from the left/right wheel. |
| Two beeps | RoboVac's side brush is stuck. | Turn off RoboVac and remove any hair or debris from the side brush. |
| Three beeps | RoboVac's suction fan is stuck. | • Turn off RoboVac, then remove and empty the dust collector.• Make sure the suction inlet is not blocked by any hair or debris. |
| Four beeps | RoboVac's rolling brush is stuck. | Turn off RoboVac and remove any hair or debris from the rolling brush. |
Wi-Fi Connection
Before Wi-Fi setup, make sure RoboVac and your Wi-Fi network meet the following requirements.
Wi-Fi Setup Requirements
- RoboVac
- RoboVac is fully charged and the main power switch on the bottom of RoboVac is turned on.
- Wi-Fi status light slowly flashes blue.
• Wi-Fi Network
- Use the correct password for your network.
- Do not use a VPN (Virtual Private Network) or Proxy Server.
- Your Wi-Fi router supports 802.11b/g/n and IPv4 protocol.
-
You are using a 2.4GHz router or a dual-band router that is configured to support a 2.4GHz frequency band. RoboVac does not support 5GHz frequency band.
-
If RoboVac cannot connect to the Wi-Fi network and you are using a 2.4/5GHz mixed network, switch to a 2.4GHz network for Wi-Fi setup. You can switch back once your setup is complete.
- When connecting to a hidden network, make sure you enter the correct network name, SSID (case sensitive), and connecting to a 2.4GHz wireless network.
29
English
When using a network extender/repeater, make sure the network name (SSID) and password are the same as your primary network.
The firewall and port settings of your Wi-Fi router allow RoboVac to connect with the Eufy servers.
Network Security Requirement
- WPA and WPA2 using TKIP, PSK, AES/CCMP encryption.
- WEP EAP (Enterprise Authentication Protocol) is not supported.
Wi-Fi Channels
- The FCC requires that all wireless devices in the United States operate on the 1-11 wireless spectrum channels.
- Some countries outside North America can use spectrum channels higher than channel 11. Refer to your local regulatory agency to determine which channels are accessible.
- A future software release will support access to channels above 11 for users outside North America. Until then, use channels 1-11.
If you cannot control RoboVac with your smartphone, try the solutions below to solve the problem. If the problem persists, contact the eufy service center for help.
| Wi-Fi Status Light | Cause | Solutions |
| Solid blue | RoboVac has connected to your router, but cannot access the Internet. | Check if your router is connected to the Internet.Check with your Internet provider to see if there is any Internet connection problem. |
| Rapidly flashing blue | RoboVac cannot connect to your wireless router. | Check if you have modified your network name and password.Reset Wi-Fi connection if necessary.Refer to the "Use Your RoboVac with the EufyHome App > Reset the Wi-Fi connection" section in this manual. |
| Slowly flashing blue | Wi-Fi connection is reset or has not been set up before. | Set up Wi-Fi connection with RoboVac.Refer to the "Use Your RoboVac with the EufyHome App" section in this manual.Reset Wi-Fi connection if necessary.Refer to the "Use Your RoboVac with the EufyHome App > Reset the Wi-Fi connection" section in this manual. |
| Off | RoboVac is turned off.RoboVac's power level is low.RoboVac is in Sleep mode. | Charge RoboVac by attaching it to the Charging Base. Make sure the main power switch on the bottom of RoboVac is turned on. |
English
Specifications
 | Product Model | T2117 (RoboVac 35C) / T2123 (RoboVac 25C) |
| Input | 19 V === 0.6 A | |
| Battery Voltage | DC 14.4 V | |
| Power Consumption | 40 W | |
| Battery Type | DC 14.4 VLi-ion 2600 mAh | |
| Dust Collector Capacity | 0.6 L | |
| Cleaning Time | Max. 100 mins | |
| Charging Time | 300 - 360 mins | |
 | Input | 19 V === 0.6 A |
| Output | 19 V === 0.6 A |
Customer Service
For FAQs and more information, please visit www.eufylife.com.
Email: support@eufylife.com
Live chat: www.eufylife.com
Customer service hotline:
(US) -1 (800) 988 7973 Mon-Fri 9:00am - 5:00pm (PT)
(UK) - 44 (0) 1604.936700 Mon-Fri 6:00 - 11:00 (GMT)
(DE) -49 (0) 69 9579 7960 Mo-Fr 6:00 - 11:00
f @EufyOfficial
@EufyOfficial
@EufyOfficial
@EufyOfficial
Anker Innovations Limited
Room 1318-19, Hollywood Plaza, 610 Nathan Road, Mongkok, Kowloon, Hong Kong
Français


- Table of Contents
- English
- Important Safety Instructions
- WARNING SYMBOLS USED
- 02
- 03
- Notice
- FCC Statement
- FCC Radiation Exposure Statement
- IC Statement
- Declaration of Conformity
- Trademark Notice
- About Your RoboVac
- RoboVac Anatomy
- 08
- 09
- Using Your RoboVac
- Preparation
- Charge Your RoboVac
- Use Your RoboVac with the EufyHome App
- Before you start, make sure that:
- Reset the Wi-Fi Connection
- Schedule Cleaning
- Start / Stop Cleaning
- Select a Cleaning Mode
- Auto cleaning
- BoostIQ™ Feature
- Spot cleaning
- Edge cleaning
- Quick cleaning
- Manual cleaning
- 18
- Use the Boundary Strip (T2117 Only)
- Use Your RoboVac with Amazon Alexa / the Google Assistant
- 19
- To control RoboVac with Amazon Alexa
- To control RoboVac with the Google Assistant
- Cleaning and Maintenance
- Clean the Dust Collector and Filters
- Clean the Rolling Brush
- Clean the Side Brushes
- 24
- Replace the Side Brushes
- Clean the Sensors and Charging Pins
- 25
- Clean the Swivel Wheel
- Error Tones
- 28
- Wi-Fi Connection
- Wi-Fi Setup Requirements
- 29
- Customer Service
- Français
Brand : Anker
Model : RoboVac 25C
Category : Robot vacuum