
VM9026 - Uncategorized JENSEN - Free user manual and instructions
Find the device manual for free VM9026 JENSEN in PDF.


| Product Type | Mobile Multimedia Receiver |
| Chassis Dimensions | 7" x 7" x 4" (178 mm x 178 mm x 100 mm) |
| Power Supply | 11 to 16 VDC, Negative Ground |
| Fuse Rating | 15 A ATO Type |
| Screen Size | 6.2" diag., 16:9 TFT LCD Active Matrix |
| Screen Resolution | 1,152,000 Sub Pixels, 800 x 3 x 480 |
| Disc Playback | DVD, DVD±R/RW, CD, CD-R/RW, VCD, SVCD |
| Audio File Support | MP3, WMA, CD-DA |
| Video Playback | MPEG 1/2, AVI, Xvid |
| Radio Bands | FM (87.5-107.9 MHz) / AM (530-1720 kHz) |
| Preset Stations | 30 (18 FM / 12 AM) |
| iPod/iPhone Compatibility | Direct USB connection; video with jLink-USB cable (sold separately) |
| Rear Camera Input | Yes, with Normal and Mirror Image View |
| Steering Wheel Control | Compatible with PAC SWI-PS (sold separately) |
| Audio Output | 2 VRMS Line Output, All Channels |
| Power Output (CEA) | 13 Watts RMS x 4 Channels into 4-Ohms at <1% THD+N |
| EQ Presets | 5 (User, Jazz, Pop, Classic, Rock) |
| Touch Screen Calibration | Yes, accessible via Setup Menu |
| SD Card Slot | Yes, supports up to 8GB (FAT32) |
| USB Port | Front USB for iPod/iPhone and storage devices |
Frequently Asked Questions - VM9026 JENSEN
User questions about VM9026 JENSEN
0 question about this device. Answer the ones you know or ask your own.
Ask a new question about this device
Download the instructions for your Uncategorized in PDF format for free! Find your manual VM9026 - JENSEN and take your electronic device back in hand. On this page are published all the documents necessary for the use of your device. VM9026 by JENSEN.
USER MANUAL VM9026 JENSEN
Operating Instructions
CONTENTS
Thank you for choosing a Jensen product. We hope you will find the instructions in this owner's manual clear and easy to follow. If you take a few minutes to look through it, you'll learn how to use all the features of your new Jensen VM9026 Mobile Multimedia Receiver for maximum enjoyment.
| Features | 2 | ||||
| Controls | and | Indicators | |||
| Operating | Instructions | ||||
| Setup | Menu | ||||
| Radio | Tuner | Operation | |||
| DVD/VCD | Video | Operation | |||
| CD | Audio | Operation | |||
| Playing | MP3/WMA | Operation | |||
| Viewing | JPEG | Files | |||
| iPod® | Operation | ||||
| Rear | Camera | Operation | |||
| Steering | Wheel | Control | (Swc) | Interface | |
| Troubleshooting | 39 | ||||
| Error | Messages | 42 | |||
| Care | and | Maintenance | |||
| Specifications | 44 | ||||
FEATURES
Congratulations on your purchase of the Jensen VM9026 Mobile Multimedia Receiver. It's a good idea to read all of the instructions before beginning the installation. We recommend having your Jensen VM9026 installed by a reputable installation shop.
DVD
• Fast Forward/Reverse - 2X, 4X, 8X and 16X
• Play, Pause, Stop, Next Chapter and Previous Chapter
CD / MP3 / WMA
• ID3 Tag Compatible
• Directory Search (MP3 / WMA Only)
• Random, Repeat and Intro
• Play, Pause, Stop, Next Track and Previous Track
AM-FM
• USA / Europe / S. America
• 30 Station Presets (18 FM / 12 AM)
• Auto Stereo / Mono
- Local / Distance
• Auto Store / Preview Scan
iPod®/iPhone® Input
- iPod®/ iPhone® via USB
- High Speed Direct Connect Interface to Access iPod® Playlists, Artists, Genres, Albums and Songs. Play music and view *video files from your iPod®.
*Video playback requires jLink-USB iPod® interface cable (sold separately).
• Power Management Charges iPod® while Connected
Chassis
• 2.0 DIN (Import / ISO-DIN Mountable)
• Fixed Front Panel
• 6.2" High Definition TFT Screen
• 1,152,000 Sub Pixels (800x3 X 480)
- Beep Tone Confirmation (ON-OFF Option)
General
• Two Video Outputs
• Two-Band Tone control (Bass and Treble) with Five Preset EQ Curves
• Front Panel A/V Aux Input for Portable Media Devices
• Rear Subwoofer Line Output
• Rear Camera Input (Normal and Mirror Image View)
- Touch Screen Calibration Mode
• 2VRMS Line Output - All Channels
• Rotary Audio Control
- Steering Wheel Control (SWC) option (Requires PAC SWI-PS Interface Adapter sold separately).
Parking Brake Inhibit
- When the Pink "Parking" wire is connected to the vehicle Parking Brake circuit, the Screen will only display video when the Parking Brake is engaged.
Optional Equipment
Rear Camera
The VM9026 is "camera ready." Before accessing any camera features, you must purchase and install a rear video camera. Once the camera is connected and operating properly, the CAMERA source mode will become active.
WARNING! It is illegal to view video while driving or operating a motor vehicle. Set parking brake to view video.
WARNING! To reduce the risk of a traffic accident never use the video display function while driving the vehicle (except when using for rear view video camera). This is a violation of federal law.
WARNING! Never disassemble or adjust the unit.
WARNING! To prevent injury from shock or fire, never expose this unit to moisture or water.
WARNING! Never use irregular discs.
CONTROLS AND INDICATORS
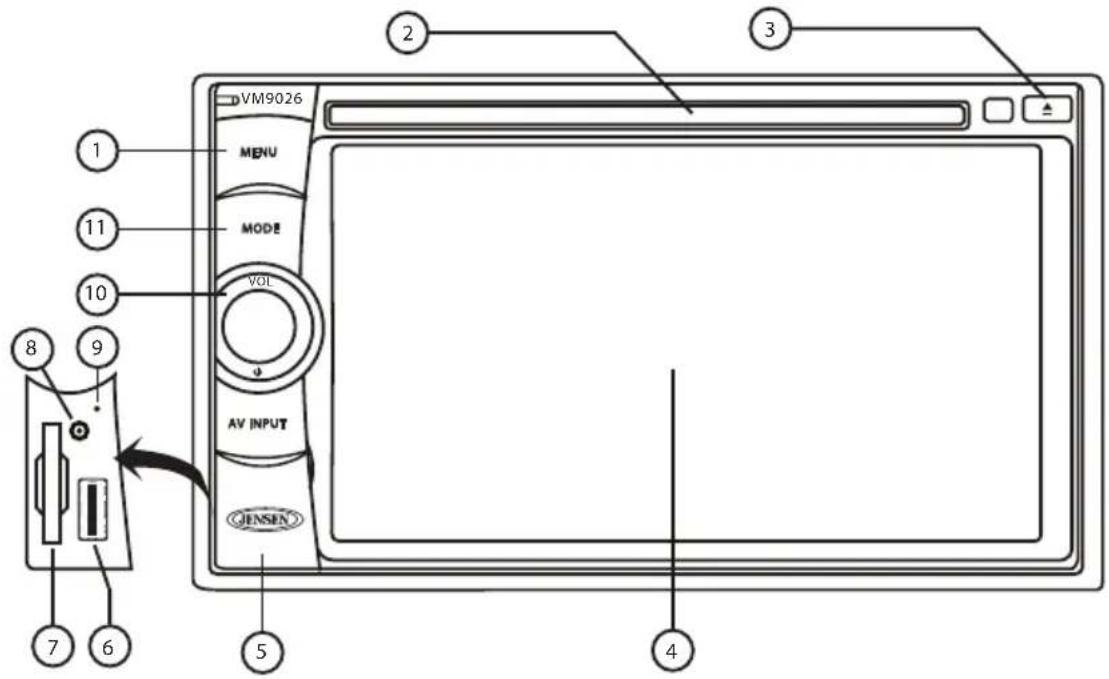
1. MENU
Press to access the MAIN Menu.
2. DiscSlot
Insert CD or DVD for playback of music/video files.
3. EJECT
Press to eject a disc.
4. TFT SCREEN
5. AV INPUT COVER
Protect the USB Port and SD Interface Slot when not in use.
6. USBPORT
Connect a USB device for playback of music/video files.
7. SD INTERFACE SLOT
Insert an SD card for playback of music/video files.
8. A/V MEDIA ADAPTER CABLE PORT
Insert A/V Cable connector for playback of music/video files from an compatible external device.
9. SYSTEM RESET
Press to reset system settings back to factory default settings.
10. POWER ON/OFF and VOLUME UP/DOWN/MUTE BUTTON
Press and hold to turn the unit ON and OFF. Rotate to adjust the output volume UP or DOWN. Press to activate the MUTE function and silence the audio output. Press again to restore sound.
11. MODE
Press to select system mode (Radio/Disc/Aux-F/Aux-R/SD/USB/Camera)
OPERATING INSTRUCTIONS
Power ON / OFF
Press the rotary Power button ☑ to turn the unit ON. The buttons on the front of the unit light up and the current mode status appears on the Screen. Press and hold the Power button again to turn the unit OFF.
Audible Beep Confirmation
An audible beep tone confirms each function selection. The Beep tone can be disabled through the Setup menu.
Mute
Press the rotary Power button to mute the volume from the unit. Press the rotary Power button again to restore the volume. The system volume level bar will be displayed on the Screen indicating the volume is muted. Adjusting the volume or using any of the audio setup features cancels the mute function.
Playing Source Selection
MAIN Menus
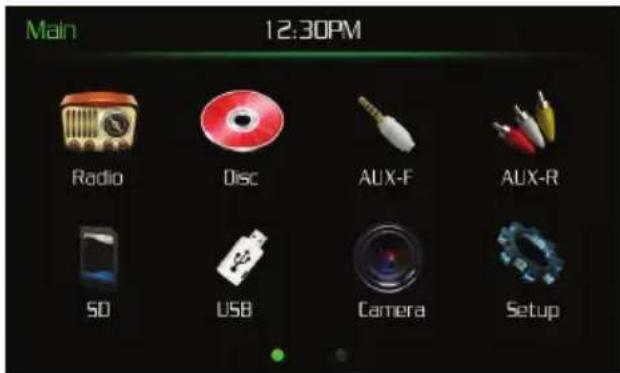
Screen 1 of 2
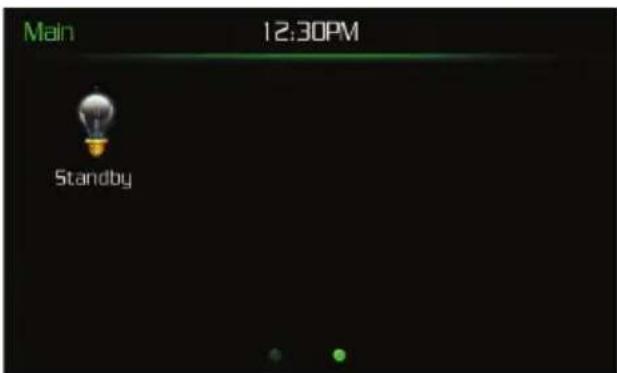
Screen 2 of 2
You can use the touch screen to change the source through the MAIN Menu. To access the MAIN Menu, touch the 📋 at the top left corner of the screen or press the MENU button. Touch the RADIO, DISC, AUX-F, AUX-R, SD, USB, CAMERA to select the corresponding source.
External Devices
External devices, including a game console, camcorder, navigation unit, iPod®, iPhone etc. can be connected to this unit via RCA output using an A/V Media Adapter Cable (not included).
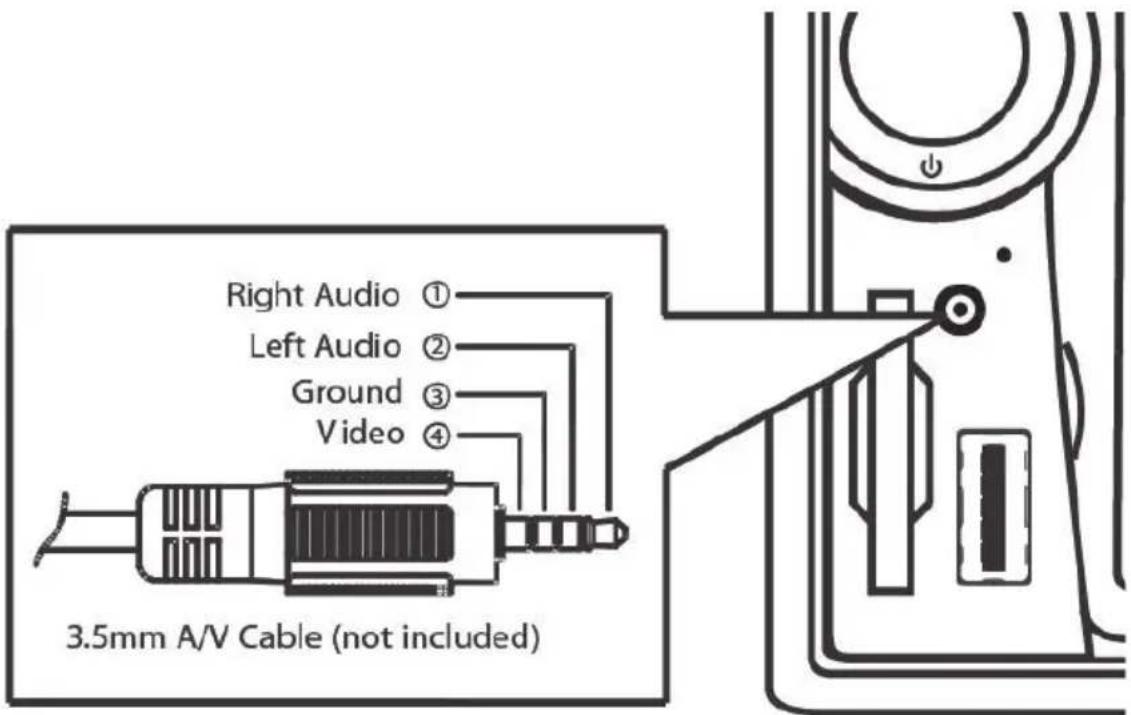
Connect an external device to the A/V Media Adapter Cable and plug the cable into the A/V INPUT connector on the front of the radio. Select "AUX-F" mode to access auxiliary devices. You cannot directly control external devices connected to the A/V INPUT.
Volume Adjustment
Volume Increase/Decrease
To increase or decrease the volume level, rotate the rotary Power / Volume button. The volume level ranges from "0" (mute) to "50" (maximum). While adjusting the volume, the system volume level bar will be displayed on the screen indicating the volume level for 5 seconds.
Audio Control Menu
The Audio Control feature allows you to easily adjust your audio system to meet the acoustical characteristics of your vehicle, which vary depending on the type of vehicle and its measurements. Proper setting of the Fader and Balance boosts the effects of the cabin equalizer.
SETUP MENU
To access system settings, press the Menu button to display the MAIN Menu, then touch SETUP on the screen to enter the SETUP Menu. The SETUP Menu appears.
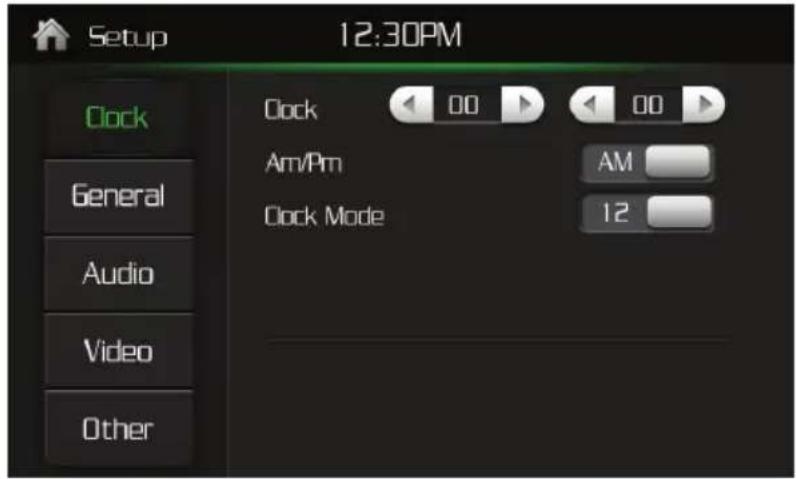
Accessing Menu Items
Touch one of the five Sub-Menus (Clock, General, Audio, Video, and Other) to make adjustments to a desired feature. The features available for adjustment under the highlighted sub-menu option will appear in the left of the screen.
Adjusting a Feature
- Touch an item on the touchscreen to select the feature to be adjusted.
- Touch the option field for the feature you want to adjust. The feature option is updated when adjustments are complete.
Clock Sub-Menu Features
Table 2: Clock Sub-Menu Adjustments
| Setting Options Function | ||
| Clock (HH:MM) Clock | ck appears in | the middle on top of the screen during certain operations.NOTE: The AM/PM indication will change as you continue to adjust the hour past 12 if 24Hr mode is set. |
| AM/PM AM or PM | This option is | used when setting the clocks time manually |
| Clock Mode 12Hr | Clock displays | 12 hour time using AM and PM. |
| 24Hr Clock displays | 24 hour time up to 23:59 |
To exit the Clock Sub-Menu:
- Press the Menu button once to enter the MAIN Menu, press the MENU button twice to return to the previous screen.
General Sub-Menu Features
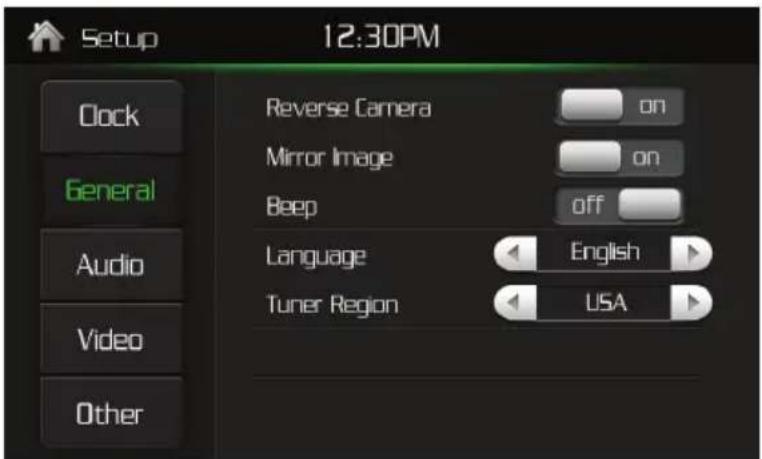
Table 3: General Sub-Menu Adjustments
| Setting Options | Function | |
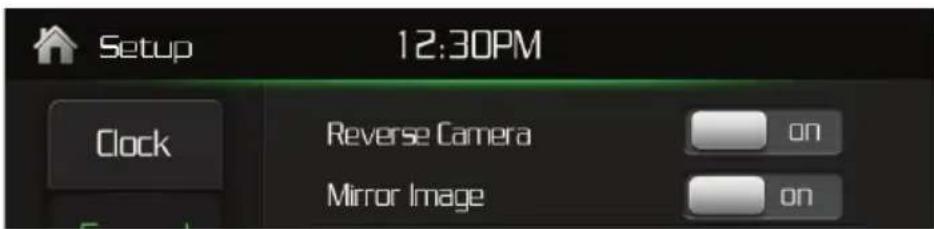
| Reverse Camera | OFF or ON | Camera image is reversed as if look through a rearview mirror. |
| Mirror Image OFF | or ON | Image can be viewed as normal or mirror. |
| Beep | OFF | No beep sounds. |
| ON | When turned on, an audible beep tone confirms each function selection. | |
| Language English or Spanish | Provides for language selection | |
| Tuner Region USA | AM Frequency Spacing - 10 kHzAM Frequency Band - 530 kHz ~ 1720 kHzFM Frequency Spacing - 200 kHzFM Frequency Band - 87.5 MHz ~ 107.9 MHz | |
| Europe • AM Frequency Spacing - 9 kHzAM Frequency Band - 522 kHz ~ 1620 kHzFM Frequency Spacing - 50 kHzFM Frequency Band - 87.5 MHz ~ 108.0 MHz | ||
| S.Amer1 • AM Frequency Spacing - 10 kHzAM Frequency Band - 530 kHz ~ 1720 kHzFM Frequency Spacing - 100 kHzFM Frequency Band - 87.5 MHz ~ 108.0 MHz | ||
To exit the General Sub-Menu:
- Press the Menu button once to enter the MAIN Menu, press the Menu button twice to return to the previous screen.
Audio Sub-Menu Features
Touch the EQ button on the right side of the screen to display the equalizer screen.
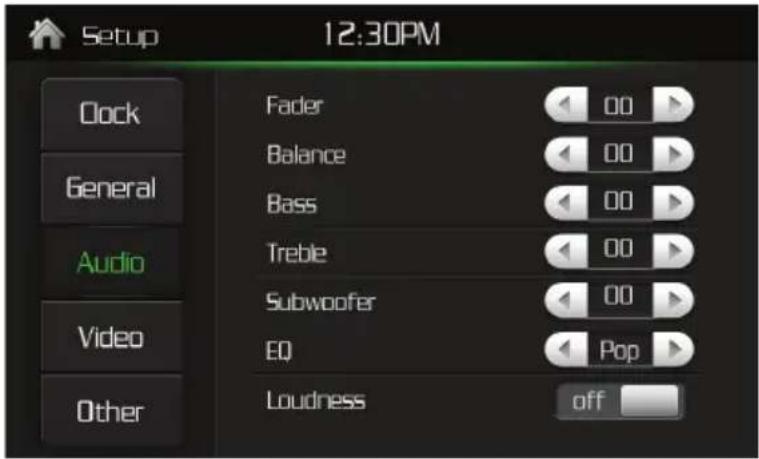
Table 4: Audio Sub-Menu Adjustments
| Setting Adjustable | Range | Function |
| Fader 00 to +7F | 00 to +7R | Balances the audio output levels between the front and back side of the vehicle.Touch the ◀ or ▶button to change the setting. |
| Balance 00 to +7L | 00 to +7R | Balances the audio output levels between the left and right side of the vehicle.Touch the ◀ or ▶button to change the setting. |
| BASS -7 to +7 Reduces or increases the bass frequency sound level. Touch the ◀ or ▶buttons to adjust the settings. | ||
| TREBLE -7 to +7 Reduces or increases the high frequency sound levels. Touch the ◀ or ▶buttons to adjust the settings. | ||
| Subwoofer -7 to +7 Reduces or increases the subwoofer sound level.Touch the ◀ or ▶buttons to adjust the settings. | ||
| (EQ) Equalizer Presets | User Applies a preset sound level to the unit's audio output signal. Touch the ◀ or ▶button to change the setting. | |
| Jazz | ||
| Pop | ||
| Class | ||
| Rock | ||
| Loudness OFF or ON Increases and decreases the power amplification of the audio playback tone | ||
To exit the Audio Sub-Menu:
- Press the Menu button once to enter the MAIN Menu, press the Menu button twice to return to the previous screen.
Video Sub-Menu Features
Table 5: Video Sub-Menu Features
| Setting Options Function | ||
| Aspect Ratio 4:3 or TFT Backlight | 16:9 Adjust the -5 to +5 Adjust the brightness of the screen. | screen aspect ratio for viewing video. |
| Brightness -5 to +5 | Adjust the brightness of the screen. | |
| Contrast -5 to +5 A | Adjust the contrast of the screen. | |
To exit the General Sub-Menu:
- Press the Menu button once to enter the MAIN Menu, press the Menu button twice to return to the previous screen.
Other Sub-Menu Features
Table 6: Other Sub-Menu Features
| Setting Options Function | ||
| TS Calibrate | OK | Use to set parameters of touch screen to ensure that when screen touched, it will correspond to the feature the user is selecting. |
| Load Factory Settings | OK | Restores the unit to factory settings. |
| Version OK | Displays a screen which lists software version for the unit. | |
To exit the General Sub-Menu:
- Press the Menu button once to enter the MAIN Menu, press the Menu button twice to return to the previous screen.
Touch Calibrate (Screen Calibration)
To access the "Screen Calibration" function from the SETTINGS MENU, select the "Other" and then the "Touch Calibrate" option.
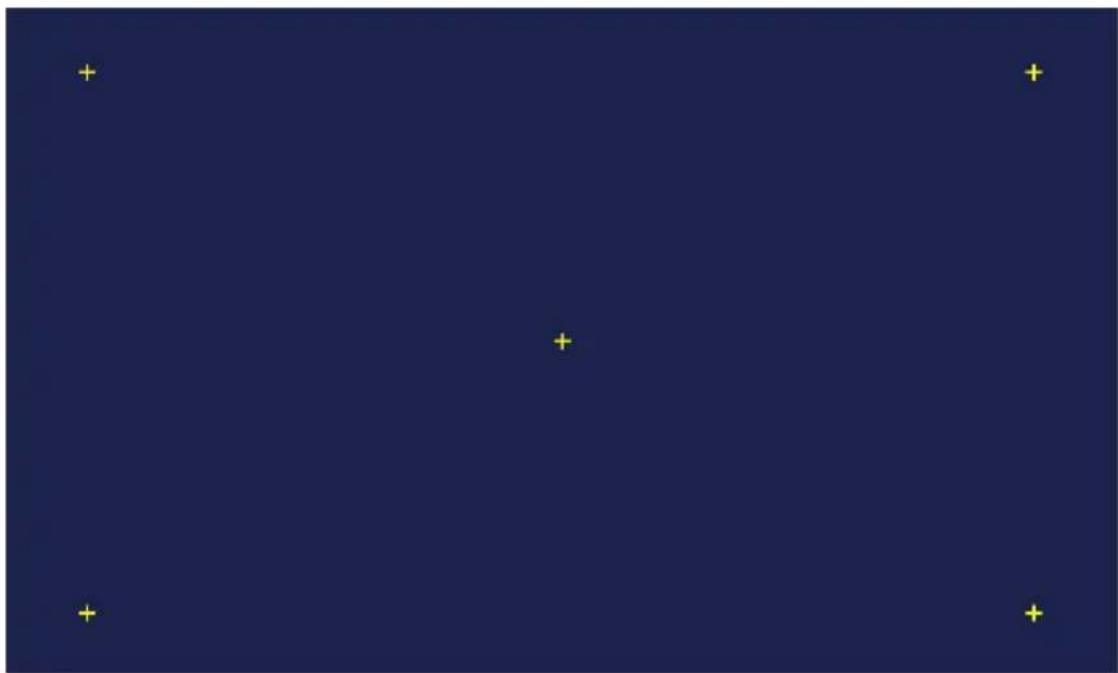
After entering Touch Calibration mode, a crosshair + appears in a corner quadrant of the Screen. To begin calibration, touch and hold the crosshair for one second until it moves to the next quadrant. Continue for each quadrant until the calibration is completed and the Setup Menu appears.
To exit the Setting Menu
- Press the Menu button once to enter the Main Menu, press the Menu button twice to return to the previous screen.
natural_image
Dark blue background with four small yellow plus signs in the top-left corner (no text or symbols)-
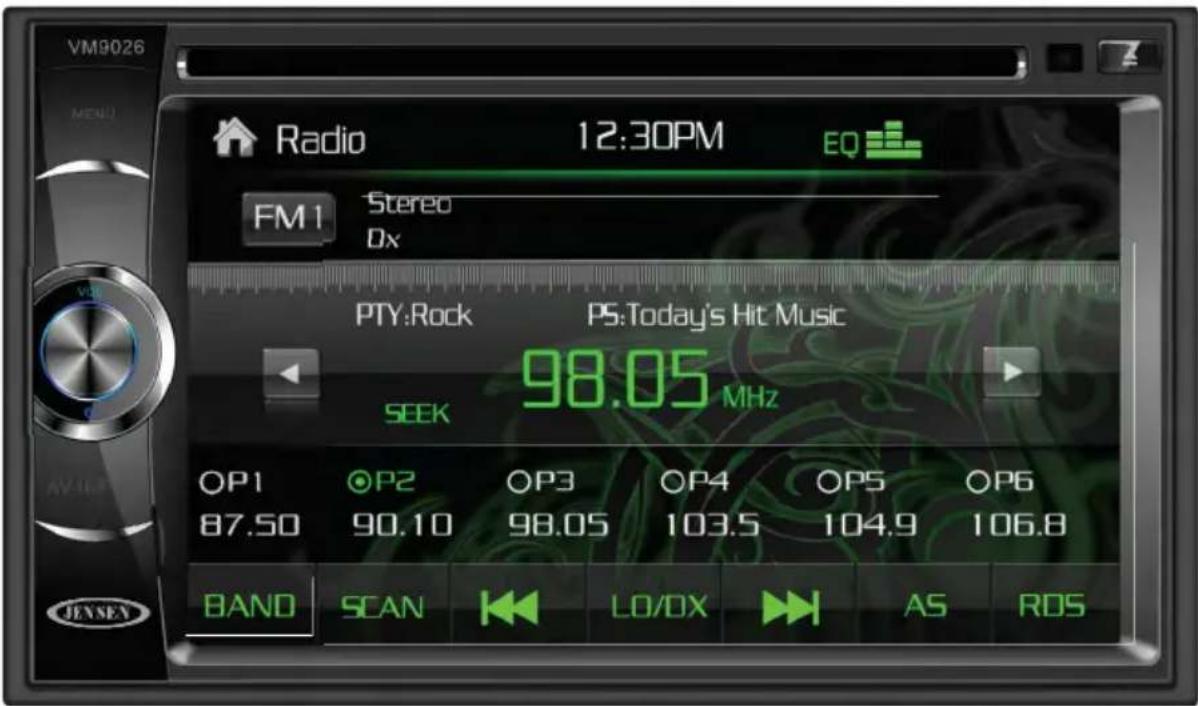
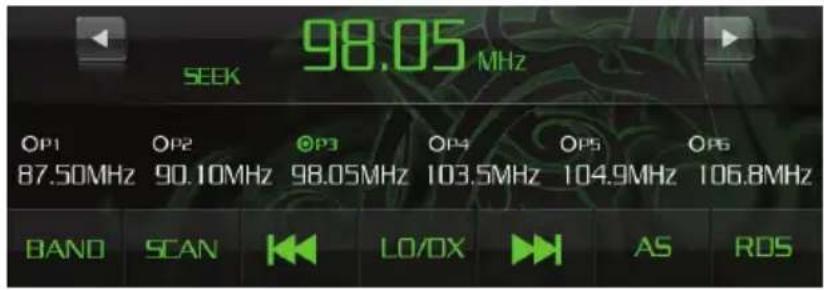
MAIN MENU (H): Touch to view the MAIN MENU and select a new playback source
-
CLOCK: Displays time in 12 hour AM/PM or 24 hour conventions as preset in Setup Menu.
-
EQ ( ): Euch for quick access to Equalizer level settings
-
AM/FM BAND INDICATOR: Current radio band indicator
-
Dx/Loc: Signal Strength setting indicator (Distant or Local broadcasting)
-
STEREO: Stereo broadcasting indicator
-
PTY: Displays the program category of the current station such as (News, Sports, Rock, Talk, etc.)
-
PS: Indicates the current song title, current song title, performing artist and station call letters
-
PREVIOUS (): Touch to tune backward one step
-
SEEK: Indicates that the radio is in Scan Mode
-
RADIO FREQUENCY INDICATOR
-
NEXT ( )▶Touch to tune forward one step
-
STATION PRESETS: Touch to choose between six preset stations
-
AM/FM BAND SELECTOR: Touch to change between AM/FM bands. (AM1, AM2 and FM1, FM2, FM3 each consist of six preset station options)
-
SCAN: Touch to scan all stations available, stopping for 8 seconds at each and continuing until a station is selected
-
SEEK BACK (◀) Touch to seek backward
-
LO/DX: Touch to select Local or Distant broadcasting frequencies
-
SEEK FORWARD (▶)Touch to seek forward
-
AS: Touch and release to automatically scan preset stations. Press and hold for three seconds to automatically search and replace six preset stations with new strong signals presets.
-
RDS (Radio Data System): Touch to adjust and set the clock time (CT) and Program Type (PTY) between genres of music, talk, news, etc.
Seek Next Station
Touch the icon on the screen to seek the next lower frequency station. Touch the icon on the screen to seek the next higher frequency station.
Using Preset Stations
Six numbered preset buttons store and recall stations for each band. All six stored stations (P1, P2, P3, P4, P5, and P6) for the current band appear on the screen.
Selecting FM/AM Band
Touch the BAND icon on the screen to change between the following bands: FM1, FM2, FM3, AM1, and AM2.
Preview Scan (SCAN)
To scan the AM or FM band for a preview of available stations in your particular area, touch the SCAN icon on the screen. The scan function will play the first 8 seconds of each station. When a desired station is reached, touch SCAN icon again to stop preview scanning. Play of the selected station will continue.
Seek Next Best Signal
To seek the next higher station with the best signal, touch the icon. To seek the next lower station with the best signal, touch the icon.
Local/Distant Radio Station Seeking
When the Local function is ON, only radio stations with a strong local radio signal are played. To activate the Local function in the AM/FM tuner mode, touch LO/DX icon on the screen to turn the local function ON or OFF. When the Local function is active, "Loc" will appear on the screen. When the Distant function is active, "Dx" will appear on the screen.
Auto-Store (AS)
This feature has two functions, scan preset stations or store stations.
- Press and hold the AS icon for three seconds to automatically select and store six strong stations in the current band. The new stations replace stations already stored in that band. If you have already set the preset memories to your favorite stations, activating the Auto-Store feature will erase those
stations and enter the new strong stations. This feature is most useful when travelling in an area where you are not familiar with the local stations.
- Touch the AS icon to scan the six preset stations previously stored.
RDS Settings
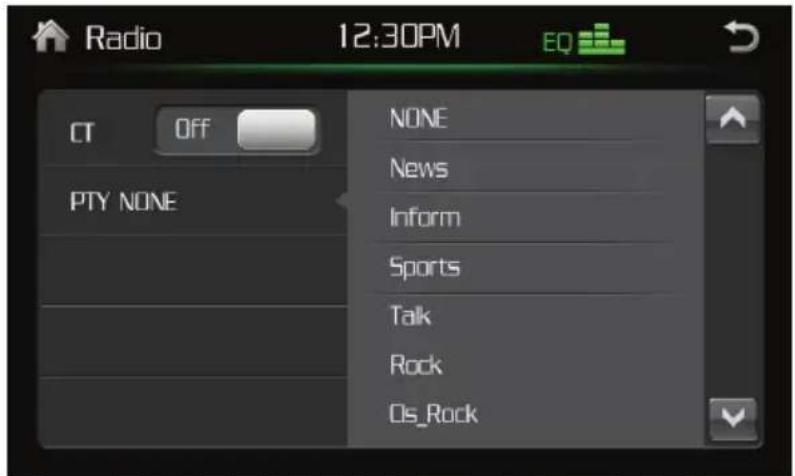
This feature has two functions, setting Clock Time (CT) and Program Type (PTY).
- CT: (Clock Time) When enabled, the radio system clock is synchronized with broadcasters time signal setting the clock automatically. In some regions where daylight savings time is not adhered to, the system clock will be OFF by 1 hour. In these cases, set CT to OFF and manually set the clock.
- PTY: (Program Type) This feature allows the user to select and set genres of music, talk, news, etc. that the radio will scan for automatically. There are 27 options to select from.
Warning-It is illegal to view video while driving or operating a motor vehicle.
NOTE: When properly installed, DVD video cannot be displayed on the main screen unless the parking brake is applied. If you attempt to play a DVD while the vehicle is moving, the screen displays the above warning:
Controlling Playback
To access the on-screen controls, touch the bottom of the screen while a DVD/VCD is playing to view, select or set video playback controls. There are three video control menu bars (1/3, 2/3 and 3/3). To access each video control menu bar, touch the first box in the menu bar to the left.
Upon inserting a DVD/VCD, the disc and track title (if available), along with the track number and playing time appear on the screen.
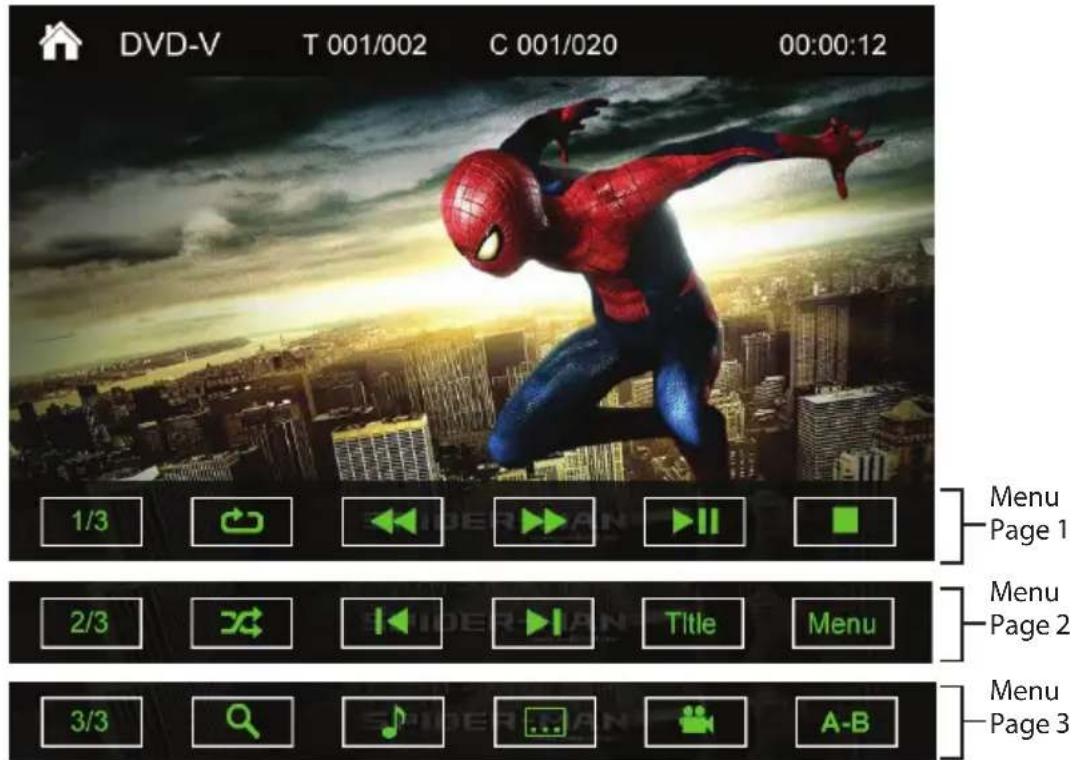
- MAIN MENU (☐) Touch to view the MAIN MENU and select a new playback source
- MODE: Indicates that unit is in DVD-V viewing mode.
- TRACK (T) and CHAPTER (C): Touch to select and manually set a Track on Chapter directly using the on-screen display.
- MENU SELECT: Touch to select one of the three DVD/VCD Menu Control bars (1/3, 2/3 or 3/3).
DVD/VCD Menu Control Bar 1/3
- 1/3: Touch to select one of the three DVD/VCD Menu Control Bars.
- REPEAT PLAY (Touch to alter repeat mode in the following sequence:
• DVD: Repeat Chapter, Repeat Title, Repeat Off, Repeat All.
• VCD (PBC Off): Repeat Single, Repeat Off, Repeat All.
-
FAST REVERSE (◀): Touch to fast reverse "x2" to "x4", "x8", and "x16" times the normal playback speed of the DVD/VCD.
-
FAST FORWARD (▶): Touch to fast forward "x2" to "x4", "x8", and "x16" times the normal playback speed of the DVD/VCD.
-
PLAY/PAUSE (▶) : Touch to begin playback. Press the icon again to pause playback.
-
STOP ( ▶ Touch to stop DVD/VCD playback.
DVD/VCD Menu Control Bar 2/3
11.2/3: Touch to select one of the three DVD/VCD Menu Control Bars.
12.SHUFFLE (✗): Touch to play chapters in random order during disc playback.
13. PREVIOUS CHAPTER (✗) Touch to move to previous chapter.
14.NEXT CHAPTER (▶): Touch to advance to the next chapter on the DVD/VCD.
15. TITLE: Touch to select a different title for playback.
16. DISC MENU: Touch to display the DVD/VCD root menu.
DVD/VCD Menu Control Bar 3/3
17.3/3: Touch to select one of the three DVD/VCD Menu Control Bars.
18.ZOOM (C) Touch to zoom in or out during playback.
19. LANGUAGE (L): Touch during playback to select to select the audio language.
20. SUBTITLE (☐): Touch during playback to select the subtitle language if the disc is recorded in multiple languages.
21. ANGLE (☐): Touch to view angles if the DVD contains scenes shot from different angles.
22. REPEAT SELECTION (A-B): Touch to repeat a specific portion from point A to point B of the DVD disc.
Inserting a DVD/VCD
Insert disc gently label side facing up (do not push disc, the unit will pull the disc in). The unit will detect the disc and will automatically begin playback.
NOTE: You cannot insert a disc if there is already a disc in the unit or if the power is OFF.
NOTE: DVD-R and DVD-RW will not play unless the recording session is finalized and the DVD is closed.
Ejecting a DVD/VCD
Press the EJECT (▲) button on the front of the unit to eject the disc. The unit will automatically revert to RADIO mode. You may eject a disc with the unit powered OFF. The unit will remain OFF after the disc is ejected.
Resetting the Loading Mechanism
If the disc loads abnormally or an abnormal core mechanism operation occurs, touch and hold the EJECT (▲) button to reset the loading mechanism. Normal operation will resume.
Accessing DVD Mode (when in a different mode)
To switch to DVD mode from a different mode when a disc is already inserted, press the MENU button on the front of the unit to access the MAIN Menu. When the MAIN Menu appears, touch the DISC icon.
Direct Track / Chapter Selection
To select and set a track/chapter directly, touch the track or chapter displayed at the top of the screen to enter the direct entry menu. When a selection is entered, touch "OK" to return to the Track or Chapter playing. The word "GOTO" will appear on the screen while the Track or Chapter is changing.
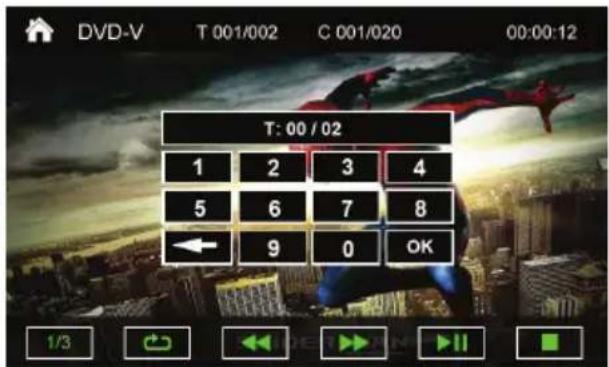
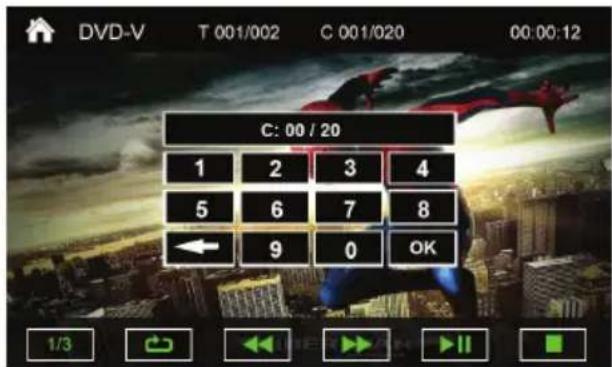
To exit the screen without changing the chapter, touch outside of the menu area. To clear an entry and start over, touch the back arrow.
Repeat Playback
Touch the REPEAT (icon) on the first control menu page once during playback to repeat the current chapter. Touch the icon a second time to repeat the current title. Touch the icon a third time to repeat the disc all.
Touch the icon a fourth time to turn the repeat function OFF.
Fast Reverse
Touch the FAST REVERSE (◀◀) icon on the first control menu page once to reverse playback of the disc two times faster (x2) than normal playback speed. Keep touching and releasing the icon to increase the rate from "x2" to "x4", "x8", and "x16". Touch the icon again to resume normal play of the DVD/VCD.
Fast Forward
Touch the FAST FORWARD (▶) icon on the first control menu page once to forward playback of the disc two times faster (x2) than normal playback speed. Keep touching and releasing the icon to increase the rate from "x2" to "x4", "x8", and "x16". Touch the icon again to resume normal play of the DVD/CD.
Play/Pause
Touch the PLAY/PAUSE (▶) icon on the first control menu page when disc is loaded to begin playback. During playback of the disc touch the icon again to pause and once again to resume playback.
Stop
Touch the STOP 📄icon on the first control menu page to stop the playback of the disc.
Shuffle
Touch the SHUFFLE ( ✗ ) icon on the second control menu page to play chapters in random order during DVD/VCD playback. Touch the icon again exit Shuffle mode.
Previous Chapter
Touch the PREVIOUS CHAPTER (◀) icon on the second control menu page to move to previous chapter.
Next Chapter
Touch the NEXT CHAPTER (▶) icon on the second control menu page to advance to the next chapter on the DVD.
Title
Touch the TITLE icon on the second control menu page to select a different title for playback. Select a title using the touch screen.
Disc Menu
Touch the MENU icon on the second control menu page to recall the DVD/VCD root menu.
ZOOM
Touch the ZOOM ( 🔒 ) icon on the third control menu page to zoom in or out during playback.
LANGUAGE
Touch the LANGUAGE 📁icon on the third control menu page during playback to select the audio language. Each time the icon is touched a different audio language is selected if you are watching a disc recorded in multiple languages.
Subtitle
Touch the SUBTITLE (☐) icon on the third control menu page during playback to select the subtitle language if the disc is recorded in multiple languages. Each time the icon is touched a different subtitle language is selected. The subtitle function can also be turned on or off. Languages will vary from disc to disc.
Angle
Some DVDs contain scenes that have been shot simultaneously from different angles. For discs recorded with multiple angles touch the ANGLE (icon) icon on the third control menu page to toggle available angles of the on-screen image.
Section Repeat (A-B)
Touch the SECTION REPEAT (A-B) icon on the third control menu page to define a specific area of a disc to repeat.
- Touch A-B on the third page of DVD on-screen controls to set the start point (A) of the repeated section.
- Touch A-B again once you reach the desired end point (B) of the repeated section. The selected portion of the DVD will now repeat continuously.
- Touch A-B a third time to cancel the A-B section setting and stop repeat play.
General Disc Information
Table 7: Disc Properties
| Symbol 12cm Disc Properties Max Play Time | ||
 | Single side single layer (DVD-5) | (MPEG 2 Method) |
| Single side double layer (DVD-9) | 133 minutes | |
 | Double side single layer (DVD-10) | 242 minutes |
| Double side double layer (DVD-18) | 266 minutes | |
| 484 minutes | ||
 | Single side single layer (VCD) (MPEG) | 1 Method) |
| 74 minutes | ||
 | Single side single layer 74 minutes | |
Table 8: Disc Symbols
| Symbol | Meaning |
 | Number of voice languages recorded. The number inside the icon indicates the number languages on the disc (maximum of 8). |
 | Number of subtitle languages available on the disc (maximum of 32). |
 | Number of angles provided (maximum of 9). |
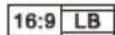 | Aspect ratios available. “LB” stands for Letter Box and “PS” stands for Pan/Scan. In the example on the left, the 16:9 video can be converted to Letter Box video. |
 | Indicates the region code where the disc can be played.• Region 1: USA, Canada, East Pacific Ocean Islands• Region 2: Japan, Western Europe, Northern Europe, Egypt, South Africa, Middle East• Region 3: Taiwan, Hong Kong, South Korea, Thailand, Indonesia South-East Asia• Region 4: Australia, New Zealand, Middle and South America South Pacific Ocean Islands/Oceania• Region 5: Russia, Mongolia, India, Middle Asia, Eastern Europe North Korea, North Africa, North-West Asia• Region 6: Mainland China• ALL: All regions |
CD AUDIO OPERATION
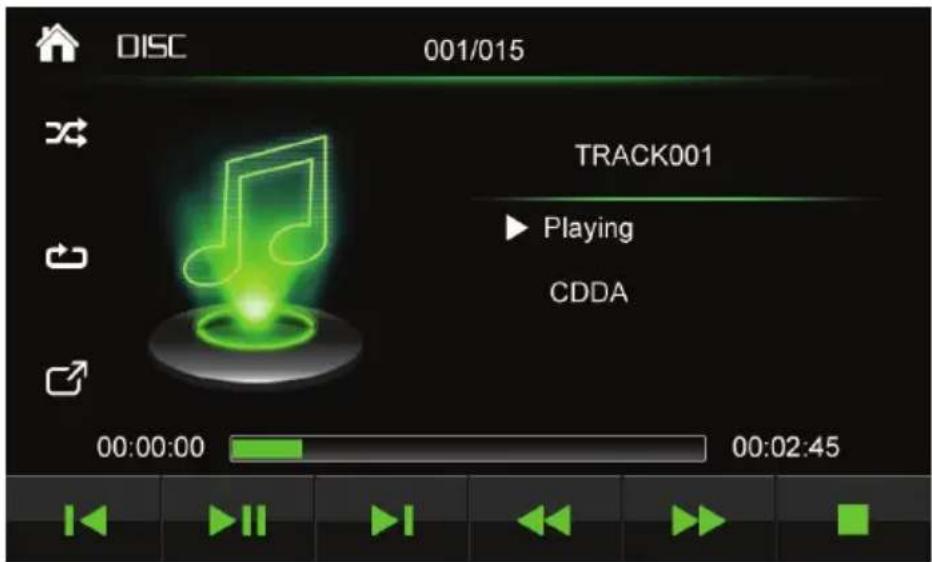
To access the on-screen controls, touch the icons at the bottom of the screen while a CD is playing, select or set playback controls.
Media Requirements
The VM9026 will play music or other audio files from the following disc media:
- CD-DA
- CD-R/RW
Upon inserting a CD the track number and playing time appear on the screen.
- MAIN MENU (☐): Touch to view the MAIN MENU and select a new playback source.
- MODE: Indicates that unit is in DISC playback mode.
- TRACK INDICATOR: Displays the current track number playing and total number of tracks on the CD.
- SHUFFLE (✗) This indicator is lit when the random mode is active.
- REPEAT (This indicator is lit when the repeat mode is active.
- SOURCE MENU 📋 touch to view the menu of the CD during playback
- ELAPSED TIME INDICATOR: Displays the elapsed playback time (left side of time bar) and total time of the current track playing (right side of time bar).
- PREVIOUS TRACK ( )Touch to play the previous track.
- PLAY/PAUSE (▶III): Touch to begin playback. Press the icon again to pause playback.
10.NEXT TRACK (▶): Touch to advance to the next track on the CD.
11.FAST REVERSE (◀): Touch to fast reverse "x2" to "x4", "x8", and "x16" times the normal playback speed of the CD.
12.FAST FORWARD (▶): Touch to fast forward "x2" to "x4", "x8", and "x16" times the normal playback speed of the CD. - STOP (■): Touch to stop CD playback.
Inserting a CD
Insert disc gently label side facing up (do not push disc, the unit will pull the disc in). The unit will detect the disc and will automatically begin playback.
NOTE: You cannot insert a disc if there is already a disc in the unit or if the power is OFF.
Ejecting a CD
Press the EJECT (▲) button on the front of the unit to eject the disc. The unit will automatically revert to RADIO mode. You may eject a disc with the unit powered OFF. The unit will remain OFF after the disc is ejected.
Resetting the Loading Mechanism
If the disc loads abnormally or an abnormal core mechanism operation occurs, touch and hold the EJECT (▲) Button to reset the loading mechanism. Normal operation will resume.
Accessing CD Mode (when in a different mode)
To switch to CD mode from a different mode when a disc is already inserted, press the MENU button on the front of the unit to access the MAIN Menu. When the MAIN Menu appears, touch the DISC icon.
Direct Track Selection
To select and set a track directly, touch the track displayed at the top of the screen to enter the direct entry menu. When a selection is entered, touch "OK" to return to the track playing.
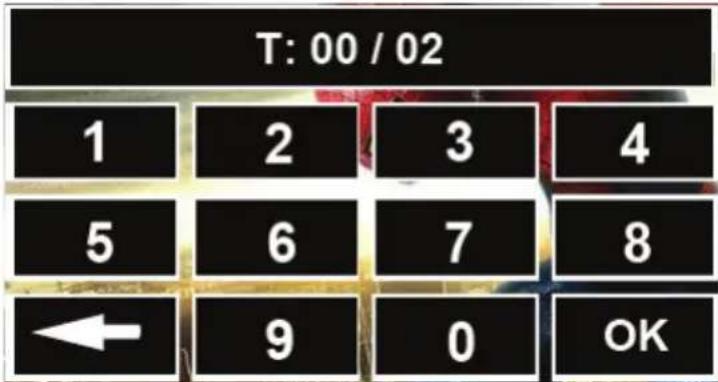
To exit the screen without changing the chapter, touch outside of the menu area. To clear an entry and start over, touch the back arrow.
Shuffle
Touch the SHUFFLE (✗) icon to play tracks in random order during CD playback. Touch the icon again exit Shuffle mode.
Repeat Playback
Touch the REPEAT (icon once during playback to repeat the current track. Touch the icon a second time to repeat the current title. Touch the icon a third time to turn the repeat function OFF.
Source Menu
Touch the SOURCE MENU (icon to access the CD track menu to view or change tracks manually. Touch the icon a again to return to the playback of the current track.
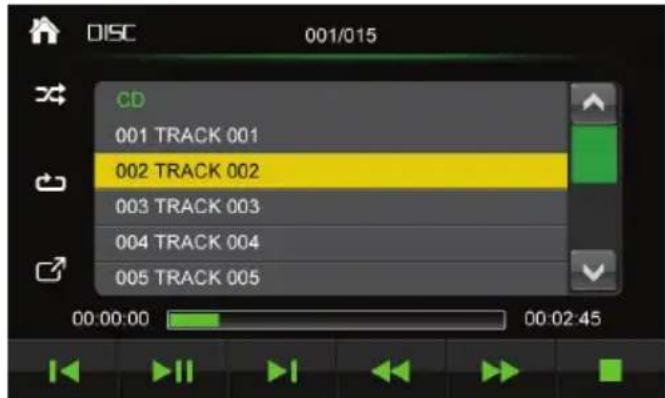
Touch a track title (if available) or track number to begin playback of that track. Touch ▲ to view the previous play list page. Touch ▼ to view the next play list page.
Elapsed Time Indicator
Displays the elapsed playback time (left side of time bar) and total time of the current track playing (right side of time bar).
Previous Track
Touch the PREVIOUS TRACK (icon to move to previous track.
Play/Pause
Touch the PLAY/PAUSE (▶) icon when disc is loaded to begin playback. During playback of the disc touch the icon again to pause and once again to resume playback.
Next Track
Touch the NEXT TRACK (▶)icon to advance to the next track on the CD.
Fast Reverse
Touch the FAST REVERSE (◀) icon once to reverse playback of the disc two times faster (x2) than normal playback speed. Keep touching and releasing the icon to increase the rate from "x2" to "x4", "x8", and "x16". Touch the icon again to resume normal play of the CD.
Fast Forward
Touch the FAST FORWARD (▶) icon once to forward playback of the disc two times faster (x2) than normal playback speed. Keep touching and releasing the icon to increase the rate from "x2" to "x4", "x8", and "x16". Touch the icon again to resume normal play of the CD.
Stop
Touch the STOP (icon on the first control menu page to stop the playback of the disc.
PLAYING MP3/WMA USING CD/DVD/SD/USB Device
Media and File Requirements
The VM9026 allows you to playback MP3 and WMA files recorded onto CD-R/RWs/DVD+R/RWs/DVD-R/RWs/SD Cards/and USB Devices.
NOTE: For CD-RWs, please make sure it is formatted using the full method and not the quick method to prevent illegal disc operation.
NOTE: For the greatest file capacity, Dual Layer DVD's can be used when burning music to a disc.
MP3 Format Compatibility
File naming formats compatible with the VM9026 are known as ISO 9660 Standard, and are listed below:
• ISO 9660 – file name: 12 characters, file extension: 3 characters
• ISO 9660 – file name: 31 characters, file extension: 3 characters
• Joliet – 64 characters
If the file or folder name does not conform to ISO 9660 file system standards, it may not be displayed or played back correctly. Use the following settings when compressing audio data for your MP3 disc:
• Transfer Bit Rate: 128kbps
• Sampling Frequency: 48kHz
When recording MP3 up to the maximum disc capacity, disable additional writing. For recording on an empty disc up to maximum disc capacity, use the "Disc at once" setting.
MP3 Playing Order
When selected for play, files and folders (Folder Search, File Search or Folder Select) are accessed in the order they were written by the CD writer. As a result, the order in which they are expected to be played may not match the order in which they are actually played. You may be able to set the order in which MP3/WMA files are to be played by writing them onto a medium such as a CD-R with their file names beginning with play sequence numbers such as "01" to "99".
NOTE: The VM9026 will recognize one folder level deep and 1000 songs / files in the ROOT directory of a disc / USB / SD card
Inserting a USB/SD Card Device
NOTE: The USB/SD ports will recognize most USB/SD flash memory devices and portable hard drives. The unit supports 8GB SD cards however SD cards larger than 8GB may not be recognized. Portable hard drives (hard drives must be formatted to FAT32 and NTFS is not supported).
- Locate the USB/SD connector on the lower left of the radio's front panel.
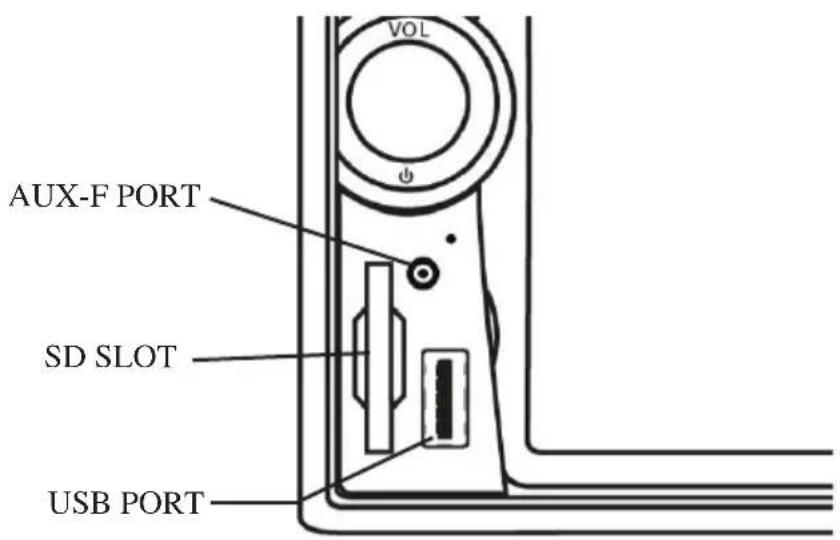
- Lift the protective cover to reveal the USB/SD slots.
- Insert the USB/SD device into the USB/SD connectors. The unit will read the audio/video files on the USB/SD device automatically.
To remove the USB/SD device, press the MAIN menu button to switch to another mode, and then remove the USB/SD device from the connector.
MP3/WMA Display
To access the on-screen controls, touch the icons at the bottom of the screen while playing tracks from a CD, USB Device of SD Card, select or set playback controls.
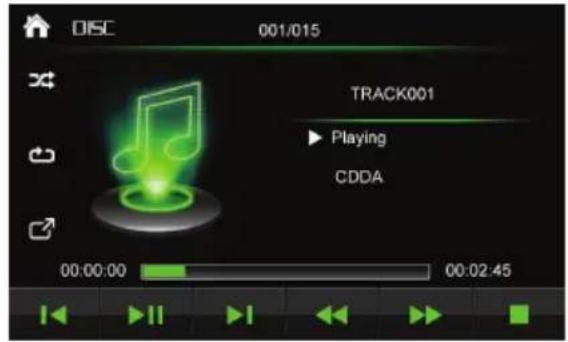
(CD) MP3/WMA Display
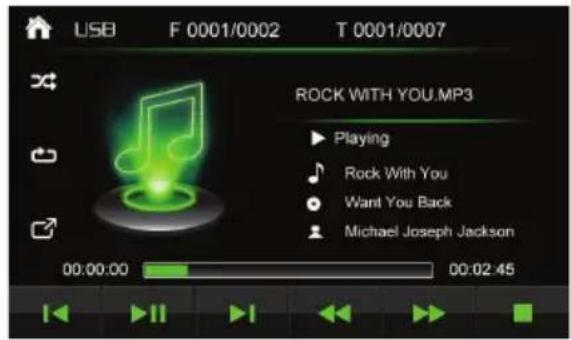
(USB) MP3/WMA Display
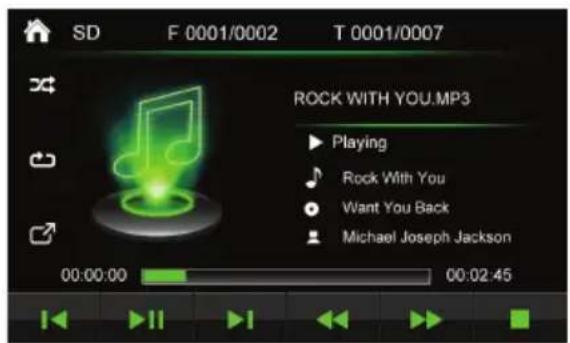
(SD) MP3/WMA Display
-
MAIN MENU (R): Touch to view the MAIN MENU and select a new playback source
-
MODE: Indicates that unit is in DISC/USB or SD playback mode.
-
FOLDER: Displays the current folder number playing and total number of folders.
-
TRACK INDICATOR: Displays the current track number playing and total number of tracks (if folders are available).
-
SHUFFLE ( ) This indicator is lit when the random mode is active.
-
REPEAT (☐) This indicator is lit when the repeat mode is active.
-
SOURCE MENU 📋 Touch to view the SOURCE Menu during playback
-
ELAPSED TIME INDICATOR: Displays the elapsed playback time (left side of time bar) and total time of the current track playing (right side of time bar).
-
PREVIOUS TRACK ( ) Touch to play the previous track.
-
PLAY/PAUSE (▶■): Touch to begin playback. Press the icon again to pause playback.
11.NEXT TRACK (▶): Touch to advance to the next track.
12.FAST REVERSE (◀): Touch to fast reverse "x2" to "x4", "x8", and "x16" times the normal playback speed.
13.FAST FORWARD (▶): Touch to fast forward "x2" to "x4", "x8", and "x16" times the normal playback speed.
- STOP ☐): Touch to stop playback.
Controlling Playback
Inserting a CD-R/CD-RW/DVD+R/RW and DVD-R/RW
Insert the disc gently label side facing up (do not push disc, the unit will pull the disc in). The unit will detect the disc and will automatically begin playback.
NOTE: You cannot insert a disc if there is already a disc in the unit or if the power is OFF.
Connecting a USB Device
Plug the USB Device cable into the USB Port. The unit will detect the USB Device and will automatically begin playback.
Inserting a SD Card
Insert SD Card label side facing toward the left (press the SD until it clicks and locks in-place).
Ejecting a CD
Press the EJECT (▲ button on the front of the unit to eject the disc. The unit will automatically revert to RADIO mode. You may eject a disc with the unit powered OFF. The unit will remain OFF after the disc is ejected.
Ejecting a SD Card
To eject the SD Card, press on the SD Card and it will spring outward. You may eject a SD Card with the unit powered OFF. The unit will remain OFF after the SD Card is ejected.
Direct Track Selection
To select and set a track directly, touch the track displayed at the top of the screen to enter the direct entry menu. When a selection is entered, touch "OK" to return to the track playing.
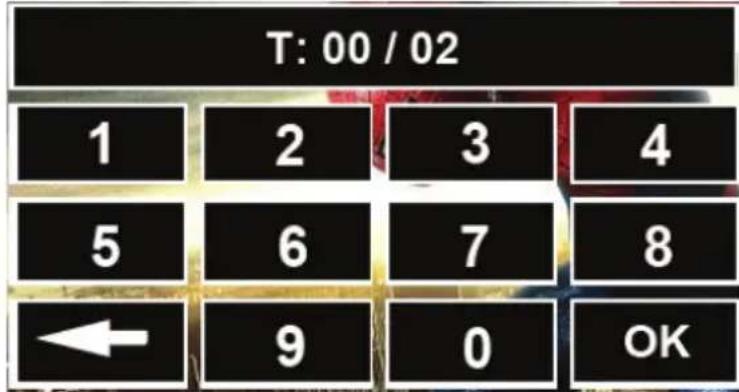
To exit the screen without changing the chapter, touch outside of the menu area. To clear an entry and start over, touch the back arrow.
Shuffle
Touch the SHUFFLE (✗) icon to play tracks in random order during playback. Touch the icon again exit Shuffle mode.
Repeat Playback
Touch the REPEAT (icon once during playback to repeat the current track. Touch the icon a second time to repeat the current title. Touch the icon a third time to turn the repeat function OFF.
Source Menu
Touch the SOURCE MENU 📋 icon to access the track menu to view or change tracks manually. Touch the icon a again to return to the playback of the current track.
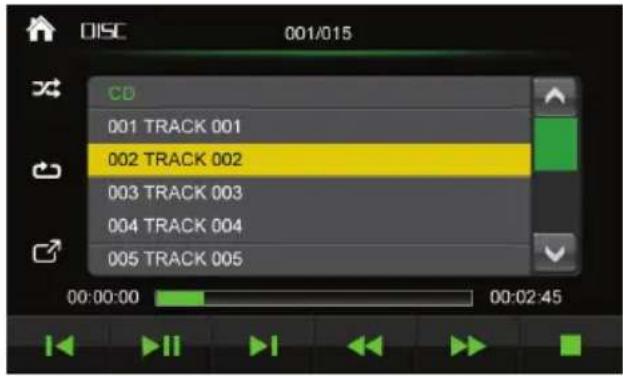
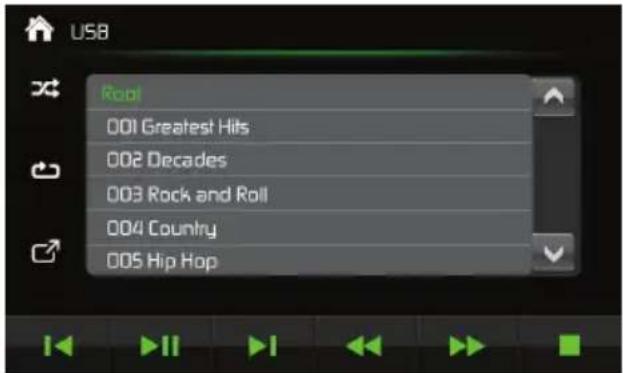
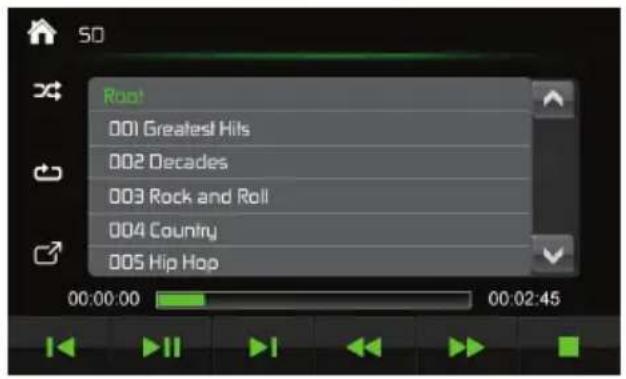
Touch a track title (if available) or track number to begin playback of that track. Touch ▲to view the previous play list page. Touch ▼to view the next play list page.
Elapsed Time Indicator
Displays the elapsed playback time (left side of time bar) and total time of the current track playing (right side of time bar).
Previous Track
Touch the PREVIOUS TRACK (◀) icon to move to previous track.
Play/Pause
Touch the PLAY/PAUSE (▶) icon when disc is loaded to begin playback. During playback, touch the icon again to pause and once again to resume playback.
Next Track
Touch the NEXT TRACK 🔊 icon to advance to the next track.
Fast Reverse
Touch the FAST REVERSE (◀◀) icon once to reverse playback of the disc two times faster (x2) than normal playback speed. Keep touching and releasing the icon to increase the rate from "x2" to "x4", "x8", and "x16". Touch the icon again to resume normal play.
Fast Forward
Touch the FAST FORWARD (▶) icon once to forward playback of the disc two times faster (x2) than normal playback speed. Keep touching and releasing the icon to increase the rate from "x2" to "x4", "x8", and "x16". Touch the icon again to resume normal play.
Stop
Touch the STOP (■) icon on the first control menu page to stop the playback.
VIEWING JPEG FILES
JPEG files can be viewed from a SD Card, Disc or a USB device. JPEG images can be stored as individual images or in folders. The unit will display the root menu.
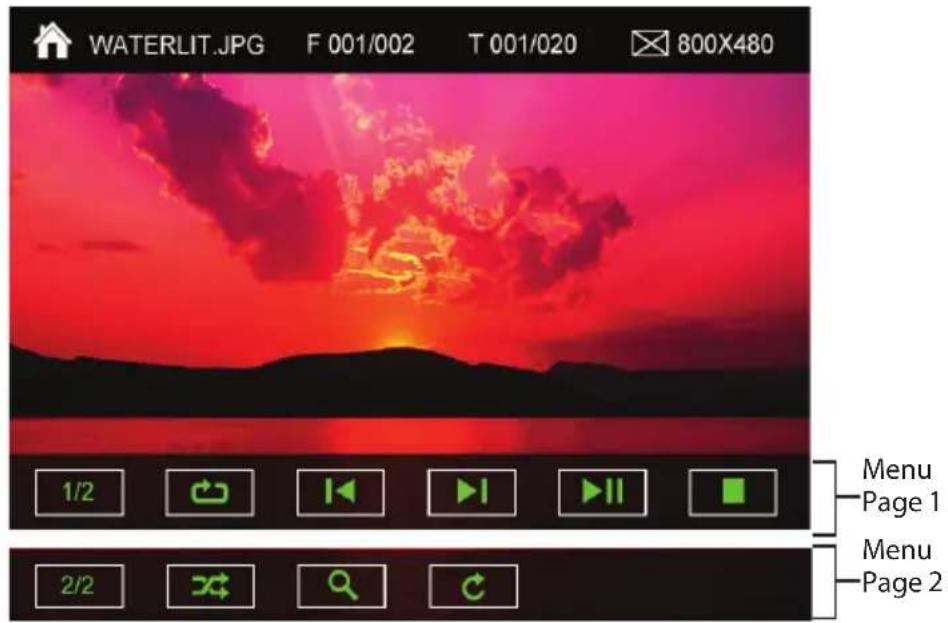
- MAIN MENU (A) Touch to view the MAIN MENU and select a new playback source
- MODE: Indicates that unit is in JPG viewing mode.
- FOLDER (F): Touch to select and manually set a image folder directly using the on-screen display.
- IMAGE TOTAL (T): Touch to select an image directly using the on-screen display.
- IMAGE RESOLUTION (Displays the image resolution
JPG Menu Control Bar 1/2
- 1/2: Touch to select one of the two JPG Menu Control Bars.
- REPEAT PLAY (Q) touch to alter repeat mode in the following sequence:
- PREVIOUS CHAPTER ( )Touch to move to previous chapter.
- NEXT CHAPTER (Touch to advance to the next chapter on the JPG.
10.PLAY/PAUSE (▶II): Touch to begin playback. Press the icon again to pause playback. - STOP ☐: Touch to stop JPG playback.
JPG Menu Control Bar 2/2
- 2/2: Touch to select one of the two JPG Menu Control Bars.
- SHUFFLE (✗) Touch to play JPGs in random order during disc playback.
- ZOOM 🔒): Touch to zoom in or out during playback.
- ROTATE (⊂): Touch to rotate JPEG images.
iPod® OPERATION
NOTE: Be sure your iPod® has the latest Apple firmware installed to avoid connectivity issues.
Accessing iPod® Mode
This unit is Made for iPod® and iPhone®. You can control your iPod® via touch screen to access Playlist, Artist, Albums, Songs, etc. Supported models include, but are not limited to the following:
- iPhone® 4S / 4 / 3GS / 3G and 1st Generation
- iPod® touch 4th / 2nd and 1st Generation
- iPod® nano 6th / 5th / 4th and 3rd Generation
- iPod® classic and iPod® with video
The unit will automatically switch to iPod ^® mode when an iPod ^® , iPod ^® touch or iPhone is plugged into the front USB connector.
NOTE: For basic iPod® connectivity, you can use the white 30-pin to USB iPod® cable that came with your Apple device. For iPod® video, you must purchase the jLink-USB cable.
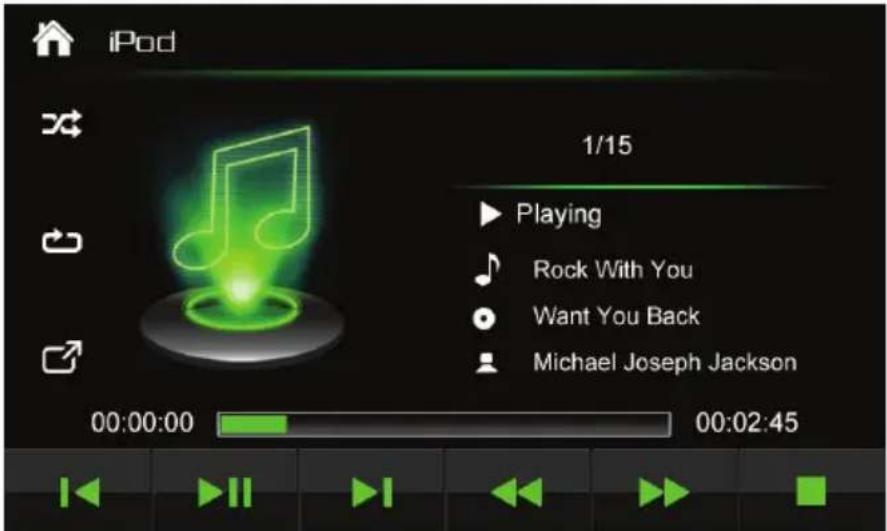
To access the on-screen controls, touch the icons at the bottom of the screen while a iPhone®/iPod® is playing, select or set playback controls.
-
MAIN MENU (M): Touch to view the MAIN MENU and select a new playback source
-
MODE: Indicates that unit is in iPhone®/iPod® playback mode.
-
SHUFFLE (✗) This indicator is lit when the random mode is active.
-
REPEAT (This indicator is lit when the repeat mode is active.
-
SOURCE MENU Touch to view the SOURCE Menu during playback
-
ELAPSED TIME INDICATOR: Displays the elapsed playback time (left side of time bar) and total time of the current track playing (right side of time bar).
-
PREVIOUS TRACK ( ) Touch to play the previous track.
-
PLAY/PAUSE (▶II): Touch to begin playback. Press the icon again to pause playback.
-
NEXT TRACK ( )Touch to advance to the next track.
10.FAST REVERSE (→:Touch to fast reverse.
11.FAST FORWARD (▶): Touch to fast forward.
12.STOP (■): Touch to stop playback.
Shuffle
Touch the SHUFFLE ( ✗ ) icon to play tracks in random order during iPhone®/iPod® playback. Touch the icon again exit Shuffle mode.
Repeat Playback
Touch the REPEAT (icon once during playback to repeat the current track. Touch the icon a second time to repeat the current title. Touch the icon a third time to turn the repeat function OFF.
Source Menu
Touch the SOURCE MENU 📋 con to access the iPhone®/iPod® track menu to view or change tracks manually. Touch the icon a again to return to the playback of the current track.
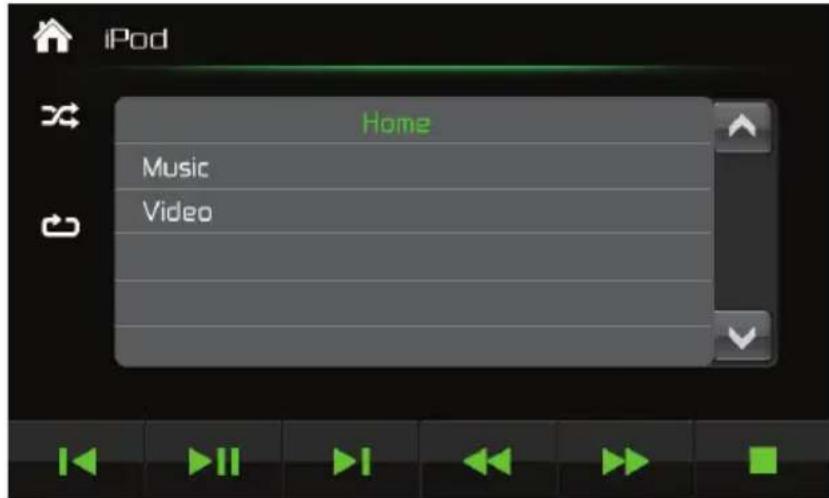
Touch a track title (if available) or track number to begin playback of that track. Touch ▲to view the previous play list page. Touch ▼to view the next play list page.
The SOURCE Menu allows the user to select music or video files stored in the iPhone®/iPod®/iPod® touch/iPod® nano.
Touch the Music list box to view and select music grouped by playlists, artists, albums, genres, songs, composer or podcast. Touch the Video list box to view and select videos grouped by movie, music videos, TV shows, video podcasts and rentals and video play lists.
Elapsed Time Indicator
Displays the elapsed playback time (left side of time bar) and total time of the current track playing (right side of time bar).
Previous Track
Touch the PREVIOUS TRACK 🔊 icon to move to previous track.
Play/Pause
Touch the PLAY/PAUSE icon when iPhone®/iPod® is loaded to begin playback. During playback of the iPhone®/iPod® touch the icon again to pause and once again to resume playback.
Next Track
Touch the NEXT TRACK 📋 icon to advance to the next track on the iPhone®/iPod®
Fast Reverse
Touch the FAST REVERSE (◀◀) icon to fast reverse.
Fast Forward
Touch the FAST FORWARD (▶) icon to fast forward.
Stop
Touch the STOP (■) icon on the first control menu page to stop the playback.
Controlling your iPod®
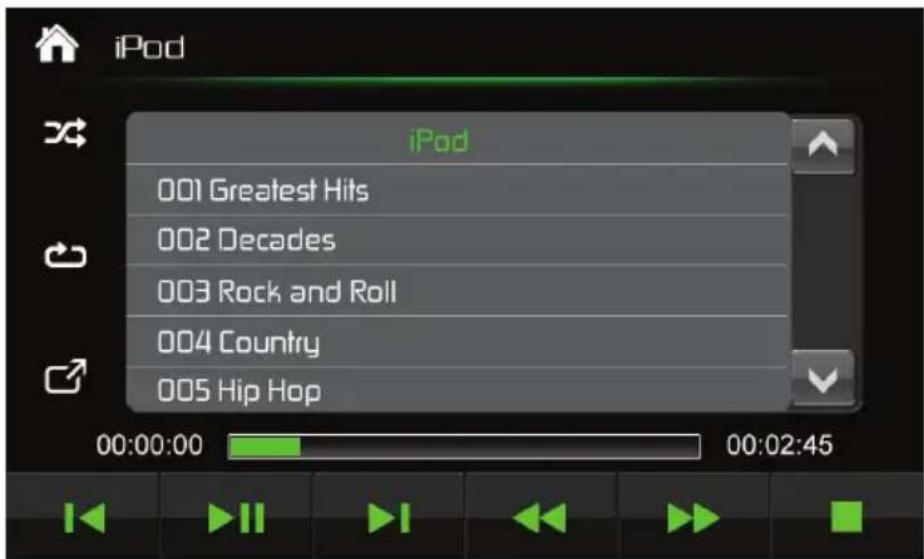
To select music or videos from the source menu, touch the name on the display and playback of the selection will begin. To return to the iPod® main screen touch the SOURCE Menu icon.
NOTE: To transmit the video from your iPod ^® to the VM9026 screen, you must set the following options through the iPod ^® video settings menu: TV Out = ON, TV Signal = NTSC, and Widescreen = ON.
This unit is camera ready. A rear video camera must be installed to access camera features.
When the camera is not installed and the function is accessed by the gear selector being placed in reverse or by the unit's MAIN menu, the message "No Signal Input" will appear, indicating the function is not available.
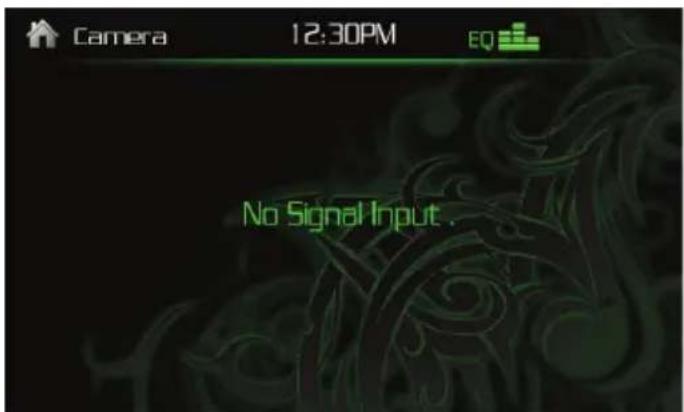
When the camera is installed, the rear view image of what is behind the vehicle will appear when the vehicle is placed in reverse gear. When leaving reverse gear, the unit displays the previous screen.
The rear camera image can be adjusted from Normal to Mirror using the Setup Menu within the General Sub-menu.
STEERING WHEEL CONTROL (SWC) INTERFACE
The VM9026 is compatible with various aftermarket SWC adapters from companies such as PAC / Metra / ADS. Information about SWC interfaces and other adapters is available on each companies web site. A 3.5mm female connector on the back of the VM9026 allows connectivity to various aftermarket SWC adapters.
SWC functions supported from the VM9026
- Volume Down
- Volume Up
- Mute
- Seek Down / Previous Track
- Seek Up / Next Track
- Source (SRC)
- Band (AM-FM)
TROUBLESHOOTING
Table 9: Troubleshooting (1 of 3)
| Problem Cause Corrective Action | ||
| GENERAL | ||
| Unit will not power on | Radio fuse blown Install new fuse with correct rating | |
| Car battery fuse blown Install new fuse with correct rating | ||
| Illegal operation Press the RESET button located in the bottom left corner of the front panel under AV Input cover. | ||
| No/low audio output | Improper audio output connection | Check wiring and correct |
| Volume set too low Increase volume level | ||
| Improper “MUTE” connection Review wiring diagram and check “TEL MUTE” connection | ||
| Speakers damaged Replace speakers | ||
| Heavily biased volume balance Adjust the channel balance to the center position | ||
| Speaker wiring is in contact with metal part of car | Insulate all speaker wiring connections | |
| Poor sound quality or distortion | Pirated disc is in use Use original copy | |
| Speaker power rating not compatible with unit | Connect proper speakers | |
| Speaker is shorted Check speaker contact | ||
Table 9: Troubleshooting (2 of 3)
| Problem Cause Corrective Action | ||
| TFT Monitor | ||
| No image Incorrect connection to parking brake wire | Check wiring and correct | |
| Parking brake is not engaged Stop vehicle in safe place and apply parking brake | ||
| Flashing image or interference appears on screen | DVD is not compatible with current TV system settings | Change setup to accommodate disc |
| Improper video signal connections | Check wiring and correct | |
| Prolonged image or improper height/ width ratio display | Improper aspect ratio setup Use d | correct aspect ratio setting |
| TUNER | ||
| Weak station searching | Auto antenna is not fully extended | Connect the auto antenna control cable properly |
| LOCAL function is activated Turn | LOCAL function off | |
| DISC | ||
| Cannot insert disc Disc already inside unit Eject current disc and insert new one | ||
Table 9: Troubleshooting (3 of 3)
| Image blurred, distorted or dark | Disc is illegally copied Use original disc | |
| Problem Cause Corrective Action | ||
| Disc does not play back | Disc is warped or scratched Use disc in good condition | |
| Disc is dirty or wet Clean disc with soft cloth | ||
| Laser pickup is dirty Clean laser pickup with cleaning disc | ||
| Incompatible disc is used Use compatible disc | ||
| Disc region code is not compatible with unit | Use disc with proper region code | |
| Disc is inserted upside down Insert disc with label side up | ||
| PBC cannot be used during VCD playback | PBC is not available on the disc | |
| No repeat or searching while playing VCD | PBC is on Turn PBC off | |
| MP3 | ||
| Interruption occurred during playback | Disc is dirty or scratched Clean disc or replace | |
| File is damaged/bad recording Re create disc with good files | ||
Error Messages
Table 10: Error Messages
| Message Displayed Cause | Corrective Action | |
| Loading Disc is being read | ||
| No Disc Disc is dirty Clean | disc with soft cloth | |
| Disc is upside down Insert | disc with label side up | |
| Disc not present in loading compartment | Insert disc | |
| Bad Disc Disc is dirty Clean | disc with soft cloth | |
| Disc is upside down Insert | disc with label side up | |
| Unknown disc Disc format | is not compatible with this unit | |
| Region Error DVD is not compatible with region code of unit | ||
| Error Illegal mechanism | operation | Press EJECT key for 5 seconds to reset loading mechanism |
Care and Maintenance
- Use only a clean silicone cloth and neutral detergent to clean the front panel or monitor. A rough cloth and non-neutral detergent (such as alcohol) may result in scratching or discoloration.
- Do not get water or cleaning fluids on the unit.
- If the temperature inside the player gets too hot, a protective circuit automatically stops play of the disc. If this occurs, allow the unit to cool before operating the player again.
- Never insert anything other than a 5" (12 cm) compact disc into the player as the mechanism can be damaged by foreign objects.
- Do not attempt to use a 3" (8 cm) CD-Single disc in this unit, either with or without an adaptor, as damage to the player and/or disc may occur. Such damage is not covered by the Warranty on this product.
- The CD player may not operate properly in extreme hot or cold. If such conditions occur, allow the interior of the vehicle to reach a normal temperature before using player.
- When the vehicle warms up during cold weather or under damp conditions, condensation may appear on the LCD panel. Should this occur, the screen will not operate properly until the moisture has evaporated.
- We suggest you use a cleaning disc in this unit more frequently than in the unit in your home due to the environmental conditions of the vehicle.
System Reset
To correct a system halt or other corrupt operation, [RESET]Button use the tip of a pen to press the reset button located on the front bottom-left corner of the unit (above the USB port). After a system reset, the unit restores all factory default settings.
NOTE: If the unit is reset while a DVD is playing, the DVD resumes play once the reset is complete.
SPECIFICATIONS
DVD/CD Player
Compatible Disc Media: DVD + R / RW (Single and Dual Layer) and CD-R / RW Compatible Media Formats: CD-DA, MP3, WMA, VCD, SVCD, Xvid, AVI, MPEG 1/2 Signal to Noise Ratio: >95dBA Dynamic Range: >95dB Frequency Response: 20Hz to 20 kHz, -3dB Channel Separation: >60dB @ 1 kHz
Video
Format: NTSC, PAL (auto-detection)
Output: 1Vp-p (75-ohm)
Input: 1Vp-p (75-ohm)
FM Tuner
Tuning Range: 87.5MHz - 107.9MHz Mono Sensitivity (-30dB): 9dBf Quieting Sensitivity (-50dB): 15dBf Alternate Channel Selectivity: 70dB Signal to Noise Ratio @ 1 kHz: 58dB Image Rejection: 80dB Stereo Separation @ 1 kHz: >30dB Frequency Response: 30Hz - 15 kHz, -3dB
AM Tuner
Tuning Range: 530 kHz - 1720 kHz Sensitivity (-20dB): 15uV Signal to Noise Ratio @ 1 kHz: 50dB Image Rejection: 60dB Frequency Response: 50Hz - 2 kHz, -3dB
Monitor
Screen Size: 6.2" (Measured diagonally), 16:9 Widescreen Screen Type: TFT Liquid Crystal Display (LCD) Active Matrix Resolution: 1,152,000 Sub Pixels, 800x3 (W) X 480 (H)
General
Auxiliary Input Impedance: 10k
Power Supply: 11 to 16VDC, Negative Ground
Power Antenna (Blue): 500mA Max
Amplifier Remote (Blue/White): 500mA Max
Operating Temperature: -20C \~ 65C
Fuse: 15-amp ATO Type
DIN Chassis Dimensions: 7" X 7" X 4" (178mm x 178mm x 100mm)
CEA Power Ratings
Power Output: 13 Watts RMS x 4 Channels into 4-Ohms @ < 1%
THD+N
Signal to Noise Ratio: 70dBA Below Reference (Reference: 1
Watt, 4-Ohms)
Frequency Response: 20 Hz - 20 kHz, -3dB. (Aux Input used as
reference input)
Reference Supply Voltage: 14.4VDC
*Specifications subject to change without notice

Audiovox Electronics Corporation
Hauppauge, NY 11788
Technical Assistance: 1-800-323-4815
www.mobile.jensen.com
© 2013 Audiovox
Printed in China
VM9026 Common Replacement Parts
| Owner's Manual, Install Manual 30613820 | |
| Wire Harness (Speaker, Power, A/V) 30313820 | |
| Trim Ring 30413820 | |
| Hardware Bag - Miscellaneous Hardware 30513820 |
- Operating Instructions
- CONTENTS
- FEATURES
- DVD
- CD / MP3 / WMA
- AM-FM
- iPod®/iPhone® Input
- Chassis
- General
- Parking Brake Inhibit
- Optional Equipment
- Rear Camera
- CONTROLS AND INDICATORS
- MENU
- DiscSlot
- EJECT
- TFT SCREEN
- AV INPUT COVER
- USBPORT
- SD INTERFACE SLOT
- A/V MEDIA ADAPTER CABLE PORT
- SYSTEM RESET
- POWER ON/OFF and VOLUME UP/DOWN/MUTE BUTTON
- MODE
- Power ON / OFF
- Audible Beep Confirmation
- Mute
- Playing Source Selection
- MAIN Menus
- External Devices
- Volume Adjustment
- Volume Increase/Decrease
- Audio Control Menu
- SETUP MENU
- Accessing Menu Items
- Adjusting a Feature
- Clock Sub-Menu Features
- General Sub-Menu Features
- Audio Sub-Menu Features
- Video Sub-Menu Features
- Other Sub-Menu Features
- Touch Calibrate (Screen Calibration)
- Seek Next Station
- Using Preset Stations
- Selecting FM/AM Band
- Preview Scan (SCAN)
- Seek Next Best Signal
- Local/Distant Radio Station Seeking
- Auto-Store (AS)
- RDS Settings
- Controlling Playback
- DVD/VCD Menu Control Bar 1/3
- DVD/VCD Menu Control Bar 2/3
- DVD/VCD Menu Control Bar 3/3
- Inserting a DVD/VCD
- Ejecting a DVD/VCD
- Resetting the Loading Mechanism
- Accessing DVD Mode (when in a different mode)
- Direct Track / Chapter Selection
- Repeat Playback
- Fast Reverse
- Fast Forward
- Play/Pause
- Stop
- Shuffle
- Previous Chapter
- Next Chapter
- Title
- Disc Menu
- ZOOM
- LANGUAGE
- Subtitle
- Angle
- Section Repeat (A-B)
- General Disc Information
- CD AUDIO OPERATION
- Media Requirements
- Inserting a CD
- Ejecting a CD
- Accessing CD Mode (when in a different mode)
- Direct Track Selection
- Source Menu
- Elapsed Time Indicator
- Previous Track
- Next Track
- PLAYING MP3/WMA USING CD/DVD/SD/USB Device
- Media and File Requirements
- MP3 Format Compatibility
- MP3 Playing Order
- Inserting a USB/SD Card Device
- MP3/WMA Display
- Inserting a CD-R/CD-RW/DVD+R/RW and DVD-R/RW
- Connecting a USB Device
- Inserting a SD Card
- Ejecting a SD Card
- VIEWING JPEG FILES
- JPG Menu Control Bar 1/2
- JPG Menu Control Bar 2/2
- iPod® OPERATION
- Accessing iPod® Mode
- Controlling your iPod®
- STEERING WHEEL CONTROL (SWC) INTERFACE
- TROUBLESHOOTING
- Error Messages
- Care and Maintenance
- System Reset
- SPECIFICATIONS
- DVD/CD Player
- Video
- FM Tuner
- AM Tuner
- Monitor
- CEA Power Ratings
Brand : JENSEN
Model : VM9026
Category : Uncategorized