
524759 - Wireless pointer Intellinet - Free user manual and instructions
Find the device manual for free 524759 Intellinet in PDF.


| Product Type | Wireless Presenter / Pointer |
| Model Number | 524759 |
| Brand | Intellinet |
| Dimensions (L x W x H) | 12.5 x 3.5 x 2.5 cm |
| Weight | 50 g (with batteries) |
| Power Source | 2 x AAA batteries (not included) |
| Connectivity | 2.4 GHz wireless via USB receiver |
| Wireless Range | Up to 15 meters (50 feet) |
| Laser Pointer | Class 2 red laser, <1 mW output |
| Compatible Operating Systems | Windows, macOS, Linux |
| Control Buttons | 4 buttons: Next, Previous, Laser, Power |
| LED Indicator | Red/Green LED for power and connection status |
| Color | Black |
| Material | ABS plastic |
| Operating Temperature | 0°C to 40°C (32°F to 104°F) |
| Storage Temperature | -20°C to 60°C (-4°F to 140°F) |
| Warranty | 1 year limited |
| Maintenance | Clean with a dry, soft cloth. Avoid liquids. |
| Safety | Do not point laser at eyes. Avoid prolonged direct exposure. |
| Spare Parts / Repairability | Batteries replaceable. No other user-serviceable parts. |
| Package Contents | Wireless pointer, USB receiver, user manual |
Frequently Asked Questions - 524759 Intellinet
User questions about 524759 Intellinet
0 question about this device. Answer the ones you know or ask your own.
Ask a new question about this device
Download the instructions for your Wireless pointer in PDF format for free! Find your manual 524759 - Intellinet and take your electronic device back in hand. On this page are published all the documents necessary for the use of your device. 524759 by Intellinet.
USER MANUAL 524759 Intellinet
WIRELESS 300N PRESENTATION GATEWAY
USER MANUAL
MODEL 524759


INTELLINET™
NETWORK SOLUTIONS
INT-524759-UM-0609-01
TABLE OF CONTENTS
1 INTRODUCTION 3
1.1 Regulatory Statements ...... 4
1.2 Safety Precautions ...... 7
2 HARDWARE INSTALLATION 8
2.1 Front Panel 8
2.2 Back Panel 8
2.3 Bottom Panel....9
2.4 Remote Control 9
2.5 Connections 10
3 SOFTWARE INSTALLATION 11
3.1 Checking the IP Address....11
3.2 Downloading & Installing the Software....13
3.3 Launching the Software 18
4.1 Projector Server 22
4.2 On-Screen Keyboard....23
4.3 About 24
4.4 Exit 24
4.5 Remote Control....24
4.6 Select User....25
5 CONFIGURATION....26
5.1 Connecting to the Web Configuration Menu 26
5.2 Utility Download....27
5.3 Basic Settings....28
5.4 Network Settings....28
5.5 Wireless Settings 30
5.5.1 Basic....30
5.5.2 Advanced 32
5.5.3 Security 34
5.5.4 WPS (Wi-Fi Protected Setup) 39
5.6 Presentation Control....40
5.7 Display Settings....41
5.8 Black Out....42
5.9 Configuration Tools 42
5.9.1 Config Tools 43
5.9.2 Firmware 43
5.9.3 Reset 44
TROUBLESHOOTING 45
SPECIFICATIONS 46
1 INTRODUCTION
Thank you for purchasing the INTELLINET NETWORK SOLUTIONS® Wireless 300N Presentation Gateway, Model 524759.
Operating as a standard access point, this convenient device lets you connect up to 16 wireless computers to any VGA- or HDMI-equipped projector or monitor — without connecting a single video cable but with enough bandwidth for all your presentation needs.
The easy-to-follow instructions in this user manual help make setup and operation relatively simple, so you'll soon be enjoying the benefits of these additional features:
• Up to 300 Mbps network link speed
- Complies with 2.4 GHz Draft IEEE 802.11n standard and is backward compatible with IEEE 802.11g/b standards
• 2T2R MIMO technology for enhanced throughput and coverage
• Supports Wi-Fi Protected Setup (WPS)
• Supports WEP and WPA/WPA2 (TKIP and AES) data encryption
• DHCP server assigns IP addresses for all wireless users
- Easy installation through a Web-based user interface
• Supports MPEG 1/2/4, Motion-JPEG, WMV9 and H.264 video formats
• Video mode allows video playback on the connected video device or projector
- Firmware upgradeable
- Three-Year Warranty
Package Contents
- Wireless 300N Presentation Gateway
- User manual
- Power adapter
- Ethernet Cat5 RJ45 cable: 1.0 m (3 ft.)
- Remote control with battery
- 2 3-dbi antennas
- 4 footpad stickers
NOTE: Some screen images have been modified to fit the format of this user manual. Additionally, this device is also commonly referred to as a Wireless Projector Server throughout this manual.
1.1 REGULATORY STATEMENTS
Federal Communications Commission (FCC) Part 68
This equipment complies with Part 68 of the FCC Rules. On the bottom of this device is a label that contains the FCC registration number and ringer equivalence number (REN) for this equipment. You must provide this information to the telephone company upon request.
The REN is useful to determine the quantity of devices you may connect to the telephone line and still have all of those devices ring when your number is called. In most, but not all, areas, the sum of the REN of all devices connected to one line should not exceed five (5). To be certain of the number of devices you may connect to your line, as determined by the REN, you should contact your local telephone company to determine the maximum REN for your calling area. If the modem causes harm to the telephone network, the telephone company may discontinue your service temporarily. If possible, they will notify you in advance. But if advance notice isn't practical, you will be notified as soon as possible. You will be advised of your right to file a complaint with the FCC.
The telephone company may make changes in its facilities, equipment, operations or procedures that could affect the proper operation of your equipment. If they do, you will be notified in advance to give you an opportunity to maintain uninterrupted telephone service.
If you experience trouble with this device, the telephone company may ask you to disconnect this equipment from the network until the problem has been corrected or you are sure that the equipment is not malfunctioning.
This equipment may not be used on coin service provided by the telephone company. Connection to party lines is subject to state tariffs.
FCC Part 15
This equipment has been tested and found to comply with the limits for a Class B digital device, pursuant to Part 15 of FCC Rules. These limits are designed to provide reasonable protection against harmful interference in a residential installation. This equipment generates, uses and can radiate radio frequency energy and, if not installed and used in accordance with the instructions, may cause harmful interference to radio communications. However, there is no guarantee that interference will not occur in a particular installation. If this equipment does cause harmful interference
to radio or television reception, which can be determined by turning the equipment off and on, the user is encouraged to try to correct the interference by one or more of the following measures:
- Reorient or relocate the receiving antenna.
- Increase the separation between the equipment and receiver.
- Connect the equipment to an outlet on a circuit different from that to which the receiver is connected.
- Consult the dealer or an experienced radio technician for help.
FCC Caution
This equipment must be installed and operated in accordance with the provided instructions, and a minimum 20 cm (8 in.) spacing must be provided between computer-mounted antennas and a person's body (excluding extremities of hands, wrists and feet) during wireless modes of operation.
This device complies with Part 15 of the FCC Rules. Operation is subject to the following two conditions: 1) This device may not cause harmful interference; and 2) This device must accept any interference received, including interference that may cause undesired operation.
Any changes or modifications not expressly approved by the party responsible for compliance could void the authority to operate the equipment.
FCC Radiation Exposure Statement
This equipment must be installed and operated in accordance with the provided instructions and a minimum 20 cm (8 in.) spacing must be provided between computer-mounted antennas and person's body (excluding extremities of hands, wrists and feet) during wireless modes of operation.
The equipment version marketed in the U.S. is restricted to usage of channels 1-11.
R&TTE Compliance Statement
This equipment complies with all the requirements of Directive 1999/5/EC of the European Parliament and the Council of March 9, 1999, on radio equipment and telecommunication terminal equipment and the mutual recognition of their conformity (R&TTE).
The R&TTE directive repeals and replaces in the directive 98/13/EEC (Telecommunications Terminal Equipment and Satellite Earth Station Equipment) as of April 8, 2000.
Safety
This equipment is designed with the utmost care for the safety of those who install and use it. However, special attention must be paid to the dangers of electric shock and static electricity when working with electrical equipment. All guidelines must therefore be followed at all times to ensure the safe use of the equipment. (See Safety Precautions below.)
EU Countries Intended for Use
The ETSI version of this device is intended for home and office use in Austria, Belgium, Denmark, Finland, France, Germany, Greece, Ireland, Italy, Luxembourg, Bulgaria, Cyprus, Czech Republic, Estonia, Hungary, Latvia, Lithuania, Malta, Poland, Romania, Slovakia, Slovenia, the Netherlands, Portugal, Spain, Sweden and the United Kingdom.
The ETSI version of this device is also authorized for use in EFTA member states Iceland, Liechtenstein, Norway and Switzerland.
EU countries not intended for use: none.
CE Mark Warning
This is a Class B product. In a domestic environment, this product may cause radio interference, in which case the user may be required to take adequate measures.
1.2 SAFETY PRECAUTIONS
- This device is not a toy. Keep it out of the reach of children!
- Do not place this device in a humid or hot environment, like a kitchen.
- This device is designed to be used indoors. Do not use it in any outdoor environment, including gardens or open patios.
- If the device is dropped into water while it's powered on, do not attempt to retrieve it before you cut power to the device. Do not use the device again before it has been properly checked out by a certified technician.
- If you're suspending the device from the overhead or positioning it in any elevated location, make sure that it's properly secured, as it can be damaged or cause injury when dropped from above.
- Do not yank any connected cord, as doing so could damage both the cord and the connection.
- Use only a damp cloth to wipe the device clean. Do not use alcohol or other chemical solutions.
- Do not attempt to open this device, as there are no user-serviceable parts inside.
- Do not set this device on or cover it with paper, cloth or other flammable materials during operation, as it can become hot after extended use.
- Don't connect or disconnect any cords or cables while the device is on.
- Don't allow any image to remain on the screen of your display device for long periods of time, as doing so could result in screen damage. Always use a screen saver.
- If smoke or any strange odor emanates from the device, cut power immediately, then call your dealer for assistance.
2 HARDWARE INSTALLATION
2.1 FRONT PANEL

Remote: This is the IR signal receiver for the remote control. Don't block the receiver: If the remote transmitter doesn't have a clear line of sight, it won't work.
USB: This can be used to connect a wired or wireless mouse.
Blackout: When lit, this LED indicates the device is in Blackout mode (no display output): Nothing will be displayed on the external display.
Ready: When lit, this LED indicates the device is ready to serve incoming requests.
WPS: When lit, this LED indicates the WPS mode is active.
WLAN: When flashing, this LED indicates wireless LAN activity.
LAN: When lit, this LED indicates the wired LAN is connected.
Power: When lit, this LED indicates the device is correctly powered.
WPS (Wi-Fi Protected Setup): Press this button to start WPS pairing.
Power: Press this button to switch this device on/off.
NOTE: The top of this device has heat sink holes, where heat generated by the device is removed. Do not block these holes during operation.
2.2 BACK PANEL

5V: This is the power jack for connecting the 5 V power adapter.
Reset: When this device isn't working properly, you can use a pen or pin (or similar pointed object) to press and hold this button in for 5 seconds to reset it.
Antennas (partially shown): For optimal results in transmitting the wireless signal, it's usually best to keep both antennas perpendicular to the floor.
HDMI: This audio/video output connects to any HDMI-compatible display.
VGA: This D-sub 15-pin video output connects to any VGA-compatible display.
Audio Out: This stereo port connects to external speakers or an audio amplifier.
USB: This can be used to connect a wired or wireless mouse.
LAN: This 10/100Mbps Fast Ethernet port connects to your local area network.
2.3 BOTTOM PANEL
Wallmount holes: Use these to hang the device on a wall. NOTE: If the device is to be placed and operated on a horizontal surface, consider placing the included foot pads on the bottom panel.
MAC address label: This is information you may need during software installation and configuration.
Product label: This is where you'll find the device's model name and serial number — useful when you request assistance.
2.4 REMOTE CONTROL
Black out: Press this button to activate the Blackout function, which removes contents on any external display. Press again to resume.
Menu: Press this button to switch the display output of the Wireless Projector Server between the presenter's computer display content and the device's configuration menu.
Page up: Equivalent to Left key on your computer keyboard.
Page down: Equivalent to Right key on your computer keyboard.
Prev.: Press to select the previous user (presenter)

in the device's configuration menu. It's equivalent to the Up key on your computer keyboard when a presentation is in progress.
Next: Press to select the previous user (presenter) in the device's configuration menu. It's equivalent to the Down key on your computer keyboard when a presentation is in progress.
▶ (Start): Press to select the user in the device's configuration menu.
IR transmitter: As you view the controls on the remote, this is located on the top "side." Aim this infrared transmitter at the IR receiver (Remote) front-panel of the Wireless Projector Server. Be careful not to block the transmitter when using the remote.
Battery cover: This is on the back of the remote control. Press the bottom edge and slide it out to open the battery compartment to install/remove the required CR-2032 lithium battery.
2.5 CONNECTIONS
Once you've positioned the Wireless Projector Server — either mounted on a wall or on a horizontal surface (with the footpads in place) — make the connections below (see Section 2.2 Back Panel above).
- Connect the Ethernet cable to the LAN port.
- If using an external audio amplifier or speaker, connect its audio cable to the Audio Out port.
- Connect either the HDMI or VGA cable from the external video display to the corresponding (HDMI or VGA) port. NOTE: You can only connect to one or the other at any given time.
- Adjust the antennas so they're perpendicular to the floor.
- Plug the power adapter into an electrical outlet, then connect it to the 5V jack.
- Press the Power button and confirm that the Power LED lights. (If it doesn't, check your connections or refer to Section 6 Troubleshooting.)
3 SOFTWARE INSTALLATION
3.1 CHECKING THE IP ADDRESS
Once the connection between the Wireless 300N Presentation Gateway (referred to as the Wireless Projector Server as it's called on the following screen images) and the external display is established, you can turn on both devices.
You should see the image below on the external display; if not, make sure the external display accepts an input video resolution of 1024 x 768 and a horizontal refresh rate of 60 Hz.

If the above image displays for more than two minutes, turn the Wireless Projector Server off and then on again. If this initial image still remains longer than a couple of minutes, refer to Section 6 Troubleshooting for possible solutions.
When the Wireless Projector Server is turned on and connected to a LAN with a DHCP server, it will automatically get an IP address from the DHCP
server; when there's no DHCP server available, it will initially use the default LAN IP address 169.254.0.200. NOTE: See Section 3.2 Setting the IP Address of the Computer.
The IP address of the Wireless Projector Server is presented on the external display, as shown below.
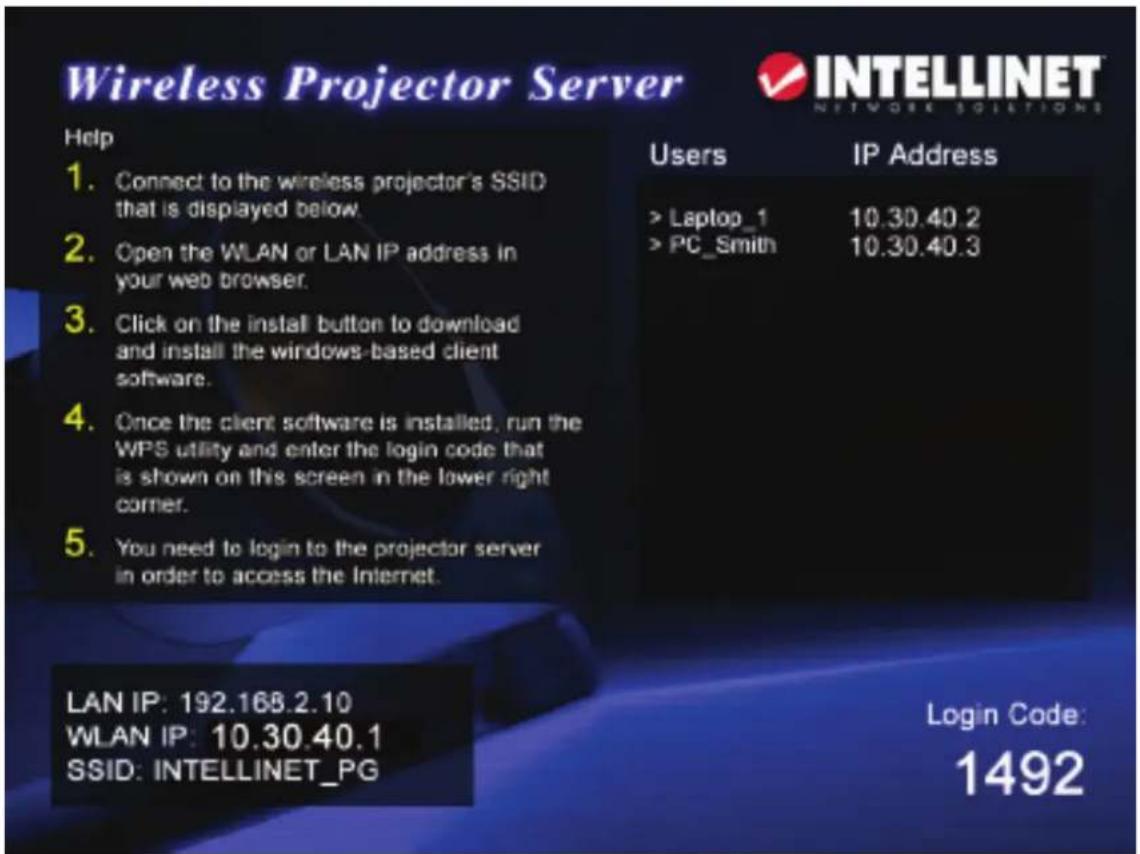
The IP addresses of the WLAN (wireless Ethernet) and LAN (wired Ethernet) interface of the Wireless Projector Server appear in the lower-left corner of the display. You can use one of these IP addresses to connect to the Wireless Projector Server. Note the Login Code, as well, for later use.
3.2 DOWNLOADING & INSTALLING THE SOFTWARE
Before any computer can use the Wireless Projector Server, the client software/utility needs to be installed.
- Use the Web browser to connect to the Wireless Projector Server's IP address (WLAN or LAN), presented in the lower-left corner of the initial screen displayed (Section 3.1 Checking the IP Address).
NOTE: The LAN IP address of the Wireless Projector Server will vary
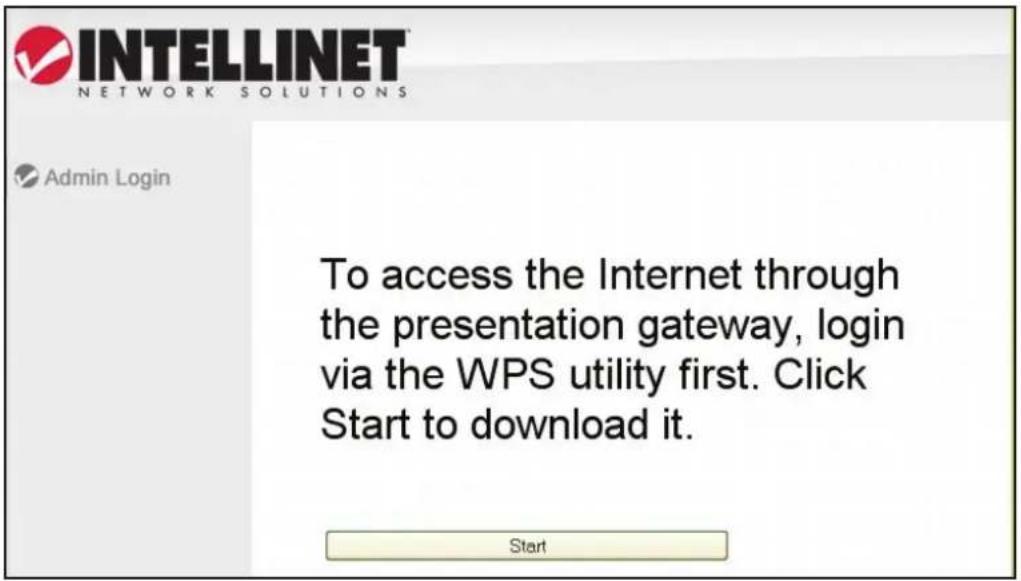
depending on the setting of the DHCP server of your LAN. It's recommended that you connect using the wireless (WLAN) IP address. You'll be redirected to the Wireless Projector Server's Web page. The wireless IP address is 10.30.40.1; the SSID is INTELLINET_PG.

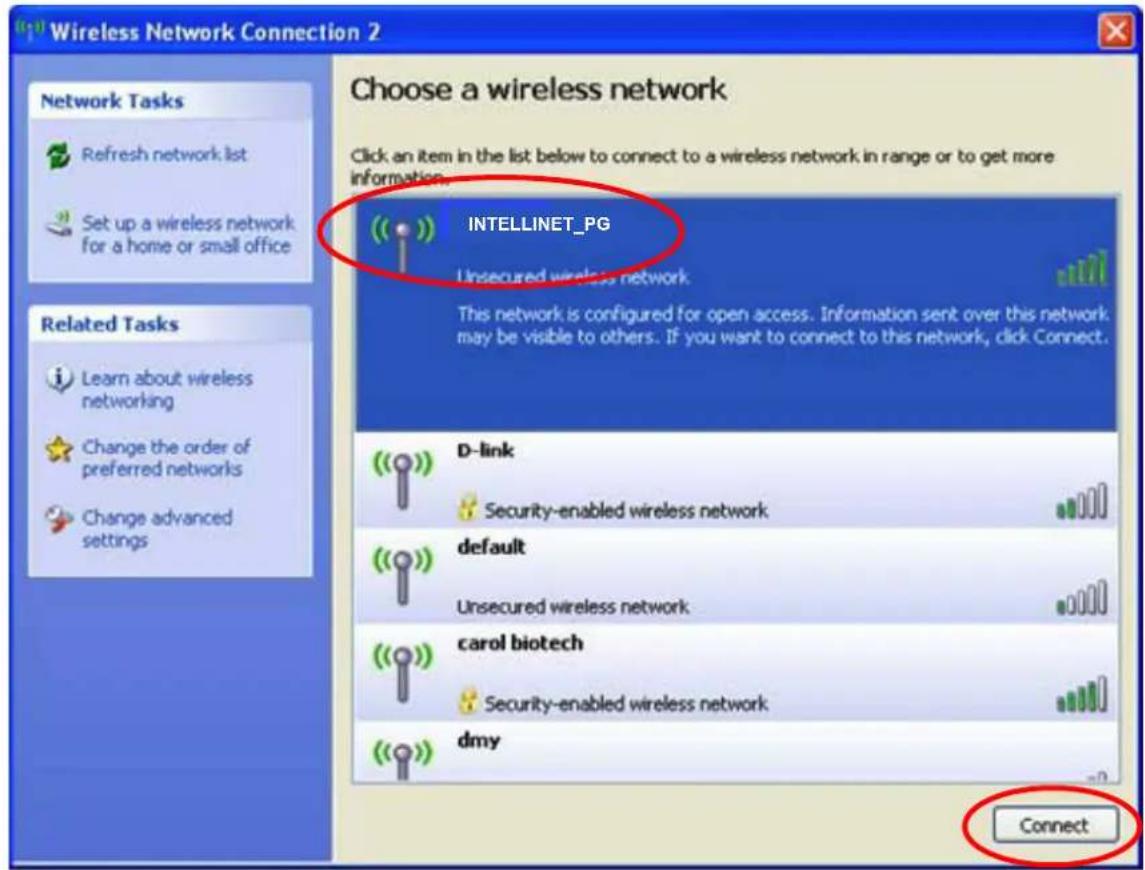
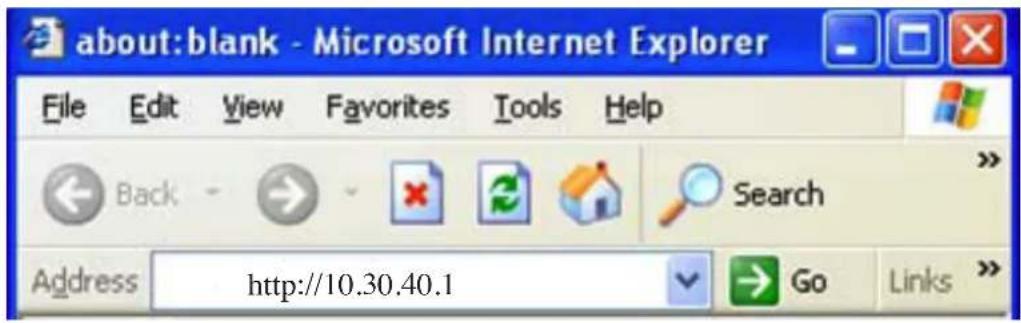
- Click "Start" to begin downloading the client software.
- When you see the Security Warning prompt(s), click "Run."


- When the InstallShield Wizard Welcome screen displays, click "Next."

- When the Choose Destination Location screen displays, click "Next" to accept the default installation destination folder and continue. To change the destination folder, click "Change."

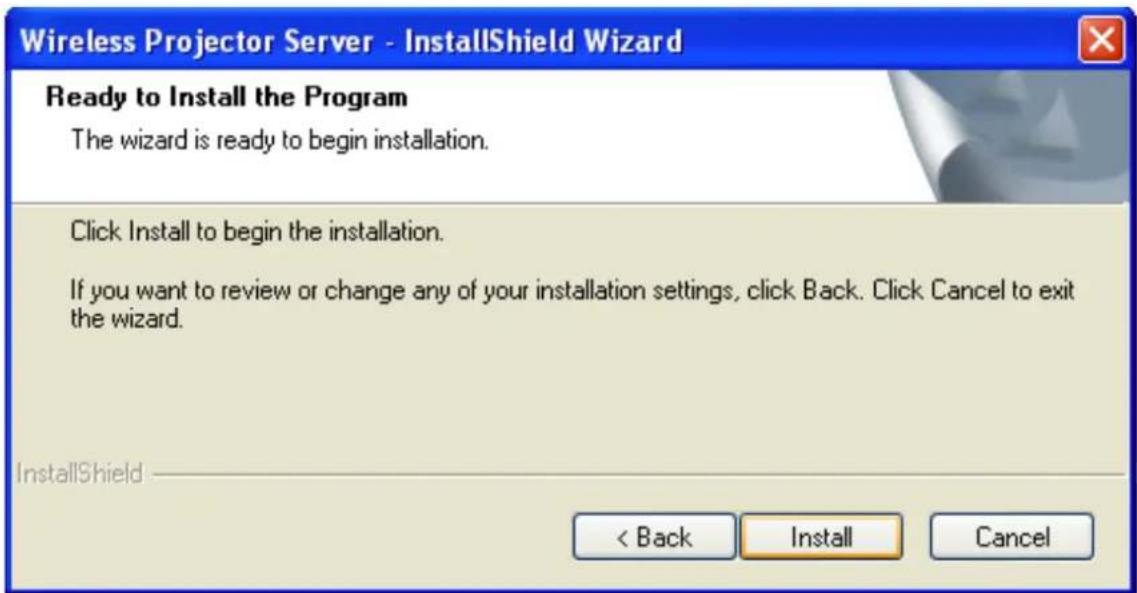
- When the Ready to Install the Program screen displays, click "Install" to start the software installation. To change any settings, click "Back"; to abort the installation, click "Cancel."
-
A Setup Status screen displays to indicate the progress of the installation. If you decide to abort, you can still just click "Cancel" at this point.
-
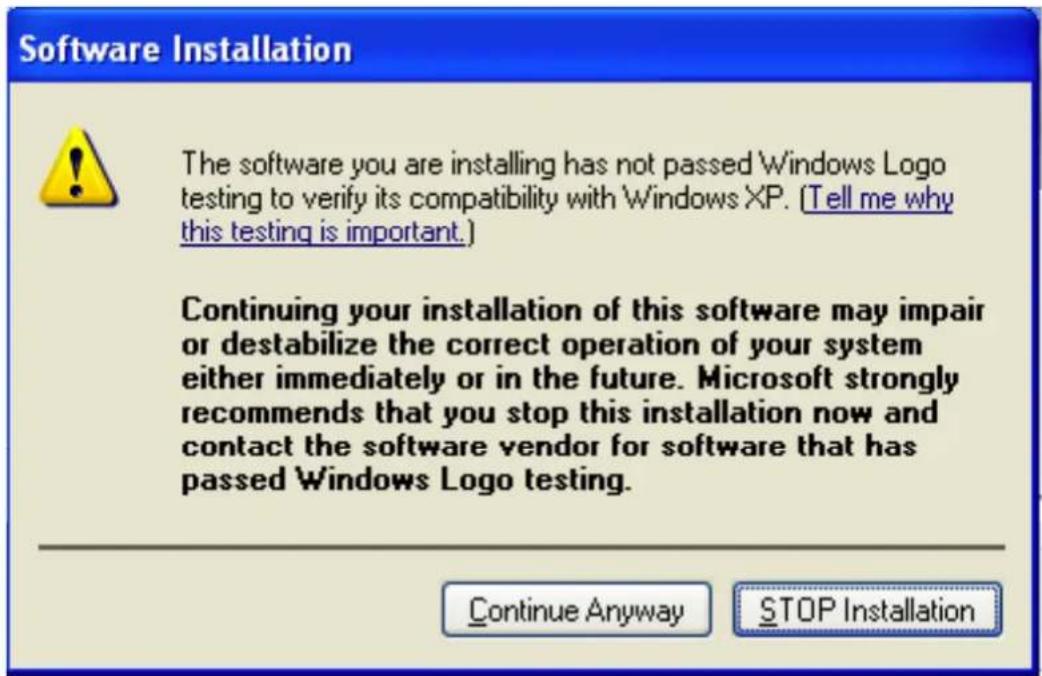
If one or more warning messages display, click "Continue Anyway" to continue the installation.
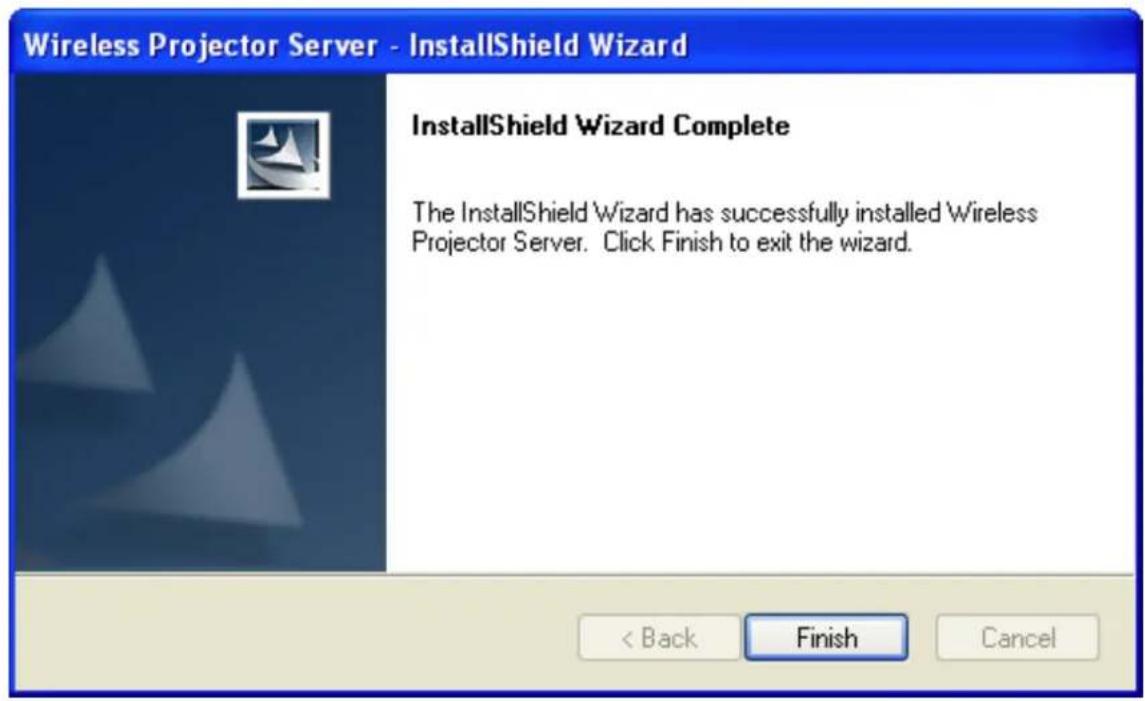
- When the InstallShield Wizard Complete screen displays, the software installation is done. Click "Finish" to continue.
3.3 LAUNCHING THE SOFTWARE
Once the software installation is complete, a new icon ("WPS") will appear on the computer's desktop.

- Double-click this icon to launch the Wireless Projector Server's client software.
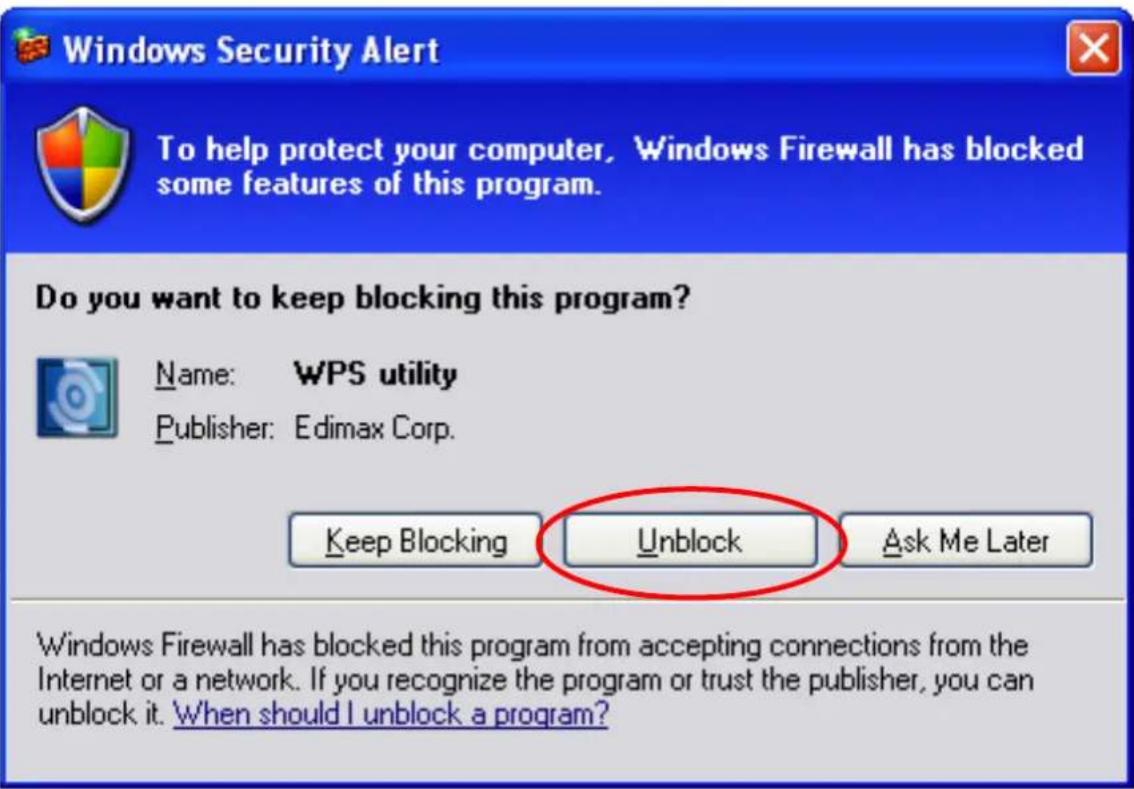
- If you have personal firewall software installed, or if your operating system is Windows XP or Vista, you may see a Security Alert screen display similar to the one below. Click "Unblock" (or the button with a similar meaning) so the firewall software will not block the network access to the Wireless Projector Server's client software.
- The client software will search for the Wireless Projector Server connected to the local area network and display a WPS Login screen (below). The device's SSID will appear in the "Projector SSID" text field. If there's more than one projector server found on the LAN, select the
one you want to connect to from the "Projector SSID" drop-down menu. If the device you want doesn't appear, click the search icon (right) to search again.


NOTE: The Wireless Projector Server will obtain the username of the computer it's connected to automatically. Each Wireless Projector Server's SSID appears in the lower-left corner of the initial display screen (see Section 3.1); the login code appears in the lower-right corner.
- Enter a unique username (used to identify each projector server user) in the "User Name" text field, and enter the login code. Click the check mark icon (right) to continue.

- If the login code you enter isn't the same as the one displayed, the screen below will appear. Click "OK" to enter the correct login code.

- When the correct login code has been entered, you'll be connected to the Wireless Projector Server as one of the users and the screen below will display. Before any user starts a presentation, all connected usernames and their IP address will be listed on the Wireless Projector Server's display screen. To disconnect from the projector server, click the Go Back icon 📋 and you'll be removed from the connected user list. To re-connect to the projector server, repeat the login procedure.

To start a presentation, click "Presentation": The content of your computer's display will be transmitted to the Wireless Projector Server
and will be displayed on its external display.
If the warning screen (right) displays, there's already a presentation in progress: Wait for the current presenter to log out or use the remote control to switch users.
If your computer display's resolution setting is different from that of the Wireless Projector Server, you'll be prompted by the screen below to change your computer's display resolution.


Click "Yes" to change the computer's display resolution to match the projector server's display resolution setting (your computer must be able to support the resolution), or click "No" to keep your computer's display resolution setting unchanged. Whichever option you choose/click, your computer's display content will be transmitted to the Wireless Projector Server's display; however, if you click "No" the displayed image will be malformed.
4 BASIC OPERATION
Once the connection to the Wireless Projector Server is made and the
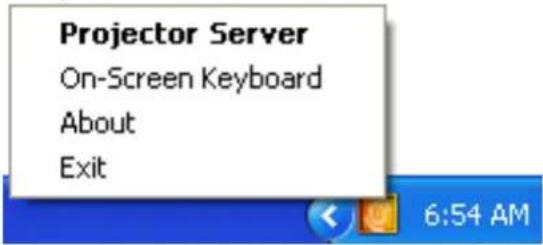
display content is being transmitted, an icon will appear in the system tray on the desktop (right). Right-click the icon to display an operation menu.
4.1 PROJECTOR SERVER
Click "Projector Server" to recall the projector server client software.

Stop: Click to stop the presentation. Your computer's display content will not be transmitted to the projector server's display, but your computer will remain connected (logged in) to the projector server.
Video Player: Click to start the built-in video player. Unlike other video players, such as Windows Media Player or QuickTime, this video player allows you to play a video file on the projector server's display in full-screen mode. Plus, while you're playing a video file, you can still use your computer's display to do other things:

- Browse — Click 📷 to browse the video files on your computer. This player supports files with .asf, .mpg1/2/4 and .mpeg extensions.
• Volume control — Drag the control bar to adjust the volume.

- Play / Pause — Click ▶ to start video playback. The button will change to while the video is playing: Click it to pause the video.
- Stop — Click ☐ to stop playing the video. When the video file ends, nothing will appear on the projector server's display (the display will turn black). Click the Stop button again to resume.
- Close — Click ⏻ to close the video player.
4.2 ON-SCREEN KEYBOARD
Click this function and an on-screen keyboard will appear, allowing you to enter characters by mouse click.
![On-Screen Keyboard File Keyboard Settings Help esc F1 F2 F3 F4 F5 F6 F7 F8 F9 F10 F11 F12 psc slk brk ` 1 2 3 4 5 6 7 8 9 0 - = bksp ins hm pup nk / * - tab q w e r t y u i o p [ ] \ del end pdn 7 8 9 lock a s d f g h j k l ; ' ent shift z x c v b n m , . / shift ↑ 4 5 6 ctrl alt alt ctrl ← ↓ → 0 . +ent](/content/2026/05/1048341/images/5e55152e711fc4472fb4556e4f1ad2fb5d39c3d36b4dc8bae3c8b54e9b45e27d.jpg)
4.3 ABOUT
Click "About" to view the version number and other information about the client software you're using: helpful when you need technical assistance.
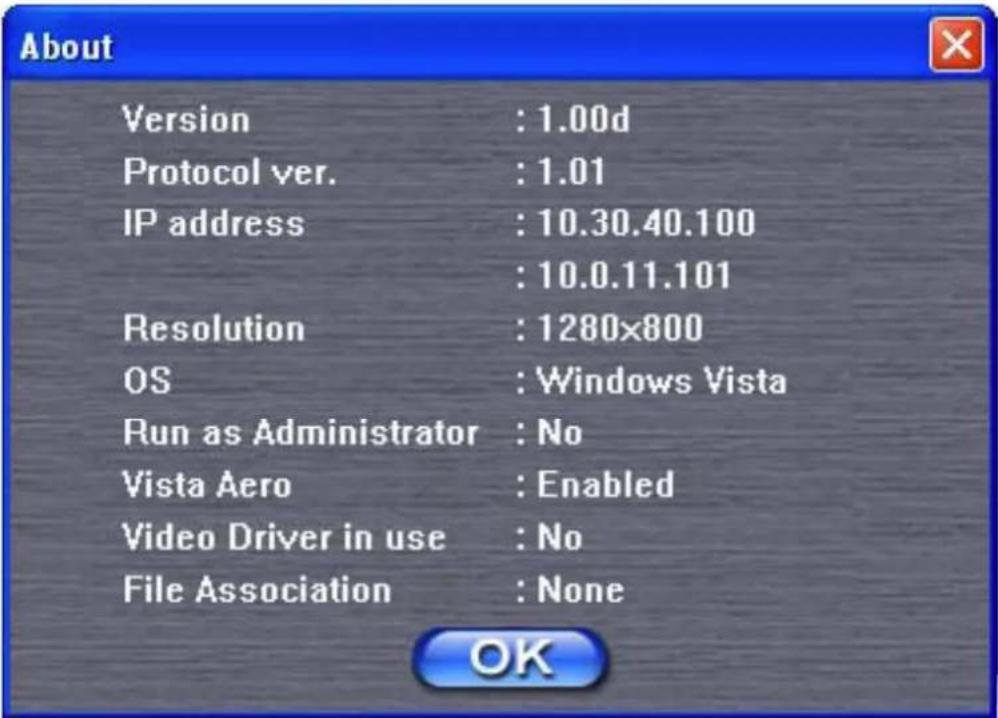
Click "OK" to close this screen.
4.4 EXIT
Click "Exit" to close the projector server client software and disconnect from the device. To start another presentation, you'll need to launch the client software again.
4.5 REMOTE CONTROL
When a presentation is in progress, you can use the remote control to conveniently manage various functions (see Section 2.4). Keep these tips in mind for more reliable operation:
- Point the remote control's IR signal transmitter toward the front panel of the Wireless Projector Server (where the IR signal receiver is).
• The remote control only works when the distance between it and the
projector server is less than 7 m (approx. 23 ft.). The effective operating distance is less in some environments, and when the power level of the remote's battery is low.
- If there's a strong light source near either unit, the remote control may not function properly.
4.6 SELECT USER
When there're more than one connected user, the Wireless Projector Server can select one of them to display content. In the example below, there are two connected users, neither in presentation mode. An active user is indicated by a green >, while others (inactive) are white.

You can also use the remote control to select which user displays content:
- If a presentation is in progress, press the Menu button, then press either the Prev. or the Next button to select a user. Press the Start button twice and the display content of the user you selected will be displayed on the projector server's display.
5 CONFIGURATION
The Wireless 300N Presentation Gateway (Wireless Projector Server) features several administrative functions that can be accessed via the Web configuration menu.
- Use your Web browser to connect to the projector server's IP address
(WLAN or LAN), which appears in the lower-left corner of the initial display screen (see Section 3.1).

- Click the Admin Login link on the left side of the screen that displays.

- On the Login screen that displays, enter the default username "admin" and the default password "1234" in the corresponding text fields, then click "OK."
- After you've logged in, a Status and Information screen displays (below) that includes a menu listing on the left-hand side for setting additional configuration options.

INTELLINET
NETWORK SOLUTIONS

Status Information

Utility Download

Basic Settings

Network Settings

Wireless Settings

Session Control

Display Settings

Black Out

Configuration Tools
Status and Information
This page displays general status information of the Wireless 300N Presentation Gateway.
Version Information
| Firmware Version | 1.10 |
| Protocol Version | 1.03 |
| Hardware Version | 1.00 |
Network Status
| MAC Address | 00:1f:1f:32:2a:ff |
| IP address | 10.10.10.48 |
| Subnet Mask | 255.255.252.0 |
| Gateway | 10.10.8.1 |
Wireless Status
| Wireless Function | Enable |
| WLAN IP | 10.30.40.1 |
| Mode | AP |
5.2 UTILITY DOWNLOAD
Click this option to download the projector server's client software (as in Section 3.2). The prompt screen will display as shown below; click "Save File" to place it in a folder.

INTELLINET
NETWORK SOLUTIONS
Opening wps.exe

Status Information

Utility Download

Basic Settings

Network Settings

Wireless Settings

Session Control

Display Settings

Black Out
You have chosen to open

wps.exe
which is a: Binary File
from: http://10.30.40.1
Would you like to save this file?
Save File
Cancel
5.3 BASIC SETTINGS
Click this option to change the Web management login password.

Current Password: Enter the current password (default: 1234).
New / Confirmed Password: Enter the password you want to use in both of these fields.
Click "Apply." NOTE: When you click "Apply" at the bottom of any of the Settings screens, a window will appear with a "Continue" button and a second "Apply" button. Click "Continue" to configure more settings; click "Apply" to restart the system and effect the changes you've made.
5.4 NETWORK SETTINGS
Click this option to change the setting of the wired Ethernet connection and the DNS (domain name service) server.
Obtain an IP address automatically: Select this option and the Wireless Projector Server will obtain an IP address from the DHCP server on your local area network automatically. If you selected this option but there's no DHCP server on your LAN, the projector server will use the IP address 169.254.0.200 automatically.
Use the following IP address: Select this option and the Wireless

Projector Server will use the IP address you define below.
IP Address: Enter the IP address you want to assign to the projector server.
Subnet Mask: Enter the subnet mask of the projector server's IP address.
Gateway Address: Enter the IP address of the gateway of your local area network. You can leave this field blank and clients on the LAN will still be able to connect to the projector server, but some network features will not function. For example, if the time server you define is not located within the local area network, the projector server won't be able to access the Internet and synchronize with the time server.
DNS Address: Enter the IP address of the DNS server (not the hostname of the DNS server).
Secondary DNS Address: You can enter another DNS server's IP address in case the projector server fails to connect to the first DNS server. You can also leave both DNS fields blank and still enjoy most of the device's features. However, you do need to enter an IP address (not hostname) for all servers required by this device (e.g., NTP server).
5.5 WIRELESS SETTINGS
Click this option to configure the settings of the wireless network interface. The settings are in four subsections, as shown on the tabs: Basic, Advanced, Security and WPS (Wi-Fi Protected Setup, not Wireless Projector Server).
5.5.1 BASIC
Basic wireless settings can be made on this screen.

Function: Select "Enable" from the drop-down menu to enable the wireless network function; "Disable" to disable it (wireless radio off).
Mode: "AP" is the only option available.
Band: Select the wireless band from the drop-down menu:
• 2.4 GHz (B) — Supports 802.11b wireless clients only.
• 2.4 GHz (N) — Supports 802.11 Draft-n wireless clients only.
• 2.4 GHz (B+G) — Supports 802.11b and 802.11g wireless clients.
• 2.4 GHz (G) — Supports 802.11g wireless clients only.
- 2.4 GHz (B+G+N) — Supports 802.11b, 802.11g, and 802.11 Draft-n wireless clients.
ESSID (SSID): Same as the SSID, enter the ESSID (extended service set identifier: the name used to identify this projector server among other wireless access points). NOTE: The client software also uses this name to identify the projector server, even if the client software is using a wired Ethernet connection with the projector server. The default ESSID/SSID is "INTELLINET_PG."
Channel Number: From the drop-down menu, select the wireless channel number used by the wireless interface of the projector server. The default channel is 11.
Associated Client: Click "Show Active Clients" to display all connected wireless clients (wired clients will not be displayed here).

Refresh: Click to reload the latest wireless client list. Click "Apply" (see Section 5.3).
5.5.2 ADVANCED
Advanced Settings should only be configured by experienced users. NOTE: The projector server can run properly without any modifications in this section, and incorrect settings may affect its performance. Do not modify the default values that display if you don't know what effect doing so will have, or unless otherwise noted below.

Fragment Threshold: Set the fragment threshold of the wireless radio.
RTS Threshold: Set the RTS threshold of the wireless radio.
Beacon Interval: Set the beacon interval of the wireless radio.
DTIM Period: Set the DTIM period of the wireless radio.
Data Rate: Select the wireless data transfer rate. Since most wireless devices will negotiate with each other and pick a proper data transfer rate automatically, it's not necessary to change this value unless you know what will happen after modification.
N Data Rate: Same as above, but only for 802.11n clients.
Channel Width: Select the channel width of the wireless radio.
Preamble Type: Select the type of preamble of the wireless radio.
Broadcast ESSID: Decide whether or not the projector server will broadcast its own ESSID. You can hide the ESSID (set the option to "Disable") so only those who know it can connect.
CTS Protect: Enabling this setting will reduce the likelihood of radio signal collisions between 802.11b and 802.11g wireless access points. It's recommended that this option be set to either "Auto" or "Always"; however, "None" will have no affect on the projector server's operation.
Tx Power: Select the output power of the wireless radio. Unless you're using the projector server in a very big space, you may not need to set the output power to 100%. Limiting the output power will enhance security (malicious/unknown users outside the signal range won't be able to reach your Wireless Projector Server).
WMM: This Wi-Fi MultiMedia option will enhance the data transfer performance of multimedia content when it's being transferred over a wireless network. If you don't know what it is or aren't sure if you need it, it's safe to set this option to "Enable" even though the default is "Disable."
Click "Apply" (see Section 5.3).
5.5.3 SECURITY
The Security Settings options let you increase the security level of the projector server. By default, the device doesn't enable wireless security so that wireless clients don't need to know the password for the wireless network before they connect.

Encryption: Select one of four options from the drop-down menu.
NOTE: Each of these options is explained briefly below, with separate subsections that follow with detailed explanations of the features.
- Disable — This allows anyone who finds the projector server on the wireless network to connect to it and download client software.
- WEP — Though some people could use certain utility software to discover the password used by Wired Equivalent Privacy (WEP) encryption, it can still provide a certain level of security. And since most wireless clients support WEP (particularly old IEEE 802.11b wireless clients), it provides better compatibility.
- WPA pre-shared key — Wi-Fi Protected Access (WPA) provides better protection strength against malicious attackers, and most up-to-date wireless clients support WPA.
- WPA RADIUS — Enables WPA encryption with RADIUS authentication server support.
5.5.3.1 ENCRYPTION: DISABLE
When Encryption is set to “Disable,” the projector server’s wireless interface uses no protection against wireless users attempting to connect to it. This is convenient for meeting room visitors; however, everyone will be able to connect to the projector server unless you select “Enable 802.1x Authentication.”
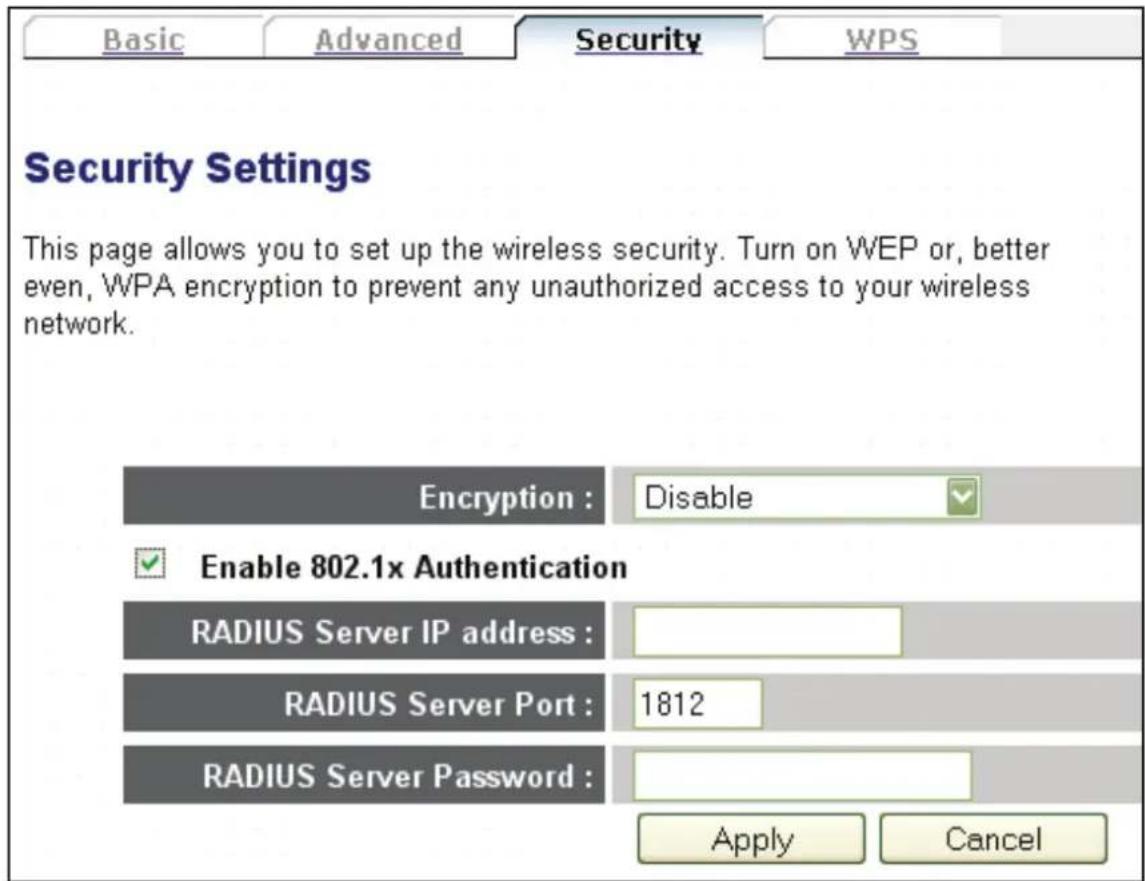
Enable 802.1x Authentication: Select to enable the function.
RADIUS Server IP Address: Enter the IP address of the RADIUS authentication server.
RADIUS Server Port: Enter the port number of the RADIUS server.
RADIUS Server Password: Enter the password of the RADIUS server.
Click "Apply" (see Section 5.3).
5.5.3.2 ENCRYPTION: WEP
When Encryption is set to "WEP," the screen below will display, requiring that you fill in the fields shown.

Key Length: There are two options: "64-bit" and "128-bit." Using 128-bit is safer, but will reduce some data transfer performance.
Key Format: There are two options: "ASCII" and "Hex." When you make your selection, the number of characters of the key will display; e.g., if you select "64-bit" as the key length and "Hex" as the key format, you'll see "Hex (10 characters)," indicating the exact length of the WEP key.
Default Tx Key: You can set up to four sets of WEP keys and designate which key is used as the default. (If you don't know which one should be the default key, select "Key 1").
Encryption Key 1 – 4: Enter the WEP key characters in one or more of the fields. The number of characters must be the same as the number displayed in the “Key Format” field. You can use any alphanumerical
characters (0-9, a-z and A-Z) if you select "ASCII"; if you select "Hex," you can use characters 0-9, a-f and A-F. You must enter at least one encryption key here; if you enter multiple WEP keys, they should all be different.
Enable 802.1x Authentication: Select to enable the function.
RADIUS Server IP Address: Enter the IP address of the RADIUS authentication server.
RADIUS Server Port: Enter the port number of the RADIUS server.
RADIUS Server Password: Enter the password of the RADIUS server.
Click "Apply" (see Section 5.3).
5.5.3.3 ENCRYPTION: WPA PRE-SHARED KEY
When Encryption is set to "WPA pre-shared key," the screen below will display, requiring that you fill in the fields shown.
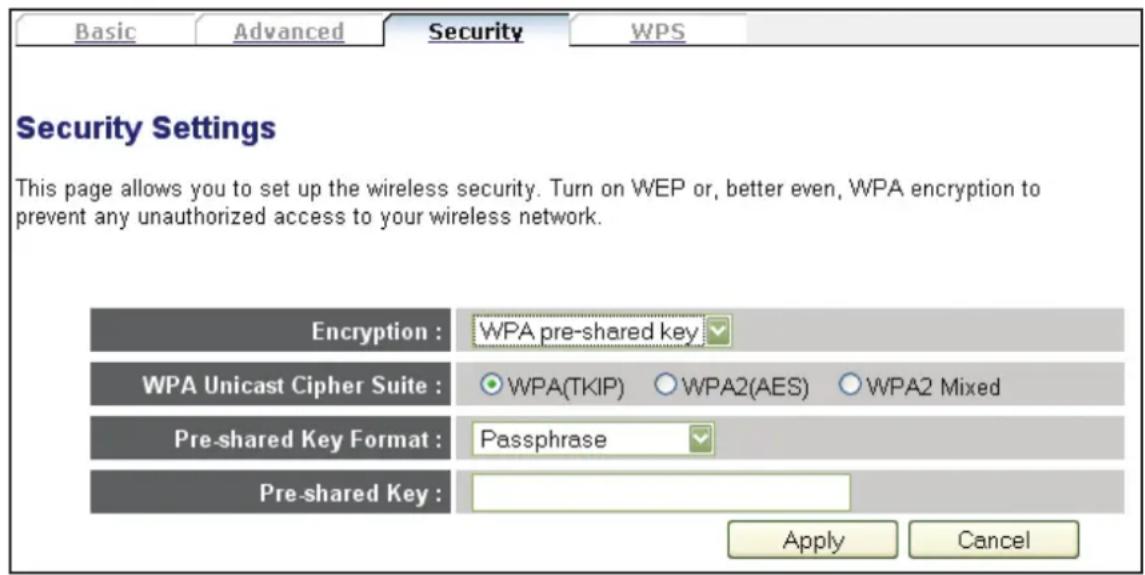
WPA Unicast Cipher Suite: Select any of the three options — “WPA (TKIP),” “WPA2 (AES)” or “WPA2 Mixed” — as long as it’s supported.
Pre-shared Key Format: Select "Passphrase" (8–63 alphanumerical characters) or "Hex" (64 characters of 0-9 and a-f).
Pre-shared Key: Enter your key. NOTE: For security reasons, don't use words found in a dictionary.
Click "Apply" (see Section 5.3).
5.5.3.4 ENCRYPTION: WPA RADIUS
When Encryption is set to "WPA RADIUS," the screen below will display, requiring that you fill in the fields shown.

WPA Unicast Cipher Suite: Select any of the three options — “WPA (TKIP),” “WPA2 (AES)” or “WPA2 Mixed” — as long as it’s supported by your wireless client(s).
RADIUS Server IP Address: Enter the IP address of the RADIUS authentication server.
RADIUS Server Port: Enter the port number of the RADIUS server. The default is 1812.
RADIUS Server Password: Enter the password of the RADIUS authentication server.
Click "Apply" (see Section 5.3).
5.5.4 WPS (WI-FI PROTECTED SETUP)
The WPS Settings screen lets you set up secure wireless connections quickly and easily with WPS-compatible wireless clients.

Enable WPS: Select to enable the function.
WPS Status: Displays the WPS configuration status: Configured (WPS ready) or Unconfigured.
Self Pin Code: Displays the code used when a pin-style WPS pairing mode is being used. WPS wireless clients need to know this code.
SSID: Displays the SSID of this projector server.
Authentication Mode: Displays the current wireless authentication mode.
Passphrase Key: Asterisks indicate a passphrase key is being used.
Config Mode: Select "Registrar" or "Enrollee" from the drop-down menu.
- Registrar — The projector server will accept WPS-compatible wireless clients to send WPS pairing requests.
- Enrollee — The projector server will send WPS pairing requests to other WPS registrars.
Configure via Push Button: Click "Start PBC" to enter WPS Push Button mode (or press the WPS button on the front of the Wireless Projector Server). When using this mode, another WPS-compatible wireless device must also enter WPS Push Button mode with a different WPS Configuration mode (e.g., if the projector server is placed into WPS Push Button mode using "Registrar," another WPS-compatible wireless device must use "Enrollee" and vice versa). NOTE: When "Start PBC" is clicked, the button will be grayed out and the function will begin a 2-minute countdown: If no WPS-compatible wireless device enters WPS Push Button mode within 2 minutes, WPS pairing will be cancelled.
Configure via Client PIN Code: If you have another WPS-compatible wireless device's self PIN code, you can enter it here and click "Start PIN" to begin PIN-style WPS pairing.
5.6 PRESENTATION CONTROL
Click this option to control the connected users and designate which is the active presenter.
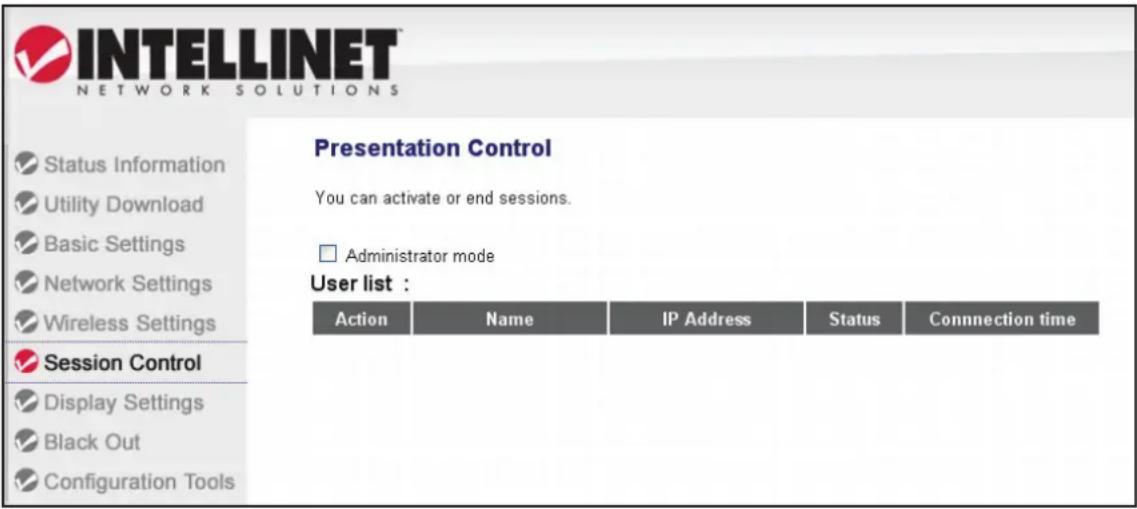
Administrator mode: Select to enter the mode and gain control of the users. NOTE: Whenever you enter or leave this mode, the projector server needs to reboot and all connected users must reconnect to the
projector server. You'll be prompted before the projector server is rebooted, and you can cancel rebooting.
Action: Click ▶ (Play/Start) on the remote control and the selected user becomes the active presenter.
IP Address: Displays the IP address of this user.
Status: Displays the status of this user.
Connection Time: Displays the total elapsed time since a connection was established with this user.
5.7 DISPLAY SETTINGS
Click this option to configure the characteristics of the external display.

Output Mode: Select which video output interface the projector server should use: "VGA" or "HDMI."
Resolution: Select the output video resolution from the drop-down menu. Select "Auto" to allow the projector server to determine the setting based on the information provided by the external display. NOTE: Not every display device supports this function. Also, when "HDMI" is selected as the output mode, the resolution cannot be changed.
Click "Apply" (see Section 5.3).
5.8 BLACK OUT
Click this option to temporarily suspend video output and prevent your audience from seeing the content of your computer display when you're the active presenter.

Screen Off: Click to stop displaying on the external display; click again to resume. NOTE: This function will not actually stop the video signal; therefore, the external display will not enter Power-Save mode (if it has this option) when this function is used to stop the display of video content.
5.9 CONFIGURATION TOOLS
Click this option to access three useful subsections, as indicated by the menu tabs: Config Tools (the initial screen that displays), for backing up and restoring the projector server's configuration; Firmware, for upgrading and improving the projector server's functions; and Reset, which can be more convenient than reaching for the Reset button on the back panel of the device.

5.9.1 CONFIG TOOLS
You can back up and restore the configuration of this projector server, and you can restore all settings back to factory default values.
Backup Settings: Click "Save..." to capture the projector server's current settings as a file to store on your computer. When prompted, select a folder on your computer to direct the file. Consider different names for multiple configuration files so you remember the purpose of each file.
Restore Settings: Click "Browse..." to select a configuration file stored in your computer's folder (you'll be prompted to select a file). Click "Upload" to upload the configuration file to the projector server.
Reset: Click to reset all settings of the projector server back to factory default settings. You'll be prompted to confirm the configuration reset.
5.9.2 FIRMWARE
Click to upgrade the firmware of this projector server. New firmware will provide more functionality and is made available should a problem be discovered that requires a fix. When the first Firmware Upgrade screen displays, click “Next” to continue to the subsequent screen (below) and begin the firmware upgrade procedure.
Firmware Upgrade
This tool allows you to upgrade the system's system firmware.
Enter the path and name of the upgrade file and then click on the APPLY button below. You will be prompted to confirm the upgrade.
Browse...
Apply
Cancel
Click "Browse..." to select a firmware file from your computer, then click "Apply" to start the upgrade. The procedure may require some time, so be patient and don't switch your computer or the projector server off during the process. Nor should you remove the network connection during a firmware upgrade: If the upgrade fails, the projector server may not be able to function properly.
5.9.3 RESET
Should the Wireless Projector Server not function properly, or if it responds to commands slowly, rebooting it may solve the problem.
Click “Apply” to reboot the projector server. You’ll be prompted before the projector server reboots: Click “OK” to reboot or “Cancel” to abort. The projector server needs about a minute to reboot (before you attempt to reconnect).

6 TROUBLESHOOTING
If the Wireless Projector Server doesn't function properly, refer to the possible solutions below. In most cases, you can solve the problem yourself.
Can't connect to the Wireless Projector Server?
- Check the LEDs on the front panel. If the Power LED doesn't light, check the connection of the power adapter and confirm the electrical outlet it's connected to has power.
- If the Ready LED doesn't light within 2 minutes of your turning on the projector server, ask your INTELLINET NETWORK SOLUTIONS dealer for help.
- Check the network connection.
- Make sure you connected to the correct IP address.
- If you're using a wireless network, make sure you connected to the correct SSID.
- If you're using a wireless network, check the WEP / WPA password.
The remote control doesn't work?
- Replace the battery (CR-2032 lithium).
- Make sure that you're pointing the IR transmitter (located at the top of remote control) directly at the front panel of the projector server and that the IR receiver on the front panel isn't blocked.
- Remove or turn off any strong or fluorescent light source near the IR transmitter and receiver.
- Make sure the distance between the IR transmitter and the receiver is no greater than 7 meters (approx. 23 feet).
Nothing displays on the projector server's display?
- Make sure the Blackout function isn’t engaged.
- Check the connection between the video display and the projector.
- If the video display you're using supports more than one video mode or source, make sure you've selected the correct one.
- Make sure you've selected the correct video output type (HDMI or VGA).
- Make sure the video display you're using supports the video output mode you've selected (in VGA mode).
- Make sure the video display is switched on.
Hear a sound when the projector server is switched on?
- There's a fan inside the projector server that starts when the projector server is switched on. This is normal and is not a malfunction. If, however, you smell something strange or even see smoke emanate from the projector server, unplug the power adapter (if possible) immediately.
7 SPECIFICATIONS
Standards
• IEEE 802.11b (11 Mbps Wireless LAN)
- IEEE 802.11g (54 Mbps Wireless LAN)
• IEEE 802.11n Draft 2.0 (300 Mbps Wireless LAN)
• IEEE 802.3 (10Base-T Ethernet)
- IEEE 802.3u (100Base-TX Fast Ethernet)
General
• LAN ports: RJ45 10/100 Mbps data port
• LAN port with Auto MDI/MDI-X
• WAN port: 10/100 Mbps RJ45 connector
- Flash: 64 MB
• Memory: 128 MB DDR1 RAM
• Supports DHCP (LAN client/ WLAN server)
• Certifications: FCC Class B, CE Mark, RoHS
Presentation
- Chipset: Sigma Designs SMP8635
• Video formats: Motion-JPEG, WMV9, MPEG1, MPEG2, MPEG4, H.264 - Supported resolutions: 800 x 600, 1024 x 768, 1152 x 864, 1280 x 720, 1280 x 768, 1280 x 960, 1280 x 1024, 1400 x 1050, 1440 x 900, 1600 x 1200, 1680 x 1050, 1920 x 1200, 1920 x 1440
• Video output ports: 1 x HDMI, 1 x VGA
• Audio output: 3.5 mm / 1.8" speaker output jack
Wireless
- Chipset: Ralink RT3052
- Wireless frequency range: 2.400 – 2.483 GHz
• Effective throughput: up to 40 Mbps
- Modulation technologies:
- 802.11b: Direct Sequence Spread Spectrum (DSSS): DBPSK, DQPSK, CCK
- 802.11g: Orthogonal Frequency Division Multiplexing (OFDM): BPSK, QPSK, 16QAM, 64QAM
- 802.11n: Orthogonal Frequency Division Multiplexing (OFDM): BPSK, QPSK, 16QAM, 64QAM
- Channels:
- USA & Canada: 11 channels
- Europe: 13 channels
- Japan: 14 channels
- Data rates:
- IEEE 802.11b (11 Mbps, 5.5 Mbps, 2 Mbps, 1 Mbps)
- IEEE 802.11g (54 Mbps, 48 Mbps, 36 Mbps, 24 Mbps, 18 Mbps, 12 Mbps, 9 Mbps, 6 Mbps)
- IEEE 802.11n (MCS0-07: up to 150 Mbps)
- IEEE 802.11n (MCS0-15: up to 300 Mbps)
- Output power:
- OFDM: 16 dBm +/- 1 dBm (300 Mbps, 40 mW max.)
- OFDM: 16 dBm +/- 1 dBm (54 Mbps, 40 mW max.)
- CCK: 18 dBm +/- 1 dBm (11 Mbps, 63 mW max.)
- Receiver sensitivity:
- 11n (300 Mbps) MCS0-15: 20 MHz: -71 dBm; 40 MHz: -68 dBm
- 11g (54 Mbps) OFDM: -74 dBm
- 11b (11 Mbps) CCK: -87 dBm
- Wireless security:
- WEP encryption (64/128 bit)
- WPA TKIP
- WPA2 AES
- WPA2 mixed
- WPA RADIUS
- Antennas:
- 2 detachable dipole antennas with 3 dBi gain each
- 2T2R MIMO mode (2 transmitters, 2 receivers)
LEDs
- Power
- WLAN Link/Act
• LAN Link/Act
• WPS
- Ready
- Blackout
Environmental
- Dimensions: 180 (W) x 155 (D) x 34 (H) mm (7.1 x 6.1 x 1.3 in.)
• Weight: 0.8 kg (1.7 lbs.) - Operating temperature: 0 – 40°C (32 – 104°F)
- Operating humidity: 10 – 90% RH, non-condensing
- Storage temperature: -10 - 60ircC (14 - 140°F)
Power
• External power adapter: 5 V DC, 2.5 A
• Power consumption: 6.5 Watts max.
System Requirements
- Windows XP/Vista
• Wireless Network Adapter
Package Contents
• Wireless 300N Presentation Gateway
- User manual
- Power adapter
- Ethernet Cat5 RJ45 cable: 1.0 m (3 ft.)
- Remote control with battery
• 2 3-dbi antennas

INTELLINET™
NETWORK SOLUTIONS
INTELLINET NETWORK SOLUTIONS ™ offers a complete line of active and passive networking products.
Ask your local computer dealer for more information or visit
www.intellinet-network.com.
- WIRELESS 300N PRESENTATION GATEWAY
- USER MANUAL
- INTELLINET™
- TABLE OF CONTENTS
- INTRODUCTION 3
- HARDWARE INSTALLATION 8
- SOFTWARE INSTALLATION 11
- CONFIGURATION....26
- TROUBLESHOOTING 45
- SPECIFICATIONS 46
- INTRODUCTION
- Package Contents
- REGULATORY STATEMENTS
- Federal Communications Commission (FCC) Part 68
- FCC Part 15
- FCC Caution
- FCC Radiation Exposure Statement
- R&TTE Compliance Statement
- Safety
- EU Countries Intended for Use
- CE Mark Warning
- SAFETY PRECAUTIONS
- HARDWARE INSTALLATION
- FRONT PANEL
- BACK PANEL
- BOTTOM PANEL
- REMOTE CONTROL
- CONNECTIONS
- SOFTWARE INSTALLATION
- CHECKING THE IP ADDRESS
- DOWNLOADING & INSTALLING THE SOFTWARE
- LAUNCHING THE SOFTWARE
- BASIC OPERATION
- PROJECTOR SERVER
- ON-SCREEN KEYBOARD
- ABOUT
- EXIT
- REMOTE CONTROL
- SELECT USER
- CONFIGURATION
- INTELLINET
- Status Information
- Status and Information
- UTILITY DOWNLOAD
- Opening wps.exe
- BASIC SETTINGS
- NETWORK SETTINGS
- WIRELESS SETTINGS
- BASIC
- ADVANCED
- SECURITY
- ENCRYPTION: DISABLE
- ENCRYPTION: WEP
- ENCRYPTION: WPA PRE-SHARED KEY
- ENCRYPTION: WPA RADIUS
- WPS (WI-FI PROTECTED SETUP)
- PRESENTATION CONTROL
- DISPLAY SETTINGS
- BLACK OUT
- CONFIGURATION TOOLS
- CONFIG TOOLS
- FIRMWARE
- Firmware Upgrade
- RESET
- TROUBLESHOOTING
- Can't connect to the Wireless Projector Server?
- The remote control doesn't work?
- Nothing displays on the projector server's display?
- Hear a sound when the projector server is switched on?
- SPECIFICATIONS
- Standards
- General
- Presentation
- Wireless
- LEDs
- Environmental
- Power
- System Requirements
Brand : Intellinet
Model : 524759
Category : Wireless pointer