
TE100R - Quad HYOSUNG - Free user manual and instructions
Find the device manual for free TE100R HYOSUNG in PDF.


| Product Type | All Terrain Vehicle (ATV) |
| Brand | Hyosung |
| Model | TE100R |
| Overall Length | 1,355 mm (53.4 in) |
| Overall Width | 820 mm (32.3 in) |
| Overall Height | 865 mm (34.1 in) |
| Wheelbase | 950 mm (37.4 in) |
| Ground Clearance | 120 mm (4.7 in) |
| Mass (Dry) | 100 kg (221 lbs) |
| Engine Type | Two-stroke, forced air-cooled, reed valve |
| Displacement | 99 cc (6.04 in³) |
| Bore x Stroke | 52.5 x 46.0 mm |
| Corrected Compression Ratio | 6.7:1 |
| Carburetor | PB11M |
| Fuel Tank Capacity | 4.0 L |
| Engine Oil Capacity | 0.6 L |
| Transmission Oil Capacity | 80 mL (replace) / 90 mL (overhaul) |
| Transmission Type | Manual, forward and reverse |
| Gear Ratio (Forward) | 2.257–0.782 (32/13, 39/9) |
| Gear Ratio (Reverse) | 27/13, 39/9 |
| Drive Chain | 428H, 56 links |
| Front Brake | Drum brake |
| Rear Brake | Disk brake |
| Front Tire Size | 18 x 7.00-7 |
| Rear Tire Size | 18 x 7.00-7 |
| Cold Tire Pressure (Front/Rear) | 25 kPa (0.25 kg/cm², 3.6 psi) |
| Ignition Type | CDI (Capacitor Discharge Ignition) |
| Spark Plug | NGK BPR7HS (standard), gap 0.6–0.7 mm |
| Head Lamp | 12V 35W |
| Tail Lamp | 12V 5W |
| Maximum Load Capacity | 68 kg (150 lbs) including rider, gear, and cargo |
| Recommended Fuel | Unleaded gasoline, 91 octane or higher |
| Recommended Engine Oil | Hyosung Hypol Oil HS (two-stroke oil) |
| Recommended Transmission Oil | SAE 10W/30 or 10W/40 multi-grade motor oil |
| Minimum Operator Age | 12 years (supervision required up to 16) |
Frequently Asked Questions - TE100R HYOSUNG
User questions about TE100R HYOSUNG
0 question about this device. Answer the ones you know or ask your own.
Ask a new question about this device
Download the instructions for your Quad in PDF format for free! Find your manual TE100R - HYOSUNG and take your electronic device back in hand. On this page are published all the documents necessary for the use of your device. TE100R by HYOSUNG.
USER MANUAL TE100R HYOSUNG
This manual should be considered a permanent part of the vehicle and should remain with the vehicle when resold or otherwise transferred to a new owner or operator. The manual contains important safety information and instructions which should be read carefully before operating the vehicle.
FOREWORD
This manual is an essential part of your vehicle. Please read it carefully. It contains important information on safety, operation and maintenance. It is especially important that this manual remain with the vehicle at the time of resale. The next owner will need this information also.
Your HYOSUNG TE100R is built for use by children, but this owner's manual is written for the adults who will be supervising the children. HYOSUNG strongly recommends, therefore, that you review this entire manual with your child and carefully explain the instructions, requirements, and warnings it contains so that your child can understand them.
IMPORTANT
WARNING/CAUTION/NOTE
Please read this manual and follow its instructions carefully. To emphasize special information the words WARNING CAUTION and NOTE have special meanings. Information following these signal words should be carefully reviewed.

WARNING
The personal safety of the rider or bystanders may be involved.
Disregarding this information could result in personal injury.

CAUTION
These instructions point out special service procedures or precautions that must be followed to avoid damaging the machine.
NOTE
This provides special information to make maintenance easier or important instructions clearer.

HYOSUNG MOTORS & MACHINERY INC.

COPYRIGHT HYOSUNG MOTORS & MACHINERY INC.
IMPORTANT NOTICE TO PARENTS

WARNING
● Even though the TE100R has four wheels, it can tip over in any direction. Improper turning techniques, traversing hills, accelerating on hills, and turning on hills can all lead to vehicle tip over. Learn proper riding techniques and avoid riding situations which can lead to tip over accidents.
The TE100R and other all terrain vehicles (ATVs) have unique handling characteristics. ATVs handle differently than motorcycles. Although ATVs have four(or three) wheels, they handle differently than automobiles, too. ATVs require special riding techniques suited to their handling characteristics, so be sure that all riders of the r TE100R practice and master the riding techniques described in this owner's manual (Starting on page 21).

WARNING
Proper parental supervision and instruction are necessary for safe and proper operation of this rTE100R by young riders.
It is important that both you and your child understand and observe the restrictions listed on the fender label of the rTE100R.
Read this owner's manual carefully and review its contents fully with your child. It is YOUR RESPONSIBILITY to make sure that your ITE100R is properly and safely ridden and maintained.

WARNING
You must take special precautions to reduce the chance of accidents and injuries resulting from operation of this vehicle. Some of the important safety precautions you should take are :
● Supervise operation of the rTE100R AT ALL TIMES. Constant supervision is necessary so you can observe that the operator is riding safely.
● Never permit children under age 12 to operate the rTE100R These children, as well as some children age 12 and older, may not be able to operate this vehicle safely due to physical or mental limitations. Parents should carefully observe their child's first use of the vehicle. Further use should be permitted only if the parent can determine that the child has the physical and mental capabilities necessary to operate the vehicle safely.
Before first use of the TE100R, read this owner's manual carefully to become familiar with the rTE100R features, and safety and maintenance requirements. Review all instructions, requirements and warnings with the riders. Keep the owner's manual in the storage compartment located under the seat.
Before the rider's first use of the r TE100R make sure that he/she is familiar with the location and operation of all controls, and has been instructed in the proper operation of the vehicle.
For first use of the rTE100R, find a level, open area for the rider to use to become familiar with the operation of controls and the operating and handling characteristics of the rTE100R.
- Before each use, perform daily inspections with the rider. Specific items to check are listed in the INSPECTION BEFORE RIDING section on page 21 of this owner's manual.
● Make sure the rider wears a helmet, eye protection, and protective clothing (gloves, leather or heavy cloth pants, long sleeved shirt or jacket, boots).
● Beware of hazardous situations. Instruct the rider to do likewise.
- Do not permit the rTE100R to be used on public roads AT ANY TIME.
This vehicle is designed and manufactured for use ONLY off public roads. It is not subject to Federal Motor Vehicle Safety Standards as it is not equipped or approved for operation on public streets, roads, or highways at any time.
- Do not permit the rTE100R to be operated on any paved surfaces.
The vehicle can be more difficult to control when it is operated on pavement.
- Permit use only by a single rider.
This vehicle is designed for use only by a single rider. Extra seat space is provided so the rider can change his/her body position to maneuver the vehicle. This space should never be used to carry a passenger.
- Do not permit anyone to operate the r TE100R while under the influence of alcohol or other drugs.
● Make sure the combined weight of the rider, protective gear and any accessories or cargo does not exceed the 68kg(150lbs) weight limit. Exceeding this weight limit may result in injury caused by damage to the vehicle or altered handling characteristics. - Observe periodic maintenance requirements your authorized HYOSUNG dealer is trained and equipped to perform this service.
● Never permit vehicle refueling by anyone other than an adult.
●Drain gasoline from the fuel tank and carburetor prior to transporting the rTE100R
● Caution the rider and others near the rTE100R not to get close to or touch any moving parts or any heated areas such as the engine and exhaust system. - Do not make any modifications to the rTE100R Modifications may make the vehicle unsafe or illegal unsafe or illegal in your state.
- r TE100R always come on the head lamp and tail lamp when starting engine.
- r TE100R has a reverse gear lever. The reverse gear indicator
lamp will come on when the transmission is in reverse gear.
To shift into reverse gear, completely stop the vehicle and wait 3 seconds.
Shifting into reverse gear when the vehicle is moving can be hazardous and damage the vehicle.
If you shift the vehicle into reverse gear when the vehicle is moving it could stop suddenly, throwing you from the vehicle.
Always come to a complete stop before shifting into reverse gear.
Check the area behind the vehicle if you are about to reverse.
After the vehicle reverse, completely stop it and wait 3 seconds.
Turn the reverse gear lever at the original situation.
●Before the vehicle started, confirm that the reverse gear lever is released.
If you started the vehicle that reverse gear is shifted into, it could be hazardous and damage the vehicle.
TABLE OF CONTENTS
-
SERIAL NUMBER LOCATION 8 . . . . . . . . . . . . . . . . .
-
FUEL AND OIL RECOMMENDATION 8
FUEL ENGINE OIL TRANSMISSION OIL
-
LOCATION OF PARTS 9
-
CONTROLS 12
- EQUIPMENT AND ADJUSTMENTS 17.
FUEL TANK CAP REMOTE ENGINE STOP SWITCH
-
BREAK-IN (RUNNING-IN) 20.
-
INSPECTION BEFORE RIDING .....21
-
RIDING TIPS .....21
-
INSTRUCTING THE YOUNG RIDER .....28
-
INSTECTION AND MAINTENANCE .....31
MAINTENANCE SCHEDULE PERIODIC MAINTENANCE CHART
SEAT REMOVAL
TOOLS
INSPECTION OF FUEL
INSPECTION OF ENGINE OIL
AIR CLEANER
SPARK PLUG
SHIFT PLAY
IDLE SPEED ADJUSTMENT
THROTTLE CABLE ADJUSTMENT
FUEL HOSE
TRANSMISSION OIL
ENGINE OIL LEVEL
BRAKE
TIRES
DRIVE CHAIN
FRONT AND REAR WHEEL REMOVAL
REPLACEMENT OF THE LAMP
GENERAL LUBRICATION
-
TROUBLE SHOOTING 48.
-
TRANSPORTING .49
-
CLEANING PROCEDURE 51
-
STORAGE PROCEDURE .....52
-
LOCATION OF LABELS .54
-
SPECIFICATIONS .....56
SERIAL NUMBER LOCATION
The frame and/or engine serial numbers are used to title the vehicle. They are also used to assist your dealer when ordering parts or referring to special service information.
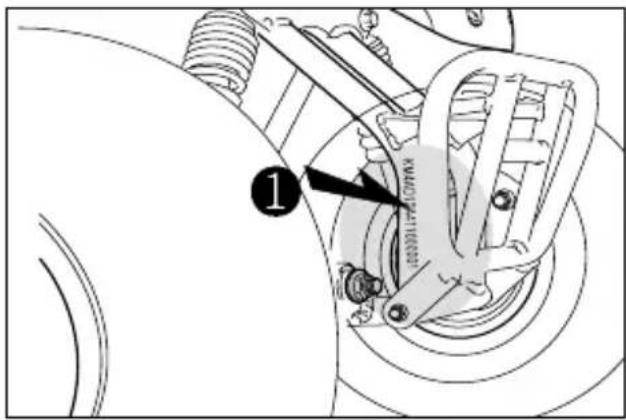
The frame number is stamped on the front frame member as shown in the illustration.

The engine serial number ② is stamped on the right side of the crankcase assembly.
Please write down the serial numbers here for your future reference.
Frame No.:
Engine No.:
FUEL AND OIL RECOMMENDATION
FUEL
Gasoline used should be graded 91 octane or higher. An unleaded type gasoline is recommended. If engine pinging is experienced, substitute another brand as there are differences between brands.
ENGINE OIL
Use HYOSUNG HYPOL OIL HS.
If they are not available, use a good quality TWO-STROKE engine oil.
TRANSMISSION OIL
Use a good quality SAE 10W/30 or 10W/40 multi-grade motor oil.
LOCATION OF PARTS

① Rear brake lever (Parking brake lever)
②Parking brake knob
③ Front brake lever
④ Throttle lever
⑤ Reverse gear lever
⑥ Fuel tank cap
⑦ Indicator lamp
⑧ Starter switch
⑨ Engine stop switch

⑩ Fuel cock
⑪Head lamp
⑫ Battery & fuse
⑬ Muffler
⑭Drive chain
⑮ Gear shift shaft
NOTE
“____” :means the invisible parts.

⑯ Tail lamp
⑰ Remote engine stop switch
⑱ Tools
⑲ Engine oil tank
⑳ Air cleaner
② Ignition switch
② Kick start lever
| NOTE |
| “----”:means the invisible parts. |
CONTROLS
IGNITION SWITCH

The ignition switch has two position :
(ON) POSITION
The ignition circuit is completed and the engine can now be started. The key cannot be removed from the ignition switch in this position.
OFF POSITION
All electrical circuits are cut off.
The engine will not start. The key can be removed.
IGNITION KEY
rTE100R comes equipped with a pair of identical ignition key.
Keep the spare key in a safe place.
INDICATOR LAMP

① OIL INDICATOR LAMP
when the engine oil level in the tank becomes too low requiring 'HYPOL OIL' refilling, the indicator will light.
When the oil indicator lamp turns on, the remaining amount of oil has become approximately 0.2 ℓ.
The engine oil tank capacity is 0.6 ℓ.
CAUTION
When the oil indicator lamp comes on, you should add engine oil to the engine oil tank at the first opportunity to avoid running out of engine oil.
The lack of engine oil will damage engine severely.
CAUTION
For checking the oil indicator lamp, the ignition switch “●”(ON).
②FUEL INDICATOR LAMP
When the fuel drop below approximately 0.8 g, the indicator lamp lit.
Fill the fuel tank before the indicator lamp lit.
The fuel tank capacity is 4 ℓ.
CAUTION
When the fuel indicator lamp comes on, you should add fuel to the fuel tank at first opportunity to avoid running out of fuel.
The lack of fuel will go off suddenly.
Failure to observe this precaution may result in loss of control and an accident.
CAUTION
For checking the fuel indicator lamp, the ignition switch “●”(ON).
③ REVERSE GEAR INDICATOR LAMP
rTE100R has a reverse gear lever.
The reverse gear indicator lamp will come on when transmission is in reverse gear.
WARNING
Shifting into reverse gear when the vehicle is moving can be hazardous and damage the vehicle.
If you shift the vehicle into reverse gear when the vehicle is moving it could stop suddenly, throwing you from the vehicle.
Always come to a complete stop before shifting into reverse gear.
Check the area behind the vehicle if you are about to reverse.
LEFT HANDLEBAR

①Rear Brake Lever
Apply the rear brake by squeezing the rear brake lever towards the grip.
②Parking Brake Knob
This knob is used to set the parking brake, which is used to prevent the ATV from moving when it is parked, being started, or at idle. Set the parking brake by squeezing the rear brake lever and pushing this knob to lock the lever in the squeezed position.
③ Starter Switch
Push in the electric starter switch to rotate the starting motor.
CAUTION
r TE100R always come on the head lamp and tail lamp when starting engine.
NOTE
If the front or rear brake lever is not squeezed, the starter motor will not rotate.
CAUTION
When the starter motor doesn't rotate within 5 seconds after pushing the switch, try again after 10 seconds to prevent damage to the battery.
④ Engine Stop Switch
● “☒” Position : The ignition circuit is off. The engine cannot start or run.
“()”Position: The ignition circuit is on and the engine can run.
RIGHT HANDLEBAR

① Front Brake Lever
Apply the front brake by squeezing the front brake lever towards the grip.
② Throttle Lever
Engine speed is controlled by the position of the throttle lever. Push it forward to increase engine speed. Release it to decrease engine speed.
This lever is operated by the rider's thumb.
③Throttle Limiter

r TE100R is equipped with the throttle limiter to restrict maximum engine power by limiting throttle lever travel. The supervising adult should adjust this limiter to limit maximum vehicle speed according to the rider's skill and experience.
To adjust the throttle limiter :
- Loosen the lock nut Ⓐ
-
Turn the throttle limiter screw Ⓑ clockwise to restrict maximum engine power or counterclockwise to increase maximum engine power.
-
Tighten the lock nut Ⓐ
REVERSE GEAR LEVER

TE100R has a reverse gear lever.
The reverse gear indicator lamp will come on when the transmission is in reverse gear.
To shift into reverse gear, completely stop the vehicle and wait 3 seconds.
To shift into reverse gear, with the front or rear brake lever is squeezed, pull the reverse gear lever toward your body and turn it for 90° direction to put in upper groove.
After the vehicle reverse, completely stop it and wait 3 seconds.
Turn the reverse gear lever at the original situation.
To release from reverse gear, with the front or rear brake lever is squeezed, pull the reverse gear lever toward your body and turn it for 90° direction to put in lower groove.

WARNING
Shifting into reverse gear when the vehicle is moving can be hazardous and damage the vehicle.
If you shift the vehicle into reverse gear when the vehicle is moving it could stop suddenly, throwing you from the vehicle.
Always come to a complete stop before shifting into reverse gear.

WARNING
When the reverse gear shift or release the front or rear brake lever is squeezed.
FUEL COCK
TE100R is equipped with a manually operated fuel cock.
There are three position : 'ON', 'OFF' and RES".

“ON Position
The normal operating position for the fuel cock lever is in the ON position.


"OFF Position
Turn the lever to the 'OFF position whenever stopping the engine for more than a few minutes.
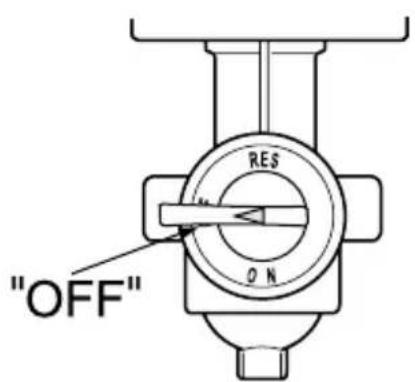
● “RES (RESERVE) Position
If the fuel level in the tank is too low, turn the lever to the RES position to use the 0.68 ℓ of reserve fuel supply.
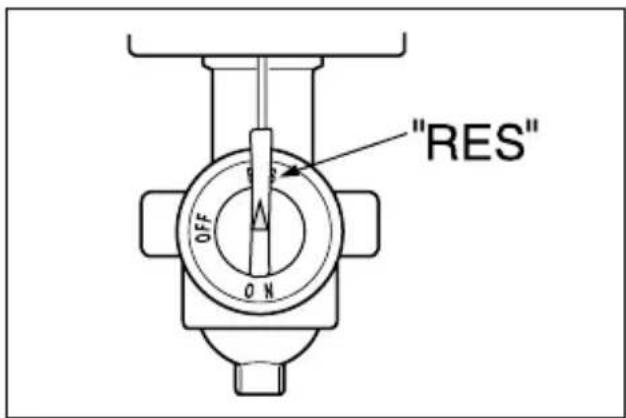
NOTE
Confirm the each mark by mark at the fuel cock lever.
CAUTION
After switching the fuel cock lever to the 'RES position, it is advisable that the tank be refilled at the closest gas station.
After refueling be sure to move the fuel cock to the 'ON position.
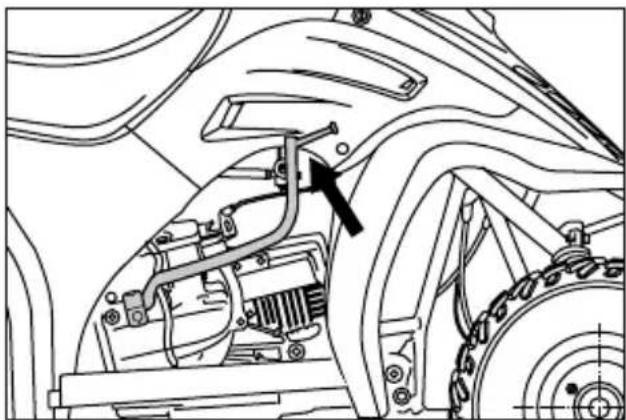
KICK START LEVER
natural_image
Technical line drawing of a vehicle's internal components, showing engine, drivetrain, and wheel assembly (no text or labels)The kick start lever exist at right side of the engine.
You can start by using the kick start lever when there is some problem in battery.
To use the kick start lever, set the parking brake, turn the key to the “●”(ON) position, and set the engine stop switch to the “○” position.
Press forcefully the kick start lever.
CAUTION
When started the engine, check that kick start lever return to normal position.
WARNING
When start by kick start lever, pay attention to position of a foot.
If they are not pay attention, be will injured.
EQUIPMENT AND ADJUSTMENTS
FUEL TANK CAP

natural_image
Technical line drawing of a motorcycle's front view showing steering wheel and dashboard (no text or symbols)To open the fuel tank cap, remove the end of the vent tube from the hole in the vehicle body and turn the fuel tank cap counterclockwise. To close the fuel tank cap, turn it clockwise and tighten it securely. Be sure that the end of the vent tube is reinstalled in the hole in the vehicle body and routed properly as shown.
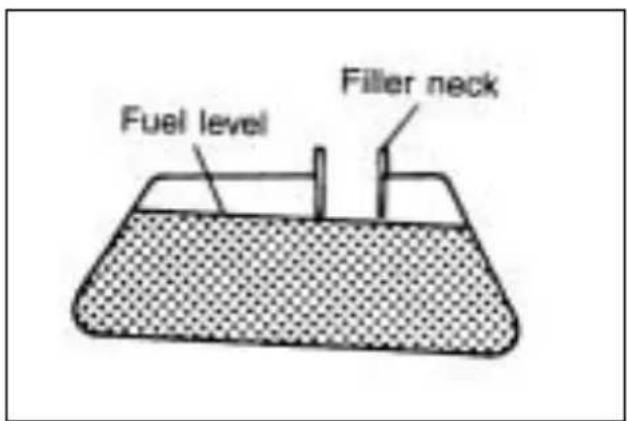
WARNING
Do not overfill the fuel tank. Stop adding fuel when the fuel level reaches the bottom of the filler neck as shown in the illustration. If you fill the fuel tank beyond this level, fuel may overflow when it expands due to engine heat or heating by the sun.
WARNING
Gasoline is extremely flammable and toxic. Always observe the following precautions when refueling your rTE100R
●Never permit vehicle refueling by anyone other than an adult.
●Refuel in a well ventilated area.
● Make sure the engine is off and avoid spilling fuel on a hot engine.
●Do not smoke, and make sure there are no open flames or sparks in the area.
● Avoid prolonged contact with skin and breathing of gasoline vapors.
- Keep children and pets away during refueling.
REMOTE ENGINE STOP SWITCH
The TE100R comes equipped with a remote engine stop switch which may be operated by pulling the leash-like lanyard attached to the remote engine stop switch cap. An adult supervising operation of the vehicle can use the lanyard to stop the engine from a short distance. The adult who trains the young rider should always use this lanyard until the rider develops sufficient skills for safe operation of the vehicle.

① Switch body
② Rubber cap
③ Remote engine stop switch lanyard
The switch consists of a rubber cap fitted over a plastic body. When the rubber cap is in place, the engine can operate. When the rubber cap is removed from the switch body, the engine cannot be started. If the engine is running and the rubber cap is removed by pulling the lanyard attached to the cap, the engine will stop running.
To use the remote engine stop switch :
- Fit the rubber cap on the engine of the lanyard over the remote engine stop switch body located on the rear end of the vehicle as shown.
- Put your fingers through the loop at the other end of the lanyard.

natural_image
Line drawing of a person pulling a motorcyclist with a long pole, no text or symbols present- With the lanyard fastened to the vehicle and to your hand, follow after the moving vehicle. If you notice any driving hazard or unsafe situation, pull the lanyard forcefully so that the rubber cap comes off.
This will activated the remote engine stop switch, stopping the vehicle s engine.

WARNING
When the remote engine stop switch cap is pulled off, the engine will stop running.
The vehicle will continue to roll for some distance, however. Remember this when judging when to operate the remote engine stop switch.

WARNING
If you do not put your fingers through the loop in the lanyard, it may slip from your grasp unexpectedly. This could make it impossible for you to stop the engine in an unsafe situation.

WARNING
The throttle limiter should always be set to the low power position(as described on page 14) when the remote engine stop lanyard is used. Only children with enough skill for safe operation of the r TE100R without parental use of the lanyard should be permitted to operate r TE100R with the throttle limiter set to the maximum power position. In addition, an adult trying to follow a moving r TE100R with the throttle limiter set to the maximum power position may run into the rider if he stops, or may trip and fall down trying to keep up with the vehicle.
- Instruction For Remote engine stop switch Lanyard Storage
The lanyard may be stowed on the r TE100R when, in the judgement of the parents, the rider has developed sufficient skills to be able to safely operate the vehicle without parental use of the lanyard.
For storage of the lanyard, follow the instructions below :

natural_image
Diagram showing a device with a black arrow pointing to a pair of earbuds (no text or symbols present)- Place the lanyard in the vinyl bag provided with the vehicle, with the rubber cap visible at the bag opening.

natural_image
Line drawing of a vehicle interior with a directional arrow indicating movement or force (no text or symbols)- Hook the bag on the frame as shown and fit the rubber cap snugly over the remote engine stop switch body.
NOTE
With the rubber cap off the switch, the engine can not be started because the ignition circuit is not completed.

WARNING
Avoid leaving any part of the lanyard visible outside the bag as it can be caught and damaged by moving parts.

WARNING
To prevent unauthorized starting or unsupervised operation of the r TE100R remove the remote engine stop switch cap and lanyard after each use and store them in a safe place, out of the reach of children.
BREAK-IN (RUNNING-IN)
The first month is the most important in the life of your vehicle. Proper operation during this break-in period will help ensure maximum life and performance from your new vehicle.
The following guidelines explain proper break-in procedures.
★ MAXIMUM THROTTLE OPEN- ING RECOMMENDATION
During the first 10 hours of vehicle operation, the maximum throttle opening you should use is 1/2 throttle.
★ VARY THE ENGINE SPEED
The engine speed should be varied during the break-in period. Although it is essential that some stress be placed on the engine components during break-in, you must be careful not to excessively load the engine.
★ AVOID CONSTANT LOW SPEED
Operating the engine at constant low speed (light load) can cause parts to glaze and not seat properly. Allow the engine to accelerate freely through the gears, without exceeding the maximum recommended throttle opening.
★ OBSERVE YOUR INITIAL AND MOST CRITICAL SERVICE
The initial service (break-in maintenance) is the most important service your vehicle will receive. During break-in operation, all of the engine components will have mated together and seated. Maintenance required
as part of the initial servie includes correction of all adjustments, tightening of all fasteners and replacement of dirty oil.
Timely performance of this service will ensure optimum service life and performance from the engine.
WARNING
The initial service (after 1 month of vehicle operation) should be performed as outlined in the INSPECTION AND MAINTENANCE section of this Owner's Manual. Pay particular attention to the information contained in the CAUTION and WARNING section when performing this maintenance.
INSPECTION BEFORE RIDING
| WHAT TO CHECK | CHECK FOR : |
| Steering | No rattle or looseness |
| Brakes | ●Proper lever play●Parking brake effectiveness |
| Tires | ●Proper pressure●Enough tread depth●No cracks, rips, or other damage |
| Fuel | ●Enough fuel for the intended run●Fuel hose connected securely●No damage to fuel tank or cap●Tank cap closed securely |
| Engine stop switch | Proper operation |
| Head lampTail lamp | Proper operation |
| Engine oil | Proper level |
| Transmission oil | Proper level |
| Throttle | ●Proper cable play●Smooth response●Quick return to idle position |
| Drive chain | Adequate lubrication |
| General condition | ●Bolts and nuts are tight●No rattle from any part of the machine with the engine running●No visible evidence of damage |
| Remote engine stop switch (if used) | ●Proper operation●No damage to rubber cap●Secure attachment of lanyard to cap |
| Indicator lamp | Proper operation |
| Reverse gear lever | No damage and smooth operation |
| Gear shift shaft | No damage and adequate grease. |
WARNING
Failure to perform an inspection before riding may result in an accident or serious damage to the vehicle. Check these items riding. Be sure your rTE100R is in good condition for the personal safety of the rider and protection of the vehicle.
WARNING
All of the items above should be checked with the engine off, except the functional check of the remote engine stop switch, head lamp and tail lamp.
Make sure your child doesn't get too close when you check the fuel level and drive chain, or he/she might be injured.
RIDING TIPS
★ DO NOT START THE『TE 1 0 OR』OR ALLOW YOUR CHILD TO RIDE YET
Finish reading the Riding Tips section and then the instructing the Young Rider section before starting the TE100R or beginning riding instructions. The Riding Tips section contains important operating information you will need to know before you go to the instructing the Young Rider section. The instructing the Young Rider section will guide you in teaching young riders how to operate and ride the TE100R using the information you learn in this owner's manual.
★ STARTING THE ENGINE
Before attempting to start the engine, make sure:
- Set the parking brake.
- Set the fuel cock to the ON position.
- Set the engine stop switch to the “○” position.
- Verify that the remote engine stop switch cap is in place.
- Turn the key to the “●”(ON) position.
- Push in the electric starter switch.
WARNING
- Do not run the engine indoors or where there is little or no ventilation. Exhaust gases contain carbon monoxide, a potentially lethal gas that is colorless and odorless.
● Never leave the vehicle running while unattended, even for a short time.
NOTE
If the front or rear brake lever is not squeezed, the starter motor will not rotate.
■ Start by using the kick start lever
You can start by using the kick start lever when there is some problem in battery.
① Set the parking brake.
② Set the fuel cock to the ON position.
③ Set the engine stop switch to in the “()” position.
④ Verify that the remote engine stop switch cap is in place.
⑤ Turn the key to the (ON) position.
⑥ Press forcefully the kick start lever.

natural_image
Technical line drawing of a vehicle engine compartment with no visible text or symbolsCAUTION
When started the engine, check that kick start lever return to normal position.
WARNING
When start by kick start lever, pay attention to position of a foot. If they are not pay attention, be will injured.
★ STARTING OFF
After the engine has warmed up, disengage the parking brake. To release the parking brake, simply squeeze the rear brake lever until the lock knob release.
WARNING
Before releasing the parking brake, make sure:
• The throttle is fully closed.
● The rider is completely ready to ride. If you do not observe these precautions, the vehicle can move forward unexpectedly when the parking brake is released. This may result in an accident and injury.

WARNING
Before the vehicle started, confirm that the reverse gear lever is released. If you started the vehicle that reverse gear is shift into, it could be hazardous and damage the vehicle.
Open the throttle gradually to move forward.

WARNING
While operating the ITE100R, the rider should keep both feet on the footrests at all times, or injuries resulting from accidents such as the rear wheels running over the rider's feet could occur. There is no need for the rider to move his/her feet from the footrests during operation or maneuvering of the vehicle. Moving the rider's feet from the footrests reduces the rider's ability to control the vehicle, and could lead to an accident.

WARNING
Keep both hands on the handgrips at all times when riding. Removing your hands from the handgrips reduces your ability to control the vehicle, and could result in an accident.

WARNING
Always open the throttle gradually to prevent front wheel lifting. Failure to observe this precaution may result in loss of control and an accident.

BRAKING
To stop the TE100R release the throttle lever and apply the brake.

WARNING
●Avoid braking during turns. Use of the brake when turning could cause the r TE100R to slide or roll over. Use the brake to slow down before entering turns.
- Apply the brake lightly and with great care on slippery surfaces to avoid skidding.

WARNING
Never operate the parking brake lock when the rTE100R is moving. The rear wheels will lock, and an accident could result.

TURNING
To turn the TE100R the rider must learn a special technique. Because this vehicle has a solid rear axle, both rear wheels always turn at the same speed. This means that if the rear wheels are getting equal traction, the vehicle will move straight ahead, because the rear wheels will travel the same distance.
For the vehicle to turn, the outside rear wheel must travel a greater distance than the inside rear wheel. To make this happen, the rider must learn how to create less traction for the inside wheel, so that it can travel a shorter distance than the outside wheel, even though both wheels are still turning at the same speed.
To turn the rTE100R, the rider should use the following technique:
- Maintain a low speed.
●Turn the handlebars in the direction of the turn. - Shift body weight slightly forward and support your weight on the outer footrest. This will reduce the load on the inside rear wheel, reducing its traction.
●Lean upper body into the turn.
■ At higher speeds :
Use the same technique that you use for turning at low speeds, but lean farther into the turn. Since natural turning forces(which tend to push the vehicle to the outside of the turn) increase as speed increases, you must lean your upper body farther into the turn as you go faster, to prevent the vehicle from tipping over to the outside of the turn. Remember, though, to keep your weight supported on the outer footrest.

WARNING
If the rider does not use the proper technique to turn the r TE100R _a it may plow straight ahead even though the front wheels are turned. The rider should practice the above technique at low speeds in a wide open area until he/she has mastered it.
★ SKIDDING OR SLIDING
If the rider experiences inadvertent skidding or sliding when not braking, he/she may be able to overcome it by using the appropriate technique listed below.
Front wheel:
If front wheel skidding occurs, try to gain front wheel traction by reducing the throttle opening and leaning your body weight slightly forward.
Rear wheel
If rear wheel skidding occurs, steer in the direction of the skid (if space permits), shift body weight away from the skid slightly, and avoid using the throttle or brakes until you regain directional control of the vehicle.

WARNING
Skidding or sliding can result in accidents caused by loss of rider control. To avoid inadvertent skidding or sliding, the rider should slow down and be very cautious when riding on slippery or loose surfaces.
★OPERATION ON HILLS
Riders who have become experienced at operating the rTE100R on level surfaces may wish to try riding on a wider variety of terrains. The rTE100R may be operated on small hills with even surfaces, but extreme care should be taken.

WARNING
When the TE100R is operated on hills, it can roll over more easily than when it is operated on level ground, under certain conditions. Only children who are capable of safe operation of the rTE100R on level ground should be permitted to operate the vehicle on hills.
Climbing a Hill
To climb a small hill with the TE100R, the rider should:
● Speed up and maintain a steady speed before reaching the bottom of the hill.
●Shift body weight forward by sliding forward on the seat. Lean slightly forward.
- Maintain a steady speed while climbing the hill.
● Slow down when reaching the top of the hill.
WARNING
Only permit your child to climb small hills. Do not let him/her attempt to climb a hill unless you are sure that he/she can easily ride to the top of the hill without stopping. It can be dangerous to stop the r TE100R while climbing a hill, because the vehicle may begin to roll backwards and then roll over.
WARNING
The rider should never open the throttle suddenly when climbing a hill. The vehicle could flip over backwards.
WARNING
The rider should never go over the top of the hill at high speed. Once over the top of the hill, he/she could lose control and crash or could collide with an unseen object.
If your child is climbing a hill and loses forward momentum, he/she should :
●Lean farther forward, uphill.
- Apply the front and rear brake and stop the vehicle before it starts to roll backwards.
- Set the parking brake and dismount to the right while still leaning uphill.
- Use one of the following procedures to turn the vehicle around :
- Ask the adult who is supervising to help drag the rear end of the TE100R around until the vehicle is angled downhill. Stay on the uphill side of the vehicle while dragging it around.
- Turn the handlebars fully to the right. While standing on the uphill side of the vehicle, release the parking brake and pump the hand brake to let the r TE100R roll slowly backwards. This will turn the vehicle sideways to the hill. Reset the parking brake. Turn the handlebars to the left. Staying on the uphill side, release the parking brake and pump the hand brake to let the ATV roll until it is angled downhill. Reset the parking brake.
●Remount the vehicle, release the parking brake and ride down the hill as instructed in the DESCENDING A HILL section.

WARNING
The rider should never allow the rTE100R to roll backwards on a hill. If the vehicle does begin to roll backwards, the rider should move his/her body weight forward and try to slow the vehicle to a stop using the FRONT BRAKE ONLY. If the front brake does not slow the vehicle, the rider should dismount to the side immediately. The rear brake should never be used when rolling backwards on a hill. Use of the rear brake can cause the vehicle to flip over.
■ Descending a Hill
To ride down a small hill with the rTE100R, the rider should:
- Point the TE100R straight down-hill.
● Transfer body weight to the rear by sliding back on the seat.
● Ride down the hill with the throttle closed. - Apply the brake to control downhill speed.
■ Traversing a Slope

WARNING
Traversing a slope is very tricky and should be avoided when possible. Improper riding techniques while traversing a slope could cause the r TE100R to tip over. Do not permit your child to traverse a slope unless you are sure he/she can perform this maneuver safely.
To traverse a slope, the rider should:
●Lean his/her body uphill.
●Steer slightly uphill, if necessary, to maintain a straight course.
★ RIDING THROUGH WATER
The TE100R may be ridden through water, provided that it is not more than 19cm (7.5 in) deep and is not moving fast. When crossing a stream, choose a spot where the banks are gently sloped on both sides and the bottom of the stream is hard. If you are unfamiliar with the area you wish to cross, park the rTE100R and inspect the stream first, to find a suitable spot for crossing. When crossing, operate the vehicle at a slow, steady speed.

WARNING
- Do not attempt to cross a stream with deep or fast flowing water.
The tires may lose their traction, and you may be unable to control the vehicle. This could result in personal injury.
● After riding through water, test the brakes to see if they have maintained their normal effectiveness. If they are less effective than normal, dry them by repeatedly applying the front and rear while riding slowly until the brakes have regained their normal effectiveness.
CAUTION
After extended operation of the r TE100R in water, bring it to your authorized HYOSUNG dealer to have the brakes inspected and cleaned, if necessary. Failure to take this precaution can result in excessive brake wear.
★ RIDING IN REVERSE
WARNING
● Shifting into reverse gear when the vehicle is moving can be hazardous and damage the vehicle.
If you shift the vehicle into reverse gear when the vehicle is moving it could stop suddenly, throwing you from the vehicle.
Always come to a complete stop before shifting into reverse gear.
- Improperly riding this vehicle in reverse can be hazardous.
You could hit an obstacles or person behind you, resulting in serious injury.
When you select reverse gear, make sure there are no obstacle or people behind you. When it is safe, back up slowly.
To engage reverse gear, follow these directions.
- Stop the vehicle completely, and wait 3 seconds.
- To shift into reverse gear, with the front or rear brake lever is squeezed, pull the reverse gear lever toward your body and turn it for 90° direction to put in upper groove.
The reverse gear indicator lamp will come on when the transmission is in reverse gear.
- Look to make sure there is nothing in your way behind you.
- Slowly release the brakes and apply the throttle.
WARNING
Sudden application of the throttle or making abrupt turns in reverse gear can be hazardous.
Throttle surges or abrupt turns could cause you to lose control of the vehicle.
When you ride in reverse, go slowly and turn carefully.
★ STOPPING THE ENGINE
Release the throttle lever. Turn the engine stop switch to the “×” position.
★ PARKING THE VEHICLE
Set the parking brake securely as explained in the "STARTING THE ENGINE section.
WARNING
It takes some time for the engine and muffler to cool off after a long ride. Do not touch these parts until they have had time to cool off, or you may burn yourself.
Your child's safety depends on your commitment to take the time necessary to fully educate him/her on the proper operation of the TE100R. Remember that proper instruction before your child begins to ride is just as important as proper instruction and supervision during riding.
Please go through this manual with your child, page by page, and fully explain all of the instructions, requirements and warnings it contains. Be sure to put as much emphasis on safety precautions as on proper operational techniques. Question your child as you go through the manual to make sure he/she understands what you are saying.
Following is a step by step guide to help make your child's first use of the TE100R a safe and enjoyable experience. Before you begin to use this guide, however, be sure you have reviewed the vehicle features and riding techniques described in earlier parts of this owner's manual, HYOSUNG strongly urges that you use this guide to teach each child that you let ride the TE100R
Be sure to take breaks as the child being instructed gets tired or his/her attention begins to wander. Full attention at all times is needed to safely operate any motorized vehicle, including the TE100R
■STEP 1 - PROPER CLOTHING AND PROTECTIVE GEAR
The first step to safe riding is proper protection of the rider. Your child should always wear a helmet, eye protection, gloves, long pants, a long sleeved shirt or jacket, and boots.
Make sure that your child is not wearing any loose fitting clothes. Loose belts, scarves, etc. can get caught in moving parts and cause personal injury. Even in hot weather, make sure your child wears long pants and a long sleeved shirt. These not only protect against abrasive injuries, but also help to reduce fatigue which comes from loss of body heat due to the wind.
WARNING
Failure to wear proper clothing and protective gear, as described above, may result in severe personal injury.
■ STEP 2 - FAMILIARIZATION WITH THE VEHICLE
Your child should become completely familiar with the names and functions of all controls. Let the young rider sit on the TE100R, with the engine off, and ask him/her to operate specific controls. Demonstrate operation of the controls if necessary. Ask the child to do such things as “apply the brakes, turn off the engine, lock the parking brake,” etc. Practice this exercise until the child can operate all of the controls without hesitation and without looking at the controls.
Go over the INSPECTION BEFORE RIDING with your child until he/she knows all of the items that should be checked and how they should be checked. Give specific examples of things to look for.
■ STEP 3 - STARTING OFF AND STOPPING
WARNING
For practice, choose a large, level area away from other riders and free of obstructions. Inspect the area before riding and remove any rocks, sticks or other potential hazards. Stay away from ditches and bumps.
To help your child develop confidence, he/she should PRACTICE FIRST WITH THE ENGINE OFF, as follows :
- Have your child sit on the TE100R and tell him/her to release the parking brake.
- Instruct your child to keep his/her eyes straight ahead and slowly push the vehicle from behind, if you are physically able to do so. This will allow your child to get the feel of riding a moving vehicle.
-
As you push the r TE100R , instruct your child to steer straight ahead and perform operations such as stopping the vehicle and turning off the engine stop switch while moving. Watch your child closely to make sure he/she is operating the controls correctly and without looking at the controls.
-
As you approach the end of the practice area, tell the rider to stop the vehicle, apply the parking brake, and get off. You should then drag the rear end of the r TE100R around so you can push it straight ahead in the opposite direction. Practice with the engine off until your child gets the feel of using the brakes and can stop the vehicle and turn off the engine stop switch without looking at the controls, and without hesitation.
WARNING
Before permitting your child to operate the rTE100R under power, be sure to adjust the throttle limiter to provide a low maximum speed capability. Turning the limiter clockwise reduces the rTE100R's maximum speed capability.
Next, start the r TE100R engine and have your child practice starting off, riding in a straight line, and stopping, with the vehicle under power.
Walk along the side of the r TE100R if you can, or have the young-ster ride back and forth between you and another supervisor.
Watch closely to make sure the rider :
- Opens the throttle gently when starting off.
- Releases the throttle and applies the brake in sequence when stopping.
- Becomes aware of the distance it takes the vehicle to stop when the engine stop switch is turned off while the vehicle is moving.
As you approach the end of the practice area, you should again tell the rider to stop the vehicle, apply the parking brake, and get off so you can turn it around for him/her. Practice this exercise until your child can start off, accelerate, cruise and stop correctly and with confidence.
■ STEP 4 - TURNING
After your child has learned to ride the rTE100R in a straight line and can stop it when he/she wants to, you should teach the child how to turn the vehicle.
Explain the proper body movements for turning, and let your child PRACTICE FIRST WITH THE ENGINE OFF, as you push the vehicle from behind.
When turning, watch to make sure your child:
- Shifts his/her weight slightly forward and supports his/her weight on the outer footrest.
- Leans his/her upper body into the turn and turns the handlebars in the direction of the turn.
When the rider is able to properly turn the TE100R in both directions with the engine off, he/she should practice with the vehicle under power. Again, make sure that the throttle limiter is adjusted to provide a low maximum speed capability. Watch closely to make sure the rider is using the proper turning technique. The rider should practice turning until he/she can do it correctly and with confidence.
■ STEP 5 - PUTTING IT ALL TOGETHER
When your child has mastered the basic riding maneuvers in the previous steps, he/she should practice putting them all together. Instruct the rider to perform various maneuvers such as turning right, turning left, stopping, parking, etc. Mix up the order of these maneuvers so the child will not know what he/she will be asked to do next. Practice this exercise until you are confident that the rider has mastered all the basic maneuvers.
The above steps will help the first time rider learn the most basic riding techniques. To become a skilled rider, your child will need a great deal of practice and instruction after these steps have been completed. Be patient with your child; take extra time when teaching him/her additional techniques such as the recommended techniques for climbing and descending hills.
After your child has mastered all of the basic riding techniques at slow speeds, you can adjust the throttle limiter to provide higher speed capabilities, according to the rider's skill and experience.
INSPECTION AND MAINTENANCE
MAINTENACE SCHEDULE
It is very important to inspect and maintain your TE100R regularly. Follow the chart below. If indicates the intervals between periodic services in months. At the end of each interval, be sure to inspect, adjust, lubricate, replace and service as indicated.

WARNING
HYOSUNG recommends that maintenance on those items in the chart below which are marked with an asterisk(*) be performed by your authorized HYOSUNG dealer or a qualified service mechanic. If you are qualified, you may perform maintenance on the unmarked items by referring to the instructions in this section. If you are not sure whether you can successfully complete any of the unmarked maintenance jobs, ask your authorized HYOSUNG dealer to do the maintenance for you.

WARNING
Do not attempt to perform maintenance on this vehicle if you are not qualified. You could be injured or may damage the machine.

WARNING
The safety of the rider depends on how well this machine is maintained. Follow all inspection and maintenance instructions carefully.

WARNING
Don t let your children tinker with this machine. They may get hurt.
Maintenance should only be performed by qualified adults. Make sure that the engine stop switch is in the “×” position unless the engine must be running to perform the required maintenance.

CAUTION
The maintenance intervals shown in the chart below are based on average riding conditions. If the TE100R is ridden in a dusty area, the air cleaner and drive chain should be serviced more frequently than shown in the chart. All items should be serviced more frequently if the vehicle is operated under extreme conditions. If you have any questions regarding appropriate maintenance intervals, consult your authorized HYOSUNG dealer.
PERIODIC MAINTENANCE CHART
● ENGINE
| Item\Interval | Initial1 month | Every3 months | Every6 months |
| Air cleaner element | Clean at least every month | ||
| Cylinder head nut * | Tighten Tighten | — | |
| Cylinder head and cylinder * | — | — | Remove carbon |
| Carburetor | Inspect Inspect | — | |
| Spark plug | Clean Clean Replace | ||
| Fuel line | Inspect Inspect | — | |
| Replace every 4 years | |||
| Transmission oil * | Inspect | — | Inspect |
| Drive chain | Inspect and lubricate every month | ||
| Sprockets * | Inspect Inspect | — | |
| Gear shift shaft * | Inspect Inspect | — | |
CHASSIS
| Item\Interval | Initial1 month | Every3 months | Every6 months |
| Brakes | Inspect Inspect | — | |
| Steering * | Inspect Inspect | — | |
| Tires | Inspect every month Check pressure each time ride | ||
| Chassis nuts and bolts * | Tighten Tighten | — | |
| General lubrication * | — | Lucbricate | — |
CAUTION
More frequent servicing may be performed on motorcycles that are used under sever conditions.
NOTE
*= Ask your Hyosung dealer or qualified mechanic to do the maintenance items marked.
SEAT REMOVAL

natural_image
Technical line drawing of a mechanical assembly with springs and a curved arrow indicating a component (no text or symbols)To remove the seat, pull the metal bar under the rear end of the seat and lift it up.
TOOLS

natural_image
Top-down schematic of a vehicle's internal components, showing engine, motors, and gear assembly (no text or labels)A tool kit is provided under the seat.
INSPECTION OF FUEL
Check if the remaining gasoline is enough for running to the destination.
Replenish the GASOLINE when the Fuel indicator lamp on with the ignition switch in the (ON).

FUEL INDICATOR LAMP
CAUTION
The lack of fuel will go off suddenly. Failure to observe this precaution may result in loss of control and an accident.
INSPECTION OF ENGINE OIL
Replenish the ENGINE OIL when the Oil indicator lamp on with the ignition switch in the (ON).
OIL INDICATOR LAMP

CAUTION
The lack of engine oil will damage engine severely.
AIR CLEANER
If the air cleaner element is clogged with dust, there will be greater intake resistance, resulting in decreased power output and increased fuel consumption.
CAUTION
● DO NOT operate the engine without the air cleaner element in place or severe engine damage may result.
- If you usually ride in dusty areas or regularly operate the vehicle in wet, muddy conditions, you must inspect the air cleaner element more frequently than shown in the periodic maintenance chart.
- If, at any time, the air cleaner element is submerged in water, immediately clean the element and the inside of the air cleaner case.
- Removing the Element
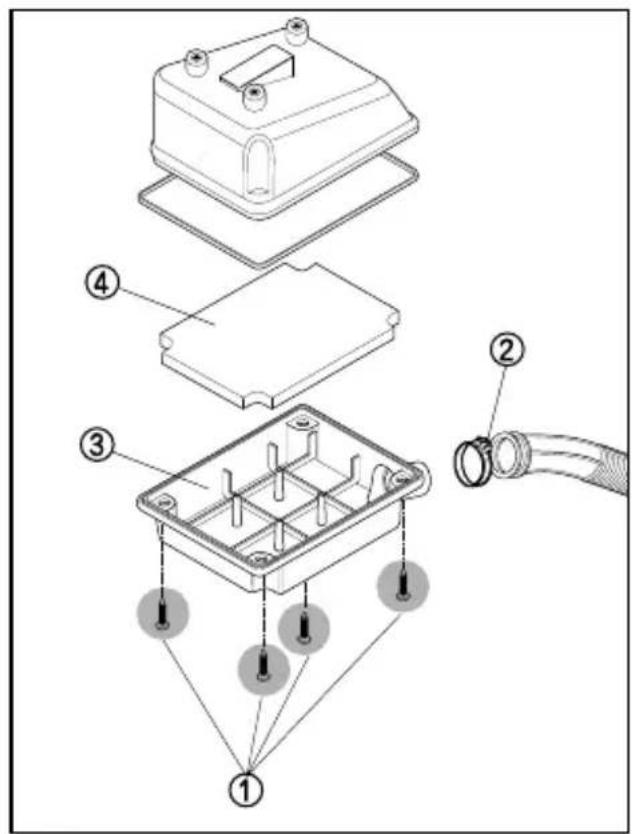
- Remove the four bolts ①
- Remove the clamp screw ②.
- Take out the air cleaner cap ③ and air cleaner element ④
- Washing the Element
Wash the element as follows :

flowchart
graph TD
    A["Step A: Top-down plate"] --> B["Step B: Down arrow to bottom plate"]
    B --> C["Step C: Left side, down arrow to bottom plate"]
    C --> D["Step D: Down arrow to top plate"]
- Fill a washing pan large enough to hold the element with a non-flammable cleaning solvent Ⓐ. Immerse the element in the solvent and wash it.
- Squeeze the element by pressing it between the palms of both hands to remove excess solvent. Do not twist or wring the element or it will develop cracks.
- Immerse the element in a separate pan filled with 2-stroke engine oil Ⓑ. Squeeze the element to remove excess oil. Make sure that the element remains damp with oil (but not soaked).

WARNING
Before, during, and after the cleaning operation, carefully examine the element for any tears in the material. A torn element could permit dirt and dust to pass into the engine. If the air cleaner element is torn, it must be replaced with a new one.
- Reinstall the cleaned element in reverse order of removal. Be sure that the element is securely in position and is sealing properly.

WARNING
Keep cleaning solvent and oil away from children and pets. Dispose of used solvent and oil properly.

CAUTION
Be sure to position the air cleaner element correctly. Make sure it fits properly so that no incoming air will bypass it. Remember, rapid wear of piston rings and cylinder walls is often caused by an improperly positioned air cleaner element.
SPARK PLUG
Your TE100R cgmes equipped with an BPR7HS spark plug. You can determine if the standard spark plug is suitable for your type of vehicle usage by observing the color of the plug's porcelain center electrode insulator after vehicle operation. If the plug has the correct heat range, it should be very light brown in color. If the plug tends to run cold, (usually evidenced by blackening of the insulator or a wet electrode) replace it with an alternate plug according to the following chart.
CAUTION
An improper spark plug may have an incorrect fit or heat range for your engine. This may cause severe engine damage which may not be covered under warranty. Use one of the spark plugs listed below or equivalents. Consult your HYOSUNG dealer if you are not sure which spark plug is correct for your type of vehicle usage.
PLUG REPLACEMENT GUIDE
| Hotter type | BPR6HS |
| Standard type | BPR7HS |
| Colder type | BPR8HS |
If the above-named plugs are not available, consult your HYOSUNG dealer.
CAUTION
To install a spark plug, turn it in as far as possible with your fingers, then tighten it with a wrench. Do not overtighten or cross thread the spark plug, or the aluminum threads of the cylinder head will be damaged. Do not allow contaminants to enter the engine through the spark plug hole when the plug is removed.

natural_image
Illustration of hands using a tool to apply a small object to a hole (no text or symbols present)
To maintain a hot, strong spark, keep the plug free of carbon. Remove carbon from the plug with a wire or pin, and adjust the gap to 0.6\~0.7mm (0.024\~0.028 in) for good ignition.
Use a thickness gauge to check the gap.
SHIFT PLAY
TE100R has a reverse gear lever.
If the vehicle does not move forward or backward, inspect the shift play and adjust the reverse gear cable.
- Inspection and Adjustment of the Shift Play

Inspect the shift play of gear shift shaft at the engine's bottom.
SHIFT PLAY Ⓐ
0\~0.2mm (0\~0.008in)
If measurement of the shift play exceeds the standards (0\~0.2mm, 0\~0.008in), to adjust the reverse gear cable at the vehicle s left side, follow these directions.

- Loosen the lock nut ①.
- Turn the adjuster ② in or out to acquire the shift play.
- After end of adjustment, tighten the lock nut ①.
IDLE SPEED ADUSTMENT
To adjust the idle speed properly, you need a engine tachometer. If you do not have one, ask your HYOSUNG dealer to perform this adjustment.

natural_image
Technical line drawing of an internal engine assembly with no visible text or symbolsTo adjust the idle speed :
- Start the engine and warm it up.
- After engine warms up, turn the throttle stop screw ① in or out so that the engine idles at lowest steady speed.
CAUTION
Make sure that the engine is fully warmed up before adjusting the engine idle speed. Improper adjustment can result in increased engine wear.
THROTTLE CABLE ADJUSTMENT FUEL HOSE

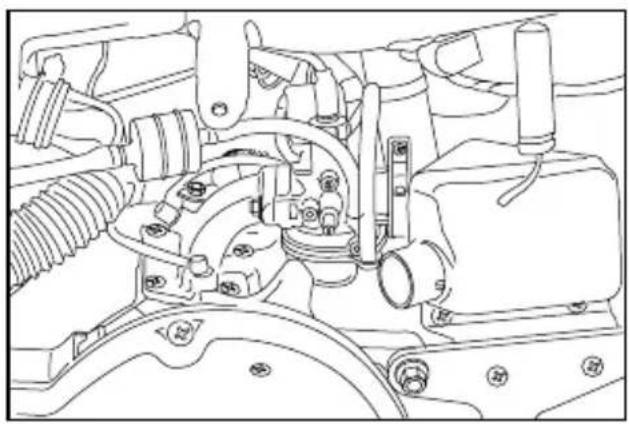
Measure the throttle cable play by pressing the throttle lever. The throttle lever should have 2.5\~6mm (0.098\~0.236 in) play.
natural_image
Technical line drawing of an automotive engine assembly (no text or symbols)Replace the fuel hose every 4 years, even if it appears to be in good condition.
Damage from aging may not always be visible.
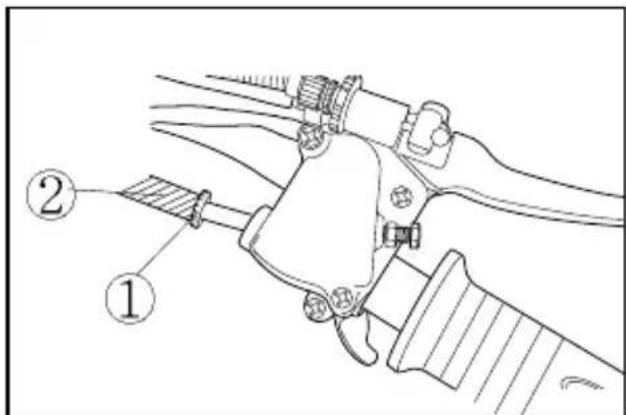
To adjust the throttle cable play :
- Remove the adjuster cover.
- Loosen the lock nut ①.
- Turn the adjuster ② in or out to obtain the correct play.
- Tighten the lock nut ①.
- Recheck the throttle cable play. Readjust it if it is not within the correct limits.
TRANSMISSION OIL
The transmission oil should always be changed when the engine is hot so that the oil's viscosity will be low and the oil will drain completely from the engine.
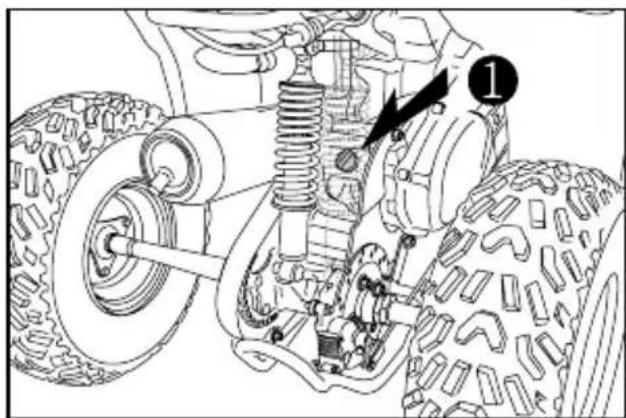


To change the oil :
- place the vehicle on level ground.
- Remove the oil filler cap ①.
- Remove the oil drain plug ③ from the bottom of the engine and drain the oil completely.
- Reinstall the drain plug ③.
- Remove the clutch cover.
- Remove the level screw ② and pour fresh oil of the specified type through the filler hole until the oil flows out from the oil level hole.
| TRANSMISSION OIL CAPACITY | |
| Replace | 80 ml |
| Overhaul | 90 ml |
- Refit the oil filler cap ⑥ and oil level screw ②.
CAUTION
Frequent use in wet conditions will require more frequent oil changes. If the vehicle becomes submerged in water, immediately change the oil.
Failure to follow these instruction may result in severe transmission damage.
ENGINE OIL LEVEL

natural_image
Top-down schematic of a vehicle's internal components, showing engine, motors, and dashboard (no text or labels)The engine oil tank is located under the seat. Check the oil level each time before starting the engine. If the oil level is low, fill up the tank with the specified oil. The oil tank holds 0.6 ℓ
WARNING
Never operate the rTE100R without an adequate amount of oil, if the engine runs out of oil, it can stop suddenly, causing injury and/or severe mechanical damage.
BRAKE
The TE100R has front drum brake and rear disk brake.

WARNING
Failure to properly inspect and maintain your ATV's brake systems can be hazardous.
Improper maintenance of the brakes increases your chances of having an accident.
Be sure to inspect the brakes before each use of the vehicle according to the INSPECTION BEFORE RIDING section. Always maintain your brakes according to the MAINTENANCE SCHEDULE.

WARNING
Operating the ATV in harsh condition can be hazardous if you do not inspect brake wear often.
Operating in mud, water, sand, or other extreme conditions can cause accelerated brake wear. This could lead to an accident.
If you operate your vehicle under these conditions, the brakes must be inspected more often than recommended in the MAINTENANCE SCHEDULE.

Front Brake

Brake adjustment

WARNING
Too much play in the front brake lever can cause poor braking performance and may lead to an accident.
Too little play may force brake shoes to rub against the drum at all times, causing damage to the shoes and the drum.
Follow the steps in this section to adjust the front brake lever properly.
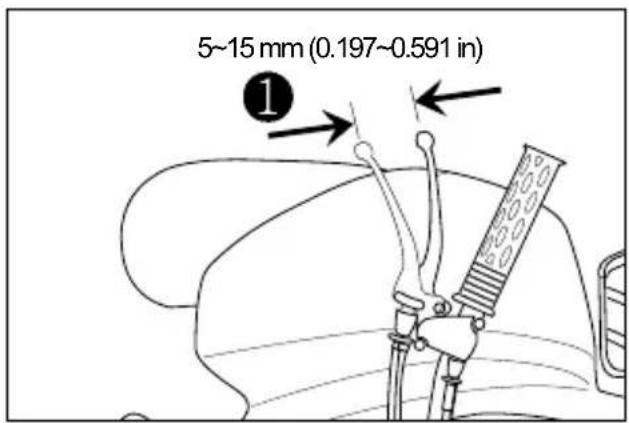
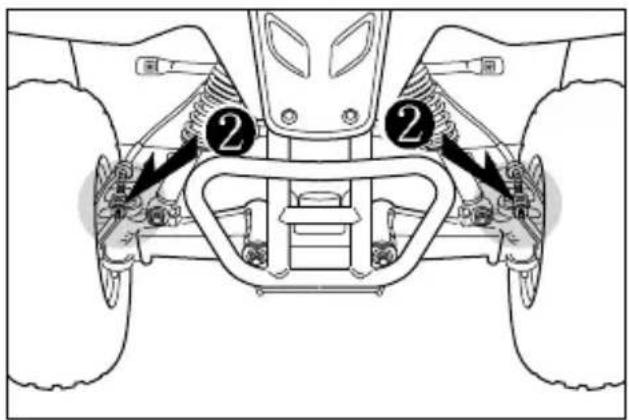
Adjust the free play to 5\~15 mm (0.197\~0.591 in) by screwing in or out the front brake adjusting nut ②
● Brake shoe wear limit
This vehicle is equipped with the brake shoe wear limit indicators on the front brakes.
To check wear of the brake shoe, perform the following :

natural_image
Pure technical line drawing of a mechanical component or tool without any text, numbers, or symbols① Check if the brake system is properly adjusted.
② While fully applying the brake, check to see that the extension line of the index mark is within the range on the brake panel.
③ If the extension line is beyond the range, have the brake shoe assembly replaced by your Hyosung dealer to ensure safe operation.

WARNING
Riding with worn brake shoe will reduce braking performance and will increase your chance of having an accident.
Inspect brake shoe wear before each use. Ask your Hyosung dealer or qualified mechanic to replace brake shoe if the shoes are worn to the limit.
Rear Brake
● Brake adjustment


natural_image
Technical line drawing of a vehicle chassis with suspension and shock absorbers (no text or symbols)- Set the parking brake by squeezing the rear brake lever and pressing the lock knob ①
- Try to move the vehicle backward and forward to see if the rear wheels are securely locked. If the rear wheels can turn, adjust the rear brake to lock the wheels securely by releasing the parking brake and turning the adjuster ② in. Repeat this procedure until the parking brake is properly adjusted.
- Measure the amount of free play needed to lock the rear brake lever, as shown in the above illustration. Adjust the rear brake, if necessary, so that amount of free play ③ is about 5\~15 mm (0.197 \~ 0.591 in).
- After any adjustment of the rear brake, check again to make sure the rear wheels can not turn when the parking brake lock knob is engaged.
● Brake pads
Inspect the rear brake pads by nothing whether or not the friction pads are worn down to the grooved limit line. If a pad is worn to the grooved limit line it must be replaced with a new one by your authorized Hyosung dealer or qualified service machanic.

natural_image
Technical line drawing of a vehicle suspension system with springs, wheels, and a car (no text or labels)
Inspect every day in the following point at the brake system.
① Operating of the brake lever.
② Wear of the rear brake pads.

WARNING
Riding with worn brake pads will reduce braking performance and will increase your chance of having accident. Inspect brake pad wear before each use. Ask your Hyosung dealer or qualified mechanic to replace brake pads if any pad is worn to the limit.
TIRES
The TE100R is equipped with low pressure tubeless tires of the size listed below:
| Front | Rear | |
| SIZE | 18 7.00 - 7 | 18 ×7.00 - 7 |

WARNING
Using tires of a different size than the tires originally equipped on your ATV can change the ATV's handling characteristics. Different handling characteristics can result from differences in carcass construction, sidewall strength, tread pattern, etc.

WARNING
For the rider's safety, check your vehicle's tires before each use of the vehicle, to make sure they have proper pressure, enough tread depth, and no damage.
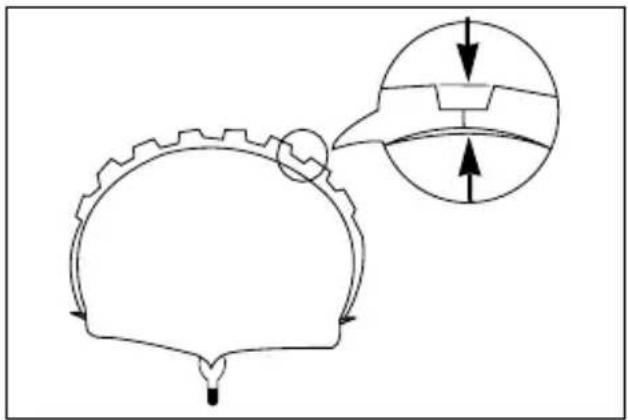
●Tire Tread Condition Tire Pressure
WARNING
Operating the vehicle with excessively worn tires can cause skidding due to decreased traction. It is recommended that the front and rear tires be replaced when the depth of the tire tread is 3 mm (0.118 in) or less.

A low pressure gauge is provided in tool kit under the seat, so you can measure the air pressure in your r TE100R tires. Check the air pressure in all tires before each use of the vehicle. Improper air pressure can affect handling, maneuverability, traction, tire life and rider comfort. Be sure that the tires are inflated to the pressures shown below. Tire pressure should only be measured or adjusted when the tires are cold, or misleading measurements can result.
COLD TIRE PRESSURE
| FRONT | 25 KPa0.25 kg/cm33.6 psi |
| REAR | 25 KPa0.25 kg/cm33.6 psi |
CAUTION
Using a high pressure air pump to fill the tires can be hazardous.
If too much air is put into a tire, the tire may burst, causing severe injury. Use a manual type air pump to fill the tires.
DRIVE CHAIN
The chain may require more frequent adjustment that it is with periodic maintenance depending upon your riding conditions. Inspect and lubricate every month. If it becomes necessary to replace the drive chain, we recommend that you take your vehicle to an authorized HYOSUNG dealer to have the work done.
You should periodically inspect the drive chain for the following :
- Loose pins
● Damaged rollers
● Dry or rusted links
● Kinked or binding links
● Excessive wear

If you find anything wrong with the drive chain condition or adjustment, there is a strong possibility that the sprockets will have some damage to them also. Inspect the sprockets for the following:
- Excessively worn teeth
● Broken or damaged teeth - Loose sprocket mounting nut(s)
Drive Chain Cleaning and Oiling

natural_image
Mechanical assembly diagram showing a hand operating a vehicle chassis with springs and tire components (no text or labels)Clean and oil the chain as follows :
- Wash the chain with kerosene. Kerosene is a petroleum product and will provide some lubrication as well as cleaning action.
WARNING
Keep kerosene away from children and pets. Dispose of used kerosene properly.
CAUTION
Do not use gasoline or other commercial cleaning solvents to clean the drive chain.
- After thoroughly washing the chain and allowing it do dry, oil the links with a drive chain lubricating oil or heavy weight motor oil.
- Inspect Drive Chain Slack

The slack in the drive chain to 5\~15mm (0.197\~0.591 in).
If exceed 15mm (0.591 in) of the drive chain slack, replace the drive chain with a new one.
WARNING
Failure to inspect the drive chain slack before each use of the vehicle could be hazardous. Too much chain slack could cause the chain to come off the sprockets, resulting in an accident or serious damage to the vehicle.
Inspect the drive chain slack before each use.
FRONT AND REAR WHEEL REMOVAL

- Place the vehicle on level groud and set the parking brake.
- Loosen the three wheel nuts ① on the wheel to be removed.
- Lift up the front or rear end of the vehicle by placing a jack or block under the axle or frame.
- Remove the three wheel nuts.
- Remove the wheel. To reinstall the wheel, reverse these steps.
WARNING
When replacing a wheel, it is very important that the wheel nuts be torqued to the proper specifications. If they are not, the wheel can come off unexpectedly. We strongly recommend that you have these nuts checked and retorqued, if necessary, by your authorized HYOSUNG dealer.
Tighten Torque
| Front and Rear wheel nut | 25 N m (2.5 kg · m) |
REPLACEMENT OF THE LAMP
Requirement electric power of the lamp shown in the following chart.
When replace the damaged lamp, always use the equal capacity.
The use of a lamp other than rules may cause to excessive at the electric system or damage the lamp.
| NAME | CAPACITY |
| Head lamp | 12V 35W |
| Tail lamp | 12V 5W |
CAUTION
The use of a lamp other than rules may cause to occur the vehicle fire and to damage electric parts.
Surely use only the lamp of proper capacity.
HEAD LAMP

- Remove the two screw ①(right, left).
- After removing the bulb at the socket, replace the new bulb.
- To install the head lamp, reverse the above sequence.
◦ TAIL LAMP

natural_image
Technical line drawing of a mechanical assembly with springs and a valve (no text or symbols)- Remove the lens at the tail lamp rubber housing.
- After removing the bulb at the socket, replace the new bulb.
- To install the tail lamp, reverse the above sequence.
GENERAL LUBRICATION
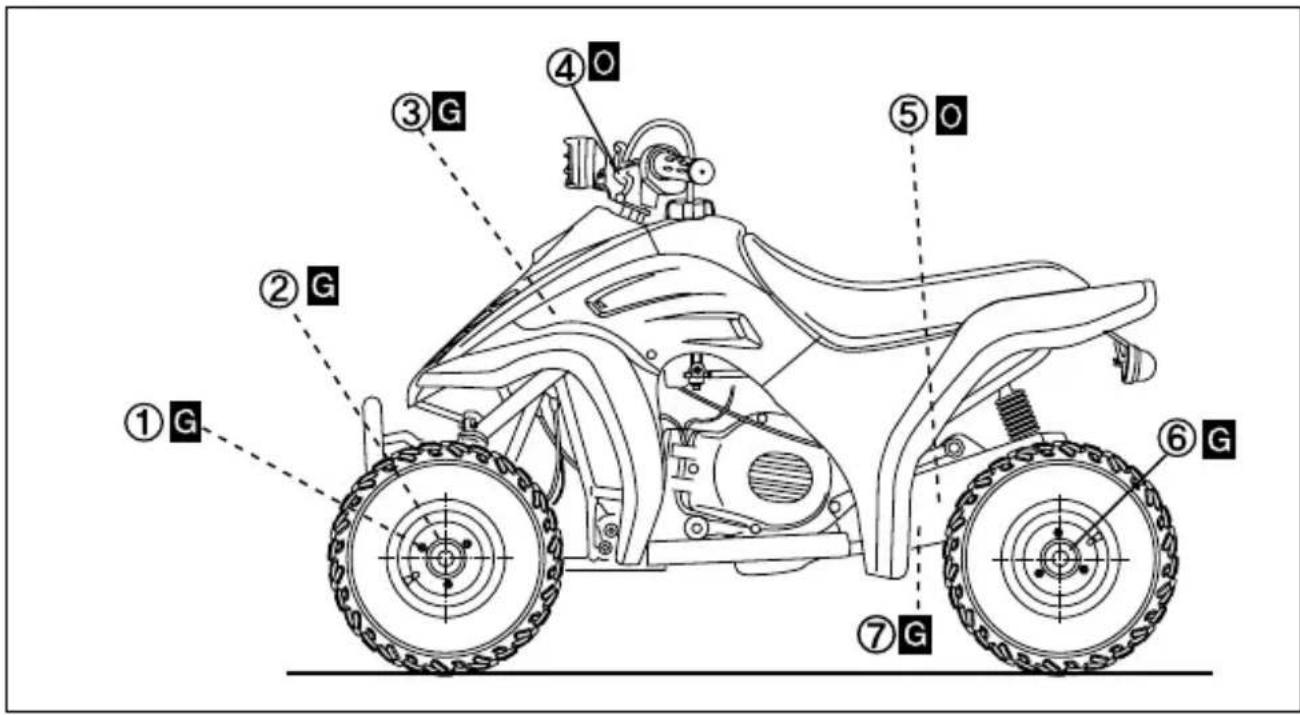

①King pin
②Front wheel bearing
③Steering shaft holder
④Rear brake cable
⑤Drive chain
⑥Rear axle housing
⑦ Gear shift shaft
⑧ Front brake cable
⑨ Throttle cable
⑩ Throttle lever
⑪ Front brake camshaft

......Motor oil

...... Grease
※ “----” :means the invisible parts.
Proper lubrication is important for safe, smooth operation and long life of each working part of your vehicle. Pay attention to the need for lubrication when you perform periodic maintenance on the vehicle. Be sure to have your authorized HYOSUNG dealer perform a general lubrication as shown in the maintenance chart on page 32.
Your authorized HYOSUNG dealer will lubricate such items as wheel bearings, rear axle housings, steering shaft holder, etc.
TROUBLE SHOOTING
CAUTION
It is best to consult your HYOSUNG dealer before attempting to trouble-shoot any problem. Damage may result from inappropriate repairs or adjustments. Such damage may not be covered under warranty.
This troubleshooting guide is provided to help you identify the cause of some common complaints.
★ COMPLAINT : Engine is hard to start or does not start at all.
Something is probably wrong with the fuel system or ignition system.
FUEL SYSTEM CHECK
- Make sure there is adequate fuel in the fuel tank.
- Check that the engine stop switch is in the “○” position.
- Check that the remote engine stop switch cap is installed on the remote engine stop switch.
- Make sure there is enough fuel reaching the carburetor from the fuel tank.
a. Loosen the drain screw which is located under the carburetor and drain the fuel from the carburetor.
WARNING
Do not allow the fuel to spill; catch the fuel in a container. Do not allow any fuel to come in contact with the hot engine or exhaust system. Extinguish any smoking materials before performing this check, and stay away from any open flames or heat sources.
b. Tighten the drain screw.
c. Remove the spark plug.
d. Loosen the drain screw and check that the carburetor is filled back up with fuel.
e. If it has been determined that fuel is reaching the carburetor, the ignition system should be checked next.
- Remove the spark plug and reattach it to the spark plug lead.
- While holding the spark plug firmly against the engine, push the starter switch with the engine stop switch in the “○” position and the remote engine stop switch cap is installed on the remote engine stop switch. If the ignition system is operating properly, a blue spark should jump across the spark plug gap. If there is no spark, take your machine to you authorized HYOSUNG dealer.
WARNING
Do not check for a spark unless you are certain that you know how to do it; you could get a high voltage electrical shock. When testing for a spark, do not point the spark plug near the spark plug hole. There may be some fuel inside the cylinder which could be ignited. Due to the possibility of electrical shock, anyone with a heart condition or pacemaker should avoid this check.
★ COMPLAINT : Engine stalls
- Make sure there is enough fuel in the fuel tank.
- Check to see that the spark plug is not fouled. Remove the plug and decarbon or replace it, if necessary.
- Make sure the fuel cock is clear. Also check connected to the fuel tank cap is not clogged.
TRANSPORTING
The TE100R should be transported in the normal position.

natural_image
Line drawing of a four-wheeled off-road vehicle with visible wheels and front suspension (no text or symbols)[NORMAL POSITION]
CAUTION
If the rTE100R be transported or deposited in the standing position, it may air income in the oil pump.
This may cause severe cylinder and piston damage which may not be bleed air of the oil pump.

natural_image
Technical line drawing of a vehicle chassis with two wheels and a valve, crossed by a cross symbol (no text or labels)[STANDING POSITION]
CAUTION
The TE100R should be transported or deposited in the normal position.
If the rTE100R be transported or deposited in the standing position, bleed air of oil pump.
Air bleeding of oil pump
①Loosen the air bleeding screw at the engine idles.
②Wait until the air bleeds out from the air bleeding screw completely.
③ Tighten the screw after air bleeding of oil pump.
Before transporting the TE100R drain the fuel from the carburetor as follows :
- Turn the fuel cock lever to the "OFF" position.
- Drain fuel from the carburetor into a suitable container by loosening the carburetor drain bolt.
- When the fuel has drained completely, retighten the drain bolt.
WARNING
When draining the carburetor, always shut the engine off. Do not smoke, and never drain or refuel in an area where there are open flames or sparks.
WARNING
Be sure to use a suitable container to catch the fuel you drain from the carburetor. Do not allow the fuel to spill or you may create a fire hazard. Keep fuel out of the reach of children and pets or they may be injured, and dispose of unwanted fuel properly.
WARNING
When transporting the TE100R lock the parking brake and tie down the vehicle securely with rope or some other suitable means. Use extra tie downs when you transport the vehicle in the standing position. Failure to properly secure the vehicle may result in an accident or damage to the vehicle.
★ STARTING THE TE100 R AFTER TRANSPORT
To feed fuel into the carburetor, turn the fuel cock to the ON position.
CLEANING PROCEDURE
A thorough cleaning of your ATV is a necessary part of maintenance and will help keep your ATV looking and performing its best. Proper cleaning can also extend the life of your ATV.
It is important to clean and inspect your ATV after every ride if it is used in mud, brush, grass, water, salt water, or very dusty conditions.
The build-up of mud, brush, grass, etc, especially on the engine and exhaust system, can reduce engine cooling, conceal damage, or increase wear of certain parts. It is important to remove all debris during cleaning.
★ PREPARATION FOR CLEANING
Wash the ATV before any mud dries on the ATV.
Block or seal the end of the exhaust pipe (muffler) using a piece of plastic wrap, cloth rag or another method to prevent water from entering the engine.
CAUTION
High pressure washers can damage your ATV.
High pressure washers such as those found at coinoperated car washers have enough pressure to damage the parts of your ATV. It may cause rust, corrosion and increase wear.
Do not use high pressure washers to clean your ATV.
★ WASHING YOUR ATV
With some care, your ATV can be washed in a similar manner to washing an automobile.
NOTE
Avoid spraying or allowing water to flow over the following places :
● Spark plug
●Fuel tank cap
Carburetor
After the battery removed, use a garden hose at low pressure to remove the majority of dirt or other debris. Hand wash your ATV with a mild soap or detergent and water. Try to thoroughly remove all dirt and debris without excessive water pressure. Cloth rags, washing mitts or cleaning brushes can be used, be careful with brushes as they may scratch plastic or painted surfaces. Rinse the ATV thoroughly with clean water. Dry all areas using a chamois or soft absorbent cloth.
★ INSPECTION AFTER CLEANING
Remove the rags or wrapping from the exhaust pipe. For extended life of your ATV, lubricate according to “GENERAL LUBRICATION” section.

WARNING
Operating ATV with wet brakes can be hazardous.
Wet brakes may not provide as much stopping power as dry brakes. This could lead to an accident.
Test your brakes after washing ATV, while riding at slow speed. If necessary, apply brakes several times to let friction dry out the linnings and pads.
Follow the procedures in the “INSPEC-TION BEFORE RIDING” section to check your ATV for any problems that may have arisen during your last ride.
STORAGE PROCEDURE
If your TE100R is to be left unused for an extended period of time, it needs special servicing requiring appropriate materials, equipment and skill. For this reason, HYOSUNG recommends that you trust this maintenance work to your HYOSUNG dealer. If you wish to service the machine for storage yourself, follow the general guidelines below:
★ VEHICLE
- Place the vehicle on level ground and thoroughly clean the entire vehicle.
- Remove the battery from the ATV.
★FUEL
Drain the fuel from the fuel tank using a commercially available hand pump or siphon. Drain the fuel from the carburetor using the carburetor drain screw.

WARNING
Do not allow the fuel to spill ; catch the fuel in a suitable container. Do not allow any fuel to come in contact with the hot engine or exhaust system. Extinguish smoking materials before draining any fuel and stay away from any other fire or heat source. Keep pets and children away from fuel, and dispose of unwanted fuel properly.
★ ENGINE
Pour one tablespoon of motor oil into the spark plug hole. Reinstall the spark plug and crank the engine a few times.
★ TIRES
Inflate tires to the normal specifications.
★ EXTERNAL
● Spray all vinyl and rubber parts with rubber preservative.
● Spray unpainted surfaces with rust preventative.
- Coat painted surfaces with car wax.
★ PROCEDURE FOR RETURNING TO SERVICE
- Clean the entire vehicle.
- Reinstall the battery.
CAUTION
Make sure that the battery lead wire is routed properly.
- Remove the spark plug. Turn the engine a few times by pushing the starter switch. Reinstall the spark plug.
● Make sure that the vehicle is properly lubricated. - Perform the “INSPECTION BEFORE RIDING” as listed in this manual.
LOCATION OF LABELS
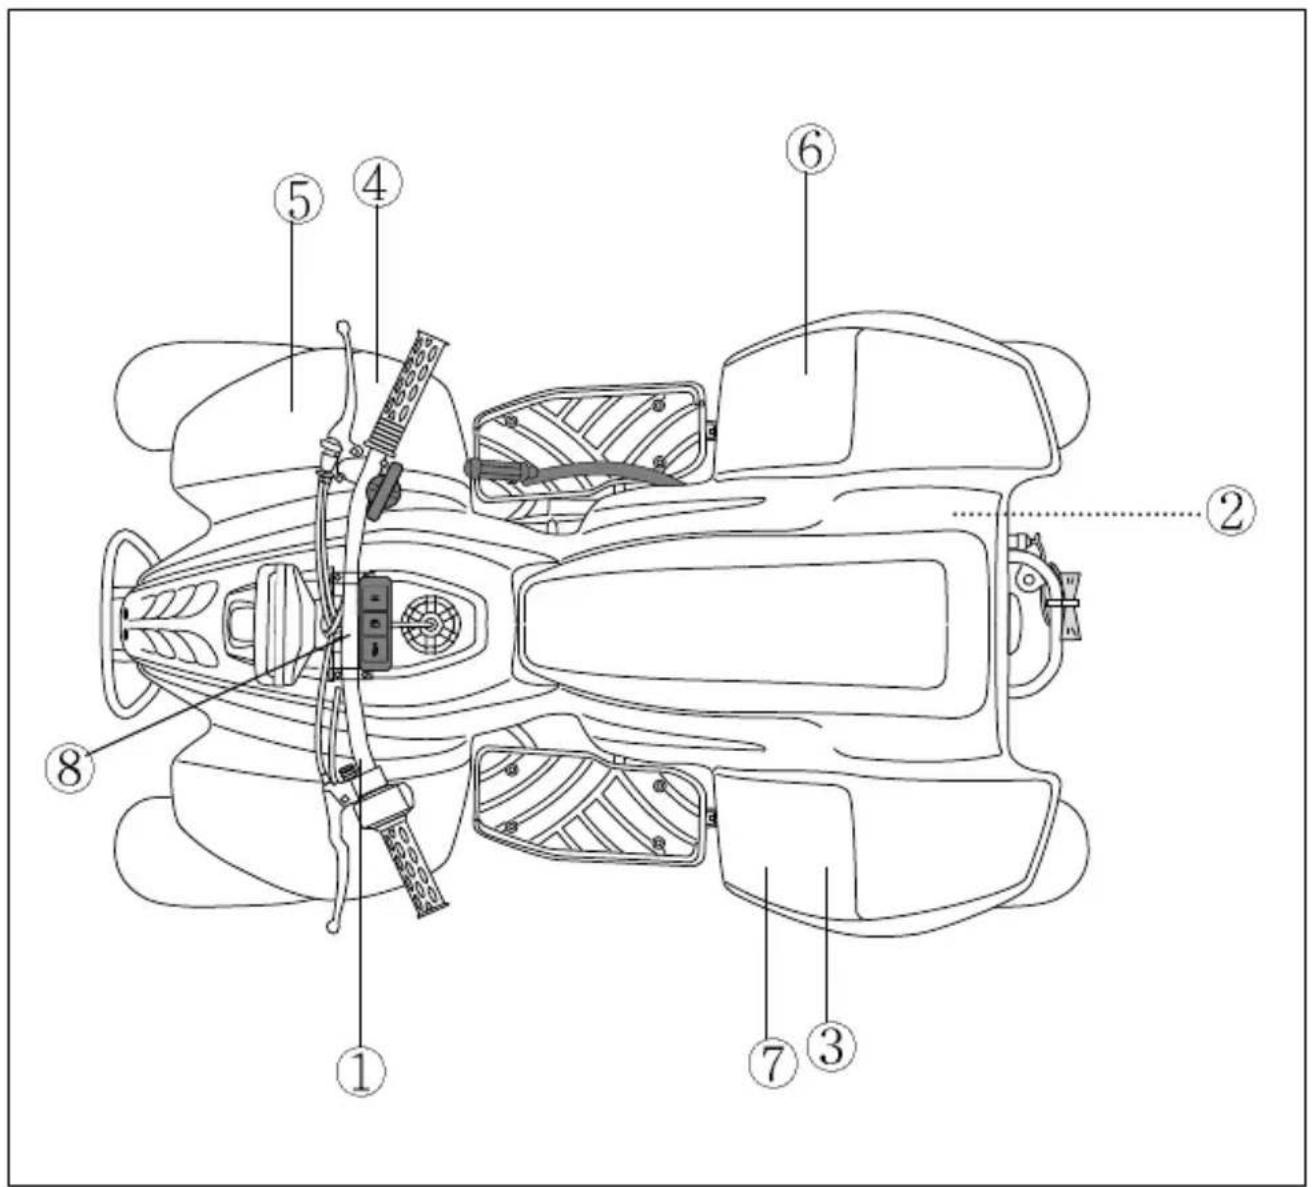
1
SET PARKING BRAKE BEFORE STARTING ENGINE.
68343 H K3100
2
WARNING
Operation of this ATV by children under the age of 12 increases the risk of severe injury or death.
Adult supervision required for children under age 16.
NEVER permit children under age 12 to operate this ATV.
68931 H L4150

WARNING
Improper tire pressure or overloading can cause loss of control.
Loss of control can result in severe injury or death.
ALWAYS maintain proper tire pressure as shown below.
NEVER exceed the Vehicle Load Capacity of 150 lbs (68 kg).
| LOAD | COLD TIRE PRESSURE |
| UP TO 150 lbs68 kg | FRONT 3.6 psi (0.25 kgf/cm2)REAR 3.6 psi (0.25 kgf/cm2) |
TIRE SIZE: FRONT 18×7.00-7 REAR 18×7.00-7
68332 H L4150

WARNING

NEVER ride as a passenger.
Passengers can cause a loss of control, resulting in SEVERE INJURY or DEATH.
68367 HK3100

WARNING
Improper ATV use can result in SEVERE INJURY or DEATH

ALWAYS USE AN APPROVED HELMET AND PROTECTIVE GEAR

NEVER USE ON PUBLIC ROADS
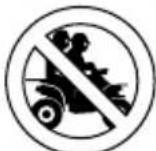
NEVER CARRY PASSENGERS
NEVER operate:
• without proper training or instruction
• at speeds too fast for your skills or the conditions
- on public roads – a collision can occur with another vehicle
- with a passenger – passengers affect balance and steering and increase risk of losing control
ALWAYS:
- use proper riding techniques to avoid vehicle overturns on hills and rough terrain and in turns
- avoid paved surfaces – pavement may seriously affect handling and control
LOCATE AND READ OWNER'S MANUAL. FOLLOW ALL INSTRUCTIONS AND WARNINGS.
68921 HK3100
6

WARNING
FAILURE TO TAKE THE FOLLOWING SAFETY PRECAUTIONS CAN RESULT IN SERIOUS PERSONAL INJURY.
- READ OWNER'S MANUAL CAREFULLY BEFORE OPERATION TO FAMILIARIZE YOURSELF WITH THIS VEHICLE'S UNIQUE HANDLING CHARACTERISTICS, PROPER RIDING TECHNIQUES, AND DETAILED SAFETY PRECAUTIONS, INSTRUCT ALL RIDERS ACCORDINGLY, THE OWNER'S MANUAL IS PROVIDED IN THE PACKING OF THIS VEHICLE.
● MAKE SURE ALL RIDERS UNDERSTAND THAT EVEN THOUGH THIS VEHICLE HAS FOUR WHEELS, IT CAN TIP OVER IN ANY DIRECTION IF IT IS IMPROPERLY USED.
● NO RIDERS UNDER AGE 12.
● ADULT MUST SUPERVISE OPERATION AT ALL TIMES.
● USE ONLY OFF - ROAD, NEVER USE ON PUBLIC ROADS OR PAVEMENT.
● SINGLE RIDER ONLY - NO PASSENGERS.
● WEAR HELMET, EYE PROTECTION AND PROTECTIVE CLOTHING.
● ADULT MUST PERFORM DAILY INSPECTION BEFORE OPERATION.
● TIRE INFLATION PRESSURE AND TIRE CHARACTERISTICS CAN AFFECT VEHICLE HANDLING. SEE THE TIRE INFORMATION LABEL AND YOUR OWNER'S MANUAL. A TIRE PRESSURE GAUGE IS IN THE TOOL KIT UNDER THE SEAT.
● ENGINE STARTING AND REFUELING MUST BE DONE BY ADULTS ONLY.
● WHEN REFUELING, DO NOT SMOKE, AND AVOID SOURCES OF SPARK OR FLAME.
● USE THE REMOTE ENGINE STOP SWITCH CAP AS A KEY TO PREVENT UNAUTHORIZED USE.
● DO NOT ALLOW THIS VEHICLE TO BE RIDDEN AT NIGHT.
● DO NOT EXCEED VEHICLE LOAD CAPACITY SHOWN ON THE TIRE INFORMATION LABEL. - WHEN USING ACCESSORIES OR CARRYING LOADS, FOLLOW THE GUIDELINES IN THE OWNER'S MANUAL.
RIDE SAFELY, PRESERVE NATUR, AND BE THOUGHTFUL OF OTHERS
68366 H L4150
WARNING
When shifting a gear into forward or reverse, please operate a gear shifting lever after ATV stop completely.
68500HP4350-PL
SPECIFICATIONS
DIMENSIONS AND MASS
| TE 100R | |
| Overall length | 1,355mm (53.4 in) |
| Overall width | 820mm (32.3 in) |
| Overall height | 865mm (34.1 in) |
| Wheelbase | 950mm (37.4 in) |
| Ground clearane | 120mm (4.7 in) |
| Front track | 658mm (25.9 in) |
| Rear track | 658mm (25.9 in) |
| Mass | 100kg (221 lbs) |
ENGINE
| TE 100R | |
| Type | Two-stroke, forced air-cooled |
| Intake system | Reed valve |
| Number of cylinder | 1 |
| Bore x Stroke | 52.5 46.0mm (2.07 1.81 in) |
| Piston displacement | 99 (6.04 in ^3 ) |
| Corrected compression ratio | 6.7 : 1 |
| Carburetor | PB11M |
TRANSMISSION
| TE 100R | ||
| Transmission | 2.257~0.782 | |
| Gear ratio | Forward | 32/13 39/9 |
| Reverse | 27/13 39/9 | |
| Drive chain | 428H 56 links | |
CHASSIS
| TE 100R | |
| Front brake | Drum brake |
| Rear brake | Disk brake |
| Front tire size | 18 7.00 - 7 |
| Rear tire size | 18 7.00 - 7 |
ELECTRICAL
| TE 100R | |
| Ignition type | CDI Type |
| Spark plug | BPR7HS |
CAPACITIES
| TE 100R | |
| Fuel tank | 4.0 |
| Engine oil tank | 0.6 |
| Transmission oil | 80 (Replace) |
| 90 (Overhaul) |

WARNING
Noise Control System(muffler assembly)
TAMPERING WITH NOISE CONTROL SYSTEM PROHIBITED
Owners are warned that the law may prohibit :
(a) The removal or rendering inoperative by any person other than for the purpose of maintenance, repair or replacement, of any device or element of design incorporated into any new vehicle for the purpose of noise control prior to its any sale or delivery to the ultimate purchaser or while it is in use; and
(b) The use of the vehicle after such device or element of design has been removed or rendered inoperative by any person.
MAINTENANCE:
The exhaust system of this motorcycle requires no periodic maintenance.
The engine should be adjusted to the manufacture's specifications and the spark plug should be kept in good condition. Running the engine with incorrectly operating spark plug or misadjusted carburetor may cause permanent damage to the catalyst and to the noise control system.

Prepared by
HYOSUNG MOTORS & MACHINERY INC.
1st Ed. SEP. 2004.
Printed in KOREA
- FOREWORD
- IMPORTANT
- WARNING/CAUTION/NOTE
- WARNING
- CAUTION
- NOTE
- IMPORTANT NOTICE TO PARENTS
- TABLE OF CONTENTS
- SERIAL NUMBER LOCATION
- FUEL AND OIL RECOMMENDATION
- FUEL
- ENGINE OIL
- TRANSMISSION OIL
- LOCATION OF PARTS
- CONTROLS
- IGNITION SWITCH
- (ON) POSITION
- OFF POSITION
- IGNITION KEY
- INDICATOR LAMP
- ① OIL INDICATOR LAMP
- ②FUEL INDICATOR LAMP
- ③ REVERSE GEAR INDICATOR LAMP
- LEFT HANDLEBAR
- ①Rear Brake Lever
- ②Parking Brake Knob
- ③ Starter Switch
- ④ Engine Stop Switch
- RIGHT HANDLEBAR
- ① Front Brake Lever
- ② Throttle Lever
- REVERSE GEAR LEVER
- FUEL COCK
- “ON Position
- "OFF Position
- ● “RES (RESERVE) Position
- KICK START LEVER
- EQUIPMENT AND ADJUSTMENTS
- FUEL TANK CAP
- REMOTE ENGINE STOP SWITCH
- - Instruction For Remote engine stop switch Lanyard Storage
- BREAK-IN (RUNNING-IN)
- ★ MAXIMUM THROTTLE OPEN- ING RECOMMENDATION
- ★ VARY THE ENGINE SPEED
- ★ AVOID CONSTANT LOW SPEED
- ★ OBSERVE YOUR INITIAL AND MOST CRITICAL SERVICE
- INSPECTION BEFORE RIDING
- RIDING TIPS
- ★ DO NOT START THE『TE 1 0 OR』OR ALLOW YOUR CHILD TO RIDE YET
- ★ STARTING THE ENGINE
- ■ Start by using the kick start lever
- ★ STARTING OFF
- BRAKING
- TURNING
- ■ At higher speeds :
- ★ SKIDDING OR SLIDING
- Front wheel:
- Rear wheel
- ★OPERATION ON HILLS
- Climbing a Hill
- ■ Descending a Hill
- ■ Traversing a Slope
- ★ RIDING THROUGH WATER
- ★ RIDING IN REVERSE
- ★ STOPPING THE ENGINE
- ★ PARKING THE VEHICLE
- ■STEP 1 - PROPER CLOTHING AND PROTECTIVE GEAR
- ■ STEP 2 - FAMILIARIZATION WITH THE VEHICLE
- ■ STEP 3 - STARTING OFF AND STOPPING
- ■ STEP 4 - TURNING
- ■ STEP 5 - PUTTING IT ALL TOGETHER
- INSPECTION AND MAINTENANCE
- MAINTENACE SCHEDULE
- PERIODIC MAINTENANCE CHART
- SEAT REMOVAL
- TOOLS
- INSPECTION OF FUEL
- INSPECTION OF ENGINE OIL
- AIR CLEANER
- - Washing the Element
- SPARK PLUG
- SHIFT PLAY
- SHIFT PLAY Ⓐ
- IDLE SPEED ADUSTMENT
- THROTTLE CABLE ADJUSTMENT FUEL HOSE
- To change the oil :
- BRAKE
- Front Brake
- ● Brake shoe wear limit
- Rear Brake
- ● Brake adjustment
- ● Brake pads
- TIRES
- DRIVE CHAIN
- - Inspect Drive Chain Slack
- FRONT AND REAR WHEEL REMOVAL
- REPLACEMENT OF THE LAMP
- HEAD LAMP
- ◦ TAIL LAMP
- GENERAL LUBRICATION
- TROUBLE SHOOTING
- ★ COMPLAINT : Engine is hard to start or does not start at all.
- FUEL SYSTEM CHECK
- ★ COMPLAINT : Engine stalls
- TRANSPORTING
- ★ STARTING THE TE100 R AFTER TRANSPORT
- CLEANING PROCEDURE
- ★ PREPARATION FOR CLEANING
- ★ WASHING YOUR ATV
- ★ INSPECTION AFTER CLEANING
- STORAGE PROCEDURE
- ★ VEHICLE
- ★FUEL
- ★ ENGINE
- ★ TIRES
- ★ EXTERNAL
- ★ PROCEDURE FOR RETURNING TO SERVICE
- LOCATION OF LABELS
- NEVER operate:
- ALWAYS:
- SPECIFICATIONS
- TAMPERING WITH NOISE CONTROL SYSTEM PROHIBITED
- MAINTENANCE:
- HYOSUNG MOTORS & MACHINERY INC.
Brand : HYOSUNG
Model : TE100R
Category : Quad