
WS590H - Weather Station Clas Ohlson - Free user manual and instructions
Find the device manual for free WS590H Clas Ohlson in PDF.


| Product type | Weather station |
| Brand | Clas Ohlson |
| Model | WS590H |
| Power supply (receiver) | 2 x LR6 (AA) batteries |
| Power supply (sensor) | 2 x LR6 (AA) batteries |
| Display type | LCD |
| Indoor temperature range | -20°C to +55°C |
| Outdoor temperature range | -30°C to +70°C |
| Humidity range | 15% to 95% |
| Number of sensors supported | Up to 4 (433 MHz) |
| Wireless frequency | 433 MHz |
| Calendar | Eternal calendar with day of week (auto leap year) |
| Alarm function | 2 programmable alarms with snooze (8 min) |
| Snooze function | Yes |
| Weather forecast | 12-24 hours, 30-50 km radius (≈75% accuracy) |
| Moon phase display | Yes (dark symbol represents actual moon) |
| Temperature trend indicator | Arrows (rising, stable, falling) |
| Air pressure graph | 12-hour history in 3-hour intervals |
| Temperature alarm | Indoor and outdoor (high/low) settable |
| Min/Max temperature memory | Daily min and max (resets at midnight) |
| Unit switching | °C/°F |
| Battery low indicator | Yes (on receiver and sensor) |
| Mounting options | Table stand and wall bracket |
Frequently Asked Questions - WS590H Clas Ohlson
User questions about WS590H Clas Ohlson
0 question about this device. Answer the ones you know or ask your own.
Ask a new question about this device
Download the instructions for your Weather Station in PDF format for free! Find your manual WS590H - Clas Ohlson and take your electronic device back in hand. On this page are published all the documents necessary for the use of your device. WS590H by Clas Ohlson.
USER MANUAL WS590H Clas Ohlson
Mottagaren
The Ground Truth image displays a single, solid horizontal line. According to Rule 2 (UNDERSCORE & LINE RULES), this is a stylistic or background line, not a placeholder underscore. Therefore, the OCR result must ignore it and output nothing or only meaningful text. The provided OCR content is "____", which consists of four underscores. This is an incorrect interpretation of the line as a placeholder, violating the rule that stylistic lines must be ignored. The OCR has hallucinated placeholder underscores where none should exist in the GT. Hence, the OCR result is inconsistent with the Ground Truth.
Herätyksen asetus
Mottaker
Please read the entire instruction manual before using and save it for future use. We apologise for any text or photo errors and any changes of technical data. If you have any questions concerning technical problems please contact our Customer Service Department
Description
General:
- Eternal calendar
- Indoor temperature
- Outdoor temperature and humidity
- Can receive and display temperature and humidity data from up to four sensors via radio signals on 433 MHz
- Max. and min. temperature memory
- Temperature and humidity trend
- Air pressure graph
- Temperature alarm
- Weather foregas
- Moon phase symbols
- Temperature readings in °C (Celsius) and °F (Fahrenheit)
- Battery type: In total 4x LR6
Receiver

Sensor
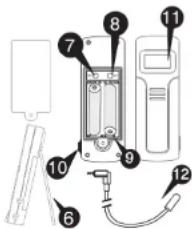
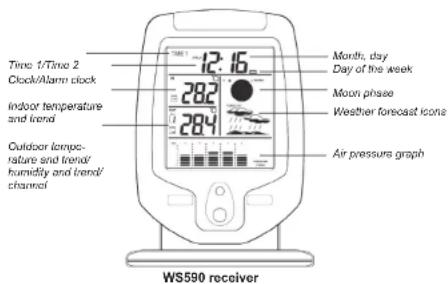
Receiver
- Snooze/Mode: Push repeatedly to see Time 1 and 2, Alarm 1 and 2, Date and Temperature Alarm. Functions as an on/off button with snooze for the alarm clock.
- Hour/+/Max/Min: Adjusts the clock, alarm, date, time and values for temperature alarm. Even displays indoor/outdoor max and min temperatures.
- Minute/°C/°F: Adjusts the clock, alarm, date, time and values for temperature alarm. Switches between display of Celsius (°C) or Fahrenheit (°F).
- Alarm: Switches between 12 and 24 hour display, alarm 1 and 2 on/off, shuts off the temperature alarm.
- Channel: Push repeatedly to display the different channels (sensors) 1-4 or to check the temperature alarm settings of the different channels (sensors). Can also be used to synchronise the various units.
- Table stand
- LCD-display
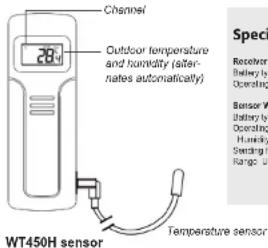
Sensor:
- C/F: Changes between Celsius and Fahrenheit and skips between channels and house codes.
9. Battery compartment
- Connecting an external temperature sensor.
11. LCD-display
-
External temperature sensor connector wire.
-
Set: Channel and house code setting button. Push to select a channel for the sensor and to set a code to suit your receiver unit. Important if there is other radio equipment close by which might interfere.
14. Wall bracket and table stand
Before starting
- Insert batteries in the sensor first, then the receiver.
- When inserting the batteries, place the sensor and the receiver unit close to each other to make sure that they synchronise.
- Position the sensor and receiver within operating range of one another. NOTE! Despite the sensor being watertight, we recommend that it is not exposed to direct sunlight, rain and snow. The range of the units is affected by their position in relation to various obstacles or walls. Experiment until you find the best position.
Getting started
Installing the sensor
-
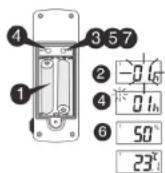
Remove the battery cover and insert 2x LR6 batteries.
-
The house code digit flashes for 8 seconds.
- Whilst the digit is flashing, choose a house code (01-15) by pushing the "C/F" button repeatedly. Make sure that all the sensors in your system have the same house code.
- Push "SET" to confirm the house code. The channel will flash for 8 seconds.
- Select a channel (1-4) by pushing "C/F". Conform the channel by pushing "SET" or by not pushing any button for 10 seconds. If you select have one person we recommend that you
only have one sensor, we recommend that you choose channel 1. - Temperature and humidity are shown on the display.
- Alternate between Celsius and Fahrenheit by pushing "C/F".
- When the sensor is installed it will send data with one minute intervals.
- Choose another house code if your weather station can receive interference from other radio signals.
• Factory presetting: house code = 01, channel = 1
Installing the receiver
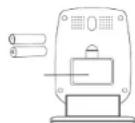
Remove the battery cover and insert 2x LR6 batteries. Make sure that the plus and minus poles correspond to the markings in the battery compartment.
Synchronising the units
Automatic synchronisation:
1. The synchronisation starts automatically and lasts for about three minutes when you insert batteries for the first time.
2. During these three minutes the receiver emits an audible signal, intercepts the temperature radio signal and displays it on the readout.
NOTE! If the receiver does not receive any signals
within three minutes “---” appears instead of the temperature. Position the units closer together and start the automatic synchronisation again by removing and inserting the batteries once more.

Manual synchronisation (searching for signals)
If you add another sensor to the system or if the receiver loses the signal (digits for the outdoor temperature flash) you need to synchronise the system again.
- Hold in the "Channel" button for three seconds when the receiver is in clock mode.
- An audible signal lets you know that the synchronisation has begun.
- The "CH" icon flashes and the receiver emits an audible signal when it has located the new sensor.
- The temperature and humidity at the sensor are displayed on the readout.
NOTE! The synchronisation procedure lasts about three minutes. If the units have not found one another within that time, try new positions until the signal is received.
Setting the time and date
To set clock 1:
- Hold in MODE for approx.3 seconds to set the clock. The CLOCK 1 symbol will show and the time blinks.
- Press Hour to set the hours and press Minute to set the minutes.
- While setting the clock, press Alarm to switch between 12/24 hour display.
- Push Mode or do not push any button for a minute to confirm the time settings.
To set clock 2
- Press MODE repeatedly until the CLOCK 2 symbol is shown on the display.
- Press Hour to set the hours and press Minute to set the minutes.
Setting the date:
- Press Hour to set the month.
- Press Minute to set the date.
- Press Minute/-/Min to set the date
- Push the Mode button once so that "YEAR" appears on the display.
- Press Hour or Minute to set the year.
• The day of the week is set automatically when you set the date.
• February automatically has 29 days when it is a leap year.


Setting the alarm
- Push the "Mode" button repeatedly to
come to "Alarm 1" or 'Alarm 2 - Press * Hour to set the hours
- Press * Minute to set the minutes.
- Push the "Alarm" button to activate or
deactivate the alarm. - The 1 or symbol appears on the
display when the alarm is activated.
When the alarm sounds
6. 1 la52
- Push the Snooze button to temporarily deactivate the alarm. The alarm will reactivate after 8 minutes. If you want to turn the alarm off completely, push any of the other buttons. If you do not push it off automatically after one minute.

Phases of the moon

The phases of the moon appear on the display and differ in appearance depending on the date. The symbols on the display represent the different phases of the moon, from new moon to full moon and back to new moon again.
NOTE! The actual "moon" is the dark one, not the light one!
Use
Reading the temperature
Reading the indoor temperature:
- When you have inserted the batteries the temperature will appear on the display.

Reading the outdoor temperature and humidity.
- Push the Channel button repeatedly to switch from channel 1, 2, 3 and 4. The temperature and humidity alternate on the display.
- Press and hold in Alarm for approx.3 seconds to activate or deactivate the automatic switch between the different channels (applies if you have more then one sensor).
Switching between Celsius and Fahrenheit:
- Switch between Celsius and Fahrenheit by pressing Alarm when the receiver is in clock mode.
Min. and max. temperature:
-
Press Hour in Clock 1 mode to see the min temperature.
-
Press Hour again in Clock 1 mode to see the max temperature.
NOTE! The min/max temperatures are erased every day at midnight.
High and low indication
'Hi' and 'Lo' appear on the display when the values fall over or under the normal values.
| Indoor/Outdoor | Temperature | Humidity | Display |
| Indoor > +55°C >95% Hi | |||
| Indoor < -20°C < 15% Lo | |||
| Outdoor > -70°C > 95% H | |||
| Outdoor < -30°C < 15% Lo |
Temperature Trend:
The temperature trend is read every half-hour and is shown with arrows as follows:
| Indicator | |||
| Trend | Rising | Stable | Falling |
Air Pressure Trend
Graph showing the air pressure over the last 12 hours in 3-hour intervals.

Setting the temperature alarm
You can decide if you want the alarm to warn you when the temperature reaches a certain level. You can set two alarms at the same time – one for the receiver and one for a sensor.
Indoor temperature alarm (receiver unit)
-
Press the Mode button repeatedly to get to the indoor temperature alarm setting mode.
-
The preset value 14°C or the latest setting will flash.
- Press Hour or Minute to set desired temperature for when the alarm should sound.
- Press Alarm repeatedly to switch between temperature alarms for high respective low temperature and also to activate the alarm.
- Press Mode to confirm the setting.
Outdoor temperature alarm (sensor)
- Press the Mode button repeatedly to get to the outdoor temperature alarm setting mode.
- Press Channel to select a sensor.
- The preset value 14°C or the latest setting will flash.
- Press Hour or Minute to set desired temperature for when the alarm should sound.
- Press Alarm repeatedly to switch between temperature alarms for high respective low temperature and also to activate the alarm.
- Press Mode to confirm the setting.
When the temperature alarm sounds:
- Press any button to shut the alarm off. If you do not push any button the alarm will shut off automatically after one minute.
• The alarm will sound when the temperature has reached the chosen value. - The signal from the temperature alarm sounds different to the signal from alarm 1 and alarm 2 (the timed alarms).
Weather forecast
- This weather station can detect changes in the air pressure and thus
forecast the next 12-24 hours' weather in a 30-50 km radius of the receiver. When the weather station is installed you can ignore it's forecasts for the first 12-24 hours as it needs some time to adjust to a new location before providing reliable forecasts. - Absolute precision cannot be guaranteed. The weather forecast function has an accuracy of about 75%, due to the fact that it is designed to be used in many different types of area.
- If the weather station is moved to a location with a significant difference in the height above sea level, the batteries should be removed and then replaced again after about 30 seconds. By doing this the weather station is not fooled into detecting the difference in pressure and providing an incorrect forecast. Again, you should ignore the forecasts for the first 24 hours.
Weather forecast icons
| Sun | Cloud Rain | Snow | Frost warning | Storm warning | |
Remarks about the frost warning function:
• The snow symbol flashes when there is a frost warning.
- Activates when the outdoor temperature sensor is between -1.9°C and +2.9°C.
• The snow symbols stop flashing and stay constant when the temperature falls below -1.9^
External temperature sensor
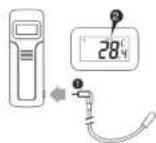
The sensor is equipped with a socket for connecting the supplied external temperature sensor.
- Connect the external weather probe to the sensor.
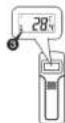
- When the weather probe is connected, the following appears on the display:
• Temperature at the probe.
• Humidity at the sensor. - The "OUT" symbol appears on the sensor.
Batteries
If the batteries are exposed to very low or very high temperatures for a long time, they can lose their power thus reducing the range between the sensor and the receiver.
Receiver
- If the low battery symbol appears on the display beneath the indoor temperature trend square, it is time to change the receiver battery. When the battery is low the following can happen:
- The display dies.
- The range between the sensor and receiver is reduced.
• Data from the sensor is lost. - You will need 2 LR6 batteries for the sensor.
NOTE! When you replace the receiver batteries all data is lost.

Sensor
- If the low battery symbol appears on the sensor's display, it is time to replace the battery.
- The low battery symbol also appears beneath the outdoor temperature trend square on the receiver.
- You will need 2 LR6 batteries for the sensor.
Trouble Shooting Guide
| Problem | Solution |
| The temperature on the sensor's display is not the same as the outdoor temperature displayed on the receiver. | Wait 1-2 minutes to make sure that the sensor and receiver are in sync. If not, synchronise the units again by holding in the "Channel" button for three seconds until a signal is heard. |
| The temperature on the sensor seems to be too high. | Make sure that the sensor is not placed in direct sunlight or next to a heat source. |
| The receiver cannot receive signals and display them. | - Synchronise the units again.- Move the units closer together.- The temperature could be under 30°C.- The sensor's batteries need replacing.- Make sure that the sensor is placed away from electrical interference. |
| The functions are strange or not working at all. | The instrument needs to be reset. Do this by replacing the batteries in both the sensor and receiver. |
| The display unit only shows a dash symbol when displaying the outdoor sensor's readings. | The sensor and the display unit are not in contact with each other:- Remove the batteries from both the sensor and the display unit and leave them out for about 1 minute.- Replace the batteries in the display unit first, and then the sensor, they should now be in contact with each other again.- Place the display unit and the sensor next to each other when carrying out this procedure. |
Recycling
Follow local ordinances when disposing of this product. If you are unsure about how to dispose of this product contact your municipality.

- Mottagaren
- Herätyksen asetus
- Mottaker
- Description
- General:
- Receiver
- Sensor:
- Battery compartment
- LCD-display
- Wall bracket and table stand
- Before starting
- Getting started
- Installing the sensor
- Installing the receiver
- Synchronising the units
- Manual synchronisation (searching for signals)
- Setting the time and date
- To set clock 1:
- To set clock 2
- Setting the date:
- Setting the alarm
- When the alarm sounds
- 1 la52
- Phases of the moon
- Use
- Reading the temperature
- High and low indication
- Temperature Trend:
- Air Pressure Trend
- Setting the temperature alarm
- Indoor temperature alarm (receiver unit)
- Outdoor temperature alarm (sensor)
- When the temperature alarm sounds:
- Weather forecast
- Weather forecast icons
- Remarks about the frost warning function:
- External temperature sensor
- Batteries
- Sensor
- Recycling
Brand : Clas Ohlson
Model : WS590H
Category : Weather Station