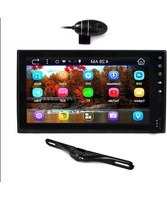
PLDNAND465 - Rear Camera Pyle - Free user manual and instructions
Find the device manual for free PLDNAND465 Pyle in PDF.


| Product Type | Rear View Backup Camera |
| Brand | Pyle |
| Model | PLDNAND465 |
| Dimensions (approx.) | 2.5 x 1.5 x 1.5 inches |
| Weight | 0.5 lbs (0.23 kg) |
| Power Supply | 12V DC (vehicle battery) |
| Image Sensor | CMOS |
| Viewing Angle | 170° wide angle |
| Night Vision | Infrared LEDs for low-light visibility |
| Waterproof Rating | IP69K (fully waterproof) |
| Video Output | Composite video (RCA) |
| Parking Guidelines | Adjustable distance guide lines overlay |
| Mirror Image | Selectable normal or mirror image |
| Mounting Type | Flush mount or license plate mount |
| Maintenance | Clean lens with a soft, dry cloth |
| Safety Precautions | Use only as a visual aid; always check surroundings manually |
| Spare Parts Available | Contact Pyle customer support for replacement cables/adapters |
| Warranty | 1 year limited warranty |
Frequently Asked Questions - PLDNAND465 Pyle
User questions about PLDNAND465 Pyle
0 question about this device. Answer the ones you know or ask your own.
Ask a new question about this device
Download the instructions for your Rear Camera in PDF format for free! Find your manual PLDNAND465 - Pyle and take your electronic device back in hand. On this page are published all the documents necessary for the use of your device. PLDNAND465 by Pyle.
USER MANUAL PLDNAND465 Pyle
natural_image
Black oval-shaped object with a camera lens and attached lever (no visible text or symbols)
natural_image
Black plastic cable with three colored connectors (red, yellow, orange) attached to a black connector (no text or symbols visible)Model:
PLDNAND465
6.5" Touchscreen Double DIN Stereo Receiver Headunit

natural_image
Side profile of a silver sedan car with visible wheel and side mirror (no text or symbols)Note: This unit is based on Android 4.4.4 platform. Besides the standard Apps we provided with the unit, you can also download thousands of Apps and install it on our platform. Please kindly note NOT all Apps are compatible with this platform. If you have any compatibility problem with a 3rd party App, please contact your App provider. For the operation instruction of a certain 3rd party App, please also contact your App provider. We are not responsible for any problem with your 3rd party Apps.
Thank you for choosing Pyle Audio!
To enjoy of the unit's features, along with proper and safe operation, please be sure to read through this manual before use. It is especially important to thoroughly understand and follow all system warnings and precautions. Keep the manual in a safe location for future reference when necessary. Contact your dealer or the nearest authorized repair center for any service, repair or technical support assistance.
| Contents | |
| Precautions | 2 |
| Installation Guide | 3 |
| Installing Steering Wheel Control | 4 |
| Front Panel and Buttons | 5 |
| Turning Power On | 5 |
| Graphics User Interface | 6 |
| Settings | 7 |
| Set Time | 7 |
| Sound | 7 |
| Aux | 7 |
| Calendar | 8 |
| Calculator | 8 |
| EQ | 8 |
| Radio | 9 |
| SD | 9 |
| USB | 9 |
| Video | 9 |
| Wallpaper | 9 |
| Third Party Apps | 10 |
| Trouble Shooting | 10 |
| Wiring | 12 |
| Bluetooth | 14 |
| How to access internet | 15 |
Note: Pyle Audio is constantly aiming to improve the customer experience and your receiver's features and specifications are continually changing for the better, with improvements to the user interface experience, software updates, bug fixes, etc. System descriptions and features reflected as herein stated by this user manual serves to express the Pyle Audio Headunit Receiver features at the current production period. We reserve the right to change terms and conditions of system specifications, features and descriptions at any time, as we continue to improve and provide our customers with upgrades in safety, performance and system operation in general. For questions, comments and concerns, visit PyleAudio.com for more information.
visit for the latest products & up-to-date model specific informationwww.PyleUSA.com
Compatibility
This unit is a standard “Double Din” sized radio. Check to see that your vehicle accepts a double din sized radio. This unit conforms to the standard size and dimensions of a double din radio. Your vehicle may require a vehicle specific or 3^rd party double din installation kit.
Precautions & Warnings
Please take a moment to read through this information booklet and heed all precautions to ensure a positive user experience.
For your safety, you must not operate the head unit's controls while driving. Make sure you have the volume set to a level where external sounds are still audible.
Do not watch the monitor, or attempt to operate any of the multimedia features while driving. If the parking brake is not engaged video playback will be disabled for your safety.
Cleaning
Clean the LCD with a slightly damp cloth. Keep the screen clean and free of any debris.
Do not use solvents such as alcohol, benzene, thinner, commercially available cleaners or antistatic spray.
When wiping the screen be sure not to scratch the surface.
Temperature
In cold weather, check for condensation on the disc. If found, wipe the moisture from the disc and do not operate your player for an hour until condensation disappears from the unit's optical reader.
System Handling
Screen may not be clear if the temperature of the vehicle is too cold or too hot. The picture will return as the car's temperature returns to normal. Never touch the screen, or operate the touch screen, with anything besides your finger(s). When the display is subject to direct sunlight and glare, the unit may become hot resulting in possible damage to the LCD display. Avoid exposing the display to excessive sunlight as much as possible.
Note:
Driving on rough terrain may cause the disc to skip during playback.
In the event of a malfunction, never open the unit's casing or lubricate any parts. Contact Sound Around USA for repair information. If liquid or any other foreign substances enter the unit, turn the power of immediately and consult your dealer or the nearest authorized repair center. If you notice smoke, irregular noises or smells coming from the unit, power off immediately and consult your dealer or the ne authorized repair center. Do not attempt to disassemble or modify the unit as there are sensitive and high voltage electronic components which can cause damage to the unit, or to one's self, if handled improperly. Be sure to consult your dealer or the nearest authorized repair center for any technical assistance
This equipment has been tested and found to comply with the limits of a Class B digital device, pursuant to Part 15 of the FCC rules and regulations. These limits are designed to provide reasonable protection against any harmful interference in a residential installation. This equipment generates, uses, and can radiate radio frequency energy. If not installed and used in accordance with the instructions, the unit may cause harmful interference to radio communications. If the unit is found to cause harmful interference the user encouraged to consult an experienced radio technician.
System Installation:
Before starting: To prevent short circuits, be sure to disconnect the battery terminal before starting.
Installation Guide - Double Din Fitting:
Caution:
1) This screen opens up. Install the unit within 30 degrees of the horizontal plane. Check that the screen has enough room to fully open. Restricting screen movement will cause damage to the mechanism.
2) Consult your vehicle dealership before making any modifications to your car's body (ex. Drilling holes)
3) Use included screws in installation. Improper hardware may result in damage.
Do not install unit in any area where:
-It may obstruct the steering wheel and gearshift lever operations
-It may obstruct the operation of safety devices such as air bags
-It may obstruct visibility
Installation kits:
This unit conforms to the standard size and dimensions of a double din radio.
Your vehicle may require a vehicle specific or 3^rd party double din installation kit.
Consult your dealer or the nearest authorized repair center for any technical assistance.
*Mounting Sleeve Bracket not included

Outer Trim Cover
*Ensure that the opening or closing of the in-dash unit, when mounted, so as it will not interfere with any of your vehicle's interior panels, consoles, gear shifts, etc. Ensure not to use elongated screws when installing / securing your unit to the in-dashconsole to avoid damage.


Installing Steering Wheel Control
Note on compatibility: This unit is a dual wire code learning Steering wheel interface, adaptable to any vehicle with existing steering wheel controls. This unit has the ability to wire directly to your vehicle's steering wheel column and does not, but may, require a 3^rd party steering wheel control interface. Pyle Audio Technical support can assist you in interfacing into vehicles with existing steering wheel controls. For additional help, contact Pyle Technical Support and be sure to supply Year Make Model and options of vehicle so that proper instructions can be supplied.
Key 1 and Key 2 wires are used for setting up steering wheel controls. The location of the attachment wires in the steering wheel column varies between different vehicle makes and models.
Steering Wheel Controls
Select the command in the application, then press the corresponding button on the wheel to teach the unit how to behave when steering wheel controls are used. To enter the steering wheel menu it will prompt you for a 4 digit pass code you will need to enter '0000'. Then you can manually program each desired option following the on screen instructions. (Note: This feature is not compatible with all vehicle types).
Front Panel and Buttons

| Button & Feature Layout | |
| Hold to power up | |
| Return | |
| Switch between apps/radio interface, Press while in GPS interface to return to radio apps | |
| Volume up | |
| Volume down | |
| RST | Use a pin to insert into reset port to trigger unit reset. (Hold for 20 secs . to reset) |
Tips: Navi----You might have several maps in this device, by pressing Navi button, you will enter into the map which you set as default in the Navi path, if you want to change the navi path to another map, please go to setting to change it Setting → Car setting → Navi setting.
Turning Power On
1) Turn on the engine key to the "ACC" or "ON" position
2) Press and hold the power button for 3 seconds
-When the engine key is turned to the off position the unit is turned off
Status Bar (Along top of radio screen and app screen) you can swipe down for more.
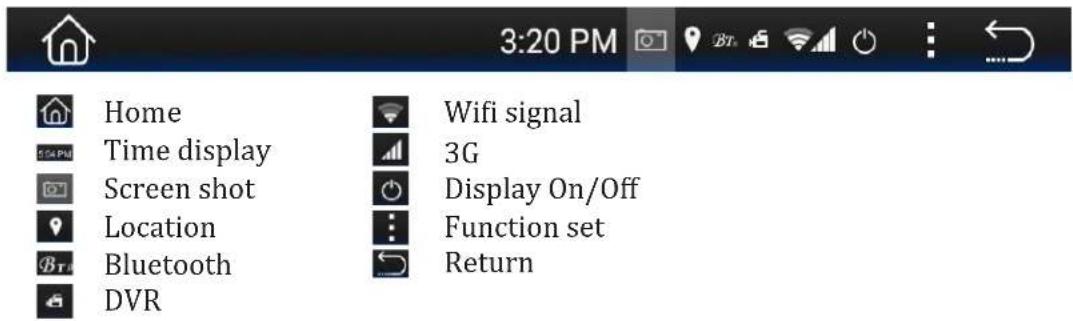
visit for additional and detailed model-specific information. www.PyleUSA.com


Swipe left/right to access more apps
| Navigation | |
| Radio | |
| All Apps list | |
| BT | |
| Settings |
| Navi | Loads Navigation software (if you have several maps in this device, you can set the default map. Setting →Car setting → Navi setting.) |
| Radio | AM/FM Tuner |
| Bluetooth | Bluetooth |
| AUX | Auxiliary Audio Video Input |
| DVR | DVR |
| Clock | Shortcut to Time Setting |
| Calculator | Opens Calendar app |
| Clear cache | Clear Cache |
| Easy connected | Phone Link |
*Please Note: GPS - Navigation and CD/DVD options and applications may only be found in select headunit receiver stereo systems, which include these, and other, additional/special features -- not all Pyle stereo models come equipped with GPS Navigation and/or CD/DVD players.
Visit www.PyleUSA.com for more detailed information and more product specific information.
Settings
1) Scrolling
Use the red bar to scroll through the list of all available options.
2) Turn on/ off
Many settings can be toggled on or off in this screen
*Note: Factory setup is not adjustable by user. Do not attempt to enter this setup menu.
Set Time
1) Time Options
You can select using GPS to provide positioning time or using net work-provided time.
Visit to learn more about model specific information. www.PyleUSA.com
2) Date and Time
Use the up and down arrows to set the date and time accordingly.
Sound
1) Fade/ Balance
Hold and drag left, right up or down to control the fade and balance of your audio output.
Aux
Auxiliary input (rear RCA jacks) allow audio and video from external devices to be displayed or played through the unit. Auxiliary output (rear RCA jacks) allow audio and video to be sent out to external devices.
1) Customization - Use the settings to adjust and optimize the display quality.
Note: auxiliary app will display “No Signal” if no video signal is connected. Screen controls will not become active until external video signal is detected.

*The Parking brake will need to be wired to a grounding trigger to allow video pass through or a warning message will appear saying warning video disabled while driving.
Calendar
Displays the day, month and year.
Use forward and back arrows the view past or future months.
Selected dates are highlighted in blue
Note: Calendar does not allow entry of appointments. Date must be set within system settings
Calculator
A handy little app for simple calculations

EQ - Equalizer
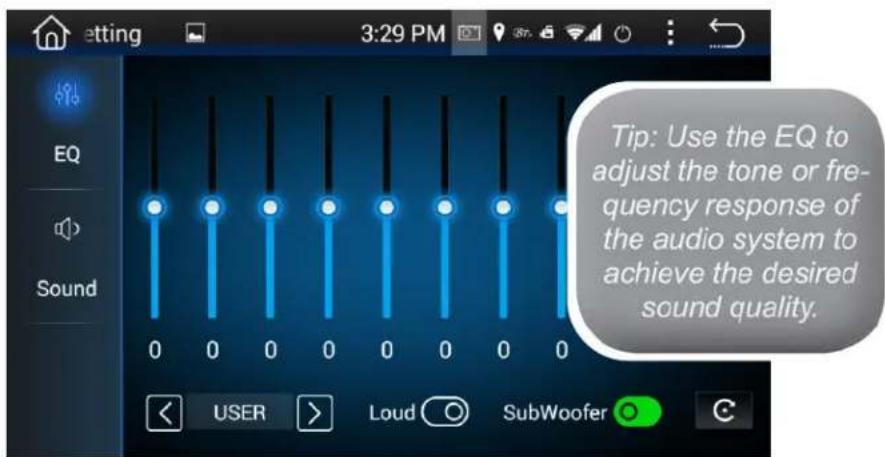
Presets
Select one to automatically adjust the equalizer
Adjustments
Hold and drag up or down to manually adjust the EQ by each frequency band
Radio
1) Scanning: Press, hold, and drag the slider to quickly tune the radio.
2) Current Station: The currently selected station will be displayed in the center.
Press the forward and back arrows to change the current station.
3) Favorite Stations: Press and hold one of the six preset slots to set and save a selection for later.

SD - Flash Memory File Browsing
Warning: Do not attempt to browse files while operating the vehicle
1) Browsing Files
File location is displayed.
Use "Back Arrow" to return to the previous folder
2) Selecting Files
The files and folders of your storage media are displayed.
Once the desired folder is located, select it and press "check icon" to open
USB - Flash Memory File Browsing
Plug in flash drives to access music video and photos.
Video
1) Brightness, Contrast, Hue
Press, hold and drag to adjust the brightness, contrast and hue of the display.
2) Presets
Select to automatically adjust the display settings.
Wall Paper
Note: Wallpapers can be imported from a flash drive or SD card. Check format sheet online for specs on formats.
1) Browse - Use left and right arrows to select the desired wallpaper
2) Select - Press OK to select the wallpaper
Third Party Apps
For the detailed operation instruction for a certain 3rd party App, such as Google map, Youtube etc., please contact your 3rd party App provider for further service. Thank you.
Trouble Shooting
Q: Unit doesn't power up
A: Use a multi-meter to check for 12v+ to red and yellow wires. Check for proper Ground on the Black wire.
Q: My video does not play
A: Attach "PARK" wire to parking break. When this wire is grounded the video will play (Grounding trigger of the parking brake)
Q: Reverse camera does not come up on the screen
A: Attach "BACK UP CAMERA" wire to reverse tail light 12v+ (Make sure camera is and sending video signal)
Q: Can I set up steering wheel control?
A: Key 1 and Key 2 wires need to be wired to your vehicle's steering wheel column
Q: The time I set is not saved after device reboot
A: Are other setting saved? If not: Check that yellow memory wire is attached to 12v+ constant
A: turn off GPS auto update
-Go to radio settings > Set Time > switch off auto update
Q: My GPS gets no reception.
A: Check antenna is connected properly
A: Mount Antenna directly to your vehicle (GPS antenna is to be magnetically mounted, it will boost GPS reception when attached)
A: Check alternate antenna placement to test for interference
Q: How do I turn up GPS instruction volume (I Can't hear it over music)
A: Change GPS sound settings
Go to Navi > Settings > Sounds > Set GPS voice level to max > Set radio volume to min (Adjust accordingly)
Q: How do I update my map card.
A: The radio will notify you when a map update becomes available. We will need to send out a new map card from our parts department. Log onto www.PyleUSA.com and open a parts ticket under "contact us" requesting the map update.
Q: Where can I download firmware updates?
A: www.pyleaudio.com, www.pyleusa.com
Q: How to I set the time?
A: System setting, set time
Trouble Shooting
Q: How do I use / set-up RDS?
A: (*Traffic and weather feature only available in Europe)
Q: My Bluetooth microphone is not working as expected
A: -Check that nothing is covering microphone port.
-Check to see if closer proximity to the mic affects its pickup
-Check that phone connection is good
-Make sure the call recipient has speaker volume set to an appropriate level
-Check that the mic is not picking up too much background noise
Note: The built-in mic cannot be changed, replaced or upgraded.
Q: I am having trouble setting up Bluetooth
A: Check that your device is Bluetooth compatible 4.0+
- Check if you are able to pair with alternate devices via Bluetooth
- Clear out your device history in your Bluetooth setting menu and attempt to pair / connect again
Q: My Map card no longer loads (COCKPIT ERROR DISPLAYED)
A: This is caused by bug in map software. Please contact Tech Support: Pyle, www.PyleUSA.com go to the "contact us" page.
A: You may be able to fix the software on your own
- Insert GPS card into computer
- Open text file under Primo\save\profiles\01\system.ini
- Edit the file to return the cockpit type to "1"
* Deleting the profile folder will default the unit's settings back to cockpit number 1
Q: How do I play video files? My unit cannot read my digital video files.
A: Make sure SD card is compatible
A: Check file format of your file (You may need to convert your video file to an alternate file format)
Q: My unit shows 5 circles and will not load
A: Your unit requires touchscreen calibration.
You have entered the 'Touch Screen Calibration Menu'. For optimum touchscreen performance, this feature enables you to enjoy the best functionality of your device's touch screen. To complete the touchscreen calibration, an "X" will appear in the circles on the screen in numbered order, continue to press the center of the "X" as it passes through each numbered circle.
(In circle number one, you will see an "X", touch the center of the "X", then the "X" will move to circle number two. Continue to touch the center of the "X" as it will move to the other circles in numbered order. If calibration senses an error, the process may restart; Repeat if necessary.)
PYLE®
PyleUSA.com
Wiring - Back Panel:


Wiring
| Radio Antenna | Radio antenna receptacle | ||
| Subwoofer Output | Pre amp subwoofer output (5V) | ||
| Audio / Video Input | Auxiliary input for external hardware | ||
| Audio / Video Output 1 | Connect to headrest display (Optional) | ||
| Audio / Video Output 2 | Connect to headrest display (Optional) | ||
| Green/White | SW KEY | Steering wheel control Key 1 interface wire | |
| Blue/White | AMP REMOTE TURN ON | DC 12 + Volt Remote turn on trigger for external amplifier | |
| Orange | ILLUMINATION | 12 volt + trigger dash board illumination | |
| Brown | BACK UP CAMERA | 12 volt + trigger from reverse lights | |
| Pink | PARKING | Connect to parking brake ground. Disables video play unless grounded | |
| Blue | AUTO ANTENNA | 12 volt + trigger output | |
| Gray/White | SW-GROUND | Steering wheel control Key 2 interface wire | |
| Black (RCA) | CAM VIDEO IN | Camera RCA video input for use with rearview camera | |
| Red | ACC | Ignition Accessory 12V+ | |
| Yellow | FUSE/ POWER B+ | Connect to (+) side of car battery | |
| Black | GROUND | Connect to (-) side of car battery | |
| Orange | CANBUS INTERFACE | TXD - Vehicle Diagnostic CANBUS Interface | |
| Brown | CANBUS INTERFACE | RXD/R - Vehicle Diagnostic CANBUS Interface | |
| Purple | Speaker Rear R | Rear right speaker | Purple (+) Purple/Black (-) |
| Green | Speaker Rear L | Rear left speaker | Green (+) Green/Black (-) |
| Gray | Speaker Front R | Front right speaker | Gray (+) Gray/Black (-) |
| White | Speaker Front L | Front left speaker | White (+) White/Black (-) |
*Brown wire tells the monitor when to activate and display rearview camera on the display (optional)
Bluetooth
Bluetooth app allows Bluetooth pairing with compatible devices for making calls and music playback. To pair your phone, ensure Bluetooth is enabled in your phone's system settings and that you are disconnected from all other devices.
In the Bluetooth app of your radio, press the “Gear” icon in the left column to access Bluetooth settings. Next, press the “Magnifying glass” icon to set the radio into pair mode. The radio will then display “searching” and show all nearby compatible Bluetooth devices:
- Select your phone from the list, and tap a second time to initiate pairing.
- Your phone should now display a pin pad where you will enter "0000"
- Check that device named "CAR_KITT" shows as connected on your phone.
Note: Once your phone is paired, you can use the other functions within the radio's Bluetooth app.
Left hand column:
- Select the "Keypad" icon to dial out using the radio's number pad
- Select the "phone" icon to see a log of incoming and outgoing calls
- Select the "gear" icon for phone pairing and selection options
- Select the "headphones" icon for music playback controls
- Select the “address book” icon to display your phone’s contact list. You will need to import your contact list using the “download” icon located in the right column of the Bluetooth app.
Right hand column:
- "Trash" delete currently selected entry
- "Download" Use to download contact data to address book
- "Speaker selection" Switch between car speaker/mic and phone speaker/mic
- “☐”Press this function icon for search/disconnect/connect/delete

How to access internet
How to access internet?
You can have three ways to access internet.
- Use a 3G dongle
Insert USB type 3G dongle to one of the rear USB port, wait for few seconds, then 3G signal icon will be shown on status bar, and you can access internet now.
- Use your smartphone as hotspot
Please turn on your smartphone hotspot, then go to this car Android unit and turn on wifi, find out your smartphone hotspot and connect it, now you can access internet.
- Use car wifi router or any other portable wifi router
You can also use car wifi router or any other portable wifi router as a hotspot for internet access.
Vehicle Blackbox DVR
User Manual
Video Recording
- Press ● to start recording ● shows it is under recording.
- When recording, the upper left corner of the screen shows video recorded time.
Setting
- Press to enter DVR setting interface.
- Setting interface is unavailable while recording.

Routine Setup
Recording mode: Record video only.
Auto record at power on: If checked, it will automatically start recording after power on.
Video Setup
Resolution: Video resolution, effective pixels on the horizontal and vertical.
Rate: Video bit rate. Bit rate refers to the data flow per second. The higher the bit rate, the finer the description of the picture, the less loss of picture quality, the closer of the resulting picture to the original one.
Output Setup
Auto segmentation: The video file recorded should not be too large, otherwise it will increase memory consumption when opening a file, which may cause playback failure. When choose high-resolution, the video file recorded will be larger, so it may be appropriate to shorten the split time.
Auto delete old video: When there is not enough free space in the storage, it will automatically delete the oldest recorded video to clear space for newly recorded video.
Storage location: The location to store video files. Path: External memory/DCIM/Dvr. When no external memory inserted, 'Not available' prompt will appear.
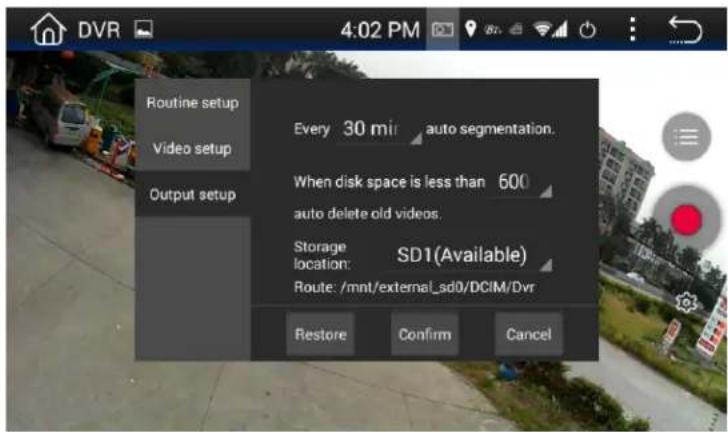
Restore Default
- After change a different type of camera, the original parameters may not apply to new camera, which may cause recording failure. In this case, please restore the default parameters.
- If recording fails due to parameter setting changes or other reasons, try to restore the default state through this function.
Video List
- Press or slide the screen left and right to enter DVR video list interface.
- On the left of each list there is a video preview thumbnail. File name is showed in the first line on the right side, and time period in the second line.
- Short press a video from the list to play it, long press to delete the video.


natural_image
Black plastic mechanical lever handle with two slots and a central knob (no text or symbols visible)PLCM18BC
Rear View Backup Camera
Please read all of the installation instructions carefully before installing the product. Improper installation will void manufacturer's warranty. The installation instructions do not apply to all types of vehicles, and are written as guidelines to assist in installing the system. Please consult an experienced technician if you are not comfortable installing the product. Prior to using and installing the Backup Camera System, please read the safety information provided in this user manual. Be sure to use the product as outlined in this user manual. Altercation or modifications carried out without appropriate authorization may invalidate the user's right to operate the equipment.
WARNING: Failure to read and follow these warnings and instructions may result in serious injury, including damaged property, so please pay close attention and exhibit the utmost care.
- The Digital Backup Camera is designed as an aid to the driver in detecting potentially hazardous driving conditions, obstructions, and large stationary objects. You, the driver, must also remember to drive safely and properly. Use of the Digital Backup Camera is not a substitute for safe, proper and legal driving practices.
- Never back up while looking only at your connected monitor display screen. You should always check behind and around the vehicle when backing up just as you would if the vehicle did not have the Digital Backup Camera. Always make sure your driving area is clear. Always back up slowly and with caution.
- Never depend on the Backup Camera entirely when backing up. The image on the monitor display screen may be slightly different from actual and real-time conditions. Objects viewed in the rear view monitor differ from actual distances because a wide-angle lens is used. So use the camera as an aid and always follow intended driving practices to properly judge distances from objects.
- The Backup Camera's assisted low lux lighting performance feature is also an aid to a driver. Always use your own eyes to confirm the vehicle's surroundings, as the displayed image may be not well lit or not entirely visible. Always proceed with caution and perform double-checks before proceeding.
- The area displayed by the Backup Camera is limited. It does not display objects that are close to or just below the bumper, underneath the vehicle, or objects out of the camera's view. The camera's view can change according to your vehicle's orientation on the road or changing road conditions.
- Be sure to check the camera is properly functioning, is properly positioned and securely mounted, every time you operate your vehicle.
- Make sure your trunk or hatch operates correctly, as intended, before and after installation.
- Proceed with caution when cleaning your vehicle around the camera. Avoid excess water exposure around the camera especially with spraying or a power washer.
- Please make sure to keep the camera clean and unobstructed from any debris
- Follow all traffic laws and motor vehicle regulations.
- Consult local laws and regulations for any restrictions on installation or use.
- Using a Backup Camera System is not adequate enough to completely eliminate a vehicle's blind spot. Always remember to drive with caution, following all traffic laws.
System Installation and Wiring
Note: Camera System installation on diesel vehicles may require a slightly different wiring install.
Caution: Connecting to other types of electrical systems will cause damage to your vehicle. Please contact the manufacturer if you are unaware of the system type in your vehicle. Refer to the model's power requirements prior to connection and installation.
Quick Installation:
This rearview backup camera system comes with camera and installation wiring. When installing, the camera is preferably to be mounted in the rear of your vehicle (just above the license plate).
This kit includes necessary wiring and cable connector accessories sufficient for typical connections. However, additional accessory cables and installation materials may be necessary for completely secure and operational backup camera performance.
Camera Connection:
Connect the camera to the using the included DC 12V power cable. Connect the DC 12V power cable to the positive 12V reverse tail light in the rear of your vehicle. Then, connect the black wire, of the DC 12V power cable, and ground properly. This connected power and ground cable then connects to the camera, and will supply power to the camera directly.
Next, use the included yellow RCA video connector cable, and run that cable from the yellow RCA video connector jack of the camera, to the yellow video connector of your compatible display monitor.
The yellow RCA cable when connected, automatically retrieves the video signal when activated (when your vehicle is switched into the reverse gear).
Installation Transcript:
- Locate the reverse taillight wiring behind your vehicle's reverse light. You may need to remove an interior panel, or other cover, in order to locate the wiring. Connect the included power 12V DC power cable to the reverse light.
a. Connect the power cable's Red wire to your vehicle's reverse light positive wire.
b. Connect the power cable's Black wire to your vehicle's reverse light negative wire.
-
Connect the camera to this 'reverse light' connection installation, then mount the camera in the desired location.
-
Run the RCA video cable from the camera to your compatible video display monitor.
*Please remember to run cables in the least obtrusive route possible. Vehicle vibrations and bumpy driving conditions can result, so extra care should be taken to securely mount the camera and fasten all cables and wiring to secure locations.
*Ensure the wires are safely and securely connected, with proper isolation applied to all connections.
Additional Notes:
- Determine the best location for the camera (The camera is preferably mounted just above the license plate).
- Be sure when running the connection cables to leave a small amount of slack so you can still move the camera around the license plate, if you decide to slightly adjust the camera's positioning at a later time.
- After installation, Test the camera before use. Placing your vehicle in reverse should provide a picture in the monitor within the rearview mirror assembly.
Pyle 'PLCM'
Backup Camera Systems
Angle Adjustable Camera Lens
Located on the camera housing are 2 screws which lock the camera lens angle in position.
The screws may be loosened to allow camera lens angle adjustment
Loosen the screws, adjust the camera lens into the desired angle. then tighten the screws securely. Be sure as to not overtighten the screws.
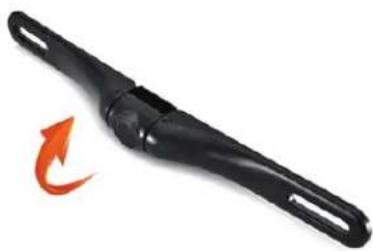
natural_image
Black plastic mechanical component with a red rotation arrow indicating clockwise motion (no text or symbols)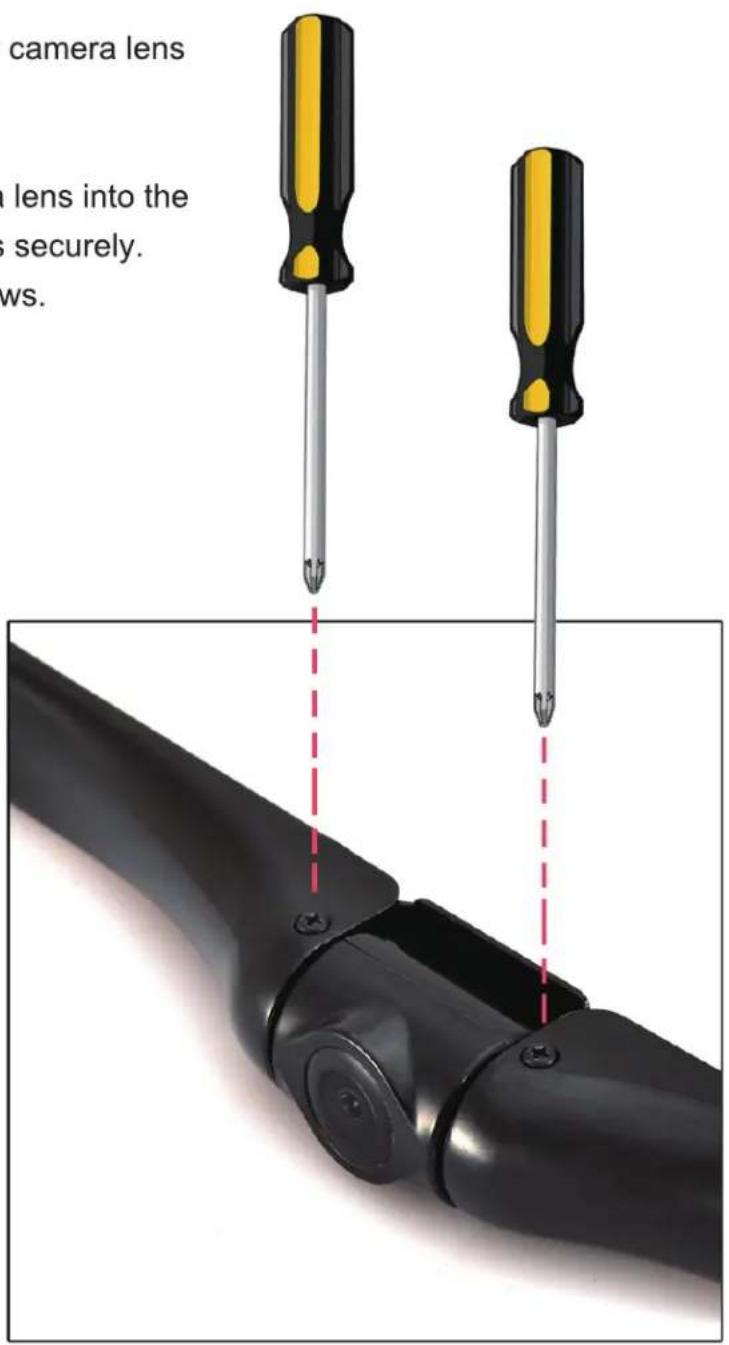
Model:
PLCM18BC

Phone Link Software
User Manual
This phone link software is developed by a 3rd party Apps developer, which we provided to our valued customers free of charge. As mobile phones manufacturers are keeping on upgrading their system, this device may not be compatible with their upgraded operating system, we will not be responsible for these incompatibility. your kind understanding is highly appreciated.
- Product introduction 2
- Product support information 2
2.1. Supported vehicle navigato 2
2.2.Supported mobile phone 2
3. Important 3
3.1. Enable USB debugging 3
3.2. Select USB cable 3
3.3. Transmit mobile phone sound to vehicle navigator 3
3.4. Mobile phone compatibility 3
3.5.Description of support to Android 2.3.x 3
3.6. Difference in connection performance 3
4. Legal statement 4
5. Connection and use 4
5.1. Functions of Easyconnected versions 4
5.2. Connection manner 5
5.3.Pop-up function menu 8
6. Setting 9
7.FAQ 9
7.1.How to enable USB debugging switch of Android mobile phone 9
7.2. Checklist of connection problems 10
1. Product introduction
Easyconnected is a software product which is developed by Wuhan Carbit Information Co., Ltd. and achieves the interconnection between a mobile phone and a vehicle navigator. This product can achieve double screen interconnection between the mobile phone and vehicle navigator by the standard US interface or Wi-Fi connection manner. It projects the screen of mobile phone to the vehicle navigator, the mobile phone may be operated on the vehicle navigator, and the traditional navigator is changed into an intelligent vehicle-mounted system, thus experiencing a new car life immediately.
2. Product support information
2.1. Supported vehicle navigator
According to different vehicle navigator systems, Easyconnected provides WinCE navigator version, Android navigator version and QNX navigator version.
2.2. Supported mobile phone
Mobile phones based on Android and IOS platforms can be connected to Easyconnected. Information of mobile phone versions supported by Easyconnected is as follows:
| Mobile phone platform | Configuration requirement | Easyconnected Android | Easyconnected WinCE | Easyconnected QNX |
| Android mobile phone | Processor: Dual core or aboveMain frequency higher than 1.5GHZMemory: >1GBSystem: Android 2.3-6.0 | Support USB and Wi-Fi connection | Support USB connection | Support USB and Wi-Fi connection |
| IOS mobile phone | Model: iPhone 4S-6 PlusSystem: IOS 7.1-9.1 | Support Wi-Fi connection | not support | not support |
3. Important
3.1. Enable USB debugging
Before connecting Easyconnected to Android mobile phone, ensure that [USB Debugging] option of Android mobile phone has been enabled. If you do not know how to enable it, please check [7.1 How to enable USB debugging switch of Android mobile phone].
3.2. Select USB cable
Since there's great difference in the performances of mobile phone data cables on the market, you're strongly recommended to use your original USB data cable of your phone for connection. Otherwise, use the USB data cable with the shielding function for connection as far as possible to ensure the connection stability.
3.3. Transmit mobile phone sound to vehicle navigator
Transmit the sound to the vehicle navigator to facilitate receiving and making a call. At the same time, the mobile phone audio can be transmitted to the vehicle terminal through A2DP protocol, and is played by the car loudspeaker. The bluetooth connection between the mobile phone and vehicle navigator shall be accomplished before using Easyconnected for the first time. Ensure the bluetooth connection status between the mobile phone and vehicle navigator when using each time. Refer to User Manual of Vehicle Terminal for the detailed procedure.
3.4. Mobile phone compatibility
Among the mobile phones with Android system, since the Android system has the problem of "version split" and the mobile phone manufacturers of all brands individually change the Android system, we cannot ensure that this product can be connected to all Android mobile phones normally. List of Mobile Phones Verified by Easyconnected provided by us is only for your reference. You may also try to connect those phones not listed in.
3.5. Description of support to Android 2.3.x
Due to lack of support to the system below Android2.3.X, part of functions may fail when the mobile phone with the system of such version is connected to this product. For example, the video in t mobile phone played through the double screen interaction may not be displayed normally.
3.6. Difference in connection performance
Due to the difference in the performance of mobile phones, the performance may have difference when using different mobile phones for connection.
4. Legal statement
Carefully read and thoroughly understand this Statement before using this software. You may not use this software, while you're considered to accept the whole contents of this Statement if you use it.
-
Please operate this software before the car runs or when the car parks. Do not operate it when the car is running, or else you shall shoulder the responsibility for the safety accidents arising therefrom.
-
Please select the traffic route according to the actual traffic condition, while the map navigation is only for your reference. You shall shoulder the responsibility for any behavior violating the traffic laws and other laws.
-
Use this software after user registration, and authorize our company to collect the data generated during the use of this software for product improvement and new function development.
5. Connection and use
5.1. Functions of Easyconnected versions
Easyconnected Android (support Android vehicle navigator)
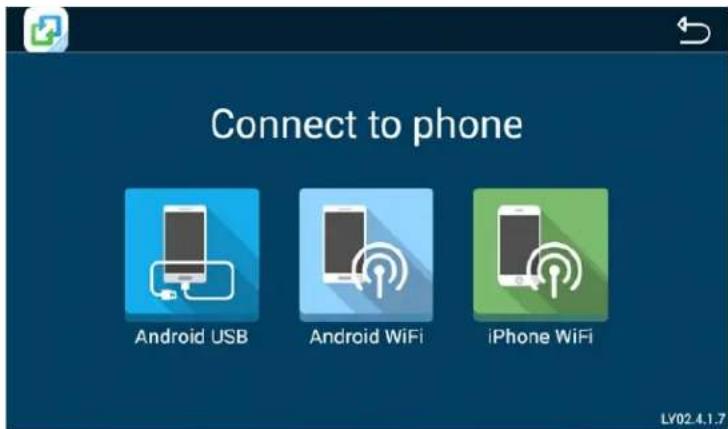
Start Easyconnected software, and click different mobile phones and connection manners:
- USB connection to Android mobile phone
2.Wi-Fi connection to IOS mobile phone
3.Wi-Fi connection to Android mobile phone
Remarks:
Wi-Fi connection to IOS mobile phone only supports reverse control in Drivemode client. The performance of Wi-Fi connection to Android mobile phone and IOS mobile phone is related to the wireless signal strength.
5.2. Connection manner
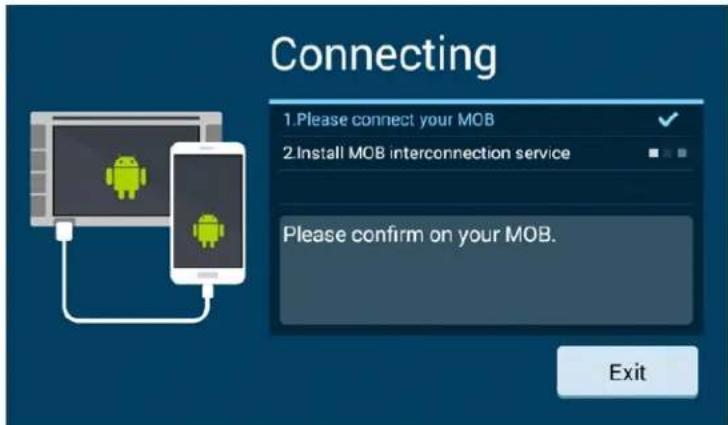
5.2.1. Android USB connection
Enable the USB debugging of mobile phone according to the prompt
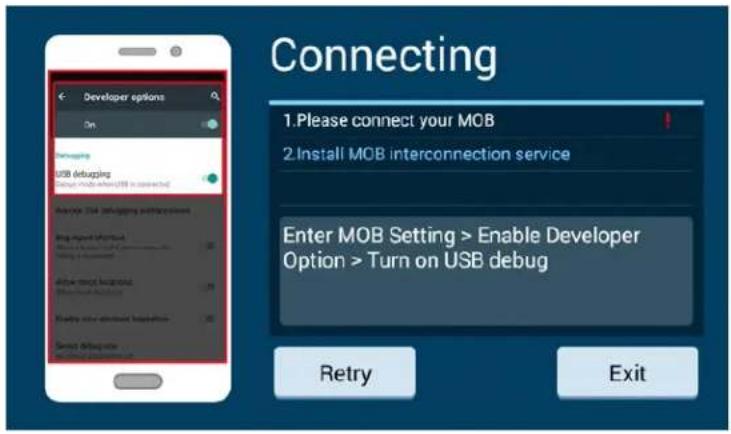
Connect with USB cable

Check and confirm Allow USB Debugging on the mobile phone during connection for the first time, and check "Always allow to debug with this computer" to facilitate use next time.

Allow to install Phone Link service and Drivemode software on the mobile phone according to the prompts (not required to confirm on some mobile phones).
5.2.2. Android Wi-Fi connection
Enable the network share and portable hotspot function of mobile phone, record the name of mobile phone hotspot, and use the mobile phone Wi-Fi as hotspot for vehicle navigator connection.
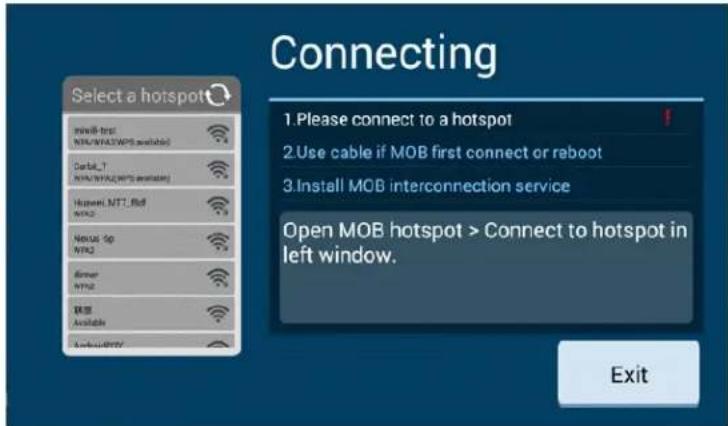
Select the mobile phone hotspot enabled just now from the box on the left side, and enter a password for connection.

Enter connection authentication by USB connection manner for mobile phone connection for the first time or after mobile phone restart to ensure the connection security. Refer to [Android USB Connection].
![Connecting 1. Connected:ketty-wifi[Change] 2. Use cable if MOB first connect or reboot 3. Install MOB interconnection service Please confirm on your MOB. Exit](/content/2026/05/1047969/images/fabc97aa263b642ad4505698e4ea31df018f04a09e7e502644be293b93b4f974.jpg)
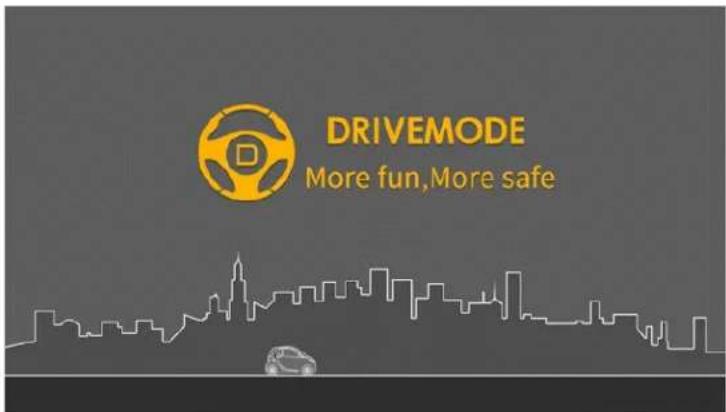
Enter the welcome interface of Drivemode successfully, which means successful connection.
5.2.3. IOS Wi-Fi connection
Enable the personal hotspot function of mobile phone, record the name of mobile phone hotspot, and use the mobile phone Wi-Fi as hotspot for vehicle navigator connection.
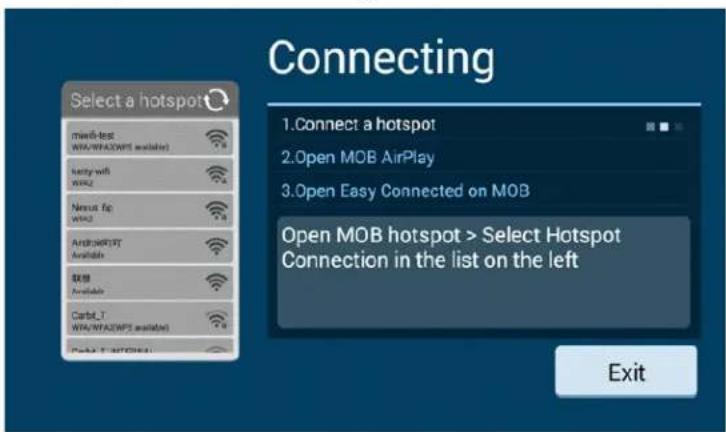
Slide on the screen of mobile phone to open the control bar, click Airplay to select EC-Mirror-**, and then enable mirror switch.

Open Drvie mode APP on the phone, if don't have, you can scan QR code and download.
![Connecting 1. Connected petty-wif[Change] 2. Open MOB AirPlay 3. Open Easy Connected on MOB scan QR code on the left to download and start the client Exit](/content/2026/05/1047969/images/20b2c1e049649ae8277203d1aa6c6ce1dc70fff4dec3d36347243385bc761e3d.jpg)
5.3. Pop-up function menu
Pop up the function menu by clicking the key (☐) at the bottom left corner of screen, and the function keys are defined as follows:
| Interface icon | Name Function | |
 | Return Return to the previous level, the same as Return key on Android mobile phone | |
 | Setting Enter the setting page of Easyconnected software | |
 | Home | Return to Easyconnected home when Easyconnected APP for mobile phone is running;Return to the home screen of mobile phone when Easyconnected APP for mobile phone is not running, the same as Home key on Android mobile phone |
 | Pop up the option menu of the current software, the same as Option exit | Menu of the current software, the same as Option key on Android mobile phone |
 | Close this software and break the double screen interaction connection with mobile phone. | |
 | Minimize | Return to the vehicle terminal page, and back Easyconnected software to the background. Double screen interaction can be achieved directly and quickly after entering again |
6. Setting
Enter the setting interface by clicking "Setting" button in the pop-up function menu:
| Name Function description | |
| Autostart When enabling this function, the vehicle navigator, after started, will prompt the user whether to automatically start Easyconnected to enter double screen interaction when detecting the mobile phone connection with USB debugging enabled, or Wi-Fi connection. | |
| Auto connect When enabling this function, the current connection manner is set as the default connection manner next time, and Easyconnected will try connection by such manner automatically during start next time. | |
| Hard decoding Smoother double screen interaction experience and better definition can be obtained by enabling hard decoding. | |
| Smooth mode Better control experience can be obtained by enabling the smooth mode | |
| Bluetooth prompt By enabling this function, when this software starts, prompt and guide the user to make bluetooth connection when detecting no bluetooth connection of vehicle terminal, and the mobile phone will enter the bluetooth interface automatically. | |
| About Description on the version, copyright and legal provisions of this software. | |
7. FAQ
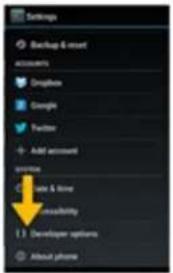
7.1. How to enable USB debugging switch of Android mobile phone
The method for enabling [USB debugging switch] will be different for different versions of Android system. Please select the connection wizard according to the system version of mobile phone to operate on the phone in sequence.
Android 4.2·5.1
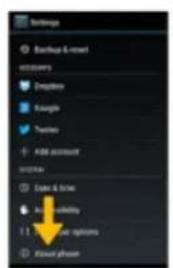

Return [Setting] and Tap [About phone]
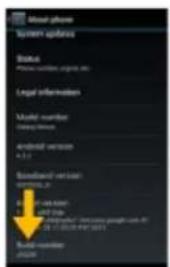

Tap Build numbier
several times


Go back to Settings
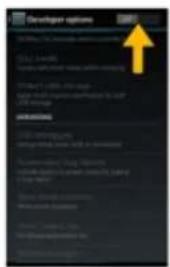

Turn on developer options


Tap OK


Check USB debugging


Tap OK


Check [Always allow form this computer] and tap OK

Return [Setting] and Tap [Developer Options]


Turn on Developer Options


Tap OK


Check USB debugging
7.2. Checklist of connection problems
| Mobile phone type | Problem | Cause analysis | Solution |
| Android mobile phone | USB Debugging icon does not appear on the mobile phone screen | Physical USB connection fails. | 1. Check whether the mobile phone has enabled [USB Debugging mode]2. Check and replace USB cable3. Check the USB interface of vehicle navigator4. Insert and withdraw the mobile phone again |
| USB Debugging icon appears on the mobile phone screen, but the mobile phone fails to connect. | 1. The mobile phone is incompatible2. Easyconnected service is prevented | Allow to install and start Easyconnected service in mobile phone assistant software. | |
| iPhone mobile phone | Airplay key does not appear on the mobile phone | No Wi-Fi connection between the mobile phone and vehicle navigator | Check if the vehicle navigator Wi-Fi has been connected with the mobile phone hotspot |
| The vehicle navigator has a blank screen when clicking the Image key | Wi-Fi signal is unstable Close | and restart it. |
1600 63rd. Street Brooklyn N.Y. 11204
PYLE®
PyleUSA.com
natural_image
Side view of a silver sedan car with visible headlights and grille (no text or symbols)- Model:
- PLDNAND465
- Thank you for choosing Pyle Audio!
- Compatibility
- Precautions & Warnings
- Cleaning
- Temperature
- System Handling
- Note:
- System Installation:
- Installation Guide - Double Din Fitting:
- Caution:
- Installation kits:
- Installing Steering Wheel Control
- Steering Wheel Controls
- Front Panel and Buttons
- Turning Power On
- Settings
- Set Time
- Sound
- Aux
- Calendar
- Calculator
- EQ - Equalizer
- Presets
- Adjustments
- Radio
- SD - Flash Memory File Browsing
- USB - Flash Memory File Browsing
- Video
- Wall Paper
- Third Party Apps
- Trouble Shooting
- Bluetooth
- Left hand column:
- Right hand column:
- How to access internet
- Vehicle Blackbox DVR
- User Manual
- Video Recording
- Setting
- Routine Setup
- Video Setup
- Output Setup
- Restore Default
- Video List
- System Installation and Wiring
- Quick Installation:
- Camera Connection:
- Installation Transcript:
- Additional Notes:
- Pyle 'PLCM'
- Backup Camera Systems
- Angle Adjustable Camera Lens
- Phone Link Software
- Product introduction
- Product support information
- Supported vehicle navigator
- Supported mobile phone
- Important
- Enable USB debugging
- Select USB cable
- Transmit mobile phone sound to vehicle navigator
- Mobile phone compatibility
- Description of support to Android 2.3.x
- Difference in connection performance
- Legal statement
- Connection and use
- Functions of Easyconnected versions
- Remarks:
- Connection manner
- Android USB connection
- Android Wi-Fi connection
- IOS Wi-Fi connection
- Pop-up function menu
- Setting
- FAQ
- How to enable USB debugging switch of Android mobile phone
- Checklist of connection problems
Brand : Pyle
Model : PLDNAND465
Category : Rear Camera