
40E5900US - Television TCL - Free user manual and instructions
Find the device manual for free 40E5900US TCL in PDF.


| Product Type | Television |
| Brand | TCL |
| Model | 40E5900US |
| Screen Size | 40 inches (diagonal) |
| Display Technology | LED |
| Resolution | 1920 x 1080 pixels (Full HD) |
| Refresh Rate | 60 Hz |
| Aspect Ratio | 16:9 |
| Brightness | 250 cd/m² |
| Contrast Ratio | 3000:1 |
| Viewing Angle | 178° horizontal and vertical |
| Audio Output | 2 x 8W speakers |
| Connectivity | HDMI x2, USB x1, AV input, RF input, VGA (PC), Ethernet, Wi-Fi |
| Power Supply | AC 100-240V, 50/60Hz |
| Power Consumption | 45W (Standby <0.5W) |
| Weight (with stand) | 6.5 kg |
| Dimensions (with stand) | 904 x 557 x 200 mm |
| VESA Mount | 200 x 200 mm |
| Energy Class | A+ |
| Remote Control | Included |
| Safety | Class II, RoHS compliant |
| Cleaning Advice | Wipe with a dry soft cloth; do not use liquids or solvents. |
| Spare Parts | Available through TCL service centers. |
Frequently Asked Questions - 40E5900US TCL
User questions about 40E5900US TCL
0 question about this device. Answer the ones you know or ask your own.
Ask a new question about this device
Download the instructions for your Television in PDF format for free! Find your manual 40E5900US - TCL and take your electronic device back in hand. On this page are published all the documents necessary for the use of your device. 40E5900US by TCL.
USER MANUAL 40E5900US TCL
For use with models: E5900 series/C1 series
COLOUR YOUR WORLD
Chapter 1: Safety Information
Precautions 3
Product 3
Power and Plug 3
Power Cord and Signal Cable 3
Use Environment 3
Cleaning 3
Hanging the TV Set on the Wall 3
Important Information .... 3
Chapter 2: Connections and Setup
TV Controller 4
Sockets 5
Remote Control Functions 6
Network Connection 8
Switching on 9
Switching off 9
Initial Set-up 10
Chapter 3: Homepage
Using Homepage-TV 11
Using Homepage-APPS 12
Chapter 4: Menu Operation
Using Quick Access Menu 13
Picture Preset 13
Sound Preset 13
Picture Freeze 13
Football mode 13
T-Link....13
Timeshift 13
PVR 13
Schedule List 14
WiFi TV link 14
Settings 14
Using System Settings 14
Picture 15
Sound 15
Channel 15
Network 16
System 18
Chapter 5: Advanced Functions
Using E-Manual(Help) 20
Using MHL Function(Mobile High-definition Link) 20
Viewing photos, playing music and watching videos from a USB device 20
Chapter 6: Other Information
Problems and Solutions 22
Troubleshooting 23
Legal Statement 24
Licence 24
Precautions
Read all of the instructions before operating the set. Keep these instructions well for future use.
Product
- Do not block or cover the ventilation openings on the back cover.
- Do not push objects of any kind into this unit through the cabinet slots as they could touch current carrying parts or short-circuit parts, resulting in fire, electric shock, or damage to the unit.
- Do not attempt to open the cabinet as this may cause damage. There are no parts inside you can service by yourself. Refer all servicing to qualified personnel.
- Do not touch the screen surface with fingers as this may scratch or mark the TV screen.
- Do not impact the TV screen with hard pressure as this may damage the TV screen severely.
- The appliance is not intended for use by young children or infirm persons without supervision. Young children should be supervised to ensure that they do not play with the appliance.
Power and Plug
- Unplug the set under the following conditions:
- If the set will not be used for a long period of time.
- If the power cord or the power outlet/plug is damaged.
- Follow the instructions to install and adjust the product. Adjust those controls that are covered in these operating instructions as improper adjustment of other controls may result in damage. If this happens, unplug the set and refer to the service personnel.
- If the set is subject to impact or has been dropped and the cabinet has been damaged
- Where the mains plug or an appliance coupler is used as disconnect device, the disconnect device shall remain readily operable.
Power Cord and Signal Cable
- Do not allow anything to rest on or roll over the power cord and the signal cable.
- Protect the power cord and the signal cable from being trampled.
- Do not overload the power cord or the power outlet.
- Do not expose the power cord and the signal cable to moisture.
Use Environment
- Do not place the set on an unstable cart, stand, or table.
- Place the set on a place that allows good ventilation.
- Do not use the set near damp, and cold areas. Protect the set from overheating.
- Keep the set away from direct sunlight.
- The apparatus shall not be exposed to dripping or splashing and no objects filled with liquids, such
as vases, shall be placed on the apparatus.
- Do not use the set in dusty environments.
- Operating Temperature: 5°C to 35°C (41°F to 95°F) Operating Humidity: 20% to 80%, non-condensing Storage Temperature: -15 °C to 45°C (5°F to 113°F) Storage Humidity: 10% to 90%, non-condensing
Cleaning
- Dust the set by wiping the screen and the cabinet with a soft, clean cloth or some special liquid cleaner.
- Do not apply excessive force to the screen when cleaning.
- Do not use water or other chemical cleaners to clean the screen as this may damage the surface of the TV screen.
Hanging the TV Set on the Wall
Warning: This operation requires two people.
To ensure a safe installation, observe the following safety notes:
- Check that the wall can support the weight of the TV set and wall mount assembly.
- Follow the mounting instructions provided with the wall mount.
- The TV set must be installed on a vertical wall.
- Make sure to use only screws suitable for the material of the wall.
- Make sure that the TV set cables are placed so that there is no danger of tripping over them.
All other safety instructions about our TV sets are also applicable here. Wall Mount Bracket not included. (Note: Certain TV models are not designed to be mounted to the walls.)
Important Information
If a television is not positioned in a sufficiently stable location, it can be potentially hazardous due to falling. Many injuries, particularly to children, can be avoided by taking simple precautions such as:
- Using cabinets or stands recommended by the manufacturer of the television.
- Only using furniture that can safely support the television.
- Ensuring the television is not overhanging the edge of the supporting furniture.
- Not placing the television on tall furniture (for example, cupboards or bookcases) without anchoring both the furniture and the television to a suitable support.
- Not standing the television on cloth or other materials placed between the television and supporting furniture.
• Educating children about the dangers of climbing on furniture to reach the television or its controls.
Note: Graphics contained within this publication are for presentation only.
Chapter 2 Connections and Setup
TV Controller
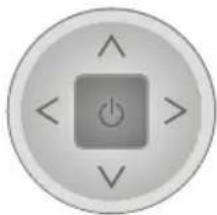
TV Controller is a multi directional button that helps navigate without remote control. For some models, there's only one TV button--TV Controller.
Note: The product colour and shape may vary depending on the model.
1. ⏻
Turns the TV on by pressing the Controller when the TV is in standby mode.
In the menu system, press and release it within 2 seconds, it acts like OK button on the remote to confirm your selection.
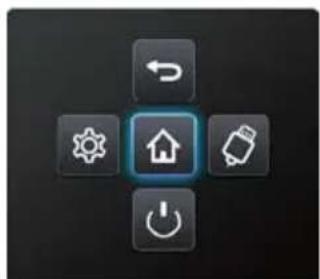
When the power is on, press and hold the TV Controller more than 2 seconds and then release, the NAV menu will display on the screen;
The NAV menu is a shortcut to Homepage, Settings menu, Source, Power and Return.
The NAV menu will disappear after several seconds without operation.
2.
Scans up/down through the channel list. In the menu system, they act like the UP/DOWN direction buttons on the remote and adjust menu controls.
3. <>
Adjusts the volume by moving the Controller left and right. In the menu system, they act like the RIGHT/LEFT direction buttons on the remote and adjust menu controls.
natural_image
Black square button with five icons: home, refresh, gear, battery, and power (no text or symbols)NAV menu on TV Screen
natural_image
Circular button with a central play button and directional arrows (no text or symbols)TV Controller
Sockets
Note: The location and names of the sockets on the TV may vary according to TV model, and not all sockets are available on all models.


Note: Only HDMI sockets with the MHL identification will support the MHL function, MHL stands for Mobile High-definition Link, and allows you to link an MHL capable mobile device to the television.




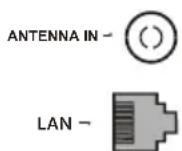
ANTENNA IN socket (input)
This socket can be used to connect the outside aerial or cable network.
LAN
RJ45 plug for connecting to external modem or network access equipment.

Headphone socket (output)
This socket can be used to connect headphones or stereo earphones.
Warning: Excessive sound pressure from earphones and headphones can cause hearing loss.

SPDIF socket (output)
The SPDIF socket can be used to connect a compatible digital audio receiver.
Remote Control Functions
Most of your television's functions are available via the menus that appear on the screen. The remote control supplied with your set can be used to navigate through the menus and to configure all the general settings.
Note: Figures and illustrations in this operation manual are provided for reference only and may differ from actual product appearance.
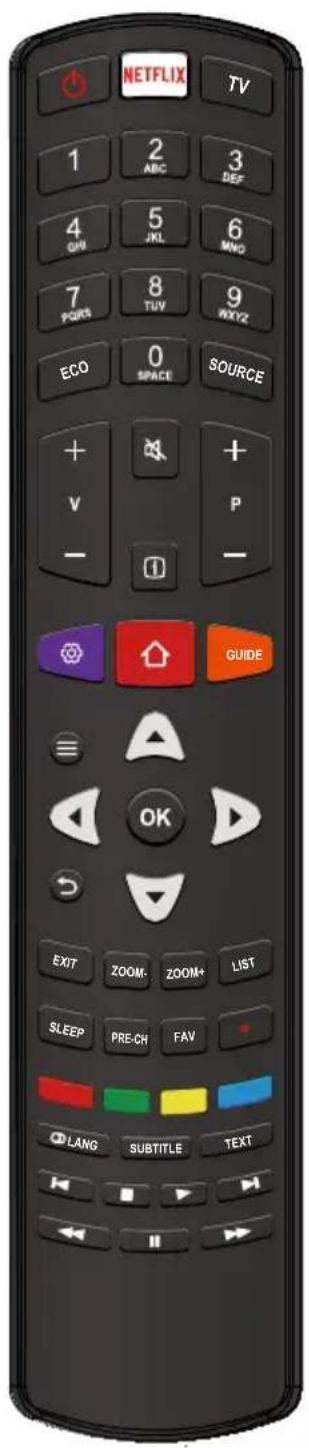
Standby / quit standby.
NETFLIX To access the NETFLIX application. (Not available for some models.)
TV To access TV mode.
0-9 To enter channel numbers; to enter a letter, a digit or a symbol in some functions.
ECO To select a desired energy saving mode.
SOURCE To select connected devices.
V+/- To control the volume.
To switch the sound off and back on.
To display programme information, if available.
P+/- To change channels.
To display the Settings menu.
To access the Smart TV portal.
GUIDE To toggle the Electronic Programme Guide on or off (only available for digital channels).
≡ To access the Option menu.
▲/▼ To navigate through the menus; to select menu options.
◀/▶ To navigate through the menus; to select menu options and change values.
OK To confirm an entry or selection.
To return to the previous menu.
EXIT To exit the menu, homepage or Teletext, etc.
ZOOM-/+ To select the screen mode.
LIST To display the channel list.
SLEEP To select the sleep timer options.
PRE-CH To return to the previous channel in TV mode.
FAV To bring up your favourite channel list.
● Recording button. (only available for some models and digital channels.)
Colour buttons To select tasks or Teletext pages; to be used for HbbTV function.
① LANG To select a sound type available for selected analogue TV programme; to select an audio language available for selected digital TV programme.
SUBTITLE To select a subtitle language available for selected digital TV programme.
TEXT To toggle Teletext on or off.
To select the previous picture, music or video.
■ To stop playback.
▶ To start playback.
To select the next picture, music or video.
◀ To start fast reverse.
To pause playback.
▶▶ To start fast forward.
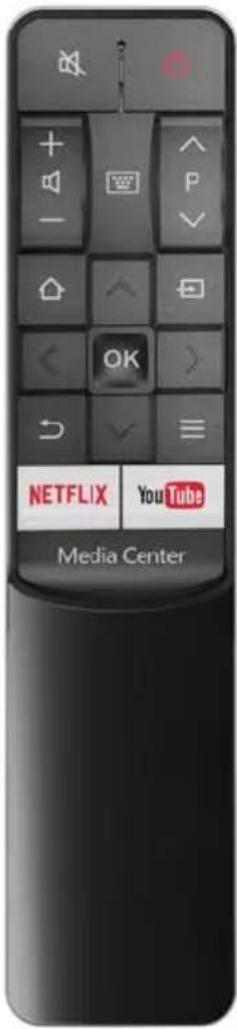
To switch the sound off and back on.
Standby / quit standby.
+/- To control the volume.
To access digit buttons.
P^/v To change channels.
To access the homepage.
^/ To navigate through the menus; to select menu options.
To select connected devices.
< /> To navigate through the menus; to select menu options and change values.
OK To confirm an entry or selection.
To return to the previous menu.
To display the function menu to perform certain operations; to display the Teletext page in different modes.
NETFLIX To access the NETFLIX application. (Not available for some models.)
YouTube To access the YouTube App.
Media Center To access a storage device.
Note: This remote control is available only for selected models.
The remote control type may be changed without notice.
Network Connection

Your TV will require an internet connection to operate all functions. Data usage charges may apply. Please refer to your Internet Service Provider (ISP) for additional information.
To access the internet, you must subscribe to high speed broadband internet service from your internet service provider.
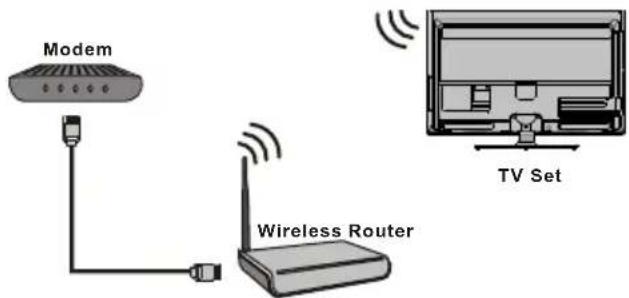
Your TV can be connected to your home network in two ways:
- Wired, using the RJ45 (LAN) connector on the back panel.
- Wireless, using the internal wireless or external wireless USB adapter and your home wireless network.
Note: The following instructions are just the usual ways to connect your TV to the wired or wireless network. The connection method may be different depending on your actual network configuration. If you have any questions about your home network, please refer to your ISP(Internet Service Provider).
Connecting to a wired network
To connect to a wired network:
- Ensure you have:
• An ethernet cable long enough to reach your TV
• A router or modem with an available Ethernet port
• A high-speed internet connection
• An Ethernet (LAN) port on the back of the TV
- Connect your ethernet cable to the router and to the Ethernet port on the back of the TV.
- Use the Network Settings to configure the TV.
Connecting to a wireless network
To connect to a wireless network
- Ensure you have:
• A router broadcasting a high-speed wireless signal
• A high-speed internet connection
- A wireless USB Adapter (not needed if your TV has a built-in wireless Adapter).
- Remember to connect your wireless USB Adapter to your TV's USB port.
- Use the Network Settings to configure the TV.
Note:
For models with a built-in wireless adaptor, the USB wireless adaptor is not required. Not all wireless adaptors are compatible with this TV.
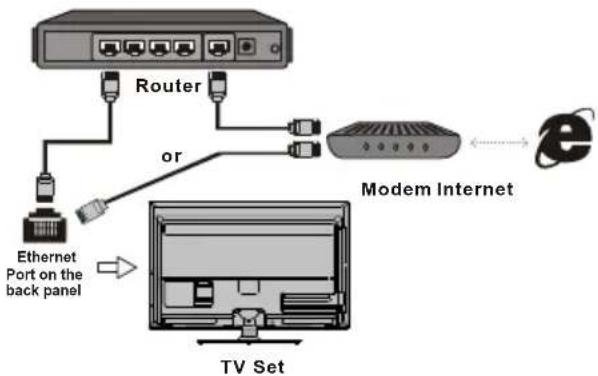
flowchart
graph TD
    A["Router"] -->|and| B["Modem Internet"]
    B --> C["Internet Port"]
    D["Ethernet Port on the back panel"] --> E["TV Set"]
    style A fill:#f9f,stroke:#333
    style B fill:#ccf,stroke:#333
    style C fill:#cfc,stroke:#333
    style D fill:#fcc,stroke:#333
    style E fill:#cff,stroke:#333
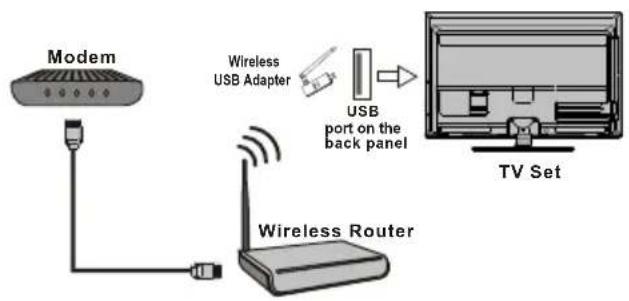
flowchart
graph TD
    A["Modem"] --> B["Wireless Router"]
    B --> C["TV Set"]
    D["USB Adapter"] --> E["USB port on the back panel"]
    style A fill:#f9f,stroke:#333
    style B fill:#ccf,stroke:#333
    style C fill:#cfc,stroke:#333
    style D fill:#fcc,stroke:#333
    style E fill:#ffc,stroke:#333
Switching on
Follow the instructions on this page on how to switch on your TV set and the remote control before going on to following pages describing how to use the channel set-up procedure.
- Insert two AAA batteries in the remote control.
Precautions on using batteries:
- Only use the battery types specified.
- Make sure you use the correct polarity.
- Do not mix new and used batteries.
- Do not use rechargeable batteries.
- Do not expose batteries to excessive heat such as sunshine, fire or similar, throw them in a fire, recharge them or try to open them, as this could cause them to leak or explode.
-
Remove the batteries from the remote control if you are not using it for a long period of time.
-
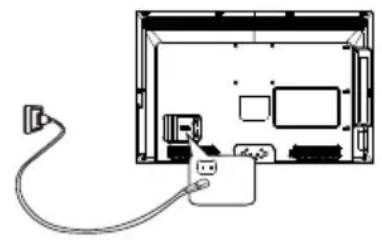
Connect the power cable to a mains socket. (If the power cable is not connected to the television, please first connect the power cable to the television.) Your TV set should only be connected to an AC supply. It must not be connected to a DC supply. If the plug is detached from the cable, do not, under any circumstances, connect it to a mains socket, as there is a risk of electric shock.
Note: The figures are for representation only. The location of the power socket at the back of the television might differ depending on the model.
- Connect the outside aerial or cable network to the ANTENNA IN socket at the back of the TV set.
The aerial socket (75 OHM - VHF / UHF / cable) can be used for connecting an external aerial or other equipment fitted with a modulator (video recorder, satellite receiver, etc.). We recommend that you do not connect other equipment (video recorder, satellite receiver, etc.) to your TV set to begin with, so as not to complicate the set-up procedure with the additional steps involved. Connect them when you have finished setting up the channels.
- When powered on, the TV will be turned on directly or be in standby mode. If the TV set is in standby mode, press the standby button on the remote control or on the TV set to turn on the TV.
Note: The location and name of the power button on the TV may vary according to TV model.
natural_image
Diagram of a device with cable and plug, no text or symbols present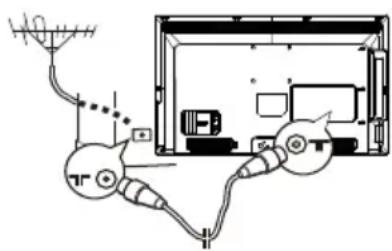
Switching off
To put the TV set into standby mode, press ⏻ on the remote control or on the TV, the TV set remains powered up, but with low energy consumption.
To switch off the TV set, disconnect the mains plug from the mains outlet.
Initial Setup
Perform the following steps before you press ⏻ on the remote control.
- Insert the batteries into the remote control.
- Connect the antenna cable to the TV.
• Plug in the AC cord to the AC outlet. - Connect your TV to a network.
Make sure that the television is switched on and follow all the steps in turn specified hereafter.
The first time you switch the set on, the Initial setup wizard opens, which guides you through the initial setup process. Press OK to start your initial setup. (Refer to Figure 1.)
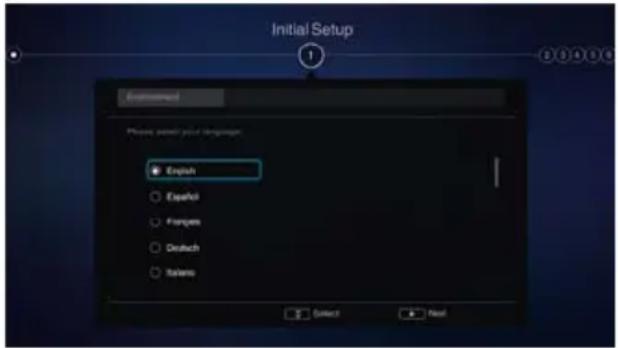
Figure 1
Step 1: Environment
- Press ▲/▼ to select your language, then press OK/▶ to enter the next step.
- Press ▲/▼ to select your country, then press OK/▶ to enter the next step.
Note: If you select France or Italy, you will have to enter the password setting menu here to set a password. Use the numeric buttons to enter a four-digit number as your password. (0000 is too simple to be set as your password.) Enter the same code again to confirm the password. After that, you will enter the next step automatically. (In this step, you can only press ◀ to return to the previous step.)
- Press ▲/▼ to select your location, then press OK/▶ to enter the next step.
Step 2: Network Setup
- Press ▲/▼ to select your network connection type (Wired or Wireless), then press OK/▶ to enter the next step.
- Follow the guides on the screen and press the corresponding buttons on the remote control to proceed.
Note: You can also skip this step and step 3 by selecting "I do not have a network connection", and connect to the Internet later. For details please refer to section Network Connection.
Step 3: Software Update
- If the set has connected to the network successfully, it will search for upgrade files automatically.
- Follow the guides on the screen and press the corresponding buttons on the remote control to proceed.
Step 4: Channel Installation
- Press ▲/▼ to select Continue to install channels.
- Follow the guides on the screen and press the corresponding buttons on the remote control to proceed.
Note: To prevent the channel installation process from being interrupted, wait for the message indicating that the installation is complete. You can also skip this step by selecting "I don't want to install channels". In this case, to search and store your channels you may do an automatic channel search by following the instructions in the next section Performing an automatic channel search.
Step 5: Clock
If the set was not connected to the network, you can use the numeric buttons to enter the date and time, then select the OK button and press OK to confirm.
When the initial setup is completed, the Congratulations message appears. Press OK to confirm.
Performing an automatic channel search
This section describes how to search and store channels automatically. This may be done in any of the cases below:
- you have selected "I don't want to install channels" in the initial setup;
- you see "No program info now, please search channels first!" in TV mode;
-
you want to update your channels.
-
In TV mode, press ≡ or ▲ on the remote control and select Settings > Channel > Channel scan. Press OK/▶ to enter.
- The TV installs and arranges channels according to your country. Press ▲/▼ to select Country, and press OK/▶ to enter. Enter the default password 1234 or your own password in case you have changed the password in the System > Lock menu. Press ▲/▼ to select your country and press OK/▶ to confirm.
-
Press ▲/▼ to select Tuner mode, then press OK/▶ to enter.
-
Press ▲/▼ to select Automatic search, then press OK/▶ to enter.
-
Press ▲/▼ to select Channel type (Digital & Analogue, Digital or Analogue), then press OK to start the automatic search for all DVB-T digital and/or analogue channels.
-
The channel search may take a few minutes. During the process, you can press OK to stop the search halfway.
- After the automatic search, channels are arranged in a preset order. If you wish to skip channels, modify the preset order, rename or delete channels, press or
Chapter 3 HomePage
Note: Figures and illustrations in this User Manual are provided for reference only and may differ from actual product appearance. And for some models, certain options are not available.
Press ⬇ on the remote control to display HomePage. Press ▲/▼/◄/► to select icons from the screen list. Press OK to enter each option. To exit the menu, press ⬇ or EXIT.
Homepage contains 2 parts: TV and APPS. Use ◀/▶ to switch among them.
WARNING:
- Configure the network settings before using Smart TV, Guide and apps.
- Slow responses and/or interruptions may occur, depending on your network conditions.
- If you experience a problem using an application, please contact the content provider.
- According to circumstances of the contents provider, an application's updates or the application itself may be discontinued.
- Depending on your country's regulations, some applications may have limited service or not be supported.
Using Homepage- TV
Note: Some options may not be available for certain signal sources. some options may appear in the next page, you can press ◀/▶ to switch.
This section explores the menus of your TV.
Press ▲ on the remote control to display HomePage. Press ▲/▼/◄/► to enter TV page and select icons from the screen list. Press OK to enter each option. To exit the menu, press ▲ or EXIT.
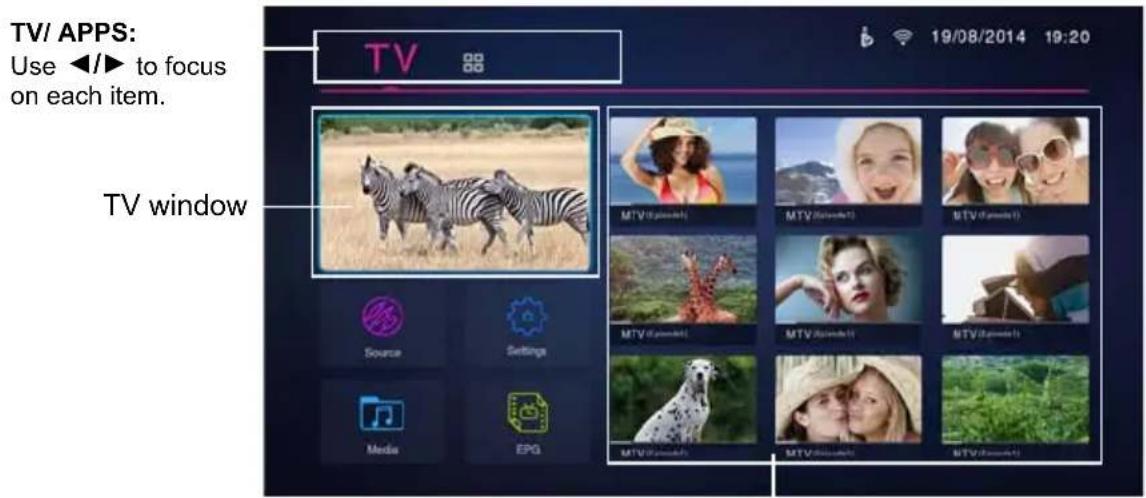
Recommendation
TV window
Displays the current selected TV broadcast programme.
Recommendation
There is information of current broadcasting programmes from nine digital channels shown on the right. Pressing OK would directly go to the corresponding channel. These nine digital channels depend on how you set favourite channels. We recommend that you include 9 digital channels in your favourite channel list so that they can be shown here for your convenience.
When TV is not connected to network, there is no information of current broadcasting programme on the right but only the default pictures are displayed. Select a picture and press OK, then [Full functions are available only after network connection.] will pop up. When you highlight [Connect] and press OK, it goes to the network setup interface directly.
Source
Select the input source from devices connected to TV through different ports. includig TV, AV, CMP, HDMI1, HDMI2, HDMI3 and HDMI4. Press ▲/▼ to select your desired source, and then press OK to confirm.
Note: The available source might differ depending on the model.
Settings
You can do the settings including Picture, Sound, Channel, Network and System. For details, please refer to introduction of Using System Settings in the Menu Operation chapter.
Media
A wonderful multimedia player. It allows you to enjoy the videos, pictures and music in the storage device (SD card or U-disk, according to configuration of the model.).
EPG
Electronic Programme Guide is an on-screen guide that displays scheduled TV programmes. You can navigate, select, view and record programmes.
Note: When Settings > Network > GuideON is set On, it runs IP EPG when the network is connected, and runs DTV EPG if the network is not connected. When Settings > Network > GuideON is set Off, it runs DTV EPG no matter the network is connected or not.
General operations & instructions:
- Select EPG icon on Homepage-TV interface, and press OK to enter, or press GUIDE on the remote control directly to enter, the Program Guide menu will appear, which allows you to get information about the current or next programme playing on each channel.
- Navigate through the different items using the navigation buttons on the remote control and operate according to the on-screen instructions.
- Press ↩ to exit the Guide and switch to the selected channel/programme.
Using Homepage- APPS
To access the menu system:
- Press ⬇ to display the homepage.
- Press ◀/▶ to move to APPS interface. Press ▲/▼/◀/▶ to select the desired item, then press OK to open it or enter the corresponding submenu.
Note: The pre-installed apps or items can not be deleted. And the apps (regardless of order) listed in the below figure may differ from actual product. For some models, certain apps are not available. - Press EXIT to return to the homepage.
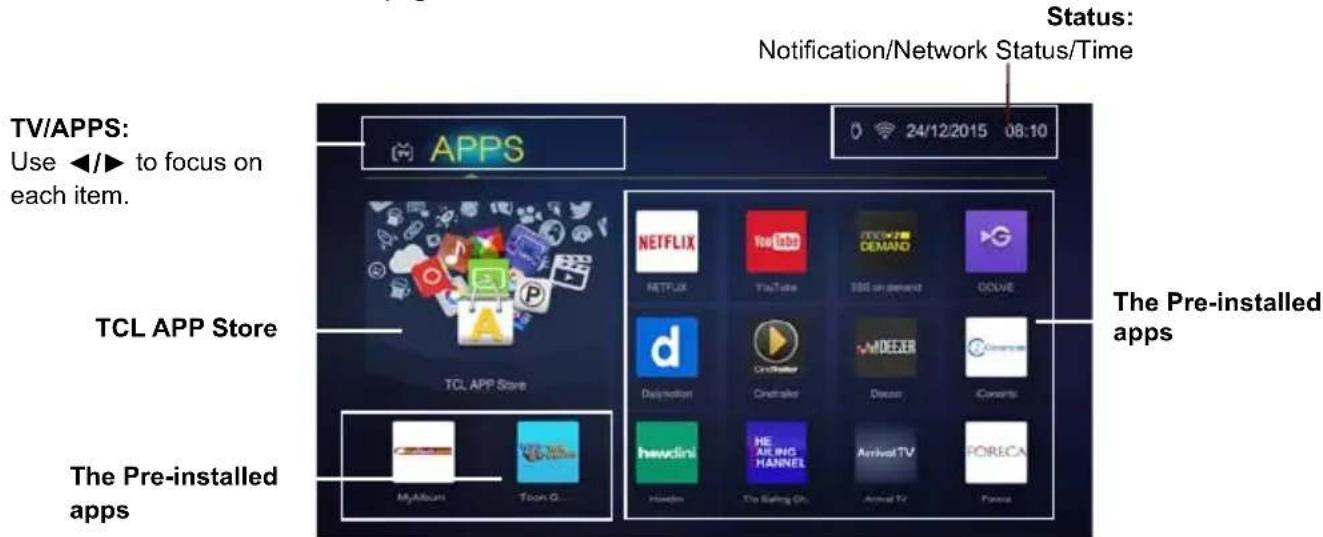
TCL APP Store: After entering the APP store, you will see the recommendations. Press ▲/▼/◄/► to select, press OK to enter. The buttons on the bottom, such as "Login", "Settings", "Help" can provide convenient operations.
The Pre-installed apps: These are recommended Apps. Highlight an app and press OK to open it.
Note: The pre-installed apps or items can not be deleted. You may need a webcam to use some of the Apps. The webcam is an optional accessory, and is available by purchase separately. Only use the specified webcam. Some external devices like webcam, smartphone, joystick and external wireless adapter may not be supported.
Using Quick Access Menu
Note: Some of the functions might be unavailable in certain sources. And for some models, certain options are not available.
This section explores the menus and settings of your TV. Each menu is outlined and detailed to help you get the most from your TV. To access the menu system:
- In TV mode, press≡ on the remote control to display the quick access list.
- Press ▲/▼ to select the desired item, then press OK/▶ to open the corresponding submenu.
- In submenus, use ▲/▼ to select menu options, Use OK/▶ to open the corresponding submenu. use ◀/▶ to make the adjustments.
- Press to return to the previous menu or press ≡ /EXIT to close the menu.
The quick access list includes below items, they are Picture preset, Sound preset, Picture freeze, Football mode, T-Link, TimeShift, PVR, Schedule list, WIFI TV link and Settings.
Picture preset
Press OK/▶ to display its submenus:
Use ◀/▶ to scroll through the picture preset settings:
Standard, Dynamic, Stadium, Movie, Digital Cinema and Personal. And then press OK to confirm the selection.
Note: for some models, certain options are not available.
Sound preset
Press OK/▶ to display its submenus:
Use ◀/▶ to scroll through the sound preset settings:
Music, Movie, Stadium, Standard, Personal and Normal. And then press OK to confirm the selection.
Picture freeze
Press OK/▶ to display its submenus, and use ◀/▶ to toggle between On and Off. When On is selected, the display screen will be frozen.
Football mode
Press OK/▶ to display its submenus, and use ◀/▶ to toggle between On and Off. When On is selected, the Picture preset and Sound preset will be showed Stadium.
T-Link
Use this function to search for CEC devices connected to the HDMI sockets in your TV.
Enable or disable T-Link
Press OK/▶ to display its submenus, and use ◀/▶ to select On or Off to enable or disable T-Link.
*Note: Below T-Link setting options and Guide menu options will be available only when T-Link is set to On.
Auto power on: Use ◀/▶ to toggle between On and Off. When Auto Power on is set to On, TV and device
will be on at the same time.
Auto standby: Use ◀/▶ to toggle between On and Off. When Auto Standby on is set to On, TV and device will be in standby mode at the same time.
Guide menu: Press OK/▶ to enter. You will find an on-screen guide map of the remote control about the shortcut to operate the playback, for example, Numeric button 2 works as PAUSE.
*Note: The CEC functions depend on the devices connected and it is possible that some devices may not interoperate correctly when connected to this TV. The user manual or the manufacturer of the problematic devices should be consulted for further information.
Timeshift
Note: This Option is only available when Time Shift is set to On: Select Settings> Channel> Timeshift, press OK/▶ to enter and use ▲/▼ to set Time Shift to On or Off.
Allows you to pause, fast forward and rewind live TV, so you don't have to miss any part of your favourite programmes. Before you use the function, connect a USB drive to the TV first. For the first time, you should complete the disk setup for the USB drive.
- Press ≡ on the remote control and select Timeshift, then press OK to confirm.
- Follow the directions on the screen to do the setup.
- After the disk setup is done, press and select
Timeshift.
- Press OK to display the time shift menu and operate according to the on-screen prompt.
- Pressing Stop button stops the time shift and exits.
- When the time shift menu disappears and only the timing of the time shift remains on the screen, you can press OK to call out the time shift menu.
Notes:
- Before you plug the USB drive to TV, make sure you have backed up the data on the drive to avoid unforeseen malfunction and data loss.
- We recommend that you use a USB drive with at least 1GB free space and a disk speed faster than 5.0MB/sec.
- The bigger the USB drive free space for time shift, the bigger the recording length.
Quick Access of Timeshift:
Insert a USB disk, press PLAY(▶) on the remote control, it will access Time Shift automatically.
PVR (Personal Video Recorder)
Allows you to record your favourite TV programmes. Before you use the function, connect a USB drive to the TV first.
Note: The feature is available only in selected products and, due to specific TV network limitations and country technical requirements, might not be available in product or place of installation. Feature might also be blocked by TV network due to copyright protection (HD
content, recording protection). Please use ≡ on the remote control to check if the feature is available in your product.
- Press ≡ on the remote control and select PVR.
- Press OK/▶ to enter. It starts to record automatically.
- Press ≡ on the remote control and use ▲/▼/◄/► to adjust the recording duration.
- Press OK to stop recording manually, the recorded file will be saved. In normal operation, the recording will stop automatically when the recording duration expires.
- In recording, the PVR mini pane will also show on the screen to indicate the recording progress.
- To watch the recorded programme, exit PVR mode first and go to ▲ > Media. Select the folder PVR, then select the related record file. Press OK to play. (It is the same if you record a digital radio programme).
Notes:
- This feature is available only for digital non encrypted channels. Even when CICAM (CI or CI+) is inserted, this feature is not available on encrypted channels.
- Before you connect the USB drive to the TV, make sure you have backed up the data in the drive to avoid the loss of your important data due to unforeseen malfunction.
- The bigger the USB drive free memory for the PVR function, the bigger the recording length.
- If you want to change channel or signal source during recording, store the recording data before changing the channel or source.
- The TV cannot play files normally if the parameters of the file exceed the limitations of the system, the file format is not supported, the file is damaged, or the file cannot be decoded.
- Do not disconnect the USB drive when the system is reading a file or transmitting data, otherwise the system or the drive may be damaged.
Schedule list
This function is used to perform scheduled recording.
-
Press = on the remote control and select Schedule list.
-
Press OK/▶ to display the schedule list. Press the red button to add a schedule. Press the green button to delete a selected schedule Press OK to edit a selected schedule.
-
Add schedule: Press the red button to add a schedule into your schedule list.
- Channel number: use ◀/▶ to select the desired channel.
- Start date: use the numeric buttons to set the start date.
- Start time: use the numeric buttons to set the start time.
- End time: use the numeric buttons to set the end time.
-
Schedule type: use ◀/▶ to select the available schedule type.
-
Select Reminder to be reminded that you can switch to the scheduled programme when the time you have set comes.
- Select Record (if available) if you want to start your scheduled recording when the time you have set comes. When time is out and you do not execute any operation, scheduled recording will start automatically.
- Repeat type: use ◀/▶ to select different repeat mode for the schedule.
- Press ▲/▼ to select Add schedule, and press OK to confirm.
- Press EXIT to lose the menu.
WiFi TV link
(*not available for some models)
WiFi TV link allows you to share screen and sound of your device such as a smartphone or a tablet to your TV, wirelessly (i.e. without cables). This makes it possible to view on your TV, at the same time, what your smartphone or tablet is showing. For example, you can launch a video on your smartphone and display it simultaneously on your TV, or use your tablet as game controller with content displayed on the big screen of your TV.
Whenever you want to use WiFi TV link, you must first activate this function in your TV. To do it follow the steps below:
- Press OK/▶ to enter. You will see details for this function.
- Find the WiFi TV link function in your device. Different devices may have different names for this function.
- Then click the "connection" function on the device. If connected successfully, you will see on your TV screen what the device is showing.
Note: TCL does not guarantee that the use of the WiFi TV link function will be smooth or error-free since not all devices are compatible with the WiFi TV link function.
Settings
The Settings menu allows you to configure the TV with your preferences. For details, please refer to the following Using System Settings part.
Using System Settings
The Settings menu allows you to configure the TV with your preferences.
- press ⬇ on the remote control to display the homepage.
- Press ▲/▼/◄/► to select Settings and press OK to enter the main menu. The list includes below items, they are Picture, Sound, Channel, Network and System.
Note: You can also press on the remote control, select Settings (if available) and press OK/▶
to enter the main menu. Some options may not be available for certain signal sources.
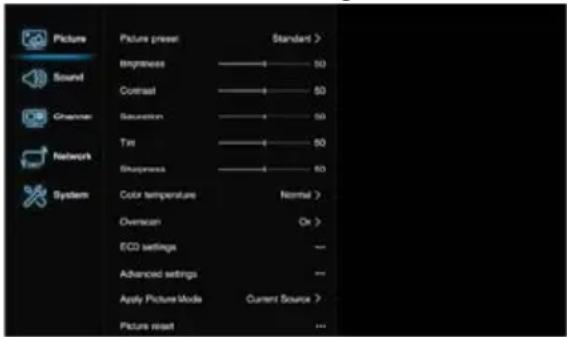
Picture
The menus for adjusting the picture are used to obtain the best picture settings according to your preference, the type of programme you are watching and the ambient lighting.
Select Settings > Picture, Press OK/▶ to enter and use ▲/▼ to choose an option.
Note: Some options may not be available for certain modes. Some options may appear in the next page of the Picture menu, you can press ▲/▼ to switch.
Picture preset: Use ◀/▶ to scroll through the picture preset settings: Standard, Dynamic, Stadium, Movie, Digital Cinema and Personal.
Backlight: Adjusts the backlight levels.
Brightness: Adjusts the brightness of the picture.
Contrast: adjusts the difference between light and dark areas of the picture.
Saturation: Adjusts the richness of colour.
Tint: Adjusts the balance between the red and green levels.
Sharpness: Adjusts the crispness of the edges in the picture.
Colour temperature: Adjusts the colour temperature of the picture. Use ◀/▶ to scroll through the colour settings: Cool, Normal, Warm, Warm2 and Custom.
Auto format: Use ◀/▶ to select On and Off, when On is selected, the TV will display the picture according to HD Signal's format.
Note: Auto format is available only in TV and HDMI mode.
Screen mode: Use ◀/▶ to select the picture size.
Note: You are recommended to use the full screen mode. Do not use the display mode with black bars on both sides of the picture (such as 4:3) for a long time, otherwise the TV screen may be damaged permanently. This function is only available when Auto format is off.
Overscan: Set Overscan function to On or Off.
ECO settings: Press OK/▶ to display its submenu. Energy saving: Press ◀/▶ to select the desired power saving mode, Off, Low, High.
Mix dimming: Press ◀/▶ to select On or Off.
Note: For some models, this option is not available.
Advanced settings: Press OK/▶ to display its submenu. Use ▲/▼ to select the items, such as Noise reduction, to adjust for obtaining a clearer picture.
Note: The options offered depend on the programme you are watching.
Apply Picture Mode: Use ◀/▶ to select Current Source or All source.
Picture reset: Select to reset the picture settings to the factory default.
Sound
Select Settings > Sound, Press OK/▶ to enter and use ▲/▼ to choose an option.
Note: Some options may not be available for certain signal sources.
Sound preset: Press OK/▶ to display the option list. Use ▲/▼ to select a sound type.
Digital Audio Output Type: Press OK/▶ to display the option list. Select a proper sound type from the list for digital programmes.
- If the current programme outputs sound in Auto format, then either PCM or Auto can be selected.
- If the current programme does not output sound in Auto format, only PCM can be selected. Otherwise no sound will be output.
Note: The options you may choose depend on the programme you are watching. If you select PCM and the sound output is ahead of the picture, you can select SPDIF delay from the Sound menu and press
◀/▶ to adjust the delay time to synchronize the sound with the picture.
SPDIF delay: If the sound output does not match the picture, press ◀/▶ to adjust the delay time to synchronize the sound with the picture
Audio delay: press ◀/▶ to adjust the synchronization between audio and image.
TV placement: Use ▲/▼ to balance the sound between Desk top and Wall mount.
Dolby professional setting: Press OK/▶ to display the option list. Use ▲/▼ to select a list.
Advanced settings: Press OK/▶ to display its submenu. Use ▲/▼ to select the items, such as Balance, to obtain a better sound.
Note: The options offered depend on the programme you are watching.
Channel
Select Settings > Channel, Press OK/▶ to enter and use ▲/▼ to choose an option..
Channel scan: Press OK/▶ to display channel scan options.
Country: Press ▲/▼ to select your country.
Tuner Mode: Antenna
Automatic search: Select Digital & Analogue (or Digital or Analogue), then press OK/▶ to start the automatic search process. The search may take a few minutes. During the process, you can press OK to abort halfway.
Automatic update: This allows you to update all available channels without altering the sorting of existing channels. Press OK to start to update the channels. During the process, you can press OK to abort halfway, or press → to return.
Analogue manual scan: Press OK to enter. Press ▲/▼/◄/► and number or OK to search, fine tune or store the channel.
Antenna manual installation: Allows you to start manual searching the available channels from the current frequency or any frequency you input.(Only for digital channels). Press OK to start search from the current frequency, or use digit keys to input a frequency, then press OK to start search. During the process, you can press OK to abort halfway and press OK to restart, or press → to return.
Clean channel list: Allows you to remove all the searched channels from the channel list.
Channel list: Press OK/▶ to display channel list.
EPG: It is an on-screen guide that displays scheduled TV programs. You can navigate, select and view programs.
Note: EPG is only available for digital channels.
Organiser: You can skip channels, sort channels, edit channels, or delete channels, Press OK/▶ to enter.
Channel skip: If a channel is stored twice or its reception is poor, you can simply skip it. The skipped channels will no longer be selected. Press OK/▶ to display Channel skip menu. Press ▲/▼ to select a channel and press OK to check the box.
Channel sort: Press OK/▶ to enter. Press ▲/▼ to select Channel swap or Channel insert, then press OK to enter.
Channel edit: Press OK/▶ to display Channel list. Press ▲/▼ to select a channel you want to edit, then press OK to enter. Press ▲/▼ to select Channel name, then press OK to access the virtual keyboard and edit the channel name, finally highlight OK and press OK to confirm. When you have finished, press → to return.
Channel delete: Press OK/▶ to display Channel list. Press ▲/▼ to select a channel you want to delete, then press OK to delete the channel.
Channel diagnostics (on digital TV channels)
-
SelectSettings >Channel > Channel diagnostics.
-
Press OK/▶ to display some signal information on current digital channel, such as signal strength, Frequency, etc..
Timeshift: Set Timeshift to On or Off. Default setting is On. For details, please see the introduction of Timeshift on page 13.
Subtitle: This enables subtitle for digital TV channels.
Select Subtitle, press OK/▶ to display its submenus:
Subtitle: Press OK/▶ to enter, press ▲/▼ to turn On or Off the subtitles.
Subtitle type: Press OK/▶ to enter, press ▲/▼ to select a subtitle type. You can select Hearing Impaired to display the hearing impaired subtitle with your selected language.
Teletext: Press OK/▶ to display its submenu.
Decoding page language: Select a proper type of language in which Teletext will display.
Digital teletext language: For digital TV channels, your TV could zap to a service with multiple initial Teletext pages in different languages. This function allows you to select an available language as primary language which relates to different initial Teletext page.
Network
You can set up your TV so that it can access the Internet through your local area network (LAN) using a wired or wireless connection.
connecting to a wired network:
you can attach your TV to your LAN using cable in three ways:
- You can attach your TV to your LAN by connecting the LAN port on your TV to an external modem using a Cat 5 cable.
- You can attach your TV to your LAN by connecting the LAN port on your TV to a IP Sharer which is connected to an external modem. Use Cat 5 cable for the connection.
-
Depending on how your network is configured, you may be able to attach your TV to your LAN by connecting the LAN port on your TV directly to a network wall outlet using a Cat 5 cable. Note that the wall outlet is attached to a modem or router elsewhere in your house.
-
Press or on the remote control, select Settings > Network > Internet connection and press OK/▶ to enter.
-
Press ▲/▼ to select On and press OK to confirm.
- Press ▲/▼ to select Interface and press OK/▶ to enter.
- Press ▲/▼ to select Ethernet and press OK to confirm.
- Press ▲/▼ to select IP settings and press OK/▶ to enter. You can set Address type to Auto or Manual.
- Select Auto if you want the TV to acquire and enter the needed IP address automatically.
- Select Manual if you want to enter your IP address manually, then:
- Press ▼ to go to the first entry field.
- Enter the IP address, Subnet Mask, Default Gateway, Primary DNS and Secondary DNS values. Use the numeric buttons to enter numbers and the ▲/▼/◄/► buttons to move from one entry field to another.
- Once IP setting is completed, press ▲/▼/◄/► to select OK and press OK to confirm. The set will try to connect to the network and inform you about the result. Press ▶to return to the Network menu.
- If you want to check the information on current connection, such as Interface, Address type, IP address, etc., press ▲/▼ to select Information and press OK/▶ to enter. Press ➕ to return to the Network menu.
- If you want to check the Internet connectivity, press ▲/▼ to select Connection test and press OK/▶.
Connecting to a wireless network
Your TV is equipped to be connected to your home network wirelessly. To do that you need a wireless router or modem.
- Press ≡ or ↑ on the remote control, select Settings > Network > Internet connection and press OK/▶ to enter.
- Press ▲/▼ to select On and press OK to confirm.
- Press ▲/▼ to select Interface and press OK/▶ to enter.
- Press ▲/▼ to select Wireless and press OK to confirm.
- Press ▲/▼ to select Wireless settings and press OK/▶ to enter. You can set the wireless network connection in 3 ways:
- a) Scan
- Press ▲/▼ to select Scan and press OK/▶ to enter. The TV will search all access points within range. Access points found by the TV will be displayed.
- Press ▲/▼ to select an available access point, then press OK/▶ to connect.
- Press to return to the Wireless settings menu.
Note: If you select a protected access point, you will have to enter the corresponding password. Press OK on the remote control to display the virtual keyboard to enable you to enter the password.
- b) Manual
Press ▲/▼ to select Manual and press OK/▶ to enter. You will be prompted to enter the correct SSID of an available wireless router to set up the connection. Press ⊃ to return to the Wireless settings menu.
- c) Auto
If your AP (Access Point) supports WPS (Wi-Fi Protected Setup), you can connect to the network via PIN (Personal Identification Number) or PBC (Push Button Configuration). WPS will automatically configure the SSID and WPA key in either mode.
Press ▲/▼ to select Auto and press OK/▶ to enter.
- PIN: Select PIN and press OK/▶ to enter. Choose a random PIN code. Make sure this code
is installed on the AP. (For the procedures, refer to your router manual.) Select OK and press OK to set up the connection.
- PBC: If your router has a PBC push button, select PBC and press OK/▶ to enter. Press the PBC push button on your router within 2 minutes before you select OK and press OK again. Your TV will automatically acquire all the network setting values it needs and connect to your network.
- Press to return to the Wireless settings menu.
-
Press to return to the Network menu.
-
If you want to check the information on current connection, such as Interface, Address type, IP address, etc., press ▲/▼ to select Information and press OK/▶ to enter. Press □to return to the Network menu.
- If you want to check the Internet connectivity, press ▲/▼ to select Connection test and press OK/▶.
DLNA (Share & See)
Note: This manual covers products with either Share & See or DLNA function. Share & See is DLNA-compatible.
Connecting to your PC
Make sure to set up a wired or wireless connection from your TV to a router first. Then connect your PC to your router either through a network cable or wirelessly. Also make sure to select Network > Internet connection and select On, and that your computer firewall won't block the connection.
Enabling DLNA function
Press ≡ or ▲ on the remote control, select Settings > Network > DLNA and press OK/▶ to enter. Press ▲/▼ to select On and press OK to confirm. Follow the steps in turn specified hereafter, then you can enjoy recorded videos, images and music saved on your PC.
Adding media from your PC for sharing
Install a DLNA media server on your PC. The simple and familiar server you may install is Microsoft Windows Media Player 11 and above. Follow the instructions below to allow your TV to access the designated files on your PC.
- Open the Microsoft Windows Media Player 11.
- Select Library > Media sharing.
- Check the checkbox Share my media to.
- Select the icon of the TV set connected to your PC.
- Select Allow to allow the TV set to access your PC, and select OK to enable the access.
Note: Use the Settings button to customize your desired settings.
- Select Library > Add to Library.
- Select your personal folders or folders of other users that you can access for sharing.
- Select Add and press OK to enable the addition.
DLNA application
Select Media from the homepage and press OK to enter. Then you can view pictures, listen to music or watch videos, which are stored on your PC. Supported file formats:
Picture JPEG, PNG
Music MP3, WMA, LPCM
Video MPEG2, MPEG4, WMV
Notes:
- If DLNA is switched on, the TV will display the list of available DLNA servers which are available in local network.
- Content from third-party DLNA servers may not play correctly on your TV due to compatibility problems.
- When sharing media files from a PC, certain features may be unavailable and, due to the file and encoding formats used, playback issues may occur.
- Because of network related conditions, playback of media files may not be error-free. When this happens, play them from a USB drive.
GuideOn
GuideOn refers to network EPG, which is an app of preview programme and helps you navigate through a vast amount of content. It provides functionality similar to a printed programme guide by informing you as to which television content is available, such as cast and related information.
-
Press or on the remote control, select Settings > Network > GuideOn and press OK/▶ to enter.
-
Press OK/▶ again, press ▲/▼ to select On and press OK to confirm, then press EXIT or ↑ to close the menu.
Note: You can also scan the QR code displayed on the screen to download the GuideOn app to your smartphone.
- Press GUIDE on the remote control to display the network EPG page. It contains three tabs: On-Going, Guide and Reminders.
- Press ◀/▶ to select a tab.
- Press OK to enter.
- To quit the EPG, press EXIT on the remote control.
Note: To use network EPG, make sure the Internet is connected. In case Internet is connected and GuideOn is turned on, network EPG replaces local EPG as described in section Using EPG (Electronic Programme Guide) when you press the GUIDE button.
TCL nScreen
This function allows you to turn a smart device into a sophisticated remote control, providing more features than your normal TV remote control. You can then control your TV through your smart device.
-
Press or on the remote control, select
Settings > Network > TCL nScreen and press OK to enter. You will see details for downloading the TCL nScreen application and other related information.
Note: The following instructions are based on the example of a laptop. -
Download and install into the laptop the correct TCL nScreen application for the laptop.
-
Make sure the laptop and the TV are in the same home LAN (local area network) or network segment.
-
Run the TCL nScreen application on the laptop, it will search and communicate with the TV automatically to enable the TCL nScreen functionality.
-
Once the TV and the laptop are linked as described in step 4, you will be able to enjoy the extra features of the TCL nScreen function.
-
To quit the TCL nScreen function, press EXIT or on the remote control.
Netflix settings
Netflix provides on-demand movies and TV shows delivered via the Internet. Netflix is available in certain countries. Unlimited membership is required. More information can be found at www.netflix.com.
Press ≡ or ↑ on the remote control, select Settings > Network > Netflix settings and press OK to enter. It contains two tabs: Deactivate, ESN.
WiFi TV link
please see the introduction of WiFi TV link on page 14.
System
Select Settings > System, Press OK/▶ to enter and use ▲/▼ to choose an option..
E-Manual: E-Manual is an electronic user manual for the product. You can find instructions for the features of this TV set.
Menu language: The Menu language menu allows you to select language.
Timer: The Timer menu allows you to set the time zone on your TV set, to programme an automatic turn-off or wake-up timer and to view the calendar.
Select System > Timer and press OK/▶ to confirm. The Timer options are as below:
Time zone: Use ▲/▼ to select the local time zone.
Country region: Use ▲/▼ to select your region.
Note: The option is unavailable when you have selected the time zone other than "As per broadcast".
Clock: Press OK/▶ to display its options:
- Auto synchronization: Use ▲/▼ to select On or Off. If On is selected, the TV will get the time automatically from DTV signals, and the Time item
cannot be adjusted. If you select Off, you should set date and time at Date and Time item. Highlight Date or Time, use ◀/▶ to select input space, enter the current date or time by using the digit keys.
Note: If Off is selected, the time set in Time option will not be memorized when turning on the TV next time, and the TV's time will start from the default.
- Power on timer: Use ▲/▼ to select Off, Daily or Once. If you select Once or Daily, you should set a time period after which the TV automatically switches to on at Time below this item. Highlight Time, use ◀/► to select input space, enter the on time using the digit keys.
- Power off timer: Use ▲/▼ to select Off, Daily or Once. If you select Once or Daily, you should set a time period after which the TV automatically switches to off at Time below this item. Highlight Time, use ◀/► to select input space, enter the off time using the digit keys.
Sleep timer: Sets a period of time after which the TV set goes into standby mode. Use ▲/▼ to set the period (120 minutes maximum). To disable this function, select Off.
Auto standby: TV will be put into standby mode automatically if there is no operation. Use ▲/▼ to set the period (8 hours maximum). To disable this function, select Off.
Lock: This menu can control the special function for TV channels.
Note: You must enter your personal code before entering the Lock menu.
Display the main menu by pressing System and select Lock, then press OK to confirm. Then press the number buttons to enter the password to enter the Lock menu.
The factory default code is 1234. And the super password is 0423. If you forget your code, enter it to override any existing codes.
The Lock options are as below:
- Channel lock: This option allows you to lock a certain Channel. Use ▲/▼ to select a certain TV channel you want to lock, then press OK to lock. To unlock, use the same operation.
- Parental rating: This option allows you to set a rating to a programme. Highlight Parental rating, press OK/▶ to display Parental rating menu, Then use ▲/▼ to adjust.
- Input lock: This option allows you to lock a certain external source you want to lock. Press OK/▶ to display Input lock menu, then press ▲/▼ to select a certain external source you want to lock, and press OK to lock. To unlock, use the same operation.
Note: When the current input is locked, you can press OK and enter the password to enter.
- Front panel lock: Press ▲/▼ to select On to lock the set's buttons.
- Installation lock: Press ▲/▼ to select On to prevent access to the Installation menu to prevent any channels from being set up without your consent.
- Change password: This option allows you to change the password. Press OK/▶ to enter, then press the number buttons to enter the new password twice.
- Max volume: Press OK/▶ to display the adjustment bar and use ◀/▶ to set the max volume when watching programme.
- Clean all: Press OK/▶ to enter, then select Yes or No.
Input settings: You can name your connected sources according to the type of device instead of the type of socket.
-
Select System > Input settings, press OK/▶ to enter.
-
Press ▲/▼ to select a connector your equipment is connected to and press OK/▶ to enter.
-
Press ▲/▼ to select the type of device connected to this connector and press OK to confirm.
-
Press EXIT or ↑ to close the menu.
After configuring, the selected source name will be displayed after the name of the related connector in the source list when pressing SOURCE on the remote control or OK on the TV set.
Note: Not all models have OK button on the set.
Software update:
Note: Do not switch off or unplug the TV until the upgrade is completed.
Press ≡ or ▲ on the remote control, select Settings > System > Software update and press OK/▶ to enter.
You have the following options to update the software.
- By USB: Enables you to install a new version software from a USB stick. Insert the USB stick in which a new version software is stored into a USB socket of the set. Select By USB and press OK/▶ to enter. Follow the on-screen instructions to complete the process.
- By network: Enables you to download and install the latest version software from the Internet. Make sure to set up a wired or wireless network connection first then select By network and press OK/▶ to enter. Follow the on-screen instructions to complete the process.
Note: Keep successful network connection during upgrade.
- By channel: Enables you to install the latest version software if available from the broadcast. Select By channel and press OK/▶ to enter. Follow the on-screen instructions to complete the process.
There is also information about the TV such as Current version and Product name, etc.
Location: Use ▲/▼ to select Home, Shop or Shop with demo.
HbbTV mode: Use ▲/▼ to select On to turn on HbbTV function.
Cookies: Use ▲/▼ to select On to turn on HbbTV
cookie.
Note: Cookies is available when HbbTV mode is set to On.
Advanced settings: Press OK/▶ to enter, please see the introduction of T-Link on page 13.
Football mode: Please see the introduction of Football mode on page 13.
Reset shop: Allows you to reset the TV to factory default settings.
- Press System > Reset shop and press OK/▶ to enter.
-
Use the numeric buttons to enter the password.
-
Press ◀/▶ to select OK and press OK to confirm.
- The Initial setup menu appears. Follow the instructions in the section Initial setup.
LED Indicator: Allows you to select the LED indicator on the TV front panel to flash or not.
- Press Settings > System > LED Indicator and press OK/▶ to enter.
- Press ▲/▼ to select Flashing or Normal and press OK to confirm.
- Press EXIT or ↑ to close the menu.
Chapter 5 Advanced Functions
Using E-Manual (Help)
You can find instructions for your TV's features from the e-manual in your TV. To view it, press ▲ on the remote control to open Homepage, use ◀/▶ to switch to TV page, select Settings > System > E-Manual and press OK to view the details.
Using MHL Function (Mobile High-definition Link)
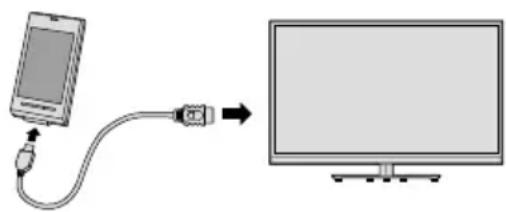
You can use the MHL functions by connecting the TV HDMI 1 (MHL) port and the USB port of a mobile device with an MHL cable. Features of the MHL functions include:
- Charge the mobile device from the TV.
- Two-way remote operation between TV and mobile device.
• Video/Audio contents play from the mobile device, and shown on the TV.
Notes:
• These functions may not be available depending on the connected equipment.
- If there is no more battery life left in the connected device, charging will not start.
Connecting MHL-compatible Device
natural_image
Diagram showing a smartphone connected to a TV via cable, illustrating the connection (no text or symbols present)- Connect the MHL-compatible device to the HDMI 1 (MHL) port on the TV, using an MHL cable (not supplied), charging starts automatically.
- When connecting MHL-compatible device to HDMI 1 (MHL) port on the TV, switch TV source to HDMI 1.
Note: Do not connect the MHL-compatible device to any ports other than HDMI 1(MHL) port.
When using MHL
- Interoperability with MHL devices of other manufacturers is not guaranteed. Therefore, TCL does not provide any guarantee against operational failure such as that described below when an MHL source is connected to the TV.
- No picture or sound.
- Some of the functions do not work by remote operation from the TV.
- If the MHL does not work properly, contact the manufacturer of the source device for advice on its use.
- Do not disconnect the power plug of the TV when the TV is active and the MHL device is being connected.
- Do not disconnect the power plug of the TV when the TV is in standby mode and the MHL device is being connected.
Viewing photos, playing music and watching videos from a USB device
Your TV is fitted with a USB connector that enables you to view photos, listen to music or watch videos stored on a USB storage device or the PVR list.
Supported file formats as below:
Picture: JPEG, BMP, PNG
Music: MP3, WMA, AC3
Video: H.265, H.264, XviD, MPEG1, MPEG2, MPEG4, VC1, WMV, TS, MKV, AVI, MP4, Mov, 3GP
Note: Some USB keys and USB products like digital cameras or mobile phones are not fully compatible with USB 2.0 or 3.0 standard so they may not work with the TV multimedia player. Not all USB keys or devices are compatible with the USB function. Not all above formats are recognised. The encoding formats of your files will determine if they can be used or not.
Press ▲ on the remote control, use ◀/▶ to switch to TV page, select Media and press OK to enter.
Media
Includes the three sections as below:
U-disk
You can access photo, music and video files on your external storage device when it is connected to the smart TV. Includes the four sections as below:
All: To dispay photos, watch videos and play back music if available.
Picture: To display photos if available.
- Select Picture, then the main file content browser will be shown. Press OK/▶ to enter.
- Use ▲/▼/◄/► to select a photo in either main or sub file content browser.
- Select a photo, press OK to watch, and a slide show begins from the selected photo. Press OK to pause the photo if you want to rotate or zoom the paused photo. Press ≡ to display the control bar in the browser mode. You can play, pause or rotate the photo, select different play modes and display effects, etc..
- Press the related buttons on the remote control to perform the available functions shown on the function bar at the bottom of the TV screen.
Video: To watch videos if available.
- SelectVideo, then the main file content browser was shown. Press OK/▶ to enter.
- Use the ▲/▼/◄/► to select a video in either main or sub file content browser in the same way as in photo display function.
- Select a video, press OK to watch, and an automatic playback begins from the selected video. Press ≡ to
display the video menu in the browser mode. You can play or pause the video, select different play modes and preset picture settings, etc.
- Press the related buttons on the remote control to perform the available functions shown on the function bar at the bottom of the TV screen.
Music: To play back music if available.
- Select Music, then the main file content browser will be shown. Press OK/▶ to enter.
- Use ▲/▼/◄/► to select a song in either main or sub file content browser in the same way as in photo display function.
- Select a song, press OK to play, and an automatic playback begins from the selected song. A control bar appears, by which you can play or pause the song, select different play modes, etc..
- Press the related buttons on the remote control to perform the available functions shown on the function bar at the bottom of the TV screen.
DLNA
Install a DLNA media server on your PC. The simple and familiar server you may install is Microsoft Windows Media Player 11 and above. Do settings to allow your TV to access the designated files on your PC. Make sure your PC and the TV are in the same home LAN. Go to Media> DLNA, then you can make the TV play the media files on the PC.
PVR
You can find all the recorded digital programmes you've got by the PVR feature.
Problems & Solutions
Note: Problems & solutions 1 to 2 are for the TV models which have network functions, so users of non-connected TV models can disregard them.
1. Fail to link to the network.
- Check if your TV is connected with the network;
- Reboot your TV;
- Consult your internet service provider, to confirm if access of your router is supported. Refer to the operation manual of your router.
- Make sure your TV is connected to a router, and make sure your router is powered on. Check that your router/modem has an internet connection, and that your Ethernet cables/wireless connection is OK. Test your connection with a computer to make sure it is OK. Should the problem persist, contact customer service.
2. The video could not be played smoothly.
- Videos from your USB flash drive --- It may result from data transmission, or its code flow is far beyond the supported formats of this TV set.
- Videos downloaded from internet, or online videos.
a. It may be caused by the lower bandwidth of your network. A high network speed is required to handle online videos.
b. Peak internet usage times may affect the bandwidth.
c. Check if any other computers on the same network are also operating, as they may be using up bandwidth. Especially if they are downloading or playing online videos.
d. The video may not be smooth itself, it is not the problem of your TV or network.
3. When two mobile hard disks are connected with the TV at the same time, they will not be recognized some times.
- All mobile hard disks consume a lot of power, which may result in power supply problems. We recommend inserting only one hard disk, or a low power consumption mobile hard disk.
4. The video from a mobile hard disk (USB) is playing with no sound.
- The audio format of the video in your mobile hard disk is not supported by the TV player.
5. Some videos fail to play.
- The formats of the videos may not be supported by the TV, especially videos shot by certain kinds of cameras, generally with their private protocol of formats, which are not compatible with your TV.
6. Video stops playing midway.
- Mistakes may occur when videos are copied or compressed, so they may automatically stop playing during playback.
7. What should I pay attention to, when I do SW updating
- No power cuts when SW updating;
- Avoid any operations with your remote control when SW updating;
-.Depending on your internet connection speed, the software updating process may take some time.
8. There are no distinct changes of TV interface after SW updating.
- Under certain conditions, SW updating may not only update or add new functions but also improve the performance of the TV set, without distinct changes to the user interface. Also, there may be no changes to the user interface at all.
Troubleshooting
Most problems you encounter with your TV can be corrected by consulting the following troubleshooting list.
No picture, no sound
- Check if the fuse or circuit breaker is working.
- Plug another electrical device into the outlet to make sure it is working or turned on.
- Power plug is in a bad contact with the outlet.
- Check the signal source.
No colour
- Change the colour system.
- Adjust the saturation.
- Try another channel. Black-white programme may be received.
Remote control does not work
- Change the batteries.
- Batteries are not installed correctly.
- Main power is not connected.
No picture, normal sound
- Adjust the brightness and contrast.
- Broadcasting failure may happen.
Normal picture, no sound
- Press the VOLUME UP button to increase volume.
- Volume is set to mute, press the Mute button to restore sound.
- Change the sound system.
- Broadcasting failure may happen.
Unorderly ripples on the picture
It is usually caused by local interference, such as cars, daylight lamps and hair driers. Adjust the antenna to minimize the interference.
Snowy dots and interference
If the antenna is located in the fringe area of a television signal where the signal is weak, the picture may be marred by dots. When the signal is extremely weak, it may be necessary to install a special antenna to improve the reception.
- Adjust the position and orientation of the indoor/outdoor antenna.
- Check the connection of antenna.
- Fine tune the channel.
- Try another channel. Broadcasting failure may happen.
Ignition
Black spots or horizontal streaks appear, or the picture flutters or drifts. This is usually caused by interference from car ignition system, neon lamps, electric drills, or other electrical appliance.
Ghost
Ghosts are caused by the television signal following two paths. One is the direct path, the other is reflected from tall buildings, hills, or other objects. Changing the direction
or position of the antenna may improve the reception.
Radio frequency interference
This interference produces moving ripples or diagonal streaks, and in some case, loss of contrast in the picture. Find out and remove the radio interference source.
*To bring you better visual experience, please remove all labels, if any, from TV front panel and screen before use.
*Figures and illustrations in this User Manual are provided for reference only and may differ from actual product appearance. Product design and specifications may be changed without notice.
Legal Statement
[Legal Statement] of TCL - manufacturer of this TV set Due to the various capabilities of products featuring the SmartTV - Services, as well as limitations in the available content, certain features, applications, and services may not be available on all devices or in all territories. Some features on SmartTV may also require additional peripheral devices or membership fees that are sold separately. Please visit our website for more information on specific device information and content availability. The services and availability of content through SmartTV are subject to change from time to time without prior notice.
All content and services accessible through this device belong to third parties and are protected by copyright, patent, trademark and/or other intellectual property laws. Such content and services are provided solely for your personal noncommercial use. You may not use any content or services in a manner that has not been authorized by the content owner or service provider. Without limiting the foregoing, unless expressly authorized by the applicable content owner or service provider, you may not modify, copy, republish, upload, post, transmit, translate, sell, create derivative works, exploit, or distribute in any manner or medium any content or services displayed through this device.
You expressly acknowledge and agree that use of the device is at your sole risk and that the entire risk as to satisfactory quality, performance and accuracy is with you. The device and all third party content and services are provided "as is" without warranty of any kind, either express or implied. TCL expressly disclaims all warranties and conditions with respect to the device and any content and services, either express or, implied, including but not limited to, warranties of merchantability, of satisfactory quality, fitness for a particular purpose, of accuracy, of quiet enjoyment, and non-infringement of third party rights. TCL does not guarantee the accuracy, validity, timeliness, legality, or completeness of any content or service made available through this device and does not warrant that the device, content or services will meet your requirements, or that operation of the device or services will be uninterrupted or error-free. Under no circumstances, including negligence, shall TCL be liable, whether in contract or tort, for any direct, indirect, incidental, special or consequential damages, attorney fees, expenses, or any other damages arising out of, or in connection with, any information contained in, or as a result of the use of the device, or any content or service accessed by you or any third party, even if advised of the possibility of such damages.
Third party services may be changed, suspended, removed, terminated or interrupted, or access may be disabled at any time, without notice, and TCL makes no representation or warranty that any content or service will remain available for any period of time. Content and services are transmitted by third parties by means of networks and transmission facilities over which TCL has no control. Without limiting the generality of this disclaimer, TCL expressly disclaims any responsibility or liability for any change, interruption, disabling, removal of or suspension of any content or service made available through this device. TCL may impose limits on the use of or access to certain services or content, in any case and without notice or liability. TCL is neither responsible nor liable for customer service related to the content and services. Any question or request for service relating to the content or services should be made directly to the respective content and service providers.
Licence

This product incorporates HDMI technology.HDMI, the HDMI logo, and High-Definition Multimedia Interface are trademarks or registered trademarks of HDMI Licensing LLC.

Plug in an MHL-compatible mobile device to view your favorite content and charge your device at the same time.

Manufactured under license from Dolby Laboratories. Dolby, Dolby Audio, and the double-D symbol are trademarks of Dolby Laboratories.

H.265-HIGH EFFICIENCY VIDEO CODING
HEVC, or H.265 is the successor to H.264 and strives to deliver video with equivalent quality with bitrate savings of up to 50 percent. HEVC is critical for streaming high-quality video even in congested network environments, and will be a driving factor in the delivery of 4K content to new Ultra HD displays.
TCL Electronics Australia Pty Ltd.
ABN 83 111 032 896
Address: 797 Springvale Road, Mulgrave, VIC 3170, Australia
Telephone: 1300 738 149
service.au@tcl.com
www.tclelectronics.com.au
72-NT67KB-EAU1A
- COLOUR YOUR WORLD
- Chapter 1: Safety Information
- Precautions 3
- Important Information .... 3
- Chapter 2: Connections and Setup
- TV Controller 4
- Chapter 3: Homepage
- Chapter 4: Menu Operation
- Using Quick Access Menu 13
- Using System Settings 14
- Chapter 5: Advanced Functions
- Chapter 6: Other Information
- Precautions
- Product
- Power and Plug
- Power Cord and Signal Cable
- Use Environment
- Cleaning
- Hanging the TV Set on the Wall
- Warning: This operation requires two people.
- Important Information
- Chapter 2 Connections and Setup
- TV Controller
- ⏻
- <>
- Sockets
- ANTENNA IN socket (input)
- LAN
- Headphone socket (output)
- SPDIF socket (output)
- Remote Control Functions
- Network Connection
- Connecting to a wired network
- Connecting to a wireless network
- Note:
- Switching on
- Switching off
- Initial Setup
- Step 1: Environment
- Step 2: Network Setup
- Step 3: Software Update
- Step 5: Clock
- Performing an automatic channel search
- Chapter 3 HomePage
- WARNING:
- Using Homepage- TV
- TV window
- Recommendation
- Source
- Settings
- Media
- EPG
- Using Homepage- APPS
- Using Quick Access Menu
- Picture preset
- Sound preset
- Picture freeze
- Football mode
- T-Link
- Enable or disable T-Link
- Timeshift
- Timeshift.
- Notes:
- Quick Access of Timeshift:
- PVR (Personal Video Recorder)
- Schedule list
- WiFi TV link
- Using System Settings
- Picture
- Sound
- Channel
- Channel diagnostics (on digital TV channels)
- Network
- connecting to a wired network:
- - a) Scan
- - b) Manual
- - c) Auto
- DLNA (Share & See)
- Connecting to your PC
- Enabling DLNA function
- Adding media from your PC for sharing
- DLNA application
- GuideOn
- TCL nScreen
- Netflix settings
- System
- Software update:
- Chapter 5 Advanced Functions
- Using E-Manual (Help)
- Using MHL Function (Mobile High-definition Link)
- When using MHL
- Viewing photos, playing music and watching videos from a USB device
- U-disk
- DLNA
- PVR
- Problems & Solutions
- Fail to link to the network.
- The video could not be played smoothly.
- When two mobile hard disks are connected with the TV at the same time, they will not be recognized some times.
- The video from a mobile hard disk (USB) is playing with no sound.
- Some videos fail to play.
- Video stops playing midway.
- What should I pay attention to, when I do SW updating
- There are no distinct changes of TV interface after SW updating.
- Troubleshooting
- No picture, no sound
- No colour
- Remote control does not work
- No picture, normal sound
- Normal picture, no sound
- Unorderly ripples on the picture
- Snowy dots and interference
- Ignition
- Ghost
- Radio frequency interference
- Legal Statement
- Licence
Brand : TCL
Model : 40E5900US
Category : Television