
EM-2416 - Microwaves SANYO - Free user manual and instructions
Find the device manual for free EM-2416 SANYO in PDF.


| Product Type | Countertop Microwave Oven |
| Brand | Sanyo |
| Model | EM-2416 |
| Capacity | 0.9 cubic feet |
| Power Output | 800 Watts |
| Power Consumption | 1200 Watts |
| Dimensions (W x D x H) | 19.5 x 15.5 x 11.2 inches |
| Weight | 28.7 lbs |
| Voltage | 120 V / 60 Hz |
| Control Type | Digital with LED Display |
| Functions | Defrost, Cook, Reheat, Popcorn, Beverage |
| Timer | 99 minutes 99 seconds |
| Door Opening | Side-swing, push-button release |
| Interior Material | Stainless steel with enamel coating |
| Turntable | 10.5 inch glass turntable |
| Child Safety Lock | Yes |
| Auto Shutoff | Yes |
| Cleaning | Wipe interior with damp cloth; mild detergent |
| Repairability | Spare parts available through authorized service |
| Warranty | 1 year limited |
Frequently Asked Questions - EM-2416 SANYO
User questions about EM-2416 SANYO
0 question about this device. Answer the ones you know or ask your own.
Ask a new question about this device
Download the instructions for your Microwaves in PDF format for free! Find your manual EM-2416 - SANYO and take your electronic device back in hand. On this page are published all the documents necessary for the use of your device. EM-2416 by SANYO.
USER MANUAL EM-2416 SANYO
Read these instructions carefully before use.
If you follow the instructions, your Microwave Oven will serve you long and well.
CONTENTS
How a Microwave Oven Makes Cooking Faster, Easier and Much More Enjoyable ..... 2
The Extra Features of Your Sanyo Microwave Oven 2
WARNING-This appliance must be earthed 2
If You Know All About It, You'll Enjoy It More 3
Things You Should Know About Variable-Power Cooking 4
Cooking Guide for Variable-Power Settings 4
How to Use Your Microwave Oven Safely 5
How to Operate Your Microwave Oven 5
Taking Care of Your Microwave Oven 6
Usable Cooking Utensils and Materials 6
Utensils and Materials to Avoid 6
A Few Other Precautions 6
What to Do If Repairs Are Needed 7
Guide to Variable Cooking Power
- Defrosting with Microwaves 8\~9
- Meat 10
- Poultry 11
• Cakes 11
- Reheating with Microwaves 12
- Adapting Recipes 12 \~ 14
PRECAUTIONS TO AVOID
POSSIBLE EXPOSURE TO EXCESSIVE MICROWAVE ENERGY
(a) Do not attempt to operate this oven with the door open since open-door operation can result in harmful exposure to microwave energy. It is important not to defeat or tamper with the safety interlocks.
(b) Do not place any object between the oven front face and
the door or allow soil or cleaner residue to accumulate on sealing surfaces.
(c) Do not operate the oven if it is damaged. It is particularly important that the oven close properly and that there is no damage to the:
1) Door (bent)
2) Hinges and Latches (broken or loosened)
3) Door seals and Sealing surfaces
(d) The oven should not be adjusted or repaired by anyone except properly qualified service personnel.
How a Microwave Oven Makes Cooking Faster, Easier and Much More Enjoyable
1. A feast in minutes.
High energy microwaves penetrate the food and cook it quickly, evenly and efficiently.
2. Natural flavour.
Microwave cooking preserves the natural taste and nutritive value of the food to a much higher degree than conventional cooking methods.
3. Utensils.
Glassware, earthenware, wooden bowls, paper containers and practically all utensils EXCEPT METAL ONES are perfectly suitable for microwave cooking.
4. Simplified operation.
You are cooking by time, and not by heat. Simply set the timer and push the 'START' button.
5. Clean, cool operation.
No smoke, no grease, no heat. Your kitchen stays cool and clean at all times.
6. Perfect for defrosting and re-heating.
When there is no time for natural thawing of frozen foods, your microwave oven can reduce the process to a matter of seconds. It defrosts all kinds of frozen foods and it reheats fast.
7. Economical.
Since the required cooking time is extremely short, microwave cooking is more economical than conventional ovens.
The Extra Features of Your Sanyo Microwave Oven
1. Compact, light weight, easy to move.
Fits easily on a kitchen counter. Can be installed practically anywhere. Light enough, to be moved to a summer house or seaside cottage.
2. Six separate safety features.
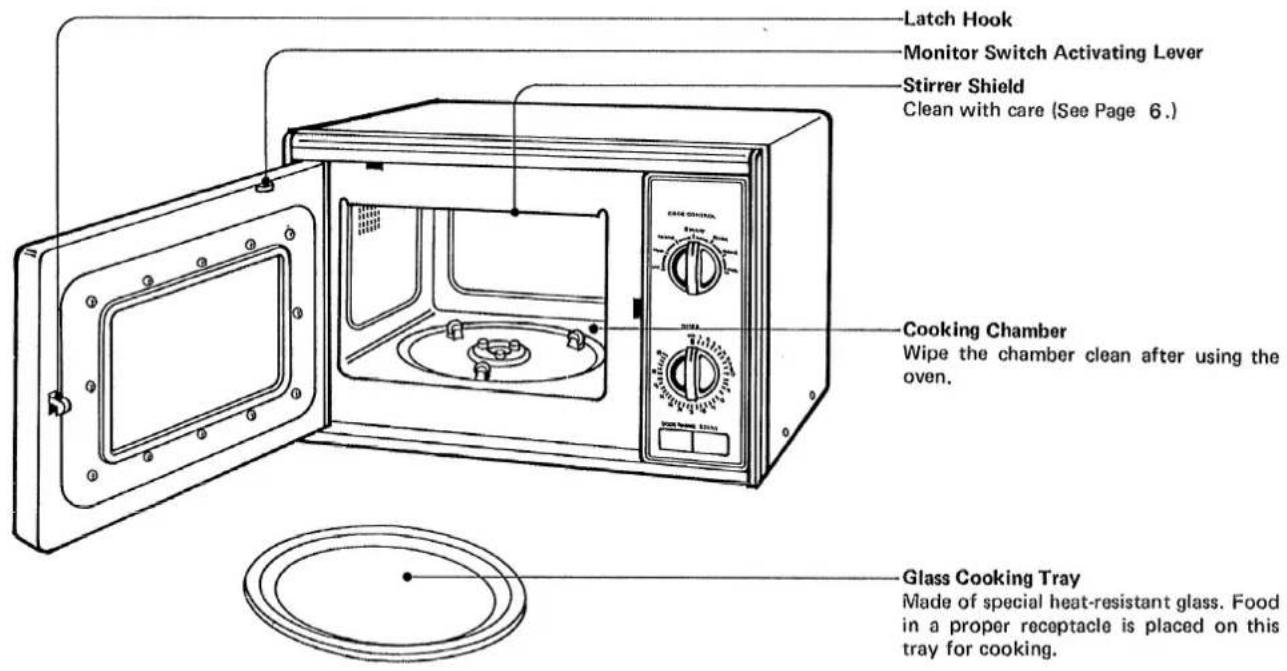
1) Latch system: when the door release button is pushed, a built-in switch turns off the oven before the door is opened.
2) Door switch: when the door is opened this switch automatically turns off the oven.
3) Choke seal: a special seal around the door prevents all radiation leakage from the oven.
4) Radiation absorbent: this absorbent is made of durable ferrite rubber.
5) Thermal limiter: when the temperature of the magnetron rises above the limit, this switch automatically turns off all radiation.
6) Monitor switch: should the latch switch fail to function properly, this switch is activated to prevent microwave radiation.
3. Variable power control
By setting the selector knob, the appropriate power between 65W to 650W may be selected.
4. Simplified cooking.
Simply set the timer and push the 'START' button. Your oven does the rest, and a chime sounds when the food is ready.
5. High-visible viewing window
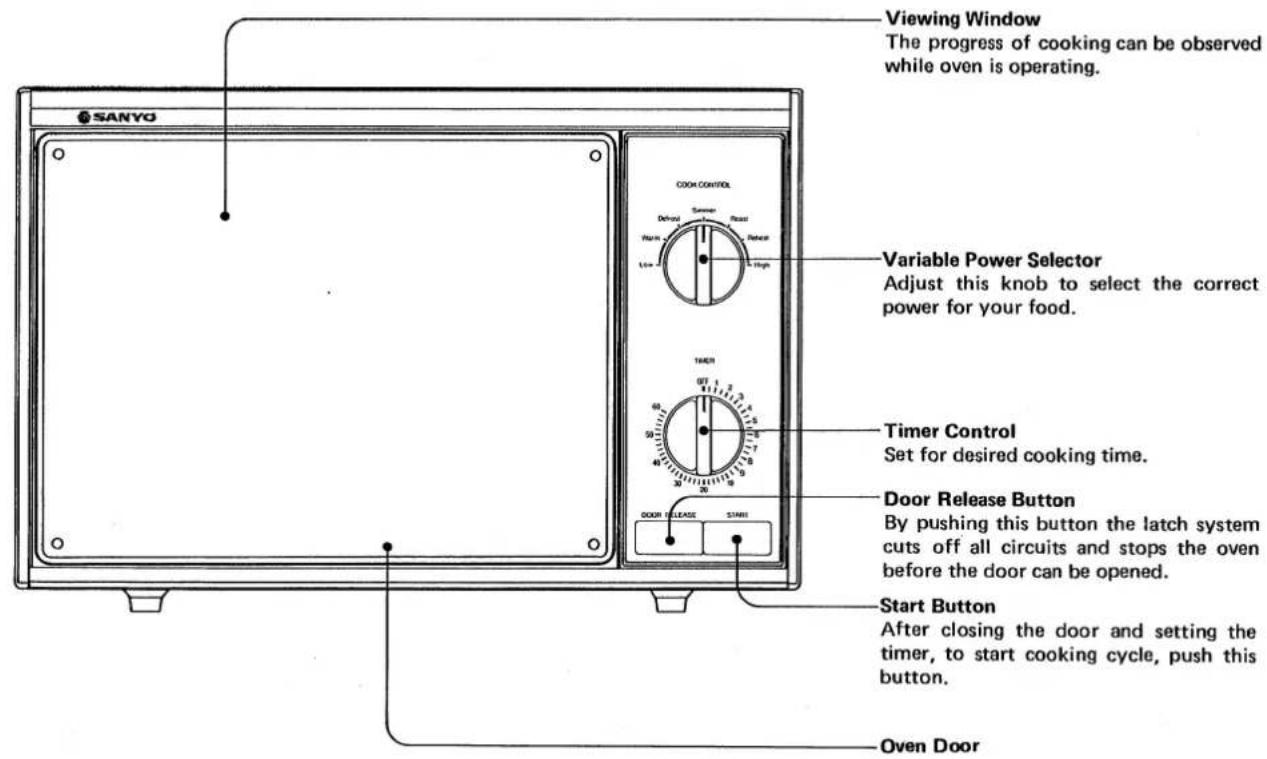
The progress of cooking can be observed while oven is operating.
6. Practical dimensions.
1) Overall: 55.0(W) × 42.8(D) × 36.5(H)cm
2) Oven: 33.0(W) × 35.0(D) × 19.0(H)cm
WARNING- This appliance must be earthed.
IMPORTANT
The wires in this mains lead are coloured in accordance with the following code:
Green-and-yellow: Earth.
Blue: Neutral.
Brown: Active.
As the colours of the wires in the mains lead of this appliance may not correspond with the coloured markings identifying the terminals in your plug, proceed as follows:
The wire which is coloured green-and-yellow must be connected to the terminal in the plug which is marked with the letter E or by the earth symbol 12 or coloured green or green-and-yellow.
The wire which is coloured blue must be connected to the terminal which is marked with the letter N or coloured black. The wire which is coloured brown must be connected to the terminal which is marked with the letter A or coloured red.
If You Know All About It, You'll Enjoy It More
Things You Should Know about Variable-Power Cooking
Sanyo technology has eliminated the last major drawback to microwave cooking: its lack of flexibility. And this has been accomplished through the added variable-power feature of this model. It is a feature that you should get to know. It provides you with the freedom to choose the speed of your microwave cooking, a feature that is not only a time advantage but affects the flavour and texture of the food as well. The "HIGH" (max. power) setting is, of course, the speediest method; REHEAT to LOW settings provide the greatest possible choice of cooking conditions. Defrosting, for example, is also given added flexibility since some foods can be defrosted either by a single DEFROST setting or by starting on "HIGH" and then
reducing the speed to the DEFROST setting. This faster method is recommended for high-density foods that weigh over 450g (1 pound) such as meat joints.
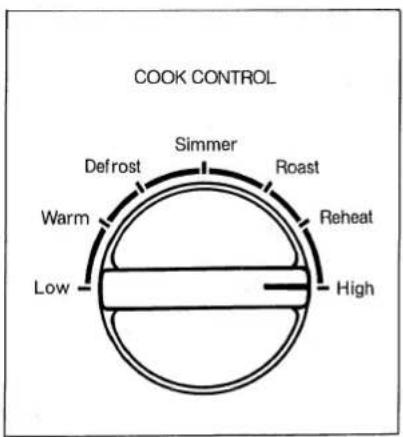
You will learn from experience in effectively using multi-power cooking. But it might be good to occasionally refer to the chart below which lists the approximate power level percentages for each setting:
| Variable-Power Setting | Approximate power level percentage |
| LOW | 10% |
| WARM | 20% |
| DEFROST | 35% |
| SIMMER | 55% |
| ROAST | 70% |
| REHEAT | 85% |
| HIGH (max. power) | 100% (650W) |
Variable Power Control provides the means to obtain greater precision in setting power levels. For instance, if you want a power level between ROAST and REHEAT, you would set the time as usual and set the variable Power Selector Dial to between ROAST and REHEAT. The oven is then set to operate at power level in between.
Cooking Guide for Variable-Power Settings
| POWER SETTING | SUGGESTED COOKING USES |
| LOW | Softening cream cheese; keeping casseroles and main dishes warm. |
| WARM | Softening chocolate; heating breads, rolls, pancakes, tacos, tortillas, and French toast; clarifying butter; taking chill out of fruit; heating small amounts of food. |
| DEFROST | Thawing meat, poultry and seafood; finish cooking casseroles, stews, and some sauces; cooking small quantities of most food. |
| SIMMER | Cooking stews and soups after bringing to the boil; cooking baked custards and pasta. |
| ROAST | Cooking rump roast, ham, veal and lamb; cooking cheese dishes; cooking eggs, and milk; cooking quick breads and cereal products. |
| REHEAT | Quickly reheating precooked or prepared food; heating sandwiches. |
| HIGH (max. power) | Cooking tender cuts of meat; cooking poultry, fish, vegetables, and most casseroles; preheating the browning dish; boiling water; thickening some sauces; cooking muffins. |
How to Use Your Microwave Oven safely
Although your oven is provided with safety features, it is important to observe the following:
a) It is important not to defeat or tamper with safety interlocks.
b) Do not place any object between the oven front face and the door or allow residue to accumulate on sealing surfaces. Wipe the sealing area frequently with a mild detergent, rinse and wipe dry. Never use abrasive powders or pads.
c) When opened, the door must not be subjected to strain, for example, a child hanging on an opened door or any load could cause the oven to fall forward to cause injury and also damaged to the door.
Do not operate the oven if it is damaged, until it has been repaired by a qualified service engineer. It is particularly important that the oven closes properly and that there is no damage to the:
i) Door (bent)
ii) Hinges and Latches (broken or loosened)
iii) Door seals and Sealing surfaces
d) The oven should not be adjusted or repaired by anyone except properly qualified service engineer.
NOTE
It is quite normal for steam to be emitted around the door during the cooking cycle.
The door is not intended to seal the oven cavity completely but its special SANYO design contributes to the complete safety of the appliance.
CAUTION
- Do not attempt to operate the oven while empty as this will cause damage.
- As an exhaust is located in the rear of the oven, install the oven so as not to block the outlet.
How to Operate Your Microwave Oven
- Connect the mains lead to an electrical outlet.
- After placing the food in a suitable receptacle, open the oven door and put it on the cooking tray.
- Shut the oven door. Make sure that it is firmly closed.
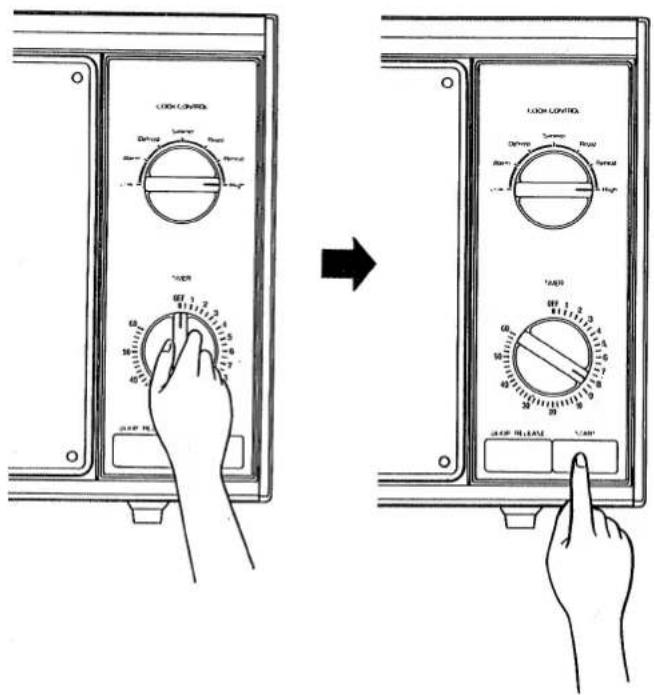
- Set the Variable Power Selector to the desired power level. (For details, refer to "Guide to Variable cooking Power")
- Set the timer control by turning the timer knob. When setting the timer to less than 2 minutes, first set the dial for a longer period, then return it to the desired reading.
- Press the 'START' button. This will light up the interior lamp and start the cooking process.
- When the cooking time is up, the time pointer reads 'OFF', the chime rings and heating stops. Push the door release button, open the door and take out the food.
- To turn off the oven during cooking, simply open the oven door or turn the timer to off. Cooking time can be reset at any time during the cooking operation by turning the timer knob.
- After use, be sure to return the timer to 'OFF'.
Taking Care of Your Microwave Oven
Wipe the oven inside and out with a mild detergent solution, rinse, and wipe dry. This should be done on a weekly basis — more often if needed. Never use abrasive powders or pads.
REMOVABLE PARTS
- The cooking tray can be removed for cleaning at the sink. Wipe up excess of spillovers with paper towel or cloth prior to removal of tray.
- The stirrer shield (inside oven top) can be gently wiped in place or removed for washing at the sink. The shield is a flexible plastic, supported at front, side and rear. Carefully remove the shield secured at the front tabs, pull forward to remove.
Wash only in warm (not hot) detergent water, rinse and wipe dry. Avoid hitting or bending the metal stirrer blades, as this could change the heating pattern in the oven.
To replace the shield, position it on the rails on sides and rear of the cooking chamber and secure it between the front metal tabs.
- While stirrer cover is out of oven make sure to clean along the front ridge where cover sits. Any food left in oven could possibly cause arcing due to carbnization.
Usable Cooking Utensils and Materials
OVENPROOF GLASS
Ovenware (treated for high-intensity heat), such as utility dishes, bread dishes, pie plates, cake plates, liquid measuring cups, casseroles, and bowls without metallic decoration.
CHINA
Bowls, cups, serving pieces, plates, and platters without metallic decoration.
POTTERY
Dishes, cups, mugs, and bowls.
PLASTIC
Plastic wrap may be used as a cover. Lay the plastic wrap loosely over the dish and press it to the sides. The dish should be deep enough so that plastic wrap will not touch the food. As the food heats, it may cause the wrap to melt wherever it touches the food. Plastic dishes, cups, semi rigid freezer containers, and plastic bags are usable for short cooking operations. Use with care as some softening of the plastic can occur with heat from the food.
Utensils and Materials to Avoid
METAL UTENSILS
Metal utensils are not recommended because the metal shields the food from microwave energy on the bottom and sides, causing uneven cooking results. Metal utensils will also cause arcing and damage the appliance.
METAL DECORATION
Metal-trimmed or -banded dinnerware, casseroles, etc., should not be used. The metal trim interferes with normal cooking and may damage the dish.
ALUMINUM FOIL
Large sheets or pieces of aluminum foil should be avoided because they will disrupt cooking and may cause harmful arcing. However, smaller pieces may be used to cover areas such as poultry legs and wings. Any aluminum foil used should never be closer than 2.5cm (1 inch) from side walls of oven.
WOOD
Wooden bowls and boards will become dried out when used in the microwave oven and may split or crack.
OTHER
Avoid using cracked, flawed, or defective utensils, including ovenproof glassware.
CAUTION: DO NOT USE METAL TIES ON ANY PAPER OR PLASTIC BAGS; THE TIES BECOME HOT AND COULD CAUSE A FIRE.
A Few Other Precautions
- Arcing in the oven during operation usually occurs from use of metallic utensils or overuse of aluminum foil. Arcing is denoted by a "snapping" or "cracking" noise and may be accompanied by bright flashes.
Continuous arcing can damage the unit. If continuous arcing occurs during operation, do not use the unit and call a service engineer.
- Always make sure that closed containers, such as jars of baby food, are opened and plastic pouches of vegetable are pierced before cooking.
Tightly closed containers could explode. - Do not cook eggs in their shells because they will explode. Puncture the membrane around the yolk before frying eggs. This is because the yolk swells faster than the membrane and the egg explodes when heated quickly.
What to Do If Repairs Are Needed
Get in contact with your nearest Sanyo Service Centre. On no account remove or interfere with any parts or screws. "THIS COULD PROVE VERY DANGEROUS"
Make the following simple check-up before contacting the Sanyo Service Centre:
- If the interior lamp does not light when the 'START' button is pressed:
- Make sure that the mains lead is securely plugged in.
- Make sure that the door is properly closed.
- Make sure that the timer is not set at 'OFF'.
- Check the fuse or circuit breaker.
- If the lamp inside lights but the food is not heated:
Make sure that the food is not completely covered with a metal container.
- Noisy operation:
- Make sure that sparks are not being produced due to the use of metal utensils.
- Make absolutely sure that the contents of the oven are not touching the stirrer shield.
Guide to Variable Cooking Power
Defrosting with Microwaves
One of the most useful functions the microwave oven can perform is defrosting frozen foods. The oven will defrost the food completely without cooking it. The food is then ready to be cooked according to a given recipe.
When you refer to the chart below, please be sure to check the "Notes" for the food you are defrosting. All foods are placed in the oven in their original packages, and are defrosted on the DEFROST setting - except when the "Notes" column specifies otherwise.
| Food | Minutes per 500 g (pound) | Notes | Total Standing Time (in minutes) |
| BEEF | |||
| Pot Roast | 5 – 7 | Turn once | 10 |
| Rump Roast | |||
| 1.5 – 2 kg (3 – 4 lb.) | 6 – 7 | Turn once | 30 |
| 3 – 3.5 kg (6 – 7 lb.) | Use ROAST setting | 45 | |
| Turn twice | |||
| Sirloin Top Roast | 7 – 9 | Turn once | 30 |
| Rib Roast, Rolled | |||
| 1.5 – 2 kg (3 – 4 lb.) | 8 – 11 | Turn once | 30 |
| 3 – 3.5 kg (6 – 7 lb.) | 7 – 10 | Use ROAST setting | 45 |
| Turn twice | |||
| Rib Roast, Standing | 7 – 8 | Turn twice | 45 |
| Ground Beef | 7 – 8 | Frozen in flat square | 5 |
| Turn once | |||
| Hamburger Patty 125 g (4 oz.) | 112 | Use a glass plate | 2 |
| Round Steak | 6 – 7 | Turn once | 5 – 10 |
| Flank Steak | 6 – 7 | Turn once | 5 |
| Sirloin Steak 1 cm (1/2 inch) thick | 6 – 7 | Turn once | 5 |
| Rib Steak | 4 – 6 | Turn once | 5 |
| Corned Beef | 6 – 7 | Turn once | 10 |
| Liver (sliced) | 7 – 10 | Separate slices. Rinse in cold water | 5 |
| LAMB | |||
| Roast | 5 – 7 | Turn once | 20 |
| Chops | 6 – 9 | Separate chops then cook 1 more minute per lb. | 5 |
| PORK | |||
| Roast | 6 – 7 | Turn once | 20 |
| Chops | 6 – 8 | Separate chops then cook 1 more minute per lb. | 5 |
| Spareribs | 7 – 10 | 10 | |
| VEAL | |||
| Veal roast | |||
| 1.5 – 2 kg (3 – 4 lb.) | 7 – 10 | Turn once | 20 |
| 3 – 3.5 kg (6 – 7 lb.) | 6 – 9 | Use ROAST settingTurn twice | |
| Sliced veal | 6 – 8 | Turn slices and separate | 10 |
| FISH/SEAFOOD | |||
| Frozen Fillets | 9 – 12 | Use original package. Separate fillets for last half of defrosting time. Rinse in cold water | 5 |
| Whole Fish | 7 – 9 | Turn once | 5 |
| Shrimp or Scallops | 6 – 7 | Use LOW setting. Separate pieces for last half of defrosting time | 5 |
| Lobster Tail | 8 – 9 | Use LOW setting. Rinse in cold water | 5 |
| POULTRY – use original wrapping without metal clips | |||
| Chicken (whole) | 9 – 11 | Turn once. Immerse in cold water during standing time | 10 |
| Chicken (cut up) | 7 – 9 | Turn every 5 minutes. Separate pieces. Continue 3 – 5 more minutes | 10 |
| Turkey (whole) | |||
| 4 – 6 kg (8 – 12 lb.) | 4 – 6 | Over 4 kg (8 lb.), use ROAST setting. Place breast up to start. Turn and let stand halfway through defrosting time. Return to oven for remainder of defrosting time. Immerse in cold water | 30 |
| 6 – 8 kg (12 – 16 lb.) | 45 | ||
| 8 – 10 kg (16 – 20 lb.) | 60 | ||
| Turkey (breast) | 5 – 7 | Over 2 kg (4 lb.), use ROAST setting. Let stand 10 min. halfway through defrosting time. Immerse in cold water | 10 |
| Turkey (pieces) | 7 – 8 | Turn every 5 minutes. Separate pieces. Continue 3 – 5 more minutes. | 10 |
| Duckling (whole 2 – 2.5 kg/4 – 5 lb.) | 5 – 6 | Use ROAST setting. Let stand 10 min. halfway through defrosting time. Immerse in cold water | 10 |
| Game Birds | 10 – 12 | Turn once. Immerse in cold water | 10 |
| BREADS/PASTRIES/FRUITS | |||
| Loaf of Bread (sliced) | 2 – 4 | Use original package | 5 |
| Dinner Rolls (1 dozen) | 2 – 4 | Use original package | 5 |
| Buns (1/2 doz.) | 2 – 4 | 1 – 2 | |
| Fruit Pie (9'' baked) | 13 – 17 | Use glass pie plate | 10 |
| Cake 500 g (1 lb.) | 3 – 4 | 5 | |
| Fruit | 2 – 3 | Use covered casserole. Defrost on HIGH | 5 |
Meat
Meat is usually the main dish. Large cuts of meat cook much more quickly in the microwave than in a conventional oven, so that it is possible to enjoy them even when time is at a permium.
To retain the juices, do not salt the meat before or during the cooking period. The following chart assumes that meat is fresh or thoroughly defrosted. For defrosting information, see page 8.
Before You Start:
1) Place the meat, fat side down, on a plastic microwave roasting rack, or on an inverted saucer in a glass baking dish.
2) Set the microwave on the "First Setting" indicated on the roasting chart below for half of the total cooking time.
3) Turn the meat fat side up. (Larger - 7 pounds or more - should be turned 3 times during the cooking period.)
4) Let the meat stand, covered with foil, about 10 minutes before you carve or serve it. The internal temperature will rise about 15^ during this standing time and the meat will continue to cook to the final degree you have chosen.
MEAT ROASTING CHART
| Meat Cut | First Setting | Second Setting | Cooking Time[Minutes per 500 g(pound)] |
| BEEF | |||
| Pot Roast | SIMMER | SIMMER | well-done: 20 – 21 |
| Rump Roast | ROAST | SIMMER | rare: 14 – 15medium: 16 – 18well-done: 19 – 20 |
| Sirloin Top Roast | HIGH | ROAST | rare: 10 – 11medium: 12 – 13well-done: 14 – 16 |
| Rib Roast, Rolled | HIGH | ROAST | rare: 10 – 11medium: 12 – 13well-done: 14 – 16 |
| Rib Roast, Standing | HIGH | ROAST | rare: 8 – 10medium: 11 – 12well-done: 13 – 14 |
| Meat Loaf | ROAST | ROAST | well-done: 11 – 12 |
| LAMB OR PORK | |||
| Lamb Roast | ROAST | ROAST | well-done: 12 – 14 |
| Pork Roast | HIGH | ROAST | well-done: 12 – 13 |
| Ham (boneless):ready to eat or canned | ROAST | ROAST | (heated) 13 – 15 |
| Ham (bone in) | ROAST | ROAST | (heated) 11 – 13 |
| VEAL | |||
| Veal Roast | ROAST | SIMMER | well-done: 10 – 15 |
Poultry
Poultry is an all-around favourite in most families. The chart below gives guidelines for cooking whole birds in the microwave oven. (The chart assumes that poultry is fresh or completely defrosted; see page 8 for defrosting chart.)
Before You Start:
1) Wash the bird and set aside the giblets. Sprinkle inside of the cavity with salt. If desired, fill the cavity and neck opening with stuffing (stuffing the bird will not affect the cooking time). Fasten the openings with wooden picks; tie the legs together and tie the wings to the body with string.
2) Place the bird, breast side down, on a microwave roasting rack in a baking dish. Brush the bird with melted butter or margarine.
3) Cook; uncovered, for the first half of the cooking time, using the "First Setting" indicated on the chart.
4) Turn the bird breast side up.
5) Cook, uncovered, using the "Second Setting" indicated on the chart for the remaining cooking time.
6) If you notice some areas (such as wing tips or legs) cooking more rapidly than others, you can cover the areas with small pieces of foil. The foil will slow down the cooking in that area.
7) Let the bird stand, covered with foil, 10 minutes. (Larger birds will require longer standing time.)
POULTRY ROASTING CHART
| Meat Cut | First Setting | Second Setting | Cooking Time [Minutes per 500 g (pound)] |
| Chicken (whole) | HIGH | HIGH | 7 – 9 |
| Chicken (cut up) | HIGH | HIGH | 7 – 9 |
| Turkey (whole) | HIGH | ROAST | 10 – 11 |
| Turkey (breast) | ROAST | ROAST | 14 – 15 |
| Turkey (pieces) | ROAST | ROAST | 19 – 20 |
| Duckling (whole) | ROAST | ROAST | 12 – 13 |
| Game Birds | HIGH | HIGH | 10 – 11 |
Cakes
Follow the guidelines below, and successful results are assured every time. Information in the Guidelines for Adapting Your Own Recipes (under Cakes) will prove very helpful.
1) No need to use cake flour; all-purpose flour works very well.
2) It is not necessary to sift the flour.
3) Reduce the leavening used (whether baking powder or baking soda) by one-fourth to one-third.
4) For a cake with a heavy batter, insert a glass in the center of the batter in the baking dish. This will create a ring cake and will ensure more even cooking.
To adapt your own recipes, choose a similar recipe in this book and use it as a guide.
Reheating with Microwaves
The microwave oven will reheat a variety of foods to serving temperature without cooking them further. Thus there is no toughening or drying out, and foods retain fresh-cooked flavour and appeal.
HERE ARE SUGGESTED GUIDELINES FOR REHEATING.
| Food | Quantity | Time at REHEAT Setting |
| MEATS AND POULTRY | ||
| Sliced Turkey, Ham, Pork, or Beef | 50 g (2 ounces) | 1 – 1-1/2 minutes |
| Hamburger | 1 patty | 1 – 1-1/4 minutes |
| Chicken | 1 piece | 1 – 2 minutes |
| MAIN DISHES/CASSEROLES | ||
| Spaghetti with Sauce | 1 cup serving | 3 – 4 minutes |
| Meat-Vegetable/Noodle Casseroles | 1 cup serving | 3 – 4 minutes |
| Dinner: Meat, Potato, Vegetables | 1 dinner plate serving | 2-1/2 – 3 minutes |
| VEGETABLES/SIDE DISHES | ||
| Rice or Noodles | 1 cup serving | 2 – 3 minutes |
| Mashed Potatoes | 1 cup serving | 2 – 3 minutes |
| Cooked Vegetables | 1/2 cup serving | 1-1/2 – 2 minutes |
| BREADS AND PASTRIES | ||
| Bread Slice | 1 slice | 10 – 15 seconds |
| Doughnuts/Sweet Rolls | 1 | 15 – 20 seconds |
| Dinner Rolls/Muffins/Biscuits | 1 | 10 – 20 seconds |
| Cake | 1 slice | 20 – 30 seconds |
| Pie | 1 slice | 30 – 40 seconds |
Adapting Recipes
To get the most out of your microwave oven, your own favourite recipes can be adapted for microwave cooking.
First, find a recipe in the cook book that's similar to the recipe you would like to try. Use the microwave recipe for guidelines on cooking time, container size, power setting, and ingredients. Or cook the dish for one-fourth of the conventional cooking time, then add time (in short segments) until the food is cooked to your liking.
This chart will give you a general idea of how to proceed.
GUIDELINES FOR ADAPTING YOUR OWN RECIPES
| Foods | Suggested Setting(s) | General Information |
| Appetizers and Sandwiches | HIGH and ROAST | Use already-toasted bread. Do not assemble canapes until ready to microwave, or crackers and toast will become soggy. Appetizers with crust do not microwave well (pastry stays pale). Dips heat well, stay smooth, and do not stick. |
| Rib, Leg of Lamb, Pork Loin Roasts | ROAST | Meat will brown somewhat but not as much as in a conventional oven. Standing time is especially important, as some cooking occurs after roast is removed from the oven. |
| Chuck and Round Roasts | SIMMER | Less browning than in a conventional oven. The warm setting allows tough meat fibres to become tender; the longer the cooking time, the more tender the meat becomes. If you wish, you can prebrown the roast on top of a conventional range. Cover; add liquid. |
| Stewing Beef | SIMMER | Depending on cut and size of pieces, will cook at different rates. Acceptable results in minimum time, but the longer the cooking time, the more tender the meat will be. Use less liquid than you would in a conventional recipe. |
| Bacon, Steak, Chops | HIGH | Bacon will brown because of its high fat content. Use browning dish for steaks and chops. |
| Meat Loaf and Ham | ROAST | Browning approximately the same as with conventional cooking. Cured meats contain sugar, concentrated in spots, and may overcook if not watched carefully. |
| Poultry and Game Birds | HIGH and ROAST | Poultry becomes very tender. Skin will be soft except for more fatty birds, such as ducks. Final colour is golden brown rather than crispy brown. |
| Fish and Seafood | HIGH | Fish will retain more moisture than in conventional cooking. Remains tender; cooking in a sauce ensures excellent results. |
| Eggs | DEFROST | Do not cook eggs in the shell (they will explode). Scrambled eggs are light and tender. Fried eggs can be cooked in browning dish. |
| Cheese | ROAST | Cheese should be melted or cooked at a ROAST setting. Cheese sauce and fondue should be stirred occasionally. |
| Rice and Pastas | HIGH | Microwave saves some time, but not a great deal. Add 1 tablespoon of salad oil to boiling water to prevent boilovers. Use large dish. |
| Fruits and Vegetables | HIGH | Tender-crisp results. Very little additional water needed, with maximum amount of natural moisture retained. No sticking. |
| Cakes, Quick Breads, Yeast Breads, Cookies | SIMMER | These do not form a crust, are lighter than conventionally baked goods. Top of cakes may be wet-looking after cooking. Do not overcook to remove the moist appearance, or product will dehydrate. When you adapt a conventional recipe, reduce baking powder and soda by a fourth or a third. Baked products will be pale (except chocolate or spice mixtures). Angel food and chiffon cakes do not bake well in the microwave. Microwave works best for bar cookies that need no browning and should remain soft. |
| Pies | HIGH and ROAST | Crust becomes flaky but does not brown. Cook crust first before adding filling. Excellent results are achieved by starting in the microwave and finishing in a conventional oven. |
| Frozen Foods | REHEAT, ROAST, and SIMMER | Reheat in microwave. Cover foods to retain moisture. Use a container that conforms to the shape of the frozen food. |
| Frostings and Candies | ROAST | These sugar mixtures cook very quickly, with excellent results. Use buttered large heat-proof bowl. Very little stirring required. Check temperature with candy thermometer after cooking periods (and after removal from oven). |
| Sauces and Fillings (thickened by flour or cornstarch) | HIGH | Microwave gives excellent results. Blend flour or cornstarch well before cooking. Stir halfway through cooking period in order to prevent lumping. Use slightly less liquid than in conventional recipes. Will not scorch. |

SANYO
- CONTENTS
- PRECAUTIONS TO AVOID
- POSSIBLE EXPOSURE TO EXCESSIVE MICROWAVE ENERGY
- How a Microwave Oven Makes Cooking Faster, Easier and Much More Enjoyable
- A feast in minutes.
- Natural flavour.
- Utensils.
- Simplified operation.
- Clean, cool operation.
- Perfect for defrosting and re-heating.
- Economical.
- The Extra Features of Your Sanyo Microwave Oven
- Compact, light weight, easy to move.
- Six separate safety features.
- Variable power control
- Simplified cooking.
- High-visible viewing window
- Practical dimensions.
- WARNING- This appliance must be earthed.
- IMPORTANT
- Things You Should Know about Variable-Power Cooking
- How to Use Your Microwave Oven safely
- NOTE
- CAUTION
- How to Operate Your Microwave Oven
- Taking Care of Your Microwave Oven
- REMOVABLE PARTS
- Usable Cooking Utensils and Materials
- OVENPROOF GLASS
- CHINA
- POTTERY
- PLASTIC
- Utensils and Materials to Avoid
- METAL UTENSILS
- METAL DECORATION
- ALUMINUM FOIL
- WOOD
- OTHER
- A Few Other Precautions
- What to Do If Repairs Are Needed
- Guide to Variable Cooking Power
- Defrosting with Microwaves
- Meat
- Before You Start:
- Poultry
- Cakes
- Reheating with Microwaves
- Adapting Recipes
- SANYO
Brand : SANYO
Model : EM-2416
Category : Microwaves