73BH - Telephone Alcon - Free user manual and instructions
Find the device manual for free 73BH Alcon in PDF.


| Product Type | Corded Telephone |
| Brand | Alcon |
| Model | 73BH |
| Dimensions (H x W x D) | 22 x 18 x 12 cm |
| Weight | 650 g |
| Power Supply | AC adapter 9V DC, 300 mA |
| Display | LCD with backlight, 2 lines |
| Keypad | Illuminated numeric keypad |
| Ringer Types | 8 selectable ringtones |
| Memory | 50-name phonebook, 10 last number redial |
| Caller ID | Yes, with call log up to 40 entries |
| Speakerphone | Full-duplex hands-free speakerphone |
| Volume Control | Adjustable earpiece and ringer volume |
| Mute Function | Yes |
| Pause Function | Yes, for PBX use |
| Wall Mountable | Yes |
| Cord Length | 2 m handset cord, 1.8 m line cord |
| Hearing Aid Compatible | Yes (HAC rated) |
| Operating Temperature | 0°C to 40°C |
| Included Accessories | Handset, base, line cord, user manual |
Frequently Asked Questions - 73BH Alcon
User questions about 73BH Alcon
0 question about this device. Answer the ones you know or ask your own.
Ask a new question about this device
Download the instructions for your Telephone in PDF format for free! Find your manual 73BH - Alcon and take your electronic device back in hand. On this page are published all the documents necessary for the use of your device. 73BH by Alcon.
USER MANUAL 73BH Alcon
Bringing People Together
High Quality Cordlessphone System ALCON-73BH User Manual
Ver. 1.0
2010/4/16
◆ Table of Contents
ALCON-73BH Features....3
Standard Package....3
Base Unit Function keys....4
Handset Unit Function keys....4
Function Explanation....5
Answering a Call ....5
Placing a Call ....5
Intercom Function (Between Handset and Base Unit) 6
Transferring Calls....7
Handset Autodialing Function....8
Redial Funtion....9
Programming a New Handset Into The System....10
OA-2538 Hi-Gain Antenna Installation....11
Coaxial Cable Mourning ....12
Charging The Battery....12
Simple Trouble Shooting Guide....13
Technical Information....14
ALCON-73BH Base Unit Installation Diagram....15
◆ ALCON-73BH User Manual
ALCON Telecommunications Co., Ltd. a professional maker of high quality communication equipment, is proud to present its newest model: ALCON-73BH Point to handset cordless telephone system. This ALCON product will give you years of performance if you read and follow carefully the instructions contained in this manual.
◆ Features
- Multi-Handset Cordless Telephone
- More powerful Handset
- Full duplex intercom
- Hold music
- Last number redial for Handset only
- Backlighting on handset keypad
- 40-channel auto scan
- Touch any key answer function for handset
- 12-number memory for each handset (15 digits)
- Handset Low battery indication
● Built-in noise cancellation circuit ( compander ) - Handset scramble function
- Hands-free headset (optional)
- Manual handset channel change function if interference occurs during outside call conversation
◆ ALCON-73BH Standard Package
Base Unit
- Base Unit x1
- Switch Adaptor 2A x1
- 5D FB / 20M cable x1
- 2M RJ11 cable x1
- Omni. Antenna x1
- User Manual x1
Handset Unit
- Handset Unit x1
- Leather Case x1
- Lithium Battery x2
- Rubber Antenna x1
- AC Adaptor 300mA x1
◆ Base Unit Function Keys
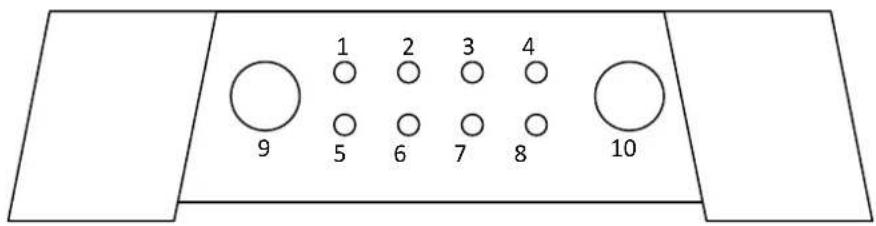
- Power indicator
- In Use indicator
- Intercom indicator
- Scramble indicator
- \~ 8. Select Button Handset No.1\~4 indicator
- Select Button
- Intercom Button
◆ Handset Unit Function Keys
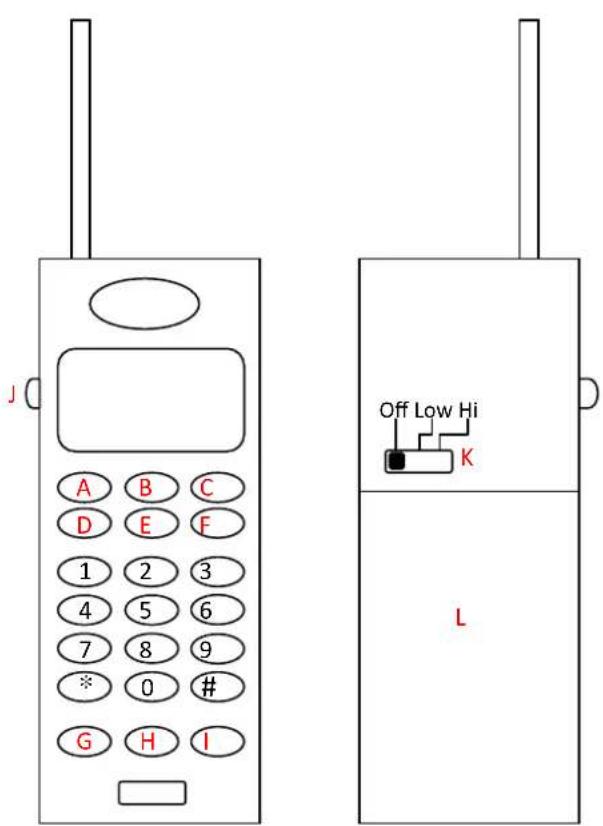
A. Redial Key
B. Flash Key
C. Hold key
D. Intercom key
E. End Call Key
F. Call Key
G. Telephone Number Memory Key
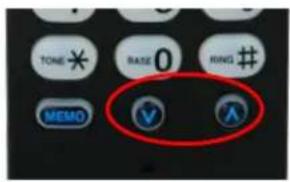
H. \~ I. Handset Receiver Volume Control Key
J. Mute Key
(on the right side of the handset)
K. Power Switch
L. Battery
◆ Function Explanation
ANSWERING A CALL
ANSWERING With the HANDSET
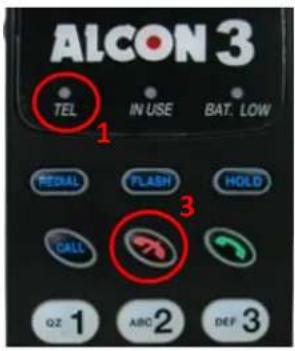
-
When a call comes in, the handset will ring. The TEL indicator, dialing buttons and handset indicators will flash.
-
Begin your conversation by pressing any key on the handset. The TEL indicator will illuminate.
-
To hang up, press

- There is a MUTE button on the right side of the handset. The person who is on the other side of the conversation won't be able to hear your voice if you push it.
RECEIVER VOLUME CONTROL
The receiver has 8 volume levels from the lowest level to the highest level. Press ☐ to adjust the volume level during a call.
SCRAMBLE FUNCTION
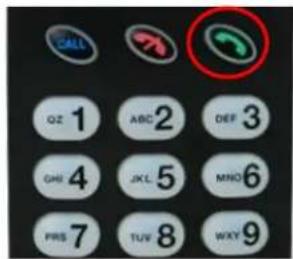
To prevent somebody from eavesdropping on your conversation when you use the handset to talk, press
NOTE
Scramble function will disengage automatically once a handset finishes a call.
PLACING A CALL
HANDSET
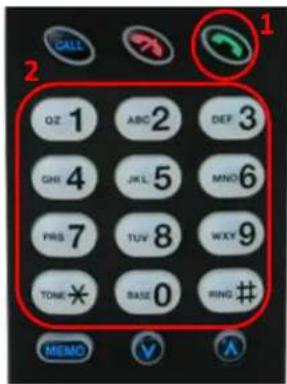
Make sure the handset POWER switch is ON.
-
Press to get dial tone. The TEL and handset indicator will illuminate.
-
Dial the number you want to call.
-
Press to hang up.
〈 Between handset unit and base unit 〉
A: Handset Calling Base Unit Handset
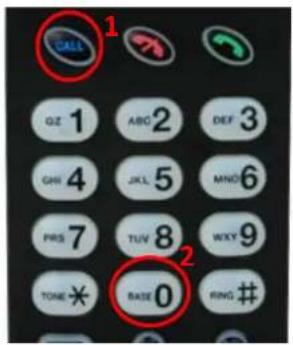
- Press CALL.
- Press the digit button "0" (means calling the base station) The IN USE indicator will flash alternatively. The IN USE indicator will illuminate during the conversation.
Base Unit
natural_image
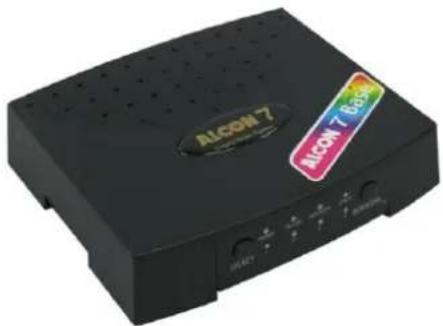
Black Alcon 7 electronic device with visible ports and control buttons (no readable text beyond branding)- The base unit will ring six times (bi-bi-bi bi-bi-bi) The INT and Handset No. indicator will flash then light on and pick up the call automatically.
B: Base Unit Calling Handset
natural_image
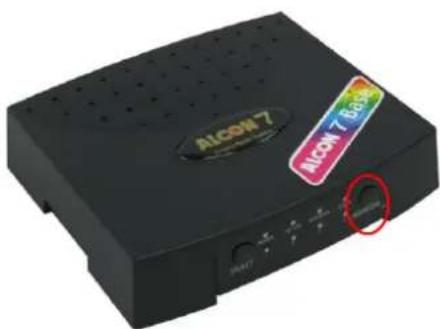
Black Alcon 7 electronic device with a colorful tag and circular button (no visible text or symbols on body)- Press the Intercom button on the Base Unit and wait for somebody at the handset end to answer.
- When the somebody answers from the handset end, communication is automatically established and you can begin your conversation. Just talk near the Base Unit since the microphone is located on the front panel.
- To finish your intercom conversation, it is necessary that the handset unit hangs up. The Base Unit cannot hang up during intercom.
- Pressing the Intercom button twice on the Base Unit cancels the intercom function.
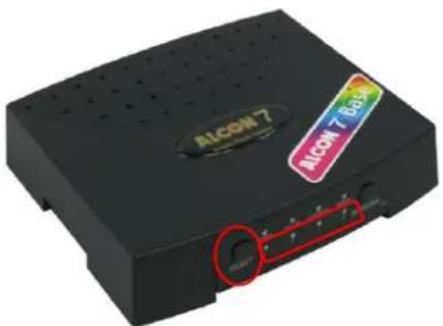
- If you have more then one Handset Unit in your network, press the Select button to choose which handset you wish to link with. Press the Select button to move from handset 1, 2, 3, or 4. Once you have selected the handset, press the Int button and only this unit will ring. Use the same procedures to communicate with this unit.
Handset Unit
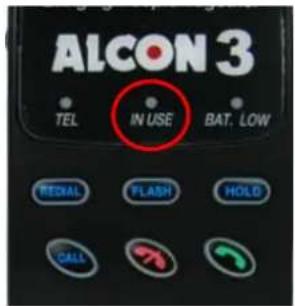
- Handsets will ring.
The indicators of IN USE will flash. This means that the base station is calling.
- Press any key to begin talking.
The IN USE indicator which answers the call will illuminate during a conversation.
- To finish the conversation, press

on the handset to
end the conversation. The base unit and handset will return to the standby mode automatically.
NOTE
When the distance between handset unit and base unit is too far, the INT indicator will flash several times without ringing.
TRANSFERRING CALLS
From Base Unit to Remote / Mobile (Only if you have a Normal Telephone Connected to the Base Unit that has the "HOLD" function)
BASE UNIT
It is necessary to connect a normal telephone that has the "HOLD" function to the Base Unit.
natural_image
Black Alcon 7 electronic device with two labeled buttons and a colorful stripe (no readable text or symbols beyond branding)- An incoming call comes into the system.
Press “HOLD” on the normal telephone. The call will be put on hold automatically.
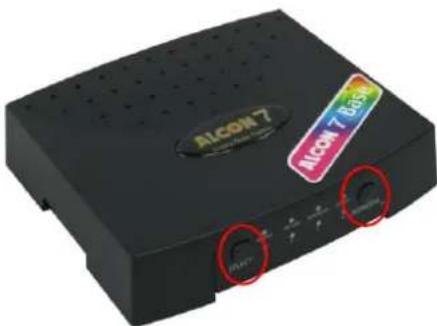
- Select the handset.
You Wish to communicate with by pressing the “SELECT” button and then press INT. Tell the person at the handset that he has an incoming. The person on the handset will hang up and then answer again. In the meantime, the
person on the Base will take the person off of hold and the call will automatically be transferred to the handset unit.
HANDSET UNIT
-
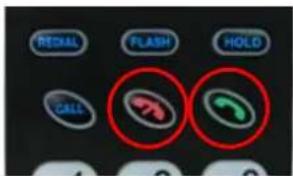
Handset will ring, press any key to talking.
-
Press to deactivate the INT and then press again to get the outside call.

- You will now be able to answer the call that is on hold.
HANDSET AUTODIALING FUNCTIONS
Make sure the handset POWER switch is ON.
The handset auto-dial memory can store up to 12 telephone numbers. Stored numbers can each have a maximum of 15 digits.
TO STORE A NUMBER
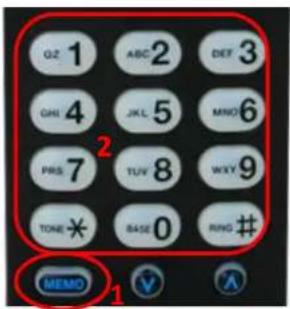
-
In the standby mode press "MEMO".
-
Input the telephone number you want to store.
-
Press MEMO again.
-
Press an index number you wish to assign that telephone number to (0\~9, #, *).
e.g. MEMO + 2614980 + MEMO + 1 this means the telephone number 2614980 is stored in the index number "1".
NOTE
If you input a wrong digit when storing a phone number, press and follow the above 4 steps again.
TO RETRIEVE AND CALL A NUMBER STORED IN THE MEMORY
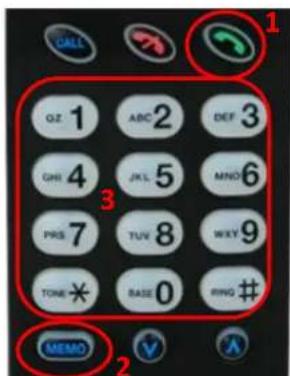
-
Press to get a dial tone.
-
Press "MEMO".
-
Press the desired index number (0\~9, #, *). The number will be dialed out automatically.
TO ERASE A NUMBER STORED IN THE MEMORY
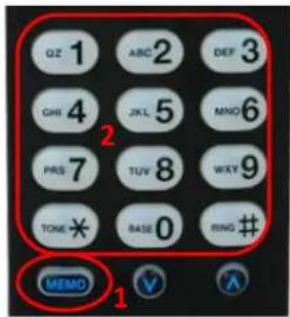
- Press "MEMO" twice in the standby mode.
- Press the desired index number (0\~9, #, *). The handset will beep and the telephone number assigned to that index number is erased automatically.
REDIAL FUNCTION
You can redial the last telephone number dialed automatically (after getting a busy signal, for instance).
HANDSET
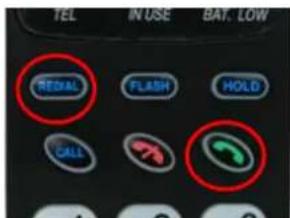
- Press to get a dial tone. The TEL indicator and dialing but tons will illuminate.
- Press REDIAL. The last telephone number dialed from the handset will be dialed out automatically.
HOLD FUNCTION
You can hold a call during the conversation.
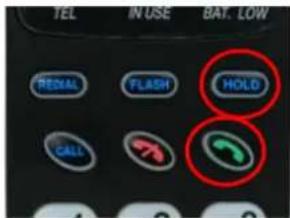
- Press HOLD to place a call on hold. The person who is on the other side of the conversation will hear an on-hold melody.
- Press to return to the call. The TEL key will illuminate.
FLASH FUNCTION
The FLASH button can be used to get a new dial tone without pressing 📄.
You can also use the flash function to obtain special services, such as Call Waiting from your local PTT or PBX.
If you subscribe to "Call Waiting":
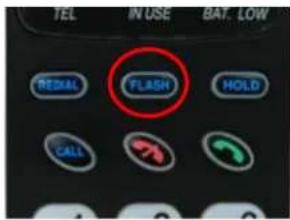
- When a call comes in when you are in an outside call conversation, you will hear a soft "do-do" sound.
- Press FLASH. The first caller is put on hold and you can converse with the second caller.
- Press FLASH again to talk to the first caller. The second caller is then put on hold.
PROGRAMMING A NEW HANDSET INTO THE SYSTEM
Setting your handset unit representative number on the Base unit. First, set the POWER switch of the Base and Handset unit to off.
BASE UNIT
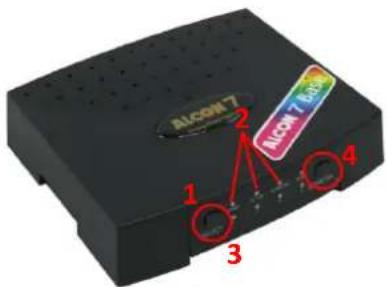
- Press SEL and without releasing POWER on the Base Unit.
- All the LED indicators will be displayed and also Indicator NO. 1.
- Press SEL to change to the Remote Unit No. that you wish to represent either "2", "3" and "4".
- Press the INT button.
NOTE
Once you press the INT button, you must complete the following procedures within 5 seconds to successfully complete the procedure.
HANDSET
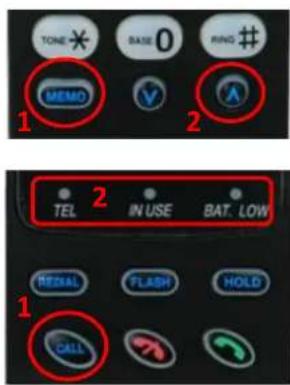
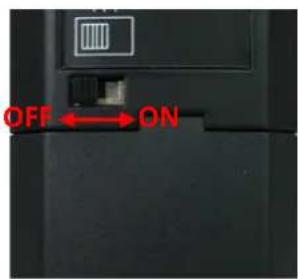
- Press MEMO and ^ simultaneously, and set the POWER switch to ON. The programming procedures are successful when hearing 5 "di" sounds.
- Set the POWER switch to the OFF position and switch it to ON again.
- Press CALL to see if the handset number indicator that flashes is the handset that you just programmed.
NOTE
If you make a mistake when following the programming procedures, repeat the above four steps again.
◆ OA-2538 HI-GAIN ANTENNA INSTALLATION:
NOTE
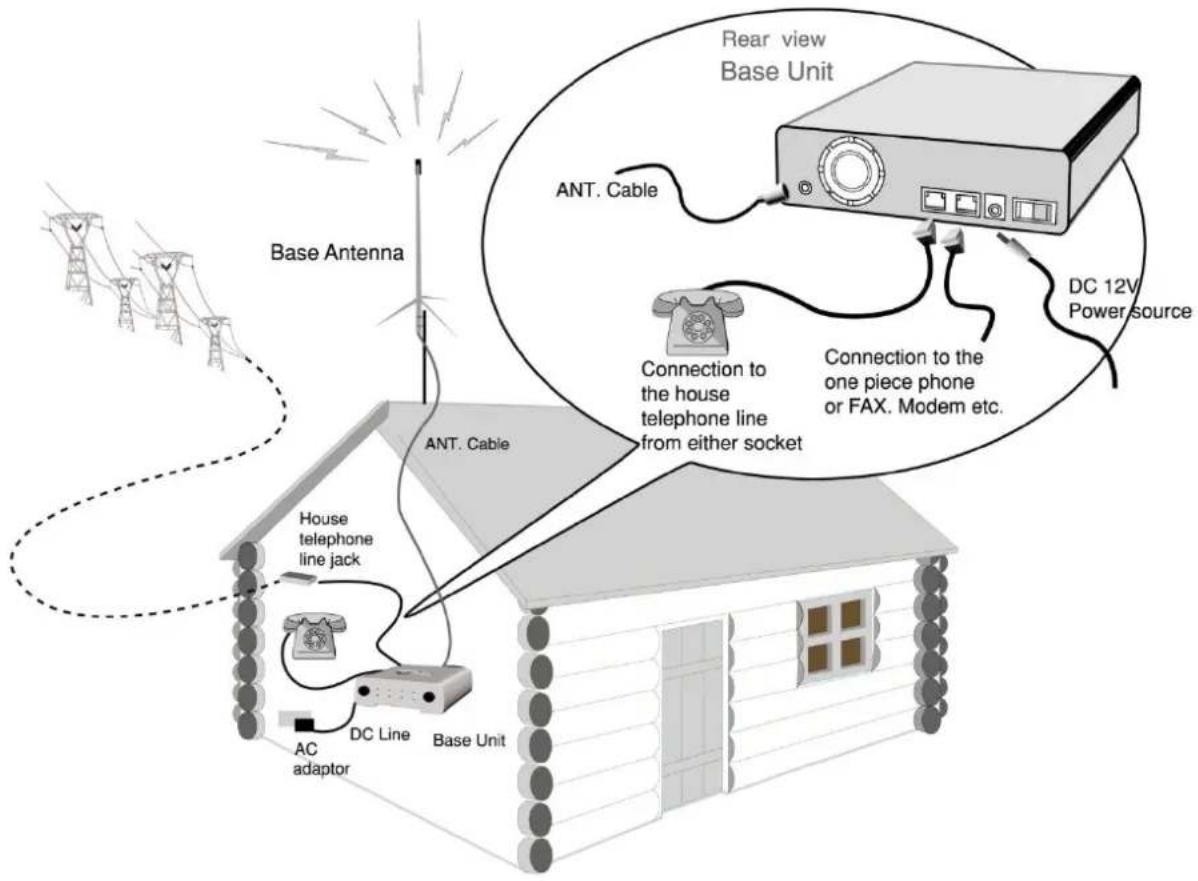
It is essential that the outdoor antenna be placed in a strategic area to provide maximum communication range and clarity. Before the base Station and the Handset unit are activated, be sure to connect the Base Antenna to avoid damage.
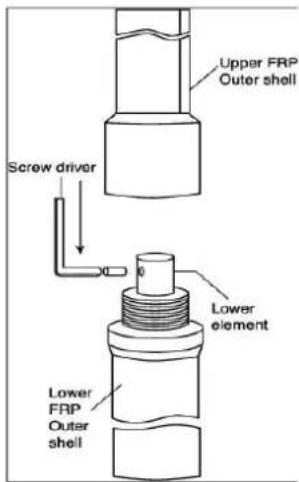
ATTACHING THE TWO SECTIONS
- Connect the two middle wires of each section of the antenna together.
- Use the mini-L wrench to fasten the screw given into the place provided on the middle wire.
- Connect the two sections together as tightly as possible.
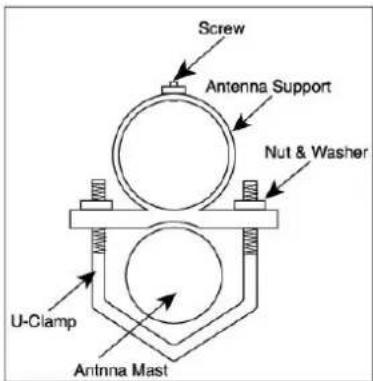
ANTENNA MOUNTING
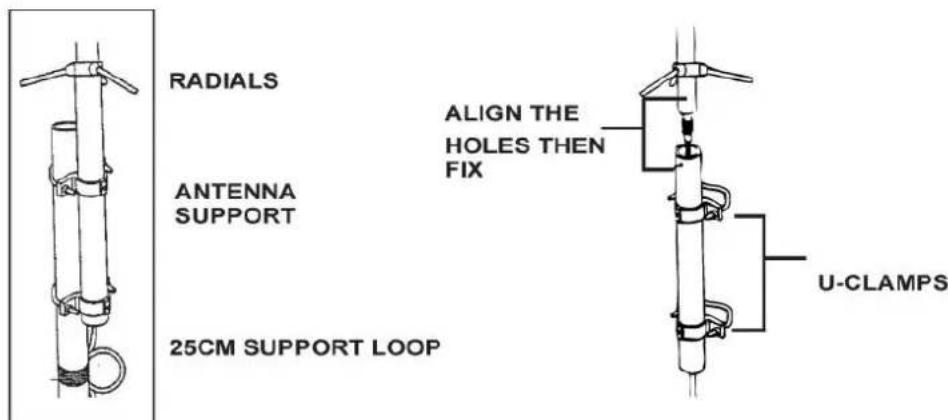
- Mount the antenna support, using the U-Clamps given, to an antenna mast (a long thin piece of wood. Metal etc.) to exten the overall height.
Note: Make sure that the material you use can withstand any climatic condition.
- Connect the M-Jacks provided to both ends of the coaxial cable. (if necessary).
ANTENNA REFLECTOR MOUNTING
- Screw the three reflectors securely in the button part of the antenna into places provided
Fig. 1
COAXIAL CABLE MOUNING
- Feed the coaxial cable through the support. Mount the high gain antenna on to the support by aligning the holes found on the antenna support with those found on the antenna. Secure the structure by using the screws provided (see illustration).
- Fix the cable securely using cable clamps and run the cable to the base station unit, then connect it to back.
Note: The coaxial cable distance can be longer than the 20M available (provided you use the same or similar specification of cable), but the recommended length is 30M or less (the less length the better.).
- When securing the coaxial cable, we recommend you turn the coaxial cable once to make a small loop (about 15 to 25 ~cm in diameter) near the antenna support to prevent excessive load from the cable on the antenna connection and to protect the coaxial cable and antenna connection from being damaged when accidentally pulled. See illustration for more details.
◆ CHARGING The BATTERY
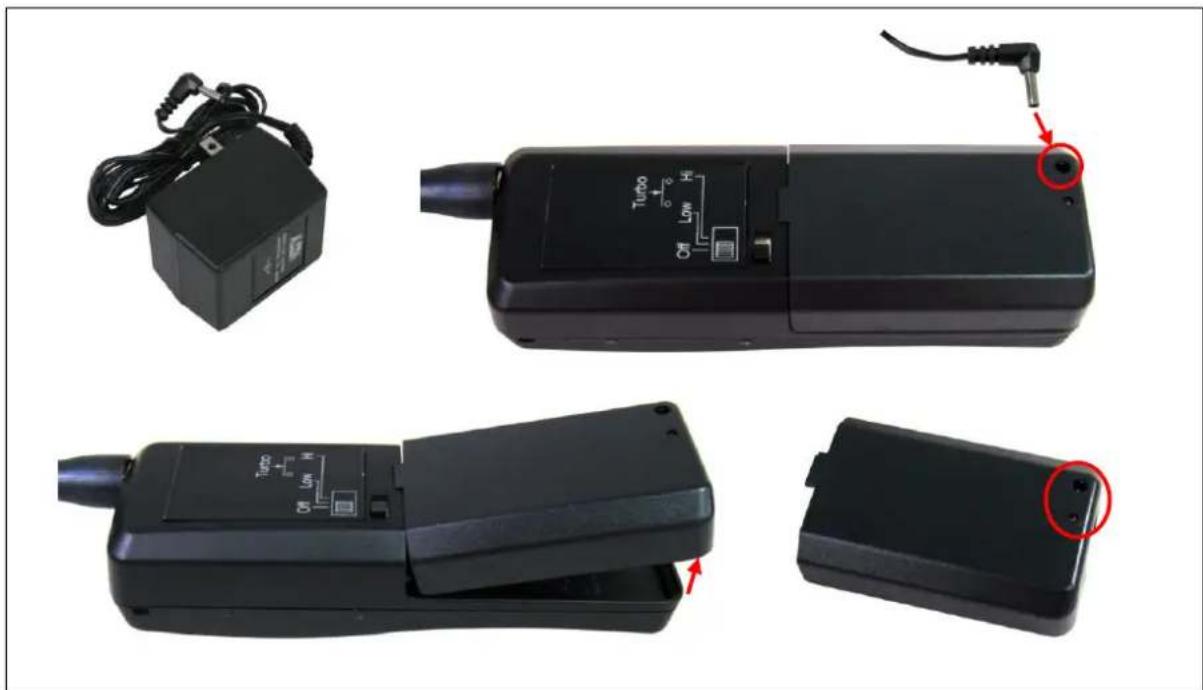
Use the adaptor 12V 300mA included for efficient battery charging of the ALCON-73BH Handset battery. Simply plug the adaptor into the socket of the handset battery and it will automatically begin charging. It is best to charge between 8 and 10 hours at a time. You can charge the battery separately or when placed inside the handset unit.
natural_image
Four black electronic devices with visible internal components and wiring, shown from different angles (no text or symbols)Note: Only charge the battery with the adaptor included.
◆ SIMPLE TROUBLE SHOOTING GUIDE
The phone does not work:
■ The AC adaptor may not be plugged into wall outlet.
■ The battery pack may need recharging (if the BATT. LOW indicator is illuminated in the in use mode).
■ The handset may be too far from the base unit.
■ Register the handset on the base unit again.
The communication becomes shorter:
■ The handset may need recharging.
■ The base unit or handset antenna may not be extended to this full length.
Incoming calls do not ring on the handset:
■ The handset may be too far from the base unit.
■ The handset POWER switch may be set to OFF.
If the phone does not work, try resetting the base unit and handset:
■ To reset the base unit.
✨ Disconnect and reconnect the AC adaptor.
■ To reset the handset, try one of the following or all:
✿ Set the POWER switch on the handset to OFF and then back to ON.
✨ Disconnect and then reconnect the battery pack in the handset.
✿Reprogram the handset with the base unit as explained in the section “Programming a New Handset in the System”
◆ TECHNICAL INFORMATION
This cordless telephone uses radio frequencies to allow mobility. Take note of the following points which could affect operation of your system.
1. NOISE
Electrical pulse noise is present in most homes at one time or another. This is most intense during electrical storms. Certain kinds of electrical equipment such as light dimmers, fluorescent bulbs, motors, fans, etc., also generate these noise pulses. Because radio frequencies are susceptible to these, on occasion, you may hear them in your handset. In general, they are a minor annoyance and should not be interpreted as a defect in your system.
2. RANGE
The effective range between the base unit and handsets will vary according to the topography and the environment. High frequencies will have shorter ranges in valleys and around concrete walls and metal objects. It is important to place the base unit antenna as high as possible for maximum performance.
3. INTERFERENCE
Electronic circuits activate a relay to connect the cordless telephone to your telephone line. These electronic circuits operate in the radio frequency spectrum. While several protection circuits are used to prevent unwanted signals, there may be periods when these unwanted signals enter the base unit. You may hear clicks or the relay may activate while you are not using the cordless handset. If this starts occurring frequently, it can be minimized or eliminated by lowering the height of the base unit antenna or relocating the base unit.
ALCON-73BH BASE UNIT INSTALLATION DIAGRAM
flowchart
graph TD
    A["Base Antenna"] --> B["Ant. Cable"]
    B --> C["DC 12V Power source"]
    C --> D["Connection to the one piece phone or FAX. Modem etc."]
    D --> E["House telephone line jack"]
    E --> F["AC adaptor"]
    F --> G["DC Line Base Unit"]
    G --> H["Ant. Cable"]
    H --> I["Rear view Base Unit"]
    I --> J["Ant. Cable"]
    style A fill:#f9f,stroke:#333
    style B fill:#ccf,stroke:#333
    style C fill:#cfc,stroke:#333
    style D fill:#fcc,stroke:#333
    style E fill:#cff,stroke:#333
    style F fill:#ffc,stroke:#333
    style G fill:#cfc,stroke:#333
    style H fill:#fcc,stroke:#333
    style I fill:#ffc,stroke:#333
- High Quality Cordlessphone System ALCON-73BH User Manual
- ◆ Table of Contents
- ◆ ALCON-73BH User Manual
- ◆ Features
- ◆ ALCON-73BH Standard Package
- Base Unit
- Handset Unit
- ◆ Base Unit Function Keys
- ◆ Handset Unit Function Keys
- ◆ Function Explanation
- ANSWERING A CALL
- ANSWERING With the HANDSET
- RECEIVER VOLUME CONTROL
- SCRAMBLE FUNCTION
- NOTE
- PLACING A CALL
- HANDSET
- A: Handset Calling Base Unit Handset
- B: Base Unit Calling Handset
- TRANSFERRING CALLS
- HANDSET AUTODIALING FUNCTIONS
- TO STORE A NUMBER
- TO RETRIEVE AND CALL A NUMBER STORED IN THE MEMORY
- TO ERASE A NUMBER STORED IN THE MEMORY
- REDIAL FUNCTION
- HOLD FUNCTION
- FLASH FUNCTION
- If you subscribe to "Call Waiting":
- PROGRAMMING A NEW HANDSET INTO THE SYSTEM
- ◆ OA-2538 HI-GAIN ANTENNA INSTALLATION:
- ATTACHING THE TWO SECTIONS
- ANTENNA MOUNTING
- ANTENNA REFLECTOR MOUNTING
- COAXIAL CABLE MOUNING
- ◆ CHARGING The BATTERY
- ◆ SIMPLE TROUBLE SHOOTING GUIDE
- The phone does not work:
- The communication becomes shorter:
- Incoming calls do not ring on the handset:
- If the phone does not work, try resetting the base unit and handset:
- ◆ TECHNICAL INFORMATION
- NOISE
- RANGE
- INTERFERENCE
Brand : Alcon
Model : 73BH
Category : Telephone