
BMC9022 - Media player MOTOROLA - Free user manual and instructions
Find the device manual for free BMC9022 MOTOROLA in PDF.


| Product Type | Media Player |
| Brand | Motorola |
| Model | BMC9022 |
| Dimensions (approx.) | 130 mm x 80 mm x 25 mm |
| Weight (approx.) | 250 g |
| Power Supply | USB 5V DC, 1A (adapter included) |
| Supported Audio Formats | MP3, WMA, WAV |
| Supported Video Formats | AVI, MP4, MOV, MKV (up to 1080p) |
| Supported Image Formats | JPEG, BMP, PNG |
| Memory Card Slot | SD/MMC (up to 32 GB) |
| USB Port | USB 2.0 (Supports flash drives up to 32 GB) |
| Video Output | HDMI (1080p) and Composite AV |
| Audio Output | Stereo RCA/3.5 mm headphone jack |
| Remote Control | Included (IR) |
| Additional Features | Photo slideshow, repeat/shuffle, OSD menu |
| Maintenance | Clean with a soft, dry cloth. Do not use liquids. |
| Safety Precautions | Keep away from water, heat sources, and direct sunlight. |
| Warranty | 1 year limited warranty |
| Reparability | Not user-serviceable. Contact Motorola support. |
Frequently Asked Questions - BMC9022 MOTOROLA
User questions about BMC9022 MOTOROLA
0 question about this device. Answer the ones you know or ask your own.
Ask a new question about this device
Download the instructions for your Media player in PDF format for free! Find your manual BMC9022 - MOTOROLA and take your electronic device back in hand. On this page are published all the documents necessary for the use of your device. BMC9022 by MOTOROLA.
USER MANUAL BMC9022 MOTOROLA
intelligence everywhere

Copyright © 2004 Motorola, Inc.
All rights reserved. No part of this publication may be reproduced in any form or by any means or used to make any derivative work (such as translation, transformation or adaptation) without written permission from Motorola, Inc.
Motorola reserves the right to revise this publication and to make changes in content from time to time without obligation on the part of Motorola to provide notification of such revision or change. Motorola provides this guide without warranty of any kind, implied or expressed, including but not limited to, the implied warranties of merchantability and fitness for a particular purpose. Motorola may make improvements or changes in the product(s) described in this manual at any time.
Motorola and the Stylized M Logo are registered in the US Patent & Trademark Office. Digeo, the Digeo logo, the Moxi logo and combinations thereof are trademarks of Digeo, Inc. in the USA and other countries. All other product, service or brand names are the property of their respective owners.
Manufactured under license from Dolby Laboratories. "Dolby" and the double-D symbol are trademarks of Dolby Laboratories.
This product incorporates copyright protection technology that is protected by U.S. patents and other intellectual property rights. Use of this copyright protection technology must be authorized by Macrovision Corporation, and is intended for home and other limited consumer uses only unless otherwise authorized by Macrovision. Reverse engineering or disassembly is prohibited.

Graphical symbols and supplemental warning markings on the back of the terminal
WARNING
TO PREVENT FIRE OR SHOCK HAZARD, DO NOT EXPOSE THIS APPLIANCE TO RAIN OR MOISTURE.
CAUTION
TO PREVENT ELECTRICAL SHOCK, DO NOT USE THIS PLUG WITH AN EXTENSION CORD, RECEPTACLE, OR OTHER OUTLET UNLESS THE BLADES CAN BE FULLY INSERTED TO PREVENT BLADE EXPOSURE.
TO PREVENT OVERHEATING, SITUATE THE PRODUCT AWAY FROM HEAT SOURCES SUCH AS RADIATORS, HEAT REGISTERS, STOVES, OR OTHER PRODUCTS (INCLUDING AMPLIFIERS) THAT PRODUCE HEAT.

The lightning flash with arrowhead symbol, within an equilateral triangle, is intended to alert the user to the presence of uninsulated “dangerous voltage” within the product’s enclosure that may be of sufficient magnitude to constitute a risk of electric shock to persons.

The exclamation point, within an equilateral triangle, is intended to alert the user to the presence of important operating and maintenance (servicing) instructions in the literature accompanying the appliance.
INSTALLATION
This installation should be made by a qualified service person and should conform to all local codes.

This equipment operates over the marked Voltage and Frequency range without requiring manual setting of any selector switches. Different types of line cord sets may be used for connections to the mains supply circuit and should comply with the electrical code requirements of the country of use.

Coaxial Connections – To reduce the risk of fire, use only No. 26 AWG or larger coaxial cable or equivalent.
REPAIRS
If you find the unit in need of repair, contact your cable system operator for repair or replacement.
NOTE TO CATV SYSTEM INSTALLER
This reminder is provided to call the CATV system installer's attention to Article 820-40 of the NEC that provides guidelines for proper grounding and, in particular, specifies that the cable ground shall be connected to the grounding system of the building, as close as possible to the point of cable entry as practical.
EXAMPLE OF ANTENNA GROUNDING

Usage Warnings
Avoid Damaging Your Television or Other AV Equipment
Do not use with certain televisions or equipment. Some televisions can be damaged if certain interactive television services or functions are used, such as tickers and online video games that can remain static on your screen. Static images presented during the use of interactive television services may "burn" into the screen, causing a permanent shadow of the static image to appear, even when such service or feature is not used. Consult your television owner's manual to determine if such features and functions can be used safely on your set. If you are unable to find this information in the owner's manual, contact your television dealer or the manufacturer to determine if such static images will cause damage to your television. Before connecting or disconnecting any audio-visual (AV) device, make sure that the power to the set-top box and to the AV device is turned off. This will reduce the risk of electrical damage to your equipment. To avoid damage to AV equipment or to the set-top box, do not touch AV cord terminals or the set-top box's AV ports with your fingers or allow metal parts to touch them.
Warning About Photosensitive Seizures
Exposure to certain visual images, including flashing lights or patterns that may appear in the use of online video games, each user interface, the video phone (if available), and other functions/applications which may be included as part of your interactive television service, can cause a very small percentage of people to experience a seizure. Even people without a history of seizures or epilepsy may have an undiagnosed condition that can cause photosensitive epileptic seizures while watching or using video games. These seizures may have a variety of symptoms, which may include eye or face twitching, lightheadedness, altered vision, shaking or jerking of arms or legs, confusion or disorientation, or momentary loss of awareness. Seizures may also cause a loss of consciousness or convulsions that can lead to injury from falling down or striking nearby objects. Immediately stop using the service and consult a doctor if you experience any of these symptoms. Parents should watch for and ask their children about the above symptoms because children and teenagers are more likely than adults to experience these seizures.
Taking the following precautions may reduce the risk of photosensitive epileptic seizures:
- Avoid using any such iTV features/services on large television screens
- View your television in a well-lit room
- Sit farther from the television screen
- Do not use any such iTV features/services when drowsy or tired
If you or any of your relatives have a history of seizures or epilepsy, consult a doctor before using the interactive television services.
Regulatory Information
Federal Communications Commission Radio and Television Interface Statement for a Class 'B' Device
This equipment has been tested and found to comply with the limits for a Class B digital device, pursuant to part 15 of the FCC Rules. These limits are designed to provide reasonable protection against harmful interference in the residential installation. This equipment generates, uses and can radiate radio frequency energy and, if not installed and used in accordance with the instructions, may cause harmful interference to radio communications. However, there is no guarantee that interference will not occur in a particular installation.
If the equipment does cause harmful interference to radio or television reception, which can be determined by turning the equipment off and on, the user is encouraged to try to correct the interference by one of the following measures:
- Re-orient or relocate the receiving antenna.
- Increase the separation between the equipment and receiver.
- Connect the equipment into an outlet on a circuit different from that to which the receiver is connected.
- Consult the dealer or an experienced radio/TV technician for help.
Changes or modification not expressly approved by the party responsible for compliance could void the user's authority to operate the equipment.
Declaration of Conformity
According to 47 CFR, Parts 2 and 15 for Class B Personal Computers and Peripherals; and/or CPU Boards and Power Supplies used with Class B Personal Computers, Motorola, Inc., 101 Tournament Drive, Horsham, PA 19044, declares under sole responsibility that the product identifies with 47 CFR Part 2 and 15 of the FCC Rules as a Class B digital device. Each product marketed is identical to the representative unit tested and founded to be compliant with the standards. Records maintained continue to reflect the equipment being produced can be expected to be within the variation accepted, due to quantity production and testing on a statistical basis as required by 47 CFR 2.909. Operation is subject to the following condition: This device must accept any interference received, including interference that may cause undesired operation. The above named party is responsible for ensuring that the equipment complies with the standards of 47 CFR, Paragraphs 15.107 to 15.109.
Canadian Compliance
This Class B digital apparatus meets all requirements of the Canadian Interference-Causing Equipment Regulations. Cet appareil numérique de la classe B est conforme à la norme NMB-003 du Canada.
Table of Contents
Introduction....2
BMC Features 2
BMC Diagrams....3
Front View 3
Back View....3
Installation....4
Ventilation Requirements....4
Equipment Required 5
BMC Connection Procedure....5
Digital Video/Digital Audio Connection....6
Digital Video/Stereo Audio Connection....6
Component Video/Digital Audio Connection 7
Component Video/Stereo Audio Connection ....7
S-Video/Stereo Audio Connection....8
Composite Video/Stereo Audio Connection....9
Installation Wrap-Up....10
Audio Configuration....10
Video Configuration ....11
Video Settings Definitions....12
Moxi Remote 13
Programming Procedure 13
Television Codes....14
Audio/Video Receiver Codes 17
Chapter 1
Introduction
The Motorola Broadband Media Center (BMC) family of products delivers digital video and audio, plus a whole new experience in interactive cable television. Finding what you want to watch and watching it when you want has never been easier. The BMC is simple to set up and easy to operate. The BMC9022D extends all its features to a second TV in your home.
This guide introduces you to the features and setup of your BMC. Refer to the Moxi Viewer's Guide to learn more about operating the BMC and some of the advanced features these models provide.
BMC Features
Standard Features of the BMC9012 and the BMC9022D
■ Dual analog/digital cable video tuners
■ Integrated HDTV decoder
■ Integrated Digital Video Recorder (DVR)
■ Integrated DOCSIS cable modem
■ High quality interactive graphics
■ S-video output
■ Digital audio (S/PDIF coaxial and optical) outputs
■ Digital Video Interface (DVI)output
■ Stereo audio output
■ Component video (YPrPb) output
■ Two USB 1.1 (front) and two USB 2.0 (back) connectors
■ 10/100 Base-T Ethernet connector
Clock display
■ Front panel control buttons
AV outputs
Additional Features of the BMC9022D
In addition to the standard features listed above, the BMC9022D includes the following:
- CD/DVD optical drive
■ Support for second TV via Media Center Extension (Moxi Mate) device
Specifications of the BMC9012 and the BMC9022D
■ Power supply: line input voltage 95V - 125V AC; frequency 57Hz - 63Hz
USB power: two connectors front, 5V, 500mA max combined current
USB power: two connectors rear, 5V, 500mA max combined current
■ DVI power 5V, 100mA max current
■ Operating temperature: 15°C - 40°C
■ Dimensions (W x H x D): 17" x 3.3" x 12"
■ Weight: approximately 15 pounds
BMC Diagrams
The following illustrations identify the controls on the BMC. Slight variations may exist between these illustrations and your model.
Front View

Figure 1: BMC Front
Back View

Figure 2: BMC Back
Chapter 2
Installation
This chapter describes how to install the BMC and verify the installation. The chapter also contains information to help you successfully disconnect, move, and reconnect the cable connections between the BMC and the TV.
When connecting the BMC, make sure all coaxial connections are "finger-tight"—secure, but not so tight they cannot be undone with your fingers. You do not need any special tools to disconnect the BMC, although you may need a wrench to loosen any tight connections.
Warnings

- Do not connect the BMC unit to any switched power source.
- Do not operate the BMC on its side (vertically).
- Use only the power cord supplied with the BMC and use that cord only for the BMC.
- Keep theBMC on, unless moving or servicing the unit. If power is removed, or a power outage occurs, it will take several minutes after power is restored for the unit to resume normal operations.
Ventilation Requirements
Allow adequate ventilation and airflow around the BMC to prevent overheating.
Warnings

- Cabinet installations must have open airflow or no doors.
- Vents must be unobstructed and open to surrounding air.
- Ensure top, side, and back clearance of at least two inches.
- Keep away from other heat-generating devices.

Figure 3: BMC Ventilation
Equipment Required
■ Video cable (Composite, S-Video, Component (YPrPb) or DVI-D) for TV/Monitor
■ Audio cable (Stereo Analog, Digital Coaxial, or Optical) for TV and/or audio system
Use the best connection supported by your TV, monitor, or audio system.
See the wiring diagrams starting on page 6 for reference.
BMC Connection Procedure
The installation scenarios described in this section apply to all BMCs, including the BMC9012 and the BMC9022D. Use the information in this section and the accompanying wiring diagrams to install the BMC9012 or the BMC9022D.
The BMC allows multiple types of audio and video connections. We recommend you use the best connection that your TV and audio system supports. Refer to the documentation that came with your TV or audio device for specific information on what the device supports.
The BMC9022D includes an optional Media Center Extension device (Moxi Mate) to control a second TV in the home. If you use both the BMC9022D and the Moxi Mate, follow the steps below to connect the BMC9022D to the main TV, and refer to the Moxi Mate Hardware Manual for the Moxi Mate installation instructions.
- Before you begin, make sure both the TV and the BMC are turned off and all connections are unplugged.
- Position the BMC in a well-ventilated open area near the TV and/or audio receiver.
- Connect the incoming cable supply to the BMC. Attach one end of the coaxial cable to the wall port and the other end to the Cable In port of the BMC.
- To connect audio and video cables, refer to the diagram and instructions listed below that apply to your installation.
| For this configuration Go to | |
| DVI-D and Digital Audio Figure 4, pg 6 | |
| DVI-D and Stereo Audio Figure 5, pg 7 | |
| Component Video and Digital Audio Figure 6, pg 7 | |
| Component video and Stereo Audio Figure 7, pg 8 | |
| S-Video and Stereo Audio Figure 8, pg 8 | |
| Composite Video and Stereo Audio Figure 9, pg 9 | |
NOTE The DVI port on the BMC may not be enabled at this time. Once the port is enabled, you can reconnect your HDTV, provided it has an HDCP-compliant DVI port or connection.
To integrate additional devices into your configuration, such as a DVD player, VCR or Moxi Mate, refer to the manufacturer's documentation for each device.
Digital Video/Digital Audio Connection
- Connect one end of the DVI-D cable to the DVI-D port of the BMC and the other end to the DVI-D In port of the TV or receiver.
- Attach one end of the S/PDIF audio cable to the appropriate optical or coaxial S/PDIF port of the BMC and attach the other end to the S/PDIF in port of the TV or receiver.
- Follow the instructions under "Installation Wrap-Up," starting on page 10.
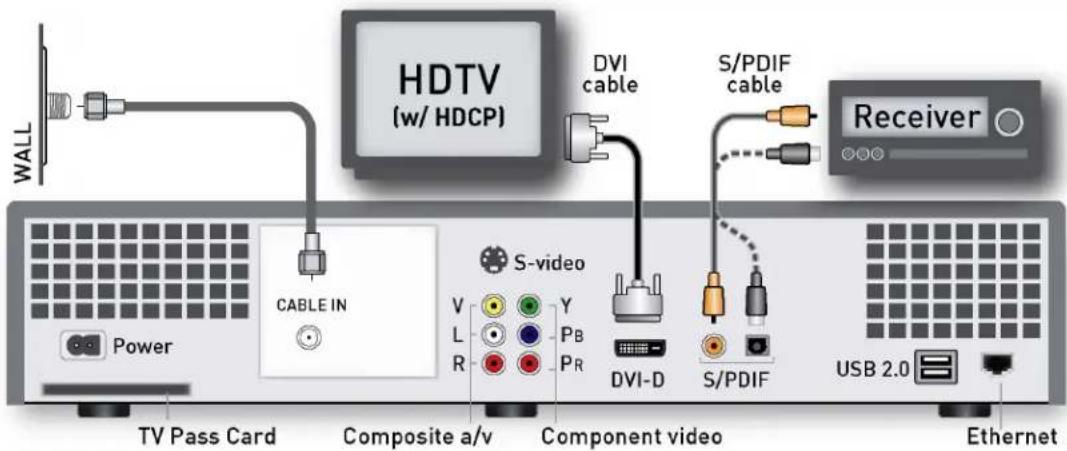
Figure 4: DVI-D digital video with S/PDIF digital audio
Digital Video/Stereo Audio Connection
- Connect one end of the DVI-D cable to the DVI-D port of the BMC and the other end to the DVI-D In port of the TV or receiver.
- Attach one end of the stereo audio cables to the Left (L) and Right (R) audio outputs of the BMC and the other end to the respective L and R inputs of the TV or receiver.
- Follow the instructions under "Installation Wrap-Up," starting on page 10.
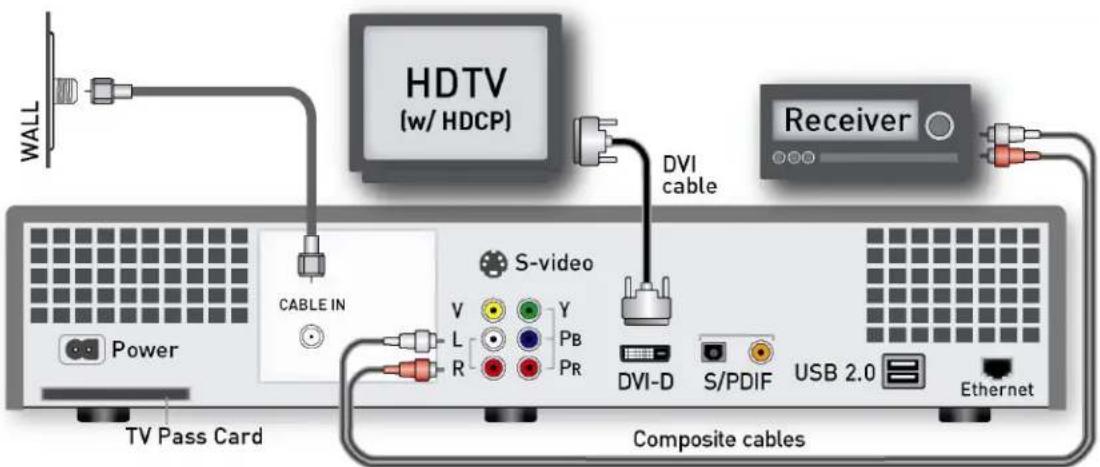
Figure 5: DVI-D digital video with stereo audio
Component Video/Digital Audio Connection
- Connect component video cables from the Y, PB, and PR outputs on the BMC to the Y, PB, and PR inputs on the TV or receiver.
- Attach one end of the S/PDIF audio cable to the appropriate optical or coaxial S/PDIF port of the BMC and attach the other end to the S/PDIF in port of the TV or receiver.
- Follow the instructions under "Installation Wrap-Up," starting on page 10.

Figure 6: Component video with S/PDIF digital audio
Component Video/Stereo Audio Connection
-
Connect component video cables from the Y, PB, and PR outputs on the BMC to the Y, PB, and PR inputs on the TV or receiver.
-
Attach one end of the stereo audio cables to the Left (L) and Right (R) audio outputs of the BMC and the other end to the respective L and R inputs of the TV or receiver.
- Follow the instructions under "Installation Wrap-Up," starting on page 10.

Figure 7: Component video with stereo audio
S-Video/Stereo Audio Connection
- Connect one end of the S-Video cable to the S-Video port of the BMC and the other end to the S-Video In port of the TV or receiver.
- Attach one end of the stereo audio cables to the Left (L) and Right (R) audio outputs of the BMC and the other end to the respective L and R audio inputs of the TV or receiver.
- Follow the instructions under "Installation Wrap-Up," starting on page 10.

Figure 8: S-video with stereo audio
Composite Video/Stereo Audio Connection
- Attach one end of a composite video cable to the video (V) output of the BMC and the other end to the Video In port of the main TV or receiver.
- Attach one end of the stereo audio cables to the Left (L) and Right (R) audio outputs of the BMC and the other end to the respective L and R inputs of the TV or receiver.
- Follow the instructions under "Installation Wrap-Up," starting on page 10.
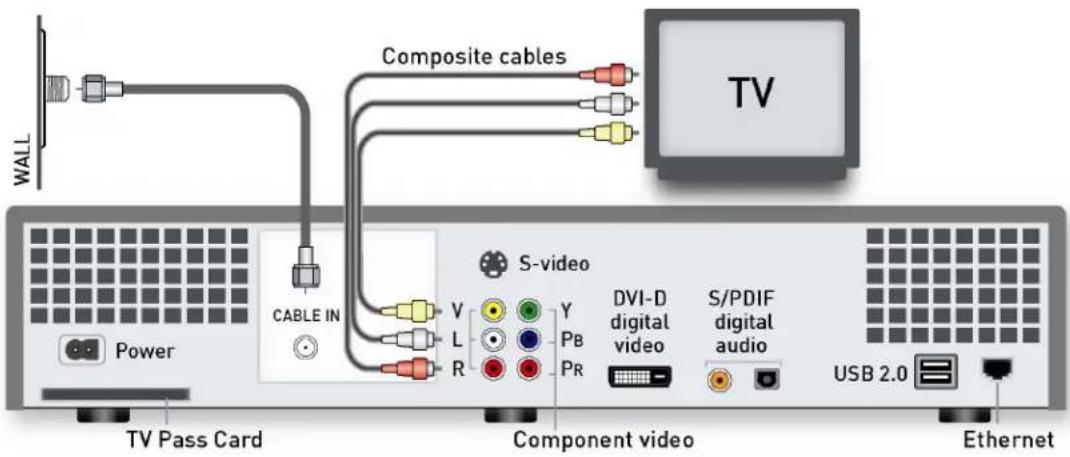
Figure 9: Composite video/stereo audio
Installation Wrap-Up
- Verify that all cable connections are tight and secure, all coaxial connections are finger-tight and properly seated, and that all RCA-style plugs are fully seated.
- Ensure that nothing blocks the vents of the BMC or other equipment.
- Plug the TV power cord into the wall outlet.
- Attach one end of the power cable to the BMC Power port and plug the other end into the wall outlet.
During the start-up process, a sequence of numbers may appear on the front panel display (where the time appears normally). This display is designed to help troubleshoot the system. If the BMC is unable to complete the startup process, please note the number shown on the display and refer to it when speaking with your cable provider's customer support representative.
Depending on the type of TV and connection used, you may need to tune the TV to the proper channel or set the video input source. Refer to your TV user manual for details.
The Moxi splash screen on the TV indicates a successful installation. Allow the unit approximately three minutes to fully start, and then configure the audio and video software settings using the information in the next two sections.
NOTE
Once the BMC is turned on, you never need to turn it off. Unless you are moving the BMC or having it serviced, you should leave it powered on at all times to ensure that scheduled recordings are not interrupted.
Audio Configuration
When your cable company installs your system, they configure your audio setting for you. However, if you upgrade or change your sound system, you must reconfigure the BMC's audio output.
- Press the MOXI button on the remote to bring up the Moxi Menu.
- Go to Settings and choose Digital Audio.
- Bring the desired setting into center focus, and then press OK to select it.
- Choose one of the following:
- If your system uses an S/PDIF connection, choose Dolby Digital for digital audio support.
If your system has a typical Red/White dual composite cable connection, choose Stereo.
The following table represents the audio format supported by each type of physical connection available on the BMC.
Supported Audio Formats
| Audio connection Supported audio | Stereo | Dolby | Digital |
| S/PDIF Audio | √ √ | ||
| Stereo Audio (L/R) | √ |
Video Configuration
If you switch between composite/S-video and component/DVI-D input connections, do the following before proceeding:
- Hook up the new cables WHILE KEEPING THE EXISTING CABLES CONNECTED.
-
If the new connection requires a different TV input, do not change it until step 4.
-
Press the MOXI button on the remote to bring up the Moxi Menu.
- Go to Settings and choose Video Output.
- Bring one of the following settings into center focus, and then press OK to select it.
If you have a high-definition (HD) compatible TV connected by a DVI-D or Component (Y, Pb, Pr) cable, select the 1080i setting.
- If your TV does not support 1080i, but supports other high-resolution settings, you can select either 480p or 720p.Remember that you must use a DVI-D or Component cable connection to support settings above 480i (see the video connections table).
- If your TV does not support high-definition settings and is connected by an S-video cable or a composite video cable (the yellow-tipped RCA cable), select the 480i setting. This is the default setting choice.
See your TV's user manual for the setting that is right for your TV.
-
When you select a video output setting, Moxi tries that setting for you. You may see a black screen while Moxi tries the new setting.
-
If you are switching between composite/S-video (480i setting) and component/DVI-D (480p, 720p, or 1080i setting) input connections, you may also need to switch your TV's input to match the new setting. If Moxi tries the setting before you have the correct TV input, the Video Output settings choices reappear on your original TV input. You must choose the new setting again.
- If you are not switching between composite/S-video and component/DVI-D connections, you can confirm the new setting without changing TV inputs.
If you select a setting that is not supported, your screen may appear unreadable.
- After Moxi tests the new setting, it asks you to confirm your new choice. If you don't confirm the new video output setting within 20 seconds, Moxi reverts to the previous one.
The following table lists the video resolutions supported by each type of physical connection available on the BMC.
Video connections: supported resolutions
| Connection | Supported | |||
| 480i | 480p | 720p | 1080 | |
| DVI-D Digital Video | √ √ | √ | ||
| Component Video | √ √ | √ √ | ||
| S-Video | √ | |||
| Composite Video | √ | |||
resolution
Video Settings Definitions
p and i Designations
In video resolution settings, the "p" and "i" designations stand for "progressive" and "interlaced." These terms are used to describe how a TV picture is displayed on the screen.
Video Resolution Formats
720p and 1080i are High Definition (HD) formats. 480p and 480i are Standard Definition (SD) formats. 480i is roughly equivalent to a normal analog TV picture. Analog TV shows broadcast on digital TV stations are broadcast in 480p or 480i.
HD and SD Aspect Ratios
The aspect ratio is the ratio of the width of a TV picture to its height. HD shows use an aspect ratio of 16:9, also known as "widescreen." SD shows use an aspect ratio of 4:3.
| TIP | If you have HDTV, we suggest you set your video output for HD (usually 1080i). However, if you want to view SD shows in their original 4:3 ratio, we suggest you follow the instructions on the previous page to change your video output setting to 480i. After the show, you will want to change the setting back for HD. |
Chapter 3
Moxi Remote
The Moxi remote allows you to access, control, and enjoy the many features of your Media Center. You can also use this remote as the primary remote for many brands of TVs and audio devices. Instructions in this chapter show you how. Refer to the Moxi Viewer's Guide for explanations of the buttons.
Your cable operator may provide a different remote. If your remote does not look like the one pictured here, refer to the manual your cable operator provided with the remote.
NOTE When replacing batteries, use only high quality, non-corrosive batteries designed for use in electronic equipment.
Programming Procedure
The Moxi remote operates the BMC, and—once programmed—will simultaneously control the power, volume, and mute functions of your TV or audio receiver. Use the following instructions to program the remote.
From the tables on the following pages, find the codes for your brand of TV or audio receiver and use this information with the "Programming by Code" procedure below. If your brand is not listed or if the given codes do not work, follow the instructions in the "Programming by Search" procedure on page 14.

Figure 10: Moxi Remote
Programming by Code
- Turn on the TV or receiver you want the remote to control.
- On the Moxi remote, press and hold the MOXI and OK buttons simultaneously until the LED light on the top of the remote blinks twice.
- Using the number buttons on the remote, enter one of the codes for your device from the reference tables starting on page 14. When you enter the correct code, the LED blinks twice. (If it blinks once, the code was invalid—try again.)
- Press the Power button on the remote. If the TV or receiver does not respond, repeat steps 2 and 3 using another listed code. Repeat until successful, or use the Programming by Search procedure.
NOTE To reset the remote to the original factory setting, enter code 9 9 9 9, and then press OK in step 3 above.
Programming by Search
- Turn on the TV or receiver you want the remote to control.
- On the Moxi remote, press and hold the MOXI and OK buttons simultaneously, until the LED light on the top of the remote blinks twice.
- Using the number buttons on the remote, press 9 9 1 0 for TV, or 9 9 1 1 for audio receiver. The LED light blinks twice.
- Press the Mute button.
If this mutes the device, go to step 5.
- If this does not mute the device, press the Up arrow to advance to the next code, and then press Mute again. Repeat until the device responds.
- Press OK to set the current code and finish.
NOTE Some older devices may not be supported. If the device still fails to respond, use its original remote to control it. Contact your cable provider's customer service for additional assistance.
Television Codes
| TV Brand Manufacturer Code TV Brand Manufacturer Code | |||
| 3M | 0737 | Mark | 0003 |
| AOC 0030, 0003, 0052, 0137, 0185 Abex 0032 | |||
| Admiral | 0093, 0463 | Advent | 0761 |
| Adventura | 0046 | Aiko | 0092 |
| Aiwa | 0701 | Akai | 0030, 0098, 0591 |
| Alaron | 0179, 0183, 0216 | Ambassador | 0177 |
| America Action | 0180 | Ampro | 0751 |
| Anam | 0180, 0004, 0009, 0068 | Anam National | 0055, 0161 |
| Apex Digital | 0748, 0765, 0767 | Archer | 0003 |
| Audinac | 0391 | Audiovox | 0451, 0180, 0003, 0092, 0623, 0713 |
| Baysonic | 0180 | Broksonic | 0236, 0463, 0003, 0426, 0642 |
| Bush 0355 | CCE | 0037, 0217, 0329 | |
| CXC | 0180 | Candle | 0030, 0056, 0046, 0186 |
| Carnivale | 0030 | Carver | 0054, 0170 |
| Casio | 0611 | Bell & Howell | 0154, 0016 |
| Bradford | 0180 | Celebrity | 0000 |
| Changhong | 0765 | Cineral | 0451, 0092 |
| Citizen | 0060, 0030, 0056, 0039, 0046, 0092, 0186, 0280, 0561 | Clairtone | 0185 |
| Compaq | 0749 | Concerto | 0056 |
| Contec | 0180, 0157, 0158, 0185 | Craig | 0180, 0161 |
| Crosley 0054 | Crown | 0180, 0039, 0672 | |
| Curtis Mathes | 0047, 0054, 0154, 0451, 0093, 0060, 0030, 0145, 0056, 0016, 0039, 0166, 0415, 0466, 0702, 0747, 1147, 1347 | Daewoo | 0451, 0039, 0066, 0067, 0091, 0092, 0623 |
| Denon | 0145, 0511 | Dumont | 0017 |
| Dwin | 0720, 0774 | Dynatech | 0049 |
| Ectec | 0391 | Eiki | 0735 |
| Electroband | 0000, 0185 | Electrohome | 0381, 0389, 0409 |
| Emerson | 0154, 0236, 0463, 0180, 0282, 0178, 0179, 0039, 0038, 0158, 0177, 0181, 0182, 0183, 0185, 0270, 0280, 0623 | Envision | 0030 |
| Fisher | 0154, 0159 | FlexVision | 0713 |
| TV Brand Manufacturer Code TV Brand Manufacturer Code | ||||
| Fujitsu 0179, 0683 | Funai 0180, 0179, 0171 | |||
| Futuretech 0180 GE 0047, 0051, 0451, 0282, 0178, 0021, | 0055, 0027, 0029, 0135, 0279, 0747, 1147, 1347 | |||
| Gibraltar 0017, 0030 GoldStar 0030, 0178, 0001, 0002, 0032 | 0106, | 0409 | ||
| Goodmans 0360 Gradiente 0053, 0056, 0170, 0392 | ||||
| Grundig | 0037 Grunpy | 0180, 0179 | ||
| Haier | 0768 | Hallmark | 0178 | |
| Harley Davidson | 0179, 0043 Harman/Kardon 0054, 0078 | |||
| Harvard | 0180, 0068 | Hauppauge | 0693 | |
| Havermy 0093 Hitachi 0145, 0056, 0016, 0032, 0038, 0095, | 0097, 0151, 0173, 0227, 0279, 0409, 0413, 0576, 0577, 0583, 0723, 0770, 1145 | |||
| InFocus | 0736, 0738, 0741, 0752 | Infinity | 0054 | |
| Innova | 0037 | Inteq | 0017 | |
| JBL | 0054 | JCB | 0000 | |
| JVC | 0053, 0036, 0069, 0160, 0169, 0182 | Janeil | 0046 | |
| Jensen | 0050 | KEC | 0180 | |
| KMC | 0106 KTV 0180, 0030, 0089, 0183, 0185, 0217, 0280 | |||
| Kamp | 0216 Kawasho 0158, 0216, 0308 | |||
| Kaypani | 0052 | Kenwood | 0030 | |
| Kloss | 0024, 0046, 0078 | Konka | 0628, 0632, 0638, 0703, 0707 | |
| LG | 0056, 0442 LXI 0047, 0054, 0154, 0156, 0178, 0148, 0747 | |||
| Loewe | 0136, 0633, 0693, 0694 | Logik 0016 | ||
| Luxman | 0056 | MEI | 0185 | |
| MGA | 0150, 0030, 0178, 0155 | MTC | 0060, 0030, 0056, 0049, 0091, 0185, 0216 | |
| Magnavox | 0054, 0030, 0179, 0020, 0024, 0028, 0036, 0096, 0186, 0187, 0230, 0386, 1254, 1454 | Majestic | 0016, 0015 | |
| Marantz | 0054, 0030, 0037, 0444, 1554 | Matsushita | 0250, 0650 | |
| Megatron | 0178, 0145, 0003 | Memorex | 0154, 0250, 0463, 0150, 0178, 0179, 0016, 0106, 1037 | |
| Mercury | 0001 Midland 0047, 0017, 0051, 0039, 0032, 0135, 0747 | |||
| Minutz | 0021 Mitsubishi 0093, 0150, 0178, 0014, 0098, 0155, 0331, 0358, 0592 | |||
| Motorola | 0093, 0055 Multitech 0180, 0049, 0217 | |||
| NAD | 0156, 0178, 0166 | NEC | 0030, 0056, 0036, 0170, 0434, 0455, 0704 | |
| NTC | 0092 | Nesa | 0763 | |
| Netsat 0037 Nikko | 0030, 0178, 0092, 0317 | |||
| Nisato | 0391 | Noblex | 0430 | |
| Noshi | 0018 | On Command | 0531 | |
| Onwa | 0180 Optimus 0154, 0250, 0166, 0650 | |||
| Optiview | 0756 | Optonica | 0093, 0165 | |
| Orion | 0236, 0463, 0179 | Ovation | 0734 | |
| Panasonic | 0250, 0051, 0055, 0162, 0226, 0650 | Penney | 0047, 0156, 0051, 0060, 0030, 0178, 0021, 0018, 0039, 0002, 0003, 0027, 0032, 0110, 0135, 0149, 0309, 0747, 1347 | |
| Philco | 0054, 0463, 0030, 0145, 0020, 0028, 0096, 0302 | Philips | 0054, 0037, 1354, 1454 | |
| Pilot 0030, 0039 Pioneer 0038, 0166, 0172, 0679 | ||||
| Portland 0039, 0092 Princeton 0685, 0700, 0717 | ||||
| Prism | 0051 | Proscan | 0047, 0747 | |
| Proton 0178, 0003 | 0031, 0052, 0466 Proxima | 0734, 0735, 0737, 0742, 0743 | ||
| Pulsar | 0017 | Quasar | 0250, 0051, 0165, 0055, 0219, 0650 | |
| RCA | 0047, 0018, 0029, 0038, 0090, 0135, 0254, 0278, 0679, 0747, 1047, 1147, 1247, 1347, 1447, 1547 | RadioShack | 0047, 0154, 0165, 0180, 0030, 0178, 0056, 0039, 0032, 0409, 0747 | |
| Realistic | 0154, 0165, 0180, 0030, 0178, 0056, 0039, 0032 | Rhapsody | 0183, 0185, 0216 | |
| Rosen | 0756 | Runco | 0017, 0030, 0612 | |
| SKY | 0037 | SSS | 0180 | |
| Sampo | 0030, 0039, 0032, 0052, 0100, 0110 | Samsung | 0060, 0030, 0178, 0056, 0032, 0037, 0329, 0408, 0427, 0482, 0702, 0766 | |
| Samsux | 0039 | Sansei | 0451 | |
| Sansui | 0463 | Sanyo | 0154, 0088, 0107, 0146, 0159, 0232, 0484 | |
| Scotch 0178 | Scott 0236, 0180, 0178, 0179 | 0309 | ||
| Sears | 0047, 0054, 0154, 0156, 0178, 0179, 0056, 0015, 0146, 0148, 0149, 0159, 0168, 0171, 0281, 0747 | Semivox | 0180 | |
| Semp | 0156 | Sharp 0093, 0165 | 0039, 0153, 0157, 0281, 0386, 0398, 0491, 0688 | |
| Signature | 0016 | Simpson | 0186, 0187 | |
| Sinudyne | 0347 | Sony | 0000, 0011, 0080, 0111, 0273, 0353, 1100 | |
| Soundesign 0180, 0178, 0179, 0186 | Spectricon | 0003, 0137 | ||
| Squareview | 0171 | Starlite | 0180 | |
| Supre-Macy | 0046 | Supreme | 0000 | |
| Sylvania | 0054, 0030, 0020, 0028, 0065, 0096, 0171, 0381 | Symphonic | 0180, 0171 | |
| TMK | 0178, 0056, 0177 | TNCi | 0017 | |
| Tandy | 0093 | Tashiko | 0588 | |
| Tatung | 0055, 0003, 0049, 0396 | Technics | 0250, 0051 | |
| Technol Ace | 0179 | Techwood | 0051, 0056, 0003 | |
| Teknika | 0054, 0180, 0150, 0060, 0179, 0056, 0016, 0039, 0092, 0175, 0186, 0312 | Telefunken | 0056, 0101, 0702 | |
| Telemagic | 0735 | Tera | 0031 | |
| Thomson | 0209, 0210 | Toshiba | 0154, 0156, 0060, 0036, 0149, 0650, 1256, 1356 | |
| Tosonic | 0185 | Totevision | 0039 | |
| Trical | 0157 | Ultra | 0391 | |
| Universal | 0027 | Vector Research | 0030 | |
| Victor | 0053 | Video Concepts | 0098 | |
| Vidikron 0054, 0242 Vidtech 0178, 0036 | ||||
| ViewSonic | 0724, 0775 Viking 0046, 0312 | |||
| Wards | 0054, 0165, 0030, 0178, 0021, 0179, 0056, 0016, 0020, 0027, 0028, 0029, 0080, 0096, 0111, 0202 | Waycon | 0156 | |
| WhiteWestinghouse | 0463, 0623 Yamaha 0030 | |||
| Zenith | 0017, 0463, 0016, 0092 | Zonda | 0003 | |
Audio/Video Receiver Codes
| Receiver Brand Manufacturer Code Receiver Brand Manufacturer Code | ||
| ADC | 3531 | ADS |
| Adcom 3002, 3304, 3319, 3616 Admiral 3182 | ||
| Aiwa 4089, 4405, 3121, 3125, 3158, 3162, 3189, 3249, 3284, 3301, 3361, 3544, 3601, 3745, 4188, 4243, 4321, 4388, 4641 | ||
| Alco 4390 Arcam | 4120, 4212, 4214, 4216 | |
| Audio Access | 3403 Audio Authority 4256 | |
| AudioSource | 3687 | |
| Audiovox | 4390 B & K 3701, 3820, 3840 | |
| BK | 3702 Bang & Olufsen 3898, 4040 | |
| Bondstec | 3049 Bose 4229, 3238, 3639 | |
| Capetronic | 3531, 3690 | |
| Casio | 3195, 3201 | |
| Clarinette | 3195 | |
| Counterpoint | 3253 | |
| Daewoo | 4250 | |
| Denon | 4104, 3004, 3273, 3386, 3771, 4142, 4311, 4360, 4660 | |
| Eclipse | 4061 Emerson 3020, 3255, 3424, 3495 | |
| Enlightened Audio Designs | 4045, 4046, 4047, 4048 Eroica 3051 | |
| Fisher | 3042, 3219, 3360, 4801 GE | |
| GPX | 3744, 4299 | |
| Glory Horse | 4263 GoldStar 3057 | |
| Gradiente | 3557 | |
| Hanwah | 3741 Harman/Kardon 3110, 3189, 3891, 4004, 4005 | |
| Hitachi | 3228, 3386, 3659, 4273 Inkel | |
| JBL | 3110, 3794, 4002 | |
| Jensen | 3705, 3713, 3754 | |
| Kansai | 3440 Kenwood 4313, 4027, 4570, 4569, 3027, 3042, 3077, 3186, 3313, 3314, 3337, 4032, 4051, 4670 | |
| Koss | 3255, 3424, 3495, 3624, 3636, 3744, 4366 | |
| Lexicon | 4076 | |
| Lloyd's | 3195 Luxman 3149, 3267, 3329, 3330, 3429, 3431 | |
| MCS | 3039, 3044, 3201, 3346 | |
| Marantz | 4089, 4189, 3006, 3039, 3189, 3200, 3352, 3455, 4289, 4892 | |
| McSilver | 3466 | |
| Modulaire | 3195 | |
| Musicmagic | 4089 | |
| NTDE Geniesom | 3744 | |
| Nikko | 3215, 3407, 3466, 3467, 3542, 3543, 3609 | |
| Onkyo 3100, 3119 | 3135, 3137, 3144, 3380,3838, 3842, 4298 | |
| Orient Power 3744 | Outlaw Audio 4109 | |
| Panasonic 4518, 3039, 3309, 3367, 3389, 4288,4316, 4763, 4764 | Optimus 4023, 3042, 3177, 3181, 3186,3219, 3229, 3286, 3440, 3531,3622, 3670, 3690, 3738, 3744,3754, 3797, 3801, 3803, 3849,4074 | |
| Parasound 3549, 3895, 4124, 4238 Penney 3044, 3195, 3201 | Panor 3350 | |
| Philco | 3479 Philips 4089, 4189,4269, 3189, 3391,3620, 3642, 4120, 4268, 4283,4368 | |
| Pioneer | 4023, 3150, 3244, 3289, 3531, 3630,4084, 4123, 4184, 4343, 4384 | Polk Audio 3189, 4289 |
| Proscan | 4254 | Proton 3026, 3047 |
| Quasar | 3039 RCA 4023, 4254,3054, 3346, 3360,3530, 3531, 3649, 4074, 4123,4154, 4300, 4390, 4609 | |
| RDS | 3242 | RadioShack 3744, 4263 |
| Realistic | 3001, 3025, 3163, 3178, 3181, 3182,3195, 3534 | Rotel 3007, 3852 |
| Revox | 3140 | SII 3355 |
| STS | 3217 Samsung 3069, 3070,3112, 4295 | |
| Sansui | 4089, 3148, 3189, 3193, 3323, 3346,3593 | Sanyo 3219, 3448, 3801, 4251 |
| Schneider | 3364 Scott 3105, 3163,3322, 3390, 3396,3418, 3449, 3495 | 3364 Scott 3105, 3163,3322, 3390, 3396,3418, 3449, 3495 |
| Sears | 3201 | Semivox 3255 |
| Sharp | 3186, 3262, 4286, 4386 | Sherwood 3062, 3066, 3324, 3475, 3491,3502, 3565, 3653, 4066, 4077,4653 |
| Sonic | 3281 | Sontec 3068 |
| Sony | 4058, 4258, 4158, 3158, 3168, 3415,3474, 3776, 4458, 4558, 4658, 4758 | Sounddesign 3670 |
| Soundstream | 3090 | Stereophonics 4023 |
| Sunfire | 4313, 3313, 3314 | Sylvania 3222 |
| Symphonic | 3182 | Tandberg 3204, 3205 |
| Teac | 3112, 3163, 3298, 3387, 3463, 3870,4074 | Technics 4308, 4309, 4518, 3039, 3208,3309 |
| Techwood 3281, 3344, 3364, 3609 Thorens 4189 | ||
| Topline | 3767 | Ultrx 3333, 3427 |
| Vector Research | 3218, 3352 | Venturer 3849, 4390 |
| Victor | 3074 Wards 3054, 3158,3189 | |
| Welton | 3344 Yamaha 3081, 3082,3176, 3186, 3293,3545, 3712, 4176, 4276, 4376 | |
| Yorx | 3195 Zenith 3281, 3511,3622, 3705, 3736,3744, 3857 | |
Visit our website at:
www.motorola.com

MOTOROLA
519445-001
9/04
MGBI
- Graphical symbols and supplemental warning markings on the back of the terminal
- WARNING
- CAUTION
- INSTALLATION
- REPAIRS
- NOTE TO CATV SYSTEM INSTALLER
- EXAMPLE OF ANTENNA GROUNDING
- Usage Warnings
- Avoid Damaging Your Television or Other AV Equipment
- Warning About Photosensitive Seizures
- Regulatory Information
- Declaration of Conformity
- Canadian Compliance
- Table of Contents
- Introduction....2
- Installation....4
- Moxi Remote 13
- Chapter 1
- Introduction
- BMC Features
- Standard Features of the BMC9012 and the BMC9022D
- Additional Features of the BMC9022D
- Specifications of the BMC9012 and the BMC9022D
- BMC Diagrams
- Chapter 2
- Warnings
- Ventilation Requirements
- Equipment Required
- BMC Connection Procedure
- Digital Video/Digital Audio Connection
- Digital Video/Stereo Audio Connection
- Component Video/Digital Audio Connection
- Component Video/Stereo Audio Connection
- S-Video/Stereo Audio Connection
- Composite Video/Stereo Audio Connection
- Installation Wrap-Up
- NOTE
- Audio Configuration
- Video Configuration
- Video Settings Definitions
- p and i Designations
- Video Resolution Formats
- HD and SD Aspect Ratios
- Chapter 3
- Moxi Remote
- Programming Procedure
- Programming by Code
- Programming by Search
Brand : MOTOROLA
Model : BMC9022
Category : Media player