USB.007 - Microphone MXL - Free user manual and instructions
Find the device manual for free USB.007 MXL in PDF.


| Product Type | USB Condenser Microphone |
| Model | USB.007 |
| Brand | MXL |
| Dimensions | 6.5 x 2.5 inches (165 x 63 mm) |
| Weight | 0.5 lbs (227 g) |
| Power Source | USB bus power (5V DC) |
| Polar Pattern | Cardioid |
| Frequency Response | 20 Hz – 20 kHz |
| Sample Rate | 48 kHz |
| Bit Depth | 16-bit |
| Connectivity | USB Type-A (cable included) |
| Compatibility | Windows, macOS, Linux (plug-and-play) |
| Controls | Built-in volume knob, mute switch |
| LED Indicator | Red when muted, blue when active |
| Cable Length | 5 ft (1.5 m) |
| Mounting | Desktop stand with adjustable angle |
| Maintenance | Wipe with a soft dry cloth; avoid liquids |
| Safety Precautions | Do not expose to moisture or extreme temperatures |
| Spare Parts | None user-serviceable; contact support for replacement |
| Repairability | Not intended for repair; dispose properly |
| General Information | Ideal for podcasting, streaming, and voice recording |
Frequently Asked Questions - USB.007 MXL
User questions about USB.007 MXL
0 question about this device. Answer the ones you know or ask your own.
Ask a new question about this device
Download the instructions for your Microphone in PDF format for free! Find your manual USB.007 - MXL and take your electronic device back in hand. On this page are published all the documents necessary for the use of your device. USB.007 by MXL.
USER MANUAL USB.007 MXL
natural_image
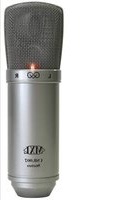
Close-up of a metallic USB 0.07 Stereo microphone with visible sound waves and speaker grille (no text or symbols on body)User Manual

Congratulations on your purchase of the MXL USB.007 which uses two gold diaphragm capsules in an X/Y pattern for stereo recording. MXL microphones are the result of world-class engineering and manufacturing capabilities. They are designed to provide you with outstanding performance and exceptional value. While we encourage you to review this entire manual, there are a few key points about handling this microphone that we want you to familiarize yourself with right from the start. The MXL USB mics are a professional quality, cardioid condenser studio microphone designed specifically for recording. Unlike microphones designed for live performance or lesser dynamic model microphones, this instrument requires careful handling. Hence, you should observe the following...
ALWAYS: Handle the microphone carefully, avoiding sudden shocks such as dropping or bumping the microphone into other objects.
ALWAYS: Maintain a distance of approximately 4 – 6 inches when speaking or singing into the microphone. You are encouraged to use a pop filter for
added protection of the sensitive capsule and to shield the instrument from saliva and sudden bursts of air.
NEVER: Tap the microphone to check if it's working. The RED LED behind the microphone's protective grill will tell you it's on and that the correct side is facing you.
NEVER: Blow into the microphone to check if it's working. The RED LED behind the microphone's protective grill.
By following these few basic handling procedures, you can expect a long and trouble-free relationship with your new microphone. Again, thank you for your purchase of this outstanding MXL microphone.
A Little Background Information:
MXL stereo microphones use what is known as a X/Y pattern, which is two capsules facing 90° apart. Each capsule will send the audio information it receives to the corresponding right or left side of a stereo track on the computer. The capsule behind the "L" is more sensitive to sound waves arriving from the left side of the microphone as opposed to those arriving from the right side. The capsule behind the "R" is just the opposite. Unlike other MXL models, this microphone benefits from being a USB (Universal Serial Bus) device—meaning this is a plug and play microphone that will interface with Windows and Macintosh computers without the need for any special drivers. As a USB device, it carries the added benefit of
MXL USB.007 User Manual
not requiring an external microphone preamp, as is the case with most condenser microphones. We've already mentioned the importance of proper handling, but should you find yourself recording an outdoor performance, you would be well advised to use a windscreen as protection for your microphone.
Unpack Your Microphone:
Begin by examining the contents of your MXL USB kit. You should have the following components:
• Protective vinyl travel case
• One MXL USB.007 microphone
• A 10-foot USB 2.0 high speed cable
- A windscreen
• A desktop microphone stand plus the mounting ring
- Owners manual
• Microphone applications guide
Getting Familiar With Your Microphone:
In addition to speaking or singing into the side of the microphone with the RED LED facing you, you should also understand the use of the three-position attenuation switch on the microphone's back side.
What's an attenuation switch?
An attenuation switch reduces the signal strength in an electronic device. As the microphone converts acoustical energy (your voice) into electrical energy (the
signal that feeds your computer), it is possible that a loud, "boomy" voice, or a vocalist who is really "belting out those notes" may exceed normal recording levels. In this case, you will want to reduce the signal strength by using the microphone's attenuation switch.

The attenuation switch on the back side of the USB mic provides three positions: High, Medium, and Low - identi-
fied as: Hi, Med, Lo. Normally, you'll want to keep the microphone's attenuation switch in the Hi position. If, however, you need to "back off" the signal to compensate for a loud voice, simply move the switch to the desired setting. You may also need to move further away from the microphone which will also reduce the level.
PLEASE NOTE: Recording is a creative process, so there are no hard and fast rules. Experimentation is the key to best results.
Using the Supplied Desktop Microphone Stand
- After opening the stand's tripod leg system and placing it on the table or desk, loosen the angle adjuster and orient the large portion of the microphone holder so that it faces upward, or horizontal.
- Place the base of the microphone into the microphone holder with one hand while holding it upright with your other hand.
- While holding the microphone upright and firmly in one hand, secure the
MXL USB.007 Setup
microphone to the desktop stand by screwing the black mounting ring into the microphone's base. The microphone should now sit securely in the desktop stand.
- At this point, attach the end of the USB cable that matches the microphone's connector. The other end of the cable will connect to your computer's USB port.
Connecting the Microphone to Your Computer (Windows)
The MXL USB.007s microphone will operate with both USB 2.0 (high speed USB) and USB 1.1 data buses. We recommend you connect your microphone directly to the computer's USB port as opposed to using a USB hub. USB hubs have been known to interfere with the performance of various USB devices.
PLEASE NOTE: Audio and video recording can be very taxing to a computer's resources. For this reason, you should close any and all running applications that are non essential.
Please take the following steps to get connected:
- If open, close your audio recording application. You will open it after the microphone is connected and operational.
- Connect the remaining end of the USB cable to the computer's USB port. Windows will display the New Hardware Found dialog message and your
system may make a sound if your computer uses Window's system sounds.
- Allow Windows time to identify the device.
- In approximately one minute, Windows should display a dialog message stating that Your New Hardware is Installed and Ready for Use. After this first connection, Windows will require just a few moments to identify the microphone.
Congratulations! You are ready to begin recording.
Initial Setup with Windows XP:
- To select the MXL USB.007 microphone as the default audio input device go to the Start Menu and select Control Panel.

- Select Sounds and Audio Devices.

- Click on the Audio tab and select USB audio CODEC as the default device for sound Recording. Note the Volume button is grayed out. To adjust the gain of the MXL USB.007 microphone use the three position gain switch located on the back of the microphone. Click Apply for these changes to take effect.

IMPORTANT NOTE ABOUT SOUND PLAYBACK:
Some computer systems may change the default sound playback device to be the USB Audio Codec when your MXL Microphone is attached to the computer. By doing this it will seem as though your computer no longer has any audio output. To fix this use the drop down menu under Sound Playback to select your standard soundcard/audio device used for audio playback. Be sure to click the Apply button after making any changes.
Your Windows XP computer is now set up to use the MXL USB.007. Some recording applications will require additional settings to be changed within the program. Please see your recording software manual for proper setup.
Initial Setup with Windows Vista and Windows 7:
- To select the MXL USB.007 as the default audio input device, go to the Start Menu and select Control Panel.

- Double click the Sound icon.

- Select the Recording tab, highlight the microphone icon labeled USB Audio Device and click Set Default.
MXL USB.007 Setup
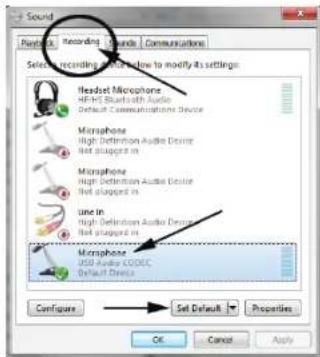
- To make further adjustments to the recording settings, double-click on the microphone icon labeled USB Audio Device. Click on the tab labeled Advanced. From the drop-down menu you can change the sample rate and bit-depth for audio recording. Please note that you should verify that these settings match the settings in your recording application.
IMPORTANT NOTE ABOUT SOUND PLAYBACK:
Some computer systems may change the default sound playback device to be the USB Audio Codec when your MXL Microphone is attached to the computer. By
doing this it will seem as though your computer no longer has any audio output. To fix this select the Playback tab. Highlight your standard soundcard/audio device used for audio playback and click the Set Default button.
Your Windows Vista/Windows 7 computer is now set up to use the MXL USB.007. Some recording applications will require additional settings to be changed within the program. Please see your recording software manual for proper setup.
Connecting the Microphone to Your MAC
As is the case with a Windows PC, the MXL USB.007 microphone will operate with both USB 2.0 (high speed USB) and USB 1.1 data buses. All current Macs operate with USB 2.0. We recommend you connect your microphone directly to the computer's USB port as opposed to using a USB hub. USB hubs have been known to interfere with the performance of various USB devices.
PLEASE NOTE: Audio and video recording can be very taxing to a computer's resources. For this reason, you should close any and all running applications that are non essential.
Please take the following steps to get connected:
- Make certain that any audio applications are closed.
- Connect the remaining end of the USB cable to the computer's USB port.
- To set the USB microphone as the default audio input for audio, click on the
Apple icon in the upper left hand of the screen and select System Preferences as shown the figure below.

- Next, click on the Sound icon in the Hardware group as shown in the figure below.

- After opening the Sound dialog screen, there will be three tabs at the top of the window, select the Input tab by clicking on it.
- Then select the USB Audio Codec as the device for sound input as shown in

- By watching the movements of the Input level meter in this window, you can now see that the MXL USB microphone is working as you speak into it. This setting will be saved as the default input whenever the microphone is plugged in.
Setting the MXL USB mic to record in Garage Band
- Open Garage Band. This application will be found in either the Dock Bar or by opening the Apple Finder, clicking on Applications and/or opening Garage Band.
- Garage Band opens with the default project "My Song". Refer to Garage Band's user manual to change the default project.
- "My Song" opens with one software instrument track. To record through the USB microphone, click on Track on the top of the window bar and select New Track as shown in the figure below.

- Select the tab in the window that opens that says Real Instrument. Then select the source you will be recording through the microphone, such as vocals or guitar, then be sure to check the box that says "Stereo" under format, as shown on the next page.

- Click OK.
- To select an audio input source for Garage Band, click on Garage Band from the top menu bar and select Preferences as shown in the figure below.

MXL USB.007
Warranty
- Then select the Audio/MIDI icon in the top row. From the drop down menu under Audio Input, select the USB Audio Codec as shown in the figure below.

- You will then be asked if you really want to change the driver. Select Yes. The computer will then say it is initializing the audio driver. Wait until this is done, then close the window.
- At this point, you should see the meter move when you speak into the microphone. You can now click on the Record button and record your vocal or dialog using your microphone.
PLEASE NOTE: As long as the microphone is plugged in when Garage Band is started, the audio input source settings in Garage Band will be saved until you change them again, even if you close the program or start a new project.
For More Information:
For additional information about your MXL USB microphone, how to contact technical support, as well as information on other products manufactured by MXL, please visit us online at www.mxlmics.com.
Windows is a registered trademark of Microsoft Corporation in the United States and other countries.
WARRANTY: Marshall Microphones are guaranteed against defects in material and workmanship for one year from date of purchase. Should you encounter any problem with this unit, promptly contact the company you purchased it from for assistance. The original dated sales receipt will be necessary for any warranty claim. Do not send any unit directly to us without prior authorization from our service department! Warranty coverage is limited to repair or replacement (at our option) of the microphone, and does not cover incidental damages due to use of this unit, nor damage caused by accidental misuse of this product.

MXL Microphones
The Professional Audio Division of Marshall Electronics
El Segundo, CA
Phone 310 333-0606 | 800 800-0688
www.mxlmics.com | sales@mxlmics.com
10/2010
- User Manual
- A Little Background Information:
- MXL USB.007 User Manual
- Unpack Your Microphone:
- Getting Familiar With Your Microphone:
- What's an attenuation switch?
- Using the Supplied Desktop Microphone Stand
- MXL USB.007 Setup
- Connecting the Microphone to Your Computer (Windows)
- Please take the following steps to get connected:
- Initial Setup with Windows XP:
- IMPORTANT NOTE ABOUT SOUND PLAYBACK:
- Initial Setup with Windows Vista and Windows 7:
- Connecting the Microphone to Your MAC
- Setting the MXL USB mic to record in Garage Band
- MXL USB.007
- For More Information:
- MXL Microphones
Brand : MXL
Model : USB.007
Category : Microphone