
AVD 8501 - Home Theater SANYO - Free user manual and instructions
Find the device manual for free AVD 8501 SANYO in PDF.


| Product Type | Home Theater System with DVD Player |
| Brand | Sanyo |
| Model | AVD 8501 |
| Dimensions (Main Unit) | 430 x 60 x 350 mm (W x H x D) |
| Weight (Main Unit) | 4.5 kg |
| Power Consumption | 120 W |
| Power Supply | AC 220-240 V, 50/60 Hz |
| Disc Playback | DVD, DVD-R/RW, CD, CD-R/RW, MP3, JPEG |
| Audio Output | 2.1 Channel (Stereo + Subwoofer) |
| Total Output Power | 200 W RMS (Front 50W x 2 + Subwoofer 100W) |
| Connectivity | FM Antenna, Audio Input, Composite Video Output, USB Port |
| FM Tuner | FM Radio with 30 Presets |
| Remote Control | Infrared Remote Included |
| Speaker Configuration | 2 Satellite Speakers + 1 Passive Subwoofer |
| Speaker Impedance | 6 Ohms |
| Frequency Response | 20 Hz - 20 kHz |
| Signal-to-Noise Ratio | 80 dB |
| Supported Video Formats | NTSC, PAL |
| Care & Cleaning | Wipe with a dry soft cloth. Avoid liquids. |
| Safety Precautions | Do not open the unit. Keep away from moisture. |
| Spare Parts & Repairability | Contact Sanyo support for approved parts. |
| General Information | User manual available online at notice-facile.com |
Frequently Asked Questions - AVD 8501 SANYO
User questions about AVD 8501 SANYO
0 question about this device. Answer the ones you know or ask your own.
Ask a new question about this device
Download the instructions for your Home Theater in PDF format for free! Find your manual AVD 8501 - SANYO and take your electronic device back in hand. On this page are published all the documents necessary for the use of your device. AVD 8501 by SANYO.
USER MANUAL AVD 8501 SANYO
natural_image
Line drawing of a home appliance setup including a remote control, speaker, and wall-mounted unit (no text or symbols)





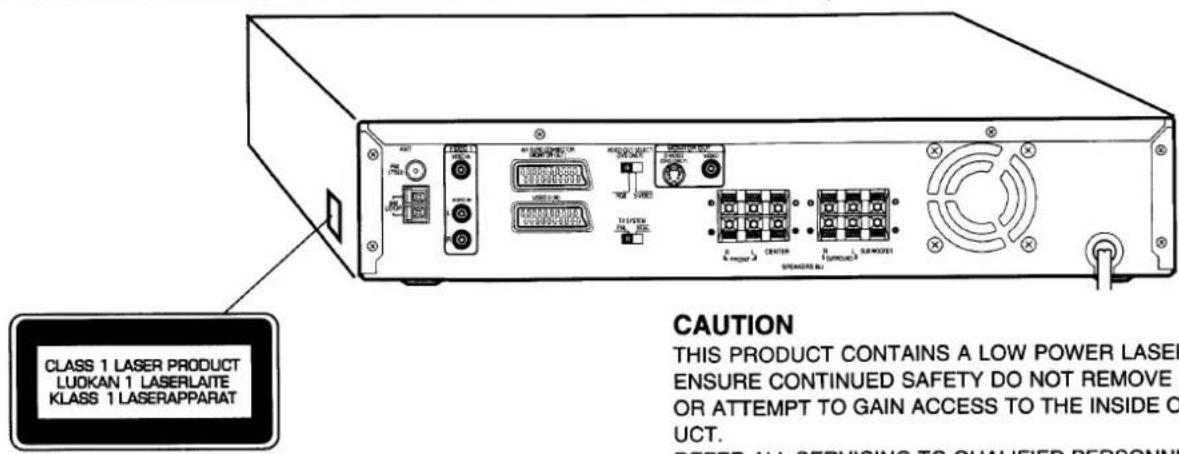
CAUTION
THIS PRODUCT CONTAINS A LOW POWER LASER DEVICE, TO ENSURE CONTINUED SAFETY DO NOT REMOVE ANY COVERS OR ATTEMPT TO GAIN ACCESS TO THE INSIDE OF THE PRODUCT.
REFER ALL SERVICING TO QUALIFIED PERSONNEL.
- The apparatus shall not be exposed to dripping or splashing.
- Do not use where there are extremes of temperature (below 5°C or exceeding 35°C) or where direct sunlight may strike it.
- Because of the DVD player's extremely low noise and wide dynamic range, there might be a tendency to set the volume on the amplifier unnecessarily high. Doing so may produce an excessively large output from the amplifier which could damage your speakers.
- Sudden changes in the ambient temperature may cause condensation to form on the optical lens inside the unit. If this happens, take out the disc, leave the unit for about 1 hour, and then proceed to operate.
- When carrying the unit, be sure to remove a disc which may be inside and turn the power off. Wait at least 10 seconds, then unplug the mains lead from the AC outlet. Carrying the unit with a disc inside may damage the disc and/or the unit.
- Do not install this equipment in a confined space, such as a book case or built in cabinet.
- Placing the unit in a well ventilated area is strongly recommended. Do not place any object on the top of the unit.
Do not block ventilation holes.
The cabinet of the unit warms up when it is used for a long time, but it is not a malfunction.
Important Information:
To connect this unit to a TV, TV must have a Video input socket or a Euro-AV socket. You cannot use an RF input socket or aerial terminal to connect this unit.
This product incorporates copyright protection technology that is protected by method claims of certain U.S. patents and other intellectual property rights owned by Macrovision Corporation and other rights owners. Use of this copyright protection technology must be authorized by Macrovision Corporation, and is intended for home and other limited viewing uses only unless otherwise authorized by Macrovision Corporation. Reverse engineering or disassembly is prohibited.
IMPORTANT
If the plug supplied with this equipment is not suitable for the socket outlets in your home it should be cut off and replaced with the correct type.
Disposal of Plug
If the non rewireable plug is to be cut off, the removed plug should be disposed of carefully as there is a shock hazard should the plug be inserted into a live socket.
Replacing Fuse
The detachable fuse cover must be replaced after changing the fuse. Only a 3A fuse should be used and should comply with BS1362 and should carry the ASTA mark ☑.
The wires in the mains lead are coloured in accordance with the following code:
Blue
Neutral
Brown
Live
The wires in the mains lead must be connected to the terminals in the plug as follows;
Wire colour
Plug terminal marking
Blue
N or Black or Blue
Brown
L or Red or Brown
Do not connect either wire to the earth terminal.
If the mains plug contains a fuse this should be 3A, if a plug without a fuse is used the distribution board fuse should not be greater than 5A.
The unit is not disconnected from the mains unless it is unplugged from the AC outlet.
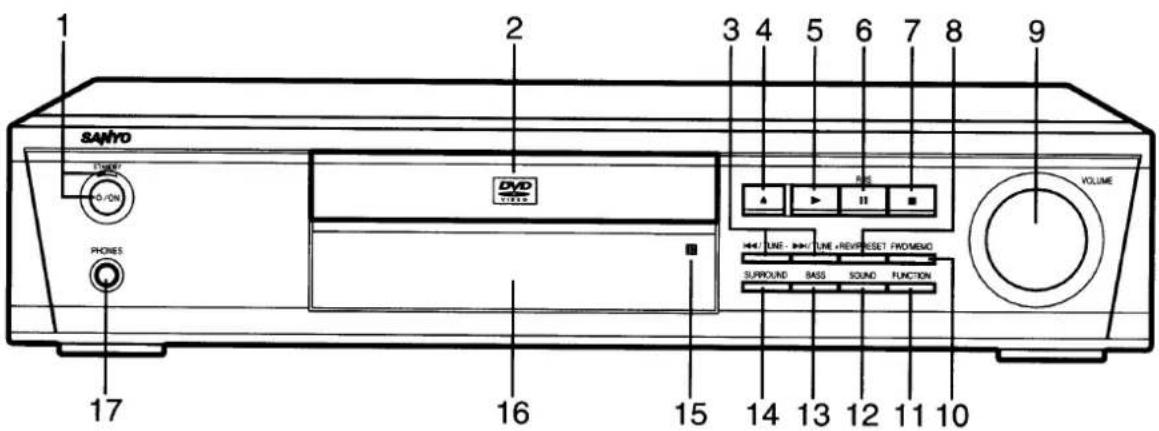
- Power button/Standby indicator (ON, STANDBY)
- Disc tray
- Skip/Next/Previous/Tuning buttons (◀◀TUNE-, ▶▶▶/TUNE+)
- Open/Close button (▲)
- Play button (▶)
- Radio data system mode/Pause/Step button (RDS/II)
- Stop button (■)
- Reverse/Preset button (REV/PRESET)
-
Volume control (VOLUME)
-
Forward/Memory button (FWD/MEMO)
- Function button (FUNCTION)
- Sound preset button (SOUND)
- Bass button (BASS)
- Surround button (SURROUND)
- Remote sensor (IR)
- Display
- Headphones socket (PHONES)
Note:
In this instruction manual, any operation of pressing any button while pressing the SHIFT button is as shown below.
Example: "Press the SHIFT + 1 ANGLE buttons."
Controls
- Power button (ON)
- TV control buttons
Power button (TV POWER) TV/Video select button (TV/VIDEO)
Channel scanning buttons (TV CH) Volume buttons (TV VOL)
Note:
- Only SANYO TVs can be operated using this remote control.
- There may be some older TV models that cannot be operated with this remote control. If this is the case, use the original remote control supplied with the TV.
- Number and other function buttons
Number buttons (1 - 9, 0, +10)
Angle button (ANGLE)
Angle replay button (A.REPLAY)
Zoom button (ZOOM)
Audio button (AUDIO)
Sleep button (SLEEP)
Timer button (TIMER)
Adjust button (ADJUST)
Set/Clear button (SET/CLEAR)
Clock button (CLOCK)
- Amplifier controls
Function button (FUNCTION)
Test tone button (TEST TONE)
Surround button (SURROUND)
Bass button (BASS)
Sound preset button (SOUND)
Muting button (MUTE)
Volume buttons (- VOLUME +)
- Tuner controls
Tuner function/Band select button (TU/BAND)
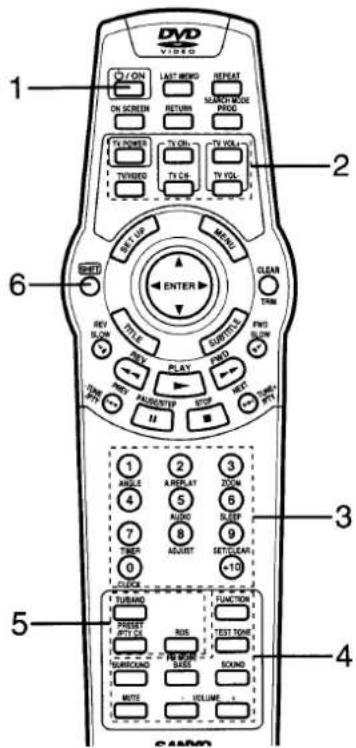
Preset tuning/Programme type check button (PRESET/PTY CK)
Radio data system mode/FM mode button (RDS/FM MODE)
- Shift button (SHIFT)
- Last memory button (LAST MEMO)
- Repeat/Search mode button (REPEAT/SEARCH MODE)
- Programme button (PROG)
- Return button (RETURN)
- Menu button (MENU)
- Clear/Trim button (CLEAR/TRIM)
- Subtitle button (SUBTITLE)
- Forward slow button (FWD SLOW)
- Forward button (FWD)
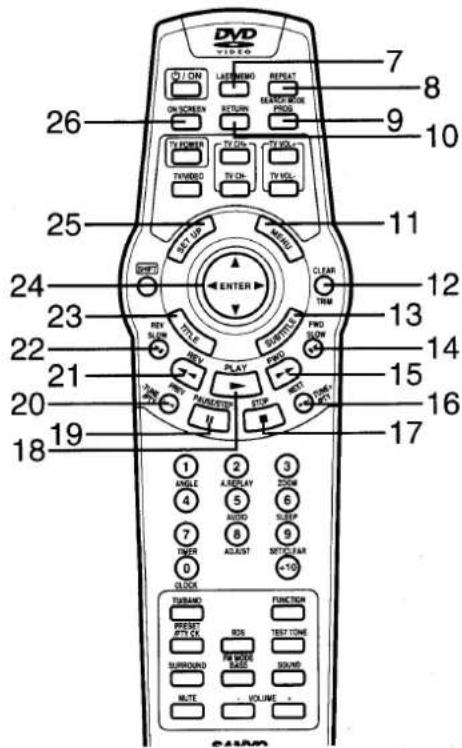
- Time setting/Skip/Next/Tuning/Programme type select button (NEXT/TUNE/PTY+)
- Stop button (STOP)
- Play button (PLAY)
- Pause/Step button (PAUSE/STEP)
- Time setting/Skip/Previous/Tuning/Programme type select button (PREV/-TUNE/PTY)
- Reverse button (REV)
- Reverse slow button (REV SLOW)
- Title button (TITLE)
- Joy-stick (ENTER, ▲, ▶, ▼, ◀)
- Setup button (SET UP)
- On screen button (ON SCREEN)
Inserting batteries
Install two "R6 (HP 7)" batteries.
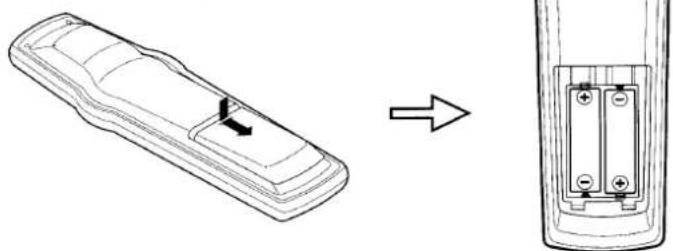
natural_image
Diagram showing a remote control panel transforming into a battery holder (no text or symbols present)Note:
Remove the batteries if the remote control is not to be used for a month or more. Batteries left in the unit may leak and cause damage.
Notes on using the joy-stick
The joy-stick has five functions depending on the direction it is moved.
Press straight down: ENTER
Tilt towards the front: ▲
Tilt towards the right: ▶
Tilt towards the back: ▼
Tilt towards the left:
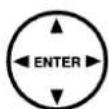
Note: Control the stick using your thumb.
Remote control range
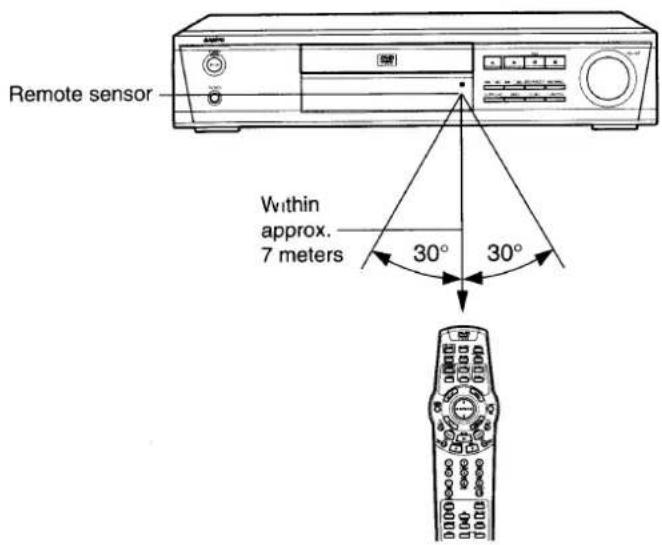
Selecting TV system
Before connecting, be sure the TV SYSTEM switch (rear of the unit) setting corresponds with your local TV system (PAL or NTSC).
After all connections have been made, connect the mains lead to an AC outlet.
Note:
- Do not connect the mains lead to an AC outlet until all connections have been made.
- The system is not completely disconnected from the mains when the ⏻/ON button is set to the ⏻ position.
Speaker connections
To achieve proper stereo reproduction, connect the speaker wires without shorting to adjacent wires as shown in figure.
| Speaker wire colour | Use |
| Black and Red | Front right speaker |
| Black and Blue | Front left speaker |
| Black and Green | Centre speaker |
| Black and Orange | Surround right speaker |
| Black and Gray | Surround left speaker |
| Black and Brown | Subwoofer |
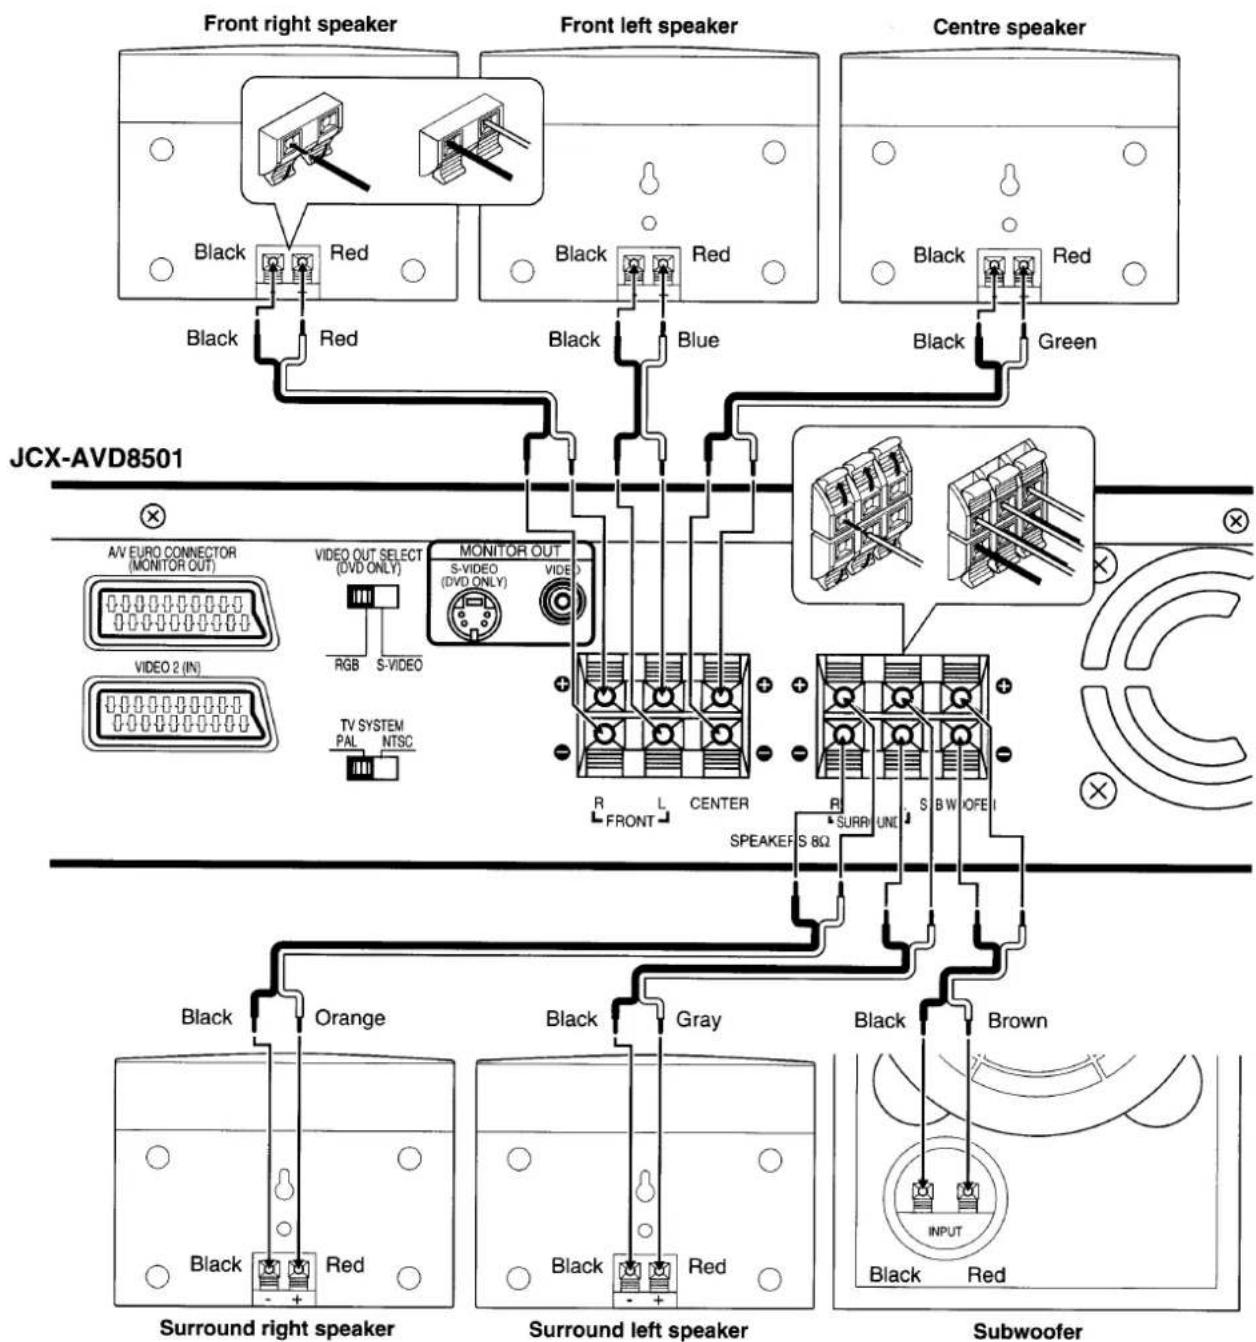
Speaker placement
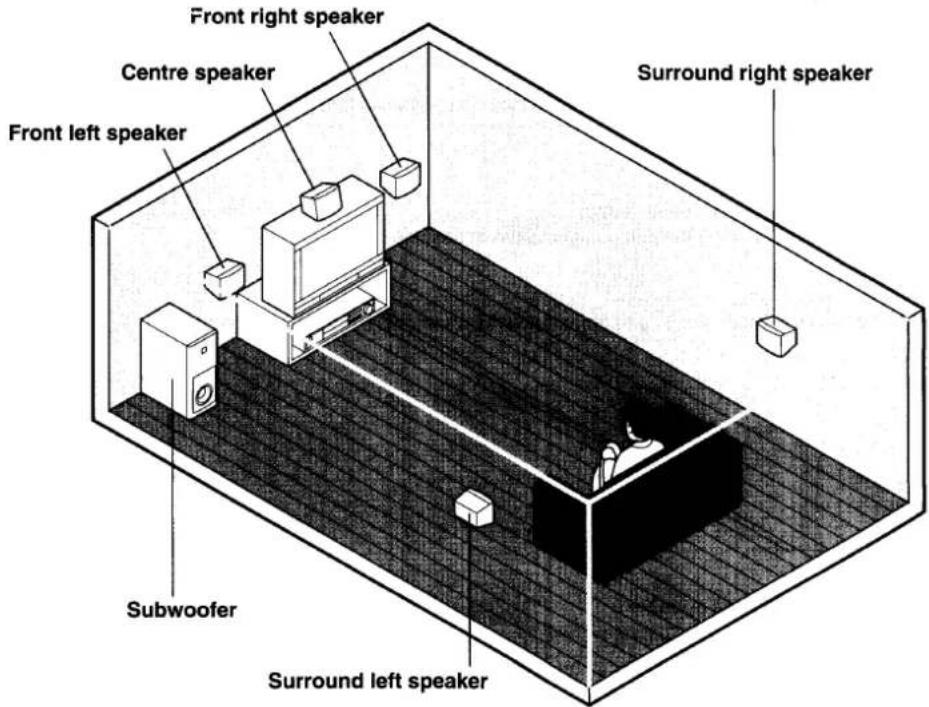
The supplied speaker has built-in magnetic stray field compensation. It may be placed close to a TV without affecting the colour purity.
Five speakers are all the same and can be used for Front left, Centre, Front right, Surround left and Surround right speakers.
Note:
If you use the other speaker system, please refer to "Speaker" under "INITIAL SETTINGS". (See Page 16.)
Example: To hang the speaker on a wall
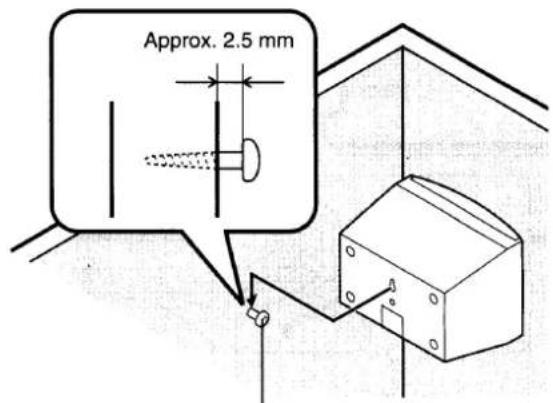
Round head screw (not supplied)
Example: To mount the speaker with a stand
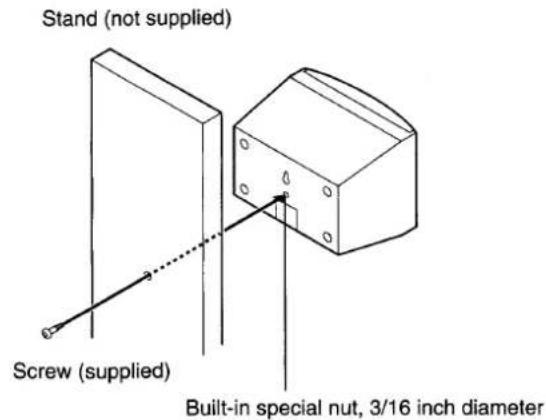
Note: Be careful of falling the speaker system, it might cause the damage or serious injuries.
Aerial connections
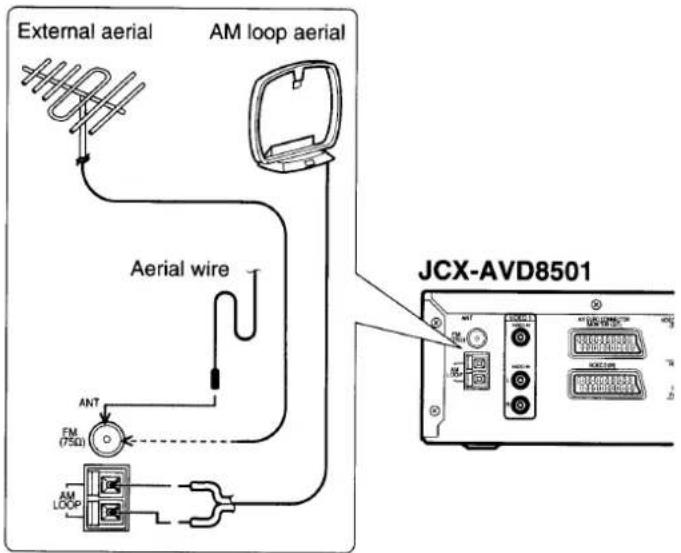
In areas close to a transmitter the simple indoor aerial is sufficient to receive broadcasts. Extend the aerial wire as straight as possible and, while listening to the sound from the system, secure it in a position which yields minimal distortion and noise.
In fringe areas or where reception is distorted or noisy, an external aerial (not supplied) should be connected instead of the simple indoor aerial. Consult your dealer.
AM loop aerial
Assemble the loop aerial.
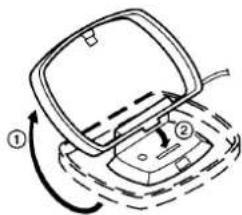
Unwind the aerial wires, then connect them to the AM LOOP terminals. Place the loop aerial in a position which yields the best AM reception, or attach it to a wall or other surface.
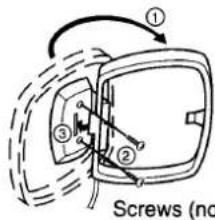
Screws (not supplied)
Note:
To minimize noise, the speaker, mains and any other leads should not come close to the indoor or external aerial lead and AM loop aerial. Do not place the aerial leads close to the system.
Connecting to a TV with the video lead
Connect the video lead between the MONITOR OUT VIDEO socket of the unit and the video input socket of the TV.
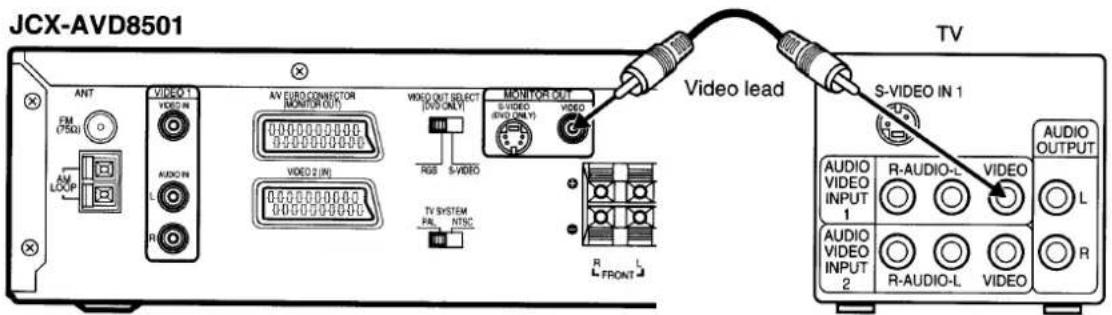
Notes on connections
- Please refer to the instruction manuals for the components that you are connecting (TV, VCR, etc.).
- When you connect the unit to your TV and other equipment, be sure to turn off the power and disconnect all of the equipments from the AC outlet until all the connections have been made.
- Do not connect the MONITOR OUT (S-VIDEO/VIDEO) and A/V EURO CONNECTOR (MONITOR OUT) sockets of the unit to a VCR directly. The playback picture will be distorted because DVD discs are copy protected.
- Please consult your local audio/video dealer for more details.
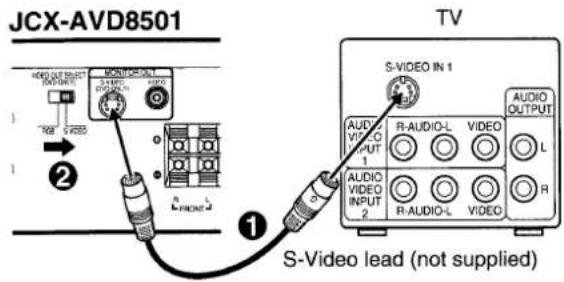
Connecting to a TV with an S-video lead
Please follow the steps before turn on the power.
- If your TV has an S-video input socket, connect the unit as shown in figure. (The MONITOR OUT VIDEO socket connection is not necessary.) You can enjoy clearer picture playback.
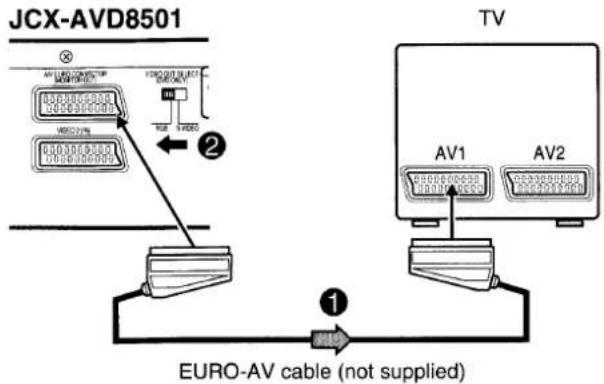
- Set the VIDEO OUT SELECT switch to S-VIDEO.
Connecting to a TV with a EURO-AV cable
Please follow the steps before turn on the power.
- If your TV has a EURO-AV socket, connect the unit as shown in figure. (Do not connect the video lead to the MONITOR OUT VIDEO socket.) You can enjoy high quality picture playback.
- Set the VIDEO OUT SELECT switch to RGB.
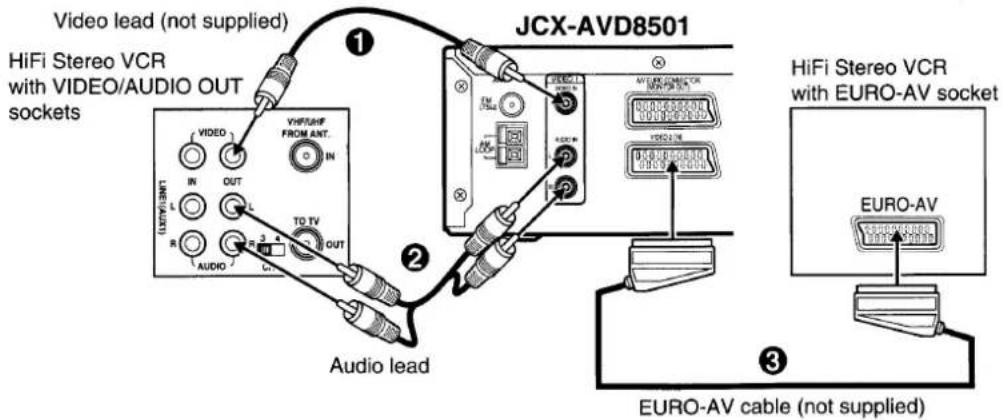
VCR Connections
With this connection, it is possible watch and listen to videocassettes or other video equipment. Connect the VCR with VIDEO/AUDIO OUT sockets as shown in figure (1) - (2). If using the VCR with EURO-AV socket or other video equipment, connect it as shown in figure (3).
Note:
- The picture from VCR may be distorted in some cases.
- When watching VCR, you must connect the video lead between the MONITOR OUT VIDEO socket of the unit and the video input socket of the TV (or connect the EURO-AV cable between the A/V EURO CONNECTOR (MONITOR OUT) socket of the unit and the Euro-AV socket of the TV). There are no VCR video signals from the MONITOR OUT S-VIDEO socket of the unit and no VCR RGB video signals from the A/V EURO CONNECTOR (MONITOR OUT) socket.
Headphones
Connect stereo headphones (not supplied) to the PHONES socket for monitoring or for private listening. The speakers are automatically disconnected when headphones are connected.
Manufactured under license from Dolby Laboratories.
"Dolby", "Pro Logic" and the double-D symbol are trademarks of Dolby Laboratories.
DVD disc with DTS may not work correctly. You can see the picture on the TV screen, but there is no sound.
"DTS" and "DTS Digital Out" are trademarks of Digital Theater Systems, Inc.
Turning the power on and off
Press the ON button. The STANDBY indicator goes out. (After connecting the mains lead, when you press the ON button for the first time, the volume-reset feature automatically sets the initial volume level.)
To turn the power off, press the ⏻/ON button again. The STANDBY indicator lights.
- When the mains lead is connected to the AC outlet, the unit will respond to commands from the remote control.
Direct start function
If the following buttons are pressed when the unit is in standby, the unit turns on automatically and the selected function is activated.
Main unit

Remote control
PLAY, TU/BAND
Selecting the function
Press the FUNCTION button to select the desired function. Each time the button is pressed, the display changes as follows:
DVD → VIDEO 1 → VIDEO 2 → FM → AM → ...
- When the function selection is changed, disc play is automatically stopped.
Adjusting the volume
Turn the VOLUME control (or press the + or - VOLUME button on the remote control). The volume level appears on the display (VOL 0 \~ VOL 80).
To reduce the volume temporarily (Remote control only)
Press the MUTE button. The volume control illumination blinks. To restore the previous volume setting, press the MUTE button again.
Bass boost system
Press the BASS button to select the desired bass boost effect.
BASS OFF → BASS ON1 → BASS ON2 → BASS OFF ...
Selecting the sound mode
Press the SOUND button to select the sound mode matching the source to be listened to.
POP: Pops, etc.
CLASSIC: Classical music, etc.
ROCK: Rock music, etc.
JAZZ: Jazz, etc.
WHAT TO DO IF...
If the operation of the unit or display is not normal,
-
Disconnect the mains lead.
-
While pressing both BASS and SOUND buttons on the main unit at the same time, connect the mains lead. "RESET" briefly appears on the display.
-
Resume operation.
ADJUSTING THE CLOCK (Using the remote control)
Example: To set "6:30"
- Press the Ⓗ/ON button to turn the power on.
- Press the SHIFT + 0 CLOCK buttons. "0:00" blinks.
- Press the SHIFT + 8 ADJUST buttons.

The hours display blinks.
- Press the ▶▶ or ◀◀ button to set the "hours".

- Press the SHIFT + 8 ADJUST buttons.

The minutes display blinks.
- Press the ▶▶| or ◀◀ button to set the "minutes".

- Press the SHIFT + 8 ADJUST buttons. The clock starts.

- The time can be set accurately by pressing the SHIFT + 8 ADJUST buttons when a time signal is heard.
To display the clock during operation
Press the SHIFT + 0 CLOCK buttons. Press both buttons again to return to the original display.
Note:
When the display blinks because of a power failure, reset the time.
Press the SURROUND button to select the surround mode. Each time the button is pressed, the surround mode changes as follows:
PROLOGIC → 3-CH → THEATER → HALL → SURR OFF → PROLOGIC ...
Note:
Some discs may restrict the selection.
PROLOGIC: Dolby Pro Logic mode
When playing a programme source encoded with Dolby Surround sound (video tape, laser disc, DVD, etc.) (Fig. A)
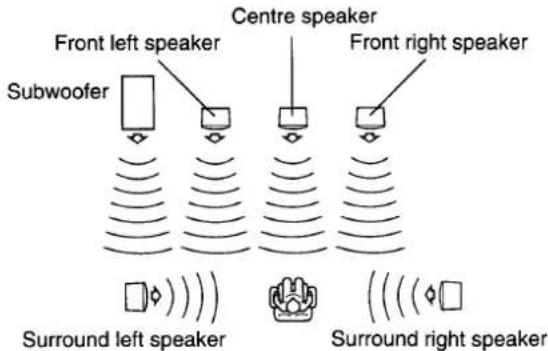
Fig. A
3-CH: 3 channel mode
Using only the Front left, Centre, Front right and Subwoofer speakers (Fig. B)
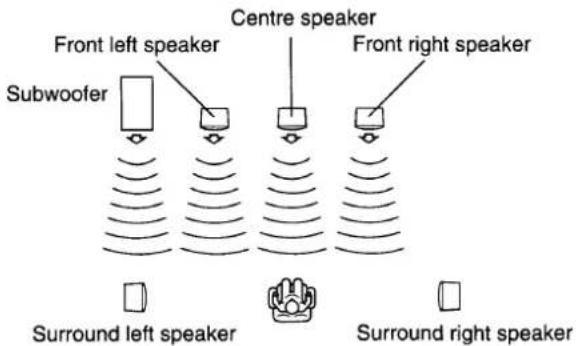
Fig.B
THEATER: "Theater" effect
HALL: "Hall" effect
When playing a programme source which is not encoded with Dolby Surround sound (Fig. A)
SURR OFF: Normal stereo sound
Using only the Front left, Front right and Subwoofer speakers (Fig. C)
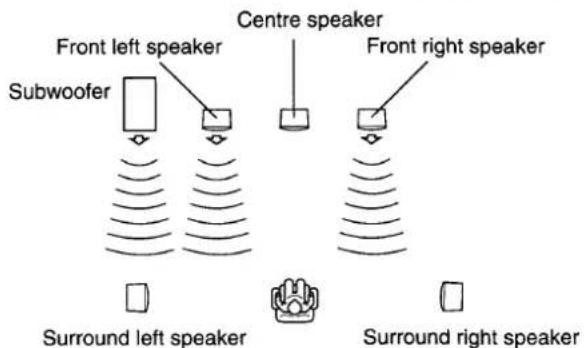
Fig.C
DOLBY D: Dolby Digital 5.1 Channel mode
When playing a DVD disc encoded with Dolby Digital 5.1 Channel (Fig. A)
Note:
Centre or Surround speakers do not sound with some discs.
Selecting Dolby Pro Logic Surround mode
When playing a programme source encoded with Dolby Surround sound (video tape, laser disc, DVD etc.), follow the steps below.
Please use the remote control at the listening point.
- Press the + or - VOLUME button to adjust the sound level from the speakers.
- Press the SURROUND button repeatedly until "PROLOGIC" appears.
- Press the TEST TONE button. "TTONE" appears and "FL" blinks. The test tone will be heard from each speaker sequentially as follows:
TTONE
FL (Front left speaker)
C (Centre speaker)
FR (Front right speaker)
RS (Surround right speaker)
LS (Surround left speaker)
- Press the + or - VOLUME button until the test tone is at a comfortable level.
If the test tone level is not the same from each speaker, you may need fine adjustment of the volume level. Please follow the steps as below. Note:
If leave it, the original display returns after approximately 15 seconds.
1) Press the TEST TONE button to turn the test tone off.
2) Press the SURROUND button to select the desired surround mode.
3) Press the SHIFT + TRIM buttons. "FNTL 0" appears.
4) Press the ENTER button repeatedly to select the speaker.
FL display (Speaker)
FNTL (Front left speaker)
CENT (Centre speaker)
FNTR (Front right speaker)
SURR (Surround right speaker)
SURL (Surround left speaker)
SUBW (Subwoofer)
5) Press the ▶ or ◀ button to adjust the volume level. (FNTL/FNTR: "0" - "-10", CENT/SURR/SURL/SUBW: "+10" - "-10".)
6) Press the ENTER button.
7) Repeat step 4) to 6) for another speaker, if necessary.
8) Press the SHIFT + TRIM buttons again to turn it off.
-
Press the TEST TONE button to turn the test tone off. "TTONE" disappears.
-
Press the + or - VOLUME button to adjust the volume.
Notes:
- There is no Dolby Surround effect when monaural programme material is used.
- When receiving weak FM broadcasts, switch the Dolby Pro Logic off. The sound quality may improve.
- When headphones are connected while any of the surround modes are selected, the surround mode is switched off automatically. The SURROUND button does not function while headphones are connected.
- For other surround mode, please refer to "Selecting Dolby Pro Logic Surround mode" as above.
- Trimming can be set at each function respectively.
The following types of discs can be played on this unit.
| Disc type and logo mark | Recorded content | Disc size | Maximum playing time | ||
| DVD Video |  | Audio + Video | 12 cm | Approx. 4 hours (Single sided disc) Approx. 8 hours (Double sided disc) | |
| 8 cm | Approx. 80 minutes (Single sided disc) Approx. 160 minutes (Double sided disc) | ||||
| Video CD |  |  (Version 2.0) (Version 2.0) | Audio + Video | 12 cm | 74 minutes |
| 8 cm | 20 minutes | ||||
| Music CD |  | Audio | 12 cm | 74 minutes | |
| 8 cm | 20 minutes | ||||
Region number
Region number (Regional restriction code) is built-in to the unit and DVD discs.
There is a region number on the rear of the unit.
The same region number or region number "ALL" of DVD discs can be used on this unit.
DVD disc
There are the marks on some DVD disc package.
Examples:

Multiple Languages

Multi-language subtitles

Multi-Angle

Multi-Aspect

Region number
DVD discs are divided into titles, and the titles are sub-divided into chapters.
| Chapter 1 | Chapter 2 | Chapter 1 | Chapter 2 | Chapter 3 |
Video CD/Music CD disc
Video CD and Music CD discs are divided into tracks.
| Track 1 | Track 2 | Track 3 | Track 4 | Track 5 |
Note:
- Only the above types of discs can be played on this unit. DVD-ROM, CD-ROM, SVCD, CVD, etc. cannot be played.
- This unit can play back the CD-R/RW that have recorded music data or MP3 files as well. However, some CD-R/RWs can not be played back depending on the recording conditions.
- The CD-R/RW that has no music data or non-MP3 files can not be played back.
- This unit is to be used exclusively with the PAL or NTSC colour system. SECAM system discs cannot be used with this unit.
Notes on handling discs
- Do not expose the disc to direct sunlight, high humidity or high temperatures for extended periods of time.
- Discs should be returned to their cases after use.
- Do not apply paper or write anything on the disc surface.
- Handle the disc by its edge. Do not touch the playing surface (glossy side).
- Fingerprints and dust should be carefully wiped off the playing surface of the disc with a soft cloth.
Wipe in a straight motion from the centre to the outside of the disc. - Never use chemicals such as record cleaning sprays, antistatic sprays or fluids, benzene or thinner to clean discs.
Important note:
- This "DISC PLAY" explains the basic instruction of the DVD player section using the remote control unit.
- Some DVD or Video CD discs have different functions that may not be explained in this instruction manual. You may be needed extra instructions. In this case, please follow the instructions displayed on the TV screen or jacket or case of the disc.
- “☒” may appear on the TV screen during operation. This icon means that the function is not available on the disc now.
Preparations
- Turn on the TV and select the channel for the DVD player.
To use the remote control for TV
The remote control must be pointed toward your TV.
-
Press the TV POWER button to turn on the power.
-
Press the TV/VIDEO button to select the video input source.
Select the playback picture size according to the aspect ratio of the TV. (See "Display" under "INITIAL SETTINGS" on Page 16.)
- Select the desired language for the screen menus. (See "OSD" - "Language" under "INITIAL SETTINGS" on Page 16.)
Note:
- Do not touch the disc tray while it is moving.
- Never place anything except a disc on the disc tray. Foreign objects can damage the unit.
- Do not apply excessive force to the disc tray.
- Discs must be placed on the disc tray one at a time.
- To open or close the disc tray, be sure to use the ▲ button (Main unit). Do not press the disc tray with your hand.
When operation buttons are pressed, that operation is displayed on the TV screen. The display turns off after several seconds.
If a disc is loaded, you can turn the unit on and begin play immediately by pressing the PLAY button.
- Press the ▲ button. "OPEN" appears on the display and the disc tray opens. "SANYO" logo appears on the TV screen.
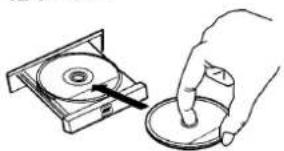
- Place the disc with the label facing up on the disc tray.
12 cm disc
natural_image
Illustration of a hand inserting a coin into a CD or DVD disc (no text or symbols)8 cm disc
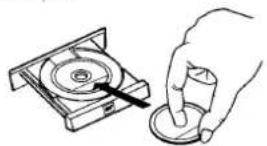
- Press the ▲ button again to close the disc tray.
- Some discs may start play automatically.
Starting play
Press the PLAY button. The DVD function is selected and play starts automatically.
- When using the main unit, use the ▶ button.
Example:

Note:
If "NO DISC" appears on the display, load the disc.
- If the disc is loaded with the label side downward (and it is a single sided disc), or if a badly scratched disc is loaded, "NO DISC" (or "NO PLAY") appears. If this occurs, load the disc correctly or replace the disc.
If a menu appears on the TV screen...
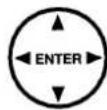
Press the ▲, ▶, ▼ or ◀ button (or the number buttons), then press the ENTER button to select the desired menu. Playback of the selected menu will start.
Note:
For more details, please refer to the jacket or case of the disc.
Stopping play
- Press the STOP button once.
When you press the PLAY button, play starts automatically from the point where you stopped.
When using the main unit, use the ■ button.
Note:
Some discs may not resume play. - Press the STOP button twice. The player stops completely.
When you press the PLAY button, play starts from the beginning of the disc.
Continuing play from where you stopped watching (LAST MEMORY PLAY) [DVD]
- During play, press the LAST MEMO button at the point from which you want to resume play later. "L.M.-STOP" appears on the display. Play stops automatically.
- Remove the disc or turn off the power.
- Load the disc (and press the PLAY button), or turn on the power. "Last Memory Play?" screen appears.
Last Memory Play?
Yes
No
Clear ... The memory is released.
-
Press the ▲ or ▼ button to select "Yes".
-
Press the ENTER button. Play resumes from the point where you stopped. (If desired, press the LAST MEMO button again.)
Note:
- Point on up to 5 discs can be memorized.
- The Last Memory Play mode may not work correctly with some discs.
What is "PBC"?
"PBC" is an abbreviation for "Playback Control" that refers to control codes prerecorded on Video CDs.
During playback of Video CD with PBC, "PBC" appears on the display.
To lock the disc tray (Using the main unit)
You can lock the disc tray to prevent misuse of young children.
While the disc tray is opened, press the ▲ button until "LOCKED" appears on the screen.
- The ▲ button will not function.
To release this mode, press the ▲ button until "UNLOCKED" appears.
“☒” may appear on the TV screen during operation. This icon means that the function is not available on the disc now.
Selecting a DVD menu [DVD]
- Press the MENU button. The main menu screen appears.
Note:
Press the MENU button again to resume play.
- Press the ▲, ▶, ▼ or ◀ button (or the number buttons) to select the desired menu then press the ENTER button. The selected menu play starts.
Selecting a title menu [DVD]
- Press the TITLE button. The title menu appears.
Note:
Press the TITLE button again to resume play from the scene when the TITLE button was first pressed.
- Press the ▲, ▶, ▼ or ◀ button (or the number buttons) to select the desired title then press the ENTER button. The selected title play starts.
Note:
Selecting a DVD or title menu operation may differ depending on the disc used and may not be possible on some discs.
Return button (RETURN) for Video CD
Normally, it returns to the previous menu when the RETURN button is pressed during play.
Note:
The operation differs according to the content of the Video CD.
Chapter (Track) skip

flowchart
graph LR
    A["Vehicle with roof"] --> B["Train"]
    B --> C["Mountain"]
Skipping forward
Press the NEXT button during play to skip to the next chapter (or track).
A chapter (or track) is skipped each time the button is pressed.
- When using the main unit, use the ▶▶/TUNE+ button.
Skipping back
Press the PREV button during play to skip back to the beginning of the chapter (or track) currently play. Press the button again immediately to skip back to the beginning of the previous chapter (or track).
When using the main unit, use the ◀◀TUNE- button.
Note:
You can skip only through the chapters, not over the title on the DVD disc.
Title search [DVD]
-
Press the SHIFT + SEARCH MODE buttons once during play or in the stop mode. "TITLE SEARCH..." screen appears.
-
Press the number button(s) to enter the title number. Play starts from the selected title.
Example:
To select No. 3, press 3.
To select No. 10, press +10, then 0.
To select No. 24, press +10, +10, then 4.
Chapter search [DVD]
-
Press the SHIFT + SEARCH MODE buttons twice during play. "CHAPTER SEARCH..." screen appears.
-
Press the number button(s) to enter the chapter number. Play starts from the selected chapter.
Track search [Video CD] [CD]
Press the number button(s) during play or in the stop mode. Play starts from the selected track.
Time search
[DVD]
-
Press the SHIFT + SEARCH MODE buttons three times during play. "TIME SEARCH..." screen appears.
-
Press the number button(s) to enter the time.
Example:
20 minutes 5 seconds
Press 2, 0, 0 then 5.
1 hour 4 minutes 35 seconds
Press 1, 0, 4, 3 then 5.
Note:
- Do not use the +10 button.
- If you made a mistake, press the CLEAR button.
- Press the PLAY button. Play starts from the searched time.
[Video CD] [CD]
- Press the SHIFT + SEARCH MODE buttons once during play. "TIME SEARCH..." screen appears.
- Press the number button(s) to enter the time.
- Press the PLAY button. Play starts from the searched time in the track.
Note:
By repeating steps 1 - 3 in the stop mode, play starts at the searched time in the disc.
Fast play
Press the FWD or REV button repeatedly to select the fast speed forward or reverse play.
[DVD] [Video CD]
"FF1▶▶", "FF2▶▶", "FF3▶▶" or "FR1◀◀", "FR2◀◀", "FR3◀◀"
[CD]
"FF1▶▶", "FF2▶▶" or "FR1◀◀", "FR2◀◀"
Press the PLAY button to return to normal play.
Slow-motion play
[DVD] [Video CD]: Forward slow play, [DVD]: Reverse slow play Press the FWD SLOW or REV SLOW button repeatedly to select the forward or reverse slow speed play.
"SF1 ▶", "SF2 ▶", "SF3 ▶" or "SR1 ◀", "SR2 ◀", "SR3 ◀"
Press the PLAY button to return to normal play.
Note:
The sound is muted during fast play or slow-motion play in DVD and Video CD.
Still picture (Pause)
[DVD] [Video CD]: Still picture mode, [CD]: Pause mode
Press the PAUSE/STEP button during play.
- When using the main unit, use the II button.
Press the PLAY button to resume normal play.
Note: The sound is muted.
Frame by frame advance play [DVD] [Video CD]
Press the PAUSE/STEP button during still picture. Each time the button is pressed, the picture advances one frame.
Press the PLAY button to resume normal play.
Note:
- The sound is muted.
- Frame play is operated forward only.
Picture zoom [DVD] [Video CD]
- Press the SHIFT + 3 ZOOM buttons during play. The central part of the picture is magnified.
![SANYO AVD 8501 - Picture zoom [DVD] [Video CD] - 1](/content/2026/05/1046262/images/e7a5f43bf47e05d934db0f414325752da9997771378daa1143c4b7383e8a1faa.jpg)
natural_image
Diagram showing a car on a curved ramp and a motor on a lift, both without any text or symbols.- Each time you press the SHIFT + 3 ZOOM buttons or press the RETURN button, the picture zooms in or out ("Zoom +15" - "Zoom -15").
-
Each time you press the ▲, ▶, ▼ or ◀ button, the picture moves from side to side, up and down.
-
To return to normal play, press the CLEAR button.
Note:
Some discs may not work Picture zoom.
Viewing from a desired camera angle (Multi-Angle) [DVD]
![SANYO AVD 8501 - Viewing from a desired camera angle (Multi-Angle) [DVD] - 1](/content/2026/05/1046262/images/12bf7326f3a22b04770145ab399043d73169c19dcb0fd7ef9b5c6f0554a2cdc5.jpg)
flowchart
graph LR
    A["Front View"] --> B["Top View"]
    B --> C["Bottom View"]
Some DVD discs may contain scenes which have been shot simultaneously from a number of different camera angles. The jacket or case of discs that are recorded with angles will be marked.
Example:
![SANYO AVD 8501 - Viewing from a desired camera angle (Multi-Angle) [DVD] - 2](/content/2026/05/1046262/images/016506865354b535b34bb52c319ea7d2e82f46d5e299b94acd6d06b04e0a9e63.jpg)
Note: The recorded angles differ depending on the disc used.
- Play the disc that is recorded with angles.
- Press the SHIFT + 1 ANGLE buttons repeatedly until the desired angle appears.
Example:
![SANYO AVD 8501 - Viewing from a desired camera angle (Multi-Angle) [DVD] - 3](/content/2026/05/1046262/images/64e271a3afddb5ea68958cbf141c7581c366871de48e47260ce49a71b1ec0dc2.jpg)
Angle replay [DVD]
During Multi-angle play screen, press the SHIFT + 2 A.REPLAY buttons. The player skips back to last approximately 10 seconds, changes it to the next camera angle and plays it, and continues play. (If desired, press both buttons again.)
Repeat play
Press the REPEAT button during play (or programmed play) of the title (or track) you want to repeat. Each time the button is pressed, the repeat mode changes as follows.
[DVD]
Title (1 REP.): Repeat of title being played
Off: Normal play mode
[Video CD] [CD]
1 (1 REP.): Repeat of track being played
All (ALL REP.): Repeat all tracks
Off: Normal play mode
Note:
Repeat play mode may not work correctly with some discs.
Programmed play [Video CD] [CD]
Up to 32 selections can be programmed.
Programming procedure
- Press the PROG button in the stop mode. "PROGRAM" screen appears. "PROG." blinks and "Pr 1" appears on the display.
- Press the number button(s) to select the track number. Example:
To select track No. 3, press 3.
To select track No.10, press 1, then 0.
To select track No.24, press 2, then 4.
Note:
- If you made a mistake, press the CLEAR button.
- Do not use the +10 button.
-
Press the PROG button to quit this menu.
-
Press the ENTER button. The highlighted box automatically moves to the next programme number.
Example:
PROGRAM
| # | Track | Track Time |
| 1 | 0 2 | 00 : 04 : 57 |
| -- | ||
| -- | ||
| -- | ||
| -- | ||
| -- | ||
| [---] | ||
| [00 : 04 : 57] | ||
| Total programmed time |
- Repeat step 2 - 3 above to select another track.
- Press the PLAY button to start play. "PROG." remains lit.
When all programmed selections have played, the player stops automatically.
- The programme contents are retained in memory.
To clear the programme one by one
In the programming mode, press the ▲ or ▼ button to select the programme number. Then press the CLEAR button.
To clear all the programmes
In the programming mode, press the STOP button.
To change the programme
- In the programming mode, press the ▲ or ▼ button to select the programme number.
- Press the number button(s) to select the track umber to be replaced, then press the ENTER button.
To use the programme again with the same contents
Press the PROG button. The previous programme contents appears on the screen, then press the PLAY button.
Selecting subtitle language [DVD]
This operation works only with discs on which multiple subtitle languages are recorded.
-
Press the SUBTITLE button during play. "SUBTITLE CHANGE" screen appears.
-
Press the ▲ button to select "On". The language is highlighted.
Example:
![SANYO AVD 8501 - Selecting subtitle language [DVD] - 1](/content/2026/05/1046262/images/c2c5ce7ca88727f28c9b25ab3dcec45da8cb769b6f611307670c6d942af0dcc5.jpg)
flowchart
graph TD
    A["SUBTITLE CHANGE"] --> B["On"]
    B --> C["▲"]
    C --> D["Prev. 02"]
    D --> E["ENGLISH"]
    E --> F["► Next"]
    F --> G["▼ Off"]
- Press the ▶ or ◀ button to select the desired subtitle language, then press the SUBTITLE button.
Note:
- In some cases, the subtitle language is not changed to the selected one.
- When a disc supporting the closed caption is played, the subtitle and the closed caption may overlap each other on the TV screen. In this case, turn the subtitle off.
- When the desired language is not selected even if the button is pressed, the language is not available on the disc.
- When the power is turned on or the disc is replaced, select the subtitle language again.
- If the subtitle language is not necessary, select "Off".
Selecting audio soundtrack language (Multi-Language) [DVD]
This operation works only with discs on which multiple audio soundtrack languages are recorded.
![SANYO AVD 8501 - Selecting audio soundtrack language (Multi-Language) [DVD] - 1](/content/2026/05/1046262/images/aa752a3ceb77e612cafcd799cbfdb0b4163d523d892b34d9fd3432207b8c5cbb.jpg)
flowchart
graph LR
    A["Step 1: Two individuals in a suit"] --> B["Step 2: Two individuals in a suit"]
    B --> C["Step 3: Two individuals in a suit"]
- Press the SHIFT + 5 AUDIO buttons during play.
- Press the SHIFT + 5 AUDIO buttons repeatedly until the desired language appears on the screen.
Example:
AUDIO CHANGE 04 FRENCH
Note:
- When the desired language is not selected even if the button is pressed, the language is not available on the disc.
- When the power is turned on or the disc is replaced, select the language again.
- If the language is not recorded on the disc, only the available language on the disc will be heard.
Changing the audio channel output [Video CD]
During Video CD play, press the SHIFT + 5 AUDIO buttons to select an audio channel.
LEFT MONO → RIGHT MONO → STEREO → LEFT MONO ...
Selecting on-screen information
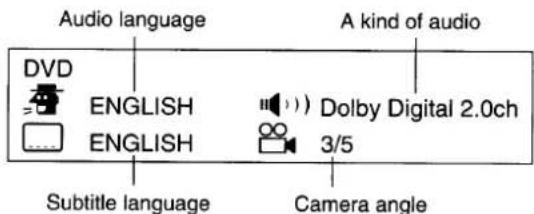
Press the ON SCREEN button repeatedly to show the disc information (Title, Chapter, Title elapsed playing time, Language, etc.).
Example for DVD:
- Press the ON SCREEN button.
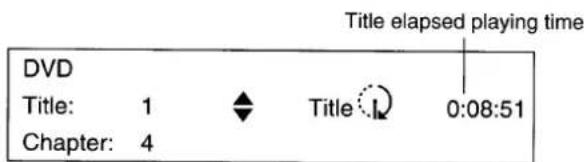
By pressing the ▲ or ▼ button, the title or chapter information changes.
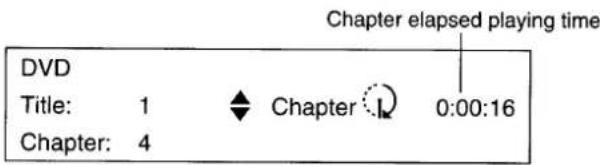
- Press the ON SCREEN button.
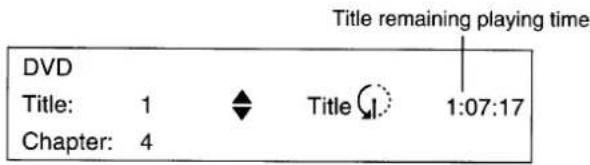
By pressing the ▲ or ▼ button, the title or chapter information changes.
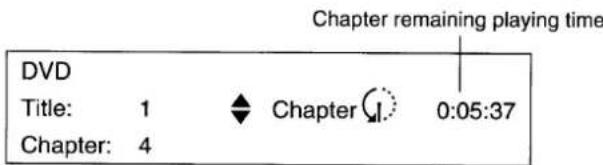
- Press the ON SCREEN button.
Note:
The ▲ or ▼ button can be used only on the active screen while "ON SCREEN" is working.
Example for VCD:
- Press the ON SCREEN button.
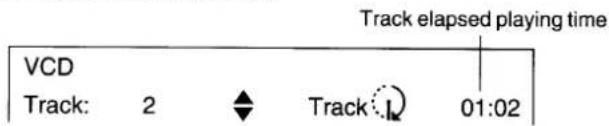
By pressing the ▲ or ▼ button, the track or disc information changes.

- Press the ON SCREEN button.
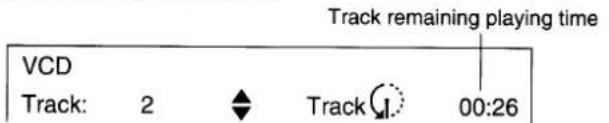
By pressing the ▲ or ▼ button, the track or disc information changes.

Note:
For Music CD, please refer to "Example for VCD" as above.
MP3 CD OPERATION
This player can play back the CD-R/RW that have recorded music data or MP3 files. Before playing back MP3 CD, please read the following.
MP3 CD information
Limitations on MP3 CD play
- This player can recognize up to 255 files or folders per disc. The CD with 256 files or folders and over is not available to this player.
- This player can recognize up to 8 directory trees per disc.
- MP3 CD may not be played in the recorded order.
- As for multi-session disc, only the first session can be played.
- If the CD has both audio tracks and MP3 files, only audio tracks are played.
- It would take 30 seconds or more for this player to read MP3 files depending on its structure.
Limitations on display
- The maximum number for display is 33 letters. Available letters for display are the following: capital or small alphabets of A through Z, numbers of 0 through 9, and _ (underline).
- Other letters than those above are replaced in blank.
Notes on MP3 files
- The recommend recording setting for a high-quality sound is 44.1 kHz of sampling frequency and 128kbps of fixing bit rate.
-
To play MP3 CD in the recorded order,
-
Please use the MP3 software with the function that can record data alphabetically or numerically.
- Put the name including two-digit or three-digit number like "01" "02" or "001" "002" on each file.
- Please refrain from making many sub-folders by preference.
- Some MP3 CDs can not be played back depending on the recording conditions.
MP3 CD Play
- Lord the MP3 CD.
A table of contents in the root directory appears on the TV screen.
Example: (the root directory)
Filesystem Browse
Directory : /
MUSIC001.mp3
MUSIC002.mp3
LABEL_1/
LABEL_2/
MUSIC003.mp3
Please select a file.
Note:
If nothing appears on the TV screen, press the MENU button.
-
Select the desired file by pressing the ▲ or ▼ button. The selected file is highlighted.
-
To go on to the next directory, select the appropriate folder and press the ▶ button. A table of contents in the selected directory appears on the TV screen.
- To go back to the previous directory, press the ◀ button.
-
You can go on up to the eighth directory.
-
Press the ENTER (or PLAY) button to start playback.
Elapsed playing time and total playing time in current file are displayed on the TV screen.
Example: (the second directory)
Filesystem Browse
Directory : / LABEL_1/
MUSIC004.mp3
MUSIC005.mp3
MUSIC006.mp3
LABEL_1_001/
LABEL_1_002/
File 1/5 00:00:45/00:05:16
File information
Notes on file skip
Skipping forward
Press the NEXT button during play to skip to the next file. Each time the button is pressed, a file is skipped within the same directory.
Skipping back
Press the PREV button during play to skip back to the beginning of the file currently play. Press the button again immediately to skip back to the beginning of the previous file.
Note:
- The files with no-MP3 extension and the folders are automatically skipped.
- To roll up and down the display, press the ▲ and ▼ buttons respectively.
INITIAL SETTINGS
Once the initial settings have been completed, the player can always be operated under the same conditions. The settings will be retained in the memory until they are changed, even if the power is turned off.
Common procedures of initial settings
- Press the SET UP button in the stop mode. "SET UP MENU" appears on the TV screen.

- Press the ▲, ▶, ▼ or ◀ button, then press the ENTER button to select the menu. Please refer to the on-screen instructions.
- Press the SET UP button to quit this menu.
Example:

OSD: ENGLISH, ESPAÑOL, FRANÇAIS, DEUTSCH, ITALIANO, PORTUGUES, DANSK, SVENSKA, SUOMI AUDIO: DISC, ENGLISH, SPANISH, FRENCH, GERMAN, ITALIAN, PORTUGUESE, DANISH, SWEDISH, FINNISH, OTHERS SUBTITLE: DISC, ENGLISH, SPANISH, FRENCH, GERMAN, ITALIAN, PORTUGUESE, DANISH, SWEDISH, FINNISH, OTHERS
DVD MENU: DISC, ENGLISH, SPANISH, FRENCH, GERMAN, ITALIAN, PORTUGUESE, DANISH, SWEDISH, FINNISH, OTHERS (DISC: It will use its first priority language setting.)
Note:
- You cannot switch audio sound track languages if there is only one language recorded on the disc.
- When you play a DVD disc, the player automatically displays the pre-selected subtitle language if it is included on the disc.
- If "OTHERS" is selected, enter the language code. (See "LANGUAGE CODE LIST" on Page 18.)
TV TYPE: 4:3 LB, 4:3 PS, 16:9
Select the appropriate your TV screen size.
4:3 LB (Letterbox):
Select when a conventional TV set is connected. When the wide screen disc is played back, the black bands appear at the top and bottom of screen.
4:3 PS (Panscan):
Select when a conventional TV set is connected. When the wide screen disc is played back, it displays pictures cropped to fill to your TV screen. The left and right edges are cut off.
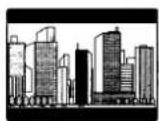
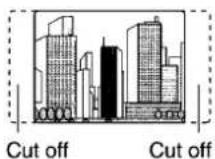
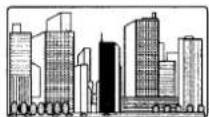
16:9 :
Select when a wide screen TV set is connected. Played in "FULL" size. (Setting the wide screen TV to "FULL" mode is also necessary.)
Note:
- The screen size may differ depending on the DVD discs.
- If you select 16:9 to get rid of the black bands on screen when wide screen disc is played back, picture may be slightly distorted.
- In some discs, even if 4.3 PS is selected, the black bands will remain on the screen.
D-RANGE CONTROL: OFF, ON FRONT SPEAKER: SMALL, LARGE CENTER SPEAKER: SMALL, LARGE SURROUND SPEAKER: SMALL, LARGE SUBWOOFER: YES, NO
When the supplied speakers are connected, you must set the speaker settings as follows:
D-RANGE CONTROL (Dynamic range control):
It limits a big sound. Select "ON" or "OFF".
When using the supplied speakers, select "SMALL".
SUBWOOFER:
When using the supplied speaker, select "YES". If not, select "NO".
ENTER PASSWORD
Enter a number in 4 digits, then press "ENTER".

To confirm, enter password again, then press "ENTER".
Invalid password
Enter a number in 4 digits, then press "ENTER".
PARENTAL LEVEL: OFF, 1, 2, 3, 4, 5, 6, 7, 8
CHANGE PASSWORD:
CHANGE PASSWORD
Enter a number in 4 digits, then press "ENTER".

To confirm, enter password again, then press "ENTER".
Parental control
MPAA (Motion Picture Association of America) Guideline is rating system that provide advance cautionary information to parent about the content of movie programmes.
The parental lock level is equivalent to the following MPAA Rating System.
Level 7: NC-17 (No one 17 and under admitted)
Level 6: R (Restricted)
Level 4: PG13 (Parental guidance cautioned)
Level 3: PG (Parental guidance suggested)
Level 1: G (General audiences)
Some DVD discs contain a restriction level which enables parents to prevent playback of discs by children. This DVD player is equipped with a password designed to prevent children changing the level.
You cannot play DVD discs rated higher than the level you selected unless you cancel the parental lock function.
For example, when you select level "5", the DVD player will not play discs with ratings of "6", "7" or "8". The information will appear on the TV screen.
If you forget the password...
Enter "788444" to clear the current password.
Enter a new password and set the parental lock level again.
Note:
DVD discs may or may not respond to the parental lock settings. Make sure this function works with your DVD discs.
For improvement, on screen displays subject to change without notice.
LANGUAGE CODE LIST
Enter the appropriate code number for the initial settings "AUDIO", "SUBTITLE" and "DVD MENU".
| Code | Abbreviation of the language | Language | Code | Abbreviation of the language | Language | Code | Abbreviation of the language | Language |
| 6565 | aa | Afar | 7369 | ie | Interlingue | 8278 | rn | Kirundi |
| 6566 | ab | Abkhazian | 7375 | ik | Inupiak | 8279 | ro | Romanian |
| 6570 | af | Afrikaans | 7378 | in | Indonesian | 8285 | ru | Russian |
| 6577 | am | Amharic | 7383 | is | Icelandic | 8287 | rw | Kinyarwanda |
| 6582 | ar | Arabic | 7384 | it | Italian | 8365 | sa | Sanskrit |
| 6583 | as | Assamese | 7387 | iw | Hebrew | 8368 | sd | Sindhi |
| 6589 | ay | Aymara | 7465 | ja | Japanese | 8371 | sg | Sangro |
| 6590 | az | Azerbaijani | 7473 | ji | Yiddish | 8372 | sh | Serbo-Croatian |
| 6665 | ba | Bashkir | 7487 | jw | Javanese | 8373 | si | Singhalese |
| 6669 | be | Byelorussian | 7565 | ka | Georgian | 8375 | sk | Slovak |
| 6671 | bg | Bulgarian | 7575 | kk | Kazakh | 8376 | sl | Slovenian |
| 6672 | bh | Bihari | 7576 | kl | Greenlandic | 8377 | sm | Samoan |
| 6673 | bi | Bislama | 7577 | km | Cambodian | 8378 | sn | Shona |
| 6678 | bn | Bengali; Bangla | 7578 | kn | Kannada | 8379 | so | Somali |
| 6679 | bo | Tibetan | 7579 | ko | Korean | 8381 | sq | Albanian |
| 6682 | br | Breton | 7583 | ks | Kashmiri | 8382 | sr | Serbian |
| 6765 | ca | Catalan | 7585 | ku | Kurdish | 8383 | ss | Siswati |
| 6779 | co | Corsican | 7589 | ky | Kirghiz | 8384 | st | Sesotho |
| 6783 | cs | Czech | 7665 | la | Latin | 8385 | su | Sundanese |
| 6789 | cy | Welsh | 7678 | ln | Lingala | 8386 | sv | Swedish |
| 6865 | da | Danish | 7679 | lo | Laothian | 8387 | sw | Swahili |
| 6869 | de | German | 7684 | lt | Lithuanian | 8465 | ta | Tamil |
| 6890 | dz | Bhutani | 7686 | lv | Latvian, Lettish | 8469 | te | Tegulu |
| 6976 | el | Greek | 7771 | mg | Malagasy | 8471 | tg | Tajik |
| 6978 | en | English | 7773 | mi | Maori | 8472 | th | Thai |
| 6979 | eo | Esperanto | 7775 | mk | Macedonian | 8473 | ti | Tigrinya |
| 6983 | es | Spanish | 7776 | ml | Malayalam | 8475 | tk | Turkmen |
| 6984 | et | Estonian | 7778 | mn | Mongolian | 8476 | tl | Tagalog |
| 6985 | eu | Basque | 7779 | mo | Moldavian | 8478 | tn | Setswana |
| 7065 | fa | Persian | 7782 | mr | Marathi | 8479 | to | Tonga |
| 7073 | fi | Finnish | 7783 | ms | Malay | 8482 | tr | Turkish |
| 7074 | fj | Fiji | 7784 | mt | Maltese | 8483 | ts | Tsonga |
| 7079 | fo | Faeroese | 7789 | my | Burmese | 8484 | tt | Tatar |
| 7082 | fr | French | 7865 | na | Nauru | 8487 | tw | Twi |
| 7089 | fy | Frisian | 7869 | ne | Nepali | 8575 | uk | Ukrainian |
| 7165 | ga | Irish | 7876 | nl | Dutch | 8582 | ur | Urdu |
| 7168 | gd | Scots Gaelic | 7879 | no | Norwegian | 8590 | uz | Uzbek |
| 7176 | gl | Galician | 7967 | oc | Occitan | 8673 | vi | Vietnamese |
| 7178 | gn | Guarani | 7977 | om | (Afan) Oromo | 8679 | vo | Volapük |
| 7185 | gu | Gujarati | 7982 | or | Oriya | 8779 | wo | Wolof |
| 7265 | ha | Hausa | 8065 | pa | Punjabi | 8872 | xh | Xhosa |
| 7273 | hi | Hindi | 8076 | pl | Polish | 8979 | yo | Yoruba |
| 7282 | hr | Croatian | 8083 | ps | Pashto, Pushto | 9072 | zh | Chinese |
| 7285 | hu | Hungarian | 8084 | pt | Portuguese | 9085 | zu | Zulu |
| 7289 | hy | Armenian | 8185 | qu | Quechua | |||
| 7365 | ia | Interlingua | 8277 | rm | Rhaeto-Romance |
-
Press the FUNCTION button to select "VIDEO 1" or "VIDEO 2".
-
Follow the instructions supplied with VCR or other video equipment.
To turn the unit on and listen to the last received station, press the TU/BAND button on the remote control.
Automatic/Manual tuning
- Press the FUNCTION button to select FM or AM.
When using the remote control, press the TU/BAND button instead of the FUNCTION button.
2. Automatic tuning
Press the ▶▶/TUNE+ or ◀◀/TUNE- button for at least 1 second to tune in a station. The unit will scan up or down the band and receive the next receivable station. Press the button again to continue.
Manual tuning
Press the ▶▶/TUNE+ or ◀◀/TUNE- button briefly until the desired frequency is displayed.
FM 103.25 MHz
To preset stations
Up to 20 FM and 10 AM stations can be preset.
Automatic presetting (APT)
-
Press the FUNCTION button to select FM or AM.
-
Press the FWD/MEMO button for at least 3 seconds. "PROG." blinks. The automatic tuning mode is set and automatic presetting begins from the low end of the band.
When 20 FM or 10 AM stations have been preset or the high end of the band is reached, automatic presetting stops. "PROG." disappears and the station memorized on channel 1 will be heard.
- To preset stations on the other band, follow steps above.
Note:
If APT is activated, all previously programmed stations of the band will be cleared and new stations will be programmed.
Manual presetting
-
Tune in the station to be preset as described in "Automatic/Manual tuning".
-
Press the FWD/MEMO button.

- While "PROG." is blinking, press the REV/PRESET button to select the channel to be preset.

- While "PROG." is blinking, press the FWD/MEMO button.
- In this example, "103.25 MHz" FM station is preset on FM channel 9.
FM 103.25 MHz
- Repeat steps above to add more preset stations.
- When presetting a new station, the previous preset station is cleared.
Listening to preset stations
- Press the FUNCTION button to select FM or AM.
- Press the REV/PRESET button briefly to select the desired channel.
- The number buttons on the remote control can also be used. Example: Press 0, then 9.
Preset scan tuning
- Press the FUNCTION button to select FM or AM.
- Press the REV/PRESET button for at least 1 second. The channel number appears. Each of the preset stations is tuned in for 5 seconds.
- The PRESET/PTY CK button on the remote control can also be used.
- When the desired station has been tuned in, press the REV/PRESET button again to keep the reception locked at that station.
To receive FM stereo broadcasts (Remote control only)
Make sure that "MONO" is not displayed. If "MONO" appears, press the SHIFT + FM MODE buttons to turn the "MONO" indication off.
"ST" appears when an FM stereo broadcast is received.
- If the signal from an FM stereo station is weak and reception is poor, press the SHIFT + FM MODE buttons to change to the MONO mode. The reception may be improved, but the sound will be monaural.
Listening to FM broadcasts with RDS (Using the remote control)
RDS (Radio Data System) permits FM stations to send additional signals with the regular programme signals. For example, the stations send their station names and information about what type of broadcast programmes, such as sports or music, etc.
When tuned in FM broadcast which provides the RDS service, the programme service (PS) RDS mode is set automatically and the station name appears on the display.
Note:
- Some FM broadcasts do not provide RDS service.
- RDS may not work correctly if the signal strength is weak.
- RDS is not available for AM broadcasts.
Selecting the RDS mode
Press the RDS button while listening to an FM broadcast. Each time the button is pressed, the RDS mode changes as follows.
When an FM broadcast with RDS is received,
Programme service (PS) mode:
The station name is displayed.
Programme type (PTY) mode:
The broadcast programme type is displayed.
Radio text (RT) mode:
Text messages the station sends will be displayed.
Frequency
Station frequency (non-RDS service)
After several seconds, the programme service mode returns if RDS signal is received.
When an FM broadcast with non-RDS is received, "NO RDS" and "PTY SEL" appears alternately. After several seconds, station frequency is displayed.
To search a preset station by PTY codes
A particular programme type broadcast can be located by specifying the PTY codes.
- Press the RDS button to select the programme type (PTY) mode or "PTY SEL" while listening to an FM broadcast.
- Press the "+" or "-" TUNE/PTY button within 2 seconds to select the desired PTY code. The PTY code changes as shown below;
("PTY SEL")
RDS ONLY → POP M → ROCK M → EASY M → LIGHT M → CLASSICS → OTHER M → NEWS → INFO → SPORT → AFFAIRS → EDUCATE → DRAMA → CULTURE → SCIENCE → VARIED → WEATHER → FINANCE → CHILDREN → SOCIAL → RELIGION → PHONE IN → TRAVEL → LEISURE → JAZZ → COUNTRY → NATION M → OLDIES → FOLK M → DOCUMENT → TEST → ALARM! → RDS ONLY
(or in the reverse sequence)
- Press the PRESET/PTY CK button within 4 seconds.
The unit searches 20 preset stations and stops when it finds a broadcast of the PTY code you have selected, then tunes into that station.
- To continue searching after the first stop, repeat steps 1 - 3 above.
- If no broadcast is found, the original station is heard.
To cancel searching, press the PRESET/PTY CK button.
TIMER OPERATION (Using the remote control)
Using the timer
Set the on and off times, function to be used and volume level. Operation will start with the selected function at the on time. The power will be switched off at the off time.
The timer will function every day unless it is released.
Preparation
Note:
Make absolutely sure that the clock is set to the correct time before setting the timer.
- Select the function for timer operation and prepare the sources to be used.
- If the function selected is tuner, tune in to the desired band and station.
- Adjust the volume level as desired.
Operation
- Press the SHIFT + 7 TIMER buttons.

The previous timer on time setting appears.
- Press the SHIFT + 8 ADJUST buttons within 15 seconds.

- Set the hours of timer on time by pressing the ▶▶▶ or ◀◀◀ button, then press the SHIFT + 8 ADJUST buttons.

Set the minutes in the same way.

The timer off time setting appears.
- Set the timer off time as described in step 3. "②" blinks.
- While "①" is blinking, press the FUNCTION button to select the source to be used.
- Press the SHIFT + 8 ADJUST buttons.
The timer operation standby mode is activated. "J" remains lit.
-
Press the ⏻/ON button to switch off the power.
-
“②” appears while timer operation is engaged.
- To switch off the power during a timer-controlled operation, press the ⏻/ON button. The timer will be set in the standby mode.
To check the timer settings
Press the SHIFT + 7 TIMER buttons repeatedly. The timer settings are displayed in the following order:
On time → Off time → Function
To change the settings, press the SHIFT + 7 TIMER buttons to select the setting to be changed, then press the SHIFT + 8 ADJUST buttons so that the display blinks. Change the setting as explained above.
To release the timer
After turning the power on, press the SHIFT + 7 TIMER buttons, then press the SHIFT + 9 SET/CLEAR.
Note:
- If the SHIFT + 9 SET/CLEAR buttons are pressed while the timer is being set, the original display returns.
- The timer mode is released if a power failure occurs during timer controlled operation.
- The timer may not operate if a power failure occurs during timer operation standby mode.
Using the sleep timer
The sleep timer automatically switches off the power after a preset time has elapsed. The volume will gradually be reduced (fade-out) during the 1-minute period before the unit turns off. There are 9 time periods available: 90, 80, 70, 60, 50, 40, 30, 20, and 10 minutes.
Press the SHIFT + 6 SLEEP buttons repeatedly to select the desired sleep time. "SLEEP" appears on the display. After several seconds, the original display returns and the brightness of the display reduces.
To check the remaining sleep time
Press the SHIFT + 6 SLEEP buttons once. After several seconds, the original display returns.
To release the sleep timer while in operation
Press the SHIFT + 9 SET/CLEAR buttons. The timer is also released if the power is switched off.
Cleaning the unit
Clean the outside of the unit with a clean soft cloth moistened with lukewarm water. Do not use benzene, thinner or alcohol since they will mar the finish of the surfaces.
TROUBLESHOOTING GUIDE
If you have followed the instructions and are having difficulty operation the unit, locate the SYMPTOM in the left column below. Check the corresponding POSSIBLE CAUSE and CORRECTIVE ACTION columns to locate and remedy the problem.
| SYMPTOM | POSSIBLE CAUSE | CORRECTIVE ACTION |
| No picture. | The wrong function is selected. | Select the correct function. |
| No disc is loaded or an unplayable disc is loaded. | Load a disc or load a playable disc. (Check the disc logo, type, colour system and regional code.) | |
| The TV is not set to receive signal from the unit. | Select the correct input function on the TV. | |
| No sound. | The wrong function is selected. | Select the correct function. |
| Volume control is set to minimum. | Turn up the volume. | |
| The playback picture is poor. | An unplayable disc is loaded. | Load a playable disc. (Check the disc logo, type, colour system and regional code.) |
| “∅” appears on the TV screen. | The selected function does not operate on the disc now. | The feature or action cannot be completed at this time because:- The feature is not available at the moment.- The DVD software restricts it.- The DVD software does not support the feature (e.g., angles). |
| The player does not start play. | No disc is loaded. | Load a disc. |
| An unplayable disc is loaded. | Load a playable disc. (Check the disc logo, type, colour system and regional code.) | |
| The disc is loaded with the label side down. | Load the disc on the disc tray correctly. | |
| The disc is dirty. | Clean the disc or replace it. | |
| “PARENTAL” is set. | Cancel the parental lock function or change the rating level. Reset it after play. | |
| The operation or display is not normal. | The memory must be reset. | 1. Disconnect the mains lead.2. While pressing both BASS and SOUND buttons at the same time, connect the mains lead.3. Resume operation. |
| The remote control does not work properly. | The batteries in the remote control are weak, or installed incorrectly. | Check the battery polarity (+ or -).Replace the batteries. |
| The remote control is not aimed at the remote sensor window. | Aim the remote control at the remote sensor window. |
Amplifier
Main amplifier
Stereo mode
30 W x 2 (at 8 ohms, 10% distortion)
Dolby Digital mode
30 W x 2 (at 8 ohms, 10% distortion, with Centre/Surround/Subwoofer amplifier off)
Centre amplifier
30 W (at 8 ohms, 10% distortion, with Main/Surround/Subwoofer amplifier off)
Surround amplifier
30 W x 2 (at 8 ohms, 10% distortion, with Main/Centre/Subwoofer amplifier off)
Subwoofer amplifier
30 W (at 8 ohms, 10% distortion, with Main/Centre/Surround amplifier off)
Inputs:
VIDEO 1:
VIDEO IN: 1.0 Vp-p (75 Ω)
AUDIO IN (L/R): 800 mV/50 kΩ
VIDEO 2 (IN):
For Euro-AV cable
Outputs:
FRONT SPEAKERS (L/R): 8 Ω
CENTER SPEAKER: 8 Ω
Semiconductor laser, wavelength: 650/790 nm
Laser output (Continuous wave max.):
1 mW (DVD)
0.5 mW (CD)
Signal to noise ratio:
More than 105 dB
Harmonic distortion
0.003%
Wow and flutter:
Below measurable level
Tuner
Reception frequency:
FM: 87.5 - 108 MHz
AM: 522 - 1611 kHz
General
Power requirements:
AC 230 V, 50 Hz
Power consumption:
170 W
1.8 W (standby mode)
Dimensions:
435(W) × 90(H) × 382(D) mm
Weight:
7.9 kg
Speaker system
Front left, Front right, Centre, Surround left and Surround right speakers (SX-8501S, magnetic shield)
Unit used:
8 cm cone type, full range
Maximum power handling capacity: 60 W (peak)
Nominal impedance:
8Ω
Dimensions:
150(W) × 110(H) × 115(D) mm
Weight:
0.75 kg/speaker
Subwoofer (SX-8501W)
Unit used:
13 cm cone type
Maximum power handling capacity:
60 W (peak)
Nominal impedance:
8Ω
Dimensions:
180(W) × 390(H) × 290(D) mm
Weight:
5.7 kg
IMPORTANT INFORMATION
Because its products are subject to continuous improvement, SANYO reserves the right to modify product designs and specifications without notice and without incurring any obligation.
GUARANTEE TO CUSTOMER
Sanyo Europe Ltd. (the Company) guarantees to the initial retail purchaser that if this equipment is or becomes defective and that, in the opinion of the Company, the defect is due to faulty material or workmanship the Company will, for a period of 12 calendar months from the date of sale to the original purchaser repair or replace, at its sole option, free of charge, any such defective component part of the equipment, always provided that: -
- The equipment has at all times been used in accordance with the operating instructions issued by the Company, and has not been connected to an electrical mains supply for which it has not been adjusted.
- Accidental damage, or damage caused by negligence or misuse by the user, including leakage from exhausted batteries, is specifically excluded.
- Unauthorised repairs, or any modification to the equipment which has not been expressly approved by the Company, shall render this guarantee null and void.
- Failure due to fair wear and tear of any item, such as batteries, record playing styli, and tape recording, playback and erase heads is specifically excluded.
This guarantee is not transferable and is only applicable within the United Kingdom (and the Republic of Ireland). Nothing in this express guarantee affects the statutory rights available to the purchaser of this equipment.
Note: This guarantee supersedes any other form of guarantee that may inadvertently have been enclosed with or attached to the product. (August 1978).
DearCustomer
Thank you for buying Sanyo. This equipment should give you many years of pleasure and faithful service but in the event that a fault occurs, the following notes for your guidance may be helpful:-
- PLEASE RETAIN YOUR PURCHASE RECEIPT WHICH WILL BE REQUIRED FOR SERVICE DURING GUARANTEE.
- If your Sanyo equipment proves faulty during the period of guarantee, take it or send it back to the dealer who originally supplied it together with this guarantee and the proof of purchase. We have made arrangements with our approved dealers under which they will carry out in-guarantee service repairs on our behalf. In this way, we hope to reduce to a minimum the amount of time you will be without your equipment.
- If for some reason it is impossible to return the equipment to the original supplies, please contact our Consumer Relations Department at the address below for further advice.
- Should the equipment require servicing after the expiry of the guarantee period, take or send it to the original supplier or any other Sanyo dealer. He will be pleased to give you a quotation for the repair. If you are in any doubt about what to do, write to us at the address below or telephone:
Consumer Relations Department,
Sanyo Europe Ltd.,
Sanyo House
Otterspool Way, Watford,
Hertfordshire WD2 8JX
Tel: Watford 246363
- CAUTION
- IMPORTANT
- Disposal of Plug
- Replacing Fuse
- Note:
- Controls
- Inserting batteries
- Notes on using the joy-stick
- Remote control range
- Selecting TV system
- Speaker connections
- Speaker placement
- AM loop aerial
- Connecting to a TV with the video lead
- Notes on connections
- Connecting to a TV with an S-video lead
- Connecting to a TV with a EURO-AV cable
- VCR Connections
- Headphones
- Turning the power on and off
- Direct start function
- Selecting the function
- Adjusting the volume
- To reduce the volume temporarily (Remote control only)
- Bass boost system
- Selecting the sound mode
- WHAT TO DO IF...
- ADJUSTING THE CLOCK (Using the remote control)
- Example: To set "6:30"
- To display the clock during operation
- Selecting Dolby Pro Logic Surround mode
- Notes:
- Region number
- DVD disc
- Video CD/Music CD disc
- Notes on handling discs
- Important note:
- Preparations
- To use the remote control for TV
- Starting play
- If a menu appears on the TV screen...
- Stopping play
- Continuing play from where you stopped watching (LAST MEMORY PLAY) [DVD]
- What is "PBC"?
- To lock the disc tray (Using the main unit)
- Selecting a DVD menu [DVD]
- Selecting a title menu [DVD]
- Return button (RETURN) for Video CD
- Skipping forward
- Skipping back
- Title search [DVD]
- Chapter search [DVD]
- Track search [Video CD] [CD]
- Time search
- [DVD]
- [Video CD] [CD]
- Fast play
- Slow-motion play
- Still picture (Pause)
- Frame by frame advance play [DVD] [Video CD]
- Picture zoom [DVD] [Video CD]
- Viewing from a desired camera angle (Multi-Angle) [DVD]
- Angle replay [DVD]
- Repeat play
- Programmed play [Video CD] [CD]
- Programming procedure
- To clear the programme one by one
- To clear all the programmes
- To change the programme
- To use the programme again with the same contents
- Selecting subtitle language [DVD]
- Selecting audio soundtrack language (Multi-Language) [DVD]
- Changing the audio channel output [Video CD]
- Selecting on-screen information
- Example for DVD:
- Example for VCD:
- MP3 CD OPERATION
- MP3 CD information
- Limitations on MP3 CD play
- Limitations on display
- Notes on MP3 files
- MP3 CD Play
- Notes on file skip
- INITIAL SETTINGS
- Common procedures of initial settings
- ENTER PASSWORD
- CHANGE PASSWORD:
- Parental control
- If you forget the password...
- LANGUAGE CODE LIST
- Automatic/Manual tuning
- Automatic tuning
- Manual tuning
- To preset stations
- Automatic presetting (APT)
- Manual presetting
- Listening to preset stations
- Preset scan tuning
- To receive FM stereo broadcasts (Remote control only)
- Listening to FM broadcasts with RDS (Using the remote control)
- Selecting the RDS mode
- To search a preset station by PTY codes
- TIMER OPERATION (Using the remote control)
- Using the timer
- Preparation
- Operation
- To check the timer settings
- To release the timer
- Using the sleep timer
- To check the remaining sleep time
- To release the sleep timer while in operation
- Cleaning the unit
- TROUBLESHOOTING GUIDE
- Amplifier
- Tuner
- General
- Speaker system
- Subwoofer (SX-8501W)
- GUARANTEE TO CUSTOMER
- DearCustomer
Brand : SANYO
Model : AVD 8501
Category : Home Theater