
HGS 81120 E - Cooker BLOMBERG - Free user manual and instructions
Find the device manual for free HGS 81120 E BLOMBERG in PDF.


| Product Type | Freestanding Cooker |
| Brand | Blomberg |
| Model | HGS 81120 E |
| Energy Source (Hob) | Gas |
| Energy Source (Oven) | Electric |
| Number of Hob Burners | 4 |
| Oven Type | Multifunction Electric |
| Oven Capacity | 65 L |
| Product Dimensions (H x W x D) | 85 cm x 60 cm x 60 cm |
| Weight | 50 kg |
| Oven Power Consumption | 2.5 kW |
| Gas Consumption (Hob) | 4 burners, varies (e.g., 1.0-2.5 kW each) |
| Main Oven Functions | Bake, Grill, Fan Bake, Defrost, Rotisserie |
| Cleaning Type | Enamel interior, steam clean (Hydroclean) |
| Safety Features | Flame failure device, child lock, cool touch door |
| Control Type | Knobs for hob, digital timer for oven |
| Color | White or Stainless Steel (varies) |
| Door Type | Drop-down, double glazed |
| Warranty | 2 years (standard) |
| Spare Parts Availability | Readily available via authorized dealers |
| Energy Class | A (approximate) |
Frequently Asked Questions - HGS 81120 E BLOMBERG
User questions about HGS 81120 E BLOMBERG
0 question about this device. Answer the ones you know or ask your own.
Ask a new question about this device
Download the instructions for your Cooker in PDF format for free! Find your manual HGS 81120 E - BLOMBERG and take your electronic device back in hand. On this page are published all the documents necessary for the use of your device. HGS 81120 E by BLOMBERG.
USER MANUAL HGS 81120 E BLOMBERG
Please read these instructions before installation or using your appliance!
Dear Customer,
By purchasing this product you have chosen an appliance of advanced technology and high quality.
The appliance was produced in modern facilities which meet all environmental standards.
The instructions will help you to operate the appliance quickly and safely.
- Upon delivery, please check that the appliance is not damaged. If you note any transport damage, please contact your point of sale immediately and do not connect and operate the appliance!
- Before you connect and start using the appliance, please read this manual and all enclosed documents. Please note in particular the safety instructions.
- Keep all documents so that you can refer to the information again later on. Please keep your receipt for any repairs which may be required under warranty.
- When you pass on the appliance to another person, please provide all documents with it.
Table of Contents
1 General information 4
Overview....4
Technical Data....5
Accessories supplied with the unit......6
Injector Table....6
2 Safety Instructions 7
Explanation of safety instructions ..... 7
Basic safety instructions....7
Safety for children....8
Safety when working with gas......8
Safety when working with electricity .9
Intended use....10
Disposal....10
Packaging material 10
Old equipment 10
Future transportation ....10
3 Installation 11
Before installation....11
Installation and connection....12
Gas conversion....14
4 Preparation 16
Tips for saving energy 16
Initial operation 16
First cleaning of the appliance......16
Initial heating 16
5 How to use the hob 18
General information on cooking......18
How to use hobs....18
6 How to Operate the Oven 20
General information on baking, roasting and grilling 20
How to use the electric oven 21
Operating modes....21
How to operate the oven timer ..... 22
Cooking times table 23
How to operate the grill 24
Cooking times table for grilling ..... 24
7 Maintenance and Care 25
General information 25
How to clean the hob....25
Cleaning the control panel....25
Cleaning the oven 25
Removal of oven door....26
Replacing the oven lamp 26
8 Troubleshooting 27
1 General information
Overview
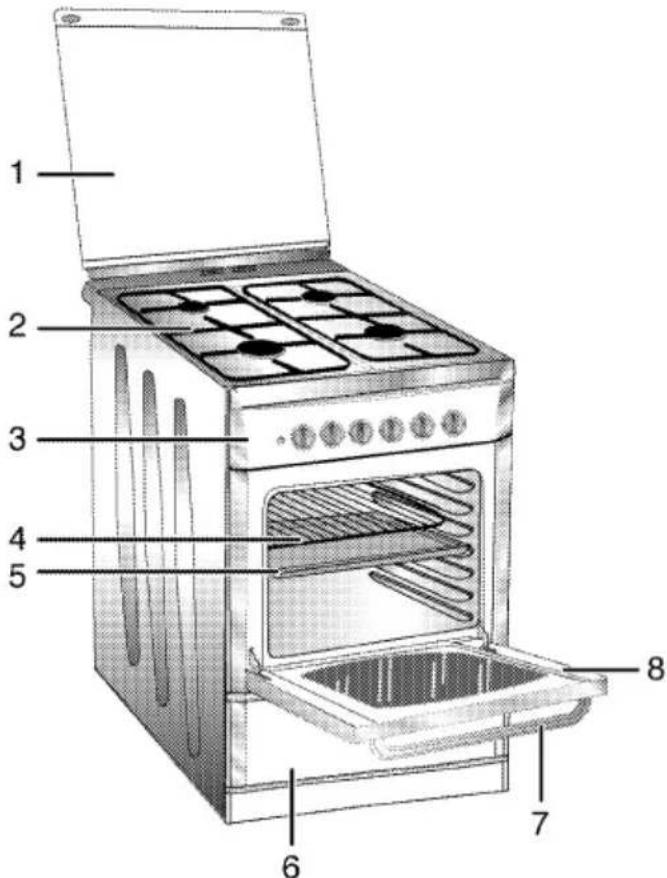
1 Top lid
2 Burners' plate
3 Control panel
4 Wire shelf
5 Tray
6 Bottom drawer
7 Handle
8 Front door
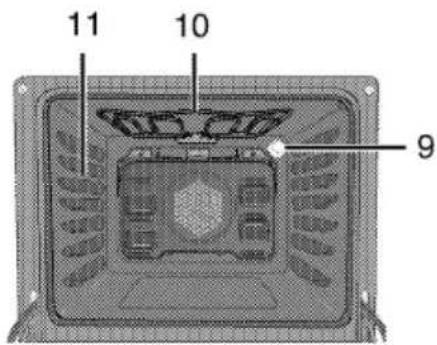
9 Lamp
10 Grill heating element
11 Shelf positions
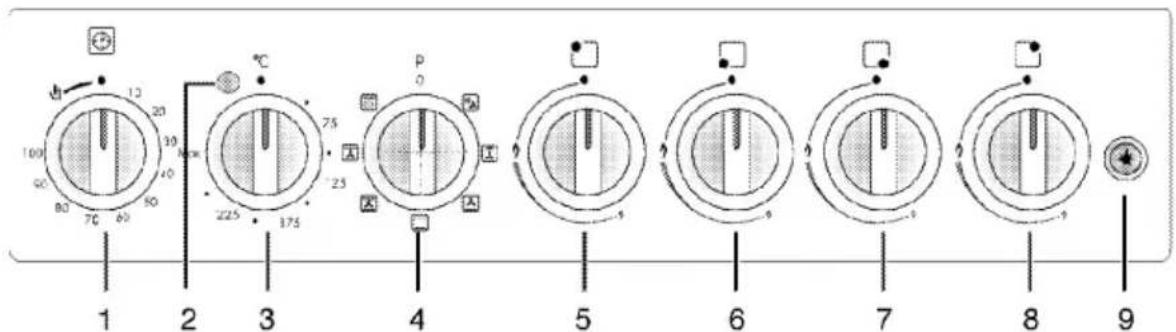
1 Mechanical timer
2 Thermostat lamp
3 Thermostat knob
4 Function knob
5 Normal burner Rear left
6 Normal burner Front left
7 Rapid burner Front right
8 Auxiliary burner Rear right
9 Ignition button
Technical Data
| GENERAL | |
| Outer dimensions (height/width/depth) | 850 mm/500 mm/600 mm |
| Voltage/frequency | 220-230V ~ 50 Hz |
| Total electric consumption | 2.0 kW |
| Fuse protection | min. 16 A |
| Cable type / cross section | H05VV-F 3G x 1.5 mm^2 |
| Cable length | max. 2 m |
| Gas device category | II_2H3B/P |
| Gas type/pressure | NG G 20/20mbar |
| Total gas consumption | 7.9 kW |
| Conversion to gas type/ pressure^§ - optional | NG G 20/13mbarNG G 20/10 mbar - LPG G 30/28-30 mbar - Propane 31/37 mbar |
| HOB | |
| Burners | |
| Rear left | Normal burner |
| Power | 2000 W |
| Front left | Normal burner |
| Power | 2000 W |
| Front right | Rapid burner |
| Power | 2900 W |
| Rear right | Auxiliary burner |
| Power | 1000 W |
| OVEN/GRILL | |
| Main oven | Multifunction oven |
| Energy efficiency class# | A |
| Inside illumination | 15–25 W |
| Grill power consumption | 1.6kW |
Basis: In electrical ovens, the data on energy labels are in conformity with EN 50304. Values were determined under standard load and convection/hot air (if available). Heating mode with an energy efficiency rating specified by EN 50304 is determined in accordance with below priority order depending on functions (modes) availability on the product. 1- Eco fan heating, 2-Slow cooking, 3-Fan heating (hot air), 4-Top and bottom heat with convection air, 5-Top and bottom heating.
Accessories supplied with the unit

Important
Accessories supplied can vary depending on the product model. All the accessories described in the user manual may not exist on your product.
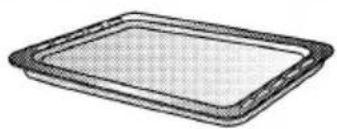
Baking tray
Can be used for pastries, frozen foods and big roasts.
natural_image
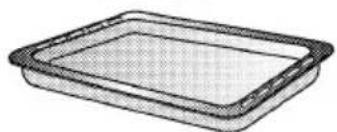
Simple line drawing of a rectangular tray or baking pan with no text or symbolsDeep roasting tray
Can be used for pastries, big roasts, foods with liquid content and during grilling as dripping pan.
natural_image
Simple line drawing of a rectangular baking tray (no text or symbols)Wire shelf
Can be used for roasting and as deposit for baking, roasting and casserole dishes.
Injector Table
| Position hob zone | 2000 W Rear left | 2000 W Front left | 2900 W Front right | 1000 W Rear right |
| Gas type / Gas pressure | ||||
| G 20/10 mbar | 125 | 125 | 155 | 90 |
| G 20/13 mbar | 116 | 116 | 145 | 84 |
| G 20/20 mbar | 103 | 103 | 115 | 72 |
| G 30/28-30 mbar | 72 | 72 | 87 | 50 |
| G 31/ 37 mbar | 72 | 72 | 87 | 50 |

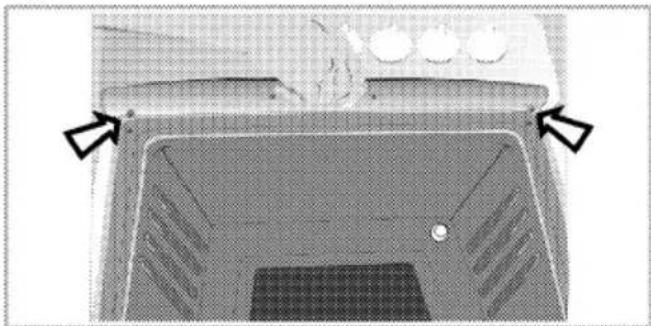
Heat shield
For grilling with the oven door open. Protects the control panel and knobs against heat and soiling.
natural_image
Top-down view of a kitchen sink with a vent and side panel, marked by two arrows (no text or symbols)Turn spit function
Can be used for grilling meat, poultry and fish from all sides.
• Fix the food to be grilled to the turn spit with the forks.
- Put the turn spit frame into the oven at the level of the turn spit drive.
- Insert the turn spit into the drive and put it onto the turn spit frame.
• Take off the handle during grilling.
2 Safety Instructions
Explanation of safety instructions
The following types of safety instructions and information are used in this manual. They can be distinguished by the symbol and the initial signal word.

DANGER
High risk of personal injury.
Non-observance may or will cause serious injuries or death.

CAUTION
Risk of personal injury.
Non-observance may or will cause minor or medium injuries.

NOTICE
Risk of material damage.
Non-observance may or will cause damage on the appliance or other objects.

Important
Tip for the user.
Useful information on how to use the appliance. No injury risk information.
Basic safety instructions
- The manufacturer reserves its right to make changes in the technical specifications in order to improve the appliance quality without any prior notice. Figures included in this manual are for schematic purpose only and may not match exactly with your appliance. Values stated on the markings of the appliance or in other printed
documents supplied with the appliance are obtained under laboratory conditions as per relevant standards. These values may vary according to the usage of the appliance and ambient conditions.
- This appliance is not intended for use by persons (including children) with reduced physical, sensory or mental capabilities, or lack of experience and knowledge, unless they have been given supervision or instruction concerning use of appliance by a person responsible for their safety.
Children should be supervised to ensure that they do not play with the appliance.
- "An additional protective means to avoid contact with the oven door is available. This part should be fitted when young children are likely to be present."
- Never use when judgement or coordination is impaired by the use of alcohol and/or drugs.
- Do not operate the appliance if it is defective or shows any visible damage.
- Do not carry out any repairs or modifications on the appliance. However, you may remedy some malfunctions; see Troubleshooting, page 27.
- Be careful when using alcoholic drinks in your dishes. Alcohol evaporates in high temperatures and may catch fire when it comes in contact with hot surfaces.
- Do not heat closed food containers and glass jars. Pressure that may build-up in the jar can cause it to burst.
- Ensure that no flammable materials are adjacent to the appliance as the sides become hot during use.
- Do not leave empty pots or pans on plates that are switched on. They may get damaged.
- Since it may be hot, do not leave plastic or aluminum dishes on the surface of appliance. These kind of dishes should not be used to keep food either.
- Do not close the lid before the hob has cooled down sufficiently. In order to avoid any spillage from leaking down the back or into the oven, you must wipe the surface of the the lid before opening upright.
- Do not place baking trays, dishes or aluminium foil directly onto the bottom of the oven. The heat accumulation might damage the bottom of the oven.
Keep all ventilation slots clear of obstructions.
- Appliance may be hot when it is in use. Never touch the hot burners, inner sections of the oven, heating elements etc. Keep children away!
• Always use heat-resistant gloves when putting or removing the dishes into/from your oven. - Don't use the cooker with front door glass removed.
- Rear surface of the oven gets hot when it is in use. Gas / Electric connection should not touch the rear surface, otherwise the mains cable may get damaged. Do not
trap the mains cable between the hot oven door and frame. Do not route the mains cable over the hot cooking section. Otherwise, cable insulation may melt and cause fire as a result of short circuit.
- Check all controls on the appliance are switched off after use.

Important
For the warranty to be valid, the appliance must be installed by a qualified person in accordance with current regulations.
Safety for children
- Accessible parts of the appliance will become hot whilst the appliance is in use and until the appliance has cooled, children should be kept away.
- Accessible parts may be hot when the grill is in use. Young children should be kept away.
- Do not store any items above the appliance that children may reach.
- The packaging materials will be dangerous for children. Keep the packaging materials away from children. Please dispose of all parts of the packaging according to environmental standards.
- When the door is open, do not load any heavy object on it and do not allow children to sit on it. It may overturn or door hinges may get damaged.
Safety when working with gas
- Any works on gas equipment and systems may only be carried out by authorised qualified persons who are Gas Safe registered.
- "Prior to the installation, ensure that the local distribution conditions (nature of the gas and gas pressure) and the adjustment of the appliance are compatible."
- "This appliance is not connected to a combustion products evacuation device. It shall be installed and connected in accordance with current installation regulations. Particular attention shall be given to the relevant requirements regarding ventilation;" See Before installation, page 11
- "The use of gas cooking appliance results in the production of heat and moisture in the room in which it is installed. Ensure that the kitchen is well ventilated: keep natural ventilation holes open or install a mechanical ventilation device (mechanical extractor hood). Prolonged intensive use of the appliance may call for additional ventilation, for example increasing the level of the mechanical ventilation where present."
- Gas appliances and systems must be regularly checked for proper functioning. Please arrange for annual maintenance.
- Clean the gas burners regularly. The flames should be blue and burn evenly.
- Good combustion is required in gas appliances. In case of incomplete combustion, carbon monoxide (CO) might develop. Carbon monoxide is a colourless, odourless and very toxic gas, which has a lethal effect even in very small doses.
- Request information about gas emergency telephone numbers and safety measures in case of gas smell from you local gas provider.
What to do when you smell gas

DANGER
Risk of explosion and poisoning!
Put out all naked flames and do not smoke, strike matches or do anything that could cause ignition. Do not operate any electric switches (e.g. light switch, TV, computer, cooker or door bell). Do not use a telephone or mobile phone.
-
Turn off all valves on gas appliances and gas meter at the main control valve, unless it's in a confined space or cellar.
-
Open doors and windows.
-
Check all tubes and connections for tightness. If you still smell gas leave the property.
-
Warn the neighbours.
-
Call the fire-brigade. Use a telephone outside the house.
5.1 If you have door or gates that are secured by an electric lock, or entry phone, please open these manually.
- Do not re-enter the property until you are told it is safe to do so.
Safety when working with electricity
- Any work on electric equipment and systems may only be carried out by authorized qualified persons.
- In case of any damage, switch off the appliance and disconnect it from the mains supply by
removing the fuse or switching off the circuit breaker.
- Ensure that the fuse rating is correct.
Intended use
The appliance is designed for domestic use only. Commercial use is not admissible.
This appliance should not be used for warming the plates under the grill, hanging towels and dish cloths etc. on the handles, drying and for heating purposes.
This product should not be used for heating purposes.
The manufacturer shall not be liable for any damage caused by improper use or handling errors.
The appliance can be used for defrosting, baking, roasting and grilling food.
Disposal
Packaging material

DANGER
Risk of suffocation by the packaging materials!
Keep children away from the packaging materials.
The packaging material and transport locks are made from materials that are not harmful to the environment. Please dispose of all parts of the packaging according to environmental standards. This is beneficial to the environment.
Old equipment
This appliance bears the selective sorting symbol for waste electrical and electronic equipment (WEEE). This
means that this appliance must be handled pursuant to European Directive 2002/96/EC in order to be recycled or dismantled to minimize its impact on the environment. For further information, please contact your local or regional authorities.
Electronic appliances not included in the selective sorting process are potentially dangerous for the environment and human health due to the presence of hazardous substances.
Future transportation

NOTICE
Do not place other items on the top of the appliance. The appliance must be transported upright.
Store the appliance's original box and transport the appliance in its original carton. Follow the guidance marks that are printed on the carton.

Important
Verify the general appearance of your equipment by identifying possible damage during the transportation.
Secure the caps and pan supports with adhesive tape.
To prevent the wire shelf and tray inside the oven from damaging the oven door, place a strip of cardboard onto the inside of the oven door that lines up with the position of the trays. Tape the oven door to the side walls.
If you do not have the original carton
Pack the appliance in bubble wrap or thick cardboard and tape it securely in order to prevent damage during transportation.
Before installation
To ensure that critical air gaps are maintained under the appliance, we recommend that this appliance is mounted on a solid base and that the feet do not sink into any carpet or soft flooring.
The kitchen floor must be able to carry the weight of the appliance plus the additional weight of cookware and bakeware and food.
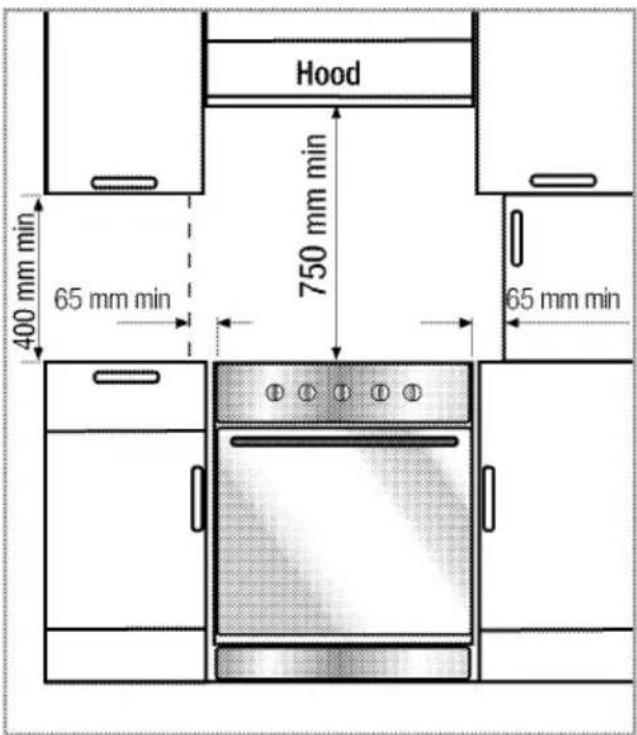
A safety distance must be left between the appliance and the kitchen walls and furniture. See figure (values in mm).
- It can be used with cabinets on either side but in order to have a minimum distance of 400mm above hotplate level allow a side clearance of 65mm between the appliance and any wall, partition or tall cupboard.
- It can also be used in a free standing position. Allow a minimum distance of 750mm from the hob surface to adjacent surfaces above the hob surface and 600mm to a cabinet above.
- If a appliance hood is to be fitted, refer to the manufacturer's instructions regarding fixing height.
- The appliance corresponds to device class 1, i.e. it may be placed with the rear and one side to kitchen walls, kitchen furniture or equipment of any size. The kitchen furniture or equipment on the other side may only be of the same size or smaller.
- Any kitchen furniture next to the appliance must be heat-resistant (100 °C min.).
Room ventilation
The air for combustion is taken from the room air and the exhaust gases are emitted directly into the room.
Good room ventilation is essential for safe operation of your appliance. If there is no window or door available for room ventilation, an extra ventilation must be installed.
Do not install this appliance in a room below ground level unless it is open to ground level on at least one side.
Failure to install correctly is dangerous and could result in prosecution.
Prolonged intensive use of the appliance may call for additional ventilation, for example the opening of a window, or the use of permanent fixed mechanical ventilation system,
for example, an extractor fan or cooker hood that ventilates to the outside.
| Room size | Ventilation opening |
| smaller than 5 m^3 | min. 100 cm^2 |
| 5 m^3 to 10 m^3 | min. 50 cm^2 |
| greater than 10 m^3 | not required |
| In the cellar or basement | min. 65 cm^2 |
Installation and connection

Important
Do not install the appliance next to refrigerators or freezers. The heat emitted by the appliance will lead to an increased energy consumption of cooling appliances.
- For installation the appliance must be connected in accordance with all local gas and/or electrical regulations.
- Carry the appliance with at least two persons.

NOTICE
Material damage! The door and/or handle must not be used for lifting or moving the appliance.
- The appliance must be placed directly on the floor. It must not be placed onto a base or a pedestal.
Connection to the gas supply

DANGER
Risk of explosion or poisoning by unprofessional installation.
The appliance may be connected to the gas distribution system only by an authorized qualified person who is Gas Safe registered.

DANGER
Risk of explosion!
Before starting any work on the gas installation, please shut off the gas supply.
- "The adjustment conditions for this appliance are stated on the label (or data plate)."

NOTICE
Your appliance is adjusted for Natural gas.
- Your natural gas installation must be adjusted before the appliance is installed.
- If necessary, interchange the sharp hose at the rear of your oven tip with the plug by selecting a suitable place on basis of the location of the natural gas valve.
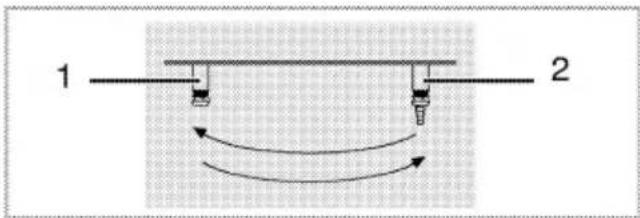
1 Plug
2 Hose nozzle
- There must be a flex pipe at the outlet of the installation for the natural gas connection and the tip of this pipe must be closed with a plug.
- Service Representative will remove the plug during connection and connect your appliance by means of a straight connection device (coupling).
• Make sure that the natural gas valve is readily accessible. - If you need to use your appliance later with a different type of gas, you must consult an authorised service centre for the related conversion procedure.

DANGER
Risk of explosion by damage of the safety tube!
The safety tube must not be clamped, bent or trapped or come into contact with hot parts of the appliance.
Connection to the mains supply

Important
This appliance must be earthed!
Our company shall not hold responsible for any damage caused by using the appliance without earthed socket.

DANGER
Risk of electric shock, short circuit or fire by unprofessional installation!
The appliance may be connected to the mains supply only by an authorized qualified person and the appliance is only guaranteed after correct installation.

DANGER
Risk of electric shock, short circuit or fire by damage of the mains lead!
The mains lead must not be clamped, bent or trapped or come into contact with hot parts of the appliance. If the mains lead is damaged, it must be replaced by a qualified electrician.
The mains supply data must correspond to the data specified on the rating plate of the appliance. The rating plate is either seen when the door or the lower cover is opened or it is located at the rear wall of the appliance depending on the appliance type.
The supply cable of the appliance must correspond to the specifications; see technical data table Technical Data, page 5.

Important
The plug should be easily accessible after installation (but not above the hob).
Plug the mains lead into the socket.

DANGER
Risk of electric shock!
Before starting any work on the electrical installation, please disconnect the appliance from the mains supply.
- Position appliance up to the kitchen wall.
- To align the appliance with the worktop, adjust the feet turning right or left hand as required.
Final check
-
Check electrical functions.
-
Turn on gas supply.
- Check gas installations for secure fitting and tightness.
- Ignite burners and check appearance of the flame.

Important
The flames should be blue and burn smoothly. If the flames appear yellowish, check secure position of the burner cap or clean the burner. Switch off gas and let burner cool before touching it.
Gas conversion

DANGER
Risk of explosion!
Before starting any work on the gas installation, please shut off the gas supply.
In order to change your appliance's gas type, change all injectors and make flame adjustment for all valves at reduced flow rate position.
Exchange injector for the burners
- Take off burner cap and burner body.
- Unscrew injectors.
- Fit new injectors.
- Check all connections for secure fitting and tightness.

NOTICE
New injectors have their position marked on their packing or injector table on Injector Table, page 6 can be referred to.

1 Flame failure device (model dependant)
2 Sparking plug
3 Injector
4 Burner

Important
Unless there is an abnormal condition, do not attempt to remove the gas burner taps. You must call an Authorised service agent if it is necessary to change the taps.
Reduced gas flow rate setting for hob taps
- Ignite the burner that is to be adjusted and turn the knob to the reduced position.
- Remove the knob from the gas tap.
- Use an appropriately sized screwdriver to adjust the flow rate adjustment screw.
For LPG (Butane - Propane) turn the screw clockwise.
For the natural gas, you should turn the screw counter-clockwise once.
» The normal length of a straight flame in the reduced position should be 6-7 mm.
-
If the flame is higher than the desired position, turn the screw clockwise. If it is smaller turn anticlockwise.
-
For the last control, bring the burner both to high-flame and reduced positions and check whether the flame is on or off.
Depending on the type of gas tap used in your appliance the adjustment screw position may vary.
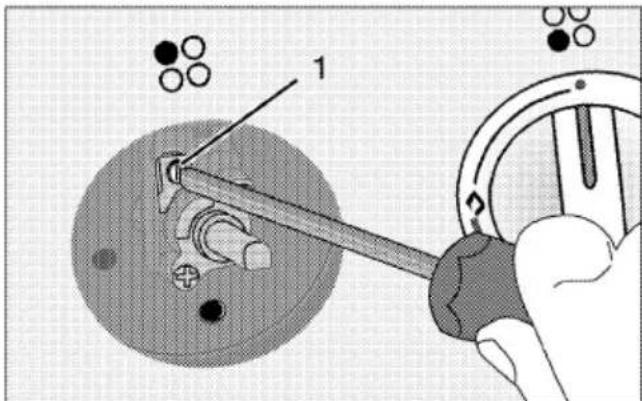
1 Flow rate adjustment screw

1 Flow rate adjustment screw

NOTICE
If the gas type of the unit is changed, then the rating plate that shows the gas type of the unit must also be changed.
4 Preparation
Tips for saving energy
The following tips will help you to use your appliance in an ecological way and to save energy:
- Use dark coloured and enamel coated trays, since the heat transmission will be better.
- While cooking your meals, perform a preheating operation if it is advised in the user manual or cooking instructions.
- During cooking, do not open the oven door frequently.
- Try to cook more than one type of meal within the oven at the same time (You can cook two different meals at the same time by locating cooking bowls on the same shelf). It will be suitable to cook more than one meal after each other. The oven will already be hot.
• Defrost frozen meals before cooking them.
- You can save energy by switching off your oven a few minutes before the end of the cooking time (The oven door should not be opened).
- Use pots/pans with lids for cooking. Without a lid, the energy consumption may be up to four times higher.
- Choose the burner/plate which is suitable to the saucepan base. Always choose the correct size of saucepans for your meals. For larger burners/plates more energy is needed.
Initial operation
First cleaning of the appliance

NOTICE
The surface may get damaged by some detergents or cleaning materials.
Do not use aggressive detergents, cleaning powder/cream or any sharp objects.
- Remove all packaging materials.
- Wipe the surfaces of the appliance with a damp cloth or sponge and dry with a cloth.
Initial heating

WARNING
Hot surfaces may cause burns!
Do not touch the hot surfaces of the appliance. Use oven gloves.
Keep children away from the appliance.
Allow the appliance to cool down before you take off the heat shield.

Important
Smell and smoke may emit during first heating. Ensure that the room is well ventilated.
Any production residues or conservation layers must be burnt off before the first use. Heat up the appliance for about 30 minutes and then switch it off.
Electric oven
- Take all baking trays and racks from the oven.
- Close oven door.
- Select top and bottom heat with the function knob.
- Select the highest temperature with the thermostat knob; see How to use the electric oven, page 21.
- Heat approximately 30 minutes.
- Switch off oven; see How to use the electric oven, page 21
Grill oven
- Take all baking trays and wire shelf from the oven.
- Close oven door.
- Select highest power of the grill; see How to operate the grill, page 24.
- Heat approximately 30 minutes.
- Switch off grill; see How to operate the grill, page 24
5 How to use the hob
General information on cooking

DANGER
Risk of fire by overheated oil!
When you heat oil, do not leave it unattended.
Never try to extinguish the fire with water! When oil has caught fire, immediately cover the pot or pan with a lid. Switch off the hob if safe to do so and phone the fire service.
- Ensure handles of pans cannot accidentally be caught or knocked and do not get hot by adjacent heating zones. Avoid pans that are unstable and easily tipped. Pans that are too heavy to move easily when filled can also be a hazard. Only use flat bottomed pots or pans.
- Use pans which have sufficient capacity for the amount of food being cooked so they don't boil over and cause unnecessary cleaning. Do not place lids on the burners. Always position pans centrally over the burners. When transferring pans from one burner to another always lift the pans do not slide them.
Cooking with gas
- The size of the pan and the size of the gas flame should match each other. Adjust the gas flames so that they do not go beyond the bottom of the pan always place
the pan onto the pan support in a central position.
How to use hobs
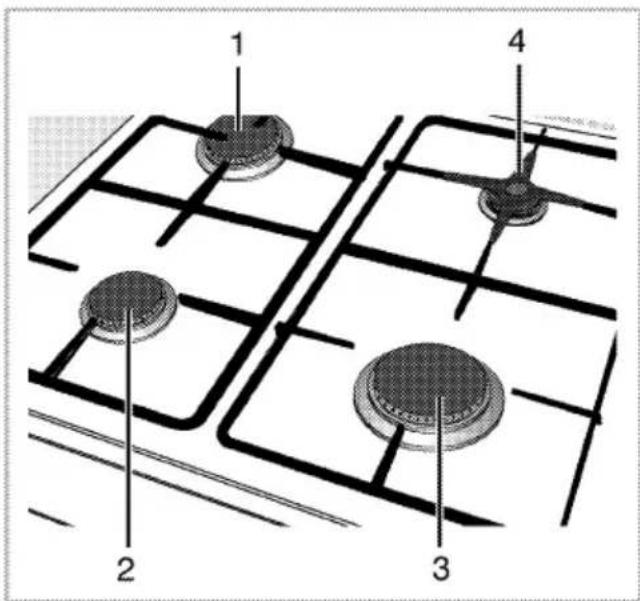
1 Normal burner 20–22 cm
2 Normal burner 20–22 cm
3 Rapid burner 22-24 cm
4 Auxiliary burner 12-18 cm is list of advised diameter of pots to be used on related burners.
The large flame symbol corresponds to the highest cooking power, the small flame symbol corresponds to the lowest cooking power. In the off position (top) the gas supply to the burner is turned off.
Ignite the gas burners
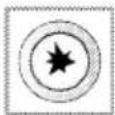
The gas burners are ignited by means of the ignition button.
- Keep hob control knob pressed.
-
Turn anticlockwise to the large flame symbol.
-
Press ignition button and release it again. Repeat the process until the emanating gas is lit.
- Adjust to the desired cooking power.
Switch off the gas burners
Turn burner control knob to off position (top).
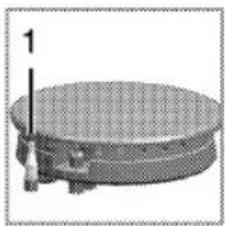
Flame failure device (model dependant)
natural_image
3D rendering of a circular mechanical component with a central flat plate and a side protrusion (no text or symbols)In case of any flame failure for any reasons in the top burners, the flame failure device immediately cuts off the gas flow.
-
Flame failure device
-
Turn the knob clockwise direction by pressing and wait for its ignition.
- Keep the knob at pressed position for 3-5 seconds after you see the flame around the burner.
- Repeat the sequence of operations if the flame does not ignite. After you release the knob, if the ignition does not continue repeat the same process by keeping the knob pressed for 15 seconds.

DANGER
Risk of deflagration incase of unburned gas!
Do not press the knob for longer than 15 seconds if there was no ignition.
Wait for one minute and then repeat the ignition process.
General information on baking, roasting and grilling

DANGER
Risk of scalding by hot steam!
Take care when opening the oven door as steam may escape.
Tips for baking
- Use non-stick coated appropriate metal plates or aluminum containers or heat-resistant silicone moulds.
• Make best use of the space on the rack. - It is recommended to place the baking mould in the middle of the rack.
- Select the correct shelf position before turning the oven or grill on - don't move oven shelves when hot.
- Keep the oven door closed.
Tips for roasting
- Seasoning with lemon juice and black pepper will improve the cooking performance when cooking a whole chicken, turkey or a large piece of meat.
- Meat with bones takes about 15 to 30 minutes longer before it is cooked than a roast of the same size without bones.
- You should calculate about 4 to 5 minutes cooking time per centimeter height of the meat.
- Let meat rest in the oven for about 10 minutes after the cooking time. The juice is better distributed all
over the roast and does not run out when the meat is cut.
- Fish in a fire-resistant dish should be placed on the rack at the medium or lower level.
Tips for grilling
Grilling is ideal for cooking meat, fish and poultry and will achieve a nice brown surface without it drying out to much. Flat pieces, meat skewers and sausages are particularly suited for grilling as are vegetables with a high water content such as tomatoes and onions.
- Distribute the pieces to be grilled on the wire shelf.
- If the grilling is on the wire shelf, locate a dripping pan under it in order to collect the fat.
- Add some water in the dripping pan for easy cleaning.

NOTICE
Fire danger due to food which is unsuitable for grilling!
Only use food for grilling which is suitable for intensive grilling heat. Do not place the food too far in the back of the grill. This is the hottest area and fat food may catch fire.
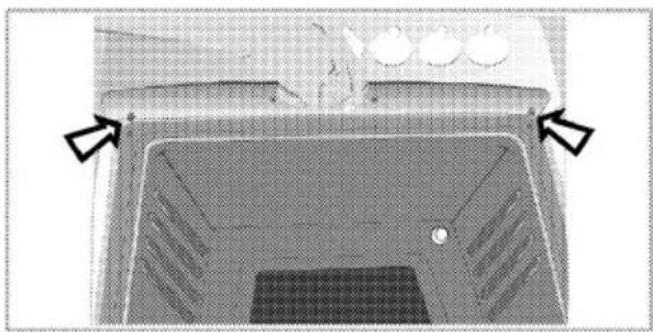
Insert the heat shield
The heat shield is used for grilling with the oven door open. It protects the control panel and knobs against heat and soiling.
- Open the oven door and insert the heat shield into the pins below the control panel.
natural_image
Top-down view of a kitchen sink with a gridded bed and three outlets, marked by arrows (no text or symbols)» When the heat shield is inserted, the oven door remains open.
How to use the electric oven
Select temperature and operating mode
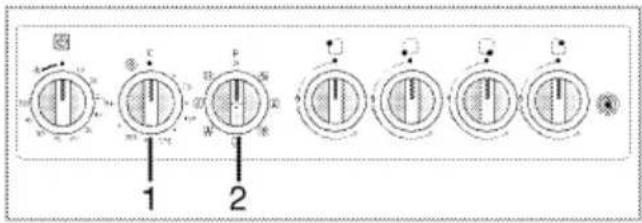
1 Thermostat knob
2 Function knob
The operating modes of the electric oven are selected with the function knob. The temperature is adjusted with the thermostat knob.
All oven functions are turned off by turning the relevant knob to off (upper) position.
- Set the oven timer to the desired cooking time; see How to operate the oven timer, page 22.
- Set thermostat knob to the desired temperature.
- Set function knob to the required operating mode.
» The oven heats up to the adjusted temperature and maintains it. During heating, temperature lamp stays on.
Switch off electric oven
Switch the oven timer to off position.

Important
When the timer is set to a certain time, it will turn off automatically; see How to operate the oven timer, page 22
Turn function knob and thermostat knob to off position (top).
Operating modes
All functions for the ovens (also included main oven) are listed in this section.
The order of operating modes shown here might deviate from the arrangement on your appliance.
Top and bottom heat

Top and bottom heat are on.
The foodstuffs are heated simultaneously from the upper and lower part.
Suitable e.g. for cakes, cookies and casseroles in baking moulds. Cook with one tray only.
Top and bottom heat with convection air

Top and bottom heat plus fan (in the rear wall) are on. The hot air is distributed evenly and quickly all over the oven by the fan. Cook with one tray only.
Top heat and convection air
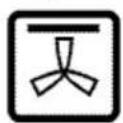
Top heat plus fan (in the rear wall) are on. Hot air is spread more evenly with the fan compared to only top heat.
Bottom heat and convection air
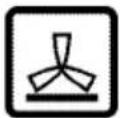
Bottom heat plus fan (in the rear wall) are on. Hot air is spread more evenly with the fan compared to only bottom heat.
Operating with fan

The oven is not heated. Only oven lamp plus fan (in the rear wall) are on. Frozen granular food is thawed slowly at room temperature and cooked food is cooled down.
Grill with convection air
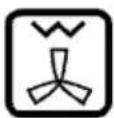
The grill effect is not as strong as with normal grilling.
- Put small or medium-sized portions in correct shelf position under the grill heater for grilling.
- Set the temperature to maximum level.
• Turn the food after half of the grilling time.
Strong grill with turn spit
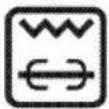
Strong grill is used with turnspit function at the same time. Suitable for grilling the entire surface of large pieces.
How to operate the oven timer
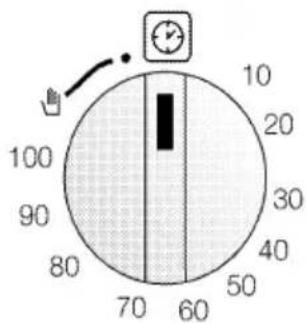
Starting cooking process

Important
To start heating units, adjust timer and set function knob to the required position. Otherwise, the oven will not operate.
- Set cooking period by turning timer knob clockwise.
- Put your dish into the oven.
- Select operating mode and temperature; see How to use the electric oven, page 21.
» The oven will reach temperature and maintain this temperature until the end of the cooking time that has been selected. - Once the cooking time is over, time setting knob will automatically rotate counterclockwise. A warning sound indicating that the set time is over is heard and the power is cut.

NOTICE
If you do not want to use timer function turn the knob counterclockwise to the hand symbol.
- Turn off the oven by using the time setting knob, function knob and/or temperature knob.
Interrupting the cooking process
- Turn timer knob counterclockwise and finish the cooking process.
- Turn off the oven using the function knob and/or temperature knob.
Cooking times table

Important
The values indicated in the table below are data indicative. They may vary according to the type of food as well as your preferences of cooking.
Baking and roasting

Important
Level 1 is the bottom level in the oven.
| Food | Dish | Insertion level | Temperature (°C) | Cooking time (min.) (approx.) | ||
| Cake | Bread mould 24 ... 26 cm | 3 | 2 | 170 ... 180 | 25 ... 35 | 20 ... 30 |
| Ring cake | Cake mould 18 ... 22 cm | 3 | 2 | 170 ... 180 | 35 ... 45 | 35 ... 45 |
| Cookies | Baking tray | 3 | 3 | 170 ... 190 | 25 ... 35 | 20 ... 25 |
| Flaky pastry | Baking tray | ...... | ...... | ...... | ...... | ...... |
| Brioche | Baking tray | ...... | ...... | ...... | ...... | ...... |
| Pies/pastries | Baking tray | 3 | 3 | 190 | 40 ... 50 | 30 ... 40 |
| Yeast dough | Roasting tray | 3 | 3 | 200 | 35 ... 45 | 30 ... 35 |
| Savory pies | Baking tray | 3 | 3 | 180 ... 190 | 25 ... 35 | 20 ... 30 |
| Choux pastry | Baking tray | 3 | 3 | 180 ... 190 | 40 ... 50 | 35 ... 45 |
| Lasagne | Oven dish | 3 | 3 | 170 ... 180 | 40 ... 50 | 35 ... 45 |
| Pizza | Baking tray | 3 | 3 | 200 ... 220 | 15 ... 20 | 15 ... 20 |
| Roast beef | Casserole | 3 | 3 | 15 min. 250 * | 110 ... 120 | 105 ... 115 |
| Lamb shoulder | Casserole | 3 | 3 | 15 min. 250 * | 70 ... 90 | 65 ... 85 |
| Roast chicken | Casserole | 3 | 3 | 15 min. 250 * | 60 ... 70 | 55 ... 65 |
| Turkey (5.5 kg) | Baking tray | 3 | 3 | 25 min. 220 * | 180 ... 240 | 175 ... 230 |
| Fish | Casserole | 3 | 3 | 200 | 15 ... 25 | 10 ... 20 |
| * then 150 | ||||||
(**) For preheating, set the required temperature, the thermostat lamp will go out when the required temperature is reached.
How to operate the grill

WARNING
Hot surfaces may cause burns! Children must be kept away. When the door fully open, it remains tilted slightly, so that any spillage will be directed away form you.
- During grilling bring the timer knob to the hand sign by turning the counterclockwise.
Switch on grill
- Open grill door.
- Set the function knob onto the grill symbol.
- Set grill temperature.
- Preheat for approximately 5 minutes, if it is necessary.
» The thermostat lamp is switched on.
Switch off grill
- Turn grill control knob to off position (top).
Turn spit function
When grill function is selected, turnspit motor will start turning.
- Locate a dripping pan through the bottom in order to collect the fats. Add some water in dripping pan for easy cleaning.
• Fix the food to be grilled to the turn spit with the forks (3).
- Place the spit on the frame (1). Slide turn spit frame into the oven at the desired level.
- Insert the skewer to the hole which is connected to the turnspit motor on the rear wall of the oven cavity.
- Do not forget to remove plastic part from spit (2).
• After grilling, screw the plastic handle (2) to the skewer and take out the food from oven.

1 Spit frame
2 Plastic part
3 Fork
Cooking times table for grilling
Grilling with electric grill
| Food | Insertion level | Grilling time (approx.) |
| Fish | 3...4 | 20...25 min.# |
| Sliced chicken | 3...4 | 15...20 min. |
| Lamb chops | 3...4 | 12...15 min. |
| Roast beef | 3...4 | 15...25 min.# |
| Veal chops | 3...4 | 15...25 min.# |
| #depending on thickness | ||
General information

DANGER
Risk of electric shock!
Switch off the electricity before cleaning appliance to avoid an electric shock.

DANGER
Hot surfaces may cause burns!
Allow the appliance to cool down before you clean it.

NOTICE
The surface may get damaged by some detergents or cleaning materials.
Do not use aggressive detergents, cleaning powder/cream or any sharp objects.
Clean the appliance thoroughly after each use; in this way it will be possible to remove cooking residues more easily, thus avoiding these from burning the next time the appliance is used.
No special cleaning agents are required for cleaning the appliance. It is recommended to use warm water with washing liquid, a soft cloth or sponge and use a dry cloth for drying.
Do not use any abrasive cleaning materials!
(model dependant) - Do not use any harsh abrasive cleaners, or hard metal scrapers to clean the glass lid as they may scratch the surface. This may destroy the glass.

Important
Do not use steam cleaners for cleaning.
How to clean the hob
Gas hobs
- Remove pan supports and burner caps and clean them.
- Clean the hob.
- Refit burner caps and check that they are securely positioned.
- While placing pan supports, take care that burners are centered to pan supports.
Cleaning the control panel

NOTICE
Damage of the control panel! Do not remove the control knobs for control panel cleaning.
Clean control panel and control knobs.
Cleaning the oven
No oven cleaner or any other special cleaning agent is required for cleaning the oven. It is recommended to wipe the oven with a damp cloth while it is still warm.
Clean oven door
Don't use any harsh abrasive cleaners or sharp metal scrapers for cleaning the oven door. They could scratch the surface and destroy the glass.
Removal of oven door
The oven door can be disassembled for easier cleaning of the inner space of the oven.
- Open oven door entirely.
- Press hinged shackles back at both sides.
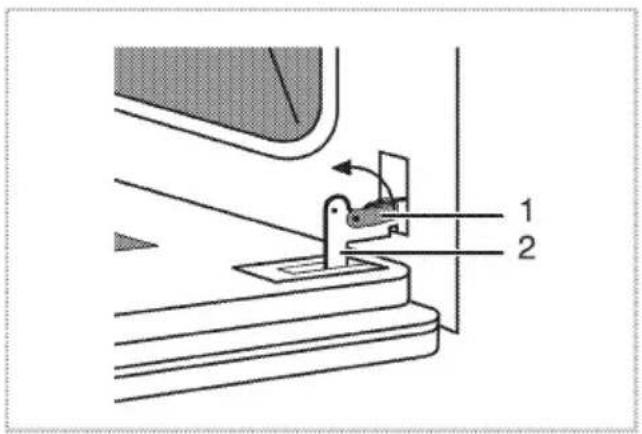
1 Hinged shackles
2 Hinge

- Put oven door in a slightly sloping position.
- Lift the oven door to the front with both hands.
Install oven door again in reverse order after cleaning.
Replacing the oven lamp

DANGER
Hot surfaces may cause burns!
Make sure that the appliance is switched off and cooled down in order to avoid the risk of an electrical shock.
The oven lamp is a special heat-resisting (T 300 °C) electric light bulb; see Technical Data, page 5. Oven lamps can be obtained from a good local electrical store.

NOTICE
Position of lamp may vary from diagram.
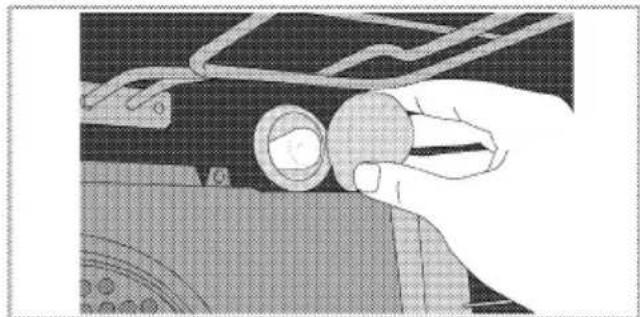
- Switch off the appliance at the mains.
- Unscrew glass cover by turning anti-clockwise.
natural_image
Close-up of a hand adjusting a mechanical component with a circular knob (no visible text or symbols)- Unscrew oven lamp by turning anti-clockwise and replace it with new one.
- Refit the glass cover.

Troubleshooting

DANGER
Risk of electric shock, short circuit or fire by unprofessional repairs!
Repairs on the appliance must be carried out by an approved service centre.

DANGER
Risk of explosion or poisoning by unprofessional repair.
Repairs on the appliance must be carried out by an approved service centre.
Normal operating conditions
- Smoke and smell may emit for a couple of hours during the first operation.
- It is normal that steam escapes during operation.
- When the metal parts are heated, they may expand and cause noise.
Before you call the service, please check the following points.
Electrical equipment
| Malfunction/problem | Possible cause | Advice/remedy |
| The appliance does not work. | The mains fuse is defective or has tripped. | Check fuses in the fuse box. If necessary, replace or reset them. |
| Appliance's plug can not be connected to the grounded socket. | Check the plug connection. | |
| Oven light does not work | Oven lamp is defective. | Replace oven lamp. |
| No current. | Check fuses in the fuse box. If necessary, replace or reset them. | |
| Oven does not heat. | Function knob and/thermostat knob are not set. | Set function knob and thermostat knob. |
| If the appliance has a timer, the timer may not be set. | Set the time. | |
| No power. | Check mains supply and fuse box. |
Gas
| Malfunction/problem | Possible cause | Advice/remedy |
| No ignition spark is produced. | No electric supply to the appliance. | Check fuses in the fuse box. |
| No gas is emitted. | Main gas tap is closed. | Open gas tap. |
| Safety tube is bent. | Install safety tube without bends. | |
| Burners do not burn smoothly or not at all. | Burners are dirty. | Clean burner parts. |
| Burners are not dry. | Dry burner parts. | |
| Burner cap is not securely positioned. | Position burner correctly. | |
| Gas tap is closed. | Open gas tap. | |
| Gas container is empty (in case of LPG connection). | Replace gas container. |
Clock/ timer (If the appliance has a digital timer)
| Malfunction/problem | Possible cause | Advice/remedy |
| Clock display is blinking or clock symbol is on. | Power was interrupted previously. | Set timeThen switch the oven off with function knobs, set the oven function again. |
If the problem has not been solved:
-
Separate unit from the mains supply (deactivate or unscrew fuse).
-
Call the after-sales service of your store reseller.

Important
Do not attempt to repair the appliance yourself. There are no customer service items inside the appliance.

- Please read these instructions before installation or using your appliance!
- Table of Contents
- General information 4
- Safety Instructions 7
- Installation 11
- Preparation 16
- How to use the hob 18
- How to Operate the Oven 20
- Maintenance and Care 25
- Troubleshooting 27
- General information
- Overview
- Accessories supplied with the unit
- Important
- Baking tray
- Deep roasting tray
- Wire shelf
- Heat shield
- Turn spit function
- Safety Instructions
- Explanation of safety instructions
- DANGER
- High risk of personal injury.
- CAUTION
- Risk of personal injury.
- NOTICE
- Risk of material damage.
- Tip for the user.
- Basic safety instructions
- Safety for children
- Safety when working with gas
- What to do when you smell gas
- Safety when working with electricity
- Intended use
- Disposal
- Packaging material
- Risk of suffocation by the packaging materials!
- Old equipment
- Future transportation
- If you do not have the original carton
- Before installation
- Room ventilation
- Installation and connection
- Connection to the gas supply
- Risk of explosion by damage of the safety tube!
- Connection to the mains supply
- This appliance must be earthed!
- Risk of electric shock, short circuit or fire by unprofessional installation!
- Risk of electric shock, short circuit or fire by damage of the mains lead!
- Risk of electric shock!
- Final check
- Gas conversion
- Risk of explosion!
- Exchange injector for the burners
- Reduced gas flow rate setting for hob taps
- Preparation
- Tips for saving energy
- Initial operation
- First cleaning of the appliance
- Initial heating
- WARNING
- Electric oven
- Grill oven
- How to use the hob
- General information on cooking
- Cooking with gas
- How to use hobs
- Ignite the gas burners
- Switch off the gas burners
- Flame failure device (model dependant)
- Risk of deflagration incase of unburned gas!
- General information on baking, roasting and grilling
- Tips for baking
- Tips for roasting
- Tips for grilling
- Insert the heat shield
- How to use the electric oven
- Select temperature and operating mode
- Switch off electric oven
- Operating modes
- Top and bottom heat
- Top and bottom heat with convection air
- Top heat and convection air
- Bottom heat and convection air
- Operating with fan
- Grill with convection air
- Strong grill with turn spit
- How to operate the oven timer
- Starting cooking process
- Interrupting the cooking process
- Cooking times table
- Baking and roasting
- How to operate the grill
- Switch on grill
- Switch off grill
- Cooking times table for grilling
- General information
- Do not use any abrasive cleaning materials!
- How to clean the hob
- Gas hobs
- Cleaning the control panel
- Cleaning the oven
- Clean oven door
- Removal of oven door
- Replacing the oven lamp
- Troubleshooting
- Normal operating conditions
Brand : BLOMBERG
Model : HGS 81120 E
Category : Cooker