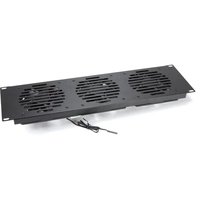
Cool-rack III - Cabinet ATM - Free user manual and instructions
Find the device manual for free Cool-rack III ATM in PDF.


| Product Type | Closet |
| Brand | ATM |
| Model | Cool-rack III |
| Dimensions (approx.) | 120 cm x 50 cm x 180 cm |
| Weight (approx.) | 30 kg |
| Material | Engineered wood with melamine finish |
| Number of Shelves | 4 adjustable shelves |
| Number of Doors | 2 hinged doors |
| Interior Hanging Rod | Yes, 1 rod |
| Drawers | None |
| Assembly Required | Yes, instructions included |
| Tools Needed | Phillips screwdriver (not included) |
| Maximum Load per Shelf | 10 kg |
| Color | White / Black (check product listing) |
| Warranty | 2 years limited |
| Care Instructions | Wipe with a damp cloth; avoid harsh chemicals |
| Safety Notes | Use wall anchor to prevent tipping (not included) |
| Spare Parts Availability | Contact ATM customer service |
Frequently Asked Questions - Cool-rack III ATM
User questions about Cool-rack III ATM
0 question about this device. Answer the ones you know or ask your own.
Ask a new question about this device
Download the instructions for your Cabinet in PDF format for free! Find your manual Cool-rack III - ATM and take your electronic device back in hand. On this page are published all the documents necessary for the use of your device. Cool-rack III by ATM.
USER MANUAL Cool-rack III ATM
Instructions for installation of the Cool-rack III
The Cool-rack III can be mounted on the front or rear rails of most equipment racks. An opening for air to enter the rack must be provided to ensure maximum cooling. The best arrangement positions the air inlet such that cool room air enters the rack at a low point and "washes" over the heated equipment on its way to the fans. A small display on the control board mounted on the back of the Cool-rack III is meant for set-up only. It reads in degrees Celsius, not Fahrenheit, and will not be visible after installation
The Cool-rack III is not for use in racks with front doors, which would block airflow. Use the rear rack rails for mounting the Cool-rack II, if possible. (ATM makes several cooling systems designed specifically for racks with doors or racks located in cabinets or closets.
Be careful not to damage the exposed temperature control printed circuit board mounted behind the fan panel. After mounting the panel in the rack, connect the output lead from the power supply to the power jack attached to the control board, and run the thermistor to the vicinity of the hottest area within the rack. The thermistor can be fastened using the adhesive-backed anchor supplied. Direct connection to the heat source will cause the fans to come on sooner than a less-direct connection, such as suspending it over, rather than on, a hot component.
Plug the power supply into an always-live AC source. When the temperature at the thermistor reaches approximately 90F/32C degrees, the fans will begin to turn. The fans will stop when the temperature falls below approximately 85F/29C. A hair dryer can be used to check for proper operation.
To change the temperature at which the fans turn ON, press the SET button on the control board momentarily. The display will blink. Press the ▼ or ▲ buttons to change to the desired temperature. After a few seconds, the new temperature will be stored.
To change the temperature at which the fans turn OFF, decide how many degrees below the turn-on temperature you wish the fans to stop, called the
differential. (The factory setting is 3 Celsius degrees, or about 5 Fahrenheit degrees.) To change the differential:
Hold the SET button for 5 seconds. P0 will be displayed. * Press the ▲button once to change the display to P1, then press SET again. The present differential temperature will be displayed. Use the ▲ and ▼buttons to set the desired differential. The display will return to displaying system temperature after a few seconds; the new differential temperature has been stored.
For your convenience, here are some Fahrenheit temperatures and their Celsius equivalents, rounded to the nearest whole degree:
$$ 7 5 \mathrm{F} = 2 4 \mathrm{C} $$
$$ 8 0 \mathrm{F} = 2 7 \mathrm{C} $$
$$ 8 5 F = 2 9 C $$
$$ 9 0 \mathrm{F} = 3 2 \mathrm{C} $$
$$ 9 5 \mathrm{F} = 3 5 \mathrm{C} $$
$$ 1 0 0 \mathrm{F} = 3 8 \mathrm{C} $$
*Pressing the ▲ or ▼ buttons again will cycle the display through the following codes: P1, P2, P3, P4, P5, P6, and back to P0. Many of these codes refer to parameters used in heating and refrigeration systems, not in cooling systems. Should any be adjusted accidentally, restore them to their factory settings:
P0 - C (for "cooling")
P1 - Desired differential, set as described above
P2 - 110
P3 - -50
P4 - 0
P5 - 0
P6 - Off

Specifications Page
| Product Cool-rack III | |
| Fans | 3/120mm |
| Airflow (free air) | 120 CFM |
| Noise level | 24 dBA |
| Power consumption | 9 watts |
| Control | Thermal – user-adjustable |
| Dimensions (in-line) | 5.25"h x 19"w x 2.d |
| Dimensions, in-line, metric | 133 x 483 x 70mm |
| Weight, boxed (lbs/kgm) | 1.75/.8 |
| ATM part number | 00-203-02 |
Brand : ATM
Model : Cool-rack III
Category : Cabinet