
EBD51SS1 - Refrigerator ELICA - Free user manual and instructions
Find the device manual for free EBD51SS1 ELICA in PDF.

| Product Type | Freestanding Refrigerator |
| Brand | Elica |
| Model | EBD51SS1 |
| Total Net Capacity | 250 L (approx.) |
| Fridge Net Capacity | 180 L |
| Freezer Net Capacity | 70 L |
| Energy Class | A+ |
| Annual Energy Consumption | 220 kWh |
| Climate Class | N-ST |
| Noise Level | 40 dB(A) |
| Dimensions (H x W x D) | 1770 x 540 x 600 mm |
| Weight | 55 kg |
| Power Supply | 220-240 V, 50 Hz |
| Current | 0.8 A |
| Refrigerant | R600a |
| Defrost Type | Frost-Free (No Frost) |
| Control Type | Mechanical Thermostat |
| Interior Lighting | LED |
| Reversible Door | Yes |
| Special Features | Adjustable Glass Shelves, Crisper Drawer, Door Balconies |
| Cleaning & Maintenance | Clean condenser coils annually; defrost automatically; use mild detergent |
| Safety Features | Overheat protection, anti-tip brackets (optional), child lock (if freezer) |
| Reparability | Spare parts available; user replaceable door gaskets and shelves |
| Warranty | 2 years (parts and labor) |
Frequently Asked Questions - EBD51SS1 ELICA
User questions about EBD51SS1 ELICA
0 question about this device. Answer the ones you know or ask your own.
Ask a new question about this device
Download the instructions for your Refrigerator in PDF format for free! Find your manual EBD51SS1 - ELICA and take your electronic device back in hand. On this page are published all the documents necessary for the use of your device. EBD51SS1 by ELICA.
USER MANUAL EBD51SS1 ELICA
natural_image
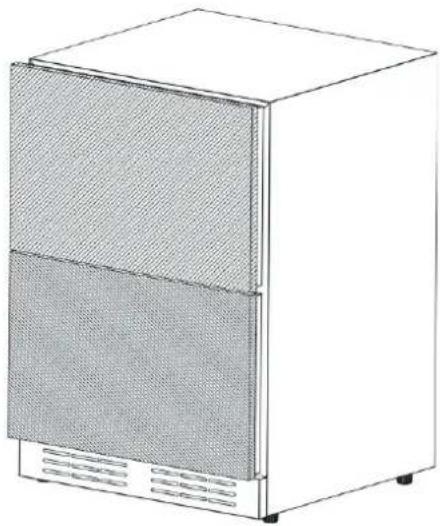
Simple line drawing of a two-tiered refrigerator with ventilation grilles (no text or symbols)BEFORE USE, PLEASE READ AND FOLLOW ALL SAFETY RULES AND OPERATING INSTRUCTIONS. KEEP THIS MANUAL IN A SECURE LOCATION.
IMPORTANT SAFETY INSTRUCTIONS
- Read all instructions before using the appliance.
- This appliance is not intended for use by persons (including children) with reduced physical, sensory or mental capabilities, or lack of experience and knowledge, unless they have been given supervision or instruction concerning use of the appliance by a person responsible for their safety.
- Children should be supervised to ensure that they do not play with the appliance.
- If the supply cord is damaged, it must be replaced by the manufacturer, its service agent or similarly qualified persons in order to avoid a hazard.
- WARNING: When positioning the appliance, ensure the supply cord is not trapped or damaged.
- WARNING: Do not locate multiple portable socket-outlets or portable power supplies at the rear of appliance.
- WARNING: Keep ventilation openings, in the appliance enclosure or in the built-in structure, clear of obstruction.
- WARNING: Do not use mechanical devices or other means to accelerate the defrosting process, other than those recommended by the manufacturer.
- WARNING: Do not damage the refrigerant circuit.
- WARNING: Do not use electrical appliances inside the food storage compartments of the appliance, unless they are of the type recommended by the manufacturer.
- Do not store explosive substances such as aerosol cans with a flammable propellant in this appliance.
- This appliance is intended to be used in household and similar applications such as
– staff kitchen areas in shops, offices and other working environments;
– farm houses and by clients in hotels, motels and other residential type environments;
- bed and breakfast type environments;
- catering and similar non-retail applications.
- Plug into a grounded 3-prong outlet. Do not remove grounding prong, do not use an adapter, and do not use an extension cord.
- It is recommended that a separate circuit, serving only your appliance, be provided. Use receptacles that cannot be turned off by a switch or pull chain.
- Never clean appliance parts with flammable fluids. These fumes can create a fire hazard or explosion.
- Before proceeding with cleaning and maintenance operations, make sure the power line of the unit is disconnected.
- Do not connect or disconnect the electric plug when your hands are wet.
- Unplug the appliance or disconnect the power before cleaning or servicing. Failure to do so can result in electrical shock or death.
- Do not attempt to repair or replace any part of your appliance unless it is specifically recommended in this manual. All other servicing should be referred to a qualified technician.
- Do not store or use gasoline or any other flammable vapors and liquids in the vicinity of this or any other appliance. The fumes can create a fire hazard or explosion.
- Use two or more people to move/install the refrigerator. Failure to do so can result in back or other injury.
- To ensure proper ventilation for your appliance, the front of the unit must be completely unobstructed. Choose a well-ventilated area with temperatures above 50^ F ( 10^ C) and below 100^ F ( 38^ C). This unit must be installed in an area protected from the elements, such as wind, rain, water spray or drips.
- The appliance should not be located next to ovens, grills or other sources of high heat.
- The appliance must be installed with all electrical
connections in accordance with state and local codes. A standard electrical supply (115V AC 60 Hz), properly grounded in accordance with the National Electrical Code and local codes and ordinances, is required.
- Do not kink or pinch the power supply cord of the appliance.
- The fuse (or circuit breaker) size should be 15 amps or higher.
- It is important for the appliance to be leveled in order to work properly. You may need to make several adjustments to level it.
- Although the unit has been tested at the factory, due to transit and storage, you should clean the appliance before use.
- Do not use alcohol-based, solvent-based cleaning agents or abrasives on the interior. These cleaners may damage or discolor the interior.
- Do not use this apparatus for other than residential purposes.
- This appliance is CFC- and HFC-free and contains small quantities of Isobutane (R600a) which is environmentally friendly, but flammable. It does not damage the ozone layer, nor does it increase the greenhouse effect. Care must be taken during transportation and setting up of the appliance that no parts of the cooling system are damaged. Leaking coolant can ignite and may damage the eyes.
• In the event of any damage:
- Avoid open flames and anything that creates a spark,
- Disconnect from the electrical power line,
- Air the room in which the appliance is located for several minutes, and Contact the Service Department for advice.
- The more coolant there is in an appliance, the larger the room it should be installed in. In the event of a leakage, if the appliance is in a small room, there is the danger of combustible gases building up. For every ounce of coolant, at least 325 cubic feet of room space is required. The
amount of coolant in the appliance is stated on the data plate on the back of the appliance. It is hazardous for anyone other than an authorized Service Person to carry out servicing or repairs to this appliance.
• Take serious care when handling, moving, and using the appliance to avoid either damaging the refrigerant tubing or increasing the risk of a leak.
- Replacing component parts and servicing shall be done by factory authorized service personnel so as to minimize the risk of possible ignition due to incorrect parts or improper service.
- WARNING: Risk of child entrapment. Before you throw away your old refrigerator or freezer:
■ Take off the doors.
■ Leave the shelves in place so that children may not easily climb inside. And make sure the coolant circuit, particularly the heat exchanger at the back/bottom of the unit is not damaged.
natural_image
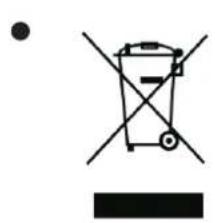
Simple line drawing of a recycling bin with no text or symbolsThe recycle symbol on the product or its packaging indicates that this product is not to be handled as normal household waste and it is to be taken to a recycling collection point for electrical and electronic goods.
- The appliance must be positioned so that the plug is accessible after installed.
INSTALLATION INSTRUCTIONS
Before Using Your Appliance
- Remove the exterior and interior packing.
- Before connecting the appliance to the power source, let it stand upright for approximately 2 hours. This will reduce the possibility of a malfunction in the cooling system from handling during transportation.
- Clean the interior surface with lukewarm water using a soft cloth.
• Install the handle on the left side of the door using the screws that are provided.

Avoid use of abrasive products and never use alcohol!
Installation of Your Appliance
- This appliance is designed for free standing or built-in (fully recessed) installation.
- Place your appliance on a floor that is strong enough to support it when it is fully loaded. To level your appliance, adjust the front leveling legs at the bottom.
- Locate the appliance away from direct sunlight and sources of heat (stove, heater, radiator, etc.). Direct sunlight may affect the acrylic coating and heat sources may increase electrical consumption. Extremely cold ambient temperatures may also cause the unit not to perform properly.
- Avoid locating the unit in moist areas.
- Plug the appliance into an exclusive, properly installed and grounded wall outlet. Do not under any circumstances cut or remove the third (ground) prong from the power cord. Any questions concerning power and/or grounding should be directed toward a certified and authorized products service center.
- This appliance is intended to be installed in a space between two units.
The minimum space required is:
600mm wide × 615mm deep × 865mm high
Please note: When the product is installed, there should be a small ventilation gap between the top of the unit and the underside of any fitting above (6mm or 1/4").
- The appliance should always be plugged into its own individual electrical outlet which has a voltage rating that matches the rating label on the appliance. This provides the best performance and also prevents overloading house wiring circuits that could cause a fire hazard from overheating. Never unplug the appliance by pulling on the power cord. Always grip the plug firmly and pull straight out from the receptacle. Repair or replace immediately all power cords that have become frayed or otherwise damaged. Do not use a cord that shows cracks or abrasion damage along its length or at either end. When moving the appliance, be careful not to damage the power cord.
Installation of the Handle
To install the handle, please follow these instructions:
- Carefully pull the door gasket (seal) away from the door in the area where the handle will be attached.
- Place the handle over the screw holes on the outside of the door and attach it with the screws that have been provided. Tighten the screws.
- Press the door gasket back into its groove.
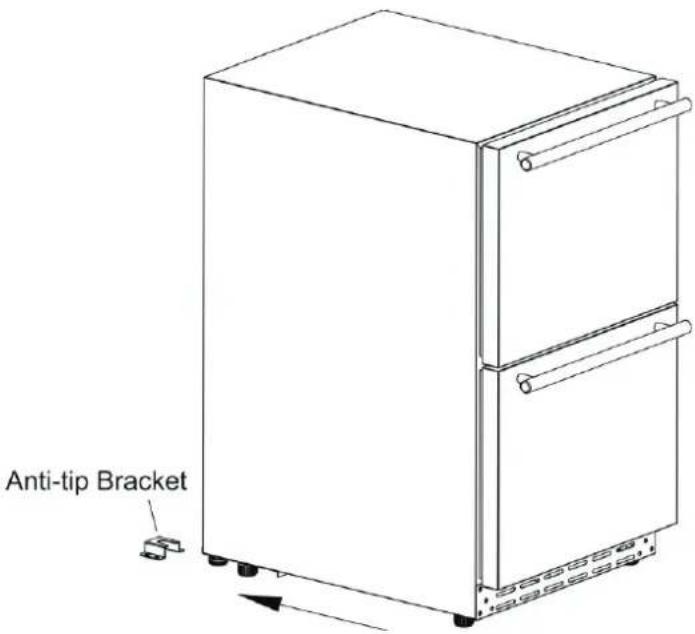
Anti-Tip Bracket Installation
To reduce the risk of tipping the appliance by abnormal usage or improper loading, the appliance must be secured by properly installing the anti-tip device packed with the appliance.
- Place the anti-tip bracket on the floor as shown in the figure to the right.
- Mark the locations of the 8 holes of the anti-tip bracket on the floor.
- Use a 11/50" masonry drill bit and insert plastic anchors.
- Secure the anti-tip bracket to the floor, using screws.
- Slide appliance into position, and make sure the leg engages the anti-tip bracket.
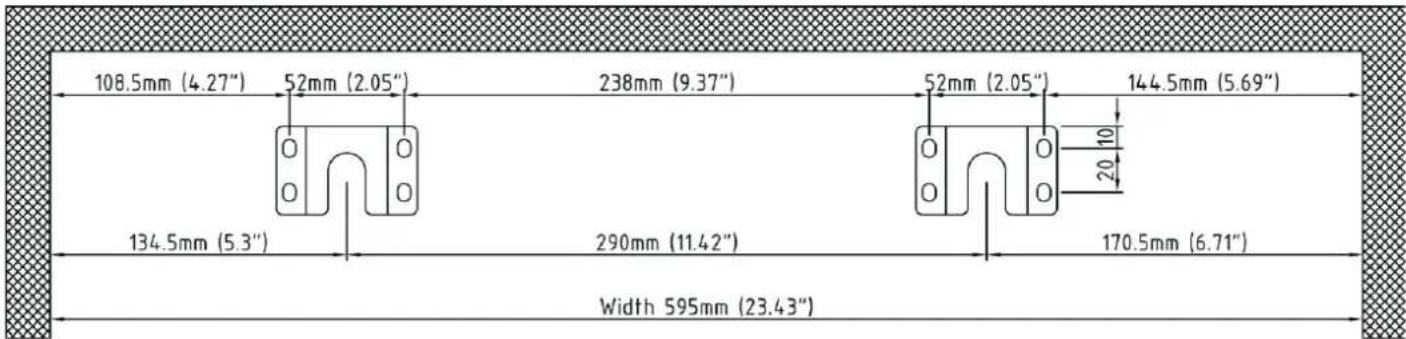
The measurements for the anti-tip bracket installation are illustrated below:
NOTE: If the appliance is relocated, the bracket must be removed and installed in the new location.
Carbon Filter
A built-in carbon filter protects your wines by acting as a natural barrier against harmful odors. The carbon filter should be replaced every 9-12 months depending on the unit's exposure level to odor. If the unit is placed in a kitchen, regular replacement every three months is ideal.
Remove the carbon filter by turning counterclockwise to unlock from rear panel.
natural_image
Simple line drawing of a circular object with grid pattern and two side handles (no text or symbols)Panel Installation
| Overlay Panel Dimension: | |
| Door Panel Width | 23.43" |
| Door Panel Height | 29.76" |
| Door Panel Depth | 3/4" max |
natural_image
Line drawing of a two-tier refrigerator with mesh insulation and front panel (no text or symbols)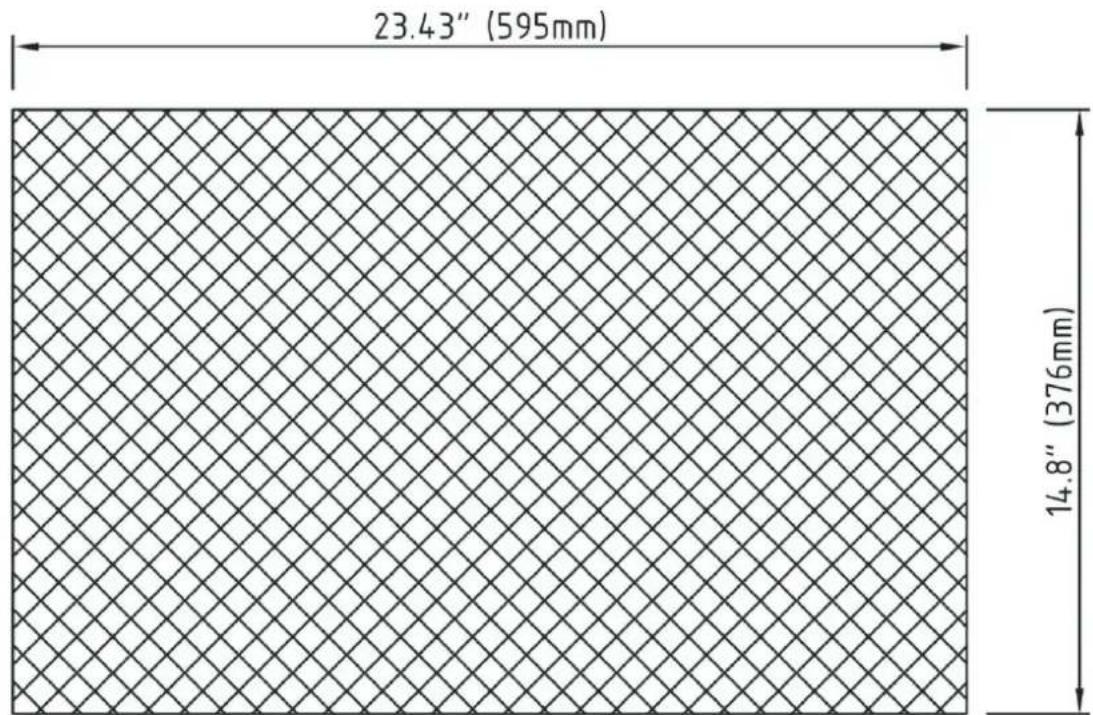
other
| Dimension | Value | | :--- | :--- | | Width | 23.43" (595mm) | | Height | 14.8" (376mm) |Same Panel For Top & Bottom Drawers
Required Tools:
- Phillips Screwdriver
- 1/8" Drill Bit
See pages 8 for overlay panel dimensions before installing.
For easy overlay installation, refrigerator door removal is required.
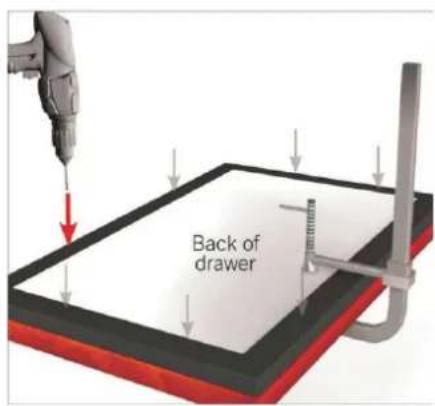
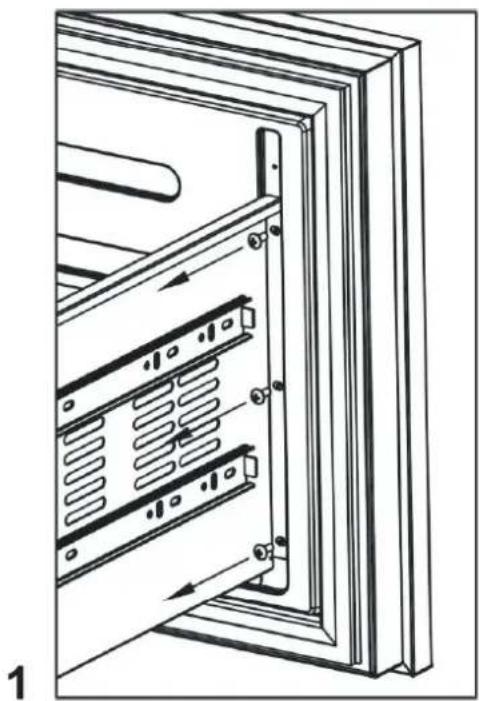
- Open the drawer and detach the front drawer panel by removing ten Phillips screws. (See image 1). Save all these screws for later reinstallation.
- Remove drawer gasket and handle.
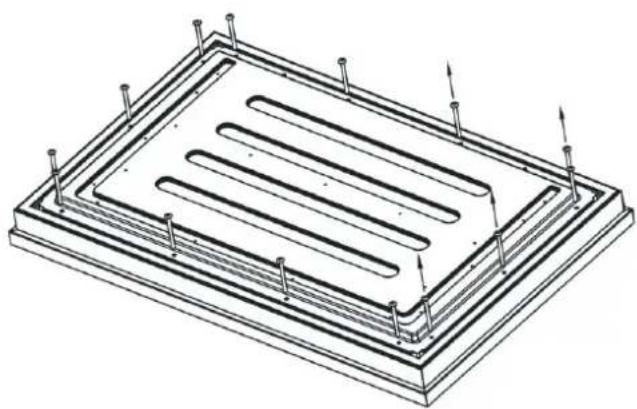
- Lay stainless steel panel face-down on a safe solid surface and detach the front drawer panel by removing fourteen Phillips screws. (See image 2). Save all these screws for later reinstallation.
- Place the new overlay panel under the drawer body and fix it with clamps to ensure that the two remain aligned and do not move. The clamp ensures the overlay panel and drawer stay aligned with each other while installing. Once panel is clamped in place, pilot holes may be drilled into the panel from the rear side of the drawer (See image 3).
- Secure overlay panel to drawer panel using appropriate size screws.
- Reattach drawer gasket by pressing and snapping back into place in gasket channel.
- Reattach drawer panel front to the drawer using ten screws.
- Reattach handle front to the drawer using appropriate size screws.
2
natural_image
Isometric technical drawing of a rectangular electronic component with internal channels and mounting holes (no text or symbols)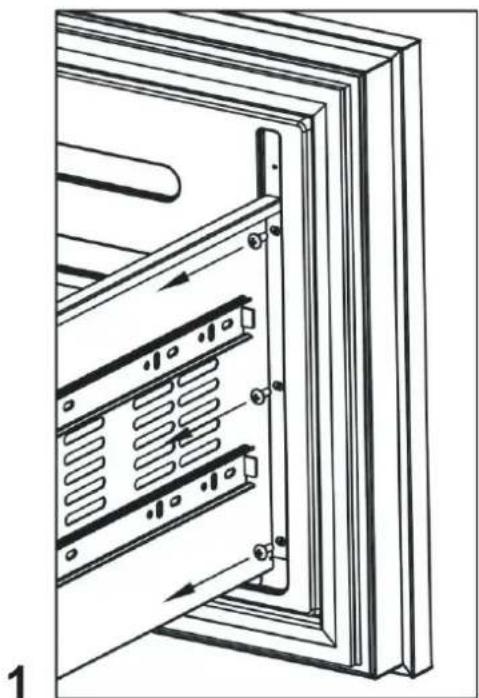
natural_image
Technical line drawing of a server rack with internal components and mounting brackets (no text or symbols)3
OPERATING YOUR APPLIANCE
Recommended temperatures for Chilling Wine:
Red Wines: 15 \~ 18°C (59 \~ 64.4°F)
Dry / White Wines: 9 \~ 14°C (48.2 \~ 57.2°F)
Sparkling Wines: 5 \~ 8°C (41 \~ 46.4°F)
- The appliance should be placed where the ambient temperature is between 10\~38°C (50\~100°F). If the ambient temperature is above or below this range, the performance of the unit may be affected. Placing your unit in extreme cold or hot conditions may cause interior temperatures to fluctuate.
- Connect power cord to a properly grounded outlet.
- This appliance is equipped with Memory IC – should there be a power interruption, unit will auto recover at last setting.
Control Panel:
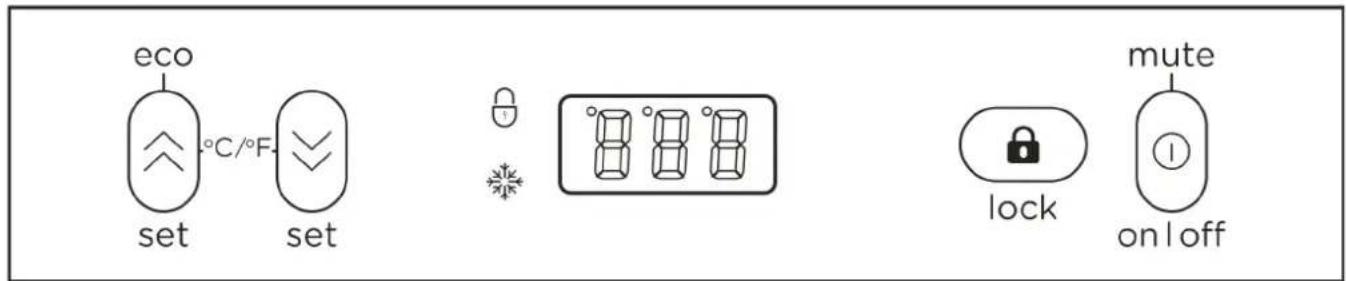
Smart control mode
- When the door is opened, inner light automatically start up and inner fan stop working.
- When the door is closed, inner light automatically shut down.
- Door ajar alarm: When the door is opened more than 5 minutes, will send out alarming sound, compressor and outer fan will stop working.
Force Quit the Smart control mode
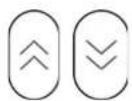
- Press and hold the buttons and simultaneously for 5 seconds, the small dot in the upper left corner of the LED will bright.
- After quit the Smart control mode, the alarm will not sound when the door is open for more than 5 minutes. Notice: The interior light can only be controlled by pressing the button.
- Press and hold the buttons 🧑 and 🔒 simultaneously for 5 seconds to re-enter the Smart control mode.
Setting the temperature Control
- Adjustable temperature: 1^ to 18^ (34°F to 65°F)
- Set the desired temperature by pressing the corresponding buttons, ⏻ to increase or ⏲ to decrease. Each press is in 1-degree increment. Once released, set temperature will flash for approximately 5 seconds then revert back to display the internal temperature.
- To view your set temperature, press either the or button once and LED display will flash set temperature for 5 seconds. - The appliance has the capability to display temperature in either Celsius or Fahrenheit. To change the temperature scale, press and hold both buttons simultaneously for approx. 3 seconds.
Note: The temperature inside may vary slightly depending on whether or not the interior bulb is ON or OFF and where the bottles are located (upper/middle or lower section).
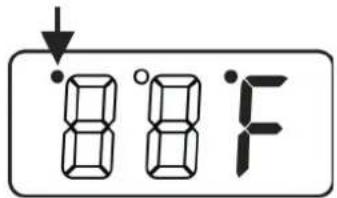
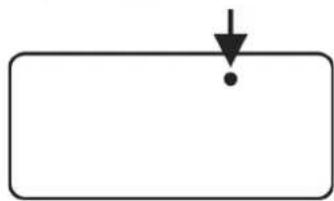
ECO mode:
natural_image
Simple diagram with a downward arrow and a dot inside a rectangle (no text or symbols)- Press and hold the button ⬇ for 3 seconds, it can enter or exit ECO mode.
- In this mode, the interior LED light, the compressor indicator ^2 and the temperature value on the display panel will be turned off and the ° will illuminate on the upper left corner of °C / °F.

Lock
- Press and hold for 3 seconds to lock or unlock the control panel.

ON/OFF Power / Mute
- To turn the appliance on or off, press and hold the ON/OFF button for 3 seconds.
- When the Door ajar alarm activated, the buzzer will sound continuously. Press one time alarm will be closed. Contact the Service Department for advice.

LOCK
If illuminated, indicates the control panel is locked.

RUN
When unit's compressor is running, this indicator light will illuminate to signify that cooling mode is currently in operation.
Demo mode
- Press and hold buttons, and simultaneously for 10 seconds, it can enter or exit demo mode. - In this mode, the display panel can operate settings, but the temperature is fixed display 12^ (54°F), all fans, the compressor does not start.
Defrosting
- The unit defrosts automatically in normal operating conditions.
- The evaporator behind the rear wall of the unit defrosts automatically. Water will drain through the drainpipe from the back of the product. Users need to bring the water to the drain or find a appliance to load the water. (If loading with a appliance, you need to pay attention to clearing the water regularly).
- However, frost may accumulate on the evaporator if the unit is repeatedly opened in a high heat or high humidity location. If this frost pattern does not clear within 24 hours, your unit will require manual defrosting.
Mandatory defrost mode: Press the lock and ① at one time for 10 seconds, enter the compulsory defrost mode.
Sabbath mode
56
- Press and hold buttons ○ and ○ at the same time for at least 5 seconds to enter or exit Sabbath mode. In this mode, LED will display "Sb". This mode turns off the displays, interior light and prevents them from turning on again. Normal cooling operations will still take place. The compressor and the fan work normally.
- When the cabinet power off, it will not automatically exit Sabbath mode, and it will keep Sabbath mode when power on again. The Sabbath Mode will automatically turn off after 96 hours.
Temperature Alarm Function
If the internal temperature ≥ 30^ (86°F) for 2 hours, the high temperature alarm will be activated, the LED will display "HH", the buzzer will sound continuously, the cooling system continues to work. The display return to normal until the high temperature conditions is relieved.
If the internal temperature is <0^ ( 32^ ) for 1 hour, the low temperature alarm will be activated, the LED will display "LL", the buzzer will sound continuously, the cooling system will stop working. The display return to normal until the low temperature is relieved.
NOTE:
- It is normal that the cabinet shows "HH" or "LL" from time to time. If it occurs frequently or lasts for a long time, you can restart the unit by unplugging it, then re-plugging after 5 minutes. If the problem occurs again after restarting, please contact customer service.
- Before reconnecting the power, wait 3 to 5 minutes. Otherwise, you could damage your appliance. If you attempt to start the appliance before the end of this time delay, the appliance will not turn on.
- If you turn on the appliance for the first time or after a restart, or after it has been out of operation for a long time, there may be a temperature difference between the temperature inside the appliance and that on the LED display. This is a normal event caused by the duration of the activation period. Leave the appliance turned on for several hours and the temperatures will stabilize during operation.
CARE AND MAINTENANCE
Cleaning Your Appliance
- Turn off the power, unplug the appliance, and remove all items.
- Wash the inside surfaces with a warm water and baking soda solution. The solution should consist of about 2 tablespoons of baking soda to a quart of water.
- Wring excess water out of the sponge or cloth when cleaning the area of the controls or any electrical parts.
- Wash the exterior of the cooler with a warm solution of mild liquid detergent. Rinse well and wipe dry with a clean soft cloth.
Power Failure
Most power failures are corrected within a few hours. If your power is going to be off for a longer period of time, you need to take the proper steps to protect your contents.
Transporting Your Appliance
If you need to move your appliance once the box has been discarded:
- Securely tape down all loose items inside your appliance.
- Turn the adjustable legs up to the base to avoid damage.
- Be sure the appliance stays secure in the upright position during transportation. Also protect the outside of the appliance with a blanket or similar item.
Energy-Saving Tip
The appliance should be located in the coolest area of the room, away from heat-producing appliances and out of direct sunlight.
PROBLEMS WITH YOUR APPLIANCE
You can solve many common problems easily, saving you the cost of a possible service call. Try the suggestions below to see if you can solve the problem before calling the servicer.
TROUBLESHOOTING GUIDE
| PROBLEM | POSSIBLE CAUSE | REMEDY |
| Appliance does not operate. | The unit defrosts automatically in normal operating conditions.The appliance is turned off.Tripped circuit breaker or a blown fuse. | Connect the appliance.Switch on the appliance.Switch on the circuit breaker or replace the fuse. |
| Appliance is not cold enough. | The temperature is not set correctly.The ambient temperature could require a lower temperature setting.The condenser is too dirty.The ventilation opening is blocked or too dusty. | Check the set temperature.Set a lower temperature.Clean the condenser when necessary.Clear the obstructions and wipe off the dust. |
| Appliance turns itself on and off frequently. | The room temperature is higher than average.A large number of bottles has been added to the unit. | Put the appliance in a cooler place.Leave the appliance to work for a while until the set temperature has been reached. |
| The light does not work. | Appliance is not connected to a power supply.Tripped circuit breaker or a blown fuse.The light was switched off on the control panel. | Connect the appliance.Switch on the circuit breaker or replace the fuse.Switch on the light. |
| Vibrations | The appliance is not properly level. | Level the appliance with the adjustable feet. |
| The appliance seems to make too much noise. | The rattling noise may come from the flow of the refrigerant, which is normal. As each cycle ends, you may hear gurgling sounds caused by the flow of refrigerant in your appliance.If temperature fluctuations occur, the contraction and expansion of the inner walls may cause popping and crackling noises. | |
| The appliance is not properly level. | Level the appliance with the adjustable feet. | |
| Display “E1”, “E2”. | “E1” or “E2” indicates that the air temperature sensor has failed. | Call for service. |
NOTE: This appliance is intended to be used exclusively for the storage and display of wines in restaurants, hotels, bars and other commercial settin
TWO-YEAR LIMITED WARRANTY
TO OBTAIN SERVICE UNDER WARRANTY
Owner must present proof of original purchase date. Please keep a copy of your dated proof of purchase (sales slip) in order to obtain service under warranty.
PARTS AND SERVICE WARRANTY
For the period of two (2) years from the date of the original purchase, the supplier will provide free of charge, non consumable parts or components that failed due to manufacturing defects. During these two (2) years limited warranty, the supplier will also provide free of charge, all labor and in-home service to replace any defective parts.
WHAT IS NOT COVERED
- Damage or failure to the product caused by accident or act of God, such as, flood, fire or earthquake.
- Damage or failure caused by modification of the product or use of non-genuine parts.
- Damage or failure to the product caused during delivery, handling or installation.
- Damage or failure to the product caused by operator abuse.
- Damage or failure to the product caused by dwelling fuse replacement or resetting of circuit breakers.
- Damage or failure caused by use of product in a commercial application.
- Service trips to dwelling to provide use or installation guidance.
- Light bulbs, metal or carbon filters and any other consumable part.
• Normal wear of finish. - When the product has not been operated in accordance with the accompanying instructions for use.
- Wear to finish due to operator abuse, improper maintenance, use of corrosive or abrasive cleaning products/pads and oven cleaner products.
WHO IS COVERED
This warranty is extended to the original purchaser for products purchased for ordinary residential use in North America (Including the United States, Guam, Puerto Rico, US Virgin Islands & Canada).
This warranty is non-transferable and applies only to the original purchaser and does not extend to subsequent owners of the up. This warranty is made expressly in lieu of all other warranties, expressed or implied, including, but not limited to any implied warranty of merchantability or fitness for a particular purpose and all other obligations on the part of the supplier, provided, however, that if the disclaimer of implied warranties is ineffective under applicable law, the duration of any implied warranty arising by operation of law shall be limited to two (2) years from the date of original purchase at retail or such longer period as may be required by applicable law.
This warranty does not cover any special, incidental and/or consequential damages, nor loss of profits, suffered by the original purchaser, its customers and/or the users of the Products.
WHO TO CONTACT
To obtain service under warranty or for any service related question, please contact the retailer that sold you this product.
To ensure prompt after-sales service, when you call we will kindly ask you to provide the following information indicated on the nameplate inside the hood: hood model, 12 NC and date of purchase on original invoice. To access the nameplate, all you have to do is remove the grease filters.
12NC:
Hood model:
Serial No.:
Date of purchase on original invoice: ____

elica
natural_image
Simple line drawing of a two-tiered refrigerator with ventilation grilles (no text or symbols)natural_image
Simple line drawing of a circular object with grid pattern and two side handles (no text or symbols)natural_image
Line drawing of a two-tier refrigerator with mesh back panel and front-mounted base (no text or symbols)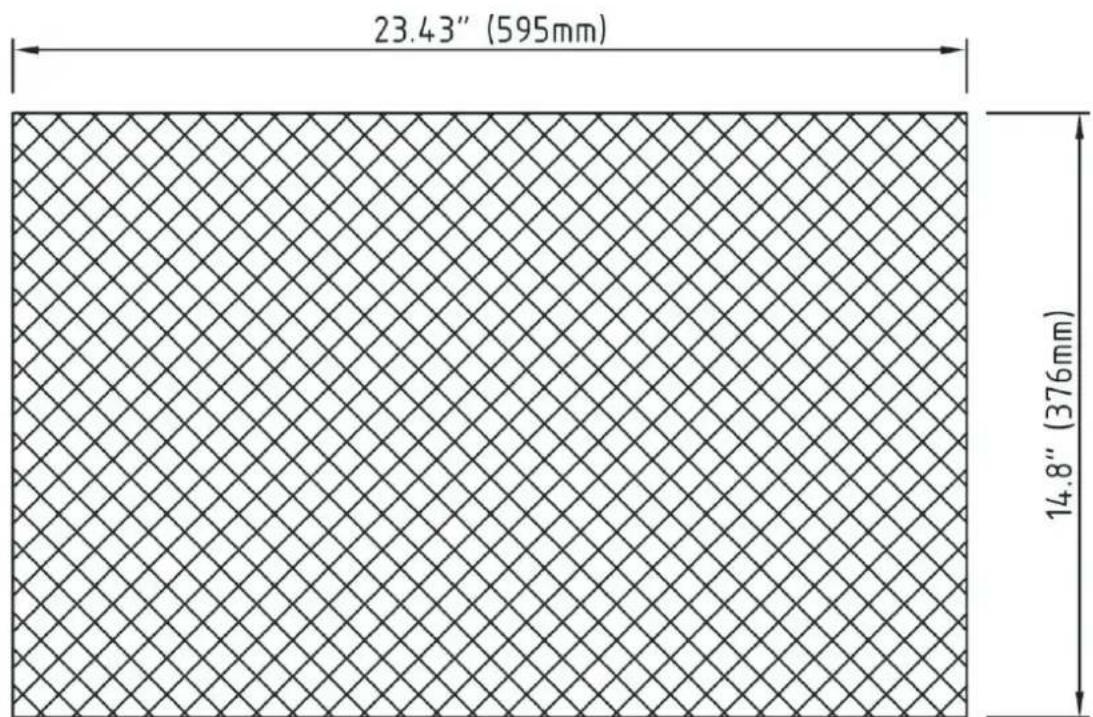
other
| Dimension | Value | | :--- | :--- | | Width | 23.43" (595mm) | | Height | 14.8" (376mm) |natural_image
Technical line drawing of a rectangular electronic component with internal channels and mounting pins (no text or symbols)2
natural_image
Technical line drawing of a server rack with internal components and mounting brackets (no text or symbols)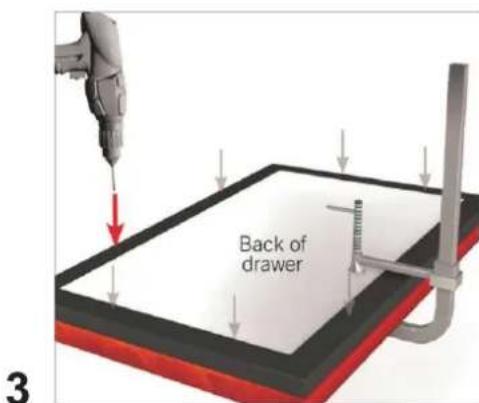
chemical
Chemical structure diagram showing 'eco' and 'set' with a central C/°F bond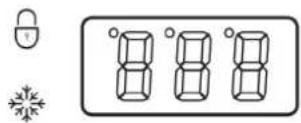


Modo de Control Inteligente
natural_image
Simple diagram with a downward arrow and a dot inside a rectangle (no text or symbols)

- IMPORTANT SAFETY INSTRUCTIONS
- INSTALLATION INSTRUCTIONS
- Before Using Your Appliance
- Installation of Your Appliance
- Installation of the Handle
- Anti-Tip Bracket Installation
- Carbon Filter
- OPERATING YOUR APPLIANCE
- Control Panel:
- Smart control mode
- Force Quit the Smart control mode
- Setting the temperature Control
- ECO mode:
- Lock
- ON/OFF Power / Mute
- RUN
- Demo mode
- Defrosting
- Sabbath mode
- Temperature Alarm Function
- NOTE:
- CARE AND MAINTENANCE
- Cleaning Your Appliance
- Power Failure
- Transporting Your Appliance
- Energy-Saving Tip
- PROBLEMS WITH YOUR APPLIANCE
- TWO-YEAR LIMITED WARRANTY
- TO OBTAIN SERVICE UNDER WARRANTY
- PARTS AND SERVICE WARRANTY
- WHAT IS NOT COVERED
- WHO IS COVERED
- WHO TO CONTACT
- elica
- Modo de Control Inteligente
Brand : ELICA
Model : EBD51SS1
Category : Refrigerator