
Dream Box Digital - Alarm system Godrej - Free user manual and instructions
Find the device manual for free Dream Box Digital Godrej in PDF.


| Product Type | Digital Alarm System |
| Brand | Godrej |
| Model | Dream Box Digital |
| Dimensions (approx.) | 200 x 150 x 40 mm |
| Weight (approx.) | 0.5 kg |
| Power Supply | 12V DC adapter or 4 x AA batteries |
| Backup Battery | Yes, built-in rechargeable battery |
| Main Functions | Arm/Disarm, Motion Detection, Alarm Siren, Remote Control, Digital Keypad |
| Detection Technology | Passive Infrared (PIR) motion sensor |
| Alarm Sound Level | 110 dB |
| Communication | Wireless RF with remote controls |
| Number of Zones | 8 wireless zones |
| Display | LCD screen with backlight |
| Keypad | Touch-sensitive numeric keypad |
| Installation | Wall-mounted or tabletop |
| Operating Temperature | -10°C to 50°C |
| Storage Temperature | -20°C to 60°C |
| Maintenance | Clean with a soft dry cloth; avoid liquids |
| Safety Features | Tamper protection, low battery warning, passcode lock |
| Spare Parts & Reparability | Contact Godrej service center for replacement parts |
| Certifications | CE, FCC |
Frequently Asked Questions - Dream Box Digital Godrej
User questions about Dream Box Digital Godrej
0 question about this device. Answer the ones you know or ask your own.
Ask a new question about this device
Download the instructions for your Alarm system in PDF format for free! Find your manual Dream Box Digital - Godrej and take your electronic device back in hand. On this page are published all the documents necessary for the use of your device. Dream Box Digital by Godrej.
USER MANUAL Dream Box Digital Godrej
DREAM BOX DIGITAL
USERMANUAL
BLANK

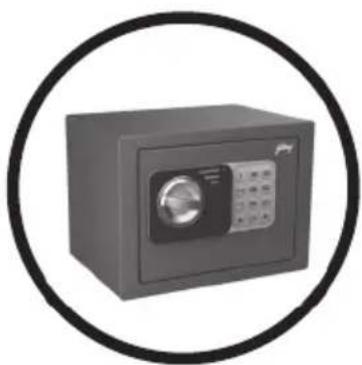
natural_image
Black and white image of a gray safety alarm box with a circular border (no text or symbols visible)
natural_image
Open gray metal cabinet with internal compartments, enclosed in a black circular border (no text or symbols visible)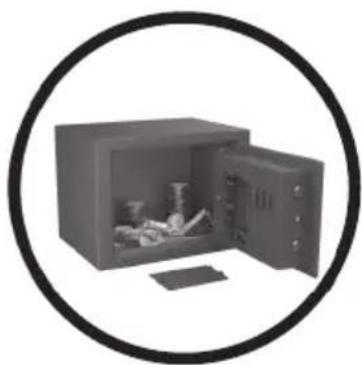
natural_image
Open metallic safe with internal compartments, enclosed in a black circular border (no text or symbols visible)Dream Box Digital
Dream Box Digital is a compact, secure and affordable option to safeguard your precious possessions.
Ideal for

Daily use valuables

Unlock with 4 to 8 Digit Password

Innovative Robust Solenoid Lock

Emergency Access Key

Convenient Cash Deposit Cutout
Low Battery Indicator
| Dimensions in cm (HxWxD) | 17 x 23 x 17 |
| Net weight (Kg.) | 2.5 |
| Volume (Ltr) | 4.5 |
1. IMPORTANT INSTRUCTIONS
Please keep this manual and override keys in a safe place (NOT INSIDE THE LOCKER)
Make sure that the locker is anchored properly as there is a possibility that it can fall and hurt people or property.

DO NOT use any liquid while cleaning the keypad, you could use a damp cloth if required.

DO NOT place any liquid on top of the locker, a spill on the keypad may damage the locker inoperable.

DO NOT overstuff the locker or you may damage the motor mechanism or the contents.

DO NOT place the safe in direct sunlight in case of Biometric. For security purposes, you should change the factory default code i.e. Personal Code AND Master Code as soon as possible.

DO NOT open the back cover or try to repair the locker yourself. In case of any problem contact GSS call center at 1800 20 999 55 or write to us at secare@godrej.com
Note: For security purposes, you should change the factory default code i.e. Personal Code and Master Code as soon as possible. Godrej Security Solutions shall not be responsible for only theft caused by such negligence.
2. PACKAGE CONTENTS
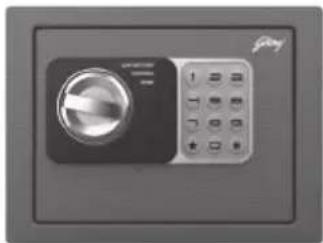
natural_image
Exterior view of a digital camera control panel (no visible text or symbols)Locker (1)

1.5V AA
Alkaline Battery (4)

Protection Carpet/Pad (1)
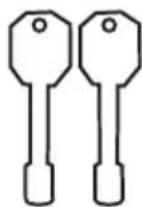
·Mechanical
Override Key (2)

Anchor Bolt (2)

User Manual (1)
3. KNOW YOUR PRODUCT
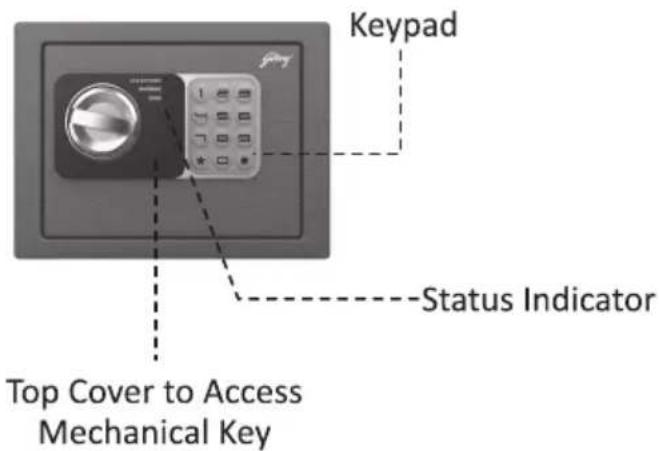
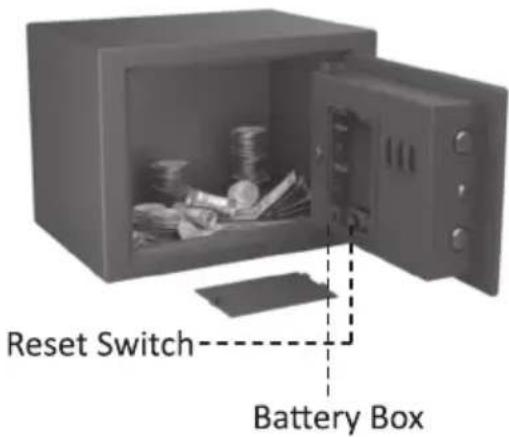
Note: To Access Reset switch open the safe door and remove battery box top cover.
Opening the safe with Personal Code
-
To open the safe: Enter personal code and press (#) to confirm. Then the indicator panel shows green light, Now rotate the knob clockwise to open the door. (Solenoid is unlocked for 5 seconds and after 5 seconds solenoid gets locked and green light disappears from indicator panel)
-
To lock the safe: Close the door and rotate the knob anti-clockwise.

Opening the safe with Master Code
- To open the safe: Enter master code and press (#) to confirm. When the indicator panel shows green light, Now rotate the knob clockwise to open the door. (Solenoid is unlocked for 5 seconds and after 5 seconds solenoid gets locked and green light disappears from indicator panel)
- To lock the safe: Close the door and rotate the knob anti-clockwise.

natural_image
Line drawing of a microwave oven with control panel and fan (no text or symbols)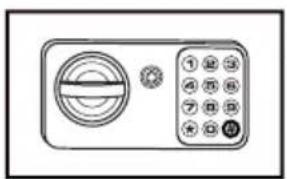
natural_image
Front view of a vintage-style analog microwave oven with control panel (no visible text or symbols)
WARNING:
If wrong code is entered 3 times continuously, the safe will be locked and alarm will sound for 20 seconds, after 20 seconds you can enter personal/ master code. If again wrong code is entered 3 times continuously, the safe will be locked and the alarm will sound for 5 minutes. During lockout, the safe goes in auto freeze mode.
5. TO CHANGE THE USER CODE
- Open the safe.
- Press Reset button once, Indicator panel will show Yellow Light and with 2 beeps.
- Enter 4 to 8 digit new User Code and press (#) to confirm, Then indicator panel shows Yellow Light with 2 beeps. Yellow Light will disappear from indicator panel, it means New User Code is accepted.
- Now you can use the New User Code to open the safe.
Note:
Default Personal Code is "1234"
6. TO CHANGE THE MASTER CODE
- Open the safe.
- Press (0) twice and then press Reset button once, Indicator Panel will show Yellow Light with 3 beeps.
- Enter six digit new code and press (#) to confirm, Indicator Panel shows Yellow Light with two beeps. Yellow Light will disappear from Indicator Panel, it means New Master Code is accepted.
- Now you can use the New Master Code to open the safe.
Note:
Default Master Code is "800000"
WARNING:
For security purposes, you should change the factory default code as soon as possible. Godrej Security Solution shall not be responsible for only theft caused by such negligence.
7. PROCESS TO RESET THE SAFE
- To RESET the safe, please refer Topic 5 and 6 i.e. Process to change User code / Master code."
8. MOUNTING
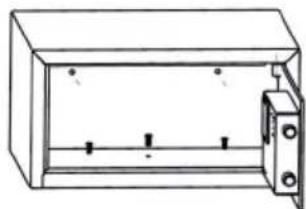
Mounting Through The Bottom Of The Safe:
• Check the floor for what type it is (wood, tile, concrete)
• Get the appropriate anchors for the type of floor
• Check location on floor for concealed wires or pipes
• Mark the floor to drill for your anchor
• Drill the appropriate size hole for the anchors you have
• Mount the safe, making sure it is secure
- For mounting to the top of a cabinet you may want to use carriage bolts through the top of the cabinet
• DO NOT mount to a shelf in a cabinet or closet without anchoring to wall behind the safe
Mounting Through The Back Of The Safe:
• Check the wall or cabinet for structural Soundness
• For safety, have someone help to hold the safe during mounting
• Check location for concealed wires or pipes
• Mark the surface to drill holes for the anchors you will be using
• Drill the appropriate size holes for the anchors you are using
• Having someone hold the unit, anchor the safe to the wall
• Test the strength of the mounted safe so it will not fall off the wall or cabinet
• DO NOT place safe on a shelf without proper mounting into a wall
natural_image
Simple line drawing of a rectangular frame with a left-pointing arrow inside, no text or symbols present.Mounting Tips:
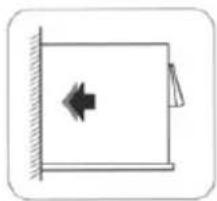
• The safe may be mounted to a wall or the inside of a cabinet or on the floor
- When mounting to a wall or cabinet, be sure of the load bearing capacity so as to hold the weight of the safe and the contents
(Failure to do so could result in the safe falling and damaging property and people)
natural_image
Technical line drawing of a rectangular enclosure with internal components and mounting holes (no text or symbols)Fig 1: Fix through baseboard

natural_image
Simple line drawing of a rectangular box with two small dots on the front face and a separate side outlet (no text or symbols)Fig II: Fix through backboard
9. REPLACING THE BATTERIES
- Open the Safe using your personal code. If the batteries are dead, use the Emergency Override key.
- Remove the battery cover on the back panel by unscrewing the Phillips screw.
- Remove all four used batteries.
- Replace the batteries with four 1.5V AA size alkaline batteries.
- Put back the battery cover.
- Dispose the used batteries in an environment friendly way.
- Put back the Phillips screw to secure the battery cover.
- Keeping the door open, test the safe to make sure it works.
10. EMERGENCY OVERRIDE KEY
When you first get the safe or in emergency like batteries running out, codes unknowns etc. you can open the safe using the following method:
- Pull the gray cover around the knob from one of the corner to access mechanical override cylinder.
- Using one of the emergency override keys, insert into the cylinder and turn anticlockwise and turn the knob clockwise to open the door.
- While the door is open, follow the instructions to set your personal code.
WARNING:
Keep the override keys in a safe place other than inside this safe. These keys are to be used in emergencies.
11. INFORMATION ON E-WASTE HANDLING AND MANAGEMENT
Dear Customer,
The Ministry of Environment and Forests have published The E-waste (Management and Handling) Rules 2010 which comes in effect from 1st May 2012.
E-waste is defined as any electrical or electronic component of products in whole or in part, or rejects from their manufacturing or repair process which are intended to be discarded.
These rules apply to every producer; consumer or bulk consumer involved in the manufacture, sale, and purchase and processing of electrical and electronic equipment or components as specified in Schedule 1 (please refer to our website www.godrej.com under the 'Green Think' sec of Godrej Security Solutions Division Page for more details).
Under these rules, specific roles and responsibilities are defined for producers, consumers and recycles handling and managing e-waste.
E-waste is to be managed in an environmentally sound manner which means, taking steps to ensure that health and environment are protected from adverse effects of hazardous substance contained in such wastes.
Rule 6 of the E-waste (Management and Handling) Rules 2010 states that bulk consumers of electrical and electronic equipment shall be responsible for recycling of the e-waste generated by them. Bulk consumer means bulk users of electronic and electrical equipment such as Central Government or State Government Departments, public sector undertakings, banks, educational institutions, multinational organisations, and international agencies, private companies that are registered under the Factories Act, 1948 and Companies Act, 1956. The bulk consumers have to ensure that the e-waste generated by them is channelised to authorised collection centres or is taken back by the producers. They shall maintain records of e-waste generated by them in Form 2 and make such records available for scrutiny by the State Pollution Control or the Pollution Control Committee concerned.
All consumers of electrical and electronic equipment irrespective of their status as bulk consumers or not, shall ensure that e-waste generated by them is channelized to authorized collection centres (s) or registered dismantler(s), or recycler(s) or is returned to the pick-up/take back services provided by the producers. (Please refer to our website www.godrej.com under the 'Green Think' sec of Godrej Security Solutions Division Page for more details).
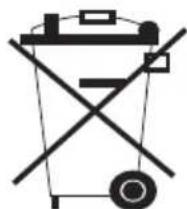
All our products intended to be recycled under the category of e-waste (as defined above) carry a label or stamp of the WEEE symbol (A wheelie bin with a cross), which states that it falls under the hazardous waste category and is not to be disposed of along with normal garbage.
We seek your support in ensuring environmentally sound management of e-waste and aid us in sustaining our earth's natural resources and maintaining the earth's green cover intact for the benefit of our future generations.
Note
RECORD OF PURCHASE
Please fill your details below for future reference.
Date of purchase: ____
Product model: ____
Name & address of Distributor/Dealer: ____
Distributor phone number: ____
FOR SAFETY, PLEASE READ THIS MANUAL PRIOR TO USE.

Godrej & Boyce Mfg. Co. Ltd., Godrej Security Solutions
Regd. Office: Plant No. 17, Pirojshanagar,
Vikhroli, Mumbai - 400079
Toll Free: 1800 209 9955 (Sales & Service)
Whatsapp Support: +91 9321665511 (Service)
Visit: www.godrejsecure.com
Email: secure@godrej.com (Sales), secare@godrej.com (Service)
www.facebook.com/GodrejSecure
Follow us. www.twitter.com/godrejsecure
- DREAM BOX DIGITAL
- BLANK
- IMPORTANT INSTRUCTIONS
- PACKAGE CONTENTS
- KNOW YOUR PRODUCT
- Opening the safe with Personal Code
- Opening the safe with Master Code
- WARNING:
- TO CHANGE THE USER CODE
- Note:
- TO CHANGE THE MASTER CODE
- PROCESS TO RESET THE SAFE
- MOUNTING
- Mounting Through The Bottom Of The Safe:
- Mounting Through The Back Of The Safe:
- Mounting Tips:
- REPLACING THE BATTERIES
- EMERGENCY OVERRIDE KEY
- INFORMATION ON E-WASTE HANDLING AND MANAGEMENT
- Note
- RECORD OF PURCHASE
Brand : Godrej
Model : Dream Box Digital
Category : Alarm system