
NW48 II - Lighting Neewer - Free user manual and instructions
Find the device manual for free NW48 II Neewer in PDF.


| Product Type | LED Video Light Panel |
| Model | NW48 II |
| Brand | Neewer |
| Power Output | 48W |
| Color Temperature | 3200K-5600K (adjustable) |
| Brightness | 0-100% dimmable |
| Number of LEDs | 480 LEDs |
| CRI (Color Rendering Index) | ≥96 |
| Power Supply | AC 100-240V (adapter included) or NP-F series batteries |
| Battery Plate | Dual NP-F battery slots |
| Dimensions | 30.5 x 25.4 x 4.5 cm |
| Weight | 1.2 kg (without batteries) |
| Control Method | Manual knobs and remote control (optional) |
| Mounting | Compatible with standard light stands (5/8" receiver) |
| Cooling | Passive (fanless) |
| Included Accessories | Power adapter, carrying case, color filters, diffuser |
| Cleaning | Wipe with dry soft cloth; avoid liquids |
| Safety | Do not cover vents; keep away from water; use certified batteries |
| Repairability | LEDs and battery contacts replaceable by technician; contact Neewer support |
Frequently Asked Questions - NW48 II Neewer
User questions about NW48 II Neewer
0 question about this device. Answer the ones you know or ask your own.
Ask a new question about this device
Download the instructions for your Lighting in PDF format for free! Find your manual NW48 II - Neewer and take your electronic device back in hand. On this page are published all the documents necessary for the use of your device. NW48 II by Neewer.
USER MANUAL NW48 II Neewer
This product is a bi-color continuous video light includes a versatile stand mount adapter for adjustable angles. The included 2.4G remote enables wireless control of multiple lights simultaneously. It comes with a light stand, 3 color gels, and a charging port, making it ideal for live streaming and makeup videos.
Package Contents

Product Overview

① Handle
② Channel Button "CH+"
③ Channel Button "CH-"
④ Color Temperature Dial
⑤ USB Port
⑥ DC Port
⑦ LCD Screen
⑧ Battery
Compartment
⑨ Brightness Dial
⑩ Power Switch
⑪ Angle Adjustment Knob
⑫ Stand Mount Adapter
Locking Knob
Product Overview
- Remote1. LED Light
EN
Installation Guide
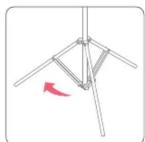
① Spread the base of the light stand. Adjust to an ideal height and secure in position using the screw knob.
Installation Guide
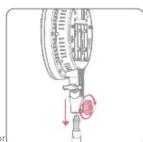
② Mount the LED light on the top of the light stand and tighten the retention knob on the support bracket.

③ Loosen the angle adjustment knob to adjust the LED light head to the right angle and then tighten the knob.
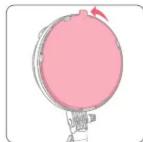
Note: The color gel included in the package has two sides. Make sure to place the side with the "outside" marking facing outward when using it.
Operating Guide

● Power Supply (Batteries)
Insert compatible batteries into the compartments.

Compatible Batteries
*Batteries are not included.
Separate purchase required.
Note: This light has a higher power output (series circuit), so it requires two batteries at the same time.

- Power Supply (Power Adapter)
To power the light, use the DC 15V power adapter provided. Connect one end of the adapter to the light's DC port and plug the other end into a wall socket for power supply.

● Power On/Off
①To power the light using
batteries, press the "-" en
to switch it on. The LCD
screen will activate and
display the battery status
②When the light is powered
by the power adapter,
press the "=" end to
switch it on. The LCD
screen will also turn o
when the light is activated.
②To turn off the light simply
⑤ TO turn off the light, simp move the switch into the
move the sn
"O" position.

- Brightness Adjustment
Turn the brightness dial to adjust from 0 to 100%.
EN
EN
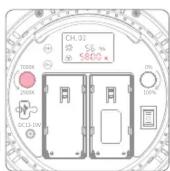
• Color Temperature Adjustment
Turn the color temperature dial to adjust between 2900K to 7000K.

- Channel Selection
Press "CH+"/"CH-" to select channels from 0 to 10.
※ "CH: 0" on the light is a backup channel. It can only be controlled by "CH: 88" on the remote.
02
Remote Control Guide
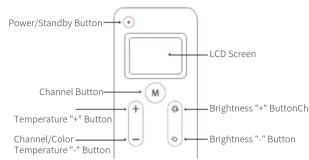
- Basic Operation of the Remote
① Remove the battery compartment cover and insert two AAA batteries,
ensuring the +/- polarity markings are correct, then replace the cover.
② Press the "●" button to turn the remote on/off.

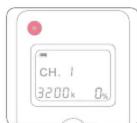
- Selecting Channels on the Remote
① Turn the remote on.
② Press "M" button, and the channel icon will flash on the LCD screen.
③ Press "+" and "-" buttons to select one of the 11 channels (1–10 and 88). Press the "M" button again after selection to confirm.

04
Remote Control Guide
- Using the Remote to Control One LED Light
Set the LED light and the remote on the same channel (for example,
CH: 1), then use the remote to control the LED light.


- Using the Remote to Control Multiple LED Lights
Set LED lights on any channel from CH: 0 to CH: 10, then set the remote on CH: 88 to simultaneously control all the lights.


Remote Control Guide
- Using the Remote to Control Multiple Groups of LED Lights
① Set the first group of lights on the same channel (for example, CH: 01), set the second group of lights on another channel (for example, CH: 02), and so forth.
② When the remote is set on CH: 01, it can control all the lights in the first group. When the remote is set on CH: 02, it can control all the lights in the second group.
③ When the remote is set on the blanket channel of CH: 88, it can control all groups of lights, irrespective of the channel set.


- Using the Remote to Adjust Brightness and Color Temperature ① Turn on the LED light and the remote, then set them on the same
② Press the "+" button to increase color temperature and "-"
button to decrease.
③ Press the "💡" to increase the brightness level and the "💡"
Button to decrease.
④ Long press the "●" button to make the remote enter or exit standby mode.
05
EN EN
Remote Control Guide

Color Temperature Setting Brightness Adjustment
Caution
- Avoid dropping the product or subjecting it to strong impact.
- Do not directly stare at the lights as it may harm your vision.
- Keep the product away from any flammable or explosive materials.
- Avoid using the product in rainy or humid environments.
- Disconnect the power when the product is not in use.
- If the product will not be used for an extended period, store it in a dry and well-ventilated place, away from heat sources and magnets.
- After the product has cooled down, store it in a bag to prevent damage to the LEDs.
Specifications
| Model | NW48 II |
| Input | DC 15V |
| Maximum Power 36W | |
| Maximum Illuminance | 5200Lx@0.5m |
| CRI | CRI 95+ |
| Brightness 0%-100% | |
| Color Temperature 2900K~7000K | |
| Channels 0-10 | |
| 2.4G Remote Power Source | 2 x AAA battery |
06
Brand : Neewer
Model : NW48 II
Category : Lighting