CH8000 - Heating N'oveen - Free user manual and instructions
Find the device manual for free CH8000 N'oveen in PDF.

| Product Type | Electric Fan Heater |
| Model | CH8000 |
| Brand | N'oveen |
| Power Supply | 220-240 V AC, 50/60 Hz |
| Power Consumption | 2000 W maximum |
| Heat Settings | Low (1000 W) and High (2000 W) |
| Fan Only Mode | Yes, for summer use |
| Thermostat | Adjustable, from 15°C to 30°C |
| Overheat Protection | Automatic shut-off |
| Tip-Over Safety Switch | Yes, cuts power if tilted |
| Dimensions (W x H x D) | 25 cm x 20 cm x 15 cm |
| Weight | 1.5 kg |
| Heating Element | Ceramic PTC |
| Oscillation | Yes, 60° wide |
| Remote Control | Not included |
| Timer | 1-12 hours |
| Display | LED screen with temperature display |
| Noise Level | ≤ 45 dB |
| Cleaning Instructions | Unplug, wipe with damp cloth; do not immerse |
| Storage | Store in a cool, dry place |
| Certifications | CE, RoHS |
Frequently Asked Questions - CH8000 N'oveen
User questions about CH8000 N'oveen
0 question about this device. Answer the ones you know or ask your own.
Ask a new question about this device
Download the instructions for your Heating in PDF format for free! Find your manual CH8000 - N'oveen and take your electronic device back in hand. On this page are published all the documents necessary for the use of your device. CH8000 by N'oveen.
USER MANUAL CH8000 N'oveen
natural_image
Exterior view of a black power supply unit with digital display and control legs (no visible text or symbols)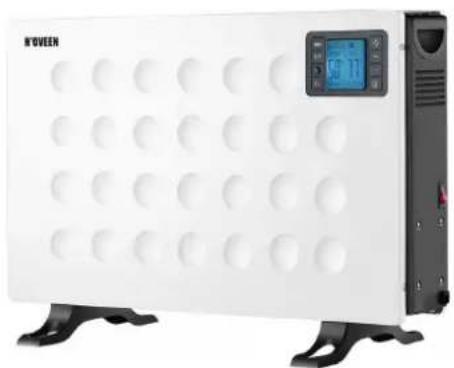
natural_image
White K'VEEN electric heater with perforated panel and digital display (no visible text or symbols)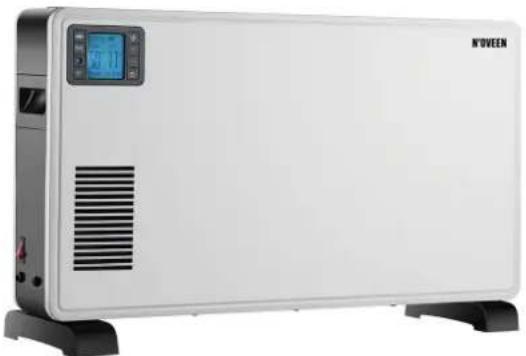
natural_image
Exterior view of a white electric heater with digital display and ventilation slots (no visible text or symbols)GRZEJNIK KONWEKTOROWY - INSTRUKCJA OBSŁUGI
CONVECTOR HEATER - USER MANUAL
CONVECTOR HEATER - BENUZERHANDBUCH
text_image
Technical diagram of a device with numbered components for identificationCH7100/CH8000

text_image
Technical diagram of a portable electric heater with numbered components for identificationCH9000

natural_image
Technical line drawing of a mechanical assembly with a tool and component (no text or symbols)
natural_image
Technical line drawing of a heat exchanger or cooling unit with labeled components (no text or symbols present)1
text_image
1 2 3 4 5 TEMP SET 20°C 23°C TIMER i h 00m 15 14 13 12 11 10 9 FPC + - 7 82

text_image
1 2 3 4 5 6 73
PLEASE READ THESE INSTRUCTIONS CAREFULLY AND SAVE IT
Thank you for choosing our product. Read carefully before assembling, installing, turning on or maintaining this device. Protect yourself and others by following the safety instructions.
GENERAL DIRECTIONS
- Remove the packaging and make sure that the appliance is intact. Packaging materials (plastic bags, polystyrene, staples etc.) must be kept out of the reach of children as they could be hazardous.
Caution:
- The appliance must only be used by responsible adults;
-
For their own safety, children and persons with reduced mental capacities must not use the appliance unless under the supervision of responsible adults;
-
Before connecting the appliance, check that the appliance rating corresponds to the mains rating.
-
If the power cable is damaged, it must be replaced by the manufacturer or otherwise by a qualified person in order to prevent any risk.
-
This appliance must only be used for the purpose for which it has been manufactured, i.e. for additional electrical heating in rooms. Any other use is considered improper and therefore dangerous. The manufacturer is not responsible for any damage caused by improper, incorrect or unreasonable use.
-
Before cleaning or carrying out maintenance on the appliance, disconnect it from the electrical mains by removing the plug from the electrical outlet or by switching off the system switch.
-
If the appliance is faulty and/or operating incorrectly, switch it off without tampering with it. If the above is disregarded, the safety of the appliance may be compromised.
-
Switch off the appliance and remove the plug from the electrical outlet when not in use.
-
The use of any electrical appliance calls for the awareness of some basic rules, such as:
- do not use the appliance near sources of water such as baths, showers or swimming pools
- do not touch the appliance with wet or damp hands or feet
- do not leave the appliance exposed to atmospheric agents
- Do not use the appliance in the presence of potentially flammable or explosive liquids or gases.
IMPORTANT
- In order to avoid overheating, it is advisable to unwind the entire length of the power cord.
- Check that the electric capacity of the system and the power outlets are adequate for the maximum power stated on the plate. If in doubt, please contact a qualified professional.
- Do not leave the appliance plugged in when not required. Unplug the appliance from the mains after having switched it off when not in use.
- Do not obstruct the ventilation or heat dispersion openings.
- The power cord on this appliance must not be replaced by the user. If the cord is damaged or requires replacement, contact service only.
- Avoid the hot contact, checking that the cord is not placed in front of the hot air outlet grille.
- Do not use near bathtubs, showers or basins (minimum distance 1 metre).
- Use in an upright position.
- Keep the suction grille clean.
- Do not use the appliance immediately below a fixed power outlet.
WARNING
In order to avoid overheating, do not cover the heater.
CAUTION
- Some parts of this product can become very hot and cause burns. Particular attention has to be given where children and vulnerable people are present.
- The heater must not be located immediately below a socket-outlet.
- Do not use this heater in the immediate surroundings of a bath, a shower or a swimming pool.
- Cleaning and user maintenance shall not be made by children unless they are older than 8 and supervised.
- Keep the appliance and its cord out of reach for the children less than 8 years.
- If the supply cord is damaged, it must be replaced by the manufacturer or its service agent or a similarly qualified person in order to avoid a hazard.
- Children of less than 3 years should be kept away unless continuously supervised.
- Children aged from 3 years and less than 8 years shall only switch on/off the appliance which provided that it has been placed or installed in its intended normal operating position, and they have been given supervision or instruction concerning use of the appliance in a safe way and understand the hazards involved.
- Children aged from 3 years and less than 8 years shall not plug in, regulate and clean the appliance or perform user maintenance.
PRODUCT FEATURES
- Aluminum shell, high thermal efficiency
- Heating element: quick heating with higher energy savings.
- LCD display function information.
- Timer from 1 to 24 hours to turn the convector heater on or off at the desired time.
- Digital display with automatic room temperature display.
- Free standing.
FOOT ASSEMBLY
Before using the heater, the feet (supplied separately in the cartoon), must be fitted to the unit. These are to be attached to the base of the heater using the 4 self-tapping screws provided, taking care to ensure that they are located correctly in the bottom ends of the heater side moldings.
CH7100/CH8000 See picture 1.1
CH9000 See picture 1.2
Note: It is normal when the heaters are turned on for the first time or when they are turned on after having been used for a long period of time the heaters may emit some smell and fumes. This will disappear when the heater has been on a short while.
CH7100/CH8000 DESCRIPTION
| 1. Air outlet | 1. Control panel |
| 2. Control panel | 2. Air outlet |
| 3. Rest for remote control | 3. Display |
| 4. Handle | 4. Feet |
| 5. Display | 5. Air inlet |
| 6. Main switch | 6. Temperature sensor |
| 7. Temperature sensor | 7. Main switch |
| 8. Air inlet | 8. Handle |
| 9. Feet | 9. Rest for remote control |
CH9000 DESCRIPTION
TECHNICAL DATA
| Power supply | Power Dimensions WeightN.W / G. W |
| CH7100/CH8000 220-240 V /50/60 Hz | 750/1250/2000 W 59.5 x 21 x 37.5 cm 3.3 / 4 kg |
| CH9000 220-240 V /50/60 Hz | 1000/1300/2300 W 68 x 18 x 41 cm 4.5 / 5.3 kg |
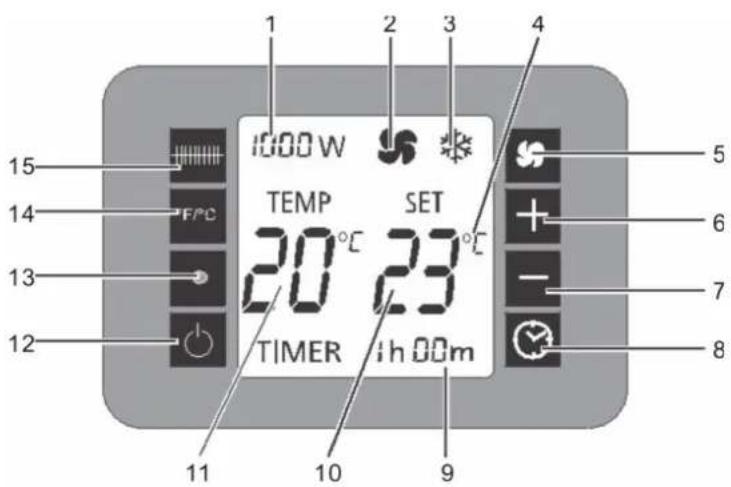
CONTROL PANEL FUNCTIONS See picture 2
1 Selected heating level display
2 "Fan" symbol
3 "Frost protection" symbol
4 Selected unit of measurement display
5 Fan button
6 Increase temperature
7 Decrease temperature
8 Timer button
9 Running time display
10 Set temperature display
11 Measured temperature display
12 On/Off button
13 Infrared receiver for remote control
14 Button for selecting unit of measurement
15 Button for selecting the heat setting
REMOTE CONTROL See picture 3
- On/Off button
- Fan button
- Increase temperature
- Timer button
- Button for selecting the heat setting
- Button for selecting unit of measurement
- Decrease temperature
OPERATION
Power (CH7100/CH8000)
Insert the plug in a suitable power socket. After turn on the main switch (on the right side), the computer board emits a "click" sound, the screen displays the current room temperature, and turn on the panel control switch, to enter the standby state and display the current room temperature and set temperature at the same time. In the meantime, other displays are not displayed.
Then press the button for selecting the heat setting, you can select the 750/1250/2000W/Anti-frost four modes. When you select the mode the heater will be heated according to your setting.
Power (CH9000)
Insert the plug in a suitable power socket. After the power is turned on, the computer board emits a "click" sound, the screen displays the current room temperature and the set temperature, and other displays are not displayed. At this time, other key operations are invalid except the ON\Off key.
Press the On\Off key once to enter the standby state and display the current room temperature and set temperature at the same time.
Timer and temperature setting
Timer (CH7100/CH8000)
Press the timer button, each time the time is increased by 1 hour, when the timer time is 24:00, press the timer button, then the function is turned off, when the timer function is set, the timer countdown starts in 5 seconds, and after the timer is over, it enters standby mode;
Timer (CH9000)
First click on the time and temperature keys two times, the temperature function is open, the temperature began to flicker, Press "+" or "-" key to set the temperature (set temperature must be greater than the current temperature)。Press the timer button, each time the time is increased by 1 hour, when the timer time is 24:00, press the timer button, then the function is turned off, when the timer function is set, the timer countdown starts in 5 seconds, and after the timer is over, it enters standby mode;
Temperature
Press the temperature unit selection button to change the value. By default these are Celsius degrees. Press the "+" or "-" button to set the temperature (the set temperature
must be bigger than the current one).
For Celsius, cycle through Internal temperature (room temperature) is displayed every time the appliance is started up. The temperature can be set when
the unit is in standby or heating mode. When the room temperature reaches the level set, the heater will switch off the heaters (if the fan was on, it will not stop to work). The heater will only start heating again when the temperature drops 2 degrees in relation to the set temperature. The temperature control range is from 5°C to 37°C.
Operation mode
Press the heating setting selection button to adjust the temperature:
750W/1250W/2000W/ANTI-FROST (CH7100/CH8000)
1000W/1300W/2300W/ANTI-FROST (CH9000)
Fan
Press the fan key, you can open the fan or turn off the fan (on the screen fan icon is lit).
Anti-frost mode
In the standby mode, when the room temperature is lower than 5^ C the unit automatically enters the high-grade heating mode 2000W (CH7100/CH8000) or 2300W (CH9000). When the room temperature reaches 9^ C, the heating is turned off to standby, followed by cycling.
Operating sound
The appliance emits a beep upon each operation setting.
LCD room temperature display
the appliance will stop when the temperature exceeds 1 degrees with respect to the set temperature.
Memory
The appliance can hold the last temperature setting in its memory. This temperature will be shown at each start-up.
If the power settings were different, start-up reset will go to those set as default.
Cleaning
Before carrying out routine cleaning, switch off the product and disconnect main power. Use a soft, damp cloth only and do not use abrasive substances.
Note: Do not submerge any part of the product in the water.