
Ionic 16 - Blender WAVES - Free user manual and instructions
Find the device manual for free Ionic 16 WAVES in PDF.


| Product Type | Blender |
| Brand | Waves |
| Model | Ionic 16 |
| Dimensions (H x W x D) | 40 cm x 18 cm x 18 cm |
| Weight | 1.5 kg |
| Power Consumption | 800 W |
| Voltage | 220-240 V, 50/60 Hz |
| Pitcher Capacity | 1.5 L |
| Material of Pitcher | BPA-free plastic |
| Blade Material | Stainless steel |
| Number of Speed Settings | 2 speeds + pulse |
| Main Functions | Blending, chopping, mixing, pureeing |
| Safety Features | Safety lock mechanism, non-slip feet |
| Cleaning Instructions | Wipe motor base with damp cloth; pitcher and lid are hand-washable |
| Spare Parts Available | Replacement pitcher, blade assembly, lid |
| Warranty | 2 years |
Frequently Asked Questions - Ionic 16 WAVES
User questions about Ionic 16 WAVES
0 question about this device. Answer the ones you know or ask your own.
Ask a new question about this device
Download the instructions for your Blender in PDF format for free! Find your manual Ionic 16 - WAVES and take your electronic device back in hand. On this page are published all the documents necessary for the use of your device. Ionic 16 by WAVES.
USER MANUAL Ionic 16 WAVES
natural_image
Front view of a black WAVES audio workstation with multiple input/output ports and signal lines (no readable text or symbols beyond branding)Safety Instructions for IONIC 16

WARNING: ELECTRICAL HAZARD

To ensure your safety, please read this manual thoroughly before using the unit. Please observe these safety rules.
- Keep this user guide for future reference.
- Take notice of and comply with all warnings included in the user guide or indicated on the device itself.
- Do not expose this unit to rain or moisture. Do not spill water or other liquids on this unit.
- When cleaning the cabinet or other parts of this appliance, use only a dry or slightly damp soft cloth.
- Do not block any ventilation openings or interfere with the proper ventilation of this unit. Install in accordance with the instructions.
- Do not defeat the internal ventilation fans.
-
Do not use or store near any heat sources such as radiators, heat registers, stoves, or other heat-producing appliances.
-
Protect the power cord from being walked on or otherwise damaged by items placed on or against it. Particular attention should be given to the plugs, receptacles, and the point where the cord exits the appliance.
- To avoid the risk of electrical shock, do not touch any exposed wiring while the unit is in operation.
- Only use attachments/accessories specified by the manufacturer.
- Unplug this unit and all connected electrical equipment during lightning storms or when left unused for a long period of time.
- Refer all servicing to qualified service personnel. Servicing is required when the appliance has been damaged in any way or fails to operate normally.
For questions about safe installation, please contact us at www.waves.com.

RoHS COMPLIANT


Contents
INTRODUCTION....4
HARDWARE AND CONNECTIONS .... 5
Front Panel 5
Rear Panel....6
Getting Started....7
Connect the Hardware 7
Download and Install Software 9
Configure the System 11
Status Indicators 12
Updating Firmware....13
Identifying a Device on the SoundGrid Network....13
Shared Devices on Multiple LV1 systems....13
IONIC 16 CONTROL PANEL 14
Input Page....15
Output Tab 18
Clock Tab 19
System Info Tab and About Tab....20
Presets....21
Device ID....21
RESETTING THE UNIT 21
SPECIFICATIONS 22
Dimensions 24
Installing IONIC 16 in a Rack 25
Waves Inc
2800 Merchants Drive, Knoxville, TN 37912 USA
1-865-909-9200
www.waves.com
Introduction
The Waves IONIC 16 audio Interface is a stagebox for use with SoundGrid systems. It is particularly suited for eMotion LV1 live sound systems. IONIC 16 provides 16 channels of mic/line input on XLR/TRS combo connectors and 12 line level outputs on XLR connectors. There are also XLR AES3 input and output connectors and two headphone jacks. Most I/O connections are from the front panel.
IONIC 16 features a new generation of Waves Signature Preamps: fast response; maximum headroom, and fully discrete analog circuits. A switchable harmonic enhancer adds analog warmth and harmonics without compromising punch or clarity. Preamp impedance is selectable between 2k ohms and 7k ohms.
IONIC operates within a SoundGrid system. Devices are connected to the eMotion LV1 application via Ethernet cables and can be up to 100 meters from the SoundGrid-compatible Ethernet switch. The 2U, 19" rack-mountable cabinet can be mounted in a flight case or rack. IONIC 16 has two power supply options: 100 V–240 V mains and a 24 VDC external power supply. Using them together provides auto-switching redundancy.
SoundGrid is the Waves high-speed networking protocol for moving audio, clock, and other information between a host system and I/O devices—and between I/O devices themselves. A SoundGrid host manages the network and assigns servers and I/O devices to mix, process, and record, depending on the host.
SoundGrid is scalable. Connect one I/O device to a DAW and you have a high-quality sound card. Add more I/Os and your system becomes more flexible and powerful. Depending on the application, a SoundGrid host can assign up to sixteen I/O devices. Complete SoundGrid systems can be networked together to share devices.
Hardware and Connections
Front Panel
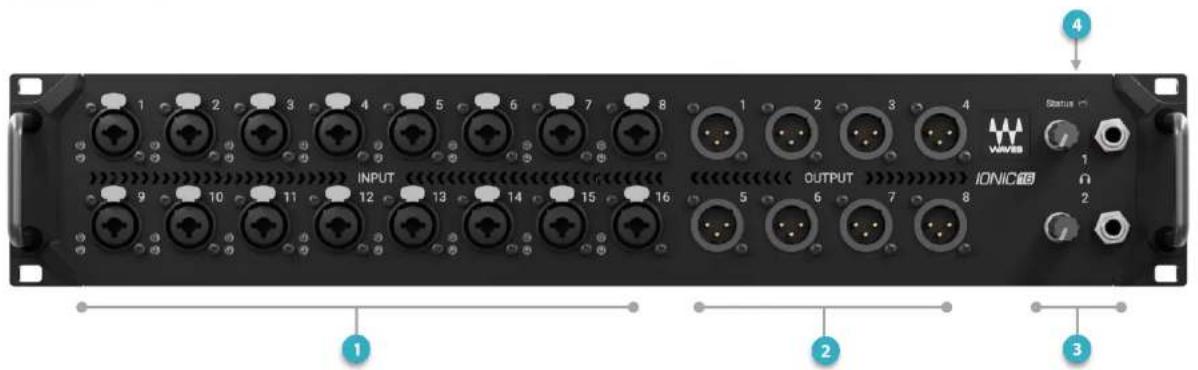
1 Analog Inputs 1–16, XLR mic/line; TRS, line
2 Analog Outputs 1–8, XLR
3 Two headphone jacks and controls
4 SoundGrid status LED
Rear Panel
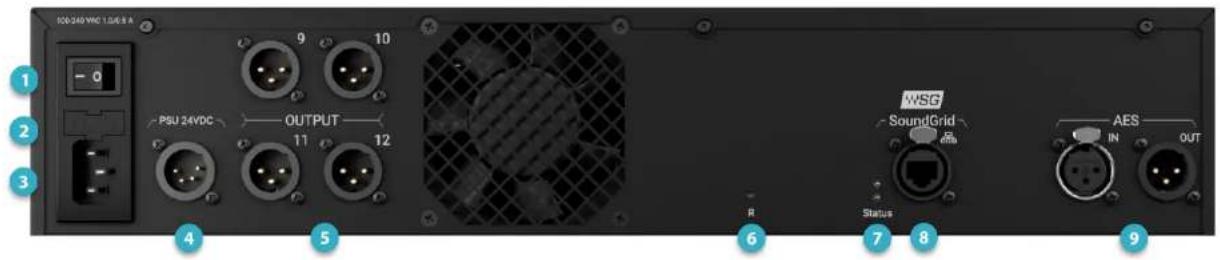
1 Power switch
2 Mains fuse ^1
3 Mains: IEC 100–240 VAC, 50/60 Hz
4 External power socket ^2
5 Analog outputs 9–12
6 Firmware reset (for troubleshooting)
7 Ethernet status indicators
8 etherCON network connector
9 AES input and output

Warning
Before changing the fuse, confirm that the mains cable and the external power supply cables are disconnected from the IONIC 16 device.
Getting Started
An eMotion LV1 SoundGrid system consists of at least one I/O device and at least one server. The I/O provides bidirectional audio and clock, and the server powers the mixer and provides plugin processing for large plugin counts. These, along with the LV1 application, make up a SoundGrid network.
There are three steps in setting up a SoundGrid network:
- Connect the I/Os and servers to the host computer via a SoundGrid-approved 1GB switch. Use Cat 5e (or better) Ethernet cables.
- Install the eMotion LV1 software.
- Configure all devices using the LV1 Inventory.
Refer to the eMotion LV1 User Guide for detailed information about connecting and configuring SoundGrid devices.
Connect the Hardware
The system below consists of an eMotion LV1, one server, and one ionic I/O. This provides mic and line inputs onstage, as well as monitor channels. The devices are connected through the 1GB Ethernet switch.

flowchart
graph TD
    subgraph FOH
        A["Computer"] --> B["4 Ethernet"]
        B --> C["3 Ethernet"]
        D["FOH"] --> E["1"]
        E --> F["2"]
        F --> G["3"]
        G --> H["4"]
    end
    subgraph Stage
        I["Stage"] --> J["2"]
        J --> K["3"]
        K --> L["4"]
        L --> M["5"]
        M --> N["6"]
        N --> O["7"]
        O --> P["8"]
        P --> Q["9"]
        Q --> R["10"]
        R --> S["11"]
        S --> T["12"]
        T --> U["13"]
        U --> V["14"]
        V --> W["15"]
        W --> X["16"]
        X --> Y["17"]
        Y --> Z["18"]
        Z --> AA["19"]
        AA --> AB["20"]
        AB --> AC["21"]
        AC --> AD["22"]
        AD --> AE["23"]
        AE --> AF["24"]
        AF --> AG["25"]
        AG --> AH["26"]
        AH --> AI["27"]
        AI --> AJ["28"]
        AJ --> AK["29"]
        AK --> AL["30"]
        AL --> AM["31"]
        AM --> AN["32"]
        AN --> AO["33"]
        AO --> AP["34"]
        AP --> AQ["35"]
        AQ --> AR["36"]
        AR --> AS["37"]
        AS --> AT["38"]
        AT --> AU["39"]
        AU --> AV["40"]
1 LV1 application
Connect one of the host computer's Ethernet ports to the switch. Use this port ONLY for the SG network—do not connect it to the internet or other networks.
2 Ionic 16 I/O Stagebox
I/O on stage. All I/Os can be up to 100 meters from the switch.
3 SoundGrid Server
The power of the server determines the plugin count.
4 SG switch
For an up-to-date list of approved SG switches, visit this support article.
EXPAND YOUR SYSTEM
You can assign up to 16 I/O devices to an LV1 system, depending on the number of channels per device, as well as your LV1 license. You can also add up to eight servers (max: four active servers and four redundant servers). Note that in this example there is an additional Ethernet switch onstage.
However large the system, basic hardware connections are always the same.

flowchart
graph TD
    subgraph FOH
        A["FOH 1"] --> B["FOH 2"]
        B --> C["FOH 3"]
        C --> D["FOH 4"]
        D --> E["FOH 5"]
        E --> F["FOH 6"]
        F --> G["FOH 7"]
        G --> H["FOH 8"]
    end
    subgraph Stage
        I["Stage 1"] --> J["Stage 2"]
        J --> K["Stage 3"]
        K --> L["Stage 4"]
        L --> M["Stage 5"]
        M --> N["Stage 6"]
        N --> O["Stage 7"]
        O --> P["Stage 8"]
    end
    FOH -->|SoundGrid| FOH
    FOH -->|Analog| FOH
    FOH -->|USB| FOH
    FOH -->|W| FOH
    FOH -->|W| W["Server"]
    FOH -->|W| V["Monitor"]
    FOH -->|W| W
    FOH -->|W| V
    FOH -->|W| W
    FOH -->|W| V
    FOH -->|W| W
    FOH -->|W| V
    FOH -->|W| W
    FOH -->|W| V
    FOH -->|W| W
    FOH -->|W| V
    FOH -->|W| W
    FOH -->|W| V
    FOH -->|W| W

    Stage -->|Waveform Display| Stage
1 Host computer with LV1 app
2 Main SoundGrid Server
3 Redundant SoundGrid Server
4 SG Ethernet switches
5 SoundGrid I/O devices
6 DAW for recording/playback
7 Extra display for LV1
8 External controllers
9 Ethernet connection to other SG systems
Download and Install Software
IONIC 16 operates in a SoundGrid environment, so a SoundGrid app (such as eMotion LV1) must be installed on the host computer. If a SoundGrid app is not currently installed, use Waves Central to install it. Waves Central is an app used to install all Waves software products and to manage licenses. If you don't have the Waves Central app, you can download it here.
Installation is the same for all SG host apps. Here, we are using eMotion LV1 to illustrate three situations for installing or updating an SG host application or drivers.
LV1 CLEAN INSTALL
To install the current version of eMotion LV1 and the SG drivers, launch Waves Central and follow these steps:

1 Select Install Products
2 Choose All Products
3 Search for the product by name
4 Select LV1 and click Install
Instal
If you have not activated your LV1 license, you can do so from the Licenses tab. Learn more from the Waves Central user guide.
When the installation is complete, you will be prompted to re-start your computer.
ADDING AN IONIC 16 TO AN EXISTING LV1 SYSTEM
When assigning a new IONIC 16 to an existing LV1 system, you probably won't need to do anything special. Since all SG drivers are installed when you install a SoundGrid host, the device should be available for assignment. If, however, the driver is damaged or missing, you can reinstall it from Waves Central. There are two ways to go about this.
Update LV1 to Latest Version
This updates LV1 and all drivers to the current version.
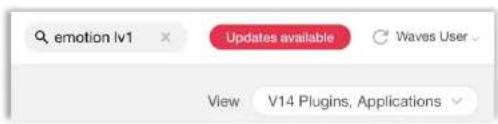
Go to Waves Central. If updates are available, it will be indicated at the top of the window.
Click Update.
Install Drivers Only
You can install or update drivers without updating LV1 to a newer version.

1 Go to Waves Central.
2 Search for and select the IONIC 16 driver.
3 Install.
LICENSES
You do not need a license to use IONIC 16. However, many hosts or specific host configurations do require a license.
Refer to the LV1 product page for details. Plugins and bundles likely require licenses.
Configure the System
A SoundGrid network is configured in the LV1 Setup window. At the heart of this page are racks where devices are assigned. This is the Inventory. Any compatible device that's part of the host's SoundGrid network, or shared across other SoundGrid networks, will be available for assignment.

CONFIGURING DEVICES AUTOMATICALLY
The first time you launch LV1, click Auto-Config to configure all your devices. For most configurations, this is sufficient.

If you later want to add devices or rearrange your inventory, run Auto-Config from the System Inventory page. Auto-Config identifies the computer's Ethernet port that is attached to the SoundGrid network. Next, it scans the SoundGrid network for devices. It then assigns devices and patches them to the host. We recommend that you let Auto-Config take care of device assignment, at least for your initial setup.
MANUAL DEVICE CONFIGURATION

You can assign, remove, and manage a device manually. Click on the arrow symbol in a device slot (circled here in yellow) to open the Device Menu, then select an IONIC 16 from the Network Devices submenu. If more than one IONIC 16 is connected to the SoundGrid network, each will appear in the Device Menu. Any device that is not already in use will be available for assignment ('Free'). If no other devices are assigned, the current device will become your clock master.
The local computer can be assigned from the Network Device menu. Drivers and servers are assigned in the same manner. See the LV1 user guide for specific instructions about device assignment, I/O channel patching, and clock.
Status Indicators
The LED on the front panel of IONIC 16 indicates network status.
Blinking Red Device is ON, but not connected to a system (host).
Blue Device is connected to a system.
Yellow Device needs a firmware update.
Multi-color ID light that is triggered by the panel that is controlling the device. This identifies the hardware.
Red/White bursts The device is not connected to the SG Network and is running on external power.
Blue/White bursts The device is connected to the SG Network and is running on external power.
LEDs on the rear panel show the speed/standard of the Ethernet connection.
One LED 100 MBS
Two LEDs 1 GB
Updating Firmware
The color of the FW button in a device slot indicates the current firmware status. To update firmware, click on the FW button. Do not disconnect the device or turn off the computer before Done appears.

Once the update is ready, turn the device off and on to reset it. If a driver is missing or damaged, you may need to reinstall it from Waves Central (see page 10).
| Grey | Compatible firmware |
| Blue | Compatible firmware, but a newer version exists |
| Red | Firmware not compatible and must be updated in order to use |
Identifying a Device on the SoundGrid Network

Click the ID button to activate a hard-to-miss LED on the panel of the corresponding hardware device. You can also activate the LED from the top bar of the device's control panel.
Shared Devices on Multiple LV1 systems.
Multiple eMotion LV1 systems can join together to form a super system. I/O devices can be shared among these systems. Individual I/O channels can be assigned across the network, and preamps can be controlled from any LV1 in the network.
Consult the eMotion LV1 user guide for details.
IONIC 16 Control Panel
There are two ways to open the device control panel:
FROM THE DEVICE RACK
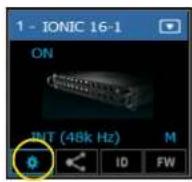
Click on the Gear button on a device in the rack slot.
FROM THE DRIVER CONTROL PANEL

Open the driver control panel and then click the Hardware Control Panel button. The driver control panel is located here in the host computer:
PC: C:\Program Files (x86)\Waves\SoundGrid\Driver Control Panel
Mac: System HD/Applications/Waves/SoundGrid
CONTROL PANEL PAGES

The Clock, Input, and Output pages are used to set up and manage the unit. The About and System Info pages provide information about the unit, such as MAC address, SOE master, firmware version, and more.
Input Page
The Input tab is used to configure the device's 16 analog mic/line inputs.

1 Preamp controls
2 Input meters
3 Preamp input gain adjust
4 AES input meters
5 Power source: Int/Ext
6 Presets: load and save
7 Device name in Inventory
8 Device status: when red, device is offline
9 Clip level indicator selector
10 Device ID on/off
PREAMP CONTROLS
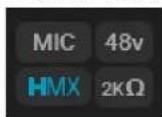
| Mic/Line | Sets input level mode for mic or line inputs.Mic: Enables input level adjustment (-3 dB to +60 dB), for both XLR and TRS.Line: Gain is fixed. XLR is set to 0 dB, 7k ohms. TRS set to -6 dB pad, 14.6k ohms. |
| 48 v | Phantom power: on or off |
| Mic impedance | Sets mic impedance: 2k ohms or 7k ohms. This enables proper pairing of the mic to the preamp. Some mics work better at a lower impedance, others at a higher one. To a certain extent, 2k ohms was the classic impedance during the ‘70s, ‘80s, ‘90s. Beyond the 2000s, 7k ohms predominates. It is more linear and there is less signal loss, especially if you perform analogue splits before the preamp. However, it's not cut and dry: there is a slight sound difference between the two impedances. Except where the impedance choice is obvious, it's best to experiment with these two options. |
| HMX | Turns Waves Harmonic Enhancer on or off. Harmonic enhancement usually results in a more natural-sounding, warmer sound, as found in classic analog equipment.Bypass HMX for a more neutral sound. |
The AES signal's sample rate is always converted to match the sample rate of the IONIC 16 device.
INPUT LEVEL ADJUST
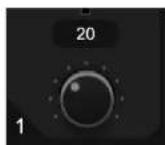
Controls the gain of the IONIC 16 preamps. Small values are used for line inputs, large for mic inputs. Range: 0 dB to 60 dB in steps of 1 dB
A setting of 0 allows a +24 dB input without clipping. A setting of +20 dB allows a +4 dB input without clipping. The channel number is shown to the left of the control; the current gain is indicated in the box above.
LEVEL ADJUST
Use the Clip Level drop-down menu to set the level at which clipping will be indicated by the LED in the meter. This does not affect the level of the audio, only the point at which clipping is indicated.
Range: -6 dB to 0 dB
PSU INDICATOR
This indicates the IONIC 16 power source.
110 v to 240 v internal power supply
Redundant 24 VDC external power supply; 4-pin XLR—pin 1 negative, pin 4 positive
Output Tab
There are 12 line outputs, a stereo AES output, and 2 stereo headphone outputs.
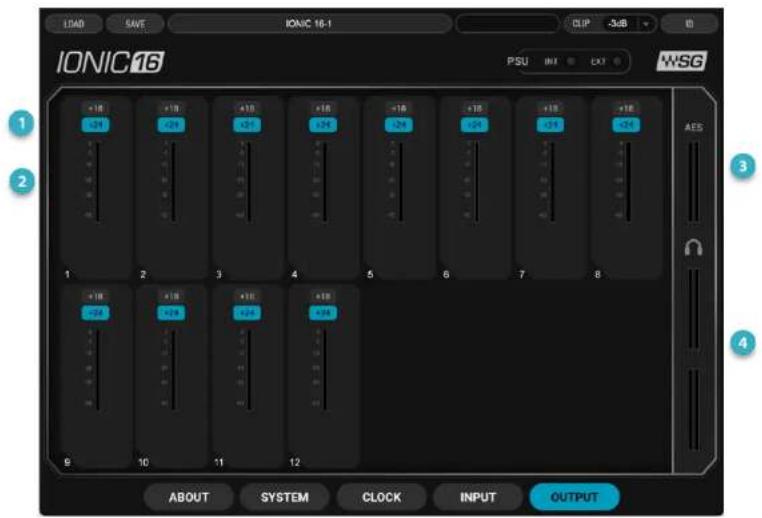
1 Headroom Select Select +18 dBu or +24 dBu mixer headroom
2 Analog output meters, dBFS -60 dB to 0 dB, +18 dBu and +24 dBu full scale line output levels
3 AES output meter Level indication only; no input control
4 Headphone meters One meter for each headphone channel
Clock Tab
Use the Clock tab to manage the clock relationship between the IONIC 16 and the SoundGrid network. The following image shows IONIC 16 locked to the network via Sync Over Ethernet (SOE). The device can also serve as the SOE clock master.
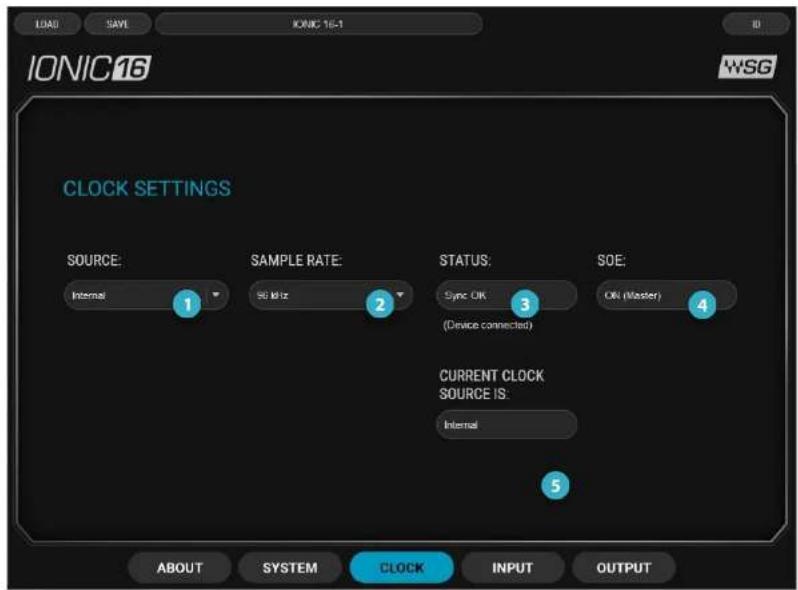
| 1 | Source Select | Request a clock source. If this source is not available, IONIC 16 will poll all other potential clock sources. If there are no available clock sources, IONIC 16 will switch to internal clock. |
IONIC 16 / User Guide

| 2 | Sample Rate | When IONIC 16 is the SOE clock master and is set to internal clock, this drop-down menu is used to set the device's sample rate (and hence the sample rate of the SOE network). When IONIC 16 is not the clock master, this window displays the SOE network sample rate. |
| 3 | Status | Displays the device network sync status. |
| 4 | SOE | Indicates SOE status (on/off, SOE Master/SOE Slave) |
| 5 | Current Clock Source | Indicates the actual current clock source. If the device is unable to sync to the requested clock, this displays the fallback. |
System Info Tab and About Tab
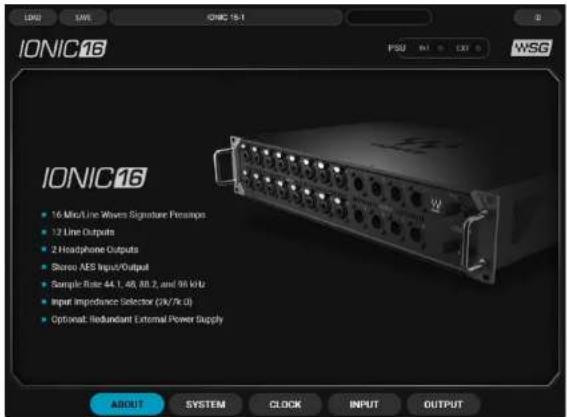
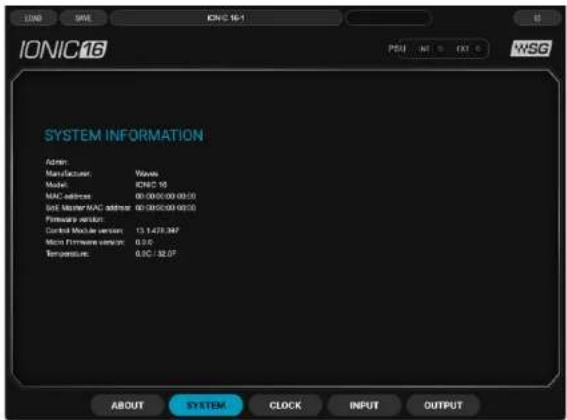
The About page contains a description of the device. The System Info tab contains technical details about the device, including MAC address, firmware version, and module version. This information is useful for troubleshooting. Please have this information handy if you contact Waves technical support concerning the device.
IONIC 16 / User Guide

Presets
You can save and load presets of device settings. A saved preset includes all parameters in the Clock and Control panels. Save IONIC 16 presets to use on future sessions or copy them to another computer to duplicate a configuration.

Device ID

Click the ID button to identify the IONIC 16 device that relates to this control panel. A flashing, multi-colored light on the front panel of the device will remain lit until you turn off the ID button.
Resetting the Unit
If an unsuccessful firmware update results in the device no longer being recognized by the host, follow these steps to reset the unit:
- Turn off the unit.
- Press and hold the Reset button (rear panel).
- Restart the unit while holding the button.
- Release the Reset button once the device has fully booted.
The unit is now in "force update" mode and a new firmware update can be performed. If your device does not have a reset button, please contact Waves technical support.
Specifications
| Sample Rate | 44.1 kHz, 48 kHz, 88.2 kHz, 96 kHz |
| Microphone / Line input | Input Gain: adjustable from -3 dB to +60 dB in steps of 1dB, default +20 dBFrequency response: (+18 dBu input)+/- 0.1 dB, 20 Hz to 20 kHz+/- 1.0 dB, 10 Hz to 40 kHzDynamic range: >110 dB (20 kHz BW, 0 dB Gain)EIN -130 dBu (gain 60 dB, 0 ohms source, A-weighted)THD+N -100 dB (997 Hz, +18dBu source, 0 dB Gain, 20kHz BW)Input impedance:XLR: 2k ohms / 7k ohms, selectable per inputTRS: 14.6k ohmsInput Sensitivity:XLR: -33 dBu to +27 dBu, adjustable in 1 dB stepsTRS: -27 dBu to +33 dBu, adjustable in 1 dB stepsCMRR: 50 dB (20 Hz to 1 kHz, 0 dB gain)Crosstalk: >90 dB (20 Hz to 20 kHz, +27 dBu input, 0 dB gain)48V phantom power switchable per inputHarmonic Enhancer, switchable per inputFront panel signal presence and clip indicator, per channel |
| Line output | Maximum output level: +18 dBu or +24 dBu , switchable per outputFrequency Response:+/- 0.1 dB, 20 Hz to 20 kHz @ 48 kHz SR+0.1 / -1.0 dB, 10 Hz to 40 kHz @ 96 kHz SRTHD+N: -100 dB @ +24 dBu, -105 dB @ +18 dBu (997 Hz, 20 kHz BW)Crosstalk: >90 dB (20 Hz to 20 kHz)Residual output noise: -87 dBu (A-Weighted)Output impedance: 150 ohms |
| Phones output | Adjustable output gainFrequency Response:+/- 0.1 dB, 20 Hz to 20 kHz @ 48 kHz SR+0.1 / -1.0 dB, 10 Hz to 40 kHz @ 96 kHz SRTHD+N: -80 dB (3V @ 30 ohms load, 997 Hz, 20 kHz BW)Output impedance: 20 ohms |
| AES3 | Input / Output impedance: 110 ohmsInput SR with auto conversion (SRC)Output SR support: 44.1 kHz, 48 kHz, 88.2 kHz, 96 kHz |
| SoundGrid | Ethernet 1GB |
| Power | 100 V–240 V auto-switching PSU 0.5 amp / 0.25 amp, Redundant PSU external input |
| Operating Temperature | 0 to 35 degrees Celsius (32 to 95 degrees Fahrenheit) |
| W x D x H | 482.1 mm (w) x 305.9 mm (d) x 87 mm (h)(19 in x 12 in x 3.42 in) |
| Weight | 5.3 kg (11.7 lbs) |
Specifications are subject to change without notice.
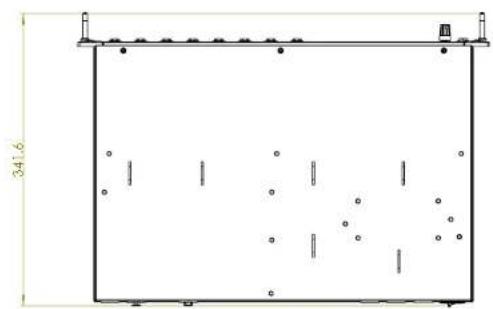
Dimensions
IONIC 16 is intended for rack installation and is sized accordingly. Dimensions below are in millimeters.


natural_image
Front view of a dual-chamber electronic device with multiple ports and connectors (no visible text or labels)
natural_image
Pure technical diagram of a rectangular enclosure with internal components and no visible text or symbolsInstalling IONIC 16 in a Rack
Care must be taken when mounting the IONIC 16 on a rack rail. Improper screw alignment or incorrect screws can damage the device and possibly cause injury.
Four screws are needed to rack the device. We recommend using M5 or M6 screws, depending on the rack specifications. IONIC 16 is supplied with handles attached. You can remove these prior to installation, if needed.

IONIC 16 / User Guide

- Safety Instructions for IONIC 16
- WARNING: ELECTRICAL HAZARD
- Contents
- Introduction
- Hardware and Connections
- Rear Panel
- Getting Started
- Connect the Hardware
- LV1 application
- Ionic 16 I/O Stagebox
- SoundGrid Server
- SG switch
- EXPAND YOUR SYSTEM
- Download and Install Software
- LV1 CLEAN INSTALL
- ADDING AN IONIC 16 TO AN EXISTING LV1 SYSTEM
- Update LV1 to Latest Version
- Install Drivers Only
- LICENSES
- Configure the System
- CONFIGURING DEVICES AUTOMATICALLY
- MANUAL DEVICE CONFIGURATION
- Status Indicators
- Updating Firmware
- Identifying a Device on the SoundGrid Network
- Shared Devices on Multiple LV1 systems.
- IONIC 16 Control Panel
- Input Page
- PREAMP CONTROLS
- INPUT LEVEL ADJUST
- LEVEL ADJUST
- PSU INDICATOR
- Output Tab
- Clock Tab
- System Info Tab and About Tab
- Presets
- Device ID
- Resetting the Unit
- Dimensions
Brand : WAVES
Model : Ionic 16
Category : Blender