
WP-3H2 - Panel Kit Kramer - Free user manual and instructions
Find the device manual for free WP-3H2 Kramer in PDF.


| Product Type | Wall Plate Kit |
| Brand | Kramer |
| Model | WP-3H2 |
| Connectivity | 3 HDMI inputs, 2 HDMI outputs |
| Video Resolution | Up to 4K@60Hz 4:4:4 |
| HDCP Support | HDCP 2.2 compliant |
| Dimensions (W x H x D) | 4.5 x 4.5 x 1.5 inches (114 x 114 x 38 mm) |
| Weight | 0.2 lbs (90 g) |
| Power Supply | Passive (no power required) |
| Operating Temperature | 32°F to 104°F (0°C to 40°C) |
| Material | Metal and plastic |
| Color | Black |
| Installation | Fits standard single-gang wall box |
| Maintenance | Wipe with a dry, soft cloth |
| Safety | No user-serviceable parts inside |
| Spare Parts Availability | Contact Kramer support for replacements |
| Repairability | Not intended for field repair; replace unit |
| Warranty | Limited 3-year warranty |
Frequently Asked Questions - WP-3H2 Kramer
User questions about WP-3H2 Kramer
0 question about this device. Answer the ones you know or ask your own.
Ask a new question about this device
Download the instructions for your Panel Kit in PDF format for free! Find your manual WP-3H2 - Kramer and take your electronic device back in hand. On this page are published all the documents necessary for the use of your device. WP-3H2 by Kramer.
USER MANUAL WP-3H2 Kramer
Scan for full manual
WP-3H2 Panel Set Quick Start Guide
This guide helps you install and use your WP-3H2 Panel Set for the first time.
Step 1: Check what's in the box
1 faceplate
1 EU frame or 1 US Frame
1 UK frame
1 Quick start guide
Step 2: Install the WP-3H2 Panel Set
After mounting the device (see www.kramerav.com/downloads/WP-3H2 EU PANEL SET) attach the frame to the device and then click in the faceplate as follows:
To install the US Version:
- Attach the faceplate to the device bracket.
- Separate the outer frame from the inner frame.
- Screw the inner frame onto the device using the 2 inner frame screws.
- Snap the outer frame onto the mounted inner frame

To install European Version:
- Attach the frame to the device bracket.
- Snap the faceplate into the frame.
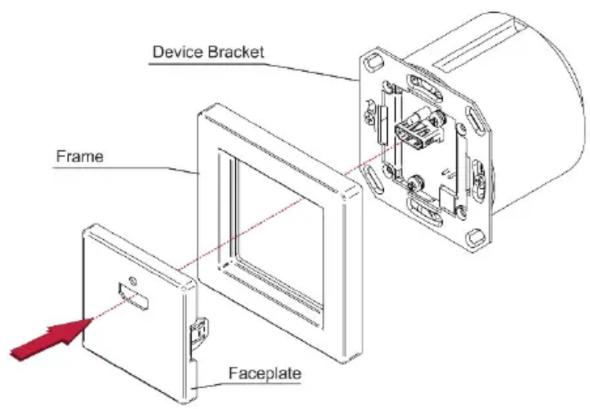
We recommend that you use any of the following standard 1 Gang in-wall junction boxes (or their equivalent):
• US-D: 1 Gang US electrical junction boxes.
- EU: 1 Gang in-wall junction box, with a cut-hole diameter of 68mm and depth that can fit in both the device and the connected cables (DIN 49073).
- UK: 1 Gang in-wall junction box, 75x75mm (W, H), and depth that can fit in both the device and the connected cables (BS 4662).
Brand : Kramer
Model : WP-3H2
Category : Panel Kit