TCW-480R Slim - Loudspeaker Taga Harmony - Free user manual and instructions
Find the device manual for free TCW-480R Slim Taga Harmony in PDF.


| Product Type | In-wall / In-ceiling Speaker |
| Brand | Taga Harmony |
| Model | TCW-480R Slim |
| Speaker Configuration | Full-range with separate tweeter (2-way system) |
| Impedance | 8 ohms |
| Mounting Type | Flush mount with rotating clamping system |
| Grille Attachment | Magnetically mounted, paintable |
| Tweeter Type | Swivel tweeter for directional sound adjustment |
| Equalizer | +/- 3dB Environmental Equalizer (treble/bass switch) |
| Terminal Type | Spring-loaded binding posts accepting up to 10 AWG wire |
| Recommended Use | Indoor home theater or music systems |
| Installation | Requires cutout in wall or ceiling using included template |
| Paintability | Frame and grille can be painted after removing internal protective fabric |
| Cleaning | Use a damp, soft cloth; do not use abrasive cleaners |
| Environmental | For indoor use only; avoid moisture and heat sources |
| Compliance | CE, RoHS |
| Accessories Included | Paper cutout template, mounting screws, user manual |
| Safety | Do not dismantle; use compatible amplifier; avoid distortion |
Frequently Asked Questions - TCW-480R Slim Taga Harmony
User questions about TCW-480R Slim Taga Harmony
0 question about this device. Answer the ones you know or ask your own.
Ask a new question about this device
Download the instructions for your Loudspeaker in PDF format for free! Find your manual TCW-480R Slim - Taga Harmony and take your electronic device back in hand. On this page are published all the documents necessary for the use of your device. TCW-480R Slim by Taga Harmony.
USER MANUAL TCW-480R Slim Taga Harmony
natural_image
Abstract geometric pattern with vertical purple bars on white background (no text or symbols)TAGA
HARMONY
Platinum IW LCRS / TCI Platinum SE / TCI Platinum / GTCS / RB / TCW / TLCR Series
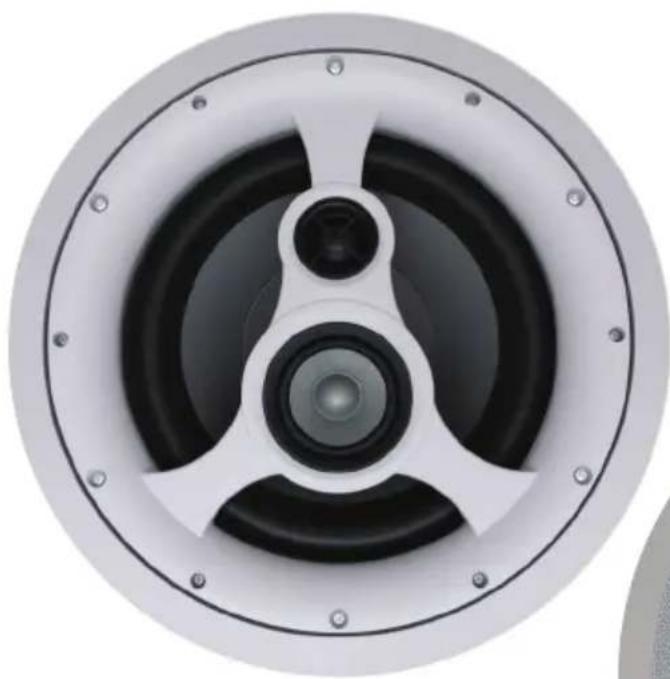
IN-WALL / IN-CEILING SPEAKERS
natural_image
Top-down view of a speaker grille with three speakers and a central hub (no text or symbols visible)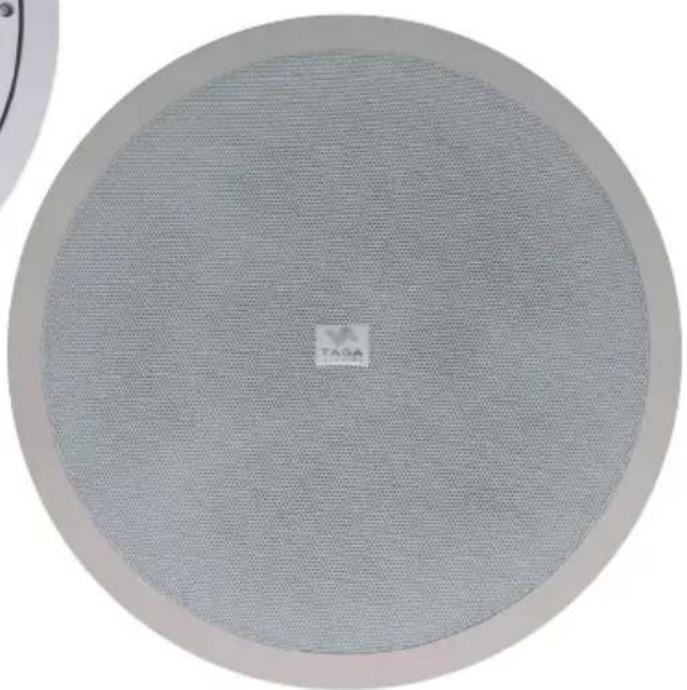
natural_image
Circular textured surface with a small logo (TADA) in the center, no visible text or symbols on the pattern itself.Instruction Manual
Introduction
Thank you for purchasing TAGA Harmony Speakers.
TAGA Harmony installation speakers provide superior sound performance and amazing value. They utilize very stiff and strong cabinets, which minimize distortion, vibrations or resonances and specialized mounting brackets that make installation very easy.
All speakers are designed to be used both in music and home theatre systems in any area of your home or commercial applications. The sound is clear, natural, dynamic and provides wide dispersion throughout a listening area, without occupying your valuable floor space!
The frames and grills may be painted to blend with any decor.
This instruction manual provides all of the information that you need to know about your TAGA Harmony Speakers. Please read it carefully before you start using the unit.
Cleaning
Do not use strong or abrasive cleaners. Use a damp, soft cloth for cleaning. Do not get any part of the speaker wet.
Specifications and the latest instruction manual edition
Full technical specifications and the latest edition of the instruction manual are available on www.Tagaharmony.com
Contents
| Important | remarks | 3 |
| Speaker | Placement | 4 |
| Hooking Up the Wires | 8 | |
| Speaker | Mounting | 9 |
| Additional | Features | 10 |
| Painting | 11 | |
| Installing the Grille | 11 |

An exclamation mark in a triangle is intended to alert the user to the presence of important operating and maintenance (servicing) instructions in the literature accompanying the appliance.
PLEASE READ THIS INSTRUCTION MANUAL CAREFULLY BEFORE INSTALLATION AND KEEP IT FOR FUTURE REFERENCE
- If not clearly specified otherwise in the product specifications (available on the www.Tagaharmony.com website), this speaker is intended for indoor use only.
- Please do not dismantle any parts of the speaker as this may void your warranty – servicing should be performed only by a qualified TAGA Harmony repair center.
- When connecting the speaker make sure to power off your audio equipment (amplifier, power mixer, sound processor etc.).
- Make sure that all connections are done according to this manual and a manual provided with your audio equipment.
- Make sure that your audio equipment output power are compatible with this speaker. Using unsuitable audio equipment may damage the speaker and / or audio equipment and void your warranty.
- The speaker may be damaged by too high output power as well as by an underpowered output signal [distortion of sound].
- Do not use very high-volume levels for a long period of time – this may damage the speaker and void your warranty.
- When switching on and off your audio equipment, turn down the volume to avoid strong electrical impact to be delivered to the speaker.
- Position the speaker in ventilated and dry atmosphere and do not expose it to sun or other heat sources (does not apply to outdoor speakers).
• Install the loudspeaker on a stable and hard surface. - We recommend having a licensed professional engineer or designer reviewed the design and installation of the system focusing on safety and performance of the application.
- To protect the drivers do not remove the protective grille (if provided).
Speaker Placement
Please spend some time considering placement prior to installing the speaker. Once it is installed, it is not to be easily moved or repositioned. Each room has its specific acoustics but there are some general rules:
Location
TAGA Harmony speakers can be installed almost anywhere thanks to our unique sound characteristic which is strong and powerful, and has a wide dispersion field.
General notes
| In-wall In-ceiling | |
| Placing the speakers near a corner will tend to increase their bass output, but may result in “boomy” or “muddy” sound. | Corner placement close to the walls provides a good balance of bass output and accuracy. |
| Placing the speakers further into the room will tend to decrease their bass output, but may result in improved articulation and clarity. | |
| Place the speakers at least 60 cm (2 feet) away from corners and other surfaces which may interfere or reflect sound (like tall furniture). | |
| To add extra bass and definition to your system we recommend TAGA Harmony Custom Installations or traditional subwoofers. | |
Placement for critical listening in stereo (2 speakers)
| In-wall In-ceiling | |
| Place the front left and right speakers at an equal distance from your listening position, at ear level while seated. | Place the left and right speakers at an equal distance from your listening position.Aim the speaker toward your listening position (if your speakers have this feature). |
| If the speakers are installed in a wall which is around 300 cm (10 feet) away from your listening position, place them no more than 300 cm (10 feet) apart from each other and no less than 150 cm (5 feet). | Place the speakers no more than 300 cm (10 feet) apart from each other and no less than 150 cm (5 feet). |
Placement for entertainment listening or background music (1 or more speakers)
| In-wall In-ceiling | |
| In rectangular smaller rooms [below 30 square meters (320 square feet)] usually 1 or 2 speakers should work fine. If you use 2 – place them near opposite corners. If you use 1 – place it on the most empty and biggest wall. | In rectangular smaller rooms [below 30 square meters (320 square feet)] usually 1 or 2 speakers should work fine. If you use 2 – place them near opposite corners.If you use 1 – place it in the center. |
| In irregular or larger rooms use more than 2 speakers and place them evenly across the space for good sound dispersion. | |
Speaker Placement
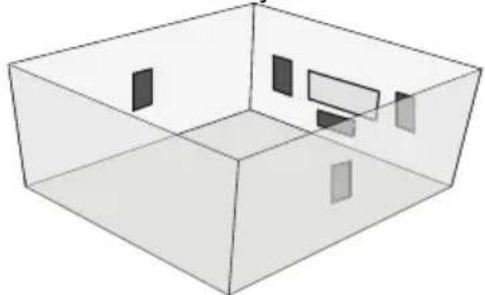
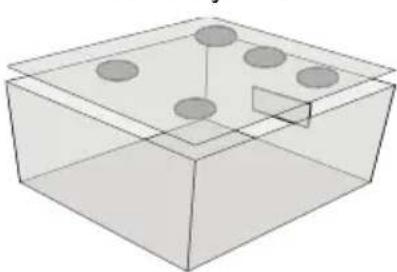
Placement for Home Theatre
(the pictures shown for the listening position in the middle of the room)
| On-wall On-ceiling | |
| 5.0/5.1 Systems | 5.0/5.1 Systems |
 |  |
| 6.0/6.1 Systems 6.0/6.1 Systems | |
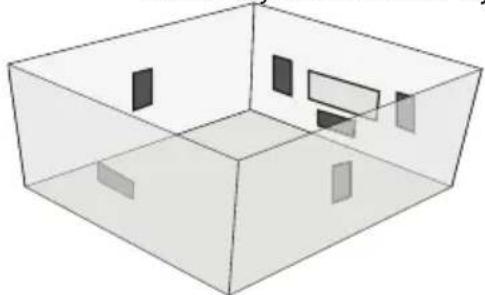 | 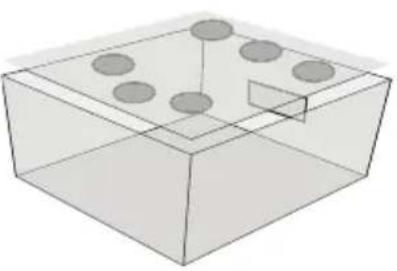 |
| 7.0/7.1 Systems 7.0/7.1 Systems | |
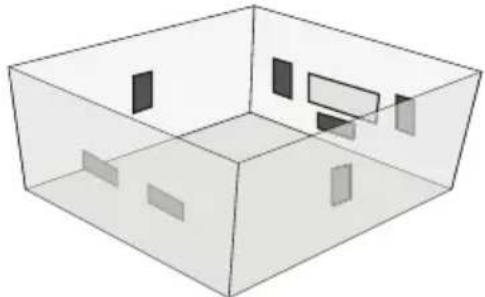 | 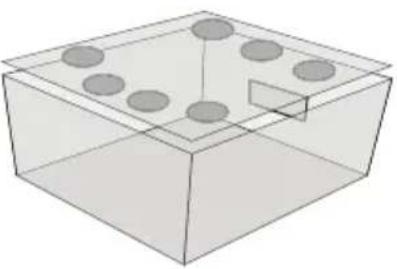 |
Speaker Placement
| In-wall In-ceiling | |
| Front speakersPlace the left and right speakers at an equal distance from your listening position, slightly above ear level while seated.If the speakers are installed in a wall which is around 300 cm (10 feet) away from your listening position, place them no more than 300 cm (10 feet) apart from each other and no less than 150 cm (5 feet). | Front speakersPlace the left and right speakers at an equal distance from your listening position, in front of your TV and about 60 – 90 cm (2 – 3 feet) away from the wall.Aim the tweeters towards the listening position (if your speakers have this feature).If the speakers are installed around 300 cm (10 feet) away from your listening position, place them no more than 300 cm (10 feet) apart from each other and no less than 150 cm (5 feet). |
| Center speakerPlace the speaker at ear level while seated. If you have a TV mounted on wall, place the speaker slightly below it. If you have a TV on a table, place the speaker above it and angle the tweeter down towards ear level while seated (if your speaker has this feature).6.0/6.1 systems – place the second center speaker (rear center) on the opposite wall to the first one – at the same height and angle the tweeter down towards ear level while seated (if your speaker has this feature). | Center speakerPlace the speaker in the middle of the front left and right speakers. Aim the tweeters towards the listening position (if your speaker has this feature).6.0/6.1 systems – place the second center speaker (rear center) behind your listening position, in line with the front center speaker. |
| Surround speakersPlace the speakers above ear level while seated, but no higher than ear level while standing.5.0/5.1/6.0/6.1 systems – place the right and left surround on the right and left side of your listening position.7.0/7.1 systems – place the right and left surround on the right and left side of your listening position. The two additional rear surround speakers should be placed behind your listening position. They should be place at equal distances from your listening position, and about half as far as the right and left surrounds. All four surrounds should be mounted at the same height. | Surround speakers5.0/5.1/6.0/6.1/7.0/7.1 systems – place the right and left surround on the right and left side of your listening position, as far apart as your front left and right speakers.7.0/7.1 systems – place the rear right and left surrounds behind your listening position, at equal distances from your position. They should be about half as far apart as the right and left surround speakers positioned on the sides. |
| We recommend to use TAGA Harmony in-wall/in-ceiling or traditional subwoofer in all Home Theatre systems. | |
Speaker Placement
Placement for Stereo/Mono models
TAGA Harmony Stereo/Mono models offer wider sound dispersion than regular speakers.
| STEREO CONNECTION MONO CONNECTION | |
| Single speakerIn smaller areas where a stereo pair of speakers cannot be used or where a single speaker is preferred to be used.7.0/7.1 systems – use the speaker as rear center speaker. Position tweeters towards the left and right sides of the room. | Single speaker6.0/6.1 systems – use the speaker as rear center speaker. Position tweeters towards the left and right sides of the room. |
| Multiple speakersIn larger areas to eliminate the sound imbalances and offer better sound coverage.7.0/7.1 systems – use two speakers as surround speakers. Position one tweeter of each speaker towards the front side of the room and the other tweeter towards the back side. | Multiple speakers5.0/5.1 systems – use two speakers as surround speakers. Position one tweeter of each speaker towards the front side of the room and the other tweeter towards the back side. |
Placement of Platinum IW LCRS and TLCR Series
TAGA Harmony Platinum IW LCRS and TLCR speakers can be used in stereo, entertainment and background music applications as well as front, center and surround speakers.
Hooking Up the Wires
The speaker terminal can accommodate up to 10 AWG speaker cables (selected models only - others up to 14 AWG). 10 or 14 AWG speaker cables are recommended for longer connections (greater than 20 meters / 66 feet). For shorter lengths you can use 16 or 18 AWG speaker cables. It is recommended to leave about 150cm (5 feet) of extra cable at the speaker end to facilitate positioning and installation of the speaker. Do not use staples, nails or other metal objects to secure the speaker cables. You will get the best sound quality and least amount of hum by keeping the speaker cables away from other electrical wires and cables.
Pay attention to connecting the polarity of the speaker correctly with the amplifier speakers output terminals (RED + with RED +, BLACK - with BLACK -). Before connecting the speaker make sure that your amplifier is switched off. Please refer to your amplifier's instruction manual for more information.
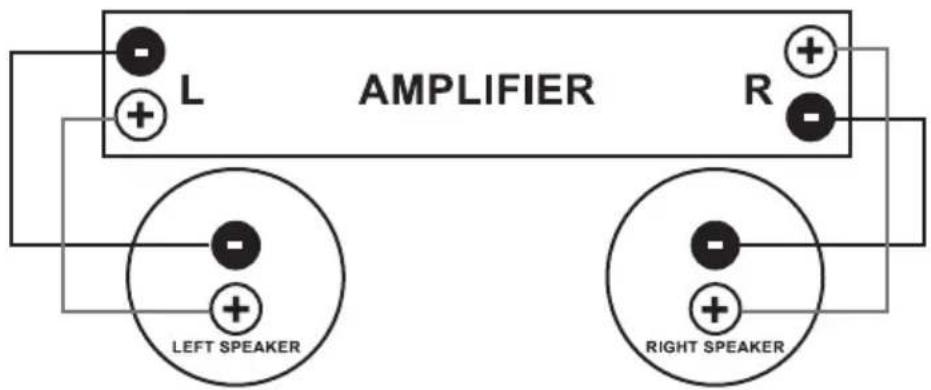

Check whether your amplifier may work with impedance of your TAGA Harmony speaker. Otherwise you may burn the amplifier and damage the speakers - it may void your warranty.
Stereo/Mono Models
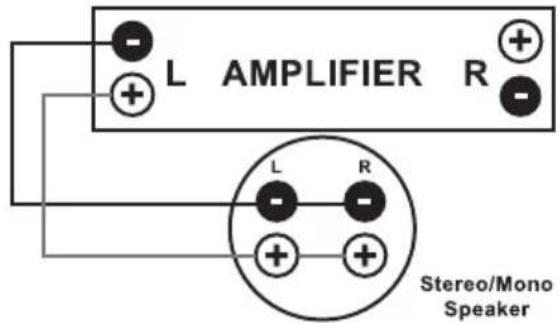
STEREO CONNECTION MONΦ CONNECTION
Connect a single speaker to two amplifier speakers output terminals.
Connect one amplifier speakers output terminal with one speaker input terminal (RED + with RED +, BLACK - with BLACK -), connect the other amplifier speakers output terminal with the other speaker input terminal (RED + with RED +, BLACK - with BLACK -).
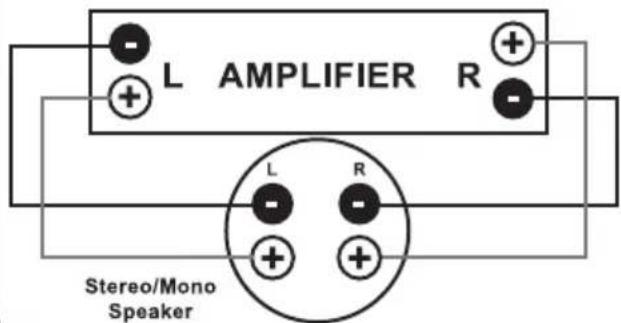
Connect a single speaker to a single amplifier speakers output terminal.
Connect one amplifier speakers output terminal with one speaker input terminal (RED + with RED +, BLACK - with BLACK -). Using a short piece of speaker cable connect Left + (RED) speaker input terminal with Right + (RED) speaker terminal. Do the same for - terminals (BLACK).
Speaker Mounting
The below mounting procedure applies to drywall walls, drywall ceilings and dropped ceilings or similar.
You will have to cut a hole in a wall or ceiling. With the right tools and a little extra care and preparation, installing the speaker can be both quick and easy.

natural_image
Silhouette of a screwdriver holding a grid-like object on a horizontal line (no text or symbols)There are 2 types of paper templates which are helpful to cut out a hole for installing the speaker. Your speaker is supplied with one of the templates.
Type #1 a template, in which a hole along the drawn line should be cut out.
- Carefully cut out the hole drawn on the template.
- Position the template in the place you wish to mount the speaker, and draw a line on the wall / ceiling along the inside edges of the hole.
Type #2 a template in the shape of a hole which has to be cut out in the wall / ceiling.
- Position the template in place you wish to mount the speaker, and draw a line on the wall / ceiling along the outside edge of the template.
Make your cuts along the line in the wall / ceiling. Try to keep the cuts neat, however the frame of the speaker will overlap the hole to hide any rough edges.
Place the speaker cable in the hole.
Connect the speaker cable to the speaker terminals.
flowchart
graph TD
    A["CLAMPS CLOSED"] --> B["CLAMPS OPENED"]
    B --> C["CLAMPS CLOSED"]
    C --> D["CLAMPS OPENED"]
Speaker Mounting
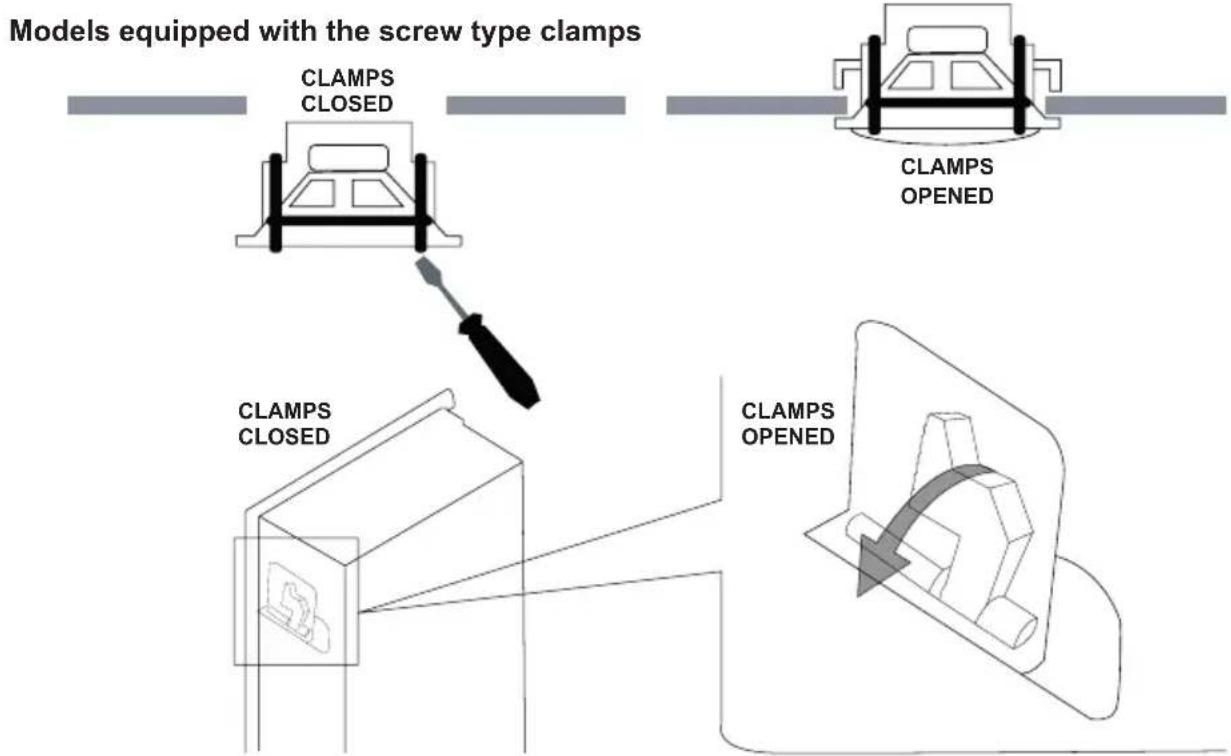
- Remove the speaker grille by pressing the mounting screws from the back of the speaker.
- With grille removed, insert the speaker into the mounting hole.
- Use a screwdriver to turn the mounting screws slowly clockwise.
- The cut edges of the wall or ceiling will be sandwiched firmly between the mounting clamps and the speaker frame.
Additional Features
Selected model are equipped with some of the following features:
- Magnetically mounted grille - easy to put on and take off. Make sure not to place any objects between the grille and the speaker frame with mounted magnets.
- Swivel tweeter - depending on your particular primary listening area, room acoustics, ceiling height, or personal preference, you may find the sound more pleasing by pointing the tweeter in a particular direction. If additional treble is desired in the primary listening area, point the tweeter towards that area; and if less treble is required, point tweeter away.
Push gently at the edge of the tweeter to point it in the desired direction.
- +/- xdB Environmental Equalizer (treble or bass switch) to compensate speaker positioning and room anomalies.
Switch positions:
+ xdB (+ or top position depending on a model): the tweeter or woofer will play xdB higher.
0/Flat (center position): tweeter or woofer will play in the most linear frequency response.
- xdB (- or bottom position depending on a model): the tweeter or woofer will play xdB lower.
Note! x - a number of dB.
Painting
In the selected models the grille and the frame, may be painted to match your room decoration.
If you want to paint the speaker frame use the part of the template remaining after the hole has been cut out. With the grille removed, protect the speaker with this part and paint the frame.
When painting the grille, make sure to remove the protective internal fabric (if your speaker is equipped with it) and to not plug the grille holes with paint or repaint it after the paint has dried. If your speaker was equipped with the protective internal fabric make sure to place it on the grille after the paint has dried.
Installing the Grille
Before installing the grille run your amplifier and check whether there are no vibrations audible from the speaker. If you hear any, it may be caused by the loose screws - tighten them up.
Install the grille and enjoy the music and movies!
We strongly advise to contact a professional installer or dealer in order to install TAGA Harmony products.
We recommend using high quality TAGA Harmony cables and other installation accessories.
EU declaration of conformity

Your product is marked with the symbol shown on the left
As its manufacturer, hereby we declare that the product is in compliance with the
following EU directives and regulations:
CE: 2014/30/EU (EMC) & 2015/863/EU (RoHS)
The full text of the EU declaration of conformity is available from the manufacturer.
Disposal of the product
natural_image
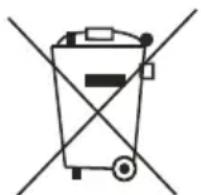
Simple line drawing of a trash bin with diagonal lines crossing through it (no text or symbols)Disposal of old electrical & electronic equipment
(applicable in the European Union and other countries with separate collection systems)
This symbol on the product or on its literature and packaging indicates that this product shall not be treated as household waste. Instead it shall be handed over to the appropriate collection point for the recycling of electrical and electronic equipment. By ensuring that this product is disposed of correctly, you will help to prevent potential negative consequences for the environment and human health, which could be caused by inappropriate waste handling of this product.
The recycling of materials will help to conserve natural resources. For more detailed information about recycling of this product, please contact your local government office, your household waste disposal service or the shop where you purchased the product.
TAGA EUROPE
POLPAK POLAND Sp. z o.o.
AL.JEROZOLIMSKIE 331A
05-816 REGUŁY k/WARSZAWY, POLAND
Email: sales@TagaHarmony.com
- TAGA
- HARMONY
- Platinum IW LCRS / TCI Platinum SE / TCI Platinum / GTCS / RB / TCW / TLCR Series
- Introduction
- Cleaning
- Specifications and the latest instruction manual edition
- PLEASE READ THIS INSTRUCTION MANUAL CAREFULLY BEFORE INSTALLATION AND KEEP IT FOR FUTURE REFERENCE
- Speaker Placement
- Location
- Placement for Home Theatre
- Placement for Stereo/Mono models
- Placement of Platinum IW LCRS and TLCR Series
- Hooking Up the Wires
- Stereo/Mono Models
- STEREO CONNECTION MONΦ CONNECTION
- Speaker Mounting
- Additional Features
- Painting
- Installing the Grille
- EU declaration of conformity
- Disposal of the product
Brand : Taga Harmony
Model : TCW-480R Slim
Category : Loudspeaker