
RS600FW3 - Wine cellar Fhiaba - Free user manual and instructions
Find the device manual for free RS600FW3 Fhiaba in PDF.


| Product Type | Wine Cellar |
| Brand | Fhiaba |
| Model | RS600FW3 |
| Dimensions (Height x Width x Depth) | 1800 x 600 x 600 mm (approx.) |
| Weight | 80 kg (approx.) |
| Power Supply | 220-240 V, 50/60 Hz |
| Power Consumption | 150 W (approx.) |
| Energy Efficiency Class | A+ (estimated) |
| Number of Zones | Dual-zone (upper and lower) |
| Temperature Range | 5°C to 20°C |
| Temperature Control | Digital thermostat with LED display |
| Humidity Control | Automatic humidity regulation (50-70%) |
| Door Type | Full-length UV-resistant tempered glass |
| Shelving Material | Chrome-plated wire shelves |
| Number of Shelves | 5 (approx.) |
| Bottle Capacity | Up to 60 bottles (standard Bordeaux) |
| Ventilation | Built-in motorized fan for air circulation |
| Security | Lock and key |
| Noise Level | ≤ 42 dB(A) |
| Cooling System | Compressor with vibration dampening |
| Defrost | Manual |
| Installation | Freestanding or built-in (ventilation required) |
| Cleaning and Maintenance | Clean interior with mild soap and water; check door seals regularly; defrost when frost buildup exceeds 5mm |
| Spare Parts Availability | Through authorized service centers; compressor warranty 5 years |
| User Manual | 68 pages, EN (available for download) |
Frequently Asked Questions - RS600FW3 Fhiaba
User questions about RS600FW3 Fhiaba
0 question about this device. Answer the ones you know or ask your own.
Ask a new question about this device
Download the instructions for your Wine cellar in PDF format for free! Find your manual RS600FW3 - Fhiaba and take your electronic device back in hand. On this page are published all the documents necessary for the use of your device. RS600FW3 by Fhiaba.
USER MANUAL RS600FW3 Fhiaba
natural_image
Illustration of hands using a power plug to install a wall socket (no text or symbols present)natural_image
Gray-scale interface panel with icons for home, power button, and wireless signal (no text or symbols)
natural_image
Simple line drawing of a finger pressing a button with a house symbol nearby (no text or labels)Modello OF
natural_image
Simple line drawing of a finger emitting signal waves (no text or symbols)natural_image
Simple line drawing of a wine bottle and a glass on a dark background (no text or symbols)Vini rossi
da +10 °C a +18 °C

natural_image
Simple line drawing of a wine bottle and a glass on a dark background (no text or symbols)Vini bianchi
da +4 °C a +9 °C
D) Premere OK.
flowchart
graph TD
    A["RESET"] --> B["MODALITÀ SABBATH"]
    B --> C["MODALITÀ DEMO"]
    C --> D["Return to RESET"]
B) Toccare l'icona INFO SYSTEM.

natural_image
Illustration of hands installing or maintaining a metal tray with rollers inside a rack (no text or symbols)Cassettone (modelli 1T, 0T, 0H)
natural_image
Illustration of a hand installing or adjusting a window frame with a magnified inset showing the screen (no text or symbols present)8.1. Illuminazione
natural_image
Diagram of a device with three panels, each showing a light source and internal structure (no text or symbols)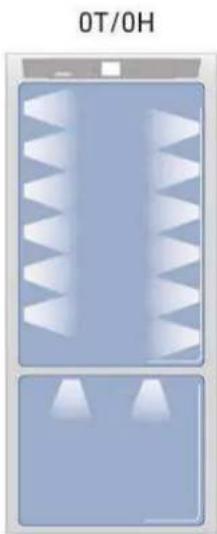
natural_image
Diagram of a device with ventilation grilles and two light sources, labeled '0T/OH' at the top (no other text or symbols)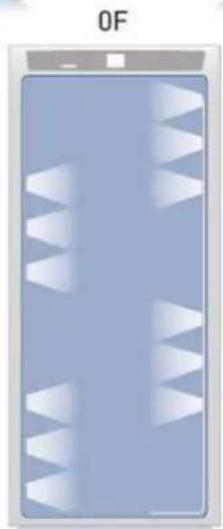
natural_image
Illustration of a smartphone screen with abstract white patterns on a blue background (no text or symbols)natural_image
Diagram of a kitchen appliance with airflow arrows indicating movement (no text or symbols)natural_image
Illustration of a hand inserting a pipe into a blue-patterned container (no text or symbols)natural_image
Diagram of a door frame with blue arrows indicating direction, showing structural components and alignment (no text or symbols)natural_image
Illustration of a hand inserting a plug into a blue-patterned panel (no text or symbols)1.1. Caring for the environment....6
1.2. Cleaning, sanitization and maintenance 6
1.3. Information for regulatory authorities....6
1.4. To save energy 6
1.5. Environmental labelling....7
2. INSTALLATION 8
2.1. Installation....8
2.2. Connection to the electrical power supply 8
2.3. Refrigerant....8
3. BEFORE ST ARTING 9
3.1. To know your wine cellar well....9
3.2. Manufacturer's liability....9
3.3. Technic al support....9
3.4. Technicalspecifications....9
3.5. Product plate 9
3.6. Main components 11
3.7. Electronic Contr ol....13
3.8. Main control panel 13
4. TURNING THE APPLIANCE ON AND OFF 14
4.1. Turning on and off....14
5. COMPARTMENT TEMPERATURE SETTING 16
5.1.How to adjust the compartment temperature 16
5.2. Information and malfunction messages on the display....17
5.3. Wine storage temperatures 17
6. FUNCTIONS AND SET TINGS 18
6.1. Functions 18
6.2. Settings....20
7. LAYOUT 25
7.1. Internal layout (positioning, adjustment, removal) 25
8. LIGHTING 25
8.1. Lighting 25
9. CONSERV ATION OF WINES 26
9.1. General directions....26
9.2. Storage temperatures 26
9.3.Time of conservation 27
9.4. Consumption temperature....28
9.5. Positioning the bottles....29
10. CARE AND CLEANING 29
10.1. Care and Cleaning....29
10.2. Internal cleaning 30
10.3. Cleaning of the ventilation grill, filter and condenser 30
10.4. Upper condenser....31
10.5. Lower condenser 31
11. TROUBLESHOOTING 32
11.1. Troubleshooting Guide....32
11.2. Malfunction messages appearing on the display....33
1.1. For your safety
If this appliance is replacing an existing appliance which must be removed or disposed of, make sure that it does not become a dangerous trap for children by cutting its power supply cable and rendering it impossible to close the door.
This appliance is designed to refrigerate beverages and foods and is intended for domestic use.
This appliance is for refrigeration and conservation of fresh and frozen foods in the home. Any other use is considered inappropriate.
This appliance is not designed to operate with external timers or with remote-control systems.
The appliance must be installed by following the instructions in the Installation Guide, particular care should be taken not to obstruct the vent openings of the appliance and of the built-in units.
The appliance features a concentrated lighting system with LED lamps. Do not stare at these lamps when they are on, as this could damage your vision.
- This warning is also included on the label attached to the inside of the refrigerator door.
When the freezer is operating, do not touch the interior stainless steel surfaces with wet or damp hands, as skin may stick to the very cold surfaces.
Do not use any type of electrical equipment inside the food storage compartments.
When positioning the shelves, do not place fingers in the shelf slide guides.
Do tnposition containers of mibaable liquids near the appliance.
Never attempt to extinguish a flame/fire with water: turn off the appliance and cover the flame with a fireproof blanket.
Do tnposition containers of mibaable liquids near the appliance.
Completely swih off thepliaape and unplug the power supply cable during cleaning operations. If the plug is not easily reached, it is a good idea to disconnect the omnipolar switch that controls the socket that the appliance is connected to.
Packaging materials can be dangerous for children: do not allow children to play with plastic bags, plastic film or polystyrene.
Any repairs must be performed by a qualified service technician.
This appliance is not intended for use by persons (including children) with reduced physical, sensory or mental capabilities or lack of experience and knowledge unless they have been given supervision or instruction concerning the use of the appliance by a person responsible for their safety. Children should
be supervised to ensure that they do not play with the appliance.
Do not damage the appliance's refrigerant circuit pipes.
Do not store explosive substances, such as aerosol cans with a flammable propellant, inside this appliance.
The amount of refrigerant gas contained in your appliance is indicated on the identification plate located inside the appliance. If the power cord of this appliance is damaged, it must be replaced by the manufacturer, customer service or a similarly qualified person.
Improper installations and repairs may put the user at considerable risk.
Repairs must be carried out by the authorized customer service.
Only original spare parts from the manufacturer can be used. Only with the use of these components does the manufacturer guarantee that the safety requirements of the product are complied with.
Repairs may be performed by the manufacturer, authorized customer service or a similarly qualified person only.
Plug the appliance into a grounded 3-poles outlet.
Do not remove the ground pole.
Do not use an adapter.
Do not use an extension cord.
Disconnect power to all units before servicing.
If the POWER CORD is damaged, it must be replaced by the manufacturer, an authorized service centre or a similar qualified person in order to avoid any hazards.
Children must be supervised to make sure they do not play with the appliance.
Do not modify this appliance.
Do nt insert pointed metal objects (kitchen utensils or tools) into the slots in the appliance.
Do not touch (especially with wet hands) frozen products or put them in your mouth directly.
Do pt store flammable, explosive or volatile substances inside the appliance.
Do not store explosive substances, such as spray bottles with flammable propellants, in the appliance.
Bottles containing beverages with a high alcohol content must be tightly closed and stored vertically.
Organic compounds, acids and essential oils can corrode the seals and plastic surfaces if left in contact with them for extended periods.
- Do not pull on the cable to unplug the appliance.
1.2. Important information when using the appliance
Cleaning and maintenance meant to be performed by the user must not be carried out by unsupervised children.
Never defrost or clean the appliance with a steam cleaner! The steam may penetrate electrical parts and cause a short-circuit. Risk of electric shock!
Do not use pointed or sharp-edged implements to remove frost or layers of ice. You could damage the refrigerant tubes.
Leaking refrigerant may cause eye injuries or ignite.
Do not misuse the plinth, pull-out drawers, doors, etc. as a point of support or as a support.
Take care that no objects get stuck in the doors.
Before cleaning the appliance, pull out the power cord plug or turn off the safety switch. Do not pull out the power cord plug by tugging on the power cord.
Store high-percentage alcohol tightly closed and standing up.
Kep plastic parts and the door seal free of oil and grease. Otherwise, parts and door seal will become porous.
Never cover or block the appliance's ventilation openings.
Allow the use of the appliance only to children aged 8 years or older. Supervise children during cleaning and maintenance.
According to current regulations, children between 3 and 8 years of age may remove food from or load it into the appliance, but we highly discourage allowing children under 8 years of age to perform these operations or to use the appliance in general.
Keep children under the age of 8 at a safe distance unless they are constantly supervised and make sure that they do not play with the appliance.
Do not use mechanical, electrical or chemical devices other than those recommended by the manufacturer to speed up the defrosting process.
Do not damage the cooling circuit (if it can be accessed).
Donot use electrical appliances inside the food storage compartments, if these are not those recommended by the manufacturer.
In the event of damage to the cooling circuit, avoid the use of open flames and ventilate the area properly.
Do not use the appliance or parts of it in any way other than those specified in this manual.
Keeping the door open for long periods can cause the temperature in the appliance compartments to rise considerably.
Perform cleaning of surfaces that may come into contact with food and accessible drainage systems regularly.
Store raw meat and fish in suitable containers in the refrigerator, so that it does not come into contact with other food or drip onto it.
If the appliance is left empty for long periods of time, switch it off, defrost it, clean it, dry it and leave the door open to prevent the development of mould inside.
Never rest sharp metal objects such as knives, forks, spoons and lids on the appliance during use.
Do not use abrasive or corrosive cleaning agents (e.g. scouring powders, stain removers or metallic scouring pads and sponges) on glass parts.
Donot sit on the appliance.
Do not sit or lean on the door or on any open drawers.
Do not put pressure on the door or handle to move the appliance.
Do not use electrical appliances (e.g. hair dryers) or sprays for defrosting which may ruin the plastic parts.
Do not use the appliance to cool rooms for any reason.
Always unplug the appliance in the event of a malfunction or when performing cleaning or maintenance.
Do not keep liquids in tins or glass containers in the freezer.
Donot place heavy objects on top of the appliance.
Symbols used in the Guide:

Note Tips for the correct use of the appliance

Important Directions to avoid appliance damage

Warning Directions to prevent injury
1.1. Caring for the environment

This appliance complies with the European WEEE Directive (2012/19/EU) and must be disposed of separately from other waste at the end of its service life.
This appliance does not contain substances in quantities sufficient to be considered hazardous to health and the environment, in accordance with current European directives.
Make sure you dispose properly of all packing materials.

Electric voltage | Electrocution hazard
Disconnect the mains power supply. Unplug the appliance.
The appliance must not be disposed of with urban waste. Contact local waste disposal centres about how to dispose of recyclable waste.
Prior to disposal, cut the power supply cord and remove the door and/or drawers.
During disposal, avoid damage to the refrigeration circuit.
Neither the refrigeration circuit nor the insulation contain substances that are damaging to the ozone layer
Our appliances are packaged in non-polluting and recyclable materials.
Deliver the packing materials to the appropriate recycling centre.

Plastic packaging | Choking hazard
Do not leave the packaging or any part of it unattended.
Do not let children play with plastic bags.
1.2. Cleaning, sanitization and maintenance
Any work on the appliance must be carried out by a qualified technician or the After-sales Service.

Warning
To avoid contamination of food, please respect the following instructions:
Opening the door for long periods can cause a significant increase in temperature inside the appliance compartments.
Perform regular cleaning of surfaces that may come in contact with food and of accessible drainage systems.
Store raw meat and fish in suitable containers in the refrigerator, so that it does not come into contact with other food or drip onto it.
Two-star frozen-food compartments are suitable for storing pre-frozen food, storing or making ice cream and making ice cubes.
One-, two- and three-star compartments are not suitable for the freezing of fresh food.
If the refrigerator is left empty for a long period, switch it off, defrost, clean and dry it, and leave the door open to prevent mould developing within the appliance.
1.3. Information for regulatory authorities
For Ecodesign tests, the installation and set-up of the appliance must comply with standard EN 62552.
Ventilation requirements, dimensions and minimum space from the rear wall are provided in the "Installation" chapter of this manual.
Contact the manufacturer for additional information.
1.4. To save energy
Correct use of the appliance, correct packaging of foodstuffs, a constant temperature and food hygiene all have effects on the quality of storage.
Keep the number of times that the doors are opened and the length of time they remain open to a minimum to avoid excessive warming.
Clean the condenser periodically to prevent the appliance from losing efficiency (see page 31).
Defrost frozen food in the refrigerator compartment in order to make use of the cold stored in the frozen foods.
1.5. Environmental labelling
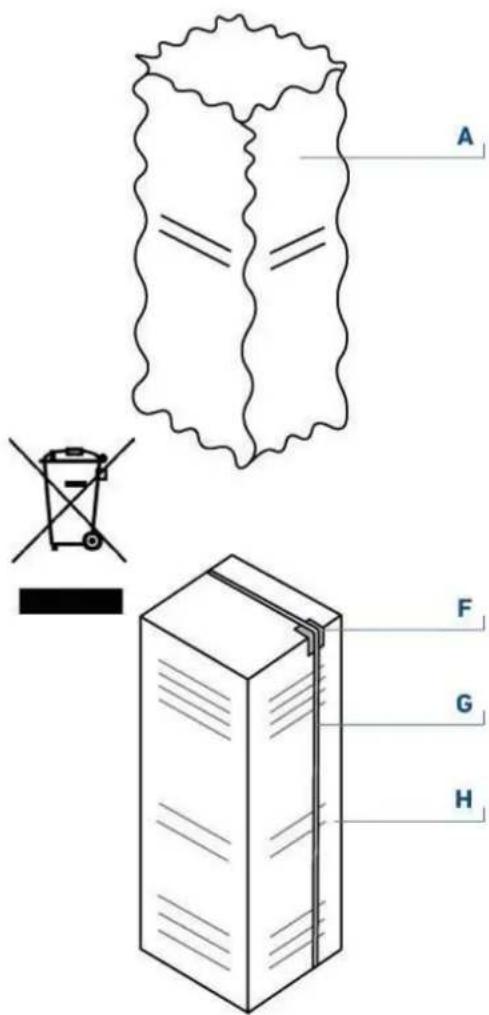
| PACKAGING MATERIAL KEY | |||
| Material | Abbreviation | Numbering | |
| A | Low-density polyethylene | LLDPE | 4 |
| B | Uncorrugated cardboard | PAP | 21 |
| C | Polystyrene | PS | 6 |
| D | Wood | FOR | 50 |
| E | Iron | FE | 40 |
| F | Polyvinyl chloride | PVC | 3 |
| G | Polypropylene terephthalate | PET | 1 |
| H | Corrugated cardboard | PAP | 20 |

2.1. Installation
Make sure that installation is performed correctly, adhering to all of the instructions in the specific installation guide provided with the appliance.

Warning
If any model has water connections, make them before connecting the machine to the electrical system.
The appliance must be connected to ground in compliance with electrical system safety standards.
Position the wine cellar with the aid of a second person.
Never use the open door to lever the wine cellar into place.
Avoid exerting too much pressure on the door when open.
The wine cellar must not be installed near heat sources. If this is not possible, suitable insulation must be used.
The appliance must not be exposed to direct sunlight.
Do not use the appliance outdoors.
Installation and servicing should be carried out by qualified personnel in compliance with current standards.
Ensure that an authorised technician performs the electrical connection.
If the power supply cable is damaged, to avoid any danger, contact technical support immediately and they will replace it, so as to prevent any risk.
Always put on the necessary Personal Protective Equipment (PPE) before performing any work on the appliance (installation, maintenance, positioning or handling).
Before performing any operation involving the appliance, switch off the power supply.
If installed near another refrigerator, refer to the installation guide.
Do not try to repair the appliance yourself or without the assistance of a qualified technician.
Do not install/use the appliance outdoors.
WARNING: Make sure that the power supply cable does not become caught or damaged when positioning the wine cellar.
To prevent instability of wine cellar, install and secure it correctly as indicated in the instructions provided in this manual.
This wine cellar can be used up to a maximum height of 2000 meters above sea level
2.2. Connection to the electrical power supply

natural_image
Illustration of hands using a power plug to install a socket on an electrical outlet (no text or symbols)The appliance is equipped with a Schuko Unel type 16A plug. It must be connected to the electrical mains by means of a corresponding Schuko Unel socket. Do not use extension cords and/or multiple adapters for connection.

Important
Do not use extension cords and/or multiple adapters for connection.

Warning
If energy is supplied through an alternative energy power source (solar, geothermal, etc...) or if home automation systems are installed, it is necessary to install the Alternative Energy Kit to integrate the unit into the power grid.
2.3. Refrigerant
The refrigerant isobutane (R600a) is contained within the refrigerant circuit of the appliance, a natural gas with a high level of environmental compatibility, which is nevertheless flammable.
The refrigerant isobutane (R600a) is a natural gas with a high level of environmental compatibility, which is nevertheless flammable.

ISO 7010 W021
Warning
Fire hazard / Flammable materials.
Use special care during transportation, installation and/or cleaning so as to avoid damaging the refrigeration circuit.

Important
Take care during transport, assembly or cleaning so that the refrigerant circuit is not damaged.

Warning
Fire / Flammable materials hazard.
3.1. To know your wine cellar well
Congratulations on having purchased your new wine cellar: from now on you can use our innovative storage system, which will allow you to store all of your food in the best possible way.
This manual will answer most of your questions about the product's features.
3.2. Manufacturer's liability
The manufacturer declines all liability for injury or property damage caused by:
uses of the appliance other than those specified;
failure to comply with the instructions in the user manual;
tampering with any part of the appliance;
use of non-original spare parts.
3.3. Technical support
In the event of appliance failure, contact technical support and have the repair carried out by qualified personnel only.
Make sure you have the model and serial number on hand (located on the identification plate).
Use only original spare parts.
Do not try to repair the appliance yourself or without the assistance of a qualified technician; this has safety repercussions and may void the warranty.
Original spare parts relevant for operation in accordance with the corresponding Ecodesign regulations can be obtained from our customer service department for a period of at least 10 years after the appliance is put into circulation within the European Economic Area.
Detailed information on the duration of the warranty and the warranty conditions in each country can be found from our customer service, your dealer or on our website.If you need further information, do not hesitate to contact the Technical Assistance Centre on our free-phone number:
800-344222 (800-FHIABA)
+39 0434 420160
care@fhiaba.com
https://www.fhiaba.com

Important
Before calling, make a note of the appliance's serial number, found on the warranty certificate and on the serial number plate located inside the refrigerator compartment on the side opposite the door opening.
3.4. Technical specifications
Refrigerant type, storage volume and other technical data can to be found on the product plate.
Further information on the chosen model is available on the website:
https://www.fhiaba.com
(only for countries of the European Economic Area). Follow the guidelines to find the relevant model. Models can be identified according to the sign placed before the product code bar (E-Nr.) on the product plate. The model can also be found in the first line of the Energy Label.
3.5. Product plate
The identification plate shows the technical data, serial number and model. The product plate must never be removed.

Climate classes
SN (Sub Normal) from + 10 °C to + 32 °C
N (Normal) from +16 °C to +32 °C
ST (Sub Tropical) from + 18 °C to + 38 °C
T (Tropical) from + 18 °C to + 43 °C
3.6. Main components

1 Stainless steel structure with aluminium trim.
2 Interactive control panel with display.
3 Cantina compartment.
4 Sliding bottle shelves.
5 Wine Cellar Compartment.
6 Wine cellar drawer.
7 Led lighting.

1 Stainless steel structure with aluminium trim.
2 Interactive control panel with display.
3 Wine cellar compartment.
4 Sliding bottle shelves.
5 Wine Cellar Drawer.
6 Led lighting.
3.7. Electronic Control
The innovative electronic control system designed by Fhiaba maintains constant temperature in the compartments and displays it on the control panel. It also allows user interaction making it possible to personalize settings of the various functions and to receive sound and/or visual messages should any malfunction occur in the appliance.
3.8. Main control panel

natural_image
Gray-scale interface panel with icons for power, home, radio, and refresh buttons (no text or symbols)
Turning On/Off
Touch the icon to turn the unit on or off.
Home
Touch the Home icon to go back to the home screen.

Alarm
Touch the icon to view the alarm tone functions and to deactivate them.

Back
Touch the arrow icon to go back to the previous screen.
4.1. Turning on and off
First startup
Touch the ON/OFF Ⓤ. The display shows the following launch screens:

natural_image
Solid dark gray gradient background with no visible text, symbols, or objects1) Manufacturer's logo
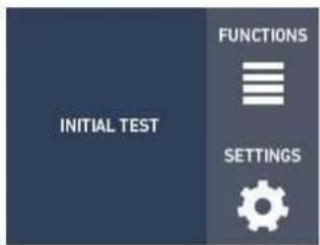
2) Initial test (lasts 3 minutes).
3) The display shows the main screen with the ambient temperature measured from the cellar inside the compartments. Automatically the unit start to cool down until reaching the set temperatures.

4) Home screen (*).

(*) The home screen varies depending on the models; (see par. 5.1. How to adjust the compartment temperature page 16).
When the appliance is first switched on, it is recommended to wait at least 12 hours before placing any food inside the unit. During this time, deactivate any error messages by touching the ALARM ⏻ button.
Switching off the appliance

natural_image
Simple line drawing of a finger pressing a button with a small house symbol nearby (no text or labels)1) Touch the ON/OFF key ⏻ to switch off.

3) Confirm the shutdown touching the YES icon.

3) Confirm shutdown again touching the YES icon.

Note When the unit is off there are no warning lights to show that the appliance is plugged into a socket.
Cantina compartment and Wine Cellar compartment shutdown (Model 1T, OT and OH)
The Cantina compartment and the Wine Cellar compartment can be shutdown individually whereas the drawer can be turned off only if the whole unit is turned off.

1) HOME screen. To turn off the Cantina compartment or the Wine Cellar, touch the corresponding icon.
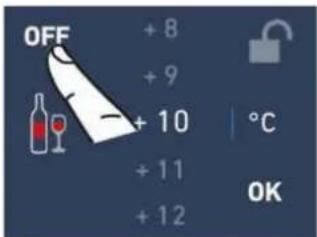
2) Touch the OFF icon.

3) Confirm the shutdown touching the YES icon.
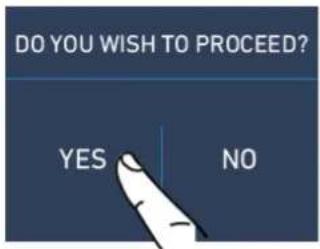
3) Confirm shutdown again touching the YES icon.

5) The home screen displays the OFF icon 📋, to show the Cantina compartment is off
To switch off the Wine Cellar compartment follow the same procedure.
Turning the appliance back on
To turn the unit back on, press the ON/OFF Ⓤ button. The display will turn on and the start screen and the home screen will be shown, once again displaying the temperature measured inside the fridge compartments. The fridge will start cooling until it reaches the set temperatures.
Switching the compartments back on
If the Cantina compartment and the Wine Cellar compartment must be switched back on, follow this procedure:
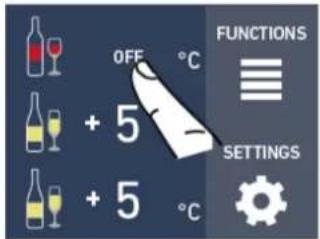
1) Home screen. To turn back on an off compartment, touch the OFF compartment next to it.
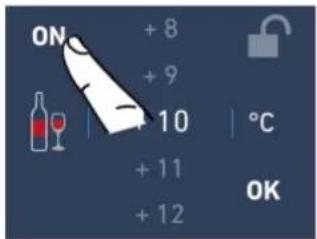
2) Touch the ON icon.

3) Confirm the turning on touching the YES icon.

4) Confirm the turning on again touching the YES icon.

5) The compartment switches back on and the HOME screen is displayed.
To on the Wine Cellar compartment again, follow the same procedure.
Switching off for long periods
During long periods of absence it is recommended that you switch off the appliance by pressing the ON/OFF ⏻ button and disconnecting the electrical plug or the breaker controlling the socket.
Empty the refrigerator completely, clean and dry it and leave the doors and drawers partially open to prevent unpleasant odours.

Note
If the word Fhiaba does not appear at the first start, but other words appear, it means that the equipment has already started the cooling procedure.
During the first startup, it will not be possible to use the Menu to modify the factory settings until the preset temperature has been reached. It is however possible to set the time and date immediately; these parameters are required to activate some of the special functions. Each time the appliance is switched on, it goes through a self-diagnosis procedure lasting three minutes before starting up completely.
If only the Cantina or Wine Cellar compartment is turned off, the corresponding fan will continue to run independently to prevent the formation of unpleasant odours and mould.
5.1. How to adjust the compartment temperature
Each model has been carefully tested before leaving the factory and is adjusted in such a way to ensure high performance and low consumption. Usually, it is not necessary to modify the settings.
How it looks to the home screen in the various models:

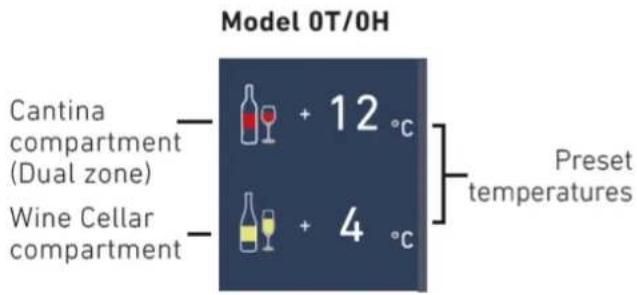

Modifying the compartment temperatures

1) Home screen. Touch the cantina compartment icon for example.


2) Scroll the values up or down to select the desired temperature (in the case of the cantina compartment the temperature can be set from +4 °C to +18 °C)

3) Touch the OK icon to confirm the selected temperature.
The same procedure is required to set the temperature:
in the Cantina compartment from +4 °C to +18 °C.
in the Wine Cellar drawer from +4 °C to +18 °C.

Note
The displayed temperature may vary slightly with respect to the set temperature if the doors are continuously opened or if large quantities at ambient temperature are inserted. It takes 6 to 12 hours to reach the selected temperature.
Padlock icon
The padlock icon shows up when the temperatures are set up.
The padlock:

open means that you can modify the compartment temperatures.

closed means that you cannot modify the compartment temperatures.
Usually an open yellow padlock is displayed; in this case you can scroll up or down with a finger on the display, select the desired temperature and press OK to confirm.

The padlock will instead be closed if the user has activated some functions (described in par. "6. FUNCTIONS AND SETTINGS" on page 18); in this situation, the user will no longer be able to change the temperatures of the compartments until the function is completed or if it is disabled manually.

5.2. Information and malfunction messages on the display
natural_image
Simple line drawing of a finger emitting sound waves (no text or symbols)An integrated control system provides information through lighted signals or text messages visualized on the display. The sound that accompanies some of the
anomaly warnings can be turned off by touching the ALARM ⏻ button on the main control panel.
You can find the list of the anomalies at the end of this manual (see paragraph "11.2. Malfunction messages appearing on the display" page 33).
5.3. Wine storage temperatures
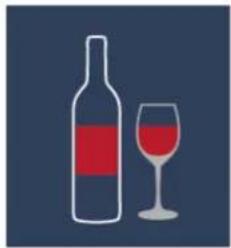
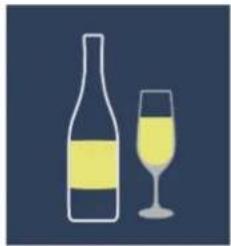
For better storage, wines need a different temperature, warmer for red wines, and colder for white wines.
natural_image
Simple line drawing of a wine bottle and two glasses on a dark background (no text or symbols)Red Wine
from +10 °C to +18 °C
natural_image
Simple line drawing of a wine bottle and a glass on a dark background (no text or symbols)White Wine
from +4 °C to +9 °C
For example if a temperature higher than +9 °C is set for white wine, the display will change icon from white wine to red wine.


Bordeaux
BOTTLE

6.1. Functions
You can tailor the operation of your unit to suit the different ways in which you might want to use it.
After touching the functions icon on the home screen the icons with the following available functions will be shown.

1) Dual zone. (OT-OH models)
5) Humidity.
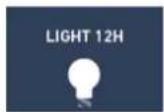
6) Internal light12h.

7) Prosciutteria. (optional models 0T-0H-0F)
1) Dual Zone (0T and 0H models)
This function enables to keep a warmer temperature in the upper part of the fridge (for red wines) and a colder one in the lower part of the fridge (for white wines).
The refrigeration system enables to maintain the cold on the lower part of the fridge.

A) HOME screen. Touch the FUNCTIONS icon.
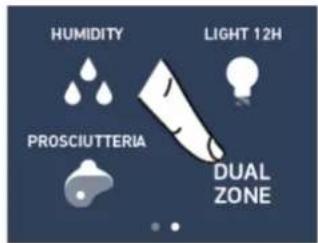
C) Touch the ON button to activate the function.

D) The HOME screen will change and the dual zone icon will be displayed.
5) Humidity
This function enables to set the humidity of the Cantina and Wine Cellar compartments.

A) HOME screen. Touch the FUNCTIONS icon.
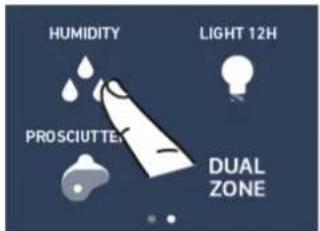
B) Scroll right twice and touch the HUMIDITY icon.
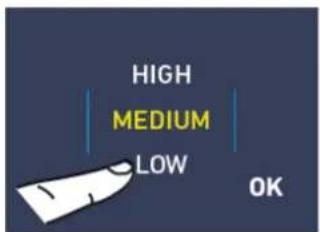
C) Scroll the values up or down to set the desired humidity.
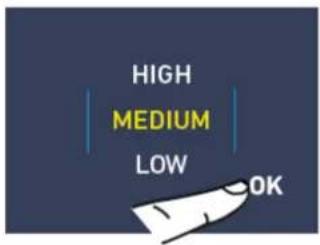
D) Press OK.
6) Internal lighting 12 h
This function enables to set the timing of the inner lighting and it stays on 12 hours when the wine cellar door is closed, in order to see the inner part lighted up, through the glass.

A) HOME screen. Touch the FUNCTIONS icon.
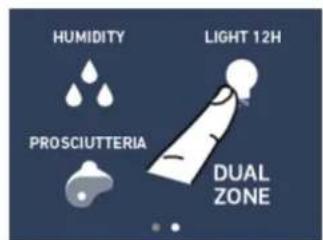
B) Scroll right twice and touch the LIGHT 12H icon.

C) Touch the ON button to activate the function.
7) Prosciutteria (option for 0T-0H-0F)
This function enables to set the Wine Cellar compartment (with temperature and humidity) in order to make it suitable for the conservation of hams, salamis and cheeses.

A) HOME screen. Touch the FUNCTIONS icon.

B) Scroll right twice and touch the PROSCIUTTERIA icon.

C) Touch the ON button to activate the function.

D) The home screen displays the PROSCIUTTERIA icon instead of the wine icon. Automatically the compartment will keep a +10 °C temperature and a medium humidity will be set.
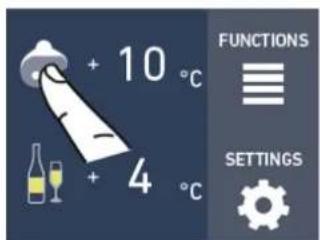
E) To set the function, touch the PROSCIUTTERIA icon.

F) Scroll the values up or down to select the desired temperature (from +8 °C to +17 °C) and press OK.
6.2. Settings
It is possible to customize the settings of your wine cellar to adapt it to your different requirements.
1) Date

2) Time

3) Celsius and Fahrenheit

4) Language
5) Sabbath

6) Reset
7) Demo Mode

8) Maintenance
9) Service

10) InfoSystem
1) Date
The display will show the date in the format (day:month:year).
You can modify the settings by touching the display.

A) Home screen. Touch the SETTINGS icon.
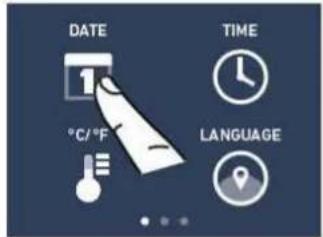
C) Scroll up and down to select the desired day and touch OK.

D) Scroll up or down to select the desired month, then touch OK.
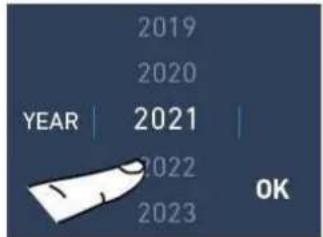
E) Scroll up or down to select the desired year, then touch OK.
2) Time
The display shows the hours and minutes in the format hh:mm. This function allows you to select a 12 or 24 hr. clock mode.

A) Home screen. Touch the SETTINGS icon.

C) Select the mode in which you want to see the time: 12 or 24 hr.

D) Scroll up or down to select the time and then touch OK.

E) Scroll and select the minutes and then touch OK.
3) ^ C / ^
This function allows visualizing the temperature in degrees Centigrade (default) or Fahrenheit.

A) Home screen. Touch the SETTINGS icon.
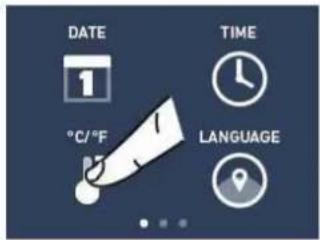
B) Touch the °C/°F icon.

C) Scroll up or down to select the degrees in Centigrades or Fahrenheit and press OK.
4) Language
To set the language of the cantina, simply follow the procedure.

A) Home screen. Touch the SETTINGS icon.
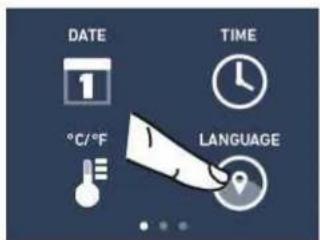
B) Touch the LANGUAGE icon.

C) Scroll up or down to select the desired language and press OK.
5) Sabbath Mode (Option)
The function makes it possible to comply with certain religious observances requiring that the operation of the appliance not be affected by the opening or closing of the doors (the thermostatic control, interior lighting and ice maker are all deactivated).

A) Home screen. Touch the SETTINGS icon.
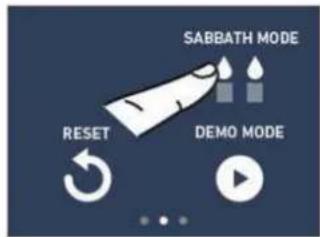
B) Scroll right twice and touch the SABBATH icon.

C) Touch the ON button to activate the function.

D) Touch the YES button to activate the function.

E) The appliance will work according to this configuration.
6) Reset
This offers the possibility to reset default factory settings and cancels any previous changes.
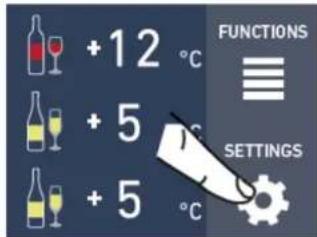
A) Home screen. Touch the SETTINGS icon.

B) Scroll right twice and select the RESET icon.

C) Touch the YES button to reset.

E) The reset has been performed. The wine cellar factory settings have been restored.

Important
If you restore the base settings ("reset"), it is necessary to set again the choice of the functioning of the drawer that has been made, in case they were set before as fridge or fresco.
7) Demo Mode
It is possible to simulate the functioning of the fridge, for showroom display or for fairs.

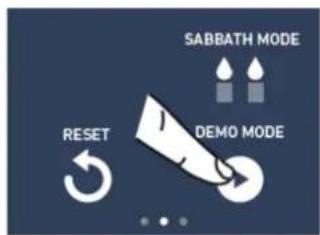
A) Home screen. Touch the SETTINGS icon.
flowchart
graph TD
    A["RESET"] --> B["SABBATH MODE"]
    B --> C["DEMO MODE"]
    C --> D["End"]
B) Scroll right twice and select the DEMO icon.
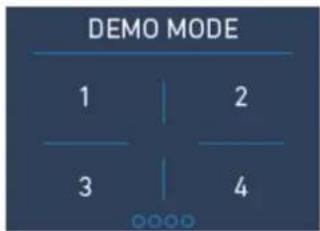
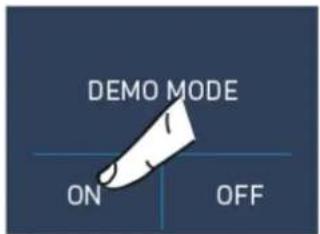
C) Enter the PASSWORD necessary to activate, that must be requested from the Manufacturer. Default password: 1-2-3-4
8) Scheduled maintenance
In order for the unit to operate correctly, the ventilation grill, filter and condenser must be cleaned periodically. The recurring cleaning every 12 months is reminded by an acoustic and optical signal on the display.
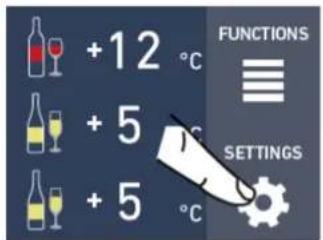
A) Home screen. Touch the SETTINGS icon.

B) Scroll right three times to reach this screen and touch the MAINTENANCE icon.
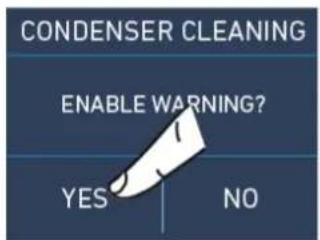
C) To enable it, touch the YES icon.
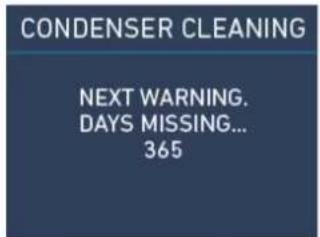
D) The display shows the time left until the next cleaning.

E) However, if you want to reset the previously set warning, touch the RESET icon.

F) The alert can be disabled and the time left before the next cleaning viewed touching the YES button.
9) Service

The Service function is reserved for the Manufacturer's Customer Service.
10) Info System
The Info System function displays the product data, such as the software code, the serial number and the wine cellar factory codes.

A) Home screen. Touch the SETTINGS icon.

B) Touch the INFO SYSTEM icon.

C) Information about the appliance is displayed.
7.1. Internal layout (positioning, adjustment, removal)
Wine shelf
The shelves can be easily removed for cleaning.
Remove the bottles, completely extract the shelf, tilt it upward until the wheels are free of their seat and extract it.

natural_image
Illustration of hands handling a metal tray with rollers inside a storage cabinet (no text or symbols)Drawer (1T, 0T, 0H models)
Simply fixed to the slide guides
to remove the drawer, unscrew the two lateral fixing knobs, lift it and remove it.
to remove the inner drawer, operate as for the drawer.

natural_image
Illustration of a hand placing a component into a device with a magnified inset showing a circular component (no text or symbols)8.1. Lighting
To provide optimum interior lighting, LED strips illuminate the different areas of the cantina compartment.
In case of malfunction and/or failures of the lighting system, the repair should be carried out by a Manufacturer's Customer Service technician.

Note
Once activated, the light of the top compartment will automatically shut off after 6 hours.

natural_image
Diagram of a device with three panels, each showing a light source and a triangular pattern, labeled '1T' at the top (no text or symbols on panels)
natural_image
Diagram of a device with heat exchanger and two light sources, labeled '0T/OH' (no readable text or symbols beyond label)
natural_image
Illustration of a smartphone screen with abstract white geometric patterns on blue background (no text or symbols)In case of malfunction and/or wearing out of the lighting system, the repair should be carried out by a qualified Fhiaba Service technician.
9.1. General directions
As is known, wine can be stored for long periods of time if this is done under the following conditions:
Suitable temperature without appreciable variations over time.
Controlled level of humidity.
Protection from light.
Absence of noise and vibrations.
Absence of odours.
Bottle kept horizontal.
All of these conditions are fully met in your wine cellar.
9.2. Storage temperatures
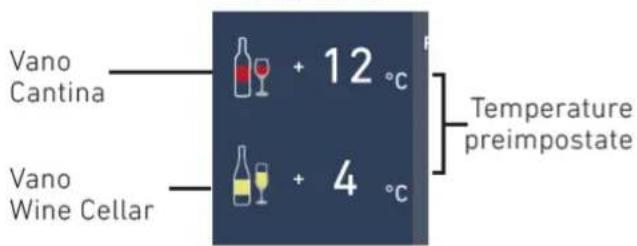
The space offered by the Wine Cellar and Cantina compartments, which can be expanded as necessary by using the TriMode compartment as a wine cellar, allows conservation of your best wines at three different temperatures.
The compartments are initially set to the following temperatures:
> Cantina compartment.
+12 °C (53.6 °F)
adjustable from +4 °C to +18 °C (from 39.2 °F to 64.4 °F)
> Wine Cellar compartment
+10 °C (50 °F)
adjustable from +4 °C to +18 °C (from 39.2 °F to 64.4 °F)
All the temperatures can be modified according to the characteristics of the wines and personal preferences. However, you should attempt to keep the temperature as constant as possible over time.
Rapid and large-scale temperature variations can in fact cause dilation of the liquid and early aging of the wine.
You should also avoid very low temperatures (below 4 °C - 39.2 °F) which may lead to the formation of deposits and damage the aesthetic qualities of the wine.
All the compartments offer optimal conditions and take into account all these needs.
It should however be noted that the cantina compartment, in particular, is thermostatically controlled in a very precise manner and ensures the utmost care and attention over time of your most prized bottles.
Models with Cantina and Wine Cellar (1T)
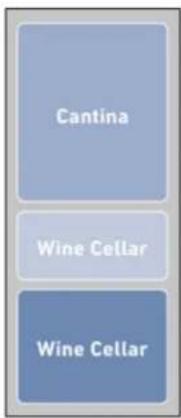
Cantina compartment +12 °C (53.6 °F) -adjustable from +4 °C to +18 °C (from 39.2 °F to 64.4 °F)
Wine Cellar compartment +10 °C (50 °F) -adjustable from +4 °C to +18 °C (from 39.2 °F to 64.4 °F)
Wine Cellar compartment +10 °C (50 °F) -adjustable from +4 °C to +18 °C (from 39.2 °F to 64.4 °F)
Models with Wine Cellar (OT, OH)

Wine Cellar compartment +10 °C (50 °F) -adjustable from +4 °C to +18 °C (from 39.2 °F to 64.4 °F)
Wine Cellar compartment +10 °C (50 °F) -adjustable from +4 °C to +18 °C (from 39.2 °F to 64.4 °F)
Models with Cantina and Wine Cellar (OF)

Cantina compartment +12 °C (53.6 °F) -adjustable from +4 °C to +18 °C (from 39.2 °F to 64.4 °F)
Wine Cellar compartment +10 °C (50 °F) -adjustable from +4 °C to +18 °C (from 39.2 °F to 64.4 °F)
9.3. Time of conservation
Improvement of wine over time and its duration usually depends on the character of the variety and its type. The following chart shows the best period of conservation and aging for various types in ideal conservation conditions offered by your appliance.
In any case, follow the suggestions offered by the bottle producer, in particular for the finest wines.
| TYPE OF WINE CONSERVATION TEMPERATURE TIME OF CONSERVATION | ||
| New wines (Vin Nouveau) from 12 to 14 °C 6 months | ||
| Sweet sparkling wines from | 8 to 10 °C 1 y | ear |
| Rosé from | 10 to 14 °C 1 y | ear |
| Semi-sparkling wines from | 10 to 12 °C 1-2 y | ears |
| Normal white wines from | 10 to 14 °C 1-2 y | ears |
| Light red wines from | 12 to 14 °C 2 y | ears |
| Dry sparkling wines from | 8 to 10 °C 2 y | ears |
| Classic sparkling wines from | 8 to 10 °C 3-4 y | ears |
| Barrique and Vigorous white wines from 8 to 12 °C 3-5 years | ||
| Normal red wines from | 14 to 16 °C 3-5 y | ears |
| Barrique and Vigorous red wines | from 14 to 18 °C 7-10 y | ears |
| Straw wines or Liquorous wines | from 16 to 18 °C 10-15 y | ears |
9.4. Consumption temperature
As a general rule, white wines should be served at a temperature between 10 and 12 °C (50 and 53.6 °F) and red wines between 12 and 14 °C (53.6 and 57 °F). Some wines may however be best enjoyed at higher or lower temperatures.
You should also keep in mind that, during the summer, wine is generally enjoyed at lower temperatures than during the winter.
You should also consider the following:
White wines
White wines are normally not served at high temperatures, since they are generally more acidic that red wines and not very tannic. Therefore they are more enjoyable at low temperatures. It is preferable to serve these wines between 10 and 14 °C (50 and 57.2 °F). Young, fresh and aromatic wines can also be served at 10 °C (50 °F), while less aromatic ones are served at (53.6 °F)Temperatures between 12 and °C14 (53.6 and 57.2 °F) are for soft, mature white wines that have been aged for some years in the bottle. Higher temperatures would favour the exaltation of the sweet character of the wine, at the expense of the acidity and volar, which are considered pleasant and desirable characteristics of this type of wine.
Rosé
Rosé wine is served at the same temperature as white wines. It should be noted that these wines may include a certain amount of tannin and may therefore be preferable at higher temperatures.
Therefore, they are served between 10 and 12 °C (50 and 53.6 °F), if young and fresh, and between 12 and 14 °C (53.6 and 57.2 °F) if robust and mature.
Due to the special processing they undergo, new vintage wines contain a low tannin content and are therefore more enjoyable if served between 12 and 14 °C (53.6 and 57.2 °F).
Red wines
Since they contain more tannin and are less acidic, red wines are normally served at higher temperatures. Younger wines with less tannin are normally served between 14 and 16 °C (57.2 and 60.8 °F), while more full-bodied ones that are more tannic may be served at up to 18 °C (64.4 °F). Some wines that have aged for years in the bottle, still full-bodies and tannic, may be served at 18 °C (64.4 °F) or even 20 °C (68 °F). Young red wines with little tannin and slightly structured may be enjoyable at lower temperatures, between 12 and 14 °C (53.6 and 57.2 °F).
Sparkling wines
It is difficult to provide instructions to cover the wide variety of sparkling wines in available. As a general rule, sweeter and more aromatic sparkling wines should be served at lower temperatures, down to 8 °C (4 6.4 °F), whereas more tannic sparkling wines may be served at higher temperatures, up to 14 °C (57.2 °F).
Dry sparkling wines are usually served between 8 and 10 °C (46.4 and 50 °F). "Classic" sparkling wines are normally served at these temperatures, which may be as high as 12 °C (53.6 °F) for sparkling wines that have been aged for some time.
It is however advisable, especially for finer wines, to follow the suggestions and recommendations of the winemaker on the bottle.
These types of wines can be served at temperatures between 16 °C and 18 °C (60.8 and 64.4 °F), depending on personal tastes, to attenuate the sweet taste of straw wines, it can also be served at 10 °C (50 °F).
Service temperature management for sparkling wines and Champagne
To ensure energy-efficient use of the wine cellar, it is important to consider the location and storage temperature of the different types of wine. of sparkling wines and champagne, which require a lower serving temperature than the storage temperatures described above, it is advisable to adopt specific positioning strategies within the wine cellar.
In a two-compartment wine cellar, sparkling wines and champagnes intended for service should be placed in the lower compartment. This makes the best use of the cellar's design features, as the cold tends to settle downwards, making it easier to maintain a lower temperature in this compartment. The ideal serving temperature for these wines is around 4° centigrade.
However, it is important to note that if the lower compartment is set to maintain a temperature of 4^ centigrade for immediate service, despite the fact that the cellar is equipped with balancing resistors, it will be difficult, if not impossible, to maintain an adequate storage temperature in the upper compartment above 14^ centigrade.
This happens because the low temperature in the lower compartment affects the environment upper compartment, reducing its ability to reach or maintain higher temperatures necessary for the optimal storage of other types of wine.
In the
of the
9.5. Positioning the bottles
The sliding shelves are made of fine wood and contoured so as to hold bottles of the most classical traditional shape or of the most modern design.
Whether your collection holds fine bouteilles or petit bouteilles, they will be right at home in the Fhiaba Wine Cellar. A special accessory, available on request, will let you place them in an inclined position, in order to display the labels of your most prized items.
Also Magnum bouteilles can be stored, provided you remove the shelf just above the one that will hold them.
Bottle Storage Guidelines
To maximize the storage capacity of wine bottles, follow these guidelines:
- store the bottle as shown in the drawing;
- ensure that the bottles do not exceed the indicated dimensions.

Warning
After a prolonged interruption of electrical power, once the electrical power is reactivated, an audible signal will indicate if the temperature has raised above normal levels. In addition to this the display will show for one minute the highest temperature detected inside the compartments, to allow the user to decide how to better use the food items. After one minute the display will resume normal operation, while the ALARM button will continue to blink; touching the ALARM button it will be possible to display the highest recorded temperatures.
Example of storing standard-sized bottles
Below are the bottle sizes most commonly used by wine producers for white, red and sparkling wines. These dimensions provide the best capacity and correct positioning of the product on the wine shelves.

10.1. Care and Cleaning
To clean parts and surfaces made of steel, use a microfibre cloth and the sponge provided in the kit supplied with the appliance.
Always use the cloth and sponge in the direction of the steel's satin finish.
Every now and then, to polish the steel, wipe with a slightly damp microfibre cloth.
Do not use the sponge on aluminium parts, such as the handles and the edging on the glass shelves. Take special care to keep the ventilation openings in the appliance or in the cabinet that houses it free of obstructions.

Note
Scrupulously follow the detailed instructions that can be found in the kit provided and never use abrasive or metallic products which could scratch and permanently damage the satin finishing on the appliance. Before performing any sort of cleaning, disconnect the appliance from the electrical power supply.
Make sure you do not damage the refrigerant circuit in any way.

Warning!
The use of chlorine-based cleaning products or other products that contain chlorine should be avoided (bleach, hypochlorite, etc.).

natural_image
Pure electrical circuit lines without any symbols10.2. Internal cleaning
Clean the interior of the appliance and its removable parts by cleaning them with a solution of lukewarm water mixed with a small amount of dishwashing detergent.
Rinse and dry right away.
Do not use mechanical devices or other methods to speed up defrosting.

Warning!
The use of chlorine-based cleaning products or other products that contain chlorine should be avoided (bleach, hypochlorite, etc.).

Warning!
Do not use water on the electrical parts, lights or control panel.

Do not bring cold glass parts into contact with hot water.
Do not wash any parts of the refrigerator in a dishwashing machine since this could damage or irreparably deform the parts.
10.3. Cleaning of the ventilation grill, filter and condenser
In order for the unit to operate correctly, the ventilation grill, filter and condenser must be cleaned periodically.
A reminder for this periodic cleaning, to be performed every 6 months, is provided through sound alerts and a notification shown on the display. To activate or deactivate this warning signal and display the time left to the next cleaning, see chap. "6.1. Functions" on page 18).
The condenser is located behind the lower or upper front ventilation grille, depending on the model (see page 31).
To clean it use a vacuum cleaner with a soft brush attachment at maximum power, sweeping it along the vent slits.
In the event of significant dust build up, the ventilation grill can be removed to allow a more thorough cleaning of the filter.
After cleaning the condenser, touch the RESET icon in order to reactivate the warning signal in 6 months.
If you do not want the warning cleaning signal of the condenser any more, touch the OFF icon (see chap. "8) Scheduled maintenance" on page 24).
10.4. Upper condenser
To clean the condenser in the models X-Pro, StandPlus and Country, follow the instructions:
Switch off the appliance by pressing the ON/OFF Ⓤ button on the main control panel for approx 3 seconds.
Wait approx. 30 minutes, until the condenser cools down to ambient temperature.
Lift up the removable grille.

natural_image
Diagram of a cabinet or rack with airflow arrows indicating movement, no text or symbols presentClean the condenser thoroughly from all dust deposits as shown in the figure, taking care not to damage it.

natural_image
Illustration of a hand inserting a pipe into a blue-patterned panel (no text or symbols)Restart the appliance acting on the ON/OFF ⏻ button again for about 3 seconds.

Warning!
The edges of the condenser are sharp, therefore use suitable protection for your hands and arms when cleaning the condenser.
10.5. Lower condenser
To clean the condenser in the models Classic, Integrated or Brilliance follow the instructions:
Switch off the appliance by pressing the ON/OFF button Ⓤ on the main control panel for approx 3 seconds.
Wait approx. 30 minutes, until the condenser cools down to ambient temperature.
Remove the removable grille under the door.

natural_image
Diagram showing airflow or heat transfer between a wall-mounted panel and a wooden panel (no text or symbols)Clean the condenser thoroughly from all dust deposits as shown in the figure, taking care not to damage it.

natural_image
Illustration of a hand inserting a pipe into a blue-patterned panel (no text or symbols)Restart the appliance acting on the ON/OFF ⏻ button again for about 3 seconds.

Warning!
The edges of the condenser are sharp, therefore use suitable protection for your hands and arms when cleaning the condenser.
11.1. Troubleshooting Guide
If you notice any malfunctioning of your appliance, use this guide before calling for service. This guide can help you to solve the problem on your own or could provide important information that you can convey to the Service technician in order to ensure rapid and effective repair.
"Call Service" message
A malfunction is usually indicated by a message on the display.
Problems that cannot be resolved by the user are signalled through a malfunction code and the "Call Service" message.
The appliance does not work
Is the appliance connected to the electrical power supply?
Is electrical power being supplied from the electrical socket?
Is the ON/OFF ⏻ key activated?
Is the condenser clean? See page 31
The internal temperatures are higher than normal
Does the display show a malfunction code? See page 33.
Is the temperature adjusted correctly?
Is the condenser clean? See page 31
Were the doors or drawers open for a long period of time?
Were large quantities of food recently placed inside?
The appliance keeps running for a long time
Bear in mind that during very hot weather and with very high temperatures in the room it is normal for the compressor to remain on for extended periods of time.
Were the doors or drawers open for a long period of time?
Were large quantities of food recently placed inside? Is the condenser clean? See page 31
Check that the doors are closed and that food or containers are not keeping the door from fully closing.
If you hear unusual noises
It is normal to hear noise from the fans or compressors during the defrost phase. Noise could be more marked depending on the position of the appliance and the surrounding environment.
Condensation forms both inside and out
If the atmospheric conditions are very humid or damp, the formation of condensation is normal. Opening the door or drawers for extended periods of time can contribute to the formation of condensation. In any case, make sure that the doors are always fully closed.
The compartment has frost or ice
Did you leave the doors open for a long period of time?
Are the doors closing completely?
If the doors do not fully close, contact your installer. In the event of frost or ice build-up due to frequent and extended opening of the doors, deactivate for some time the functions acting on the relative button on the control panel. Wait until the frost or ice melt, then remove the drawer and dry the sides and bottom of the compartment.
Unpleasant odours inside the refrigerator
Clean the appliance thoroughly according to the instructions.
Hermetically cover all of the food. Do not store food for extended periods of time.
The doors are difficult to open
The appliance was designed to permit hermetic closure. When the door is closed, a vacuum condition can be created: in such an event, it is necessary to wait a few seconds until the pressure balances before opening the door.
11.2. Malfunction messages appearing on the display
In the event of a malfunction, touch the ALARM ⏻ button and the display will show the fault message with its error code (see following table).
The message will be shown for 3 seconds, then it will go back to the HOME screen.
To block the message on the screen, press the INFO button 📄 on the display. The message will remain on the screen for 30 seconds, then it will go back to the HOME screen.
In the event that there is more than one error message, the display will show the different fault messages in chronological order.
Display message Malfunction description
| Power Failure | Extended interruption of electrical powerThe appliance starts up again automatically and indicates the highest recorded temperatures. Press the ALARM button to deactivate the sound alarm |
| Door open | Door openThis message appears when the door has been open for a few minutes. |
| TriMode OPEN | Drawer openThis message appears few minutes from the drawer opening. |
| Cellar too warm | Cellar (Wine Cellar) compartment too warmSee chap. "11. TROUBLESHOOTING" on page 32 |
| Cellar too cold | Cellar (Wine Cellar) compartment too coldwait for 12 hours: if the malfunction persists, call Customer Service for advice. |
| Cantina too warm | Cantina compartment too warmSee chap. "11. TROUBLESHOOTING" on page 32 |
| Cantina too cold | Cantina compartment too warmwait for 12 hours: if the malfunction persists, call Customer Service for advice. |
| Fridge too warm | TriMode compartment (refrigerator mode) too warmSee chap. "11. TROUBLESHOOTING" on page 32 |
| Fridge too cold | TriMode compartment (refrigerator mode) too coldwait for 12 hours: if the malfunction persists, call Customer Service for advice. |
| Refrigerator too warm | TriMode compartment (cooler mode) too warmSee chap. "11. TROUBLESHOOTING" on page 32 |
| Refrigerator too cold | TriMode compartment (cooler mode) too coldwait for 12 hours: if the malfunction persists, call Customer Service for advice. |
| TriMode too warm | TriMode compartment (freezer mode) too warmSee chap. "11. TROUBLESHOOTING" on page 32 |
| TriMode too cold | TriMode compartment (freezer mode) too coldwait for 12 hours: if the malfunction persists, call Customer Service for advice. |
| Error Code... | Functional problemsContact Technical Service. |
| Check condenser | Check CondenserEvery 6 months the display shows the message "CHECK COND.", clean the condenser and press and hold the ENTER button √ for 5 seconds to reset. |
- Cassettone (modelli 1T, 0T, 0H)
- Illuminazione
- INSTALLATION 8
- BEFORE ST ARTING 9
- TURNING THE APPLIANCE ON AND OFF 14
- COMPARTMENT TEMPERATURE SETTING 16
- FUNCTIONS AND SET TINGS 18
- LAYOUT 25
- LIGHTING 25
- CONSERV ATION OF WINES 26
- CARE AND CLEANING 29
- TROUBLESHOOTING 32
- For your safety
- Important information when using the appliance
- Caring for the environment
- Electric voltage | Electrocution hazard
- Plastic packaging | Choking hazard
- Cleaning, sanitization and maintenance
- Warning
- Information for regulatory authorities
- To save energy
- Environmental labelling
- Installation
- Connection to the electrical power supply
- Important
- Refrigerant
- ISO 7010 W021
- To know your wine cellar well
- Manufacturer's liability
- Technical support
- Technical specifications
- Product plate
- Climate classes
- Main components
- Electronic Control
- Main control panel
- Turning On/Off
- Home
- Alarm
- Back
- Turning on and off
- First startup
- Switching off the appliance
- Cantina compartment and Wine Cellar compartment shutdown (Model 1T, OT and OH)
- Turning the appliance back on
- Switching the compartments back on
- Switching off for long periods
- Note
- How to adjust the compartment temperature
- Modifying the compartment temperatures
- Padlock icon
- Information and malfunction messages on the display
- Wine storage temperatures
- Functions
- 1) Dual Zone (0T and 0H models)
- 5) Humidity
- 6) Internal lighting 12 h
- 7) Prosciutteria (option for 0T-0H-0F)
- Settings
- 1) Date
- 2) Time
- 3) ° C / °F
- 4) Language
- 5) Sabbath Mode (Option)
- 6) Reset
- 7) Demo Mode
- 8) Scheduled maintenance
- 9) Service
- 10) Info System
- Internal layout (positioning, adjustment, removal)
- Wine shelf
- Drawer (1T, 0T, 0H models)
- Lighting
- General directions
- Storage temperatures
- > Cantina compartment.
- > Wine Cellar compartment
- Time of conservation
- Consumption temperature
- White wines
- Rosé
- Red wines
- Sparkling wines
- Service temperature management for sparkling wines and Champagne
- Positioning the bottles
- Bottle Storage Guidelines
- Example of storing standard-sized bottles
- Care and Cleaning
- Warning!
- Internal cleaning
- Cleaning of the ventilation grill, filter and condenser
- Upper condenser
- Lower condenser
- Troubleshooting Guide
- "Call Service" message
- The appliance does not work
- The internal temperatures are higher than normal
- The appliance keeps running for a long time
- If you hear unusual noises
- Condensation forms both inside and out
- The compartment has frost or ice
- Unpleasant odours inside the refrigerator
- The doors are difficult to open
- Malfunction messages appearing on the display
Brand : Fhiaba
Model : RS600FW3
Category : Wine cellar