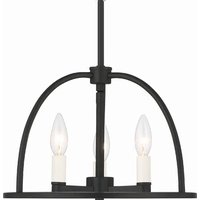
Abbott ABB-3003-BK - Lighting Crystorama - Free user manual and instructions
Find the device manual for free Abbott ABB-3003-BK Crystorama in PDF.


| Product Type | Mini Chandelier |
| Brand | Crystorama |
| Model | Abbott ABB-3003-BK |
| Finish | Black |
| Material | Metal and Glass |
| Number of Lights | 3 |
| Bulb Type | E12 Candelabra Base (not included) |
| Max Wattage per Bulb | 60W |
| Voltage | 120V |
| Dimensions (H x W x D) | 18" x 20" x 20" |
| Height Adjustment | Adjustable rod length (up to 6 ft.) |
| Weight | 5.5 lbs |
| Mounting Type | Ceiling mount (hardwired) |
| Safety Rating | UL Listed for Dry Locations |
| Dimmable | Yes (with compatible dimmer and bulbs) |
| Included Components | Fixture, mounting hardware, instructions |
| Cleaning Instructions | Wipe with dry or slightly damp cloth; do not use harsh chemicals |
| Warranty | 1 year limited warranty |
| Repairability | Replacement parts available from manufacturer |
Frequently Asked Questions - Abbott ABB-3003-BK Crystorama
User questions about Abbott ABB-3003-BK Crystorama
0 question about this device. Answer the ones you know or ask your own.
Ask a new question about this device
Download the instructions for your Lighting in PDF format for free! Find your manual Abbott ABB-3003-BK - Crystorama and take your electronic device back in hand. On this page are published all the documents necessary for the use of your device. Abbott ABB-3003-BK by Crystorama.
USER MANUAL Abbott ABB-3003-BK Crystorama
For ceiling
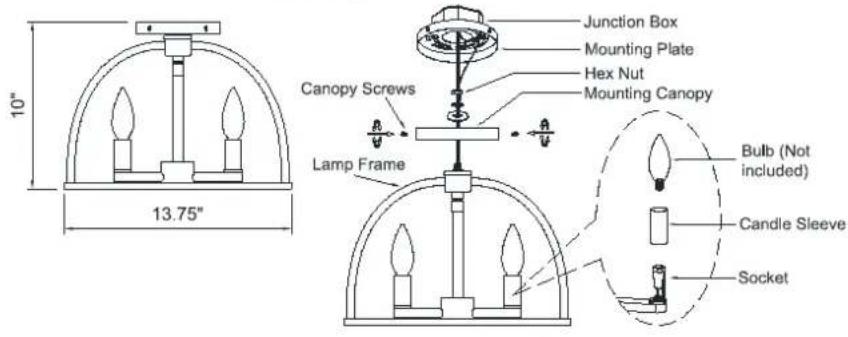
Drawing (2)


All electrical components must be installed by a licensed electrician in accordance with the National Electric Code and the appropriate
local electrical codes.


You will need 3-Candelabra
60 Watts Max
USE LED BULBS FOR EXTENDED USE
This fixture is dry rated
How to install for hanging:
- Determine the desired hanging height and choose the correct length of rod.
- Feed fixture wires through the rod and canopy. Connect the rods together and then screw the canopy onto the top of rods.
- The canopy of the fixture can now be mounted to the ceiling by following instruction Drawing 2.
- Place the Candle Sleeve over the Socket, then Install the Bulb to the Socket.
Bulb replacement:
- Install the Bulb into the Socket.
How to install for ceiling:
- Remove the swivel from the canopy.
- Put the canopy over the top of the frame and secure with hex nut.
- The canopy of the fixture can now be mounted to the ceiling by following instruction Drawing 2.
- Place the Candle Sleeve over the Socket, then Install the Bulb to the Socket.
Bulb replacement:
- Install the Bulb into the Socket.
WARNING: This product can expose you to lead, which is known to the state of california to cause cancer and / or birth defects or reproductive harm. For more information go to www.P65warnings.ca.gov

Part Number
Part Numbers
A. (1) Mounting Hardware
B. (1) Canopy; w5" x h0.75" (XFW3003BKCAN5IN)
C. (3) Canopy Screw; w0.16"x h0.48"
D. (3) Long Rod; w0.48"x h12" (XFW3003BKROD12IN)
E. (1) Short Rod; w0.48"x h6" (XFW3003BKROD6IN)
F. (1) Lamp Body
G. (3) Bulbs (Not Included)
H. (3) Candle Sleeve; w1"x h2"(XFW3003BKCDL2IN)
Brand : Crystorama
Model : Abbott ABB-3003-BK
Category : Lighting