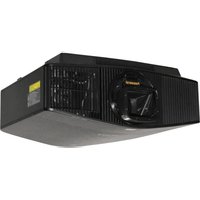
DCR-S2 - Video projector Panamorph - Free user manual and instructions
Find the device manual for free DCR-S2 Panamorph in PDF.


| Product Type | Anamorphic Lens System |
| Model | DCR-S2 |
| Brand | Panamorph |
| Compatible Projector Models | Sony VPL-VW885ES (International: VPL-VW760ES), VPL-VW915ES (International: VPL-VW790ES) |
| Mounting Types | Ceiling or shelf mounting |
| Minimum Throw Ratio | 1.4:1 |
| Recommended Screen Aspect Ratio | 2.4:1 flat screen with minimum 1.5" border |
| Projector Horizontal Centering Tolerance | +/- 3 inches |
| Projector Vertical Position Limits | Up to 10% of screen height below bottom to 30% above top |
| Anamorphic Lens Setting (Sony) | 1.24X |
| Aspect Mode (Sony) | V-Stretch |
| Cleaning Method | Blow off with clean air; use professional lens cleaning supplies if needed |
| Warranty Period | 24 months from ship date |
| Warranty Coverage | Repair or replacement at Panamorph's discretion for performance/functionality changes; excludes damage from lack of care, accident, misuse |
| Geometric Distortion | Slight barrel curvature, greatest at 1.4:1 throw ratio; reduces with longer throw |
| Reduction of Distortion | Using Sony Calibration Pro software |
| Installation Tools Required | Phillips #2 screwdriver |
| 16:9 Content Modes | Squeeze, V-Stretch, Normal, 2.35:1 Zoom (with trade-offs) |
| Included Items | DCR lens/mount assembly, rear retainer, cover, assembly screws |
Frequently Asked Questions - DCR-S2 Panamorph
User questions about DCR-S2 Panamorph
0 question about this device. Answer the ones you know or ask your own.
Ask a new question about this device
Download the instructions for your Video projector in PDF format for free! Find your manual DCR-S2 - Panamorph and take your electronic device back in hand. On this page are published all the documents necessary for the use of your device. DCR-S2 by Panamorph.
USER MANUAL DCR-S2 Panamorph
CEILING OR SHELF MOUNTING. Regardless of the projector orientation the DCR retainer should be installed with the prongs closer to the ceiling so the Panamorph logo is upright after installation.
ABOUT GEOMETRIC DISTORTION. Anamorphic vertical compression lenses such as the DCR naturally create a slight "barrel" shaped curvature especially at the edges of the image. The amount of this curvature is greatest at the minimum recommended projector throw ratio of 1.4:1 and decreases as the projector is located farther back from a given screen size. However, most content was actually created with more internal geometric distortion than that from an anamorphic lens. Once residual edge distortion is masked by the edge of the screen the effect becomes quite unnoticeable. Note that at least some residual geometric distortion can be reduced using Sony's Calibration Pro software available from both Sony or Panamorph.
CLEANING. Small amounts of dust and wipe marks are very noticeable on lens surfaces with a high brightness projection beam but typically will not impact the image as much as damage from excessive cleaning in pursuit of a "perfect" optical surface. Occasionally blowing off the lens surfaces with clean air is the best way to keep long term performance. If there is any excessive residue or build-up then it is recommended that you clean the optics with professional lens cleaning supplies such as from a camera store while the lens is in front of the lit beam of the projector. This will allow you to quickly see if the cleaning process is causing any damage.
LIMITED WARRANTY. Panamorph, Inc. warrants this product against any change in performance or functionality for a period of twenty-four months from our ship date. During this period, a unit may be repaired or replaced, at the discretion of Panamorph, Inc., by returning it in its original packaging with a copy of your receipt. This warranty does not cover damage resultant from lack of prudent care, accident or misuse (including use with other products in ways not intended); any cosmetic damage not reported within 15 days of purchase; or any performance change caused by the environment in which it is used. All damages are limited to the cost of the product.
Panamorph®
We bring cinema home
DCR-S2
Anamorphic Lens System
INSTALLATION GUIDE
(Phillips #2 screwdriver required)
For use only with the following Sony projector models:
VPL-VW885ES (International: VPL-VW760ES)
VPL-VW915ES (International: VPL-VW790ES)
IMPORTANT THEATER GUIDANCE
- Projection screen should be flat, in the 2.4:1 aspect ratio and with a minimum 1.5" border.
- Projector should be horizontally centered on the screen +/- 3 inches with minimal horizontal lens shift.
- Throw ratio (throw distance divided by screen viewable width) should be at least 1.4:1.
- Projector vertical position should ideally be close to the top of the screen with limits of up to 10% of screen height below to 30% of screen height above for best performance. Beyond these limits may prevent the beam from passing through the lens at low throw ratios.
DCR-S2 Installation Steps
1 INSTALL THE DCR LENS RETAINER. Remove the two front Phillips assembly screws from the lens/mount assembly and remove the rear retainer (it comes loosely assembled). Squeeze the retainer to fit into the projector lens opening and then relax it so that it nests into the inner rim of the opening with the prongs level and the gap downward.

Retainer nested into projector lens opening
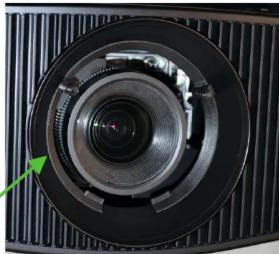
natural_image
Close-up of a camera lens mounted on a striped surface, with a green arrow pointing to the lens (no text or symbols visible)2 PREPARE THE PROJECTOR. Make sure the projector lens is horizontally centered in its opening (ie little or no horizontal lens shift). Adjust the projector roll, tilt and/or yaw so the projector test pattern lines are square to the screen edges and the test pattern is centered on the screen. Then ...
Show a 2.4:1 movie. Set the Sony anamorphic lens menu setting to 1.24X and the Aspect mode to V-Stretch. Make sure the projector lens is clean and as dust free as possible.
3 INSTALL THE DCR LENS. Remove the rear DCR lens cover. Tilt the DCR lens/mount assembly to insert the bottom mount tabs through the bottom retainer gap and behind the projector housing rim. Then tilt the assembly back and over the retainer prongs. Remove the front protective film; rotate the assembly so that any visible edges of the movie appear the same on the left and right; then insert and tighten the two assembly screws (do not over tighten).
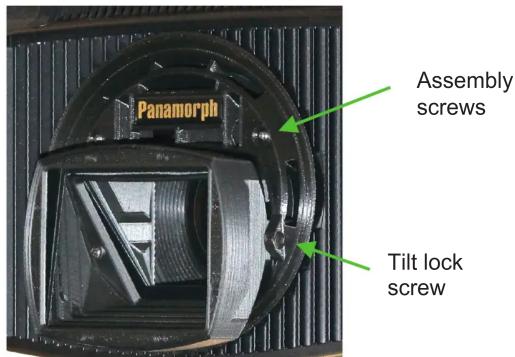
4 ADJUST THE LENS TILT AND PROJECTOR SHIFT. Adjust the projector lens zoom to fill the width of the screen with the movie. Tilt the DCR lens in its mount and adjust the projector vertical lens shift to make sure the beam is getting through the DCR lens to fill the screen. There is only a slight variation in vertical image height with this adjustment but experimentation may lead to the best fit. Lock the DCR lens tilt by tightening the single Philips tilt lock screw. As desired you may want to adjust any panel alignment in the projector (see Sony projector instruction manual).
5 DECIDE HOW TO WATCH 16:9 CONTENT. The “classic” mode to watch 16:9 content is to set the projector anamorphic mode to Squeeze. However, V-Stretch, Normal or 2.35:1 Zoom will better fill the full cinema format screen with 16:9 with various tradeoffs worth exploring. Note that menus are always created in 16:9 so some type of switch from V-Stretch will be necessary to show complete menu content.
Brand : Panamorph
Model : DCR-S2
Category : Video projector