
6Runner 10 DLX - Armchair Shoprider - Free user manual and instructions
Find the device manual for free 6Runner 10 DLX Shoprider in PDF.


| Product Type | Power Mobility Scooter |
| Brand | Shoprider |
| Model | 6Runner 10 DLX |
| Overall Length | 47 inches |
| Overall Width | 23 inches |
| Overall Height | 36 inches |
| Weight Capacity | 300 lbs |
| Total Weight (without batteries) | 170 lbs |
| Maximum Speed | 5 mph |
| Range per Charge | 15 miles |
| Battery Type | 12V 35Ah (2x) |
| Charger Input | 110-240V AC |
| Front Wheel Size | 10 inches |
| Rear Wheel Size | 10 inches |
| Turn Radius | 39 inches |
| Ground Clearance | 4 inches |
| Color Options | Red, Blue, Silver |
| Key Features | Adjustable armrests, LED headlight, rear basket, anti-tip wheels |
| Maintenance | Check tire pressure monthly; clean with damp cloth; avoid water exposure |
| Safety | Use seat belt; avoid steep slopes; charge only with supplied charger |
| Replacement Parts | Contact Shoprider dealer for batteries, tires, chargers |
Frequently Asked Questions - 6Runner 10 DLX Shoprider
User questions about 6Runner 10 DLX Shoprider
0 question about this device. Answer the ones you know or ask your own.
Ask a new question about this device
Download the instructions for your Armchair in PDF format for free! Find your manual 6Runner 10 DLX - Shoprider and take your electronic device back in hand. On this page are published all the documents necessary for the use of your device. 6Runner 10 DLX by Shoprider.
USER MANUAL 6Runner 10 DLX Shoprider
Mid-wheel Powerchair USER MANUAL
Models:
6Runner 10 (888WNLM)
6Runner 10 DLX (858WM)
6Runner 14 (888WNLLHD)
6Runner 10 (888WNLM)
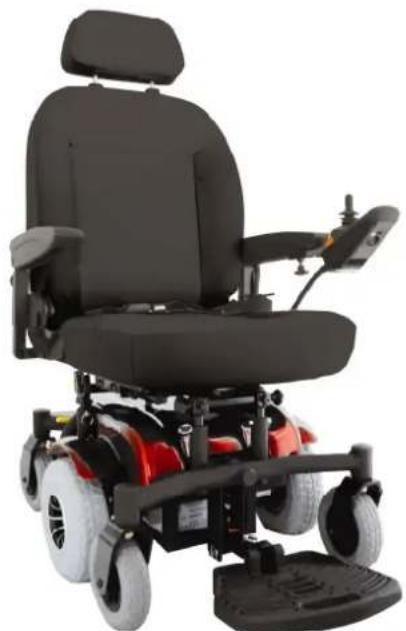
natural_image
Exterior view of a modern electric mobility wheelchair with black seat, red and white wheels, and orange handle (no text or symbols visible)6Runner 10DLX (858WM)
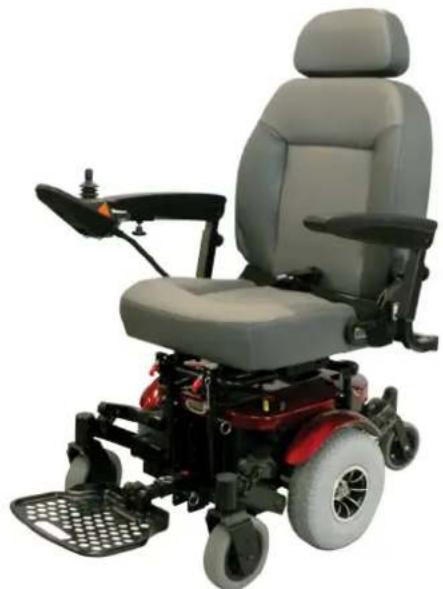
natural_image
Exterior view of a modern electric wheelchair with gray seat, red body, and black legs (no text or symbols visible)6Runner 14
(888WNLLHD)
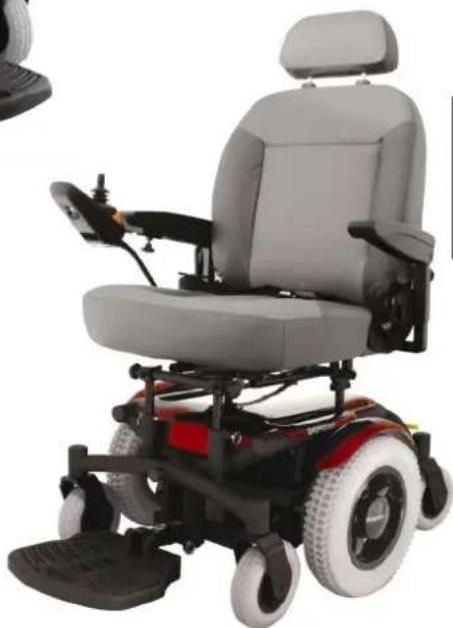
natural_image
Exterior view of a modern electric wheelchair with gray seat and red/white wheels (no text or symbols visible)
SHOPRIDER®
Table of Contents
INTRODUCTION.... 3
EMI WARNING .... 4
ELECTROMAGNETIC INTERFERENCE FROM RADIO WAVES 4
POWERED CHAIR ELECTROMAGNETIC INTERFERENCE (EMI) 5
SAFETY INSTRUCTIONS 6-7
FEATURE GUIDE...... 8-9
GETTING TO KNOW YOUR SHOPRIDER.... 10-11
THE JOYSTICK CONTROLLER (VSI)....12
LOCKING / UNLOCKING THE JOY STICK CONTROLLER....13
DRIVE/FREEWHEEL MECHANISM 14
DRIVING YOUR POWERCHAIR 15
CARING FOR YOUR POWERCHAIR.... 16
BATTERIES AND BATTERY CHARGING 17-18
TROUBLESHOOTING.... 19
SPECIFICATIONS 20
QUARTERLY INSPECTION 21
DISCLAIMER....22
NOTES....23-24
INTRODUCTION
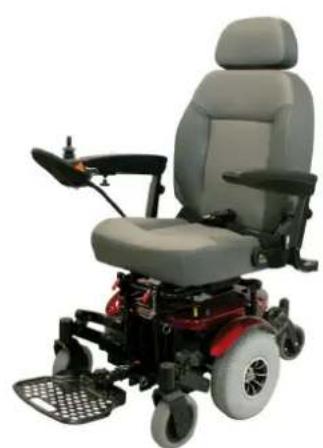
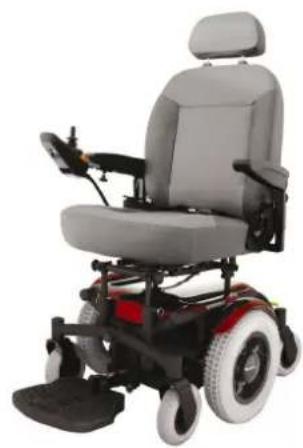
Congratulations on insisting on the best. Shoprider Powerchairs are the ultimate combination of style and comfort. The 6Runner features support easy maneuverability and smooth control for today's active lifestyle.
The innovative design of the 6Runner includes articulating double frames that move in any direction. This intelligent feature keeps all 6 wheels on the ground at all times, even when driving on uneven terrain, hence the name 6Runner. Combine this with the programmable joystick controller, fully adjustable footplate and arm assemblies, flat-free tires, deluxe reclining captain seat, easy access batteries and quick-change color shrouds. For a complete powerchair package we know that your 6Runner Powerchair will provide, many years of mobility, and freedom to go out into the world.
This manual contains important information regarding the safe use of your Shoprider Powerchair. Please read this manual carefully and thoroughly before using your Powerchair and make sure you understand all the instructions.
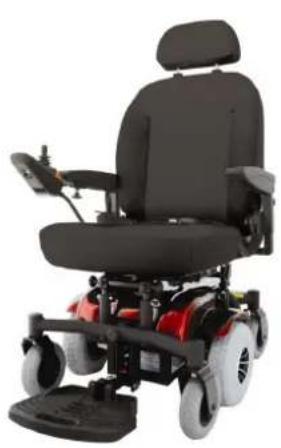
natural_image
Exterior view of a modern electric wheelchair with black seat, red and white power cord (no text or symbols visible)6Runner 10" (888WNLM)
natural_image
Exterior view of a modern electric wheelchair with gray and red seats (no text or symbols visible)6Runner 10DLX" (858WM)
natural_image
Exterior view of a modern electric wheelchair with gray and red body (no text or symbols visible)6Runner 14" (888WNLLHD)
EMI WARNING
Electromagnetic Interference (EMI) from Radio Wave Sources
Powered electric chairs may be susceptible to electromagnetic interference, which is a kind of interfering electromagnetic energy (EM) emitted from sources such as radio stations, TV stations, amateur radio (HAM) transmitters, two-way radios and cellular phones. The interference (from radio wave sources) can cause the power chairs to release its brakes, move by itself or move in unintended directions. It can also permanently damage the powered chair's control system.
The sources of radiated EMI can be broadly classified into three types:
- Hand-held portable transceivers (transmitters-receivers) with the antenna mounted directly on the transmitting unit. Examples include: citizens band (CB) radios, "walkie talkies", security, fire and police transceivers, cellular telephones and other personal communication devices
NOTE: Some cellular telephones and similar devices transmit signals while they are ON, even when not being used.
-
Medium-Range mobile transceivers, such as those used in police cars, fire trucks, ambulances and taxis. These usually have the antenna mounted on the outside of the vehicle.
-
Long-Range transmitters and transceivers, such as commercial broadcast transmitters (radio and TV broadcast antenna towers) and amateur (HAM) radios.
NOTE: Other types of hand-held devices, such as cordless phones, laptop computers, AM/FM radios, TV sets, CD players, cassette players and small appliances such as electric shavers and hair dryers, so far, as we know, are not likely to cause problems to your Powerchair.
Powered Chair Electromagnetic Interference (EMI)
Because EM energy rapidly becomes more intense the closer one moves to the transmitting antenna (source), the EM fields from handheld radio sources (transceivers) are of special concern. It is possible to unintentionally bring high levels of EM energy very close to the Powerchair's control system while using these devices. This can affect the Powerchair's movement and braking. Therefore, the warnings listed below are recommended to prevent possible interference with the control system of the Powerchair.
WARNINGS
The following warnings listed below should reduce the chance of unintended brake release or Powerchair movement, which could result in serious injury.
- Do not operate hand-held transceivers (transmitter-receivers), such as citizens band (CB) radios, or turn ON personal communication devices, such as cellular phones, while the Powerchair is turned ON.
- Be aware of nearby transmitters, such as radio or TV stations, and try to avoid coming close to them.
- If unintended movement or brake release occurs, turn the Powerchair OFF as soon as it is safe.
- Be aware that adding accessories or components, or modifying the Powerchair may make it more susceptible to EMI.
NOTE: There is no easy way to evaluate the overall immunity of the powered chair.
Report all incidents of unintended movement or brake to your Powerchair provider, and note whether there are sources of EMI nearby.
NOTE: The VSI controller EMI rating is FDA Regulated and conforms to federal regulations.
Safety Instructions
Please use your Powerchair to enhance your active lifestyle. With increased mobility, please observe a few rules to ensure safe operation of your Powerchair. So please...
- Do not drive the Powerchair without reading this manual.
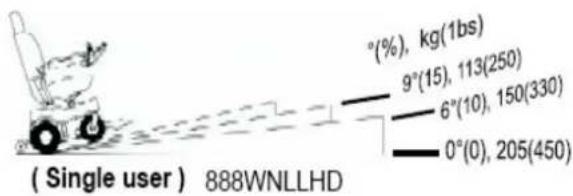
- Do not exceed the safe climbing maximum angle (Fig. 5A-5C).
- Do not use the joystick in an erratic manner when going up or down an incline.
- Do not carry passengers or exceed the maximum weight limit (Table 2).
- Do not turn off the joystick controller by switching the On/Off Button when moving at any speed. This will bring the electromagnetic brakes on immediately and could cause damage to the joystick controller.
- Do not drive over deep and soft terrain (soft dirt, loose gravel, deep grass).
- Do not attempt to mount a curb height above 2 inches.
- Do not mount or dismount the Powerchair unless the electromagnetic brakes are engaged and the joystick controller is off.
- Do not operate the Powerchair if the unit is in freewheel mode.
- Do not use on the road, except when crossing between sidewalks.
- Do not sit on the Powerchair when in a vehicle, but transfer to a vehicle seat.
- Do not exceed any grade over 6 degrees (10%).
- Always stop fully before changing forward or reverse direction.
- Always engage a slow speed when going down gradients (move the joystick slowly towards center position to reduce the speed).
- Always approach and climb over curbs at slow speed.
- Always approach curbs and gradients at 90 degrees.
- Always use the safety belt.
- Always keep the feet on the leg rest while driving.

SHOPRIDER®
-
Always make sure the batteries are fully charged before setting out on a journey.
-
Always charge the Powerchair in a well ventilated area to prevent any possible risk.
-
Always check that the drive wheels are engaged. Someone may have left the Powerchair in freewheel mode.
-
Always reduce your speed when turning sharply.
-
Avoid turning sharply on a slope or gradient.
-
To brake in an emergency simply release the joystick.
-
Always try to find a "dropped curb" or "curb cutout" whenever possible.
-
Always keep your Powerchair properly maintained.
-
Never try to use your Powerchair beyond it's limitations as described in this manual.
-
Always put seat in most upright position whenever driving up an incline.
Important Notes
The Shoprider Powerchair is designed to assist in your individual mobility needs. Any usage outside of the guidelines in this manual may result in damage to the chair or injury to the user or third party.
Please do not lift the wheelchair by the armrests.
First Time Use
Prior to using your 6Runner Powerchair for the first time, you must charge the batteries fully (refer to Battery Charging Procedures). Charging may take up to 12 hours. Charging the batteries completely prior to first time use will benefit battery efficiency and life of batteries.
Feature Guide 6Runner 14" – 888WNLLHD
Figure 1
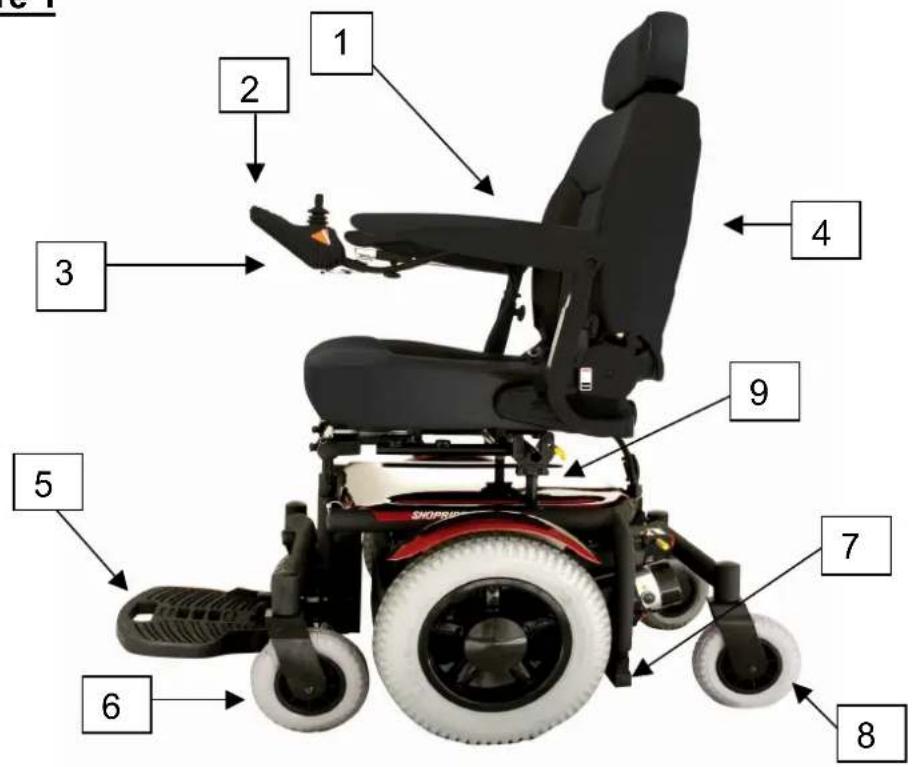
(1) Removable Armrests with Width, Height & Angle Adjustment (Flips Up for Easy Sideways Transfer)
(2) Programmable VSI Joystick Controller with Adjustable speed & Battery Life Indicator.
(3) Charging Port
(4) Deluxe Reclining Captain Seat
(5) Adjustable Length, Height, Angle Foot Plate
(6) Front Castor Assy (7" flat free tire)
(7) Frame Serial Number (13 alphanumeric characters)
(8) Rear Castor Assembly (7" flat free tire)
(9) Adjustable Seat Height
Feature Guide
6Runner 10" (888WNLM)
6Runner 10" DLX (858WM)
Figure 2
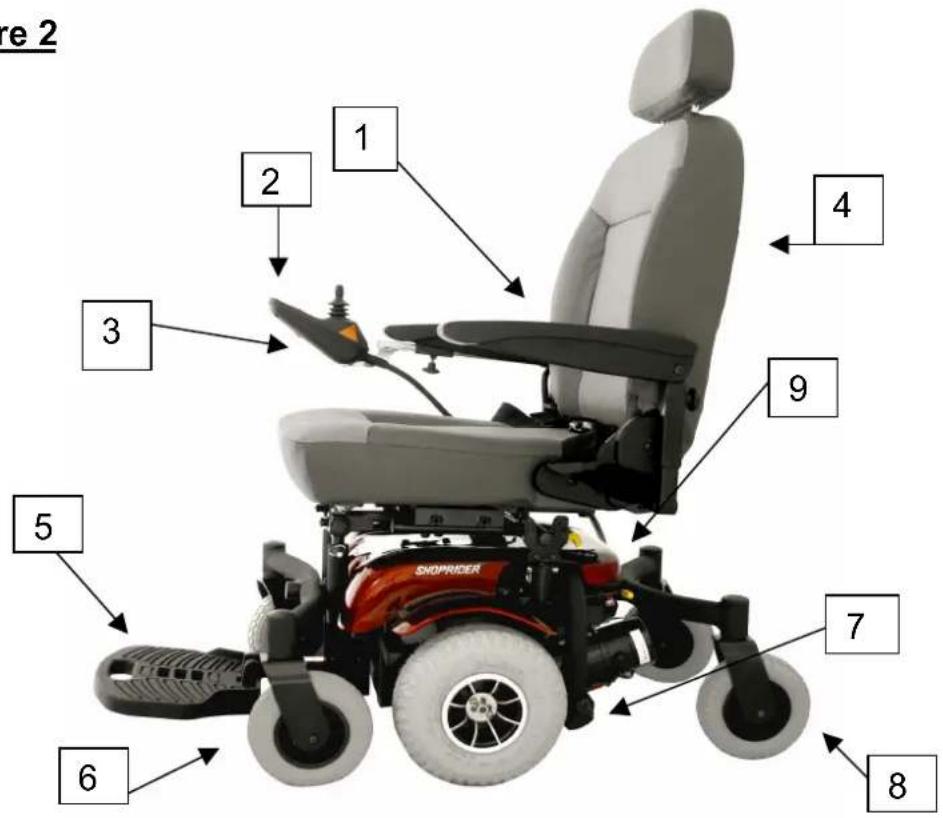
(1) Removable Armrests with Width, Height & Angle Adjustment (Flips Up for Easy Sideways Transfer)
(2) VSI Joystick Controller with Adjustable speed & Battery Life
(3) Charging Port
(4) Deluxe Reclining Captain Seat
(5) Standard Angle Adjustable Foot Plate
(6) Front Castor Assy (7" on 888WNLM,6" on 858WM)
(7) Frame Serial Number (13 alphanumeric characters)
(8) Rear Castor Assembly (7" on 888WNLM,5" on 858WM
(9) Removable shroud for easy color style changes
Getting to Know Your Shoprider Powerchair The Seat and Arm Assemblies
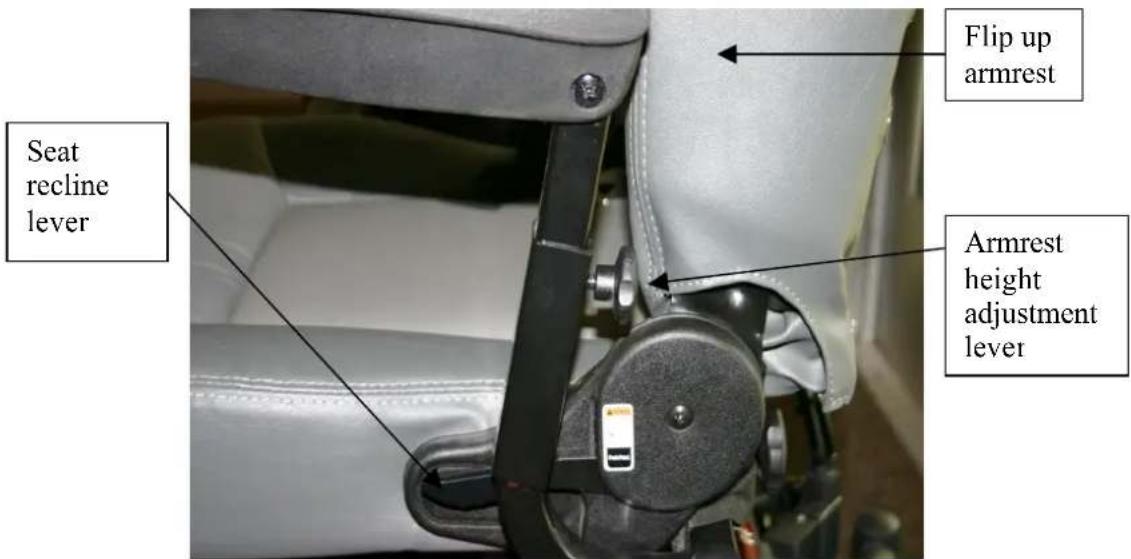
The seat is built for comfort, style, and stability. Your seat comes with a reclining back for comfort. The flip-up arm-rests are especially built for easy side access for getting in and out of your 6Runner, with the greatest of ease. The arm-rests have a built in height adjustment knob, that adjusts the arm pad to a comfortable level for the driver. The seat is covered in a durable long lasting black/grey vinyl for comfort and style.
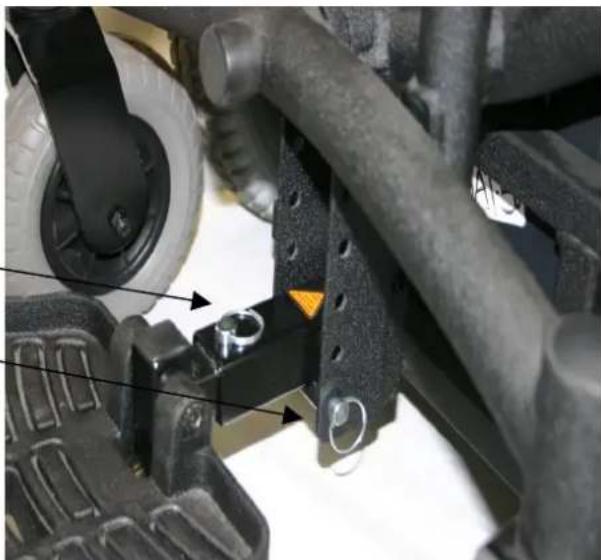
Adjustable footplate
The footplate adjusts to fit to the users size and comfort. It adjusts length and height wise to help in comfort and stability for the user.
Adjustment pins are easily accessible for the removal and adjustment of the length and height of the footplate.
natural_image
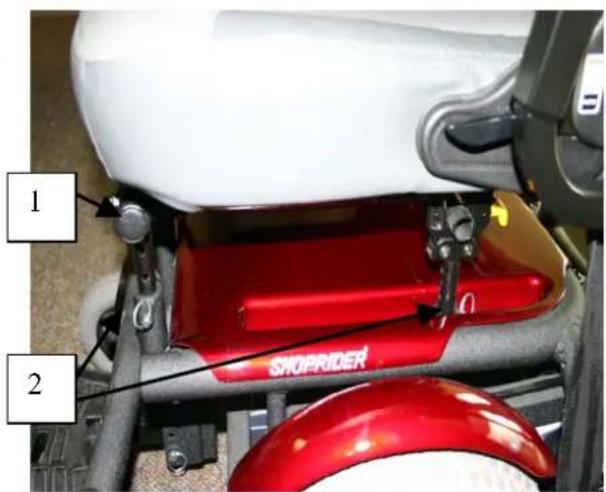
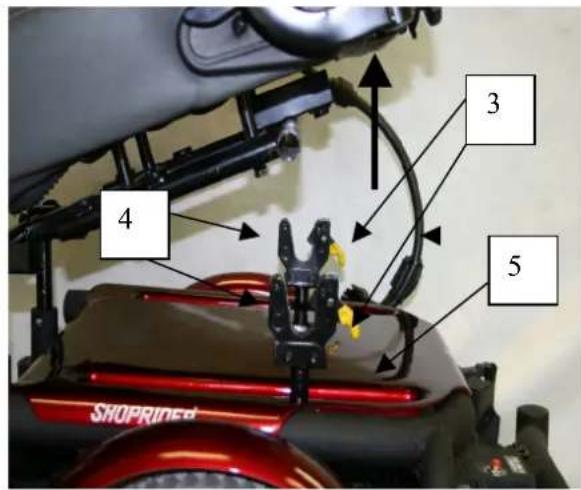
Close-up of a mechanical assembly with visible components and mounting features (no text or symbols)Seat Height Adjustment And Easy Battery Access
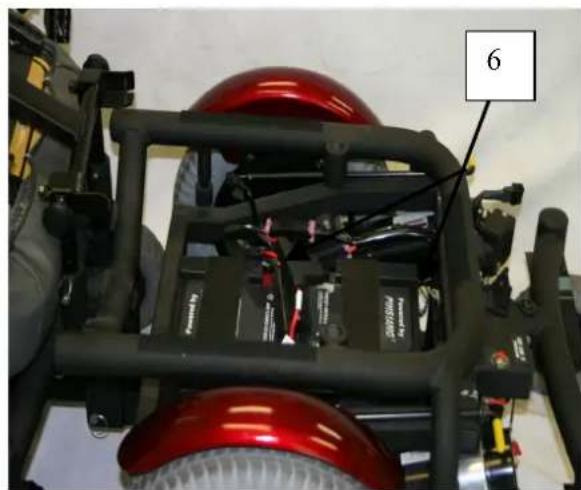
- Tightening knob that allows for the seat to be removed if needed, if not, there is a pivot point that allows for the seat to move up and away from the base.
- Adjustment pins that can be used to adjust the height of the seat to fit the user.
- Release levers; allow for the rear of the seat to be lifted and moved away from the base for easy battery access, without removing entire seat.
- U-Hooks hold the seat in place and must be removed before removing the shroud to get to the batteries.
- Bottom shroud is easily popped off, to allow for battery access.
- Batteries are sitting on the base (either 36Ah/75Ah depending on which unit is purchased) allow for an easy battery access and change
natural_image
Rear view of a red and black vehicle chassis with visible battery pack and wiring (no text or symbols)The Joystick Controller (VSI)
-
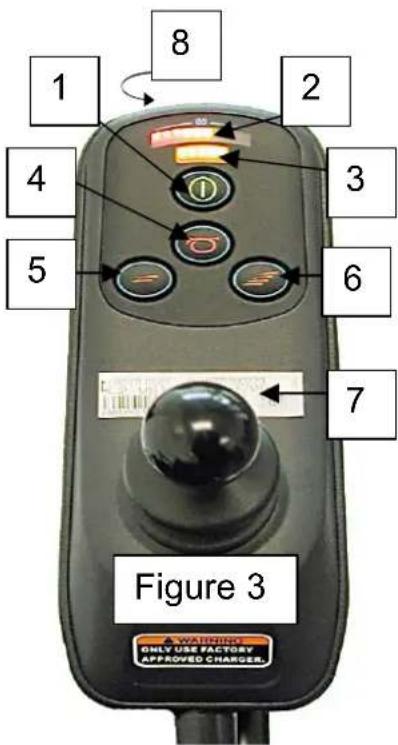
On-Off Button: This button turns the joystick controller (hereinafter referred to as VSI) on and off. Do not use this button to stop the power chair, except in an emergency.
-
Battery Gauge: This is a 10-segment display, which indicates if the VSI is switched on and gives the state of charge of the battery. Additionally, any faults in the Powerchair electrical system are also indicated by this display. Refer to Table 1 for more details.
-
Maximum Speed Indicator: This is a 5-segment display, which indicates the maximum speed setting selected.
-
Horn Button: This button operates the Powerchair's horn.
-
Speed Decrease Button: This button decreases the maximum speed.
-
Speed Increase Button: This Button Increases the maximum speed.
-
Joystick: This controls the speed and direction of the Powerchair. Push the joystick in the direction you want to go. The further you push it, the faster the speed will be. Releasing the joystick will automatically engage the brakes and stop the Powerchair.
-
Charging Port: This is the primary charging port for the 6Runner. When using this charging port only plug into this port with the qualified Shoprider charger certified by the original manufacturer of the Powerchair. This port should not be used as a power supply for any other electrical devices. Doing either of these as stated above will void the warranty of the Powerchair.
Note: The controller can be fitted to suit either right or left-handed users. Please contact your provider for further assistance.
Locking/Unlocking the VSI Joystick
\*\*\*\*PLEASE NOTE\*\*\*\*
LOCK MODE: The VSI controller may be programmed to have a lock mode function enabled to prevent unauthorized use. The locking method is achieved through a sequence of key presses and joystick movements, as detailed below.
To lock Powerchair controller:
■ While the controller is switched on, depress and hold the on/off button.
■ After 1 second the controller will bleep. Now release the on/off button.
■ Push the joystick forward until the controller bleeps.
- Push the joystick in reverse until the controller bleeps.
■ Release the joystick, there will be a long bleep.
■ The Powerchair controller is now locked.
To unlock the Powerchair controller:
- Use the on/off button to switch the controller on. The maximum speed/profile indicator will be rippling up and down.
■ Push the joystick forward until the controller bleeps.
■ Push the joystick in reverse until the controller bleeps.
■ Release the joystick, there will be a long bleep.
■ The Powerchair is now unlocked.
SLEEP MODE: If the controller is left on and not used for more than ten minutes, the controller will automatically “go to sleep”. This is recognized by a slow intermittent flash of the battery indicator lights. Simply turn the controller off and back on to reset.
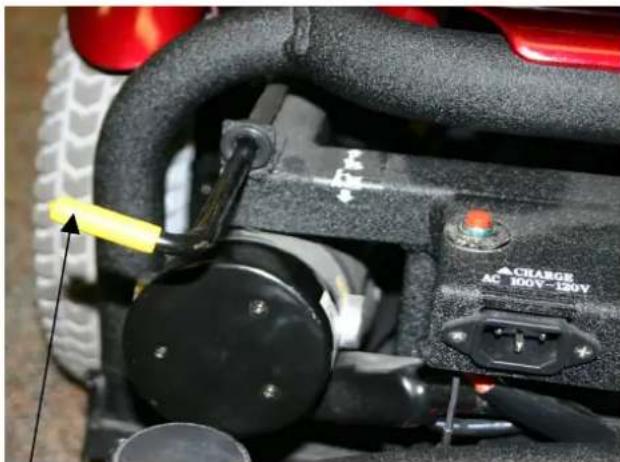
Always leave the chair in drive mode. The freewheel option is there only to allow the chair to be pushed manually when the need arises (i.e., to store or push unit out of a tight space). Following the sticker picture put each lever in the direction of the person sitting down driving the chair.

SHOPRIDER®
The Powerchair will not function while the drive mechanism is disengaged (in freewheel).
Both left and right sides must be in drive mode for power chair to operate. Otherwise the Powerchair motors will spin, but the unit will not move, until both freewheel levers are engaged. Unit will spin in circles if only one side is in drive mode.
*** DO NOT PUT INTO DRIVE MODE WHILE MOTORS ARE SPINNING ****
6Runner - 888WNLM, 888WNLLHD & 858WM
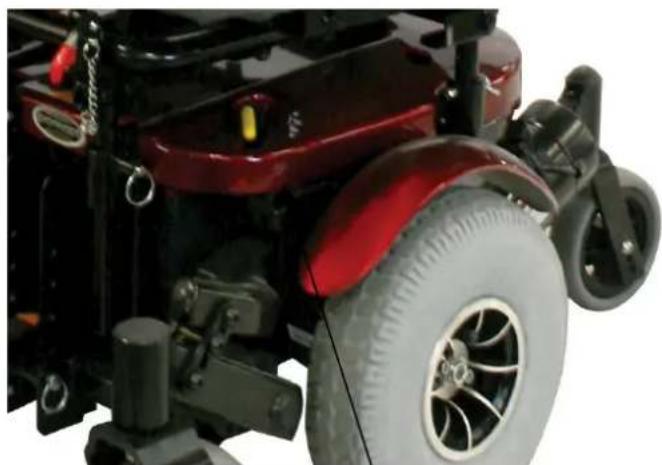
The drive/freewheel levers are found toward the rear of the Powerchair on 888WNLM and 888WNLLHD (Figure 4A). On the 858WM freewheel levers are located under the front part of the seat (Figure 4B), both have yellow colored handles. These levers will allow you to disengage the drive mechanism (When the levers are pulled out away from the unit) the Powerchair is in freewheel mode. ***NOTE*** the VSI will not work in Freewheel mode. When the levers are pushed in (towards the inside of the unit) the motors are engaged and the powerchair is in drive mode.
FIGURE 4A
natural_image
Close-up of a red and black motorcycle wheel with visible tire, dashboard, and charging button (no readable text or symbols)FIGURE 4B
natural_image
Close-up of a red and silver electric wheelchair with visible wheels and mechanical components (no text or symbols)Sticker will also help indicate in which position the brakes are locked or unlocked.
Freewheel lever
Freewheel lever **NOTE** There is a lever on opposite side
Driving Your Shoprider Powerchair Ramps, Slopes and Cambers
The indoor/outdoor Powerchair has the ability to negotiate ramps, slopes and cambers of a low to medium gradient. It is of the utmost importance that the following points are observed:
- Never attempt to go up or down an incline which has a rough, wet or slippery surface (loose gravel, tree roots, wet grass, polished floor, etc.)
- Always approach an incline head on, not at an angle
- Always travel at a speed that you are comfortable with and that you feel in complete control
- Avoid sudden or erratic action with the joystick
- Always have the reclining seat in the most upright position when driving up an incline
- When riding along in a straight line you may experience "veering to one side". This is due to the natural camber in the construction of the pavement. To correct this you simply have to steer slightly against it, as you continue to move forward
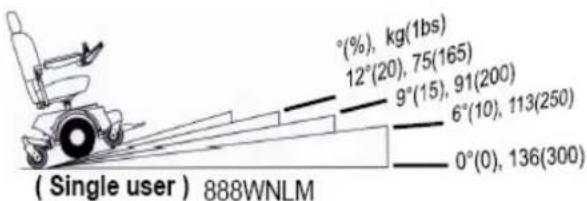
FIGURE 5A
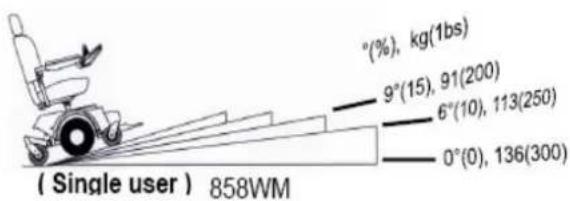
FIGURE 5B FIGURE 5C


SHOPRIDER®
Caring for Your Shoprider 6Runner Powerchair
First Time Use
Prior to using your Powerchair for the first time, you must charge the batteries fully (refer to Battery Charging Procedures). Charging may take up to 12 hours. Charging the batteries completely prior to first time use will benefit battery efficiency and battery life.
Tires
Since your tires are flat free tires, there is no need to ever worry about tire air-pressure. When tread is worn, it is highly recommended to replace tires.
General Maintenance and Lubrication
- Inspection for loose wheel bolts, seat and arm tightening bolts, castor nuts and other nuts and bolts is recommended on a regular basis.
- Most lubricated components on the Powerchair are designed to be maintenance free and are sealed. Therefore, lubrication is not required for these components. However, the driving wheel axles and seat post should always have a very light coat of multi-purpose grease.**NOTE** Never put grease or oil in the breather cap located on the top of each worm gear.
DO NOT USE TOO MUCH GREASE!
Drips may stain or damage carpets, furnishings, etc.
- It is recommended that the driving axles (inside the drive wheel assembly) and castor assemblies be checked and cleaned occasionally for hair and debris build-up, which will hinder the performance of the unit.
- Check the 6Runner's batteries on a regular basis. For extended battery life, it is highly recommended that the batteries be fully charged after each use. If the batteries are weak, severely discharged or old, a variety of problems may occur with the unit including charging problems, reduced speed, loss of range, loss of charge capacity and others. Please contact your provider for battery replacement and proper disposal. Note: Charging your batteries daily will enhance the life of your batteries. If the batteries are left unattended for extended periods of time, it is recommended that they be left in a fully charged state. Leaving your batteries in a discharged state, or not charging them regularly will diminish the life of your batteries and cause irreversible damage to your batteries.
Batteries & Battery Charging
Batteries
The Shoprider 6Runner Powerchairs are designed to operate on two 12 volt/36Ah or 75Ah sealed lead acid aka SLA (AGM or gel-cell type) maintenance free batteries. The life of the batteries may be affected by temperature, terrain, weight of user, driving methods, and care of batteries. The active user will need to charge the batteries after using approximately 30% of battery capacity. As an inactive user, only using from once a week to every other day, the recharge point would be at 50% of discharge (Refer to Figure 8). For extended battery life, it is highly recommended that these guidelines be followed. You cannot over charge the batteries.
• Active users: Charge daily
- Occasional users: Charge your battery before any outing and always after active use.
\*Keeping the batteries charged extends the life of the batteries\*
SLA batteries should be kept fully charged at all times. They must not be left in a discharged state if the unit is not being used for some time or the batteries will be permanently damaged and will no longer hold a charge. The SLA batteries should be checked once a month and kept charged as needed. Typically SLA batteries have up to about 400 charging cycles.
Red Bottom 3 Bars
Flashing. Danger, you must stop and recharge the batteries. Failure to do so may result in damage of batteries.
Amber Middle 4 Bars
From 30% - 50%
discharge. Batteries will
need charging.
Green Top 3 Bars
Full battery charge.

natural_image
Grid of eight patterned squares with varying dot textures (no text or symbols)NEVER DISCHARGE BATTERIES TO RED BARS OF INDICATOR!
Figure 7
6Runner 888WNLM,858WM, 888WNLLHD
How to Charge Your Unit
1) Plug the A/C power cord into the wall. Plug the male three-pin charger plug into the female 3-pin receiver located on the bottom of the VSI. Turn the switch on if applicable (8Amp charger only)
The battery charger's light indicator is as follows:
One light charger (4Amp)
Yellow/Amber-Charging
Green-
Charging
Complete
Or
Two light charger (8Amp)
Red (solid)- Power ON
Yellow/Amber-Charging
Green-
Charged
NOTE: It is very important to check the charger light color. If there is no light or a different color light on than should be, refer to the charging trouble shooting section in this manual.
Depending on the amount of battery discharge, the charge time can take up to 12 hours. The battery charger has an electronic switch that will terminate the charge when the batteries are fully charged. Do not remove the battery charger until the charging cycle is complete. Be sure to unplug charger from the wall first before unplugging charger from the Powerchair.
WARNING! Only use the original manufacturer approved charger! This charger is for indoor use only. Do not expose it to rain or water spray.
Do not leave the charger plugged into the Charging Port if the charger is not charging.

SHOPRIDER®
Troubleshooting
The Self-Help Guide (Table 1) is intended to assist in the location of a fault that may occur in a certain part of the Powerchair.
If after checking the fault from the table below and the fault is still showing, do not use the Powerchair. Turn off the power and consult your provider immediately.
Table 1
| BATTERY GAUGE FAULT CODE | POSSIBLE VSI-50 FAULT |
| 10 Bars flash | Battery voltage is too high, check the battery connections. Call your Shoprider Provider. |
| 9 Bars flash Brake Fault. Call your provider. | |
| 8 Bars flash | Possible controller fault. Check controller connector. Call your Shoprider Provider. |
| 7 Bars flash | Possible joystick fault. Be sure joystick is at center when controller is turned on. Call your Shoprider Provider. |
| 6 Bars flash | Battery charger connected. Unplug charger. |
| 5 Bars flash | Right-hand motor wiring fault. Check connections. Call your Shoprider Provider. |
| 4 Bars flash | Right-hand motor disconnected. Check connections. Call your Shoprider Provider. |
| 3 Bars flash | Left-hand motor wiring fault. Check connections. Call your Shoprider Provider. |
| 2 Bars flash | Left-hand motor disconnected. Check connections. Call your Shoprider Provider. |
| 1 Bar flash | Low battery voltage. Charge batteries immediately. Do not drive Powerchair until batteries are completely charged! |
Battery/ Charging Troubleshooting
- If the charger indicator light goes to green within a few minutes after being plug in and doesn't charge the batteries the batteries may be over discharged and may require additional service or replacement. Contact your provider for assistance.
If the charger indicator light goes immediately to green when plugged in to charge, the problem is likely a blown fuse, popped circuit breaker (push reset button) or similar. Contact your provider for assistance. If the charger does not come on at all when plugged in, check the charger fuse if applicable, then call your provider.
Specifications
Table 2
| 6Runner 10888WNLM | 6Runner 10 DLX858WM | 6Runner 14888WNLLHD | |
| Overall Dimensions:L ^1 x W x H | 30" x 23" x 44" 30" x 22" | x38.6 " 41" x 25" x 46" | |
| Total Weight of Unit With Seat and Batteries | 191 Lbs.(w/ 36Ah batts) | 191 Lbs. (w/ 36Ah batts) | 277 Lbs. (w/ 75Ah batts)233 Lbs. (w/ 50Ah batts) |
| Maximum User Weight | 300 Lbs. 300 Lbs. 450 Lbs. | ||
| Battery Capacity | 12v – 36Ah x 2 12v – 36Ah x 2 | 12v – 75Ah x 212v – 50Ah x 2 | |
| Charger | Off Board, 4 amp Off Board, 4amp Off Board, 8amp | ||
| Maximum Speed | Approx 4.5-5 mph Approx 4.5-5 mph Approx 3.1-3.8 mph | ||
| Safe Climbing Angle, Maximum Single User Weight | Refer to figure 5A Refer to figure 5B Refer to figure 5C | ||
| Range ^2 | 16.3-18.8 Miles | 16.3-17.5 Miles | 16.3-17.5 Miles |
| Turning Radius | 21.5 Inches | 18 Inches | 23.5 Inches |
| Seat to floor height (Adjustable) | 19",20",21" | 19",20",21,22",23" | 24",25",26" |
| Ground Clearance | 2.50" | 3" | 2.75" |
| Output Power of Motor x2 (Reference Only) | .8 hpx2 | .8 hpx2 | 1.34 hpx2 |
As a part of our ongoing product improvement initiative, Shoprider reserves the right to change specifications and design without prior notice. All specifications and dimensions are approximate. ^1 Includes the anti-tip wheel.
^2 The actual driving range varies with the factors shown below:
- The weight of the user
- Ground surface condition
- Battery condition
- Type of charger
- Ambient temperature
- Driving style
- Terrain
- After battery and mechanical moving parts have broken in
*Proceed up any incline with seat in upright position*

SHOPRIDER®
QUARTERLY INSPECTION
For your own safety, quarterly inspection and service on the product with inspection by an authorized dealer is strongly recommended. There may be a nominal dealer inspection fee for this service not covered by warranty. Maintenance records (below) should be kept at all times. The manufacturer / distributor / vendor will be indemnified from any product liability claim if the above maintenance / service requirement are not met.
NOTE! Regular (Monthly) inspection is strongly recommended by the manufacturer to ensure ultimate performance of the vehicle.
Service Record:
Date of Purchase: / /
Purchaser:
Model #:
Serial #:
Dealer Unit Was Purchased From:
| M / D / Y | M / D / Y | M / D / Y | M / D / Y | Y M / D / Y | Y M / D / Y |
| M / D / Y | M / D / Y | M / D / Y | M / D / Y | M / D / Y | M / D / Y |
| M / D / Y | M / D / Y | M / D / Y | M / D / Y | M / D / Y | M / D / Y |
| M / D / Y | M / D / Y | M / D / Y | M / D / Y | M / D / Y | M / D / Y |
| M / D / Y | M / D / Y | M / D / Y | M / D / Y | M / D / Y | M / D / Y |
| M / D / Y | M / D / Y | M / D / Y | M / D / Y | M / D / Y | M / D / Y |
| M / D /Y | M / D / Y | M / D / Y | M / D / Y | M / D / Y | M / D / Y |
QUALITY SHOPRIDER ASSURANCE SHOPRIDER®
Disclaimer
Congratulations on your purchase of the Shoprider 6Runner Powerchair.
This Powerchair is not intended to be used by individuals with physical limitations that could prevent the user from operating the Powerchair safely. Shoprider disclaims all responsibility for any personal injury or property damage, which may occur as a result of improper or unsafe use of its products.
Warranty is only valid when genuine Shoprider parts are used. All modifications on the Powerchair, unless approved and authorized by Shoprider will automatically invalidate the warranties. Standard warranty does not extend to consumable items and parties other than the original user.
The preceding guidance is intended to assist you in the safe operation of this Powerchair. If you should have any questions about the correct operation of the Powerchair, please contact your authorized Shoprider provider.
Model Name-
Provider Stamp
Serial No.:
Shoprider Mobility Products, Inc. www.shoprider.com 800-743-0772
- Mid-wheel Powerchair USER MANUAL
- SHOPRIDER®
- Table of Contents
- INTRODUCTION
- EMI WARNING
- Electromagnetic Interference (EMI) from Radio Wave Sources
- Powered Chair Electromagnetic Interference (EMI)
- WARNINGS
- Safety Instructions
- Important Notes
- First Time Use
- Feature Guide 6Runner 14" – 888WNLLHD
- Feature Guide
- 6Runner 10" (888WNLM)
- 6Runner 10" DLX (858WM)
- Getting to Know Your Shoprider Powerchair The Seat and Arm Assemblies
- Adjustable footplate
- Seat Height Adjustment And Easy Battery Access
- The Joystick Controller (VSI)
- Locking/Unlocking the VSI Joystick
- \*\*\*\*PLEASE NOTE\*\*\*\*
- To lock Powerchair controller:
- To unlock the Powerchair controller:
- Driving Your Shoprider Powerchair Ramps, Slopes and Cambers
- Caring for Your Shoprider 6Runner Powerchair
- Tires
- General Maintenance and Lubrication
- DO NOT USE TOO MUCH GREASE!
- Batteries & Battery Charging
- Batteries
- \*Keeping the batteries charged extends the life of the batteries\*
- Red Bottom 3 Bars
- Amber Middle 4 Bars
- Green Top 3 Bars
- 6Runner 888WNLM,858WM, 888WNLLHD
- How to Charge Your Unit
- Troubleshooting
- Battery/ Charging Troubleshooting
- Specifications
- QUARTERLY INSPECTION
- QUALITY SHOPRIDER ASSURANCE SHOPRIDER®
- Disclaimer
Brand : Shoprider
Model : 6Runner 10 DLX
Category : Armchair