T1.4000DL - Audio Receiver Soundstream - Free user manual and instructions
Find the device manual for free T1.4000DL Soundstream in PDF.


| Product Type | Car Audio Amplifier |
| Brand | Soundstream |
| Model | T1.4000DL |
| Power Output (RMS) | 2000W x 1 @ 1 ohm |
| Power Output (Peak) | 4000W x 1 |
| Amplifier Class | Class D |
| Number of Channels | 1 (Monoblock) |
| Frequency Response | 10Hz - 250Hz |
| Signal-to-Noise Ratio | >100 dB |
| Input Sensitivity | 0.2V - 6V |
| Impedance | 1 ohm - 4 ohms |
| Low Pass Crossover | 50Hz - 250Hz variable |
| Subsonic Filter | 10Hz - 50Hz variable |
| Bass Boost | 0 - 12 dB variable |
| Dimensions (L x W x H) | 15.5 x 10.2 x 2.4 inches |
| Weight | 12.5 lbs |
| Power Supply Voltage | 12V DC (10-15V) |
| Fuse Rating | 250A (external) |
| Remote Turn-On | 12V trigger |
| Protection Circuits | Thermal, short circuit, DC offset |
| Recommended Speaker Wire | 4 AWG or larger |
| Included Accessories | Remote bass knob, mounting hardware, manual |
Frequently Asked Questions - T1.4000DL Soundstream
User questions about T1.4000DL Soundstream
0 question about this device. Answer the ones you know or ask your own.
Ask a new question about this device
Download the instructions for your Audio Receiver in PDF format for free! Find your manual T1.4000DL - Soundstream and take your electronic device back in hand. On this page are published all the documents necessary for the use of your device. T1.4000DL by Soundstream.
USER MANUAL T1.4000DL Soundstream
natural_image
Black silhouette of a spider (no text or symbols)OWNER'S MANUAL
T4.1500L
T1.4000DL
T1.6000DL
T5.2500DL

natural_image
Black silhouette of a spider (no text or symbols)OWNER'S MANUAL
T4.1500L
T1.4000DL
T1.6000DL
T5.2500DL
Table of Contents
Installation
Installation Notes, Installation of Amplifier, Electrical Connections 2
4-Channel Amplifiers T4.1500L
Functions & Controls Speaker- & RCA Connections 3 4-5
1-Channel Mono Bass Amplifier T1.4000DL
Functions & Controls Speaker- & RCA Connections 6 7-8
1-Channel Mono Bass Amplifier T1.6000DL
Functions & Controls 9 Speaker- & RCA Connections 10-11
5-Channel Amplifiers T5.2500DL
Functions & Controls Speaker- & RCA Connections 12 13-14
Trouble Shooting 15
Specifications 16
Installation
Installation Notes
The amplifier is generally mounted in the rear trunk area but can be mounted in any convenient area such as beneath a seat. Please be sure to locate this unit where you have reasonable air circulation and protection from moisture. When considering the mounting location you should minimize the length of the power and speaker leads. Minimizing both leads will yield a more reliable installation. It is also important to ensure that the heat sink fins are not against a panel or a surface, preventing air circulation. Do not install the amplifier on a subwoofer box or on vibrating parts of the vehicle, since the vibrations can cause damage to the amplifiers electrical components.
Installation of the amplifier
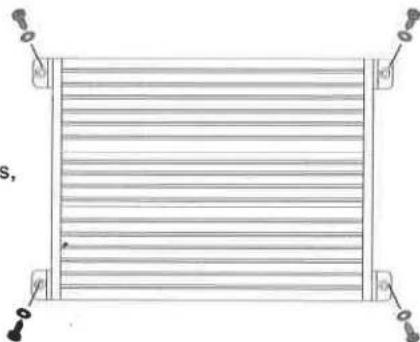
Before starting with the installation, mount the provided mounting brackets on the amplifier. Mark the location for the mounting screw holes by using the amplifier as a template. Drill holes at the marked locations as and firmly fasten the amplifier in place with the mounting screws supplied in the accessory kit. Before drilling or cutting any holes, investigate the layout of your automobile thoroughly: Take care when working near the gas lines or hydraulic lines and electrical wiring.
Electrical Connection
natural_image
Pure diagram of a rectangular panel with horizontal lines and corner connectors, no text or symbols present.Ground (GND)
This wire is the electrical ground and must be fastened securely to the vehicle chassis. The best method is to use a threading sheet metal screw since the threads cut into bare metal. Ensure that all paint or other insulationis removed from around the hole area, and using self tapping screw, securely affix the bare wire ends to the vehicle chassis. Use as short a piece of cable as possible - use the same gauge as was used for the +12V cable. Make sure that the connection is safe and stable.
Remote (REM)
Connect the remote wire of your headunit with the remote turn-on of the power amplifier,
Battery Connection (+12V Power)
This wire is usually connected directly to the positive battery terminal. Ensure that the + power supply wire is fused via an in-line fuse near by the battery. Please use a sufficient gauge (min 16 mm) with spade lug with insulating sleeve.
Fuses
The integrated amplifier fuses protect the units from short circuit and overload. The fuse rating is for 4 Ohm loads (impedance) of the speakers, for 2/1 Ohm loads the fuses may have to get increased by up to 50% / 100% in case of higher power consumption.
T4.1500DL/T1.6000D/T5.2500DL
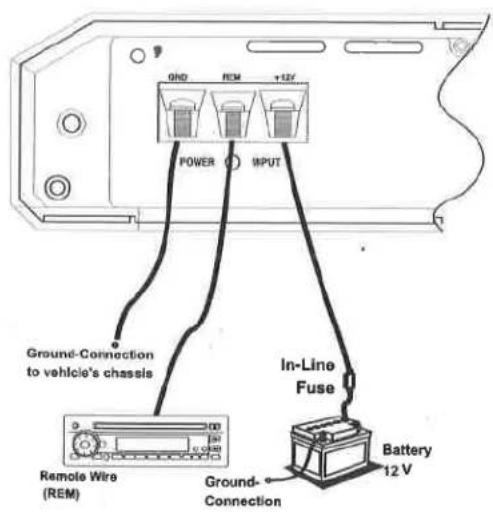
T1.4000D
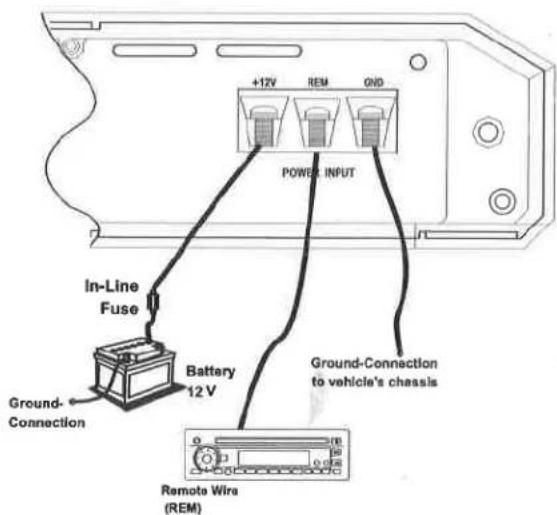
Functions & Controls
T4.1500L
HP-/LOPASS CH1/2 & CH3/4
HP PASS (HighPass)
Controls the frequency response of your speakers downwards. The Cut-off frequency is continuously variable from 50Hz up to 400Hz
LOW PASS (LowPass)
Controls the frequency response of your speakers upwards. The Cut-off frequency is continuously variable from 50Hz up to 400Hz
If the X-OVER - Switch is set on LP -position, so the HP PASS-controller is activated as Subsonic-Filter, who eliminates the lowest frequencies to protect the speakers from damages.
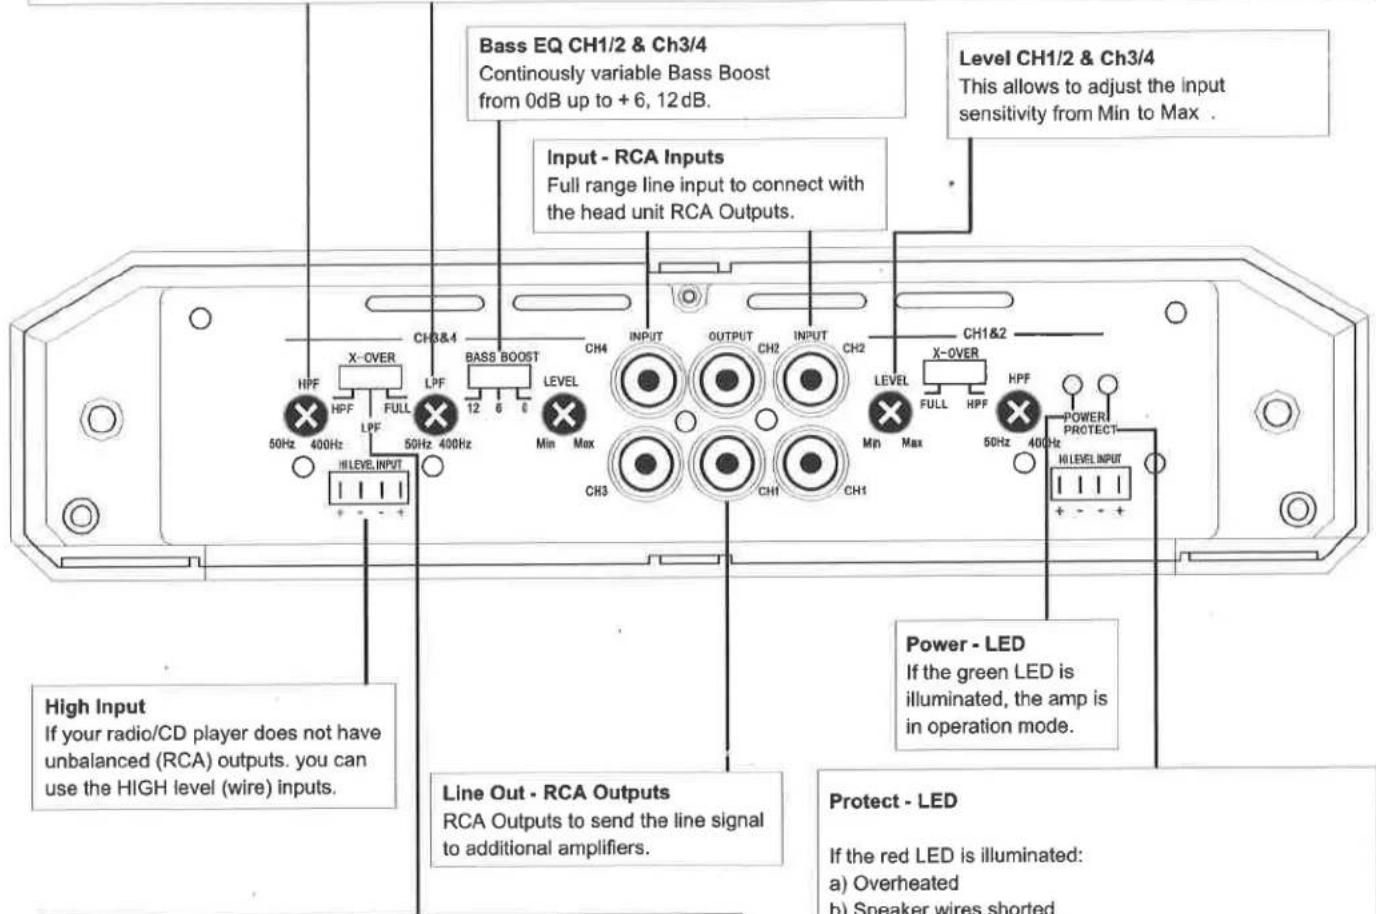
X-Over CH1/2 & CH3/4
Selects the operation modes of the amplifier which is required:
Position HPF:
Highpass/Subsonic (frequency response is limited downwards. It is controlled by the HP PASS-controller)
Position FULL:
Provides a full range signal to the speakers (whole frequency response).
Position LPF:
Lowpass (frequency response is limited upward. It is controlled by the LOW PASS-controller)
Protect - LED
If the red LED is illuminated:
a) Overheated
b) Speaker wires shorted
c) Overload (Impedance, less Power Supply)
d) Amplifier is damaged
The built-in electronic diagnostic protection saves the amplifier and speakers from serious damage. If the red LED lights up due to overheating, let the amplifier could down a while a turn it on again.
If the red light is still lighting up, ensure that all connections, especially the speakers are correct and not shorted.
If the amp is still in protection mode, try to restart the amplifier without any speaker or RCA wires.
If the green light is now lighting up, re-check again all speaker- and RCA-connections, to ensure correct connection.
Speaker & RCA Connections
T4.1500L
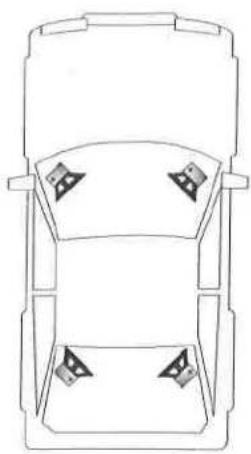
4-Channel-Mode: 2 Frontspeakers / Stereo & 2 Rearspeakers / Stereo
natural_image
Top-down line drawing of a car viewed from the side, showing four front-facing seats (no text or symbols)Cable connection
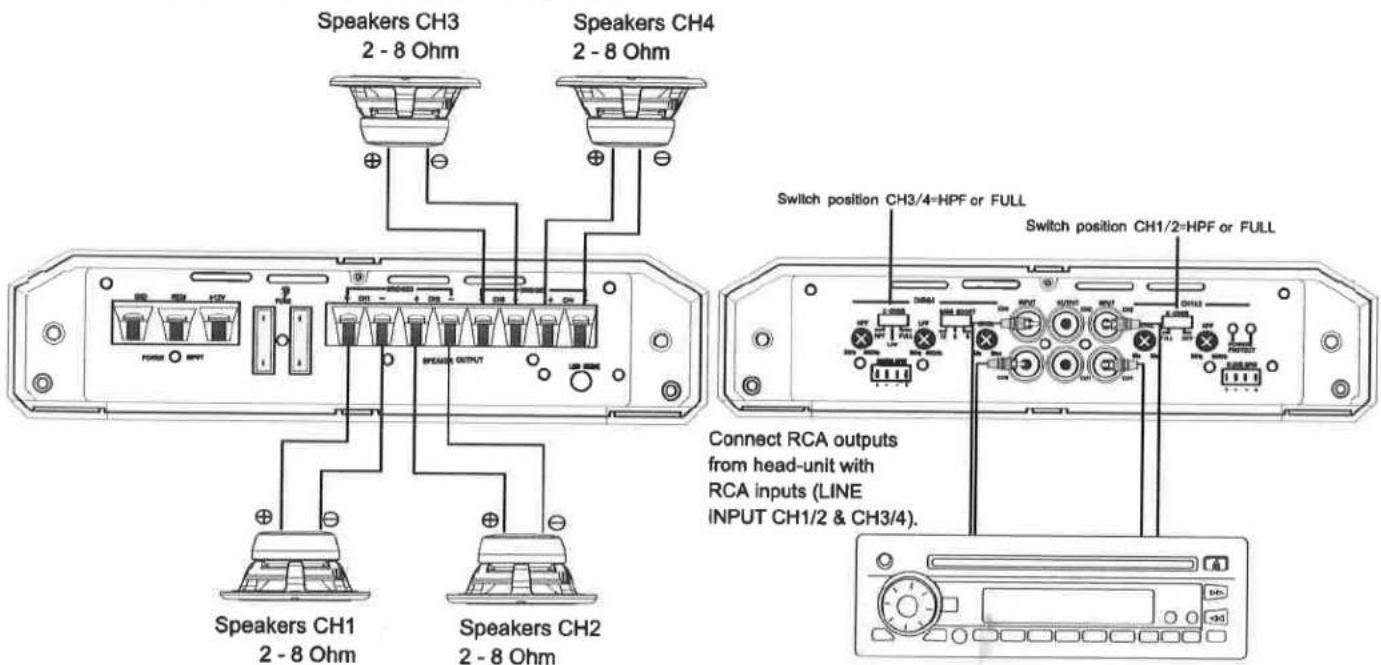
- Connect INPUT of the amplifier to the head unit line output with good quality RCA cables. By connecting the RCA jacks OUTPUT with a additional amplifier, a full range signal will be provided to the amplifier.
- Connect the speakers with the terminal block (CH1 +/- und CH2 +/- SPEAKER) and (CH3 +/- and CH4 +/- SPEAKER) of the amplifier.
- The minimum final speaker impedance must not be below 2 Ohm per channel. Too low speaker loads result in too high heat dissipation and may cause the amplifier run into protection.
- Please observe speaker channel and polarity as printed by the speaker terminal block. Incorrect phasing of the speakers results in total loss of bass response.
Caution
Please avoid to connect speaker (-) to the ground or vehicle chassis.
X-OVER - Switch & Control CH1/2 and CH3/4
- If larger than 20 cm speakers are used, the "FULL" position is recommended.
- For all smaller speakers (8.7cm - 16cm) the "HP"-Position (HIGH PASS) is recommended, which eliminates the lowest frequencies and protects the speakers from damage. Set the crossover-frequency between 50Hz - 400Hz, depending on the size of the installed speakers. The Highpass adjustment can be done with the HIGH PASS - Control. In this configuration the LOW PASS - Control is not in use.
LEVEL INPUT - Control CH1/2 and CH3/4
- Turn the LEVEL INPUT - Control on the amplifier to "6V" position.
- Tum the head unit volume control to about 80-90% of its full setting.
- Turn the LEVEL INPUT - Control clockwise until you hear some distortion.
- Then turn back the LEVEL INPUT - Control slightly until you can hear clean sound.
BASS BOOST CH1/2 and CH3/4
- Turn the BASS BOOST - Control into "0dB" - position.
Speaker & RCA Connections
T4.1500L
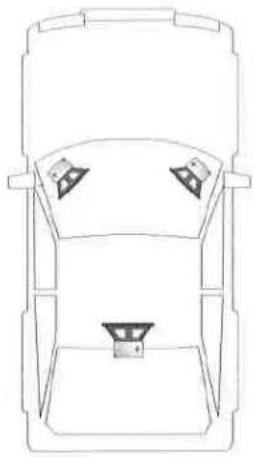
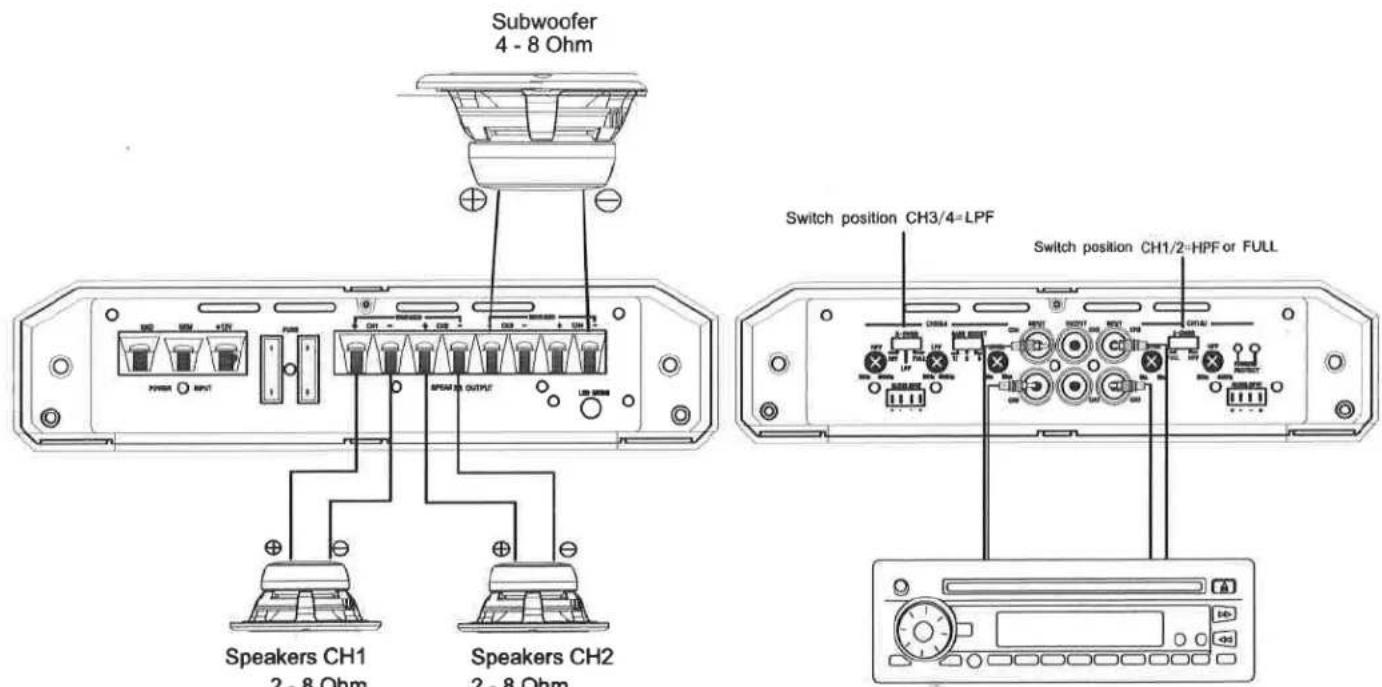
3-Channel-Mode: 2 Speakers/Stereo & 1 Subwoofer / Mono bridged
natural_image
Top-down line drawing of a car's front and rear views showing dashboard, seat, and speaker (no text or symbols)Cable connection
- Connect the INPUT of the amplifier to the head unit line output with good quality RCA cables. By connecting the RCA jacks OUTPUT with a additional amplifier, a full range signal will be provided to the amplifier.
- Connect the speakers with the terminal block (CH1 +/- & CH2 +/- SPEAKER OUTPUT and the subwoofer with CH3/4 + BRIDGED - SPEAKER OUTPUT) of the amplifier.
• The minimum final speaker impedance must not be below 2 Ohm per channel and 4 Ohm (Subwoofer) per channelpair. Too low speaker loads result in too high heat dissipation and may cause the amplifier run into protection. - Please observe speaker channel and polarity as printed by the speaker terminal block. Incorrect phasing of the speakers results in total loss of bass response.
Caution
Please avoid to connect speaker (-) to the ground or vehicle chassis.
BASS BOOST - Control (Subwoofer on CH3/4)
• The BASS BOOST - Control adjusts the bass level at 45 Hz from 0dB up to 12dB. Caution! Please use the Bass-Boost carefully.
Functions & Controls
T1.4000DL
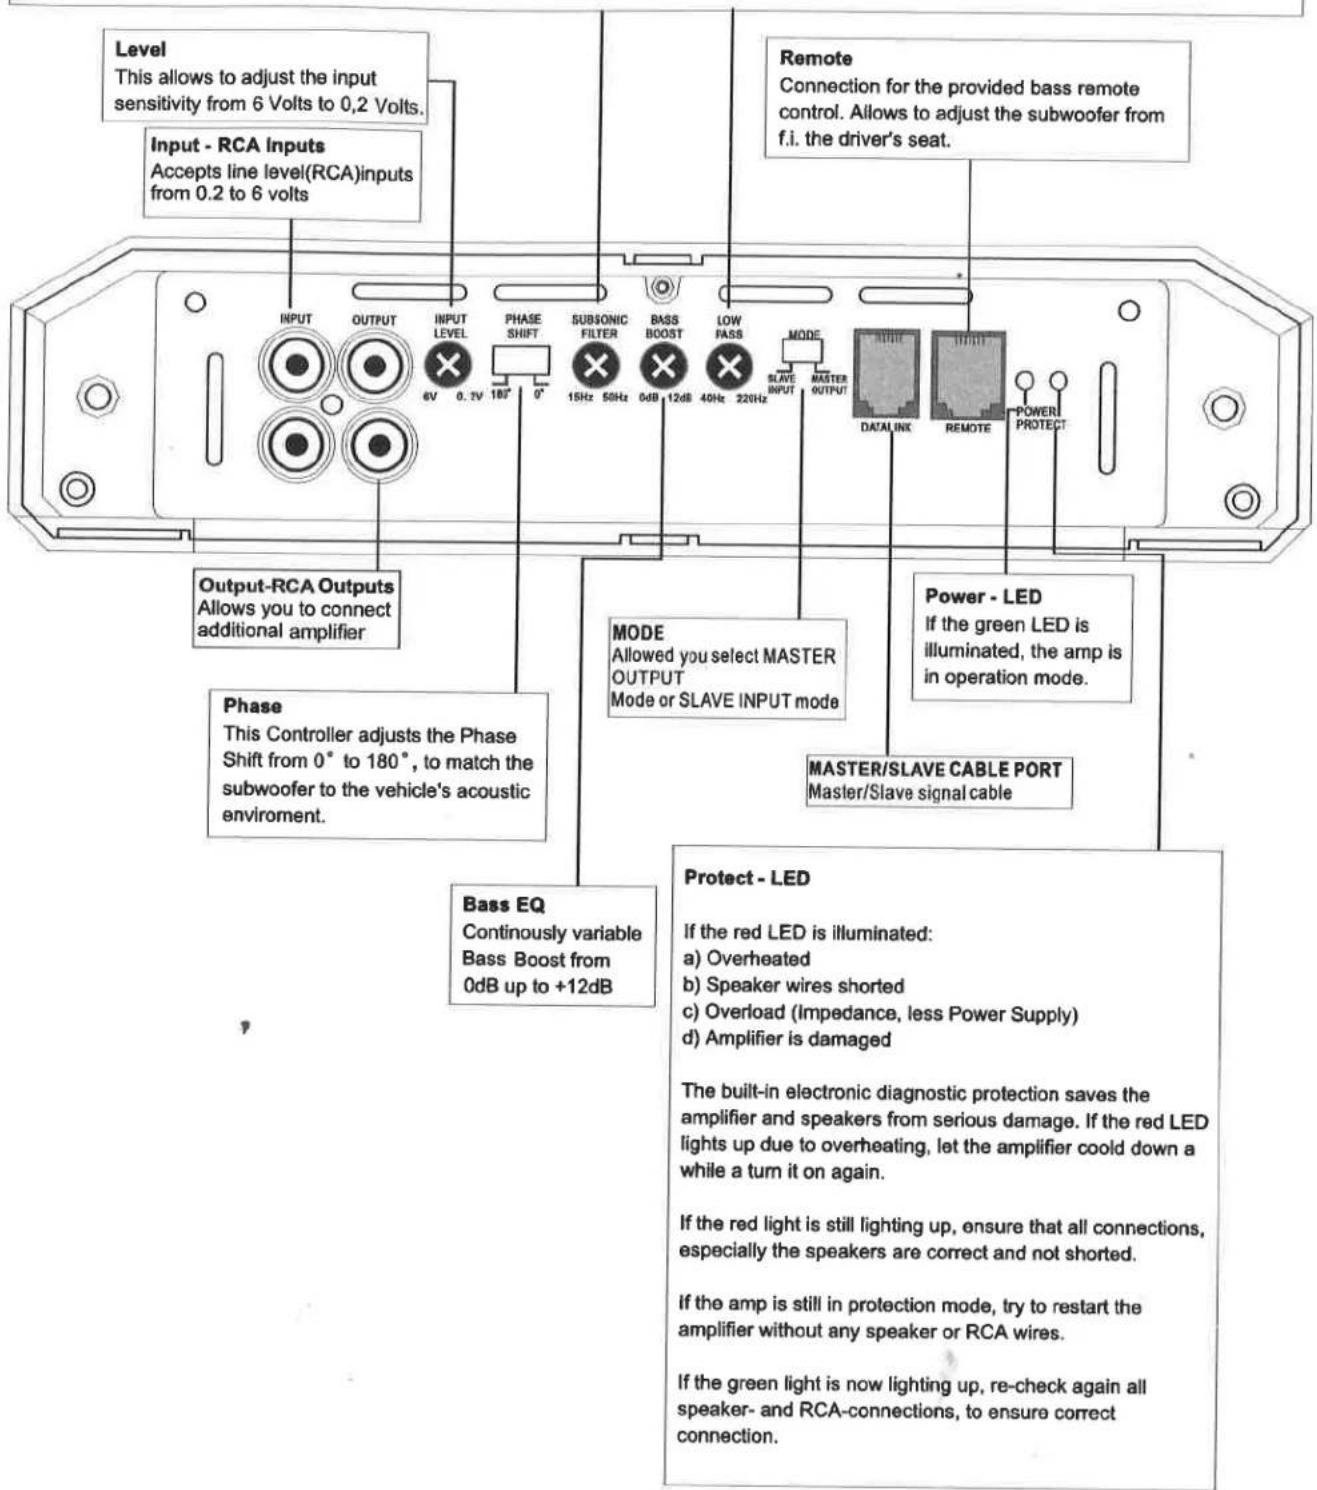
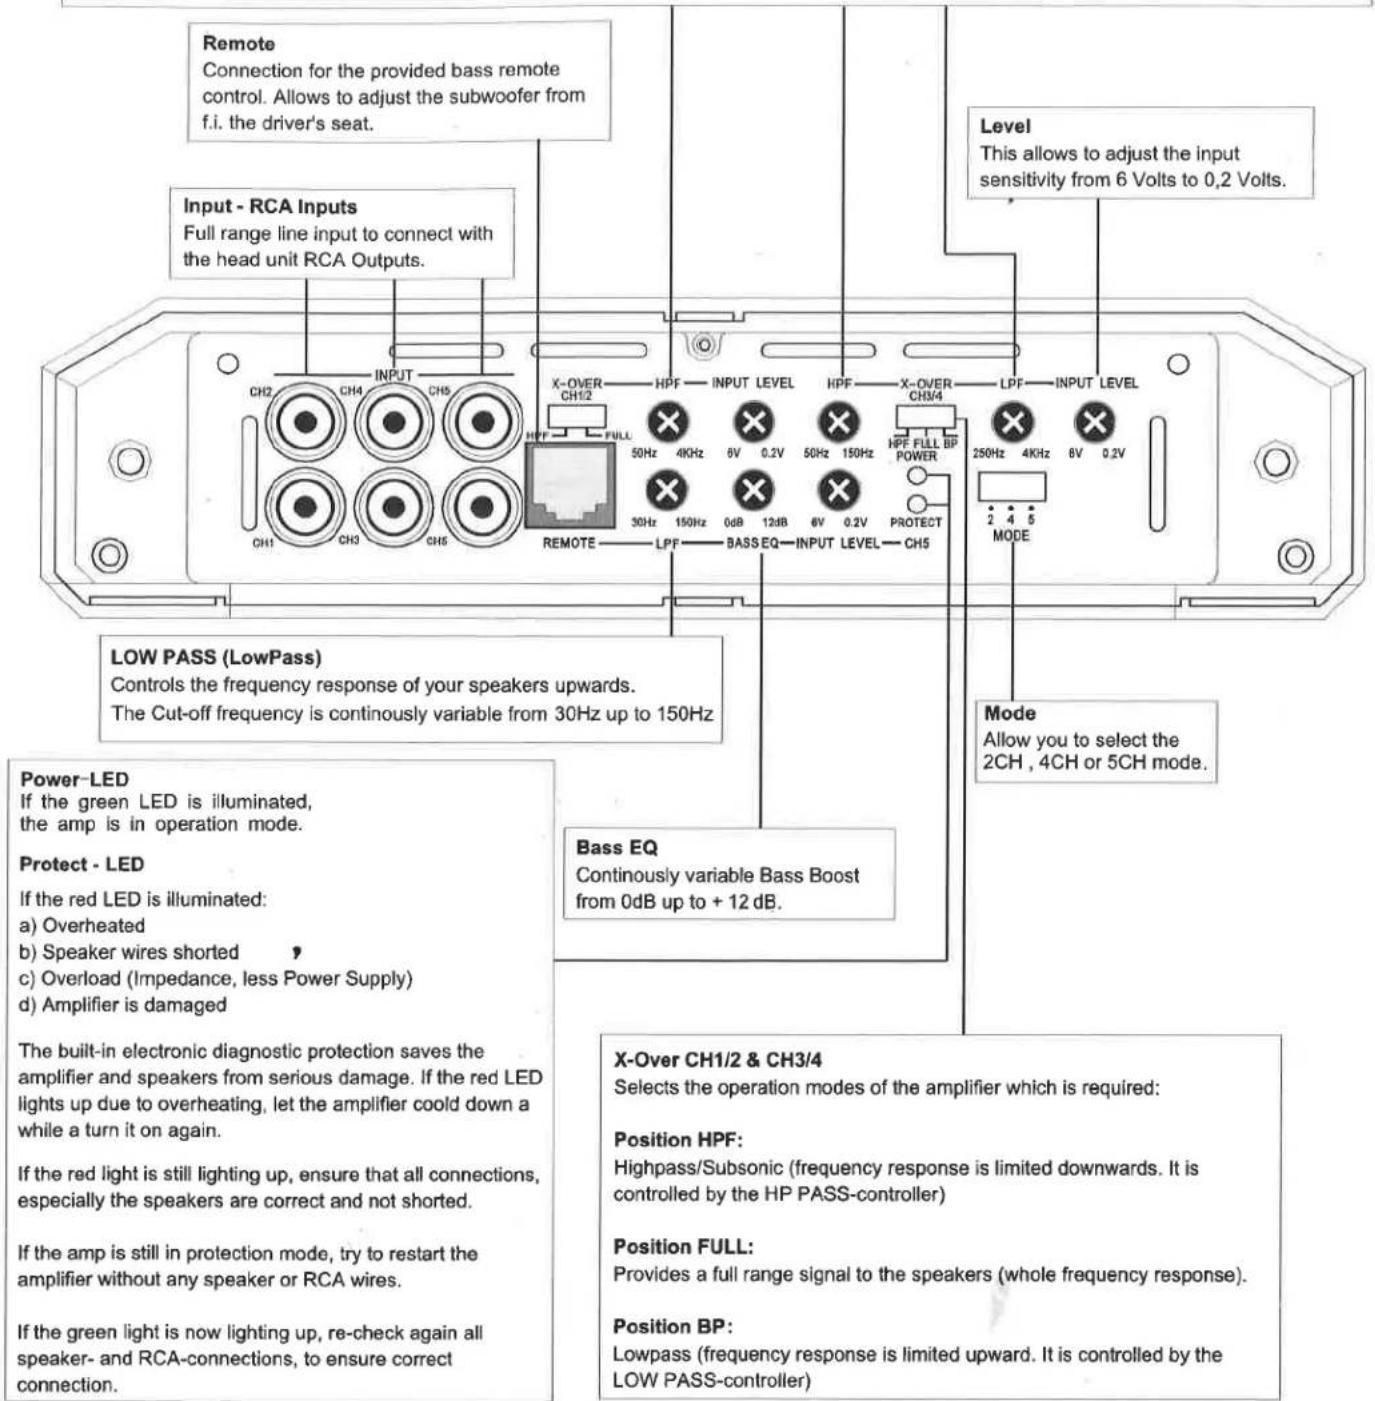
Low Pass
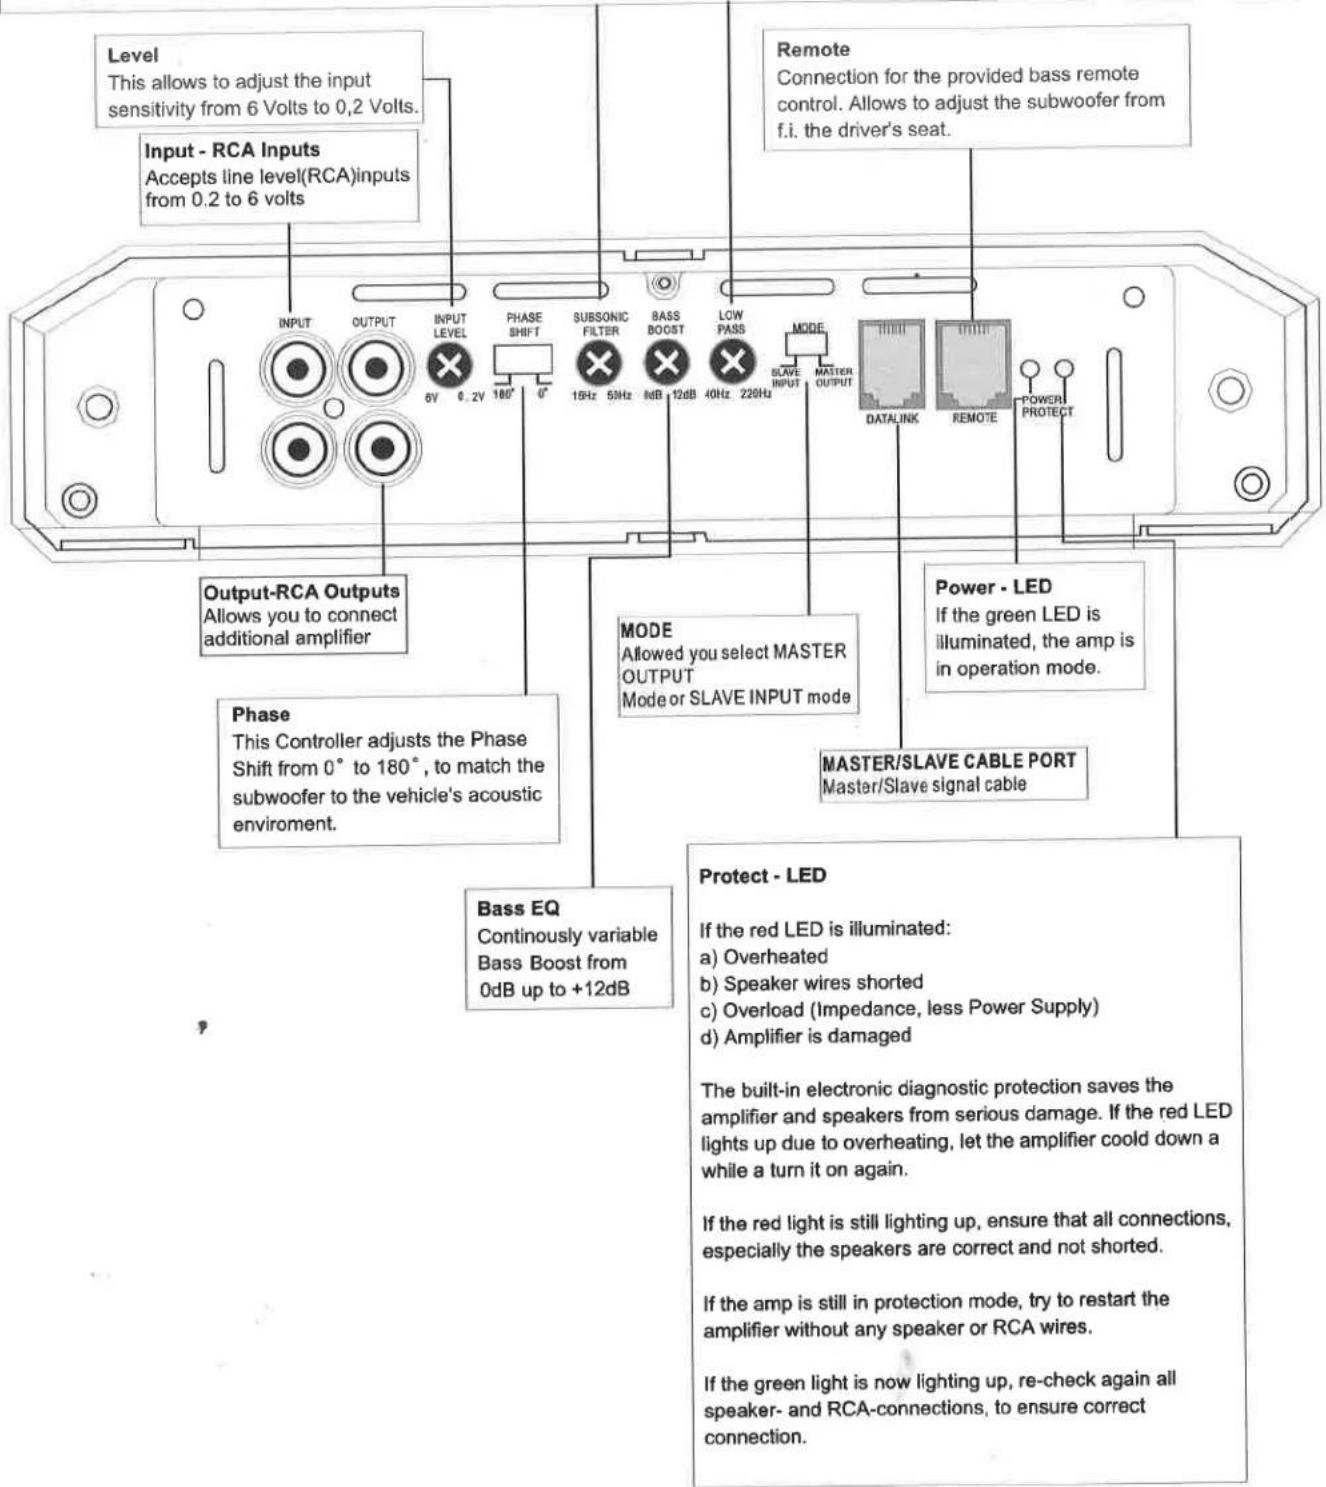
This Controller adjusts the frequency response of your subwoofer upwards and is continuously variable from 40Hz to 220Hz
Sub Sonic
This Controller eliminates the lowest frequencies to protect the subwoofer from damages. These low frequencies can cause damages. The frequency is adjustable from 15Hz to 50Hz
Speaker & RCA Connections
T1.4000DL
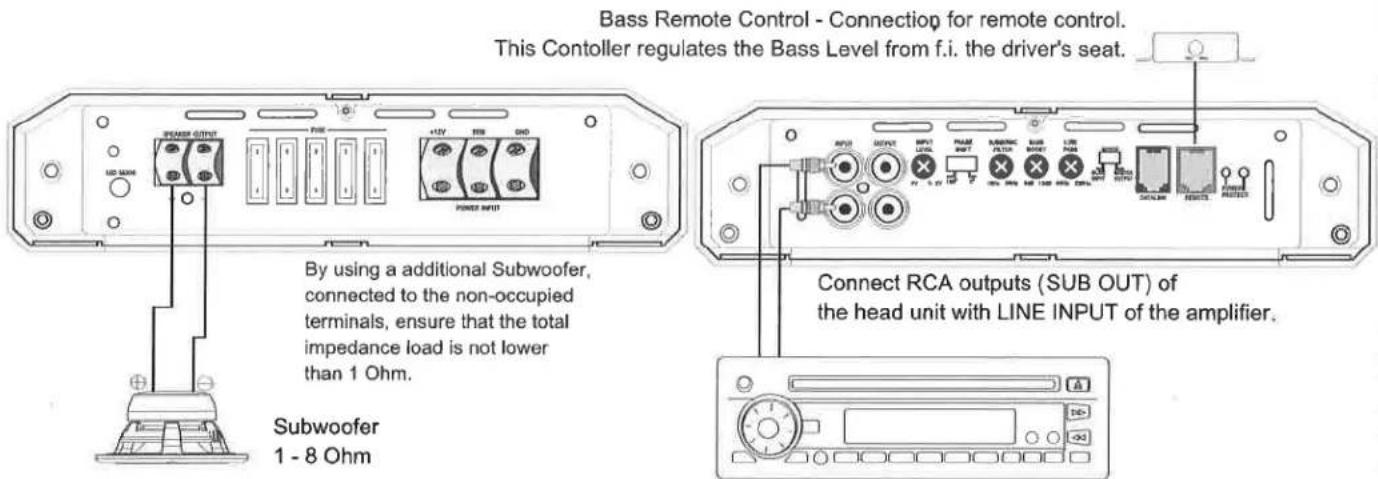
RCA & Speaker wiring:
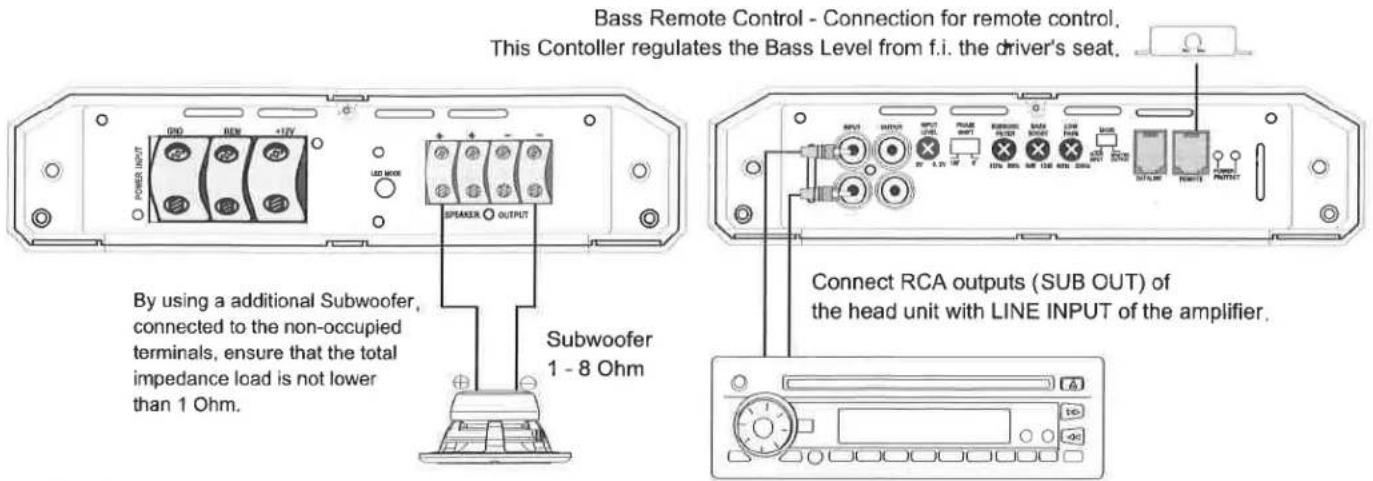
- Connect the LINE INPUT of the amplifier to the head unit line output with appropriate good quality RCA cables. As optional feature the Balanced Inputs can be used. But therefor an signal transmitter with specific wires is required. Ask your specialist dealer for the required equipment.
Connect the subwoofer with appropriate wires to the terminal block (SPEAKER OUTPUT + and -) of the amplifier. As optional feature a additional Subwoofer can be connected to the non-occupied terminals. - The minimum final subwoofer impedance must not be lower than 1 Ohms in total. Too low speaker loads result in too high heat dissipation and may cause the amplifier run into protection.
- Please observe correct speaker channels and polarity as printed by the speaker terminal
Caution!
Do not connect speaker (-) to the ground or vehicle's chassis.
Low Pass
- This eliminates the higher frequencies. Set the crossover-frequency between 40Hz-220Hz, depending on the size of the installed subwoofer.
Sub Sonic
- This eliminates the lowest frequencies and protects the speakers from damage. Set the frequency between 15Hz-50Hz, depending on the size of the installed subwoofer.
Phase
- This Controller allows to adjust the Phase Shift 0^ to 180^ , to match the subwoofer to the vehicle's acoustic environment.
Input Level
- Turn the LEVEL control of the amplifier to 6V position.
- Turn the head unit volume control to about 80 - 90% of its full setting.
- Turn the LEVEL control clockwise until you hear some distortion.
- Then turn back the LEVEL control slightly until you can hear a clean sound.
Bass EQ
• This Controller regulates the Bass Boost from 0 - 12dB.
Caution! Please use the Bass-EQ carefully. The additional boost may result in clipping or overload.
Bass Remote
• The provided Bass Remote regulates the Bass Level from f.i. the driver's seat.
Speaker & RCA Connections
T1.4000DL
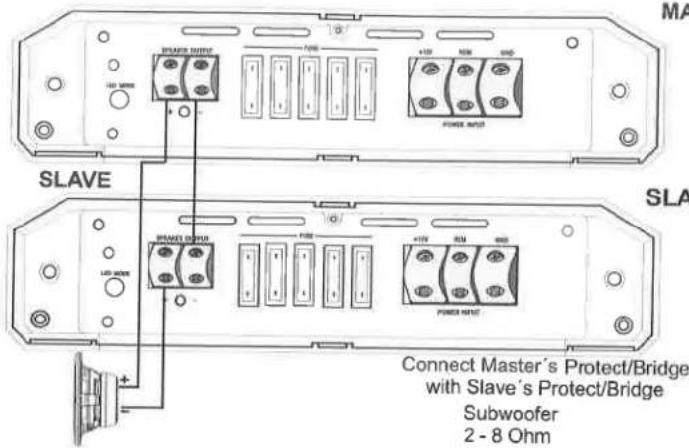
MASTER/SLAVE-MODE / Subwoofer-Mode with two Amplifiers
- Connect the "LINE IN" (L & R) of the MASTER-amplifier to the head unit's line output with appropriate good quality RCA cables.
- Connect the "SLAVE OUT" RCA Output of the MASTER-Amp with the "LINE IN" RCA Input of the SLAVE-AMP.
- Connect the "REMOTE"-Terminal of the MASTER-Amp with the supplied BASS REMOTE.
- Connect the "REMOTE"-Wire of your head unit with the REM-Terminals of both Amplifiers.
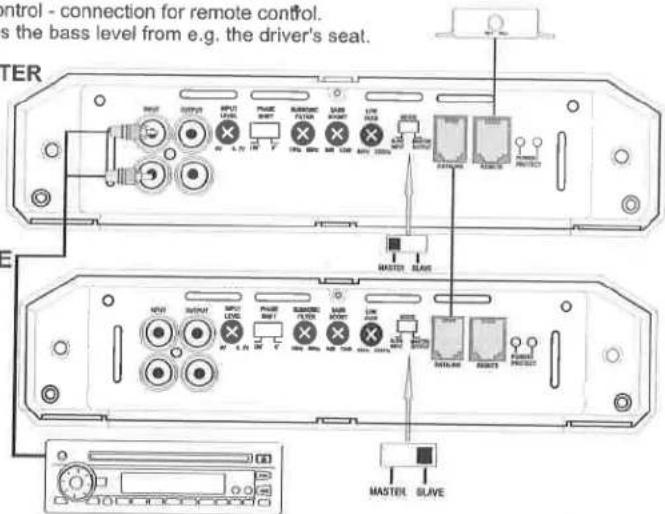
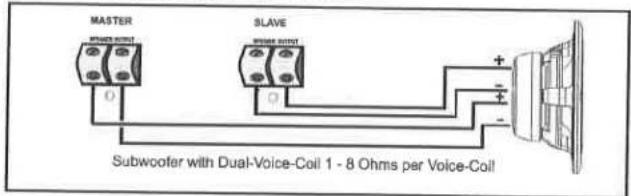
- Connect the subwoofer with appropriate wires to the terminal block (SPEAKER OUTPUT + and -) of both amplifiers. As optional feature an additional Subwoofer can be connected to the non-occupied terminals.
- Connect the Protect/Bridge Connection of the Master with the Protect/Bridge Connection of the Slave.
This connection warrants if there is an operation fault both amps, Master and Slave, would go into protection mode so the amps are prevented for any possible damages.
• The minimum final subwoofer impedance must not be lower than 2 Ohms in total (1 Ohm for each Amplifier) or 2 Ohms bridged. Too low speaker loads result in too high heat dissipation and may cause the amplifier run into protection. - Please observe correct speaker channels and polarity as printed by the speaker terminal.
Caution!
Do not connect speaker (-) to the ground or vehicle's chassis.
MASTER
Bass Remote Control - connection for remote control.
This controller regulates the bass level from e.g. the driver's seat.
MASTER
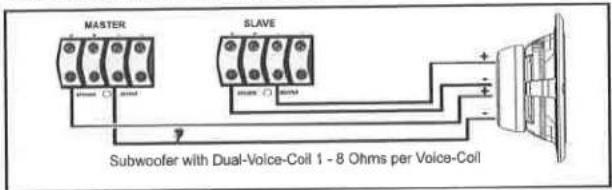
Subwoofer with Dual-Voice-Coil
2 Subwoofers with Single-Voice-Coil
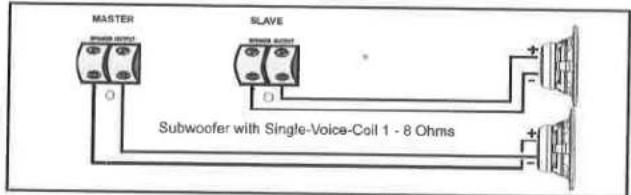
Caution: Please observe the right polarity. Slave's - to Loudspeaker's + and Slave's + to Loudspeaker's -.
Functions & Controls
T1.6000DL
Low Pass
This Controller adjusts the frequency response of your subwoofer upwards and is continuously variable from 40Hz to 220Hz
Sub Sonic
This Controller eliminates the lowest frequencies to protect the subwoofer from damages. These low frequencies can cause damages. The frequency is adjustable from 15Hz to 50Hz
Speaker & RCA Connections
T1.6000DL
RCA & Speaker wiring:
- Connect the LINE INPUT of the amplifier to the head unit line output with appropriate good quality RCA cables. As optional feature the Balanced Inputs can be used. But therefor an signal transmitter with specific wires is required. Ask your specialist dealer for the required equipment.
Connect the subwoofer with appropriate wires to the terminal block (SPEAKER OUTPUT + and -) of the amplifier. As optional feature a additional Subwoofer can be connected to the non-occupied terminals. - The minimum final subwoofer impedance must not be lower than 1 Ohms in total. Too low speaker loads result in too high heat dissipation and may cause the amplifier run into protection.
- Please observe correct speaker channels and polarity as printed by the speaker terminal
Caution!
Do not connect speaker (-) to the ground or vehicle's chassis.
Low Pass
- This eliminates the higher frequencies. Set the crossover-frequency between 40Hz-220Hz, depending on the size of the installed subwoofer.
Sub Sonic
- This eliminates the lowest frequencies and protects the speakers from damage. Set the frequency between 15Hz-50Hz, depending on the size of the installed subwoofer.
Phase
- This Controller allows to adjust the Phase Shift 0^ to 180^ , to match the subwoofer to the vehicle's acoustic environment.
?
Input Level
- Turn the LEVEL control of the amplifier to 6V position.
- Turn the head unit volume control to about 80 - 90% of its full setting.
- Turn the LEVEL control clockwise until you hear some distortion.
- Then turn back the LEVEL control slightly until you can hear a clean sound.
Bass EQ
• This Controller regulates the Bass Boost from 0 - 12dB.
Caution! Please use the Bass-EQ carefully. The additional boost may result in clipping or overload.
Bass Remote
• The provided Bass Remote regulates the Bass Level from f.i. the driver's seat.
Speaker & RCA Connections
T1.6000DL
MASTER/SLAVE-MODE / Subwoofer-Mode with two Amplifiers
- Connect the "LINE IN" (L & R) of the MASTER-amplifier to the head unit's line output with appropriate good quality RCA cables.
- Connect the "SLAVE OUT" RCA Output of the MASTER-Amp with the "LINE IN" RCA Input of the SLAVE-AMP.
- Connect the "REMOTE"-Terminal of the MASTER-Amp with the supplied BASS REMOTE.
- Connect the "REMOTE"-Wire of your head unit with the REM-Terminals of both Amplifiers.
- Connect the subwoofer with appropriate wires to the terminal block (SPEAKER OUTPUT+ and -) of both amplifiers. As optional feature an additional Subwoofer can be connected to the non-occupied terminals.
- Connect the Protect/Bridge Connection of the Master with the Protect/Bridge Connection of the Slave.
This connection warrants if there is an operation fault both amps, Master and Slave, would go into protection mode so the amps are prevented for any possible damages. - The minimum final subwoofer impedance must not be lower than 2 Ohms in total (1 Ohm for each Amplifier) or 2 Ohms bridged. Too low speaker loads result in too high heat dissipation and may cause the amplifier run into protection.
- Please observe correct speaker channels and polarity as printed by the speaker terminal.
Caution!
Do not connect speaker (-) to the ground or vehicle's chassis.
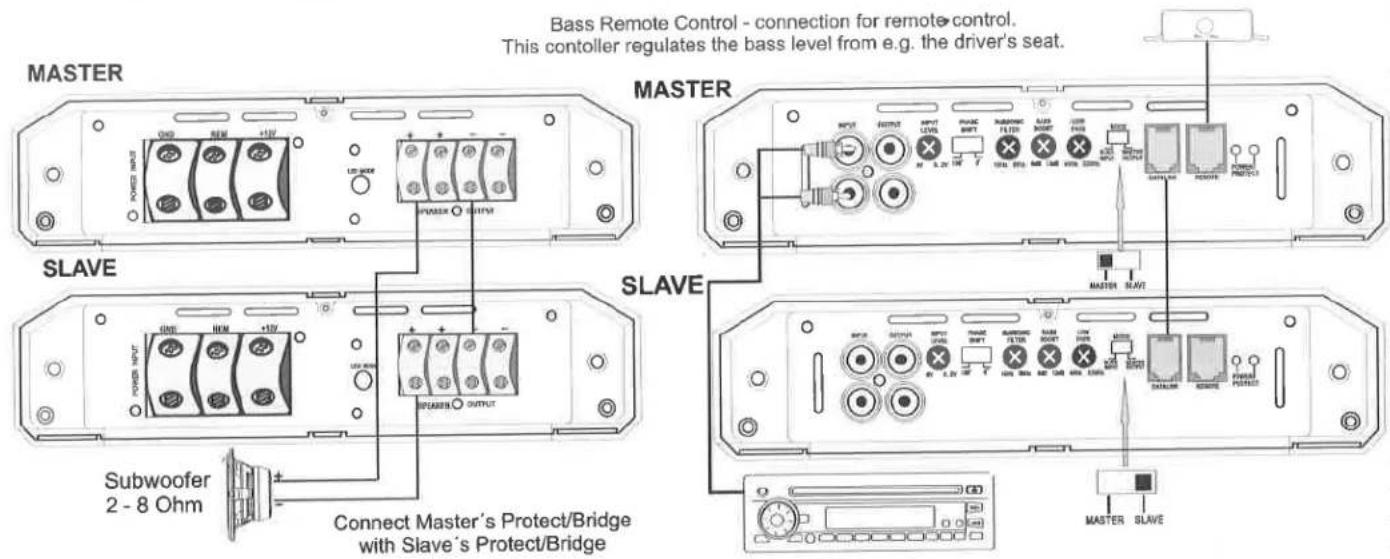
Bass Remote Control - connection for remote control.
This controller regulates the bass level from e.g. the driver's seat.
Subwoofer with Dual-Voice-Coil
2 Subwoofers with Single-Voice-Coil
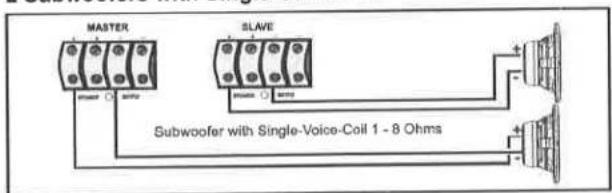
Caution: Please observe the right polarity. Slave's - to Loudspeaker's + and Slave's + to Loudspeaker's -.
Functions & Controls
T5.2500DL
HP PASS (HighPass) CH1/2
Controls the frequency response of your speakers downwards. The Cut-off frequency is continuously variable from 50Hz up to 4KHz
HP PASS (HighPass) CH3/4
Controls the frequency response of your speakers downwards. The Cut-off frequency is continuously variable from 50Hz up to 150Hz
LOW PASS CH3/4
Controls the frequency response of your speakers upwards. The Cut-off frequency is continuously variable from 250Hz up to 4kHz
Speaker & RCA Connections
T5.2500DL
INTERCONNECTION EXAMPLE 5-Channel Mode: 5x Stereo System (Front or rear)
RCA & Speaker wiring:
- Connect the RCA lineouts of the headunit with the RCA jacks LINE INPUT of the amplifier with appropriate high-value RCA cables.
- Connect the front or rear speakers with the speaker outputs (CH1+/- und CH2+/- SPEAKER), (CH3+/- und CH4+/- SPEAKER) and (CH5+/- SPEAKER) by using appropriate wires.
- Ensure by any means, that the total impedance load of all speakers is not lower than 2 ohms. Too low impedance cause high temperature and will shut down the amplifier operation.
• Always ensure the correct polarity of the speakers. The interchange of plus and minus cause total loss of bass playback and could damage the speakers.
Caution! Do not connect speaker (-) to the ground or vehicle's chassis.
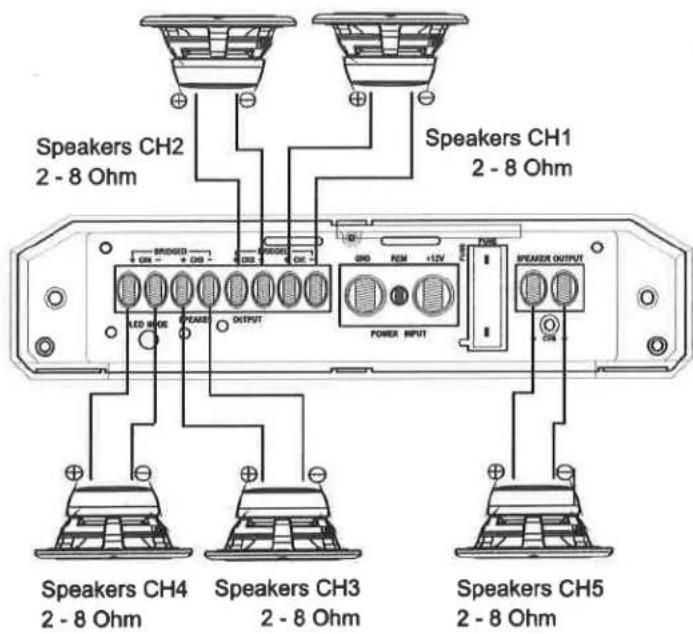
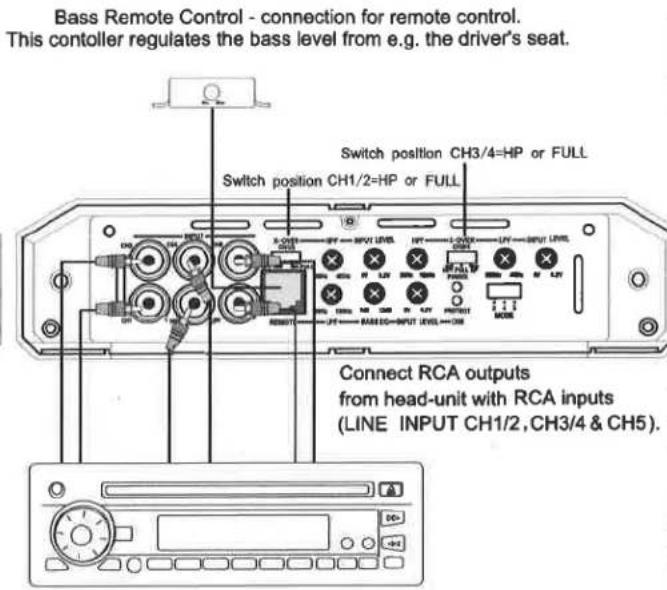
- By using bigger speakers (more than 20cm) you can set the X-OVER switch to the FULL position (Full Range Signal).
- By using smaller speakers (8.7cm - 16cm) you must set the X-OVER switch to the HPF Position (Highpass Mode) to avoid any damage by lower frequencies on the speakers. The cut-off frequency is adjustable with the HIGH PASS controller and should be set between 50Hz to 4kHz(CH1/2) and 50Hz to 150Hz(CH3/4), depending on the size of the speakers.
- The LOW PASS Controller is not in use in this interconnecting example.
LEVEL CONTROLLER
- Turn the LEVEL controller of the amplifier to the 6V position.
- Turn the volume controller of the headunit to 80 - 90% of its full setting.
- Turn the LEVEL controller clockwise until you hear some distortion.
- Then turn back the LEVEL controller slightly until you hear a cleaner sound.
BASS BOOST CONTROLLER
- The BASS BOOST controller must be turned to 0 dB position in this interconnecting example.
Speaker & RCA Connections
T5.2500DL
INTERCONNECTION EXAMPLE 5-Channel Mode: 4 x Stereo System (Front or rear)
RCA & Speaker wiring:
- Connect the RCA lineouts of the headunit with the RCA jacks LINE INPUT of the amplifier with appropriate high-value RCA cables.
- Connect the front or rear speakers with the speaker outputs (CH1 +/- and CH2 +/- SPEAKER) and (CH3 +/- und CH4 +/- SPEAKER) by using appropriate wires.
- Ensure by any means, that the total impedance load of all speakers is not lower than 2 ohms. Too low impedance cause high temperature and will shut down the amplifier operation.
• Always ensure the correct polarity of the speakers. The interchange of plus and minus cause total loss of bass playback and could damage the speakers.
Caution!
Do not connect speaker (-) to the ground or vehicle's chassis.
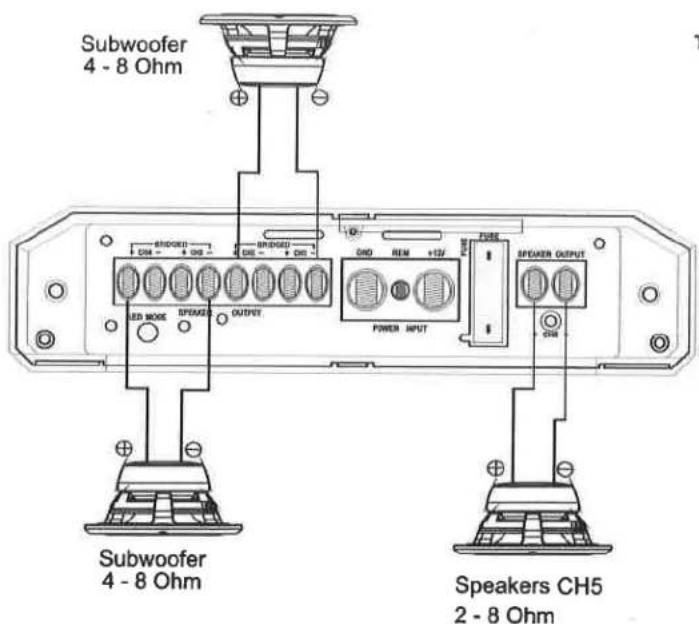
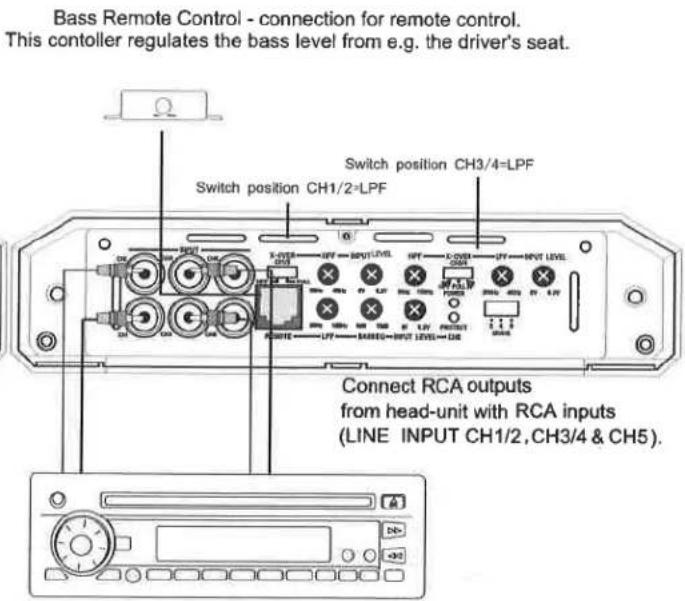
- By using bigger speakers (more than 20cm) you can set the X-OVER switch to the FULL position (Full Range Signal).
- By using smaller speakers (8.7cm - 16cm) you must set the X-OVER switch to the HPF Position (Highpass Mode) to avoid any damage by lower frequencies on the speakers. The cut-off frequency is adjustable with the HIGH PASS controller and should be set between 50Hz to 4kHz(CH1/2) and 50Hz to 150Hz(CH3/4), depending on the size of the speakers.
- The LOW PASS Controller is not in use in this interconnecting example.
LEVEL CONTROLLER
- Tum the LEVEL controller of the amplifier to the 6V position.
- Turn the volume controller of the headunit to 80 - 90% of its full setting.
- Turn the LEVEL controller clockwise until you hear some distortion.
- Then turn back the LEVEL controller slightly until you hear a cleaner sound.
BASS BOOST CONTROLLER
- The BASS BOOST controller must be turned to 0 dB position in this interconnecting example.
Troubleshooting
System does not turn on
- Check all fuses.
- Check all connections.
- Measure the +12 volt and remote turn on voltages at the amplifier terminals. If these are non existent or low, take voltage measurements at fuse holders, distribution blocks, the head unit's +12 volt and remote leads to localize the problem.
Noise problems
- Check the speaker wiring
2.Speakers are damaged
No Signal at all Channels
- Set Balance and Fader from head unit on Zero-Position
- Check wiring (Amplifier, Speakers)
- Speakers are damaged
- Subsonic Filter is adjusted too high or Lowpass Filter is adjusted too low
Hiss or white noise
- Speakers are overload
- High levels of white noise usually occurs when amplifier level controls are turned up too high - readjust according to the procedures in section "Setting up systems after installation for best performance"
- Another problem that can cause excessive hiss, is a noisy head unit - unplug the amplifier input RCA cables, and if the hiss level reduces, the source unit is at fault.
No Stereo-Sound or Low Output
- Check speaker wiring (- and +)
Amplifier Protection-Mode (red LED is illuminated)
- Speaker cables are shorted
- Inadequate cooling - relocate or remount to provide better natural airflow over the fins.
Driving high power levels into low impedances - back off on the volume control, and/or make sure you are not loading the amplifier with less than the recommended loudspeaker impedance.
- Make sure that the battery voltage, as measured at the amplifier's +12 volt and ground terminals, is 11 volts or more.
Electrical interference
The inside of an automobile is a very hostile electrical environment. The multitude of electrical systems, such as the ignition system, alternator, fuel pumps, air conditioners to mention just a few, create radiated electrical fields, as well as noise on the +12 volt supply and ground. Remember to isolate the problem - first unplug amplifier input RCAcables, if the noise is still present, check the speaker leads, if not, plug the RCA's back, and investigate the source driving the amplifier, one component at a time.
A ticking or whine that changes with engine RPM:
- This problem could be caused by radiation pickup of RCA cables too near to a fuel pump or a distributor, for instance, - relocate cables.
- Check that the head unit ground is connected straight to the vehicle chassis, and does not use factory wiring for ground.
- Try to supply the head unit with a clean +12 volt supply directly from the battery +, instead of using a supply from the in dash wiring/fusebox. This type of noise can be more difficult to pinpoint, but is usually caused by some kind of instability, causing oscillations in the system.
7
A constant whine:
- Check all connections, especially for good grounds.
- Make sure that no speaker leads are shorting to exposed metal on the vehicle chassis.
- RCA cables are notorious for their problematic nature, so check that these are good, in particular the shield connections.
Caution!
In this amplifier are integrated protection circuits. Short Circuit Protection engaged: The amplifier will turn off and try to come back on immediately. The amplifier will cycle like this indefinitely, with "blips" of sound each time. If this is the case, check your speakers and wiring for low impedance and short circuits. Thermal Protection engaged: The amplifier will turn off and several minutes later will come back on. In this case, ensure that there is nothing blocking the normal convective airflow of the amplifier. No obstruction should be within 2" of the amplifier on all sides. NOTE: Low battery voltage will cause the amplifier to run warmer and possibly damage the amplifier. If the red LED still lighting up after all re-checking, the amplifier is damaged. Please send then a detailed malfunction description and a copy of the invoice of purchase together with the device to you car audio retailer.
Specifications
| T4.1500L | T1.4000DL | T1.6000DL | T5.2500DL | |
| Channels | 4 | 1 | 1 | 5 |
| Watts RMS into 4 Ohm | 4 x 120W | 1 x 700W | 1 x 800W | 4 x 75W+1 x 325W |
| Watts RMS into 2 Ohm | 4 x 180W | 1 x 1300W | 1 x 1400W | 4 x 125W+1 x 500W |
| Watts RMS into 1 Ohms | — | 1 x 2000W | 1 x 2500W | — |
| Watts RMS into 5 Ohms | — | 1 x 3000W | — | |
| Watts RMS into 4 Ohm mono bridged | 2 x 360W | — | — | 2 x 250W+1 x 750W(1ohm) |
| Frequency Response | 10Hz - 50KHz | 10Hz - 300Hz | 10Hz - 150Hz | 1CH-4CH 10Hz - 50KHz5CH 10Hz - 150Hz |
| Signal-to-Noise Ratio | >104 dB | >104 dB | >104 dB | >104 dB |
| THD&N | < 0,05 % | < 0,10 % | < 0,10 % | < 0,05 % |
| Input Sensitivity | 0,2-6 Volt | 0,2-6 Volt | 0,2-6 Volt | 0,2-6 Volt |
| Input Impedance | >47 kOhm | >47 kOhm | >47 kOhm | >47 kOhm |
| XOver CH1 & CH2 | ||||
| Variable High Pass | 50Hz - 400Hz | — | — | 50Hz - 4KHz |
| Variable Low Pass | — | 40Hz - 220Hz | 40Hz - 220Hz | — |
| Bass-Boost @ 45Hz | — | 0 - 12 dB | 0 - 12 dB | — |
| Variable Subsonic Filter | — | 15Hz - 50Hz | 15Hz - 50Hz | — |
| XOver CH3 & CH4 | ||||
| Variable High Pass | 50Hz - 400Hz | — | — | 50Hz - 150Hz |
| Variable Low Pass | 50Hz - 400Hz | — | — | 250Hz - 4KHz |
| Bass-Boost @ 45Hz | 0 -6- 12dB | — | — | — |
| XOver CH5 | ||||
| Variable High Pass | — | — | — | — |
| Variable Low Pass | — | — | — | 30Hz - 150Hz |
| Bass-Boost @ 45Hz | — | — | — | 0 - 12dB |
| Fuses | 2 x 40 A | 5 x 35 A | (External fuse) | 1 x 100 A |
| Dimensions in mm width x height | 231x54 | 231x54 | 231x54 | 231x54 |
| Dimensions in mm length | 403 | 442 | 500 | 421 |
All specifications are subject to chang
- OWNER'S MANUAL
- Table of Contents
- Installation
- 4-Channel Amplifiers T4.1500L
- 1-Channel Mono Bass Amplifier T1.4000DL
- 1-Channel Mono Bass Amplifier T1.6000DL
- 5-Channel Amplifiers T5.2500DL
- Installation Notes
- Installation of the amplifier
- Electrical Connection
- Ground (GND)
- Remote (REM)
- Battery Connection (+12V Power)
- Fuses
- Functions & Controls
- T4.1500L
- Protect - LED
- Speaker & RCA Connections
- 4-Channel-Mode: 2 Frontspeakers / Stereo & 2 Rearspeakers / Stereo
- Cable connection
- X-OVER - Switch & Control CH1/2 and CH3/4
- LEVEL INPUT - Control CH1/2 and CH3/4
- BASS BOOST CH1/2 and CH3/4
- 3-Channel-Mode: 2 Speakers/Stereo & 1 Subwoofer / Mono bridged
- Caution
- T1.4000DL
- Low Pass
- Sub Sonic
- RCA & Speaker wiring:
- Caution!
- Do not connect speaker (-) to the ground or vehicle's chassis.
- Phase
- Input Level
- Bass EQ
- Bass Remote
- MASTER/SLAVE-MODE / Subwoofer-Mode with two Amplifiers
- T1.6000DL
- T5.2500DL
- HP PASS (HighPass) CH1/2
- HP PASS (HighPass) CH3/4
- LOW PASS CH3/4
- INTERCONNECTION EXAMPLE 5-Channel Mode: 5x Stereo System (Front or rear)
- Caution! Do not connect speaker (-) to the ground or vehicle's chassis.
- LEVEL CONTROLLER
- BASS BOOST CONTROLLER
- INTERCONNECTION EXAMPLE 5-Channel Mode: 4 x Stereo System (Front or rear)
- Troubleshooting
- System does not turn on
- Noise problems
- No Signal at all Channels
- Hiss or white noise
- No Stereo-Sound or Low Output
- Amplifier Protection-Mode (red LED is illuminated)
- Electrical interference
- A ticking or whine that changes with engine RPM:
- A constant whine:
Brand : Soundstream
Model : T1.4000DL
Category : Audio Receiver