
AXGMLN-09 - Automotive Data Interface Axxess - Free user manual and instructions
Find the device manual for free AXGMLN-09 Axxess in PDF.


| Brand | AXESS |
| Model | AXGMLN-09 |
| Product Type | Electronic Device |
| Dimensions | Approx. 10 x 6 x 2 cm |
| Weight | Approx. 150 g |
| Power Source | USB 5V, 500mA |
| Battery | Rechargeable lithium-ion, 3.7V, 1000mAh |
| Operating Temperature | 0°C to 40°C (32°F to 104°F) |
| Storage Temperature | -10°C to 60°C (14°F to 140°F) |
| Connectivity | Bluetooth 5.0 |
| Functions | Music playback, hands-free calling, voice assistant support |
| Controls | Power button, volume +/- , play/pause, multifunction button |
| Indicators | LED for power and pairing status |
| Material | Plastic and silicone |
| Water Resistance | IPX4 (splash proof) |
| Included Accessories | USB charging cable, user manual |
| Maintenance | Clean with a dry cloth; avoid liquid contact |
| Safety | Do not disassemble or expose to high temperatures |
| Spare Parts | Available from AXESS customer service |
| Certifications | CE, RoHS |
Frequently Asked Questions - AXGMLN-09 Axxess
User questions about AXGMLN-09 Axxess
0 question about this device. Answer the ones you know or ask your own.
Ask a new question about this device
Download the instructions for your Automotive Data Interface in PDF format for free! Find your manual AXGMLN-09 - Axxess and take your electronic device back in hand. On this page are published all the documents necessary for the use of your device. AXGMLN-09 by Axxess.
USER MANUAL AXGMLN-09 Axxess
APPLICATIONS
CHEVROLET
Colorado (1) 2015-2018
Corvette* 2014-2019
Equinox (1)....2018
Impala* 2014-2018
Malibu (2)....2016-2018
- Designed for non-amplified models
- Provides accessory power (12-volt 10-amp)
- Retains R.A.P. (retained accessory power)
- Provides NAV outputs (parking brake, reverse, speed sense)
- Retains OnStar®/OE Bluetooth
- Retains all warning chimes
Visit AxxessInterfaces.com for more detailed information about the product and up-to-date vehicle specific applications
- Adjustable volume for chimes and OnStar®
- Retains the AUX-IN jack
- Prewired AXSWC harness (AXSWC sold separately)
- Retains balance and fade
- Micro-B USB updatable
OPTIONAL ACCESSORIES (sold separately)
Extension Harness: AXEXH-GM09
Steering Wheel Control Interface: AXSWC
BOSE Retention interface: AXM50-GM1
(1) With RPO code I05 or I06 (2) With RPO code I03,
I05, or I06 (3) With Base model radio, RPO code IP1
The IOA/IOB code, if applicable, can be found in the
Service Parts Identification label.
Locations: Malibu: Rear Compartment Floor
Canyon/Colorado/Cruze/Equinox/Silverado/
Sierra: Glovebox
TABLE OF CONTENTS
Connections....2
AXSWC Connections....3
Installation 3
Programming......3
Adjustments......4
Troubleshooting....4
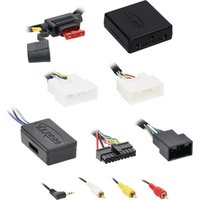
INTERFACE COMPONENTS
- AXGMLN-09 interface
- AXGMLN-09 harness
• 16-pin harness with stripped leads
TOOLS REQUIRED
- Crimping tool and connectors, or solder gun, solder, and heat shrink • Tape • Wire cutter
- Zip ties • Small flat-blade screwdriver
ATTENTION: With the key out of the ignition, disconnect the negative battery terminal before installing this product. Ensure that all installation connections, especially the air bag indicator lights, are plugged in before reconnecting the battery or cycling the ignition to test this product.
NOTE: Refer also to the instructions included with the aftermarket radio.
CONNECTIONS

AXSWC CONNECTIONS
12-pin AXSWC harness & 3.5mm jack:
The 12-pin AXSWC harness & 3.5mm jack are to be used with an AXSWC (sold separately) to retain steering wheel audio controls. If the AXSWC is not being used, disregard this harness and 3.5mm jack. If it is to be used, please refer to the AXSWC instructions for radio connections and programming. Disregard the harness that comes with the AXSWC.
- Connect the 4-foot long Green/Black wire to the Green/Black steering wheel control wire located in the steering column, at the top left. (Figure A)
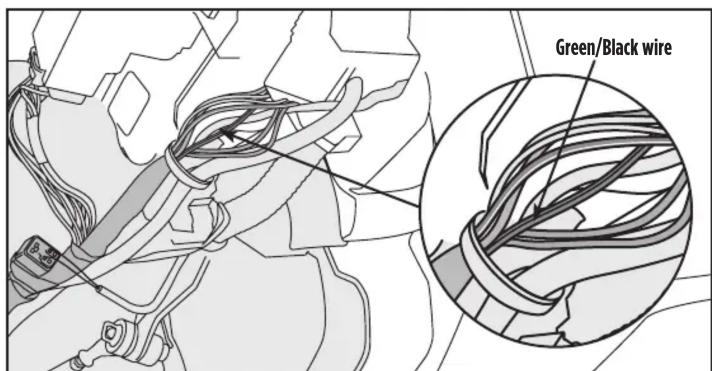
(Figure A)
INSTALLATION
With the key in the off position:
- Connect the 16-pin harness with stripped leads, and the AXGMLN-09 harness, into the AXGMLN-09 interface.
- If an AXSWC (sold separately) will be used, do not connect it until the AXGMLN-09 is programmed and fully functional.
- If an AXM50-GM1 (sold separately) will be used, REFER to AXM50-GM1 wiring/programming instructions.
Attention! Do not connect the AXGMLN-09 harness to the wiring harness in the vehicle yet
PROGRAMMING
For the steps below, the L.E.D. located inside the AXGMLN-09 interface can only be seen while active. The interface does not need to be opened to see the L.E.D.
- Start the vehicle.
- Connect the AXGMLN-09 harness to the wiring harness in the vehicle. The L.E.D. will initially be Green to indicate the interface is powered.
Note: For the Equinox and Malibu, use part number AXEXH-GM09 (sold separately) to extend the wiring harness to the right of the glovebox where the radio brain is located at. - After a few seconds the L.E.D. will turn on solid Red while the interface automatically programs to the vehicle. The radio will shut off at this point. This process should take 5 to 30 seconds.
- After the interface is programmed, the L.E.D. will turn on solid Green, and the radio will come back on, indicating programming was successful.
- Test all functions of the installation for proper operation, before reassembling the dash. Note: The vehicle must be running for the factory camera to power on.
- If the interface fails to function, refer to the Troubleshooting section.

AXGMLN-09
INSTALLATION INSTRUCTIONS

ADJUSTMENTS
Chime Level Adjustment
- With the vehicle on, turn it off and leave the key in the ignition. Open the driver's door; chimes will be heard.
2 Wait 10 seconds, and then with a small flat-blade screwdriver, turn the potentiometer clockwise to raise the chime level; counterclockwise to lower the chime level.
Note: The potentiometer is located on the side of the interface where the 16-pin harness with stripped leads is connected to. - When the chime level is at a desired level, remove the key from the ignition. This will lock the chime volume at its current level.
OnStar® Level Adjustment
- Press the OnStar ® button to activate it.
- While OnStar ® is speaking, press the VOLUME UP or VOLUME DOWN buttons on the steering wheel to raise or lower the OnStar ® level.
- If the vehicle does not come equipped with steering wheel controls, find the Black/Yellow wire on the AXGMLN-09 harness.
- While OnStar is speaking, tap the Black/Yellow wire to ground. Once the OnStar level is set, it will stay at that level until the Black/Yellow wire is tapped to ground again.
TROUBLESHOOTING
Resetting the AXGMLN-09 Interface
- The Blue reset button is located inside the interface, between the two connectors. The button is accessible outside the interface, no need to open the interface.
- Press and hold the reset button for two seconds, then let go to reset the interface.
- Refer to the Programming section from this point.
Having difficulties? We're here to help.
Contact our Tech Support line at:
386-257-1187

techsupport@metra-autosound.com
Tech Support Hours (Eastern Standard Time)
Monday - Friday: 9:00 AM - 7:00 PM
Saturday: 10:00 AM - 5:00 PM
Sunday: 10:00 AM - 4:00 PM

Metra recommends MECP certified technicians



- APPLICATIONS
- CHEVROLET
- OPTIONAL ACCESSORIES (SOLD SEPARATELY)
- TABLE OF CONTENTS
- INTERFACE COMPONENTS
- TOOLS REQUIRED
- AXSWC CONNECTIONS
- 12-PIN AXSWC HARNESS & 3.5MM JACK
- INSTALLATION
- WITH THE KEY IN THE OFF POSITION
- PROGRAMMING
- AXGMLN-09
- INSTALLATION INSTRUCTIONS
- ADJUSTMENTS
- CHIME LEVEL ADJUSTMENT
- ONSTAR® LEVEL ADJUSTMENT
- TROUBLESHOOTING
- RESETTING THE AXGMLN-09 INTERFACE
- TECH SUPPORT HOURS (EASTERN STANDARD TIME)
Brand : Axxess
Model : AXGMLN-09
Category : Automotive Data Interface