
SOOGM-19L - Interface Hub CRUX - Free user manual and instructions
Find the device manual for free SOOGM-19L CRUX in PDF.


| Product Type | Interface Hub |
| Brand | CRUX |
| Model | SOOGM-19L |
| Vehicle Compatibility | Select GM vehicles with 19-pin radio connector (Chevrolet, GMC, Buick, Cadillac) from 2006-2013 |
| Input Voltage | 12V DC (vehicle battery) |
| Dimensions (approx.) | 4.5 x 2.5 x 1.2 inches |
| Weight | 0.4 lbs |
| Key Functions | Retains chimes, OnStar, steering wheel controls, parking brake, reverse signal, and Bose amplifier integration |
| Installation Type | Plug-and-play, no programming required |
| Wiring Harness | 19-pin GM radio harness to aftermarket radio (ISO) |
| Adjustable Outputs | 12V accessory, illumination, reverse trigger |
| LED Indicator | Power and data activity status |
| Supported Radios | All aftermarket single-DIN and double-DIN radios with standard ISO connectors |
| Special Features | Retains factory Bluetooth, USB, and AUX input |
| Package Contents | Interface module, wiring harness, installation guide |
| Warranty | 1 year limited |
Frequently Asked Questions - SOOGM-19L CRUX
User questions about SOOGM-19L CRUX
0 question about this device. Answer the ones you know or ask your own.
Ask a new question about this device
Download the instructions for your Interface Hub in PDF format for free! Find your manual SOOGM-19L - CRUX and take your electronic device back in hand. On this page are published all the documents necessary for the use of your device. SOOGM-19L by CRUX.
USER MANUAL SOOGM-19L CRUX
- Retains factory features in select GM LAN V2 (LIN) Bus vehicles while functioning with an aftermarket radio.
- Retains OnStar functionality.
- Retains all chime functions.
- Retains OEM Auxiliary Input.
- Retains Factory Bluetooth in Vehicles 2008-upwards if equipped with the new OnStar device.
- Retains factory Steering Wheel Controls via built-in, preprogrammed interface.
- Retains RAP (Retained Accessory Power).
- Includes factory backup camera connection for the IO3 system. (vehicles with IO4, IO5 & IO6 systems can be hard wired to retain the OEM camera. See page 3)
PARTS INCLUDED:

natural_image
Four electronic components: a black rectangular device, bundled cables with various colored wires, and a black cable with connectors (no visible text or symbols)SOOGM-19L MODULE SOOGM-19L HARNESS SWC CABLE ANTENNA ADAPTER
INSTALLATION DIAGRAM:

flowchart
graph TD
    A["Antenna Adapter (Included)"] --> B["16-Pin Green Connector"]
    C["Reverse"] --> B
    D["Illumination (+)"] --> B
    E["+12V Constant"] --> B
    F["Ground"] --> B
    G["Entertainment Turn On"] --> B
    H["Parking Brake"] --> B
    I["Vehicle Speed Sense"] --> B
    J["Right Front (+)"] --> B
    K["Right Front (-)"] --> B
    L["Left Front (+)"] --> B
    M["Left Front (-)"] --> B
    N["Right Rear (+)"] --> B
    O["Right Rear (-)"] --> B
    P["Left Rear (+)"] --> B
    Q["Left Rear (-)"] --> B
    R["Audio Input"] --> S["AFTERMARKET RADIO"]
    T["Rear Camera (IO3)"] --> S
    U["TO FACTORY HARNESS"] --> V["20-Pin Gray Connector"]
    W["24-Pin Connector"] --> X["10-Pin Connector"]
    Y["VR Activation for OnStar (set DIP#1 to ON)"] --> Z["8-Pin Connector"]
    AA["NON BOSE"] --> Z
    AB["SWC DIP"] --> AC["Chime Volume Adjustment"]
    AD["LIN BUS (Green/Black)"] --> AE["4-Pin Connector"]
    AF["JVC/Kenwood (Blue / Yellow)"] --> AE
    AG["Cap or insulate if not being used"] --> AE
    AH["3.5MM SWC CABLE Plug in the 3.5MM SWC cable to the 4-pin port on the module. See "DIP SWITCH SETTINGS" section."] --> AE
AUDIO CONNECTION:
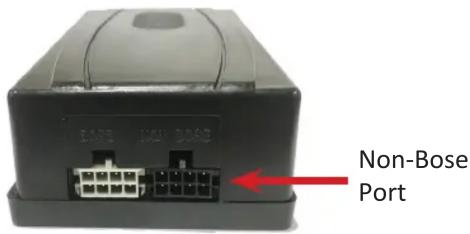
Plug in the 8-pin Molex connector of the SOOGM-19L harness to the Black, NON BOSE, port of the module.
BOSE AMPLIFIER BYPASS:
For vehicles equipped with a factory Bose amplifier, extend the speaker wires of the SOOGM-19L harness and connect to the Bose amplifier output wires. Locate the Bose amplifier to find out how much speaker wires is necessary. The Bose amplifier is located as follows: (NOTE: Bose amplifiers are commonly found in the locations listed below but the manufacturer can mount it elsewhere. Installer should verify the location before installation.)
Trucks = Center of the rear wall / SUVs = Center console or in the cargo space / Sedans = Rear deck or Trunk area
Pinout for the 8 and 16 pin OEM Bose amplifier connectors:

| Pin # | Wire Color | Description |
| 1 | Dark Blue / Grey | Subwoofer + |
| 2 | Yellow | Right Front Speaker + |
| 3 | Dark Blue | Left Front Speaker + |
| 4 | Red / Yellow | Constant +12V |
| 5 | Grey / Black | Subwoofer - |
| 6 | Yellow / Black | Right Front Speaker - |
| 7 | Brown / Dark Blue | Left Front Speaker - |
| 8 | Black | Ground |
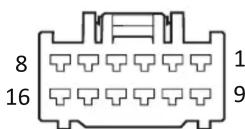
| Pin # | Wire Color | Description |
| 4 | Brown / Light Green | Right Front Tweeter + |
| 5 | Yellow / Dark Blue | Left Front Tweeter + |
| 6 | White | Right Rear Speaker + |
| 7 | Light Green | Left Rear Speaker + |
| 12 | Purple / Brown | Right Front Tweeter - |
| 13 | Yellow / Grey | Left Front Tweeter - |
| 14 | Dark Blue / Black | Right Rear Speaker - |
| 15 | Light Green / Black | Left Rear Speaker - |
CHIME VOLUME ADJUSTMENT:
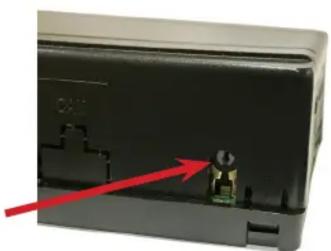
The SOOGM-19L has a potentiometer to adjust the chime volume. It is set at half way by default. To adjust the volume, simply use a suitable screw driver and turn the potentiometer clockwise to increase the volume and counter-clockwise to decrease the volume.
Chime Volume Adjustment
natural_image
Close-up of a black electronic device with a small green component and red arrow pointing to it (no visible text or symbols)ONSTAR VOLUME ADJUSTMENT:
To adjust the OnStar volume, turn on OnStar and adjust the volume using the SWC volume adjustment. There are 4 steps of volume control. Once it is set, the SOOGM-19L will memorize this level.
INSTALLATION INSTRUCTIONS:
- Connect the aftermarket radio's power/speaker harness to the SOOGM-19L T-Harness using the Installation Diagram on page 1. Use good quality crimp caps or butt splice for a secure connection. Solder and heat shrinking the connections is highly recommended.


natural_image
Interior view of a car dashboard with hands adjusting controls (no visible text or symbols)- Carefully remove the radio trim with a plastic pry tool and pull outward.

natural_image
Interior view of a car dashboard with a hand pointing to the screen (no visible text or symbols)- Remove the radio bezel by removing the 4 screws on the corners.
natural_image
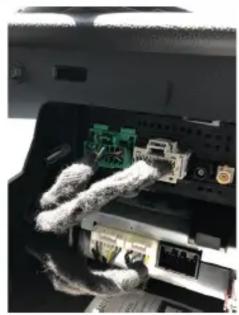
Close-up of a car's rear camera showing internal components including a green circuit board and attached electronic devices (no visible text or symbols)- Unplug the GREEN and GRAY connectors from the headunit.

natural_image
Close-up of a hand inserting a green USB into a device (no visible text or symbols)- Plug the GREEN and GRAY connectors to the SOOGM-19L T-Harness.

natural_image
Close-up of a hand holding a cable inserted into an electronic device (no visible text or symbols)-
Use the supplied antenna adapter to plug between the OE antenna connector and aftermarket radio antenna port.
-
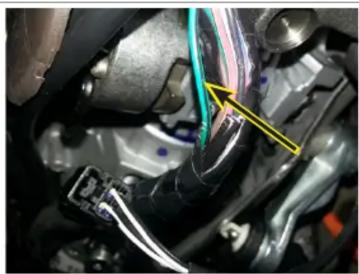
Remove plastic trim under the steering wheel column and locate a GREEN/BLACK wire in the bundle. Tap the GREEN/BLACK from the SWC Cable. We recommend soldering the wires together for a reliable connection.
natural_image
Close-up of mechanical components with a yellow arrow pointing to a component (no visible text or symbols)- Use a dash kit (not included) for a clean install. Test the radio for functionality. Test the chime and Retained Accessory Power (RAP) functions. Reverse the process to install the new aftermarket radio.
OEM CAMERA RETENTION:
The SOOGM-19L is prewired with an RCA connector to retain the OEM camera on vehicles with a IO3 system. To retain the OEM camera on IO4, IO5 and IO6 systems, you will need connect an RCA cable to the 12-pin connector on the HMI module found either by the passenger kick panel or behind the glove box. Connect the RCA as follows:
HMI Connector
PIN 5 = Gray/Yellow to RCA positive
PIN 6 = White/Blue to RCA shield
We recommend soldering and heat shrinking these wires for a secure connection.

natural_image
Close-up of a mechanical component with wires and connectors, no visible text or symbolsPin 6
White/Blue
Pin 5
Gray/Yellow
DIP SWITCH SETTINGS:
AFTERMARKET RADIO DIP SWITCH SETTINGS:
| RADIO BRAND: | DIP#: | 1 | 2 | 3 | 4 |
| Atoto, Dual, Fahrenheit, Jensen, Pioneer, Power Acoustik, Soundstream Blaupunkt, Most off-brand Radio Alpine Clarion Kenwood JVC Boss, Old Sony New Sony | OFF | OFF | ON | ON | |
| OFF | OFF | ON | ON | ||
| OFF | OFF | ON | ON | ||
| OFF | OFF | OFF | OFF | ||
| OFF | ON | ON | OFF | ||
| OFF | ON | ON | ON | ||
| OFF | ON | OFF | ON | ||
| OFF | ON | OFF | OFF | ||
| OFF | OFF | ON | OFF |
SWC MODULE
DIP SWITCH

1 2 3 4
NOTE: For Atoto, Blaupunkt, Dual, Farenheit, Power Acoustik, Soundstream, and most off-brand radios, check the aftermarket radio's manual to see if the SWC buttons need to be programmed.
3.5MM SWC CABLE
Plug in the 3.5MM to 4-Pin SWC cable to the SWC module.
NOTE: Cap or Insulate the 3.5mm plug and Blue/Yellow wire if not being used.
For aftermarket radios that have wires for SWC connections, cut off the 3.5mm plug on the Crux SWC Cable (option B) and connect the SWC wires as follows:

RED to SWC Key 1
WHITE to SWC Key 2
SHIELD to SWC Ground
Note that there are some radios that only have SWC1 and SWC2, in this case “shield” does not need to be connected.
VEHICLE APPLICATIONS:
BUICK
| 2017 | ENVISION |
| 2016 | LACROSSE |
| 2014-2015 | REGAL |
CADILLAC
| 2015-2016 | ATS |
| 2014-2015 | CTS |
| 2015 | ESCALADE |
| 2015-2016 | SRX |
| 2017 | XT5 |
CHEVROLET
| 2016-2018 | CAMARO (with 8" IO5/IO6) |
| 2018 | CAMARO (with 7" iOB) |
| 2015-2016 | COLORADO |
| 2016 - 2017 | CRUZE |
| 2018 | CRUZE (with 7" iOB) |
| 2014-2016 | IMPALA Non Classic (with 8" IO5/IO6) |
| 2017-2019 | IMPALA (with 8" IO5/IO6) |
| 2016 | MALIBU Non Classic |
| 2017-2018 | MALIBU |
| 2014-2017 | SILVERADO |
| 2018 | SILVERADO (with 7" iOB) |
| 2018 | SILVERADO (with 8" IO5/IO6) |
| 2019 | SILVERADO Classic (with 7" iOB) |
| 2019 | SILVERADO Classic (with 8" IO5/IO6) |
| 2015-2019 | SILVERADO HD |
| 2017 | SONIC |
| 2015, 2018 | SPARK |
| 2015-2019 | SUBURBAN |
| 2015-2019 | TAHOE |
GMC
| 2017 | ACADIA (with 8" IO5/IO6) |
| 2015-2016 | CANYON |
| 2014-2016 | SIERRA |
| 2017 | SIERRA (with 7" iOB) |
| 2017-2018 | SIERRA (with 8" IO5/IO6) |
| 2015-2017, 2019 | SIERRA HD |
| 2015-2019 | YUKON |
| 2015-2017, 2019 | YUKON XL |
NOTE:
- Does not retain Bose amplifier.
Brand : CRUX
Model : SOOGM-19L
Category : Interface Hub