
KAMESHWFI6A - Router Kogan - Free user manual and instructions
Find the device manual for free KAMESHWFI6A Kogan in PDF.


| Product Type | Wi-Fi 6 Mesh Router |
| Brand | Kogan |
| Model | KAMESHWFI6A |
| Dimensions (W x D x H) | 120 x 120 x 200 mm |
| Weight | 350 g |
| Power Supply | 12V DC, 1.5A |
| Wi-Fi Standards | IEEE 802.11a/b/g/n/ac/ax |
| Frequency Bands | 2.4 GHz and 5 GHz |
| Maximum Speed | Up to 1800 Mbps |
| Ethernet Ports | 1x Gigabit WAN, 2x Gigabit LAN |
| USB Port | 1x USB 2.0 |
| Antenna Type | Internal, 4×4 MU-MIMO |
| Mesh Support | Yes, Kogan Mesh System compatible |
| Security | WPA2-PSK, WPA3-SAE, SPI Firewall |
| Management | Web interface, Kogan Mesh App |
| Care and Cleaning | Wipe with a soft, dry cloth. Do not use liquids or aerosols. |
| Safety | Place in a well-ventilated area away from heat sources. Do not disassemble. |
| Spare Parts & Repairability | Contact Kogan support for power adapter replacement. |
| General Information | Supports IPv4/IPv6, QoS, Guest Network, Parental Controls. |
Frequently Asked Questions - KAMESHWFI6A Kogan
User questions about KAMESHWFI6A Kogan
0 question about this device. Answer the ones you know or ask your own.
Ask a new question about this device
Download the instructions for your Router in PDF format for free! Find your manual KAMESHWFI6A - Kogan and take your electronic device back in hand. On this page are published all the documents necessary for the use of your device. KAMESHWFI6A by Kogan.
USER MANUAL KAMESHWFI6A Kogan
natural_image
Two white cylindrical electronic devices with ports and indicator lights, shown from different angles (no visible text or symbols)AX1800 WHOLE-HOME MESH WI-FI 6 DUAL-BAND SYSTEM
(1 PACK)
KAMESHWF16A
Overview 4
Components 5
Installation 5
Getting Started 7
General Configuration 15
Advanced Settings 21
FAQ 41
Notes 42
OVERVIEW

1 Touch-link pad
2 DC power input
3 Power switch
4 Reset button
5 Pair button
6 LAN ports
7 USB port
8 WAN/LAN port
COMPONENTS
• AX1800 Wi-Fi 6 Mesh Router
- Power adapter
- RJ45 Ethernet cable
- User guide
INSTALLATION
Connecting the Mesh Router
Follow the steps below to connect the router to your devices:
- Connect the WAN port on the mesh router to the LAN port on your modem router.
- Connect the power adapter to the mesh router, plug it into an electrical outlet and turn on the power.
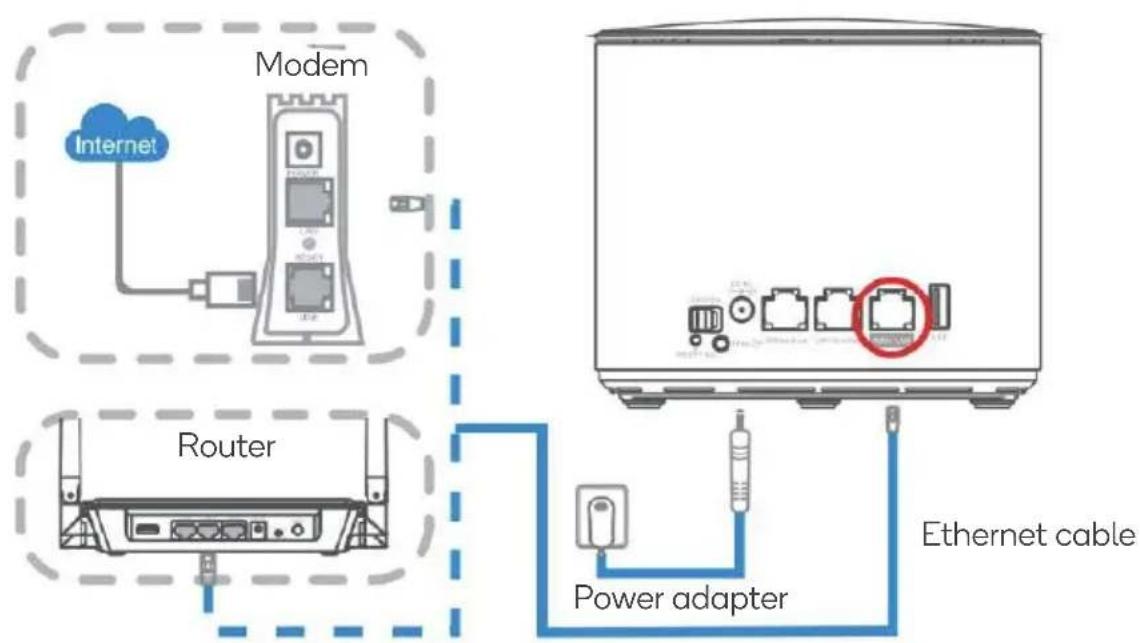
flowchart
graph TD
    A["Modem"] --> B["Internet"]
    B --> C["Router"]
    C --> D["Power adapter"]
    D --> E["Ethernet cable"]
    style A fill:#f9f,stroke:#333
    style B fill:#ccf,stroke:#333
    style C fill:#cfc,stroke:#333
    style D fill:#fcc,stroke:#333
    style E fill:#cff,stroke:#333
Connecting the Mesh Router to your Devices
- Wired: Connect your device to the LAN port on the mesh router using an ethernet cable.
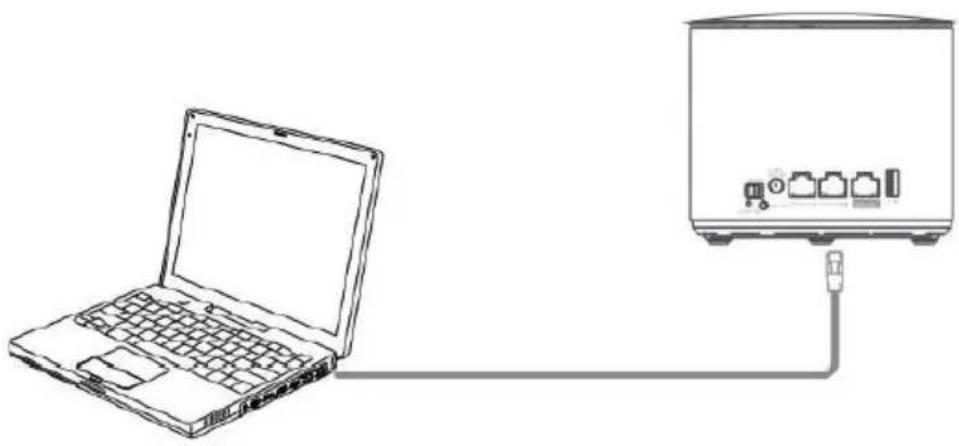
natural_image
Line drawing of a laptop connected to a server via cable (no text or symbols)- Wireless: Turn on wireless networking on your device, search for "Kogan-Mesh Wi-Fi_XXXX" and connect to it.
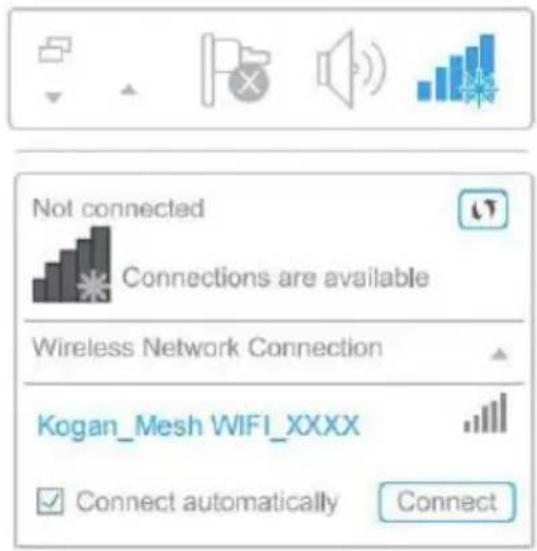
Windows
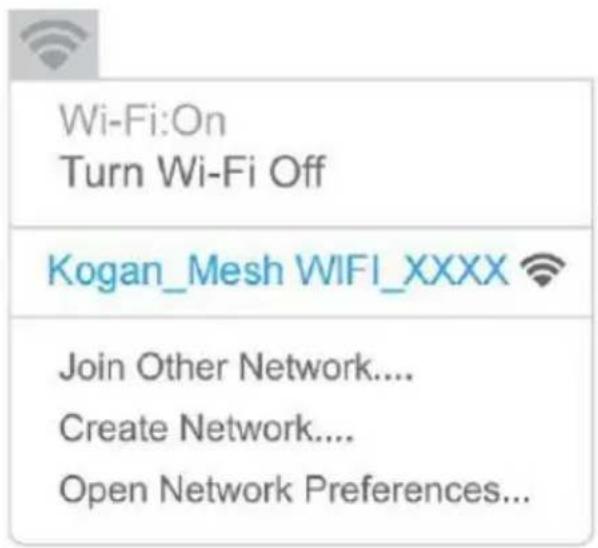
iOS
GETTING STARTED
PC: TCP/IP Settings
The IP address has to be obtained automatically before starting the configuration of the mesh router. Follow the steps below to check, confirm and modify:
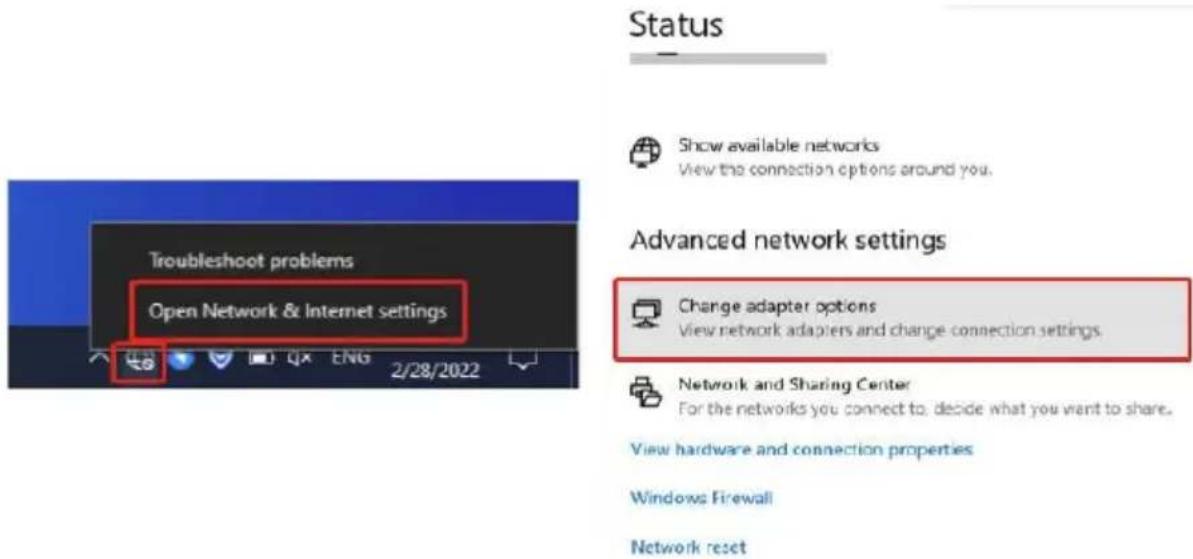
- Right-click the Network icon, and click "Open Network & Internet settings" then click "Change adapter options" in "Advanced network settings".
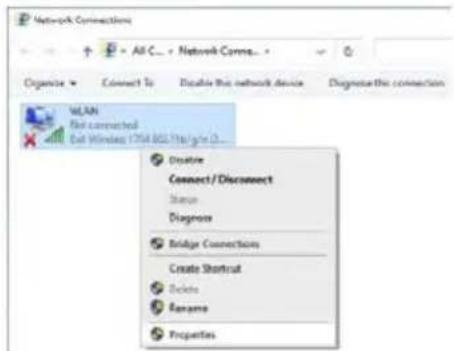
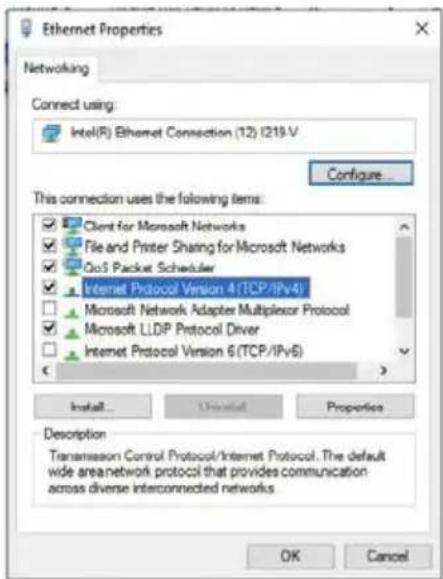
- Right-click the computer icon, and select "Properties". Double-click Internet Protocol Version 4 (TCP/IPv4) in the Properties window.
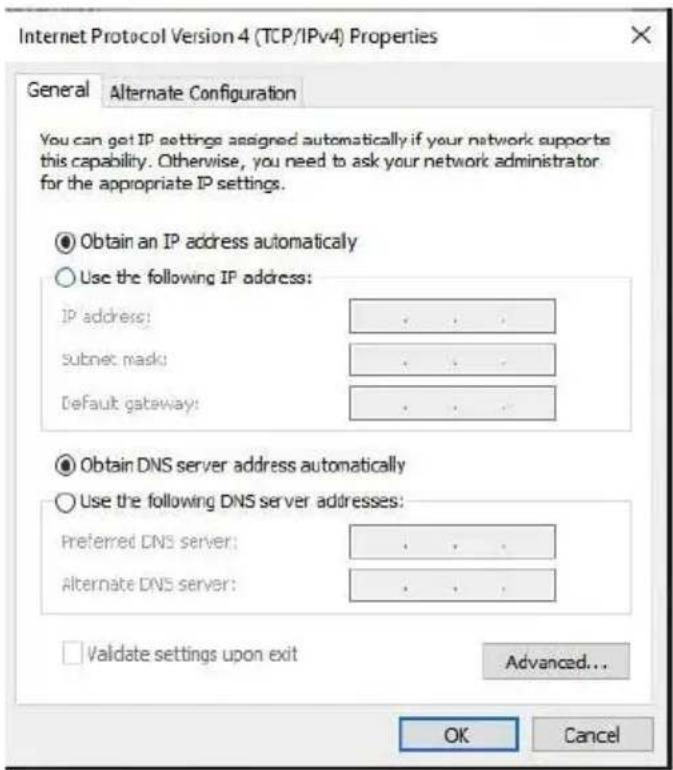
- Select "Obtain an IP address automatically" and "Obtain DNS server address automatically". Click "OK" to confirm the configuration.
Configure Mesh Router via Web browser
- Open a web browser and enter "netlogin.link" or "192.168.10.1" in the address bar. The default login password is "admin", and then click "Login".

- After logging in, select "Country/Region" and "Time Zone", then "Change Password" and click "Next" to continue.
Note: Password length cannot exceed 30 characters or be less than 6 characters. English letters, numbers and some special characters (- . / " |) can be included.

- Set SSID, encryption mode and password for your wireless network. The default encryption mode is "WPA2-PSK". If your device supports "WPA3/WPA2-MIX", select "WPA3/WPA2-MIX". Click "Next" to complete the setup.
Note: SSID length Maximum cannot exceed 31 characters and 10 Chinese characters, and special characters ( , # ; \$ & () * < > \ ' ), line feed, space and carriage return cannot be included.
Note: WiFi Password length cannot exceed minimum 63 characters or less than 6 characters. English letters, numbers and some special characters ( - . / " | ) can be included.

Networking Settings
Router Mode:
-
Router Mode is the most commonly used mode, which is equivalent to an ordinary wireless broadband router. In this mode, the router needs to be connected to devices such as ADSL Modem or optical modem for network configuration.
-
According to your internet connection type, select the corresponding WAN Type, and then click "Save". You will need to wait for approximately 2-3 minutes.
Note: Contact your Internet Service Provider (ISP) when you are unsure of your Internet connection type.
| WAN Type | Description |
| DHCP | DHCP is commonly used if your internet service provider (ISP) does not provide any IP to use. Router will obtain IP address information automatically. |
| PPPoE | PPPoE is typically used for DSL services. Enter the username and password provided by your ISP. |
| Static IP address | Select Static IP if your ISP provides the static IP address, subnet mask, default gateway and DNS server address. |
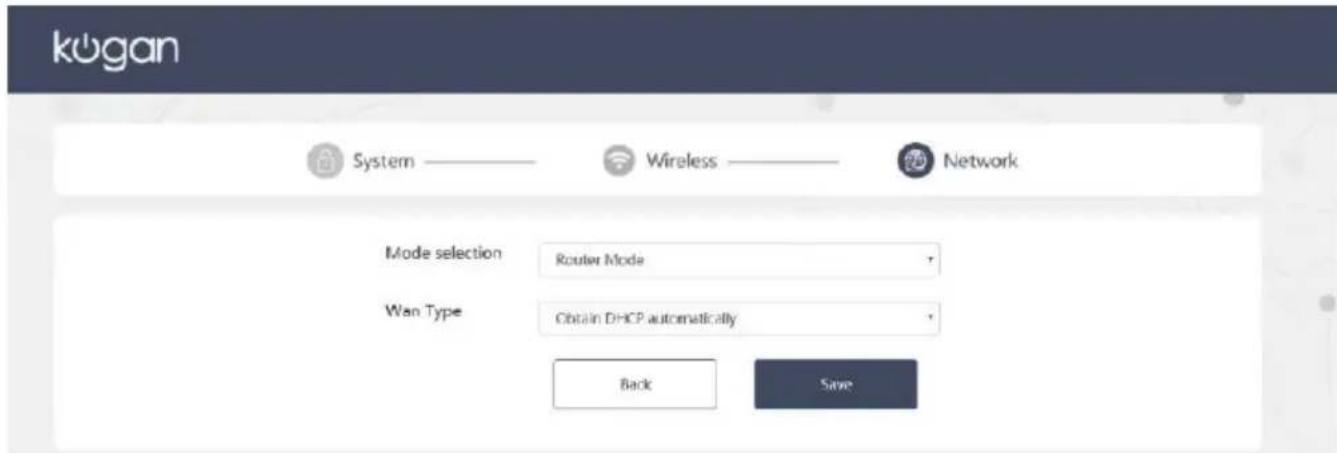
- Click "Refresh" to enter the login interface. The login password is the password from when the router was first set up. After successful login, you will enter the router home page.
Note: The mesh router has the hardware NAT acceleration function enabled by default, which affects the throughput rate. The speed in the network speed measurement item does not match the actual network speed. To count the throughput rate, disable the hardware NAT acceleration function.


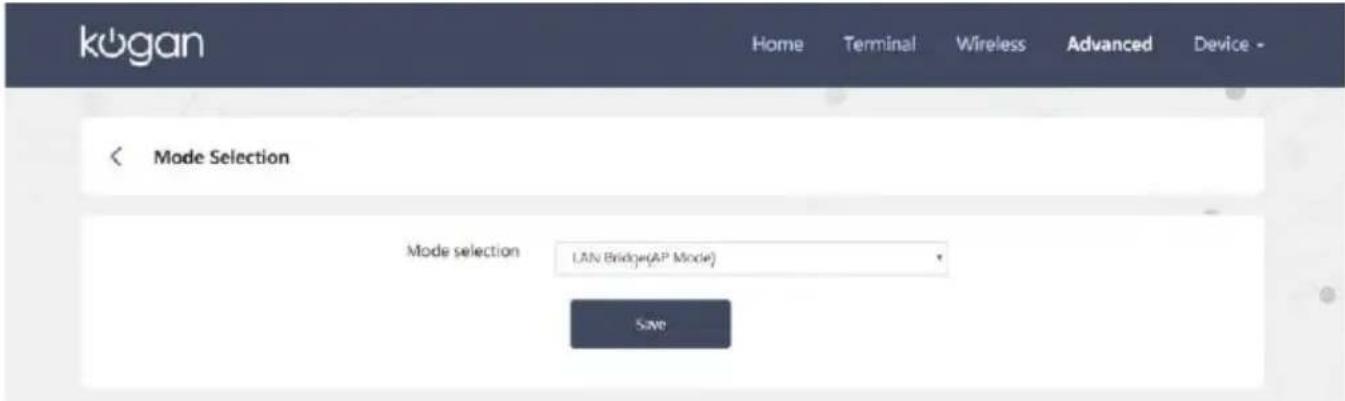
LAN Bridge (AP Mode):
LAN Bridge (AP Mode) is used to transfer wired connection into wireless. The Device is connected to a wired network then transforms the wired Internet access into wireless so that multiple devices can share the Internet. This mode is suited for office, home and places where only a wired network is available.
- Select LAN Bridge (AP Mode) and click "Save". The indicator light will begin flashing BLUE.
Configure Mesh Router via App
Download the App:
- Download the MeshGo app by scanning the code below or by searching for "Meshgo" on the Google Play Store (android) or the App Store (iOS).

natural_image
Abstract blue background with two interlocking white hexagons (no text or symbols)
- Open you the Wi-Fi settings on your phone and select "Kogan-Mesh WIFI_XXXX" to connect.
- After the connection is successful, please go back to the home page of the APP.
- Under, the Current connected router section click "Kogan_Mesh WIFI_XXXX".

Configure Mesh Router:
- Log into the The default login password is "admin", and then click "Login".
- After logging in, select "Country/Region" and "Time Zone", then "Change Password" and click "Next" to continue.
Note: Password length cannot exceed 30 characters or be less than 6 characters. English letters, numbers and some special characters ( - . / " | ) can be included.
- Set SSID, encryption mode and password for your wireless network. The default encryption mode is "WPA2-PSK". If your device supports "WPA3/WPA2-MIX", select "WPA3/WPA2-MIX". Click "Next" to complete the setup.
Note: SSID length Maximum cannot exceed 31 characters and 10 Chinese characters, and special characters ( , # ; \$ & () * < > \ ' ), line feed, space and carriage return cannot be included.
Note: WiFi Password length cannot exceed minimum 63 characters or less than 6 characters. English letters, numbers and some special characters (- . / " |) can be included.
Networking Settings
Router Mode:
-
Router Mode is the most commonly used mode, which is equivalent to an ordinary wireless broadband router. In this mode, the router needs to be connected to devices such as ADSL Modem or optical modem for network configuration.
-
According to your internet connection type, select the corresponding WAN Type, and then click "Save". You will need to wait for approximately 2-3 minutes.
Note: Contact your Internet Service Provider (ISP) when you are unsure of your Internet connection type.
| WAN Type | Description |
| DHCP | DHCP is commonly used if your internet service provider (ISP) does not provide any IP to use. Router will obtain IP address information automatically. |
| PPPoE | PPPoE is typically used for DSL services. Enter the username and password provided by your ISP. |
| Static IP address | Select Static IP if your ISP provides the static IP address, subnet mask, default gateway and DNS server address. |
- Click "Refresh" to enter the login interface. The login password is the password from when the router was first set up. After successful login, you will enter the router home page.
Note: The mesh router has the hardware NAT acceleration function enabled by default, which affects the throughput rate. The speed in the network speed measurement item does not match the actual network speed. To count the throughput rate, disable the hardware NAT acceleration function.
LAN Bridge (AP Mode):
LAN Bridge (AP Mode) is used to transfer wired connection into wireless. The Device is connected to a wired network then transforms the wired Internet access into wireless so that multiple devices can share the Internet. This mode is suited for office, home and places where only a wired network is available.
- Select LAN Bridge (AP Mode) and click "Save". The indicator light will begin flashing BLUE.
GENERAL CONFIGURATION
Terminal Management
Click "Terminal", you can see Online Terminal and Offline Terminal.
- Online Terminal: The Device Name, IP Address and MAC Address, Current Speed and Speed Limit (KB) are displayed.
- Offline Terminal: The Device Name and MAC Address of the offline device that has previously been connected to the router are displayed.
You can rename a device by clicking the “ ” icon after the device name. You can specify the maximum upload/download bandwidth of the device under the speed limit.
Notes: 1MB/s=1024KB/s
- The default speed limit is 0, which means no speed limit.
• The speed limit of each device ranges from 0KB/s to 65535KB/s. - Set the speed limit range required by the specified device according to your actual network bandwidth.
| Device Name | Connection Time | IP Address and MAC Address | Current Speed | Speed Limit(KB) |
| DESKTOP | 4h 48m 13s | 192.168.*** | ↑5KB/S | 0 |
| 70.*******EE | ↓0KB/S | 0 |
| Online Terminal | Offline Terminal | ⑦Help | ||
| Device Name | MAC Address | Speed Limit(KB) | Remove Terminal | |
| HONOR | 92****0C | 0 0 | ||
Wireless Settings
When you need to configure the router's 2.4G/5G wireless network, click "Wireless".
- You can turn ON/OFF the dual-frequency integration setting. This will be ON by default.
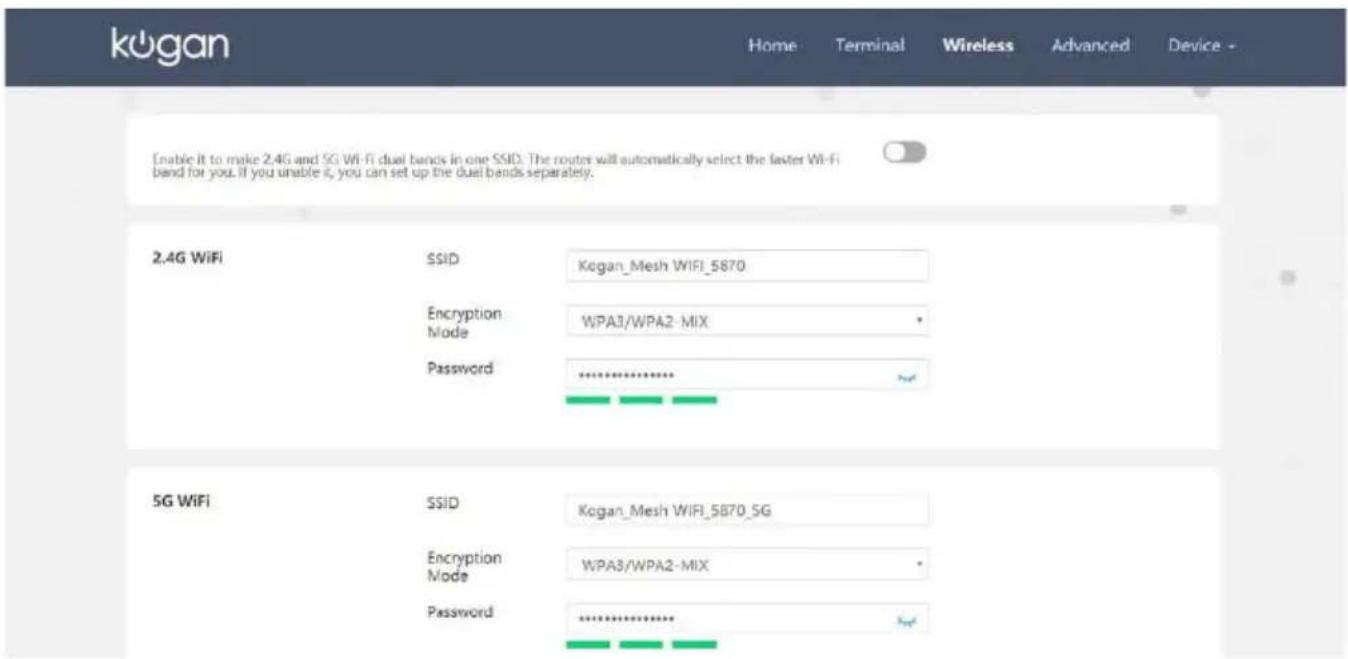
| Status | Description |
| ON | The router automatically selects the faster Wi-Fi band for you, and 2.4G and 5G will use the same network name, password and encryption method. |
| OFF | The network name, password and encryption method of 2.4G and 5G can be modified individually. |
2. Click "Advanced" to display more settings.
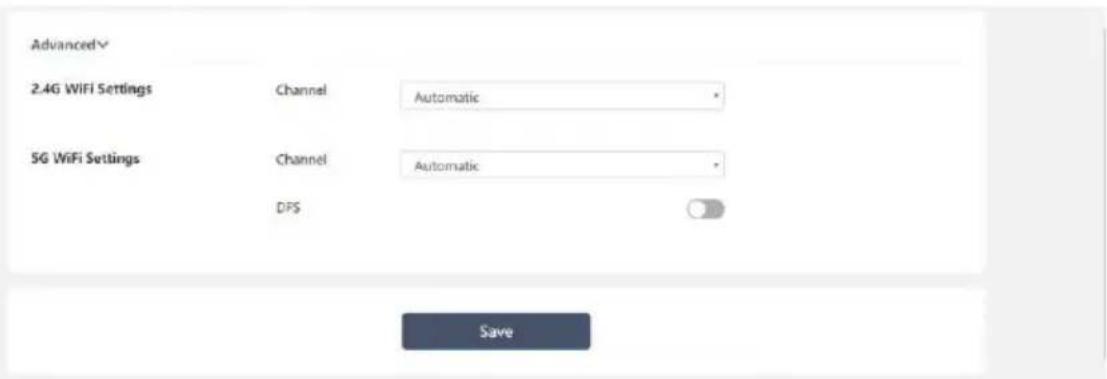
| Item | Description |
| Channel | The automatic option is default, and the router will automatically select the channel to use. If there is severe signal interference, you can try to manually select the channel. |
| Hide SSID | If Hide SSID is enabled, the wireless network with this SSID will not be discovered by other Wi-Fi devices. |
| DFS | (Dynamic frequency Selection) If your terminal device does not support DFS function, do not enable it. |
Mode Selection
To change the router mode, go to "Advanced Settings > Mode Selection".

Internet Settings
- To adjust your internet settings, go to "Advanced Settings → Network Settings".
- Select the following WAN types, please confirm with your network provider the WAN type supported by your network.

| Mode | Description |
| Obtain DHCP automatically | DHCP is commonly used if your internet service provider (ISP) does not provide any IP to use. Router will obtain IP address information automatically. |
| PPPoE | PPPoE is typically used for DSL services. Enter the username and password provided by your ISP. |
| Static IP address | Select Static IP if your ISP provides the static IP address, subnet mask, default gateway and DNS server address. |
| PPTP Dual Access | Based on the VPN communication protocol on the PPP (Point to Point) protocol, DHCP establishes a connection with the PPTP server to realize PPTP dial-up Internet access. |
| L2TP Dual Access | Based on packet-oriented Point to Point connection, DHCP and the L2TP server establishes a connection to realize L2TP dial-up Internet access. |
| PPPOE DUAL Access | Based on the Point to Point communication protocol on the Ethernet, the connection between DHCP and the PPPOE server is established to realize the PPPOE dial-up Internet access. |
- Click "Advanced" to display more settings.
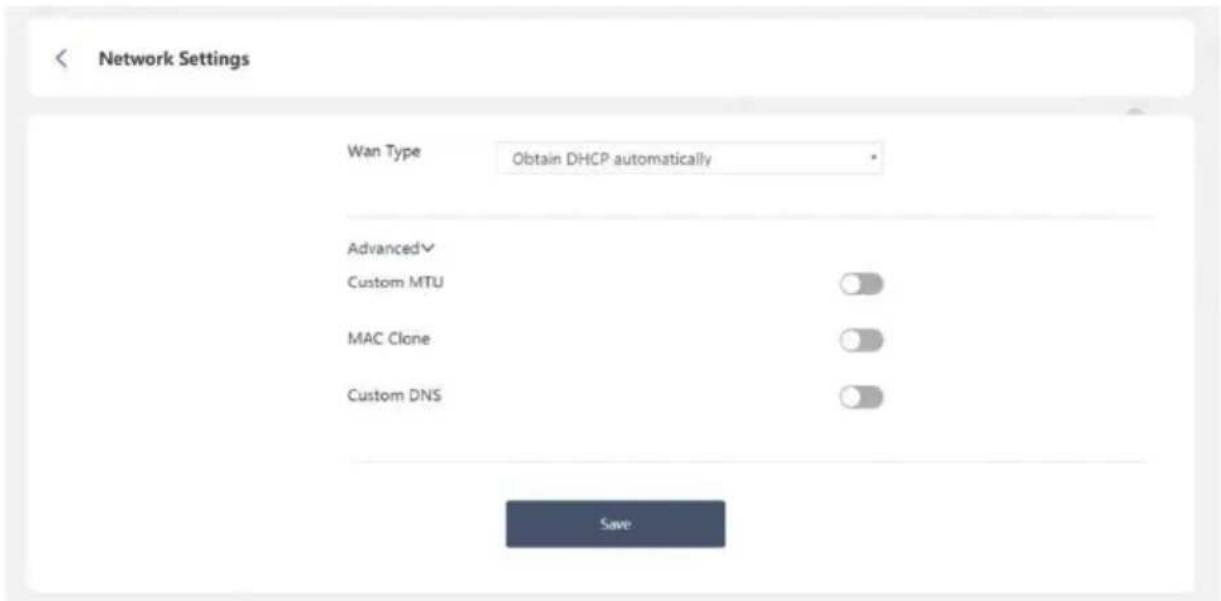
| Item | Description |
| Custom MTU | Custom MTU Define the maximum length of the data packet. |
| Custom MAC Clone | Modify the WAN MAC address of the current router to the MAC address specified by the user. |
| DNS | When you need to specify a server, you can toggle this switch and enter the IP addresses of the primary DNS server and secondary DNS server (when available). |
LAN Settings
- To adjust your internet settings, go to "Advanced Settings → LAN Settings".
- The current LAN IP Address, Subnet Mask, Start IP and End IP are displayed.

| Item | Description |
| IP Address | The router's LAN IP address. |
| Subnet Mask | Subnet mask associated with the LAN IP address. |
| Start and End IP | Connectable IP within the range. |
ADVANCED SETTINGS
Adding Additional Mesh Devices
This mesh router device supports up to 7 mesh devices (including this router). To add more mesh devices to build a stronger network in your home, you will need to pair the new device with your existing network.
Method one:
- Place the new mesh device in your desired location and connect it to power.
- On the currently connected mesh router, press and hold the PAIR Button for 2 seconds.
- Press the PAIR button on new mesh device. The LED is RED.
- The pairing process will take approximately 2 minutes. When successful, the LED will turn BLUE.
- If pairing fails repeat this process or pair using "Method two"
Method two:
- Go to Advanced Settings → Mesh Network
- Enter the 5G MAC/Pair Key (found on the bottom of the device) of the Mesh device to join the Mesh network.
- Click "Mesh Topology" in the upper right corner of this interface to view the Mesh network connection status map.

Guest Wi-Fi
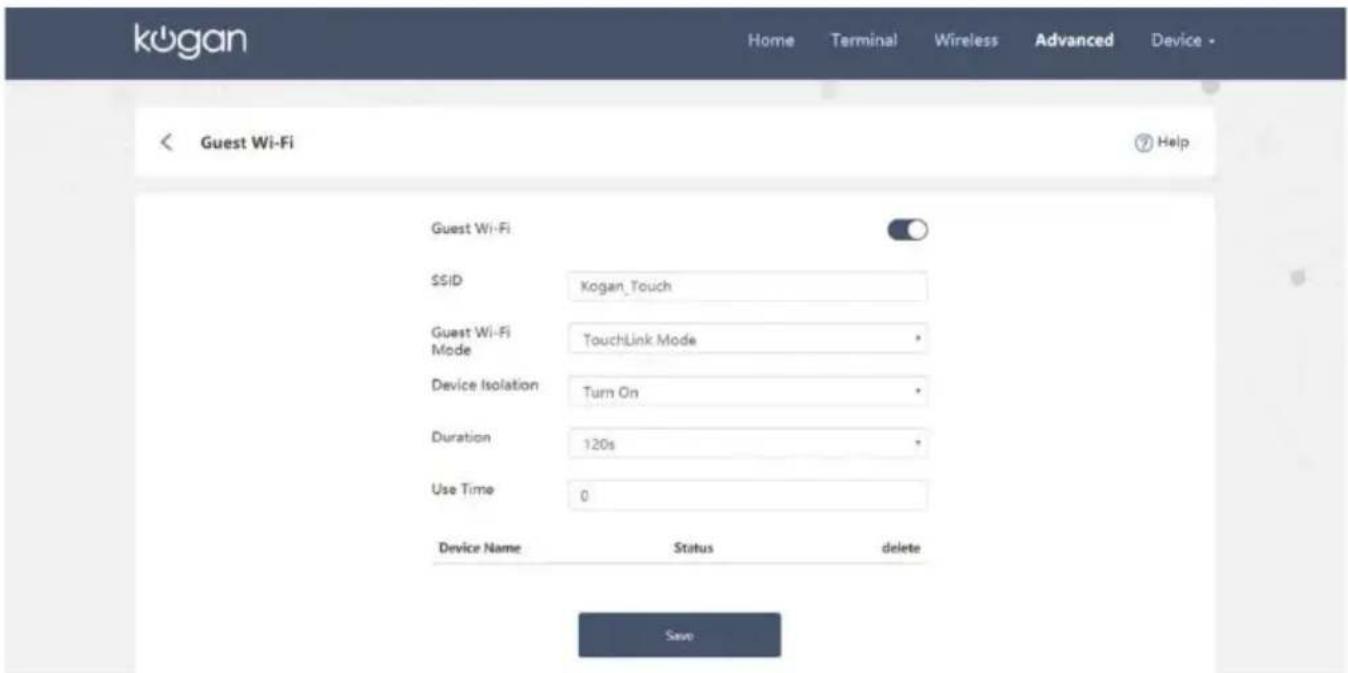
Guest Wi-Fi is specially designed for temporary guests. By setting the guest Wi-Fi to provide the guests with network connection rights, the devices connected to the guest Wi-Fi will not be able to access the shared files in the home network.
- Go to "Advanced Settings → Guest Wi-Fi" to set up guest Wi-Fi:
- Set / default SSID;
- Set guest Wi-Fi Mode:
• Encryption Mode: please set password for guest Wi-Fi connection
• No Encryption Mode: guest Wi-Fi can be connected without password
- TouchLink Mode: set guest Wi-Fi duration and use time
- To protect your home network information, please turn on "Device Isolation".
- Use Time: The default is 0 (the use time is not limited).
- Click "Save" to save the settings, the guest network will be available in approximately 2-3 minutes.
Parental Control
Parental Control allows you to set restrictive rules on individual devices on your home Wi-Fi. When you have a child at home and want to control their internet time.
- Go to "Advanced Settings → Parental Control"
- Set SSID, Encryption Mode and Password.
- Set Ban Time Period for your kids.
- Click "Save" to save the settings, and please wait patiently for 2-3 minutes.

VLAN
VLAN is Virtual Local Area Network, which is a communication technology that divides a physical LAN into multiple broadcast domains.
-
Before setting, confirm whether your network supports VLAN services, such as IPTV, VOIP, internet VLAN, etc.
-
After obtaining the VLAN ID, you can enable this function at Advanced Settings → VLAN interface. After clicking "Save".
Example: if your network supports the IPTV function, and the VLAN ID is 99, then fill in 99 in the VLAN1 ID on the VLAN setting interface and select the port number of the network cable connecting the router to the TV for the VLAN1 port number.

Storage Management
Storage Management allows you to share files stored on USB devices with anyone who can access your network. When you want to configure the access rights of USB devices, please go to "Advanced Settings → Storage Management".
- Set the password and click "Save".
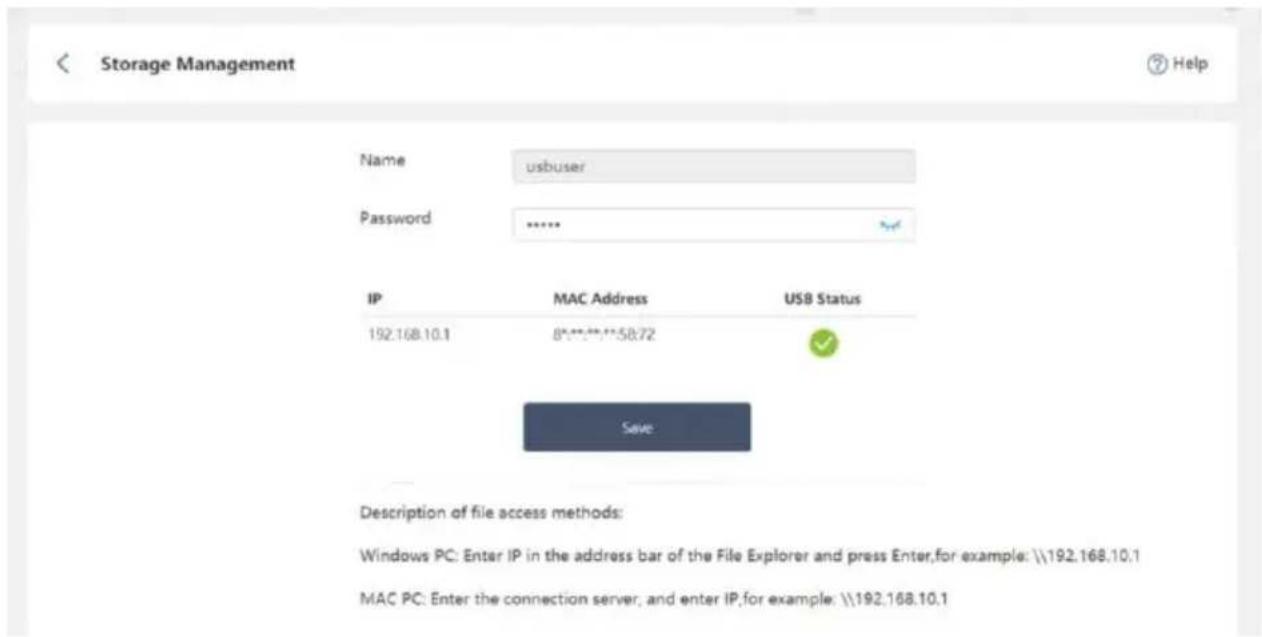
Before proceeding, ensure that your USB storage device is connected to the USB port of the router (you can check the USB status on this interface).
Windows:
- Open the Windows Explorer, enter \netlogin.link in the address bar, and press Enter.
- The USB device folder will be displayed. Double-click the folder, if the login interface pops up, please enter the user name and password you set before.
- After successful login, you can view and edit the content of the USB device.

iOS:
- Go to the connection server and enter "netlogin.link".
- The USB device folder will be displayed. Double-click the folder, and the login interface will pop up, please enter the user name and password previously set.
- After successful login, you can view and edit the content of the USB device.
Remote Control
Remote Control enables remote users to access and manage the router by configuring the WAN IP and port number.
To use remote control, go to "Advanced Settings → Remote Control".
- Turn on Remote Control.
- Set External Port.
- Click "Save" to save the settings, and please wait 2-3 minutes.
- Enter the router's WAN IP in the browser's address bar, followed by a colon (:) and the port number. For example, if the WAN IP address is 111.111.111.111 and the port number is set to 80, you can enter http://111.111.111.111:80 to manage the router remotely.
Notes:
- The default port is 80; if it cannot be connected, change it to another port number. When your router uses DHCP to access the Internet, the WAN IP may change every day. Check the latest WAN IP before using it.
- In order to avoid potential danger from the Internet, please close it when not using remote management.

Hardware NAT Settings
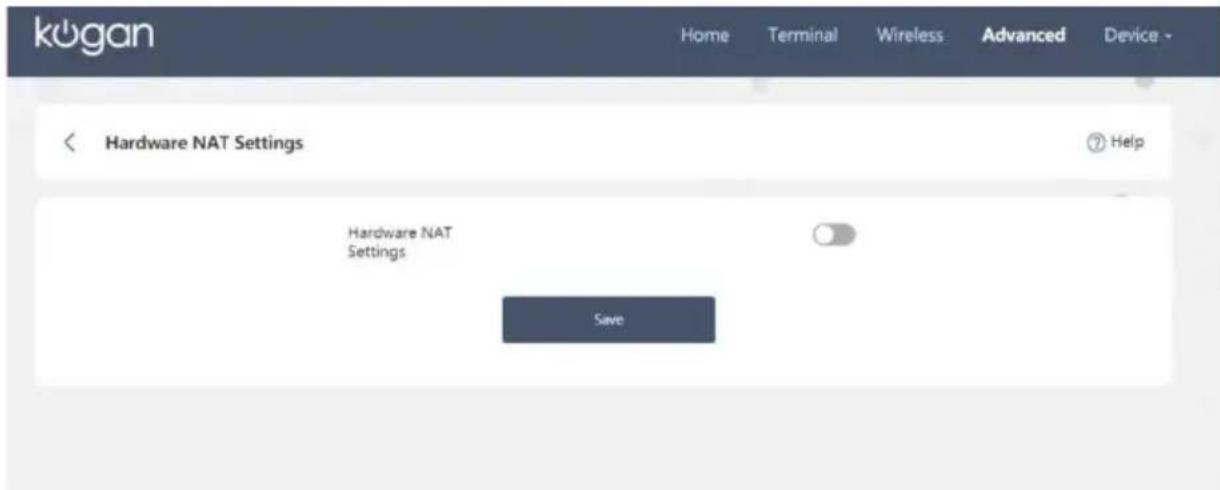
NAT acceleration, that is, data is forwarded by hardware instead of CPU processing, which can reduce CPU consumption and improve device performance. The function is enabled by default.
To enable/disable, go to "Advanced Settings >→ Hardware NAT Settings".
Note: To count the throughput rate, please disable NAT acceleration.
Static IP
The IP in the LAN is controlled by the router. When connecting, the router will assign an IP to the terminal. The local IP address displayed for each connection may be different. Static IP will assign a fixed IP address to the terminal. The local IP address displayed for each connection is the same.
To set a fixed IP for the terminal, go to "Advanced Settings → Static IP" and follow the steps below:
- Select the terminal MAC address you want to fix, and set its IP address (by default, this IP address needs to be on the same network segment as the router IP address).

- Click "Bind".
- When you have multiple terminals and want to fix IP, click the "+" icon.
- Repeat the above steps.
Note: When you don't want the fixed IP, please click "Delete".

Dynamic DNS
Dynamic DNS is dynamic domain name service, which is to map the user's dynamic IP address to a fixed domain name resolution service, allowing you to use a fixed domain name (host name) to host a server (Web, FTP, etc.), instead of remembering dynamic IP addresses that may change from time to time.
To use the Dynamic DNS function, go to “Advanced Settings → Dynamic DNS”, and follow the steps below:
- Turn on Dynamic DNS.
- Select a service provider (currently only NO-IP is supported).
- Enter the Name, Password, Host Name (domain name).
- Click "Save", and please wait 2-3 minutes to save the settings.
NO-IP: Dynamic DNS service provider, through NO-IP's DDNS service, can build a dedicated VPS.
Note: Before setting up DDNS, create a DDNS account and purchase a hostname on the service provider's website, and then set up DDNS on this interface.

Port Forwarding
Port Forwarding allows remote users through forwarded ports to access certain public services on the local network, such as games, downloads, or web servers.
To set up Port Forwarding, go to "Advanced Settings → Port Forwarding" and follow the steps below:
- Enter the LAN IP of the server, specify the port/port range for external and internal ports, and select the protocol.
- Click "Save" to save the settings (wait 2-3 minutes), and you can also add other services by clicking the "Plus".
- Once configured, access to the server will be redirected to the server IP address via the WAN IP.

DMZ Management
DMZ can realize the connection between the external network and a server device in the internal network through the local IP address and port number. Some public servers that do not contain confidential information, such as Web, Mail, FTP, etc., are usually placed in the DMZ. Visitors from the external network can access the services in the DMZ, but will not be exposed to the company's confidential or private information stored on the internal network.
Go to “Advanced Settings → DMZ Management” to use this function and follow the steps below:
- Turn on DMZ.
- Fill in DMZ Host IP address.
- Click "Save".
Note: When accessing the external network, you need to enter the WAN IP of the router and the port number of the corresponding service.

UPnP
Universal Plug and Play (UPnP) is used to implement LAN computers and smart mobile devices to automatically connect to each other peer-to-peer through the network.
When you want real-time communication or point-to-point connection, go to “Advanced Settings →UPnP” and turn on the “UPnP” switch.
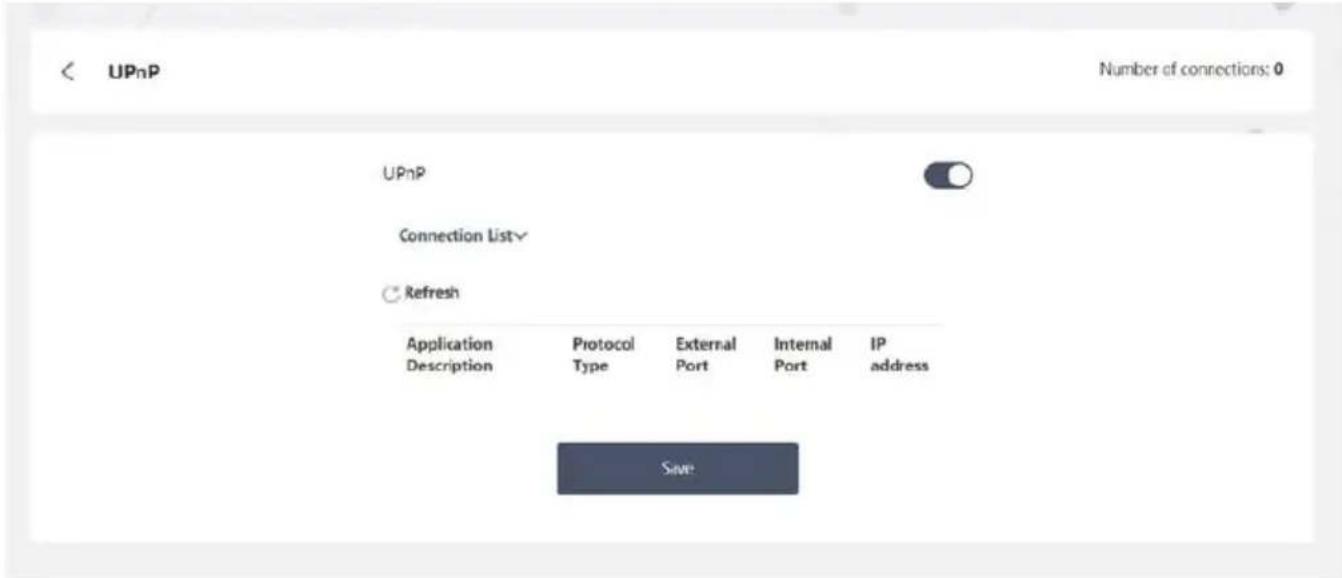
Web Block
Web Block is used to restrict the access rights of certain websites in the local area network, and restrict the specified terminal devices from accessing the specified websites.
To set site access permissions, go to “Advanced Settings → Web Block” and follow the steps below:

- Select the terminal you want to restrict and click "+".
- Enter the keyword or domain name of the site you want to restrict (eg: Google, Youtube).
- Click "Save".
Note: To restore permissions, click "+" behind the previous settings terminal, select the website you wish to restore, and click "Delete".

Lighting Settings
The working status of the router can be determined by the display of the LED light on the router. It is turned on by default. During operation the corresponding LED will light/flicker.
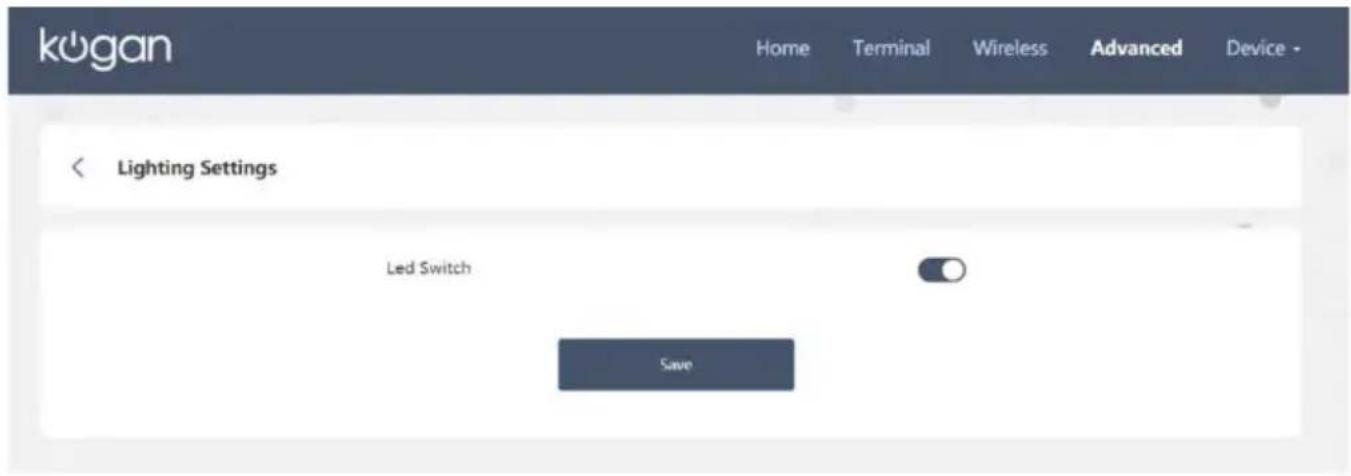
| Item | Description | |
| WAVLINK Logo | Solid Blue light | Internet is functional |
| Flashing Red light | Internet is disconnected | |
| Flashing Blue light | TouchLink/Pair/Turbo mode is on | |
| Wi-Fi | Solid on | Wi-Fi enabled |
| Off | Wi-Fi disabled | |
| WAN | Blinking | The WAN port is transmitting or receiving data. |
| Off | The WAN port is not connected properly. | |
| LAN1/2/3/4 | Blinking | The LAN port is transmitting or receiving data. |
| Off | The LAN port is not connected properly. | |
IPv6 Settings
IPv6 is a next-generation IP protocol designed by the Internet Engineering Task Force (IETF) to replace IPv4. It can solve the problem of the number of network address resources, and solve the obstacles for various access devices to connect to the internet.
The host disables the service by default, and automatically assigns IPv6 addresses to devices in the local area network after it is enabled.
To enable the service, go to "Advanced Settings → IPV6 Settings", and enter the correct IPv6 address prefix provided by the operator.

Device Status
Device Status displays system information, WAN and LAN status, and Wi-Fi status information. You can check the router status from “Advanced Settings → Router Status”.
| Device Status | |||
| System Information | Up Time 2h 18m 45s Firmware Version MS2X2_V230511 | ||
| Network Status | WAN Status Connection Type Origin DHCP automatically Status Connected IP Address 172.16.8.76 Gateway 172.16.8.1 MAC Address 60:3P:5D:00:58:21 | LAN Status IP Address 192.168.10.1 MAC Address 80:3F:1D:00:S3.70 | |
| Wi-Fi status | 2.4G Wi-Fi Status SSID Kogan_Mesh WIFI_5870 Wireless Mode 11R/G/N/AX Mixed Channel Automatic MAC Address 60:3P:5D:00:58:72 | 5G Wi-Fi Status SSID Kogan_Mesh WIFI_5870 Wireless Mode 11A/AN/AC/AX Mixed Channel Automatic MAC Address 82:3F:1D:40:S3.72 | |
Security settings
Security settings can safely protect the local network from the dangers of Internet attacks. When you want to configure security for your router and network, you can go to “Advanced Settings → Security Settings”.
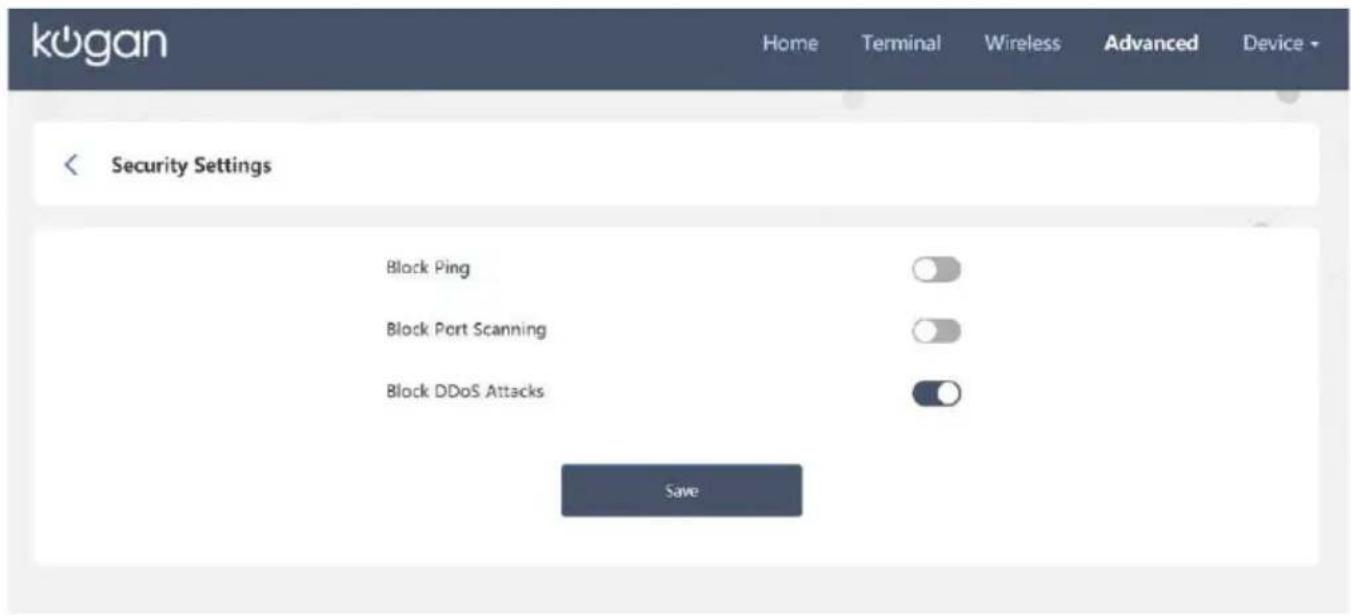
| Status | Description |
| Block Ping | To prevent the external network from pinging the router, you can enable this function. |
| Block Port Scanning | Prevent others from sending port scan information. |
| Block DDoS Attacks | Protect your network from DDoS attacks. |
Backup and Restore
Backup and Restore means that when there is an accident or change, you can restore the router configuration by restoring the factory settings or backing up the file. When you need this function, please go to “Advanced Settings → Backup and Restore”.

| Operation | Description |
| BackupConfiguration | Click to download and save the current router settings to the device location you specify. |
| RestoreConfiguration | Click “Browse” to find the backup file, and click this button. |
| Reset | Click to reset the router to factory defaults. |
Time Zone
When setting up the router for the first time or resetting the router, you will be asked to select your current time zone when configuring the setup wizard. Also, when you want to modify the configuration time zone, you can modify the configuration at "Advanced
Settings → Time Zone".

Firmware Update
Use this function to perform version detection and upgrade on the router. When you want to check if there is a new version, go to “Advanced Settings → Firmware Upgrade” and click “Check New Version”.
- When a new update version is found, please click "Download and Upgrade" to update the latest firmware.
Note: After your firmware upgrade is complete, please reset your router. It is recommended that you clear the browser cache you are using.

Change Password
When you set up the router for the first time, you will be asked to set a new password during the setup wizard, or you can change the password at "Advanced Settings → Change Password".
Administrator Password Rules: Password length cannot exceed 30 characters or less than 6 characters, and English letters, numbers and some special characters ( - . / " | ) can be included.

Device Management
When you need to restart the router or log out, go to "Device", and choose to "Router Reboot" or "Logout".

FAQ
Q1: Why doesn't the login page appear after entering http://netlogin.link?
A: Make sure your PC is set to obtain IP address automatically.
A: Ensure you entered the correct website.
Q2: What can I do if I cannot access the Internet?
A: Make sure your Internet works normally. If not, contact your ISP (Internet Service Provider)
A: Initiate your browser, enter "192.168.10.1" or "netlogin.link", and then set up the following quick start guide.
A: Reboot your device and try again.
Q3: How do I restore the device to factory default setting?
A: Press and hold the reset button of the device for 6 seconds.
Q4: Why is the flow monitoring is inaccurate?
A: The Hardware NAT default setting's open status leads to the absence of monitored data. If you want keep the flow monitoring accurate, you will need to turn off the Hardware NAT Settings function manually, which inevitably will increase the CPU usage.
Q5: Why can't I use the WPS function in EasyMesh mode?
A: EasyMesh mode only supports Mesh networking pairing, and router mode only supports WPS pairing.
Q6: How to resolve the conflict between WAN IP and LAN IP?
A: When the router acts as a secondary router and obtains IP through DHCP to access the Internet, there is a possibility that the IP obtained by the router's WAN and the IP network segment of the router's LAN are the same. For example, the upper-level router uses 192.168.10.1, and the IP range assigned by the local router is 192.168.10.xx, and the local router is also 192.168.10.1, which will affect the normal network function of the router. In this case, when the router detects a conflict, it will adjust the LAN segment, usually adding one to the corresponding IP segment to change to 192.168.11.1. The customer can also modify it according to the actual situation to avoid this conflict.
NOTES
Need more information?
We hope that this user guide has given you the assistance needed for a simple set-up.
For the most up-to-date guide for your product, as well as any additional assistance you may require, head online to help.kogan.com
kogan.com
- AX1800 WHOLE-HOME MESH WI-FI 6 DUAL-BAND SYSTEM
- OVERVIEW
- COMPONENTS
- INSTALLATION
- Connecting the Mesh Router
- Connecting the Mesh Router to your Devices
- GETTING STARTED
- PC: TCP/IP Settings
- Configure Mesh Router via Web browser
- Networking Settings
- Router Mode:
- LAN Bridge (AP Mode):
- Configure Mesh Router via App
- Download the App:
- Configure Mesh Router:
- GENERAL CONFIGURATION
- Terminal Management
- Notes: 1MB/s=1024KB/s
- Wireless Settings
- Click "Advanced" to display more settings.
- Mode Selection
- Internet Settings
- LAN Settings
- ADVANCED SETTINGS
- Adding Additional Mesh Devices
- Method one:
- Method two:
- Guest Wi-Fi
- Parental Control
- VLAN
- Storage Management
- Windows:
- iOS:
- Remote Control
- Notes:
- Hardware NAT Settings
- Static IP
- Dynamic DNS
- Port Forwarding
- DMZ Management
- UPnP
- Web Block
- Lighting Settings
- IPv6 Settings
- Device Status
- Security settings
- Backup and Restore
- Time Zone
- Firmware Update
- Change Password
- Device Management
- FAQ
- NOTES
- Need more information?
Brand : Kogan
Model : KAMESHWFI6A
Category : Router