
CEWH30RW-UY - Water heater CANDY - Free user manual and instructions
Find the device manual for free CEWH30RW-UY CANDY in PDF.


| Product Type | Electric Storage Water Heater |
| Brand | Candy |
| Model | CEWH30RW-UY |
| Capacity | 30 L |
| Net Weight | 12 kg |
| Dimensions (W x D x H) | 390 mm x 400 mm x 447 mm |
| Mounting Type | Wall-mounted |
| Power Supply | 220-240 V ~ 50 Hz |
| Rated Power | 1500 W |
| Maximum Temperature Setting | 75 °C |
| Rated Pressure | 0.80 MPa |
| Minimum Water Pressure | 0.05 MPa |
| Heating Element | Electric heating tube |
| Thermostat | Adjustable thermostat with manual-reset |
| Safety Valve | Included (rated 0.80 MPa) |
| Heating Indicator Light | Yes |
| Corrosion Protection | Magnesium rod |
| Water Connection Size | G1/2 |
| Package Contents | Water heater unit, safety valve, 2 expandable hooks, instruction manual |
| Cleaning Interval | Every 3 years (internal) |
| Safety Features | Earthing required, automatic power cutoff, overheating protection |
Frequently Asked Questions - CEWH30RW-UY CANDY
User questions about CEWH30RW-UY CANDY
0 question about this device. Answer the ones you know or ask your own.
Ask a new question about this device
Download the instructions for your Water heater in PDF format for free! Find your manual CEWH30RW-UY - CANDY and take your electronic device back in hand. On this page are published all the documents necessary for the use of your device. CEWH30RW-UY by CANDY.
USER MANUAL CEWH30RW-UY CANDY
Home Water Heater Instruction Manual
CEWH30RW-UY
CEWH50RW-UY
CEWH80RW-UY
CEWH100RW-UY
CEWH30RW-12
CEWH50RW-12
CEWH80RW-12
CEWH100RW-12
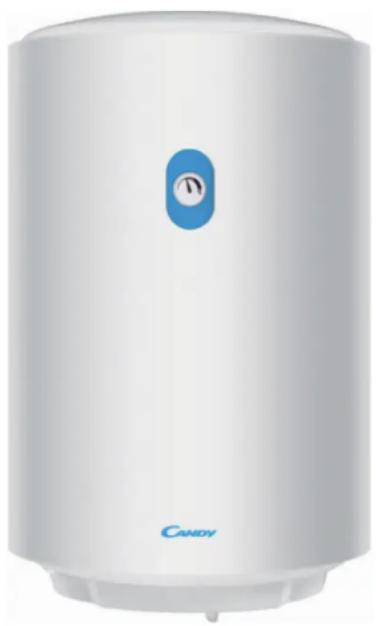
natural_image
Exterior view of a white cylindrical water heater with a blue circular button and 'CANDY' branding (no additional text or symbols visible)Index(EN)
Safety notices ( Please read before use )----1
Electrical diagram----2
Exterior and accessories 2
Technical parameters----2
Installation instruction----3-4
Instruction manual----5
Cleaning and maintenance----6
Packing list----6
Troubleshooting----7
Índice (ES)
Safety notices ( Please read before use )
Meanings of Icons

Forbidden
These are actions which are forbindden

Warning
These are actions which must be carried out

Caution
These are matters for which attention is required

Immediately cut off power supply and contact our Service Center once the water heater does not work properly or emits burnt smell.

Warning
The product is only available for alternating current.

Earthing
To ensure safety, the water heater should be connected to independent sockets (do not use adapters), with reliable earthing. In addition the power socket must conform to national standards. Use of waterheater without reliable earthing is strictly prohibited. Use pen multimeterto check whether the live line and zero line are reverse.

Warning
Do not use damaged wire and power socket. Promptly clean the dust on the power plug and socket.

Warning
Check the power meter and the electric wire's diameter to ensure that they comply with the rated current for the water heater. Where necessary engage qualified electrician to check the electric circuit.

Forbidden
Do not touch the plug with wet hands, and make sure that the water heater, plug socket do not come into contact with water. If they are accidentally wet, they must be checked by professions appointed by our company before using, in order to prevent electrocution.

Forbidden
Do not use water from the water heater for drinking or similar purposes.

Forbidden
Storing of inflammable and explosive items near the water heater is strictly prohibited.

Forbidden
Do not connect to power when installing or repairing the water heater.

Forbidden
Non-professionals are strictly prohibited from carrying out repairs, maintenance, dismantling or revamping of the water heater.

Forbidden
Installation of water heater outdoors is strictly prohibited.

Forbidden
Do not install the water heater in an environment which is susceptible to ice-formation. Ice will cause the container and water pipe to break, leading to scalding and water leakage.

Warning
Please take precautionary measures during cold weather, in order to prevent damage to water heater from freezing.

Warning
If the soft power cable is damaged, it must be replaced by professional staff from the manufacturers or Maintenance Department in order to avoid danger.

Caution
Take care not to be scalded by heated water.
- Touching of hot water walve and pipes is strictly prohibited.
- Make sure to check the water temperature before use; use only when it feels suitable.

Caution
Please cut off the power supply if the water heater was not used for an extended period of time. Drain the water heater of all water according to the instructions in the chapter on Cleaning and Maintenance.
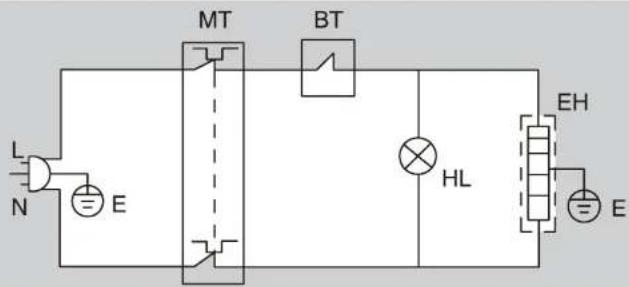
Electrical diagram
EN
L:Live wire (brown)
N:Neutral line (blue)
MT:Manual-reset thermostat
BT:Adjustable thermostat
HL:Heating indicator light
EH:Heating tube
E:Earth line (yellow-green; dual color)
Exterior and accessories
EN
Front view

natural_image
Simple line drawing of a cylindrical container with a circular top and side base (no text or symbols)Rear view
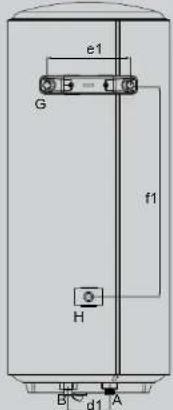
Side view

natural_image
Technical line drawing of a rectangular enclosure with labeled dimensions (c1, b1), no readable text or symbols beyond labelsCross-section view
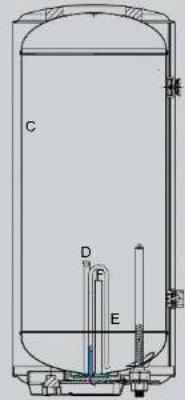
A: Hot water outlet
B: Cold water inlet
C: Inner chamber
D: Temperature measurement pipe
E: Heating pipe
F: Magnesium rod
G: Wall hook
H: Support block
| Model No. | Capacity (L) | Net weight (kg) | a1 (mm) | b1 (mm) | c1 (mm) | d1 (mm) | e1 (mm) | f1 (mm) |
| CEWH30RW-UY CEWH30RW-12 | 30 | 12 | 390 | 400 | 447 | 100 | 200 | 157 |
| CEWH50RW-UY CEWH50RW-12 | 50 | 15 | 390 | 400 | 650 | 100 | 200 | 198 |
| CEWH80RW-UY CEWH80RW-12 | 80 | 24 | 390 | 400 | 930 | 100 | 200 | 508 |
| CEWH100RW-UY CEWH100RW-12 | 100 | 30 | 390 | 400 | 1160 | 100 | 200 | 568 |
Note: 1. The margin of error for the above parameters (measurements, weight) is ±10%.
2. The thermometer is not a precision instrument.
Technical parameters
EN
| Voltage | Rated power | Rated temperature | Rated pressure | Waterproof rating | Water pressure |
| 220-240V, 50Hz | 1500W 0.8 | 0MPa | Not less than | 0.05MPa |
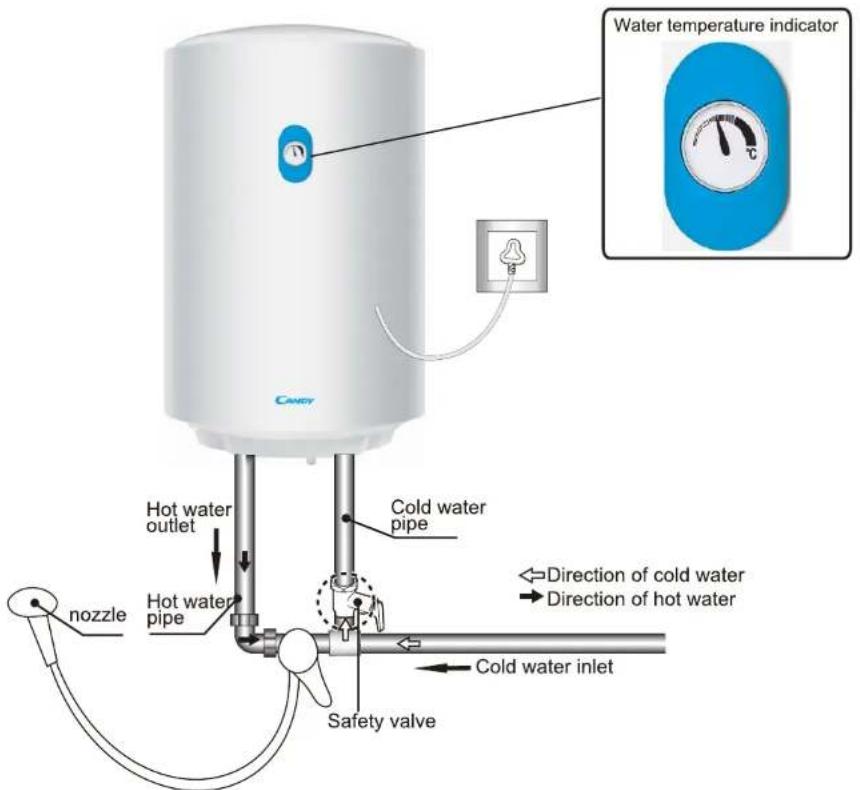
Note: category of power line plugs in schematic diagram is only used for sketch.
Installing safety valve
Install the safety valve which has a rated pressure of 0.80MPa (its connection is G1/2) into the water intake pipe with the arrow on the safety valve pointing at the water heater. When the water heater is heated by electricity, a small amount of water will flow from the safety valve's pressure relief hole due to the expansion of water in the heater. This is normal. The pressure-relief hole should be connected to the atmosphere and free from blockage at all times.
Installation method for safety valve's drainage pipe: Attach an end of the water drainage pipe onto the pressure relief hole on the safety valve. You may cut the water drainage pipe to make it shorter, or extend it depending on the situation. Connect to the other end of the water drainage pipe to the lower water outlet. This will prevent the water from the pressure relief hole from splashing. The water drainage pipe connected to the safety valve is to be installed in a continuously downward direction and in a frost-free environment.

Note: If your water heater is not installed in a bathroom with sewer, our recommendation would be that you add safety valve water drainage pipe.
Note: The water may drip from the discharge pipe of the pressure-relief device (safety valve) and that this pipe must be left open to the atmosphere.
Installation Precautions
- When installing the water heater, certain space should be reserved (not less than 250mm from the top and bottom, and not less than 700mm from the front and the sides) for ease of subsequent maintenance and repair. If the water heater was to be built into clip boards, the bottom section of the clip board should be movable for ease of removal of plastic cover during maintenance.
● Make sure the pressure on the water intake is not less than 0.05MPa, and not more than 0.80MPa.
Installation Precautions
- The water heater should be installed indoors in a place where the ambient temperature is above 0°C. The pipes should be closely laid out. The hot water outlet should be too far away from the point of usage. If the distance exceeds 8 meters, the hot water pipe should have insulation protection, in order to prevent heat loss.
● The wall on which the water heater should be strong such as it is able to withstand twice the weight of the water heater when filled with water. If the wall was not weight-bearing wall or made of hollow bricks, adequate protective measures such as addition of support and high-strength wall screw with back panel should be adopted. - The water heater should be installed in places such as it is easy to use and maintain and with floor drain. In order that it will not cause damage to nearby facilities or those in the lower levels during a leakage of the water tank or water pipe. It should not be installed over toilet bowls, bathtub, wash basin or door frame in order that users do not feel oppressed or insecure.
- Power socket for the water heater should be installed in dry places which do not easily come into contact with water, in order not to affect the heater's normal operation (it would be best equipped with protective cover).
- Do not reverse the installation for the water intake and outlet. The safety valve should be installed in the designated position and not moved without permission. The safety valve's pressure-relief hole should be connected to the atmosphere and free from blockage at all times.
- Use pen multimeter to check whether the live line and zero line are reverse. Turn on power supply only when you have ensured that the heater is filled with water and that there is no water leakage. The power supply should also conform with requirements.
● Safety reminder: In order to prevent accidents, please use our company's accessories during installation. Do not replace them on your own or use substitutes. Please make sure to contact our Maintenance Department if the pipes or accessories are damaged and replace them with the accessories supplied by our company. Our company shall not be liable for any direct or indirect losses caused as a result of accidents for failure to comply with the aforesaid.
● All water pipes should be installed by qualified water pipe installation workers. The pipelines should comply with the national standards and regulations on the prohibition of prevention tools to draw water to water source pipelines by way of inverse siphon, as well as local building codes.
Installation method
● Must be installed by personnel in our company's After-sales Department or designated installation personnel. Expandable Wall-mount
● The water heater is wall-mounted type.
- Determine the installation position of the water heater. Based on the measurements indicated in the technical data form, use impact drill to drill two holes of 12mm in diameter and 65mm in depth. Insert the expandable hooks into the said holes and ensure that they are securely fixed. Lift the water heater and slip its wall hook onto the expandable hooks. For accessories such as
safety valve, please refer to the "Installation of Safety Valve" (for reference only). Make sure to seal the joints with Teflon tapes to prevent water leakage.
- For ease of installation and removal of water heater, we would recommend that G1/2 loose joints be installed at appropriate locations on the water inlet and outlet pipes of the water heater. Determine the position of the hot water supply. Connect the water intake and outlet pipe together with the water pipe to the positions reserved for use of hot water. Hot water pipe should preferably not be too long in order to prevent heat loss. Note: Make sure that the water heater is securely attached to the hook before letting it go; otherwise it may drop and cause injury or property damage.

After completion of installation, make sure to turn on the water intake valve and mixing valve since there is no water in the inner chamber. Turn the mixing valve to the maximum for hot water outlet. Turn off the out-flow valve when water flows out from the sprinkler or the water outlet (indicating that the container is filled with water). Turn off the water outlet valve. Inspect all connections to ensure that there is not water leakage before connecting to power.
- Adjust the water temperature knob at the bottom of the water heater to set the
temperature.
- The maximum temperature setting is 75°C. Temperature adjustment knob: Turn the knob gradually clockwise to raise the temprature setting. The knob will not continue to turn once it reaches maximum temperature setting. Turn it anti-clockwise graudally to reduce the temperature setting. Once the minimum temperature setting is reached, the water heater's power will be cut off if you continue to turn the water temperature knob.
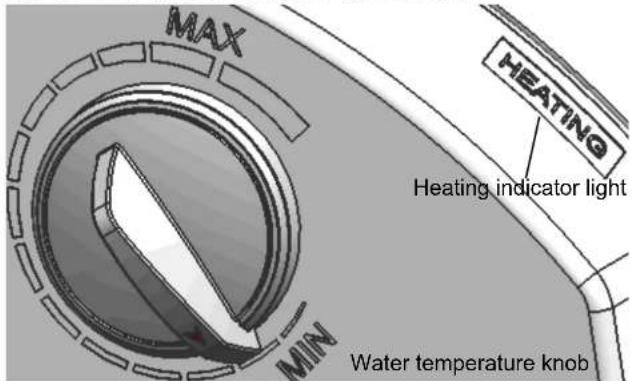
● If the heating indicator light is lit, it means that the water heater is heating.
- If the heating indicator light is off it means that heating is complete and that the water heating is on standby.
- Observe thermometer the current water temperature.

- Power will be automatically cut off when the water temperature reaches the set temperature. Once it lowers to certain temperature power will be automatically connected. - When the water pressure is ≥ 0.80MPa and the pressure-relief hole on the safety valve emits large volume of water, it means that the water pressure is excessive. In such case, please notify the After-sales Department.
Things to note during use
1 Do not connect the power before filling the inner chamber with water in order to prevent damage to the water heater.
2 Adjust the water temperature to the suitable level before use in order to prevent scalding.
3 As long as the hot water is adequate, set a lower temperature to reduce heat loss, high temperature corrosion and scaling, thus extending the water heater's lifespan.
4 Do not place inflammable substances such as petrol near the water heater; otherwise it may cause fire.
5 This appliance is not intended for use by persons (including children) with reduced physical, sensory or mental capabilities, or lack of experience and knowledge, unless they have been given supervision or instruction concerning use of the appliance by a person responsible for their safety.
6 Children should be supervised to ensure that they do not play with the appliance.
Cleaning and maintenance
EN

The water heater must be repaired or maintained by qualified professionals. Improper methods may cause serious injury or damage to property.
Warning
- Cleaning
- External cleaning
• Power must be switched off before cleaning the water heater.
• Take a wet cloth and dab it with small quantity of neutral detergent. Lightly wipe the water heater. Do not use petrol or other solvents. Finally use a dry cloth to wipe; make use to dry the water heater thoroughly. Make sure not to use detergents containing abrasive agents (e.g. toothpaste); acidic substances; chemical solvents (e.g. alcohol) or polish to clean the water heater.
2. Internal cleaning
In order to ensure that the water heater will work with high efficiency, clean the heating tube and inner chamber once every three years. Take care not to damage the exterior of the heating pipe and the protective layer on the surface of the inner chamber. Depending on the local water quality and usage habit, the magnesium rod should be regularly replaced. If maintenance is required, please contact the local Maintenance Department.
- Check
- When the water heater is in use, the safety valve should be checked to remove lime deposits and to verify that it is not blocked once a month.
To check it, turn the safety valve's small handle on the side of the water intake (take care not to hurt your hand). If there is water flowing out, the safety valve is working normally. Please contact the local After-sales Department if no water flows out. In the event of damage to the safety valve, please replace it with a safety valve of similar specifications.
- Regularly engage service personnel to carry out safety inspection and promptly clear the water heating pipes of the scale. Check also the consumption of the magnesium rod; change it if consumption becomes excessive.thpaste); acidic substances; chemical solvents (e.g. alcohol) or polish to clean the water heater.
● Not in use for an extended period of time
If the water heater is not used for an extended period of time, please carry out the following steps:
-
Turn off the water pipe valve.
-
Screw the water drainage pipe to the safety valve's pressure-relief hole; turn on the safety valve handle.
-
Turn the hot water valve to the maximum (at the same time unscrew the soft sprinkler pipe from the water outlet valve; take care not be scalded by hot water), drain the inner chamber of water.
When the water heater needs to be used again, our recommendation is to open hot water valve before switching on the power in order to prevent accidents. Allow any gas that may be trapped in the pipe to be discharged. Do not smoke or allow other exposed fire to be near the opened valve. At the same time, make sure to carefully examine all the parts of the water heater and ensure that they are in a perfect condition. Make sure to fill the inner chamber with water before use.
Packing list
| Name of Parts | Electric water heater (Unit) | Safety valve (Set) | Expandable Hook (pc.) | Instruction Manual (unit) |
| Quantity | 1 | 1 | 2 | 1 |
| Symptom | Things to Check | Solutions |
| No water | 1. Whether the water supply has stopped or whether the water pressure is too low | Check |
| 2. Whether the water-usage point is blocked or whether the hot water valve is opened | Check and clear | |
| Only cold water but the heating indicator lamp is lit | 1. Whether hot water outlet is opened | Check and open |
| 2. Whether the water temperature is adjusted | Increase the temperature to the required value. Once the water is heated to the pre-set temperature, control flow volume of cold and hot water using the moderating mixing valve. | |
| 3. Heating time is too short and set temperature is not achieved | Adjust water temperature | |
| 4. Whetehr heating pipe is damaged | Confirm it is not due to the reasons under 1, 2 and 3, then contact Maintenance Department | |
| Only cold water and the heating indicator lamp is not lit | 1. Whether power is properly connected | Check power socket |
| 2. Whether thermostat is out of control | Confirm that this is not due to reason 1, then contact Maintenance Departmentnt | |
| Heating indicator light Is on all the time | 1. Water has not reached the set temperature | Continue heating |
| 2. Whether thermostat is out of control | Confirm that this is not due to reason 1, then contact Maintenance Departmentnt | |
| Water volume is sometimes large or small, or water is sometimes hot or cold | Whether water pressure is stable | Set lower mixing valve or ensure water pressure is stable before use |
| Samll hot water outflow volume | 1. Whether the present temperature setting is too low | Calibrate using the method stipulated in the Instruction Manual |
| 2. Whether water pressure is too much | Set lower mixing valve |
natural_image
Simple line drawing of a rectangular container with a circular top and base, labeled 'a1' at the bottom (no text or symbols on the container itself)natural_image
Simple line drawing of a rectangular container with a circular button and a base labeled 'a1' (no text or symbols beyond basic markings)Vista de trás

Vista lateral

natural_image
Technical line drawing of a rectangular enclosure with labeled dimensions (c1, b1), no readable text or symbols beyond labelsVista transversal

natural_image
Technical line drawing of a mechanical assembly with a shaft and flange (no text or symbols)natural_image
Close-up of a blue circular gauge with a black pointer and 'C' label, no additional text or symbols visible.- Home Water Heater Instruction Manual
- Index(EN)
- Índice (ES)
- Safety notices ( Please read before use )
- Meanings of Icons
- Electrical diagram
- Exterior and accessories
- Technical parameters
- Installing safety valve
- Installation Precautions
- Installation method
- Things to note during use
- Cleaning and maintenance
- Warning
- - Cleaning
- Internal cleaning
- - Check
- ● Not in use for an extended period of time
Brand : CANDY
Model : CEWH30RW-UY
Category : Water heater