
MC110AMST - Microwaves Magic Chef - Free user manual and instructions
Find the device manual for free MC110AMST Magic Chef in PDF.


| Product Type | Countertop Microwave Oven |
| Brand | Magic Chef |
| Model | MC110AMST |
| Capacity | 1.1 cu. ft. |
| Power Output | 1000 Watts |
| Dimensions (W x D x H) | 20.4 x 16.7 x 12.2 inches |
| Weight | 30.4 lbs |
| Power Source | 120 V, 60 Hz, 15 A |
| Control Type | Electronic Touchpad with Digital Display |
| Cooking Functions | Auto Cook, Defrost, Popcorn, Potato, Pizza, Beverage, Reheat |
| Timer | Up to 99 minutes 99 seconds |
| Clock | 12-hour or 24-hour display |
| Child Lock | Yes |
| Turntable | Yes, glass tray |
| Interior Light | Yes |
| Door Type | Push-button release |
| Cleaning | Wipe interior with damp cloth; do not use abrasive cleaners |
| Safety | UL listed; auto shut-off; door interlock system |
| Spare Parts | Glass turntable, roller ring, fuse, door switches available |
| Repairability | Repair by qualified technician; user replaceable fuse |
| Warranty | Limited 1 year parts and labor |
Frequently Asked Questions - MC110AMST Magic Chef
User questions about MC110AMST Magic Chef
0 question about this device. Answer the ones you know or ask your own.
Ask a new question about this device
Download the instructions for your Microwaves in PDF format for free! Find your manual MC110AMST - Magic Chef and take your electronic device back in hand. On this page are published all the documents necessary for the use of your device. MC110AMST by Magic Chef.
USER MANUAL MC110AMST Magic Chef
Countertop Microwave Oven
User's Manual
natural_image
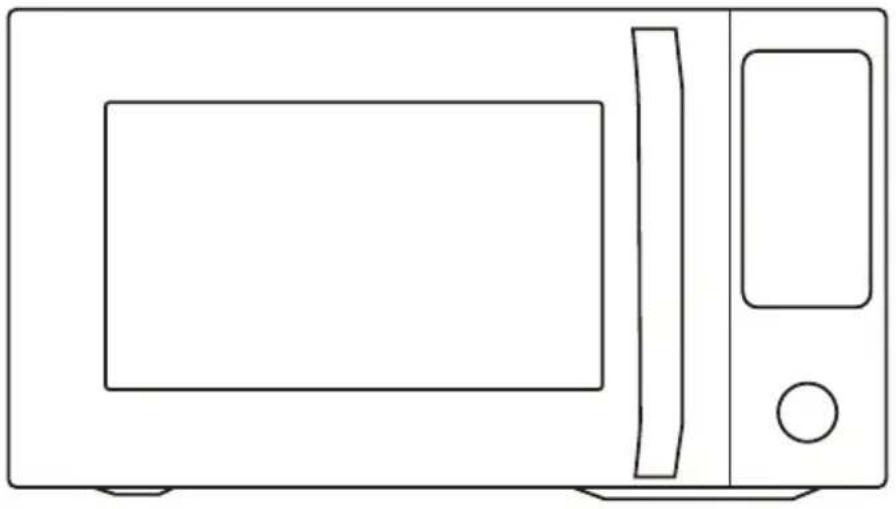
Line drawing of a microwave oven with front panel and control panel (no text or symbols)Model:MC110AMST
PLEASE READ THIS MANUAL CAREFULLY BEFORE USING YOUR MICROWAVE OVEN AND KEEP IT FOR FUTURE REFERENCE.
Product Registration
Thank you for purchasing a Magic Chef product. The first step to protect your new product is to complete the product registration on our website: www.mcappliance.com/register. The benefits of registering your product include the following:
- Registering your product will allow us to contact you regarding a safety notification or product update.
- Registering your product will allow for more efficient warranty service processing when warranty service is required.
- Registering your product could act as your proof of purchase in the event of insurance loss.
Once again, thank you for purchasing a Magic Chef product.
PRECAUTIONS TO AVOID POSSIBLE EXPOSURE TO EXCESSIVE MICROWAVE ENERGY
(a) Do not attempt to operate this oven with the door open since open-door operation can result in harmful exposure to microwave energy. It is important not to defeat or tamper with the safety interlocks.
(b) Do not place any object between the oven front face and the door or allow soil or cleaner residue to accumulate on sealing surfaces.
(c) Do not operate the oven if it is damaged. It is particularly important that the oven door close properly and that there is no damage to the: (1) door (bent), (2) hinges and latches (broken or loosened), (3) door seals and sealing surfaces.
(d) The oven should not be adjusted or repaired by anyone except properly qualified service personnel.
TABLE OF CONTENTS
PRECAUTIONS TO AVOID POSSIBLE EXPOSURE TO EXCESSIVE MICROWAVE ENERGY.... 1
- IMPORTANT SAFETY INSTRUCTIONS....3
• GROUNDING INSTRUCTIONS .... 5
• RADIO INTERFERENCE....6 - SPECIFICATIONS....7
• UTENSILS....7 - SETTING UP YOUR OVEN....9
- INSTALLATION .... 11
- MICROWAVE OVEN CONTROL....12
- MICROWAVE OVEN USE 12
SETTING THE CLOCK 12
KITCHEN TIMER 12
CONVECTION COOKING....13
COMBI. COOKING....13
MULTI-STAGE COOKING....13
SPEEDY COOKING....13
CHILD-LOCK....13
AIRFRY MENU....13
AUTO MENU 14
- MAINTENANCE....15
• MICROWAVE OVEN WARRANTY 16
IMPORTANT SAFETY INSTRUCTIONS
When using electrical appliances basic safety precautions should be followed, including the following:
WARNING - To reduce the risk of burns, electric shock, fire, injury to persons or exposure to excessive microwave energy:
- Read all instructions before using the appliance.
- Read and follow the specific: "PRECAUTIONS TO AVOID POSSIBLE EXPOSURE TO EXCESSIVE MICROWAVE ENERGY" found on page 1.
- This appliance must be grounded. Connect only to properly grounded outlet. See "GROUNDING INSTRUCTIONS" found on page 5.
- Install or locate this appliance only in accordance with the provided installation instructions.
- Some products such as whole eggs and sealed containers - for example, closed glass jars - are able to explode and should not be heated in this oven.
- Use this appliance only for its intended use as described in the manual. Do not use corrosive chemicals or vapors in this appliance. This type of oven is specifically designed to heat, cook or dry food. It is not designed for industrial or laboratory use.
- As with any appliance, close supervision is necessary when used by children.
- Do not operate this appliance if it has a damaged cord or plug, if it is not working properly, or if it has been damaged or dropped.
- This appliance should be serviced only by qualified service personnel.
Contact nearest authorized service facility for examination, repair, or adjustment.
- Do not cover or block any openings on the appliance.
- Do not store this appliance outdoors. Do not use this product near water - for example, near a kitchen sink, in a wet basement, near a swimming pool, or similar location.
- Do not immerse cord or plug in water.
- Keep cord away from heated surface.
- Do not let cord hang over edge of table or counter.
- When cleaning surfaces of door and oven that comes together on closing the door, use only mild, nonabrasive soaps, or detergent applied with a sponge or soft cloth.
- To reduce the risk of fire in the oven cavity:
a) Do not overcook food. Carefully attend appliance when paper, plastic, or other combustible materials are placed inside the oven to facilitate cooking.
b) Remove wire twist-ties from paper or plastic bag before placing bag in oven.
c) If material inside of the oven ignite, keep oven door closed, turn oven off, and disconnect the power cord, or shut off power at the fuse or circuit breaker panel.
d) Do not use the cavity for storage purposes. Do not leave paper products, cooking utensils, or food in the cavity when not in use.
- Liquids, such as water, coffee, or tea are able to be overheated beyond the boiling point without appearing to be boiling. Visible bubbling or boiling when the container is removed from the microwave oven is not always present.
THIS COULD RESULT IN VERY HOT LIQUID SUDDENLY BOILING OVER WHEN THE CONTAINER IS DISTURBED OR A UTENSIL IS INSERTED INTO THE LIQUID. To reduce the risk of injury to persons:
a) Do not overheat the liquid.
b) Stir the liquid both before and halfway through heating it.
c) Do not use straight-sided containers with narrow necks.
d) After heating, allow the container to stand in the microwave oven
for a short time before removing the container.
e) Use extreme care when inserting a spoon or other utensil into the container.
-
Oversized food or oversized metal utensils should not be inserted in a microwave/toaster oven as they may create a fire or risk of electric shock.
-
Do not clean with metal scouring pads. Pieces can burn off the pad and touch electrical parts involving a risk of electric shock.
-
Do not use paper products when appliance is operated in the toaster mode.
-
Do not store any materials, other than manufacturer's recommended accessories, in this oven when not in use.
-
Do not cover racks or any other part of the oven with metal foil. This will cause over-heating of the oven.
SAVE THESE INSTRUCTIONS
GROUNDING INSTRUCTIONS
This appliance must be grounded. In the event of an electrical short circuit, grounding reduces the risk of electric shock by providing an escape wire for the electric current. This appliance is equipped with a cord having a grounding wire with a grounding plug. The plug must be plugged into an outlet that is properly installed and grounded.
WARNING:
Improper use of the grounding can result in a risk of electric shock. Consult a qualified electrician or serviceman if the grounding instructions are not completely understood, or if doubt exists as to whether the appliance is properly grounded. If it is necessary to use an extension cord, use only a 3-wire extension cord that has a 3-blade grounded plug, and 3-slot receptacle that will accept the plug on the appliance. The marked rating of the extension cord shall be equal to or greater than the electrical rating of the appliance.
DANGER:
Electric Shock Hazard
Touching some of the internal components can cause serious personal injury or death. Do not disassemble this appliance.
WARNING:
Electric Shock Hazard
Improper use of the grounding can result in electric shock. Do not plug into an outlet until appliance is properly installed and grounded.
- A short power-supply cord is provided to reduce the risks resulting from becoming entangled in or tripping over a longer cord.
- Longer cord sets or extension cords are available and may be used if care is exercised in their use.
- If a long cord or extension cord is used:
a) The marked electrical rating of the cord set or extension cord should be at least as great as the electrical rating of the appliance.
b) The extension cord must be a grounding-type 3-wire cord.
c) The longer cord should be arranged so that it will not drape over the counter top or tabletop where it can be pulled on by children or tripped over unintentionally.
RADIO INTERFERENCE
- Operation of the microwave oven may cause interference to your radio, TV or similar equipment.
- When there is interference, it may be reduced or eliminated by taking the following measures:
a) Clean door and sealing surface of the oven
b) Reorient the receiving antenna of radio or television.
c) Relocate the microwave oven with respect to the receiver.
d) Move the microwave oven away from the receiver.
e) Plug the microwave oven into a different outlet so that microwave oven and receiver are on different branch circuits.
THIS DEVICE COMPLIES WITH PART 18 OF THE FCC RULES.
SPECIFICATIONS
| Model MC110AMST | |
| Rated Voltage 120 V~ 60 Hz | |
| Microwave Input 1600 W | |
| Microwave Output 1000 W | |
| Convection 1800 W | |
| Grill 1000 W |
UTENSILS
CAUTION:
Personal Injury Hazard
Tightly-closed utensils could explode. Closed containers should be opened and plastic pouches should be pierced before cooking.
See the instructions on "Materials you can use in microwave oven or to be avoided in microwave oven."
There may be certain non-metallic utensils that are not safe to use for microwaving. If in doubt, you can test the utensil in question following the procedure below.
Utensil Test:
- Fill a microwave-safe container with 1 cup of cold water (250ml) along with the utensil in question.
- Cook on maximum power for 1 minute.
- Carefully feel the utensil. If the empty utensil is warm, do not use it for microwave cooking.
- Do not exceed 1 minute cooking time.
MATERIALS YOU CAN USE IN MICROWAVE OVEN
| Utensils Remarks | |
| Browning dish | Follow manufacturer's instructions. The bottom of browning dish must be at least 3/16 inch (5mm) above the turntable. Incorrect usage may cause the turntable to break. |
| Dinnerware | Microwave-safe only. Follow manufacturer's instructions. Do not use cracked or chipped dishes. |
| Glass jars | Always remove lid. Use only to heat food until just warm. Most glass jars are not heat resistant and may break. |
| Glassware | Heat-resistant oven glassware only. Make sure there is no metallic trim. Do not use cracked or chipped dishes. |
| Oven cooking bags | Follow manufacturer's instructions. Do not close with metal tie. Make slits to allow steam to escape. |
| Paper plates and cups | Use for short-erm cooking/warming only. Do not leave oven unattended while cooking. |
| Paper towels | Use to cover food for reheating and absorbing fat. Use with supervision for a short-term cooking only. |
| Parchment paper Use as a cover to prevent splattering or a wrap for steaming. | |
| Plastic | Microwave-safe only. Follow the manufacturer's instructions. Should be labeled "Microwave Safe". Some plastic containers soften, as the food inside gets hot. "Boiling bags" and tightly closed plastic bags should be slit, pierced or vented as directed by package. |
| Plastic wrap | Microwave-safe only. Use to cover food during cooking to retain moisture. Do not allow plastic wrap to touch food. |
| Thermometers Microwave-safe only (meat and candy thermometers). | |
| Wax paper Use as a cover to prevent splattering and retain moisture. | |
MATERIALS TO BE AVOIDED IN MICROWAVE OVEN
| Utensils Remarks | |
| Aluminum tray May cause arcing. Transfer food into microwave-safe dish. | |
| Food carton with metal handle | May cause arcing. Transfer food into microwave-safe dish. |
| Metal or metal-trimmed utensils | Metal shields the food from microwave energy. Metal trim may cause arcing. |
| Metal twist ties May cause arcing and could cause a fire in the oven. | |
| Paper bags May cause a fire in the oven. | |
| Plastic foam | Plastic foam may melt or contaminate the liquid inside when exposed to high temperature. |
| Wood | Wood will dry out when used in the microwave oven and may split or crack. |
SETTING UP YOUR OVEN
Names of Oven Parts and Accessories
(In case of any differences between the appliance and the pictures in this manual, the product shall prevail.)
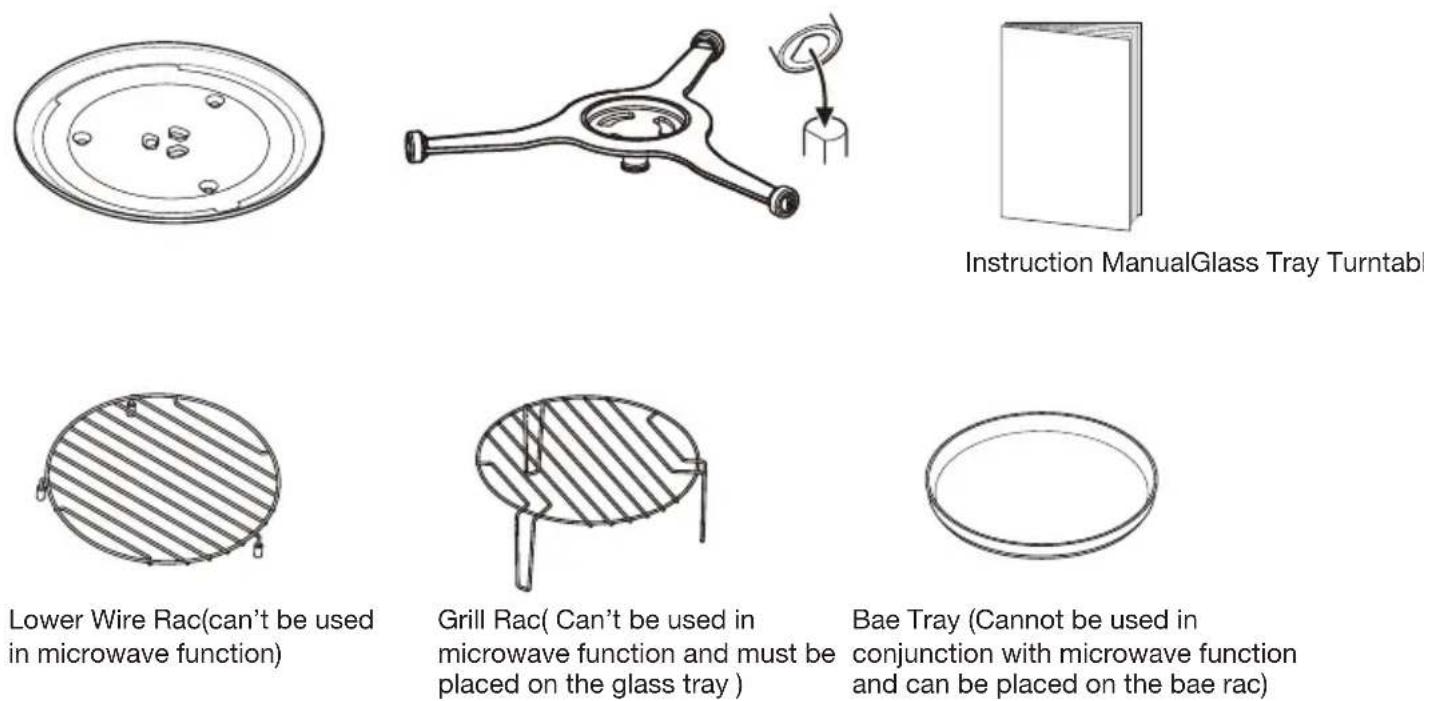
Remove the oven and all materials from the carton and oven cavity.
Your oven comes with the following accessories:
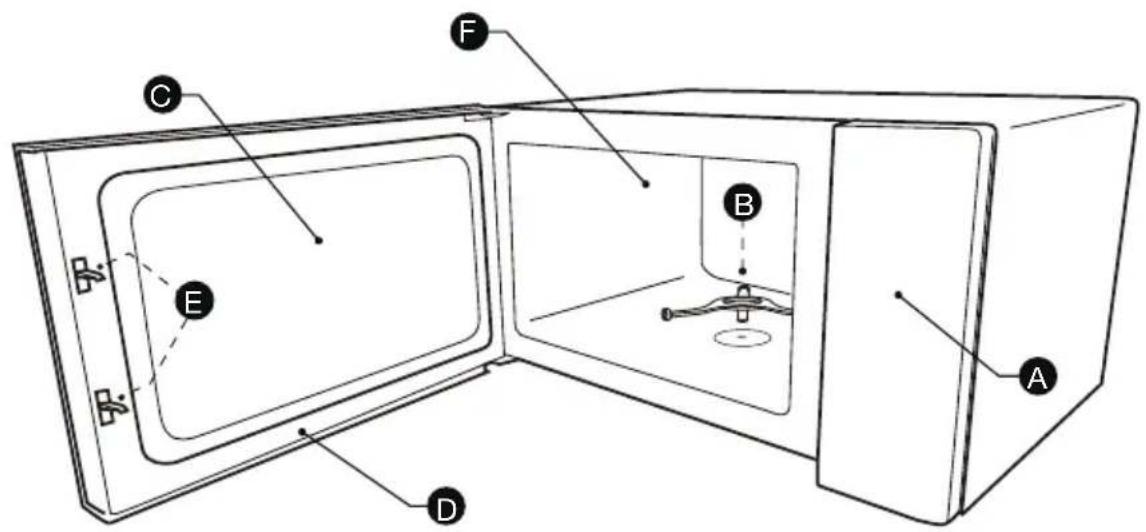
A) Control panel
B) Turntable Ring Assembly
C) Observation window
Cleaning the cooking compartment and putting the turntable in place. For new installations, make sure all packaging and shipping tape has been removed. Before using the appliance to prepare food for the first time, you will need to put the turntable in place correctly. You must clean the cooking compartment and accessories.
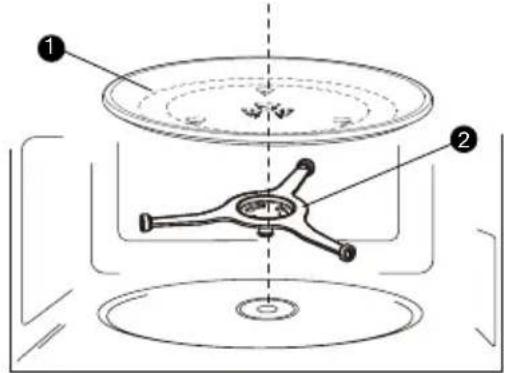
1) Glass Tray
2) Turntable Ring Assembly
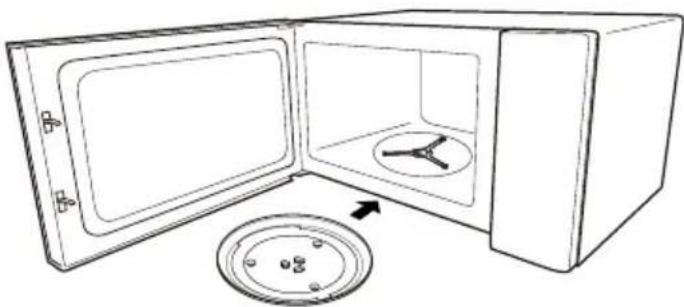
natural_image
Line drawing of a microwave oven with lid and fan, showing open door and interior (no text or symbols)Note:
- Never use the appliance without the turntable. Make sure that it is properly engaged. The turntable can turn clockwise or anti-clockwise.
- Never place the glass tray upside down. The glass tray should never be restricted.
- Both glass tray and turntable ring assembly must always be used during cooking.
- All food and containers of food are always placed on the glass tray for cooking.
- Never restrict the movement of the turntable.
- If glass tray or turntable ring assembly cracks or breaks, contact your nearest authorized service center.
COUNTERTOP INSTALLATION
Remove all packing material and accessories. Examine the oven for any damage such as dents or broken door. Do not install if oven is damaged.
Cabinet: Remove any protective film found on the microwave oven cabinet surface. Do not remove the light brown Mica cover that is attached to the oven cavity to protect the magnetron.
INSTALLATION
- Select a level surface that provide enough open space for the intake and/or outlet vents. A minimum clearance of 3.0 inches (7.5cm) is required between the oven and any adjacent walls. One side must be open. The minimum installation height is 3.0ft (91.6cm).
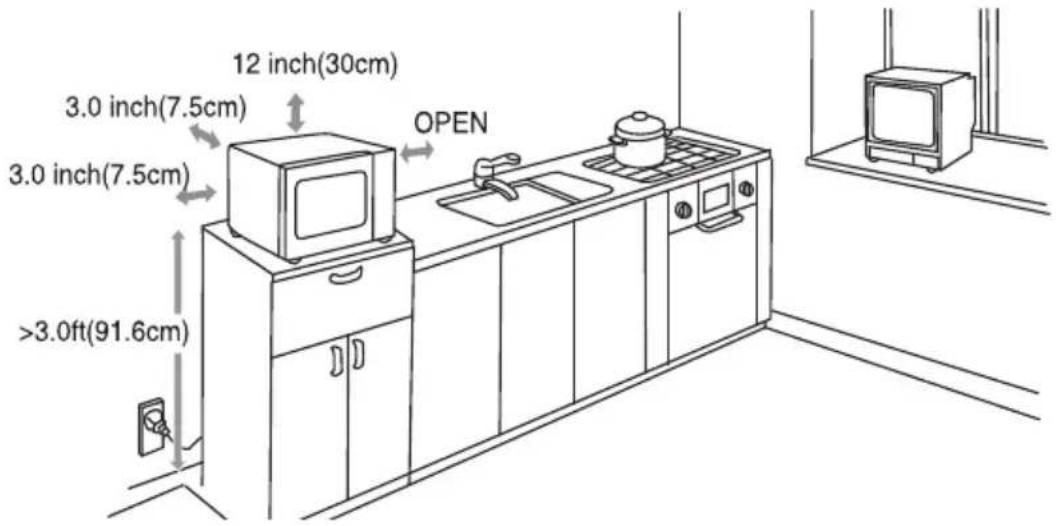
- Leave a minimum clearance of 12 inches (30cm) above the oven.
- Do not remove the legs from the bottom of the oven.
- Blocking the intake and/or outlet openings can damage the oven.
-
Place the oven as far away from radios and TV as possible. Operation of microwave oven may cause interference to your radio or TV reception.
-
Plug your oven into a standard household outlet. Be sure the voltage and the frequency is the same as the voltage and the frequency on the rating label.
WARNING: Do not install oven over a range cooktop or other heat-producing appliance. If installed near or over a heat source, the oven could be damaged and the warranty would be void.
WARNING:
Do not install oven over a range cooktop or other heat-producing appliance. If installed near or over a heat source, the oven could be damaged and the warranty would be void.
The accessible surface may be hot during operation.
Microwave
Grill/Combi./Convection
Air Fry
Weight/Time Defrost
Kitchen Timer/Clock
Stop/Clear
Start/+30sec.
MICROWAVE OVEN USE
Setting The Clock
When the microwave oven is electrified, the screen will display "0:00", the buzzer will ring once.
- In standby mode, press "Kitchen Timer/Clock" twice, the screen displays "01:00".
- Turn " " to adjust the hour figures, the maximum value is 12.
- Press "Start/+30sec." to confirm, the minute figures will flash.
- Turn " " to adjust the minute figures, the maximum value is 59.
-
Press "Start/+30sec." to finish clock setting. Note:
-
The clock will not work if it is not set when powered.
-
After step 4, if you do not press "Start/+30sec." within 5 minutes, the oven will go back to the previous status automatically.
Kitchen Timer
- In standby mode, press "Kitchen Timer/ Clock" once, the screen displays "00:00".
- Tum " " to set the kitchen timer. (The maximum value is 95:00).
- Press " Start/+30sec. " to start counting down.
Microwave Cooking
- Press " Microwave " once, " P100 " will flash on the screen.
- Press "Microwave" repeatedly to select microwave power from P100 to P10.
- Press "Start/+30Sec." to confirm the power.
- Tum " " to adjust the cooking time. (The maximum value is 95:00).
- Press "Start/+30sec." to start cooking.
Microwave Power Chart
| Level Power | |
| High P100 | |
| M.High P80 | |
| Med | P50 |
| M.Low | P30 |
| Low | P10 |
Weight Defrost
- In standby mode, press "Weight/Time Defrost" once, the screen displays "dEF1"
- Tum " 🔍 " to select the weight of food. The defrost weight only should be within 4\~70 Oz.
- Press "Start/+30sec." to start defrosting. Note: During defrosting, the buzzer will sound to remind you of turning over the food.
Time Defrost
- In standby mode, press "Weight/Time Defrost" twice, the screen displays "dEF2".
- Tum " " to select the defrost time, the maximum value is 95:00.
- Press "Start/+30sec." to start defrosting. Note: During defrosting, the buzzer will sound to remind you of turning over the food.
Grill Cooking
- Press "Grill/Combi./Convection" once, "G" will flash on the screen.
- Press "Start/+30Sec." to confirm.
- Tum " "to adjust the cooking time. (The maximum value is 95:00)
- Press "Start/+30Sec." to start cooking. Note: When half of the time arrived in, the buzzer will sound to remind you of turning over the food.
Convection Cooking
- Press " Grill/Combi./Convection " once, " G " will display.
- Press " Grill/Combi./Convection " repeatedly or turn " to select the convection temperature .The temperature can be chosen from 100°F\~425°F.
- Press "Start/+30Sec." to confirm the temperature.
- Press " Start/+30Sec. " again to start preheating. When the preheating temperature arrives, the buzzer will sound twice to remind you to put the food into the oven. And the preheated temperature is displayed and flashes. Put the food into the oven and close the door.(If you don't need preheating,skip the step 4).
- Tum " " to adjust the cooking time.
- Press "Start/+30Sec." to start cooking.
Combi. Cooking
- Press " Grill/Combi./Convection " once,"G " will flash on the screen.
- Press " Grill/Combi./Convection " repeatedly or turn " [icon] to set the combinate mode, "C-1,C-2" are available.
- Press "Start/+30Sec." to confirm.
- Tum " " to adjust the cooking time.(The maximum value is 95:00).
- Press "Start/+30Sec." to start cooking.
Note: Combination instructions
| Instructions Display Microwave Grill Convection | ||
| 1 C-1 | ● | ● |
| 2 C-2 | ● | ● |
Multi-Stage Cooking
Two stages can be maximumly set. If one stage is defrosting, it should be put in the first stage automatically. The buzzer will sound after each stage and the next stage will begin. Note: Kitchen timer, auto menu, speedy cooking or preheating can't be set as one of the multi-stage.
For example, setting the multi-stage cooking for 7 minutes' defrosting and 3 minutes' grilling:
- In standby mode, press "Weight/Time Defrost" twice, the screen displays "dEF2".
-
Turn " 🔍" to select the defrost time until 07:00 displays.
-
Press "Grill/Combi./Convection" once, "G" will flash on the screen.
- Press "Start/+30Sec." to confirm.
- Turn " 🔍 " to adjust the cooking time until 03:00 displays.
- Press "Start/+30Sec." to start cooking.
Speedy Cooking
- In standby state, press "Start/+30Sec." to start cooking with 100% power for 30 seconds, each added press will increase 30 seconds cooking time up to 95 minutes.
- In standby state, turn " left to choose cooking time for 95 minutes with P100 power level directly, turn " repeatedly to set the cooking time, and then press " Start/+30Sec." to start cooking.
Child-Lock
To lock the microwave so that it cannot be operated by children or other unintended users.
Lock: In standby or colck state, press "Stop/Clear" for 3 seconds, there will be a long beep, the screen will display locked icon and current time (if the clock is set).
Lock quitting: In locked state, press "Stop/Clear" for 3 seconds, there will be a "beep" denoting that the lock is released, and the lock indicator will disappear.
AirFry Menu
- In standby mode, press "Air Fry" once, "H-01" will display.
- Tum "or press "Air Fry" repeatedly to set the menu.H-01\~H-10 will display.
- Press "Start/+30Sec." to start cooking.
Air Fry Menu Chart
| Display | Menu | Weight |
| H-01 Frozen French Fries 11 Oz | ||
| H-02 Frozen onion Rings | 10 Oz | |
| H-03 | Frozen chicken nuggets | 12 Oz |
| H-04 | Frozen chicken wings | 18 Oz |
| H-05 | Frozen chicken legs | 27 Oz |
| H-06 | Chicken Tenders | 11 Oz |
| H-07 | Frozen Shrimps | 9 Oz |
| H-08 Fish Sticks 12 Oz |
| H-09 Spring Rolls 11 Oz |
| H-10 Mozzrarella Sticks 11 Oz |
Auto Menu
- In standby mode, turn "right to choose the menu, and "A-01" to "A-10" will display in order.
- Press "Start/+30Sec." to confirm the desired menu.
- Turn " " to choose the weight of menu.
- Press "Start/+30Sec." to start cooking.
Auto menu Chart
| Display | Menu | Weight |
| A-01 Potato | 1(8oz) | |
| 2 | ||
| 3 | ||
| A-02 Pizza | 4.0 Oz | |
| 8.0 Oz | ||
| 14.0 Oz |
| A-03 Auto Reheat | 9.0 Oz | |
| 12.0 Oz | ||
| 18.0 Oz | ||
| A-04 Popcorn | 3.2 Oz | |
| 3.5 Oz | ||
| A-05 Beverage | 4.0 OZ | |
| 8.0 OZ | ||
| 12.0 OZ | ||
| A-06 Soup | 8.0 OZ | |
| 16.0 OZ | ||
| 24.0 OZ | ||
| A-07 | Vegetables | 4.0 OZ |
| 8.0 OZ | ||
| 16.0 OZ | ||
| A-08 | Oatmeal | 28.0 OZ |
| A-09 Cake | 16.0 OZ | |
| A-10 Cookie | 7.5 OZ | |
MAINTENANCE
Troubleshooting
Check your problem by using the chart below and try the solutions for each problem. If the microwave oven still does not work properly, contact the nearest authorized service center.
If the unit is within the warranty period, please contact customer service at 888-775-0202.
TROUBLE POSSIBLE CAUSE POSSIBLE REMEDY
| Oven will not start | 1. Electrical cord for oven is not plugged in.2. Door is open.3. Wrong operation is set. | 1. Plug into the outlet.2. Close the door and try again.3. Check instructions. |
| Arcing or sparking | 1. Materials to be avoided in microwave oven were used.2. The oven is operated when empty.3. Spilled food remains in the cavity. | 1. Use microwave-safe cookware only.2. Do not operate with oven empty.3. Clean cavity with wet towel. |
| Unevenly cooked foods | 1. Materials to be avoided in microwave oven were used.2. Food is not defrosted completely.3. Cooking time, power level is not suitable.4. Food is not turned or stirred. | 1. Use microwave-safe cookware only.2. Completely defrost food.3. Use correct cooking time, power level.4. Turn or stir food. |
| Overcooked foods | Cooking time, power level is not suitable. | Use correct cooking time, power level. |
| Undercooked foods | 1. Materials to be avoided in microwave oven were used.2. Food is not defrosted completely.3. Oven ventilation ports are restricted.4. Cooking time, power level is not suitable. | 1. Use microwave-safe cookware only.2. Completely defrost food.3. Check to see that oven venti- lation ports are not restricted.4. Use correct cooking time, power level. |
| Improper defrosting | 1. Materials to be avoided in microwave oven were used.2. Cooking time, power level is not suitable.3. Food is not turned or stirred. | 1. Use microwave-safe cookware only.2. Use correct cooking time, power level.3. Turn or stir food. |
Limited Warranty
MC Appliance Corporation warrants each new Counvertop Microwave Oven to be free from defects in material and workmanship, and agrees to remedy any such defect or to furnish a new part(s), at the company's option, for any part(s) of the unit that have failed during the warranty period. Parts and labor expenses are covered on this unit for a period of one year from the date of purchase. A copy of the dated sales receipt or invoice is required to receive warranty service by an authorized service agent.
In addition, MC Appliance Corporation warrants the magnetron (parts only) to be free from defects in material and workmanship for a period of eight years. The consumer is responsible for all labor and transportation expenses related to the diagnosis and replacement of the magnetron after the initial one-year warranty expires. In the event the unit requires replacement or refund under the terms of this warranty, the consumer is responsible for all transportation expenses to return the unit to our factory prior to receiving a replacement unit or refund. A copy of the dated sales receipt/invoice is required to receive warranty service, replacement or refund.
This warranty covers appliances in use within the continental United States, Alaska, Hawaii and Puerto Rico. This warranty does not cover the following:
- Damages due to shipping damage or improper installation.
• Damages due to misuse or abuse.
- Content losses due to failure of the unit.
- Inside components such as turntable, roller guide, light bulbs, etc.
• Repairs performed by unauthorized service agents.
- Service calls that do not involve defects in material and workmanship such as instructions on proper use of the product or improper installation.
- Replacement or resetting of house fuses or circuit breakers.
- Failure of this product if used for other purposes than its intended purpose.
- Disposal costs for any failed unit not returned to our factory.
- Any delivery/installation costs incurred as the result of a unit that fails to perform as specified.
- Expenses for travel and transportation for product service if your appliance is located in a remote area where service by an authorized service technician is not available.
- The removal and reinstallation of your appliance if it is installed in an inaccessible location or is not installed in accordance with published installation instructions.
• Refunds for non repairable products are limited to the price paid for the unit per the sales receipt.
Limitations of Remedies and Exclusions:
Product repair in accordance with the terms herein, is your sole and exclusive remedy under this limited warranty. Any and all implied warranties including merchantability and fitness for a particular purpose are hereby limited to one year or the shortest period allowed by law. MC Appliance Corporation is not liable for incidental or consequential damages and no representative or person is authorized to assume for us any other liability in connection with the sale of this product. Under no circumstances is the consumer permitted to return this unit to the factory without the prior written consent of MC Appliance Corporation.
Some states prohibit the exclusion or limitation of incidental or consequential damages, or limitations on implied warranties. This warranty gives you specific legal rights, and you may also have other rights which vary from state to state.
Model
MC110AMST
One Year Eight Years
Carry In
Type of ServiceMagnetron (Part
For Service or Assistance please call 888-775-0202 or visit us on the web at www.mcappliance.com to request warranty service or order parts.
CNA International, Inc. d/b/a MC Appliance Corporation. All rights reserved. Magic Chef® logo is a registered trademark of CNA International, Inc.
- Countertop Microwave Oven
- Product Registration
- PRECAUTIONS TO AVOID POSSIBLE EXPOSURE TO EXCESSIVE MICROWAVE ENERGY
- TABLE OF CONTENTS
- PRECAUTIONS TO AVOID POSSIBLE EXPOSURE TO EXCESSIVE MICROWAVE ENERGY.... 1
- IMPORTANT SAFETY INSTRUCTIONS
- SAVE THESE INSTRUCTIONS
- GROUNDING INSTRUCTIONS
- WARNING:
- DANGER:
- RADIO INTERFERENCE
- THIS DEVICE COMPLIES WITH PART 18 OF THE FCC RULES.
- SPECIFICATIONS
- UTENSILS
- CAUTION:
- Utensil Test:
- MATERIALS YOU CAN USE IN MICROWAVE OVEN
- MATERIALS TO BE AVOIDED IN MICROWAVE OVEN
- SETTING UP YOUR OVEN
- Names of Oven Parts and Accessories
- Note:
- COUNTERTOP INSTALLATION
- INSTALLATION
- MICROWAVE OVEN USE
- Setting The Clock
- Kitchen Timer
- Microwave Cooking
- Weight Defrost
- Time Defrost
- Grill Cooking
- Convection Cooking
- Combi. Cooking
- Multi-Stage Cooking
- Speedy Cooking
- Child-Lock
- AirFry Menu
- Auto Menu
- MAINTENANCE
- Troubleshooting
- Limited Warranty
- Limitations of Remedies and Exclusions:
Brand : Magic Chef
Model : MC110AMST
Category : Microwaves