
AFS518 - Steam cleaner Airflo - Free user manual and instructions
Find the device manual for free AFS518 Airflo in PDF.

| Product Type | Steam Cleaner |
| Brand | Airflo |
| Model | AFS518 |
| Power Consumption | 1500 W |
| Water Tank Capacity | 1.2 L |
| Heating Time | Approximately 3 minutes |
| Steam Pressure | 4 bar |
| Steam Flow Rate | 35 g/min |
| Boiler Material | Stainless steel |
| Cord Length | 5 m |
| Weight | 3.2 kg |
| Dimensions (L x W x H) | 30 x 25 x 28 cm |
| Safety Features | Auto shut-off, safety valve, overheating protection |
| Attachments Included | Floor mop, detail brush, squeegee, extension tubes |
| Water Level Indicator | Yes |
| Adjustable Steam Control | Yes |
| Continuous Fill | No |
| Descalable | Yes |
| Maintenance | Descaling recommended every 3 months |
| Warranty | 2 years |
Frequently Asked Questions - AFS518 Airflo
User questions about AFS518 Airflo
0 question about this device. Answer the ones you know or ask your own.
Ask a new question about this device
Download the instructions for your Steam cleaner in PDF format for free! Find your manual AFS518 - Airflo and take your electronic device back in hand. On this page are published all the documents necessary for the use of your device. AFS518 by Airflo.
USER MANUAL AFS518 Airflo
natural_image
Red and black electric vacuum cleaner with long black arm and white base (no text or symbols visible)Multi Steamer
Model AFS 518
SAFETY INSTRUCTIONS
- Do not operate machine without water in the tank.
- Do not allow machine to run unattended at any time.
- Do not allow this appliance to be used as a toy.
- Do not direct steam at people, animals or at electrical devices.
● The machine is designed for household use only, do not expose to rain. - Do not overfill the water tank. The machine has a maximum of 1200ml of water only. Overfilling the water tank may cause damage or injury.
- Never turn the machine over or tilt more than 45 degrees when it is switched on or if it's still producing steam.
● Never use this machine to clean electronic devices or installations - Do not run steam cleaner for more than 1 hour at a time.
- Use extra care when cleaning on stairs.
- Do not immerse cord, plug or machine in water or any other liquid.
- Do not operate with a damaged cord. If the power cord is damaged or any improper performance of this machine occurs, it should be repaired by a qualified electrician only.
- Do not operate machine barefooted or even with only open shoes or sandals.
- Do not pull or carry using the cord or use the cord as a handle or close the door on the cord or pull cord around sharp edges or corners. Keep the cord away from heated surfaces.
● Unplug appliance when not in use. Turn all controls off before unplugging from mains. - Do not unplug by pulling on the cord. Always grasp the plug, not the cord. Never handle plug or appliance with wet hands.
- Store in a dry place. Do not expose the steamer to freezing temperatures.
- Do not try to repair the appliance yourself. Contact a qualified technician. To avoid danger, a defective cable should be replaced only with an equivalent cable by an authorized service man.
- Regularly check the appliance and the cable. Do not switch the appliance on if it is damaged.
- The liquid or steam must not be directed towards equipment containing electrical components.
- If there is excess steam emission from the fill cap, switch off and unplug the cleaner at once. The cleaner should be checked and repaired by a service agent.
- If the supply cord is damaged, it must be replaced by the manufacturer, its service agent or similarly qualified persons in order to avoid a hazard.
- This appliance is not intended for use by persons (including children) with reduced physical, sensory or mental capabilities, or lack of experience and knowledge, unless they have been given supervision or instruction concerning use of the appliance by a person responsible for their safety.
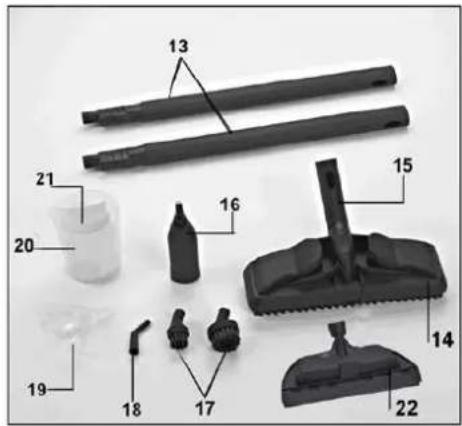
The two extension wands allow you to select various lengths for comfortable operation
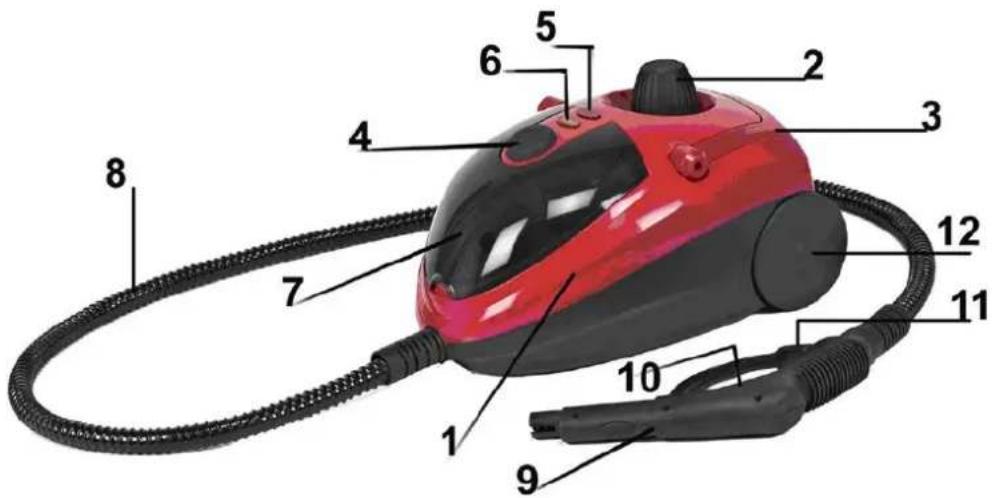
- Water tank
- Pressure Cap
- Carry handle
- On/off switch
- Operating indicator
- Steam indicator switch
- Accessories store
- Fixed steam hose
- Steam Gun
- Steam trigger
-
Red Safety button
-
Wheels
- Snap on extension wands
- Floor Brush
- Floor angled detail tool
- Adaptors for accessories
- Multi-purpose round brushes
- High pressure nozzle
- Funnel
- Measuring jug
- Cleaning cloth
- Windows brush
OPERATING INSTRUCTIONS
● Make sure the machine is unplugged from the mains.
● Unscrew the safety cap (2) by turning it counterclockwise.
- Using the measuring jug and funnel (20), fill the machine with up to 1200ml of water. This should be sufficient to steam clean for approximately one hour.
● Once full, replace the safety cap by turning clockwise and fasten tightly.
- Attach the accessory or floor cleaning tool you require to the machine.
- Now plug the machine into the mains and switch on. Two lights should illuminate. The red light (5) is a power indicator. The orange light (6) indicates that the machine is building up steam pressure. When the machine is first switched on this light will illuminate and the machine can take up to 8 minutes to reach the correct pressure level depending on the amount of water in the tank.
- Once the orange light has gone out, the machine is ready to use. The orange light may come back on when the machine is in use. If this happens, release the safety trigger and allow the steam pressure to build up once again. This should take no longer than 40 seconds. If the safety trigger is pressed when the orange light is on hot water may come out of the machine.

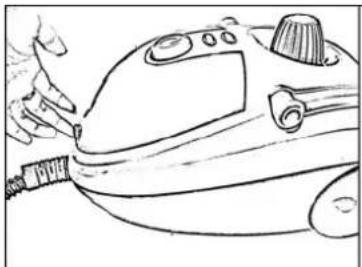
natural_image
Red and black electric vacuum cleaner with a hand pointing to the button (no visible text or symbols)
natural_image
Hand operating a red and black vacuum cleaner with a button, no visible text or symbols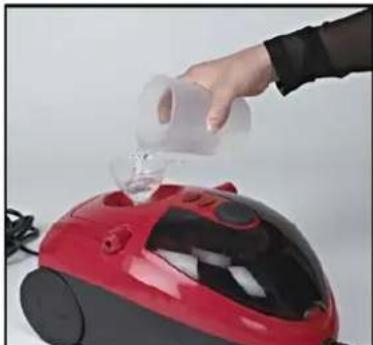
natural_image
Hand pouring liquid into a red and black vacuum cleaner (no text or symbols visible)REFILLING THE WATER TANK
● Switch the machine off using the on/off button(4)
- Disconnect the power cable from the mains.
- Wait 5 minutes before squeezing the safety trigger to make sure that the machine is no longer under pressure. Then, unscrew the safety cap. DO NOT unscrew the safety cap until the steam has stopped.
● Fill the water tank as necessary using the funnel provided.
- DO NOT exceed 1200ml of water before replacing the safety cap by turning clockwise. Fasten cap tightly.
● You are now ready to switch the machine on and resume steam cleaning.
If you live in a hard water area, it is best to use distilled water (this prevents internal lime scale that may damage the steam system)
CLEANING FLOORS
Attach the floor brush to the extension wands / rods, which snap together. Then attach the extension rod to the steam gun. Ensure the extension rods are firmly connected. Before cleaning, always remove dust from the surface you wish to clean.
To release the extension rods, press the button on the hose connection.
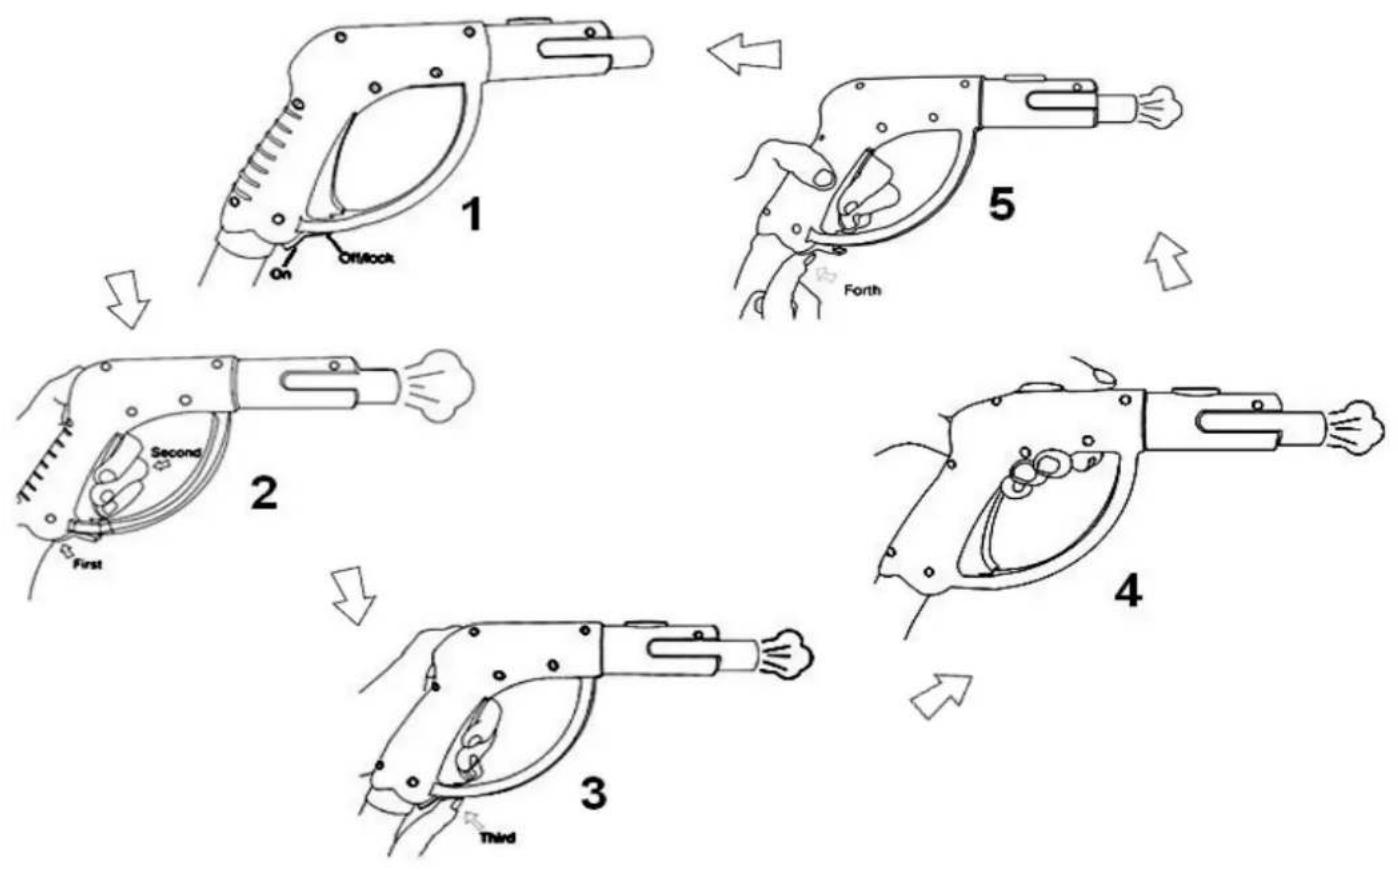
Cleaning floors and carpets with the cleaning cloth
While the machine is switched off, attach the cleaning cloth to the floor brush via the spring loaded clips. Make sure the edges of the cleaning cloth are secure. DO NOT attempt to do this while the machine is still hot. Never remove the cleaning cloth whilst the safety trigger is released or the machine is warm to the touch.

Warning - risk of injury!

natural_image
Person in traditional patterned robe holding a black cylindrical object (no visible text or symbols)
natural_image
Person holding a black handheld device with a small connector, wearing a patterned garment (no visible text or symbols)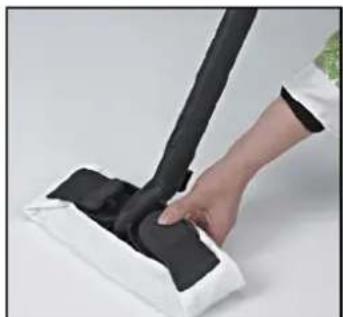
natural_image
Person using a black cloth to clean or wash the fabric (no text or symbols visible)FITTING THE ACCESSORIES
The accessories may be fitted to the steam gun (9) using adaptors (16). When using the round brushes or high-pressure nozzle, the adaptor (16) is required.
natural_image
Line drawing of a hand using a power tool to clean or install a steam machine (no text or symbols present)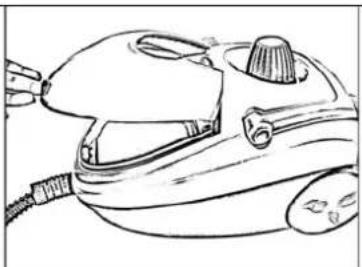
natural_image
Line drawing of a steam iron with handle and cord (no text or symbols)
natural_image
Line drawing of a steam iron with a magnified inset showing internal components (no text or symbols)CLEANING AND MAINTENANCE
Cleaning and maintenance operations should be carried out with the appliance disconnected from the power supply. The machine should be allowed to completely cool down before it is stored away or cleaned. Clean the machine and its accessories with a slightly damp cloth only.
Never use a cleaning product or detergent. To ensure that your machine operates correctly over a long period, rinse out the water tank once a month to remove lime-scale deposits. Never use vinegar or a lime-scale remover.
SWITCHING ON THE APPLIANCE
Before switching on the appliance, check that the mains voltage that you want to use is suitable for the appliance. The information you need for this is shown on the identification plate.

natural_image
Close-up of a hand holding a black electric vehicle charging plug, with an inset close-up showing the cable attachment detail (no text or symbols visible)You will find the Steam Trigger and the Red Safety Button on the steam gun.
The Red Safety Button is marked with an "Off / Lock" or "On".
a) Steam spraying
Set Red Safety Button to "ON" position and press the Steam Trigger. This will release a spray of steam. Keeping your finger on the trigger constantly will release continuous steam.
(See sketch No.2)
b) Auto continuous steam spray
If you want continuous steam without constant depressing the trigger, press the Red Safety Button to "Off/Lock" position (See sketch Nos. 3+4)
c) Close
When you wish to return to manual spray, press the Red Safety Button to the "On" position. To lock the spray gun, press the safety button to the "Off /Lock" position. This will disable the spray gun. When storing, it is recommended to lock the spray gun.
flowchart
graph TD
    A["1: On/Offlock"] --> B["2: Second"]
    B --> C["3: Third"]
    C --> D["4: Fourth"]
    D --> E["5: Forth"]
ACCESSORIES
The accessories provided allow you to use the power of steam to blast away grease, grime, mildew, scum, kill dust mites, fleas and harmful germs with minimum effort – especially in difficult-to-reach-and-clean areas – and without the use of chemicals.
Cleaning Cloth (15)
The Cleaning Cloth is machine washable when dirty. It easily fits to the floor brush via spring loaded clips. The cloth is designed to lift, trap and absorb dirt in sensitive cleaning surfaces, leaving surfaces clean and sanitized.
natural_image
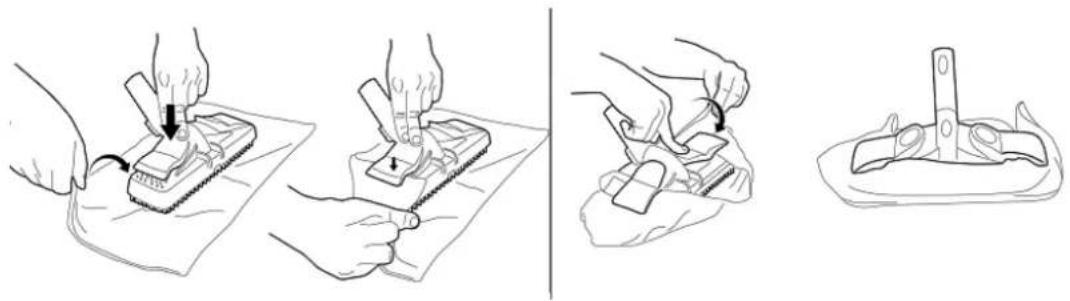
Illustration showing three sequential steps of a tool application: cutting, holding a tool, and holding a tool (no text or symbols present)Floor Brush (14)
The floor brush fits well with the Floor-Angled Detail Tool
Use with extension rods for floor and carpet cleaning. It has spring loaded clips to hold the cleaning cloth. Its brush bristles loosen dirt and open fibers for steam to penetrate.

natural_image
Illustration of a hand holding a tool, showing sequential steps from application to assembly (no text or symbols)Extension rods (13)
The two extension rods allow you to select various lengths for comfortable operation, reducing the need to bend while enabling you to reach high places. The rods or wands and accessories snap-lock into place for a leak-free operation.
Round Brushes (17)
The Round Brushes are essential for cleaning small and hard-to-reach areas. Use on tile grout, grates, grills and bathroom fittings. These small round brushes fit on the end of the steam gun(9), using both 16a and 16b adaptors.
Squeegee (19)
Use on mirrors, windows or other smooth surfaces. Steam loosens surface dirt and the rubber blade of the squeegee scrapes it clean. It attaches directly to the steam gun using both 16a and 16b adaptors.
High Pressure Nozzle (18)
Allows for concentrated high pressure steam flow. Connects directly to the steam gun using both 16a and 16b adaptors.
Water Funnel and Measuring Jug (19+20+21)
Use the measuring jug to ensure you fill the machine with the correct amount of water. The funnel ensures no mess when filling the tank.


WARNING!
DO NOT switch this machine on or attempt to use it without water in the tank. NEVER operate without the safety cap screwed tightly in place.
Read the attached safety instructions carefully before proceeding.

CAUTION!
Cleaning Fabrics: When cleaning fabrics, a number of materials and fabrics are NOT suitable to be cleaned by steam. Do not use on leather, wax-polished furniture or floors, synthetic fabrics, velvet, dralon or other delicate,
steam-sensitive materials.
Cleaning Glass/Mirrors: Thermal shock can also shatter glass. Before cleaning glass surfaces, carefully warm the surface by directing the steam jet on the glass from a distance of no less than 6" or 15cm.

CAUTION!
We recommend you test (in a safe area before cleaning) for colour and fabric sensitivity. If color or appearance is affected DO NOT proceed to steam clean.
TROUBLESHOOTING
Water comes out of the nozzle
The Steam Cleaner develops a massive amount of steam. This may condense as water or water droplets in the steam hose and tools and nozzle, which are then expelled when used after a period of cooling. This is normal and not a cause for concern.
No steam comes out
Check in case the hose has become kinked or blocked, or that you have run out of water or power.
I can't get the pressure cap off
Make sure that you have fully de-pressurized the boiler. See the section REFILLING WITH WATER IN USE.
Steam flow is erratic; sometimes it works really well, sometimes not so good
You may have a small blockage inside your Steam Cleaner.
I have hard water and use boiled water from the kettle, or water that I left in the boiler, now my Steam Cleaner doesn't work well at all.
Actually, you have made matters worse because boiled water concentrates the minerals that form lime scale rather than boiling them away. Water left in the boiler will go off and may create a reaction with the boiler and/or the steam hose. So, ALWAYS empty the machine after use and NEVER use boiled water.
PLEASE RETAIN IN A SAFE PLACE FOR FUTURE REFERENCE.


- SAFETY INSTRUCTIONS
- OPERATING INSTRUCTIONS
- REFILLING THE WATER TANK
- CLEANING FLOORS
- Cleaning floors and carpets with the cleaning cloth
- FITTING THE ACCESSORIES
- CLEANING AND MAINTENANCE
- SWITCHING ON THE APPLIANCE
- a) Steam spraying
- b) Auto continuous steam spray
- c) Close
- ACCESSORIES
- Cleaning Cloth (15)
- Floor Brush (14)
- Extension rods (13)
- Round Brushes (17)
- Squeegee (19)
- High Pressure Nozzle (18)
- Water Funnel and Measuring Jug (19+20+21)
- WARNING!
- CAUTION!
- TROUBLESHOOTING
Brand : Airflo
Model : AFS518
Category : Steam cleaner