
SBT559 - Headphones Sharper Image - Free user manual and instructions
Find the device manual for free SBT559 Sharper Image in PDF.


| Product Type | Wireless Headphones |
| Brand | Sharper Image |
| Model | SBT559 |
| Connectivity | Bluetooth 5.0 |
| Driver Size | 40mm |
| Frequency Response | 20Hz - 20kHz |
| Impedance | 32 Ohms |
| Battery Capacity | 300mAh |
| Battery Life | Up to 12 hours |
| Charging Time | 2 hours |
| Charging Port | USB-C |
| Microphone | Built-in with noise reduction |
| Controls | Multifunction button, volume up/down |
| Weight | 0.5 lbs (227 g) |
| Dimensions (folded) | 7.5 x 6.5 x 3 in |
| Ear Cushion Material | Memory foam with leatherette |
| Adjustable Headband | Yes |
| Foldable Design | Yes |
| Color Options | Black |
| Accessories Included | USB charging cable, audio cable, user manual |
| Cleaning Instructions | Wipe with dry soft cloth; avoid liquids |
| Repairability | Replaceable ear cushions |
Frequently Asked Questions - SBT559 Sharper Image
User questions about SBT559 Sharper Image
0 question about this device. Answer the ones you know or ask your own.
Ask a new question about this device
Download the instructions for your Headphones in PDF format for free! Find your manual SBT559 - Sharper Image and take your electronic device back in hand. On this page are published all the documents necessary for the use of your device. SBT559 by Sharper Image.
USER MANUAL SBT559 Sharper Image
In the box in the box

Bluetooth Headphones

User Guide

Charging the Bluetooth HeadphonesCha
- Connect the small end of the Micro USB charging cable to the charging port on the headphones.
- Connect the large end of the Micro USB charging cable to your computer's USB port or an AC adapter (not included).
- The LED indicator light turns RED when charging.
- When fully charged, the LED indicator light turns off.
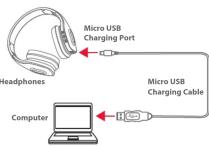

Make sure you charge your headphones for hours before using them for the first time.
Pairing the headphones with a Bluetooth enabled device
. Press and HOLD the [∅] button for 6 seconds until the voice prompt "Bluetooth enter pairing mode" is heard and the LED indicator light flashes RED and BLUE alternately.
- Keep your Bluetooth headphones and Bluetooth enabled device within 3 feet of each other during the pairing process.
. Set your mobile phone or other Bluetooth enabled device to search for Bluetooth devices.

On an iPhone
- Go to SETTINGS > BLUETOOTH (Make sure Bluetooth is turned ON)

On a Blackberry
- Go to SETTINGS/OPTIONS > BLUETOOTH
- Enable BLUETOOTH
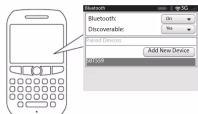
On an Android Phone
- Go to SETTINGS > BLUETOOTH
Search for devices (Make sure Bluetooth is turned ON)

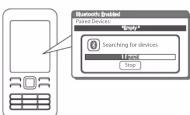
On other Cell Phones/Devices
-
Review the instruction manual that came with your phone/device.
-
When the Bluetooth enabled device finds the headphones, select "SBT559" from the list of found devices.
-
If required, enter the password 0000. Select OK or Yes to pair with your device.
-
After a successful registration, the voice prompt "Bluetooth is connected" will be heard and the LED indicator light will slowly flash BLUE.

Pairing the headphones with a second Bluetooth enabled device
The SBT559 supports a multi-connect function that allows the headphones to pair with two mobile devices at the same time. To connect to a second device:
-
Make sure the headphones are connected to the first device.
-
Now power the headphones OFF.
-
Press and HOLD the [☐] button for 6 seconds until the voice prompt "Bluetooth enter pairing mode" is heard. The LED indicator light will flash RED and BLUE alternately.
-
Set your second mobile device to search for Bluetooth devices.
-
When the second mobile device finds the headset, select SBT559 from the list of found devices.
-
If required, enter the password 0000. Select OK or Yes to pair.
-
After a successful pairing, turn the headphones OFF, then turn them ON again. The headphones will automatically connect to both phones and the voice prompt "Bluetooth is connected" will be heard.
Using your Bluetooth Headphones Using Your Sketching Tips Phone-shooting Tips Warranty
Powering ON/OFF
- To turn ON, press and HOLD the [◎] button until the voice prompt "Bluetooth is turned on" is heard. - To turn OFF, press and HOLD the [◎] button until the voice prompt "Bluetooth is turned off" is heard.
Adjusting the volume
- To increase the volume, long press the [ + ] button. - To decrease the volume, long press the [ - ] button.
You can also adjust the volume from your connected device's volume control.
Answering/ending a call
- To answer a call, quick press the [◎] button. - To end a call, quick press the [◎] button again.
Rejecting a call
To reject a call, press the [◎] button for 2 seconds.
Redial a number
Double press the [⏻] button. The last number called will be redialed.
Playing MusicPlaying Music
To enjoy wireless music on your Bluetooth Headphones, make sure you are connected to a Bluetooth enabled device. Once connected, you can control the music with the controls on the headphones or on your connected device.

Play/pause
- Quick press the [⏻] button to play music. - Quick press the [⏻] button to pause music.
Skipping songs
- Quick press the [ + ] button to skip to the previous song.
- Quick press the [ - ] button to skip to the next song
Adjusting the volume
- To increase the volume, long press the [ + ] button. - To decrease the volume, long press [ - ] button.

Using as wired headphones Using a
. Connect the one end of the included 3.5m Auxiliary Cable to the AUX IN jack on the
headphones, and the other end of the cable to the
other end to an external device's headphone jack
(smartphone, tablet, computer, or MP3 player).
. Open a media player on your dev PLAY to start playing your music
. Use the controls on your connected device to
control music playback and volume


-
Make sure your Bluetooth device supports A2DP profile
-
Turn up the volume on your Bluetooth device.
-
You may have to unpair the headphones, then re-pair to your device.
I cannot get the Bluetooth headphones into Pairing mode.
-
Make sure the Bluetooth headphones are turned OFF before beginning the pairing process.
-
Press and HOLD the [☐] button for 6 seconds until the voice prompt "Bluetooth enter pairing mode" is heard and the LED indicator light flashes RED
and BLUE alternately. 4. Check that the headphones are charged.

- Make sure the Bluetooth headphones are turned Q55 before making the voice
OFF before beginning the pairing process.
device within 3 feet of each other during the pairing process
-
Check that YOUR device's Bluetooth feature is turned ON.
-
Try repeating the pairing process. See "Pairing the headphones with a Bluetooth-enabled device".
Legal informationLegal information
Caution: Any changes or modifications not expressly approved could void the user's authority to operate the equipment.
Note: This equipment has been tested and found to comply with the limits for a Class B digital device, pursuant to part 15 of the FCC Rules. These limits are designed to provide reasonable protection against harmful interference in a residential installation. This equipment generates, uses and can radiate radio frequency energy and, if not installed and used in accordance with the instructions, may cause harmful interference to radio communications. However, there is no guarantee that interference will not occur in a particular installation. If this equipment does cause harmful interference to radio or television reception, which can be determined by turning the equipment off and on, the user is encouraged to try to correct the interference by one or more of the following measures:
• Reorient or relocate the receiving antenna.
- Increase the separation between the equipment and receiver.
- Connect the support to an outlet on a circuit different from that to which the receiver is connected.
- Consult the dealer or an experienced radio/TV technician for help.

90 Days Limited Warranty
In the unlikely event that this product is defective, or does not perform properly, you may within ninety (90) days from your original date of purchase return it to the authorized service center for repair or exchange.
TO OBTAIN WARRANTY SERVICE:
- Call the Customer Support number located below, or go to our website portal to receive an SRO number.
- Provide proof of the date of purchase within the package (Dated bill of sale).
- Prepay all shipping costs to the authorized service center, and remember to insure your return.
- Include a return shipping address (no P.O. Boxes), a
telephone contact number, and the defective unit within the package.
- Describe the defect or reason you are returning the product.
Your product will be repaired or replaced, at our option, for the same or similar model of equal value if examination by the service center determines this product is defective. Products received damaged as a result of shipping will require you to file a claim with the carrier.
The shipping address of the authorized service center is:
Southern Telecom, Inc.
14-C 53rd Street
Brooklyn, NY 11232
Should you have any questions or problems concerning this product, please contact our customer service department at:
Customer Support:
Phone: 1-877-768-8481 Monday Friday 8AM 10
1.2.2023, 1987, 2011, 12:16 (22):
www.southerntelecom.com
Warranty service not provided
This warranty does not cover damage resulting from accident, misuse, abuse, improper installation or operation, lack of reasonable care, and unauthorized modification. This warranty is voided in the event any unauthorized person opens, alters or repairs this product. All products being returned to the authorized service center for repair must be suitably packaged.
Limitation of Warranty:
- THE WARRANTY STATED ABOVE IS THE ONLY WARRANTY APPLICABLE TO THIS PRODUCT. ALL OTHER WARRANTIES, EXPRESS OR IMPLIED (INCLUDING ALL IMPLIED WARRANTIES OF MERCHANTABILITY OR FITNESS FOR A PARTICULAR PURPOSE) ARE HEREBY DISCLAIMED. NO VERBAL OR WRITTEN INFORMATION GIVEN BY AIT, INC. ITS AGENTS, OR EMPLOYEES SHALL CREATE A GUARANTY OR IN ANY WAY INCREASE THE SCOPE OF THIS WARRANTY.
- REPAIR OR REPLACEMENT AS PROVIDED UNDER THIS WARRANTY IS THE EXCLUSIVE REMEDY OF THE CONSUMER. AIT, INC. SHALL NOT BE LIABLE FOR INCIDENTAL OR CONSEQUENTIAL DAMAGES RESULTING FROM THE USE OF THIS PRODUCT OR ARISING OUT OF ANY BREACH OF ANY EXPRESS OR IMPLIED WARRANTY ON THIS PRODUCT. THIS DISCLAIMER OF WARRANTIES AND LIMITED WARRANTY ARE GOVERNED BY THE LAWS OF THE STATE OF NEW YORK. EXCEPT TO THE EXTENT PROHIBITED BY APPLICABLE LAW, ANY IMPLIED WARRANTY OF MERCHANTABILITY OR FITNESS FOR A PARTICULAR PURPOSE ON THIS PRODUCT IS LIMITED TO THE APPLICABLE WARRANTY PERIOD SET FORTH ABOVE.
Some states do not allow the exclusion nor limitation of incidental or consequential damages, or limitations on how long an implied warranty lasts so the above limitations on exclusions may not apply to you. This warranty gives you specific legal rights, and you also may have other rights that vary from state to state.
Sharper Image* name and logo are registered trademarks. Manufactured and
SHARPER IMAGE
- Pairing the headphones with a Bluetooth enabled device
- Pairing the headphones with a second Bluetooth enabled device
- Using your Bluetooth Headphones Using Your Sketching Tips Phone-shooting Tips Warranty
- Powering ON/OFF
- Adjusting the volume
- Answering/ending a call
- Rejecting a call
- Redial a number
- Playing MusicPlaying Music
- Play/pause
- Skipping songs
- Using as wired headphones Using a
- Legal informationLegal information
- Days Limited Warranty
- TO OBTAIN WARRANTY SERVICE:
- Southern Telecom, Inc.
- Brooklyn, NY 11232
- Warranty service not provided
- Limitation of Warranty:
- SHARPER IMAGE
Brand : Sharper Image
Model : SBT559
Category : Headphones