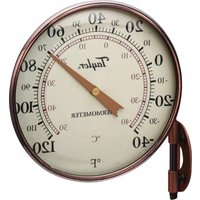
481CR - Thermometer Taylor - Free user manual and instructions
Find the device manual for free 481CR Taylor in PDF.


| Product Type | Thermometer |
| Brand | Taylor |
| Model | 481CR |
| Measurement Range | -40°F to 160°F (-40°C to 71°C) |
| Accuracy | ±2°F (±1°C) |
| Dial Diameter | 2 inches (5 cm) |
| Stem Length | 4 inches (10 cm) |
| Overall Dimensions | 6 x 2 x 0.5 inches (15.2 x 5 x 1.3 cm) |
| Weight | 1.6 oz (45 g) |
| Power Source | None (mechanical, no battery required) |
| Display Type | Analog dial with glass lens |
| Material | Stainless steel stem, plastic case |
| Usage | Oven, refrigerator, freezer, grill, and deep fryer |
| Mounting | Clip or hanging hole for storage |
| Calibration | Adjustable via nut on back; ice water test recommended |
| Cleaning | Wipe with damp cloth; do not submerge |
| Safety | Keep away from children; avoid direct heat sources |
| Storage | Store at room temperature in dry place |
| Warranty | 1-year limited |
Frequently Asked Questions - 481CR Taylor
User questions about 481CR Taylor
0 question about this device. Answer the ones you know or ask your own.
Ask a new question about this device
Download the instructions for your Thermometer in PDF format for free! Find your manual 481CR - Taylor and take your electronic device back in hand. On this page are published all the documents necessary for the use of your device. 481CR by Taylor.
USER MANUAL 481CR Taylor
Taylor® Heritage Collection
INDOOR/OUTDOOR DIAL THERMOMETER
Mounting Instructions for Model Number 481
Thank you for purchasing a Taylor Heritage Collection® Indoor/Outdoor Dial Thermometer. This classic icon is the perfect decorative accent for inside or outside the home. The thermometer shows temperature in Fahrenheit and Celsius providing an attractive, practical and weatherproof unit that will withstand the elements for years to come.
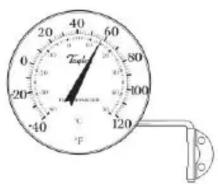
ASSEMBLY INSTRUCTIONS
- Place the “Z” shaped tube into the back of the dial. At the other end of the tube, place the half circle bracket over the end of the tube.
MOUNTING INSTRUCTIONS
- Select a desirable location out of direct sunlight for accurate temperature readings.
- Depending on the mounting surface material, you may need to pre-drill holes to install mounting screws.
- Use the two screws included in the box. Drive screws into surface leaving approximately 12 protruding.
- Mount the unit's metal hanging bracket using the screws.
- Tighten screws to secure the unit.
ONE YEAR LIMITED WARRANTY
This product is warranted against defects in materials or workmanship for one (1) year from date of original purchase for original purchaser. It does not cover damages or wear resulting from accident, misuse, abuse, commercial use, or unauthorized adjustment and/or repair. Should this product require service (or replacement at our option) while under warranty, do not return to retailer. Please pack the item carefully and return it prepaid, along with store receipt showing date of purchase and a note explaining reason for return to:
TAYLOR
2220 Entrada Del Sol, Suite A
Las Cruces, New Mexico 88001 USA
www.taylorusa.com
Email: taylorusa@lifetimebrands.com
There are no expressed warranties except as listed above. This warranty gives you specific legal rights, and you may have other rights which vary from state to state. For additional product information, or warranty information outside the USA, please contact us through www.taylorusa.com.
Made to our exact specifications in China.
Brand : Taylor
Model : 481CR
Category : Thermometer