
FZLS 1008V-E - Log splitter Fieldmann - Free user manual and instructions
Find the device manual for free FZLS 1008V-E Fieldmann in PDF.


| Product Type | Electric Log Splitter |
| Brand | Fieldmann |
| Model | FZLS 1008V-E |
| Motor Power | 3000 W (S6 40% duty cycle) |
| Voltage / Frequency | 230 V / 50 Hz |
| Current | 13 A |
| Maximum Splitting Force | 8 tons |
| Hydraulic Pressure | 21.0 MPa |
| Hydraulic Oil Capacity | 4 L |
| Log Diameter Capacity | 8 - 30 cm |
| Log Length Capacity | 10 - 55 cm |
| Ram Travel | 48.5 cm |
| Ram Forward Speed | 3.1 cm/s |
| Ram Retract Speed | 17.3 cm/s |
| Noise Level (No Load) | 74.7 dB(A) |
| Noise Level (Full Load) | 77.8 dB(A) |
| Vibration Level | < 2.5 m/s² |
| Overall Dimensions (L x W x H) | 84.5 x 93.5 x 150 cm |
| Weight | 109.9 kg |
| Safety Features | Two-hand control, wedge guard, emergency stop, overload protection |
| Included Accessories | Wheels, support table, adjustable log holder, control levers, hardware kit |
| Protection Class | IP54, Class I |
| Operating Temperature | +5°C to +40°C |
| Storage Temperature | -25°C to +55°C |
Frequently Asked Questions - FZLS 1008V-E Fieldmann
User questions about FZLS 1008V-E Fieldmann
0 question about this device. Answer the ones you know or ask your own.
Ask a new question about this device
Download the instructions for your Log splitter in PDF format for free! Find your manual FZLS 1008V-E - Fieldmann and take your electronic device back in hand. On this page are published all the documents necessary for the use of your device. FZLS 1008V-E by Fieldmann.
USER MANUAL FZLS 1008V-E Fieldmann
Home & Garden Performance
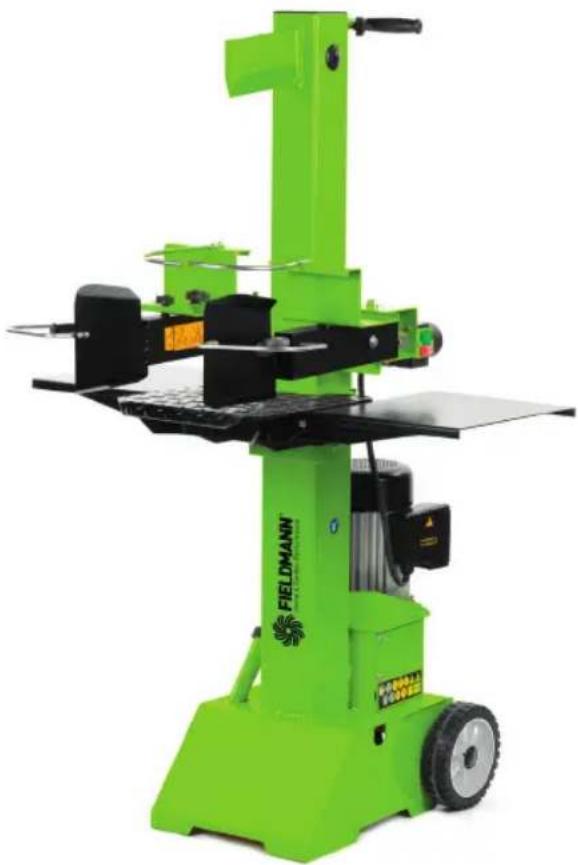
natural_image
Green Fieldmann milling machine with black and white components, no visible text or symbols on the device itself.FZLS 1008V-E
English 3-32
Čeština....33-62
Slovenčina 63-92
Magyarul....93-122
Polski 123-152
8T LOG SPLITTER USER'S MANUAL
TABLE OF CONTENTS
- GENERAL SAFETY INSTRUCTIONS....4
- SAFETY INSTRUCTIONS....5
- INTRODUCTION....8
- SYMBOLS 8
- SAFETY WARNINGS & INSTRUCTIONS.... 10
- CONTENTS SUPPLIED....14
- ASSEMBLY....15
- KNOW YOUR MACHINE....18
- TRANSPORT 19
- DELIVERING LOG SPLITTER TO WORK SITE....19
- SPLITTER OPERATION....20
- REPLACING HYDRAULIC OIL 23
- SHARPENING WEDGE....24
- TROUBLE SHOOTING 25
- WIRING DIAGRAM 26
- HYDRAULIC SYSTEM DIAGRAM 27
- PARTS SCHEMATIC....28
- DISPOSAL....31
- DECLARATION OF CONFORMITY....32
1. GENERAL SAFETY INSTRUCTIONS
Important safety notice
Carefully unpack the product and take care not to throw away any part of the packaging before you find all the parts of the product.
Store the product in a dry place out of reach of children.
Read all warnings and instructions. Not following warnings or instructions may lead to injury by electrical shock, a fire and/or serious injuries.
Packaging
The product is packed in a package that prevents damage during transport. This package is a resource and so can be handed over for recycling.
Operating instructions
Before you start working with the power tool, read the following safety and usage instructions. Understand the operating elements and the correct use of the power tool. Keep the user's manual in a safe place where it can be easily retrieved for future use. Save the original packaging, including the internal packing material, warranty card and proof of purchase receipt, at least for the duration of the warranty. If you need to ship this power tool, pack it in the original cardboard box to ensure maximum protection during shipping or transport (e.g. when moving or when you need to send this power tool for repair to a service centre).

Note: If you hand over the power tool to somebody else, do so together with this user's manual.
Following the instructions in the included user's manual is a prerequisite for the proper use of the power tool. The user's manual also contains operating, maintenance and repair instructions.
The manufacturer takes no responsibility for accidents or damages resulting from not following the instructions in this manual.
2. SAFETY INSTRUCTIONS
ATTENTION!
Acquaint yourself with all warnings and safety instructions and with operation instructions for the power tool.
ATTENTION!
Not adhering to warnings or safety instructions may result in injury by electrical shock, a fire and/or serious injury.
ATTENTION!
Store all warnings and safety instructions in a practical location for future reference.
Note: The term "power tool" in all hereafter provided warnings is defined as an electric power tool powered from the power grid (via a flexible power cord).
Safety in the work area
- Keep the work area tidy and well illuminated. Untidiness and dark locations in the workplace are sources of accidents.
Do not use the power tool in environments where there is a explosion hazard, where there are flammable liquids, gases or dust. The power tool generates sparks which could ignite dust or vapours.
When using the power tool, prevent children and other persons access to the power tool. If you become distracted, you may lose control over the power tool.
Safety when working with power tools
The plug on the flexible power cord must correspond to the power socket outlet. Never modify the plug in any way. Never use any socket adapters with power tools that have a safety earth grounding connection. Plugs that are not damaged by modifications and that correspond to the power socket will limit the danger of injury by electrical shock.
* Prevent your body from coming into contact with grounded objects, such as pipes, central heating radiators, stoves and refrigerators. The risk of injury by electrical shock is greater when your body is connected to the ground.
Do not expose the power tool to rain, dampness or wetness. The entry of water into the power tool increases the danger of injury by electrical shock.
Do not use the flexible power cord for other purposes. Never carry or pull the power tool by its power cord or pull the plug out of the socket by the power cord. Protect the power cord against heat, grease, sharp edges and moving parts. Damaged or tangled power cords increase the danger of injury by electrical shock.
If the power tool is used outdoors, use an extension cord suitable for outdoor use. Using extension cords designed for outdoor use limits the risk of injury by electrical shock.
If you will be using the power tool in a damp environment, use a residual current device (RCD) in the power supply circuit. The use of a residual current device reduces the risk of injury by electrical shock.
Note: The "residual current device" (RCD) may be substituted for by the term "ground fault circuit interrupter" (GFCI) or "earth leakage circuit breaker" (ELCB).
Safety of people
When working with the power tool, always stay alert, watch what you are doing and use common sense. Do not use power tools if you are tired or under the influence of drugs, alcohol or medication. A moment of carelessness when working with power tools may result in serious injury.
Use personal protective aids. Always use eye protection. Use protective aids, e.g. respirator, safety footwear with anti-slip soles, hard head cover or hearing protection appropriately to the work conditions; they reduce the risk of injury to persons.
Avoid accidentally starting up the power tool. Before connecting to a power source, before connecting the battery, before storage or before carrying the power tool, make sure that the start/stop trigger is in the off position. Carrying the power tool with a finger on the trigger or connecting the power tool's plug with the trigger engaged may cause an accident.
Remove all adjustment tools and spanners before turning on the power tool. An adjustment tool or spanner left attached to a rotating part of the power tool may result in injury to persons.
Only work in locations that you can reach safely. Always maintain a stable stance and balance. In this way you will have better control over the power tool in unexpected situations.
* Dress in an appropriate manner. Do not wear loose clothing or jewellery. Make sure that your hair, clothing and gloves are at a sufficient distance from moving parts. Loose clothing, jewellery and long hair may become caught in the moving parts.
If there is equipment available for the extraction and collection of dust, make sure that such equipment is connected and used correctly. The use of such equipment may limit the danger posed by the created dust.
Using power tools and their maintenance
Do not overload the power tool. Only use power tools that are appropriate for the work being performed. Appropriate power tools for the given task will do the job better and more safely.
Do not use power tools that cannot be turned on and off with a switch. Any electric power tools that cannot be controlled using a switch are dangerous and must be repaired.
Before adjusting the power tool, before replacing accessories or if you will not be using the power tool, pull the power plug out of the power socket. These preventative safety measures limit the danger of accidentally turning on the power tool.
When not used, store the power tool out of children's reach and do not permit person not acquainted with the power tool or these instructions to use the power tool. A power tool in the hands of inexperienced users is dangerous.
Perform maintenance on the tool. Check the adjustment of moving parts and their movement, focus on cracks, broken parts or any other circumstances that may threaten the proper operation of the power tool. If the power tool is damaged, have it repaired before using it again. Many accidents are caused by insufficiently maintained power tools.
Keep cutting power tools clean and sharp. Correctly maintained and sharpened cutting power tools are less likely to get stuck on material or to jam and they are also easier to control.
Use power tools, accessories, working tools, etc. in accordance with these instructions and in such a manner as prescribed for the specific power tool with respect to the given work conditions and the type of work being carried out. Using power tools for tasks other than for which they are designed may lead to dangerous situations.
Service
Have your power tool repaired by a qualified person that will use original spare parts. In this manner, the same level of safety will be ensured as before the repair of the power tool.
Storage
* only move or store the power tool with the protective cover attached
* carefully clean and perform appropriate maintenance before storing the power tool
before transporting the power tool, secure it against oil leakage, damage or injury hazard
3. INTRODUCTION
Your new log splitter will more than satisfy your expectations. It has been manufactured under stringent quality standards to meet superior performance criteria. You will find your new unit easy and safe to operate, and with proper care, it will give you many years of dependable service.

ATTENTION!
Carefully read through this entire operator's manual before using your new log splitter. Take special care to heed the cautions and warnings.
4. SYMBOLS
The rating plate on your machine may show symbols. These represent important information about the product or instructions on its use.
 | Read these instructions in full before using the machine. |
 | Wear safety footwear! |
 | Wear protective gloves! |
 | Wear eye protection!Wear hearing protection! |
  | Keep your work space tidy!Untidiness may result in accidents. |
 | Do not remove or tamper with any protection or safety devices. |
 | Dispose of the used oil in an environment-friendly way. |
 | Do not use in the rain. |
 | Danger! Keep clear of moving parts! |
 | Do not remove jammed logs with your hands. |
 | Before starting any repair maintenance or cleaning, always disconnect the power. |
 | Avoid injury from the movement of the splitting blade. |
 | Keep bystanders away from the working area. |
5. SAFETY WARNINGS & INSTRUCTIONS
UNDERSTAND YOUR LOG SPLITTER
Read and understand the owner's manual and labels affixed to the log splitter. Learn its application and limitations as well as the specific potential hazards peculiar to it.
DRUGS, ALCOHOL AND MEDICATION
Do not operate the log splitter while under the influence of drugs, alcohol, or any medication that could affect your ability to use it properly.
AVOID DANGEROUS CONDITIONS
Always operate your log splitter on dry, solid, level ground. Never operate your log splitter on slippery, wet, muddy, or icy surfaces. The location you choose should be free from any tall grass, brush, or other interferences. There should be plenty of room for handling, and help the operator stay alert. Keep your work area clean and well lighted.
Cluttered areas invites injuries. To avoid tripping, do not leave tools, logs, or other components laying around the work area. Do not use the log splitter in wet or damp areas or expose it to rain. Do not use it in areas where fumes from paint, solvents or flammable liquids pose a potential hazard.
INSPECT YOUR LOG SPLITTER
Check your log splitter before turning it on. Keep guards in place and in working order. Form a habit of checking to see that keys and adjusting wrenches are removed from tool area before turning it on. Replace damaged, missing or failed parts before using it. Make sure all nuts, bolts, screws, hydraulic fittings, hose clamps, etc. are securely tightened. Always check the oil level in the hydraulic oil tank. Never operate your log splitter when it is in need of repair or is in poor mechanical condition.
DRESS PROPERLY
Do not wear loose clothing, gloves, neckties or jewelry (rings, wrist watches).
They can be caught in moving parts.
Protective electrically non-conductive gloves and non-skid footwear are recommended when working. Wear protective hair covering to contain long hair, preventing it from getting caught in machinery.
PROTECT YOUR EYES AND FACE
Any log splitter may throw foreign objects into the eyes. This can cause permanent eye damage. Always wear safety goggles. Everyday eyeglasses have only impact resistant lenses. They are not safety glasses.
EXTENSION CORDS
Improper use of extension cords may cause inefficient operation of the log splitter which can result in overheating. Be sure the extension cord is no longer than 10m and the diameter of each line is no less than 2.5mm^2 to allow sufficient current flow to the motor. Avoid use of free and inadequately insulated connections. Connections must be made with protected material suitable for outdoor use.
AVOID ELECTRICAL SHOCK
Check that the electric circuit is adequately protected and that it corresponds with the power, voltage and frequency of the motor. Check that there is a ground connection, and a regulation differential switch upstream. Ground the log splitter. Prevent body contact with grounded surfaces: pipes, radiators, ranges, and refrigerator enclosures. Never open the switch / plug box. Should this be necessary, contact a qualified electrician. Make sure your fingers do not touch the plug's metal prongs when plugging or unplugging the log splitter. Avoid excessive bending and twisting of the connection between the power cord of the British plug and the junction box.
PREVENT FIRES
Do not smoke or have open flames when operating or refilling the log splitter. Never operate the log splitter near a flame or spark. Oil is flammable and can be exploded.
KEEP BYSTANDERS AWAY
Allow only one person to load and operate the log splitter. Always keep bystanders, including visitors, children and pets away from the work area, especially when the log splitter is under operations. Only the operator should stand near the machine and only within the safe operating area prescribed in this manual. Never use another person to help you with freeing a jammed log.
No one under the age of 16 should be allowed to operate the log splitter. Any individual under the age of 18 should have the necessary training & skills to perform the functions properly and safely and should always be under the supervision of an adult.
INSPECT YOUR LOG
Never attempt to split logs containing nails, wire or debris. Always make sure that both ends of the log you are splitting are cut as square as possible. This will prevent the log from sliding out of position while under pressure. Branches must be cut off flush with the trunk.
DON'T OVERREACH
Keep proper footing and balance at all times. Never stand on the log splitter.
Serious injury could occur if the tool is tipped or if the cutting tools are unintentionally contacted. Do not store anything above or near the log splitter where anyone might stand on the tool to reach them.
AVOID INJURY FROM UNEXPECTED ACCIDENT
Do not straddle or reach across the splitting area when operating the log splitter. Never pile logs to be split in a manner that will cause you to reach across the log splitter. Only use your hands to operate the control levers. Never use your foot, knee, a rope, or any other extension device. Always pay full attention to the movement of the wedge ram. Never attempt to load your log splitter while the ram is in motion. Keep hands out of the way of all moving parts. Never try to split two logs on top of each other. One of them may fly up and hit you.
PROTECT YOUR HANDS
When the ram of the log splitter is in the return mode, keep your hands off the machine – the log splitter is designed to automatically stop when the cylinder is fully retracted. Keep your hands away from splits and cracks which open in the log. They may close suddenly and crush or amputate your hands. Do not remove jammed logs with you hands.
DON'T FORCE TOOL
It will do a better and safer job at its design rate. Don't use log splitter for a purpose for which it was not intended. Do not, under any circumstances, alter your log splitter. This equipment was designed and engineered to be used in accordance with the operating instructions. Altering the equipment, or using the equipment in such a way as to circumvent its design capabilities and capacities, could result in serious or fatal injury and will void the warranty. Never try to split logs larger than those indicated in the specifications table.
This could be dangerous and may damage the machine.
NEVER LEAVE TOOL RUNNING UNATTENDED
Don't leave tool until it has come to a complete stop.
DISCONNECT POWER
Unplug when not in use, before making adjustments, changing parts, cleaning, or working on the log splitter. Consult technical manual before servicing.
MAINTAIN YOUR LOG SPLITTER WITH CARE
Always clean the unit after each use.
Keep the log splitter clean for best and safest performance. Follow instructions for lubricating. Inspect all hydraulic seals, hoses and couplers for leaks prior to use. Control levers and power switch must be kept clean, dry and free from oil and grease at all times.
PROTECT THE ENVIRONMENT
Take used oil to an authorized collection point or follow the stipulations in the country where the log splitter is used. Do not discharge into drains, soil or water.
Lock the shop. Store the log splitter away from children and others not qualified to use it.
SPECIAL WARNINGS & INSTRUCTIONS
The splitting operation of the machine is designed to be activated by one person. While there is the possibility that additional operators could be working with the machine (e.g. for loading and unloading), only one operator should activate splitting operations;
The machine shall not be used by children;
Description of functional tests of the machine;
The installation and maintenance requirements including a list of those devices e.g. two-hand control device which should be verified, how frequently the verification shall be carried out and by what method;
Never attempt to remove a log which has got stuck on the wedge by hand. Lower the wedge until the log is completely split;
If a log becomes stuck on the wedge at the bottom position, press the handle with one hand and turn off the machine with the other hand.
Slightly knock the log by hammer to free it;
Only qualified person can assemble the machine.
SPECIFICATIONS
| Model Number FZLS 1008V-E | ||
| Motor (230V) | ~50Hz 13A) S6 40% 3000W | |
| Log Size Capacity | Dia. 8-30 cm | |
| Length 10~55 cm | ||
| Maximum Force 8 Ton | ||
| Hydraulic Pressure 21.0 Mpa | ||
| Hydraulic Oil Capacity 4 L | ||
| Ram Travel 48.5 cm | ||
| Speed | Forward 3.1 cm/sec | |
| Retract 17.3 cm/sec | ||
| Noise Pressure Level (LpA) 74.7 dbA under no load; 77.8 dbA under full load | ||
| Vibration <2.5 m/s | ^2 | |
| Overall Sizes | Length | 84.5 cm |
| Width | 93.5 cm | |
| Height | 150 cm | |
| Weight | 109.9 kg | |
* S6 40%, continuous operation periodic duty: time of one load cycle is 10 minutes, operation time at constant load is 4 minutes, operation time at no-load is 6 minutes.
APPLICATION CONDITIONS
This log splitter is designed for operating under ambient temperatures between +5°C and 40°C and for installation at altitudes no more than 1000m above M.S.L. The surrounding humidity should be less than 50% at 40°C. It can be stored or transported under ambient temperatures between -25°C and 55°C.
ELECTRICAL REQUIREMENTS
With 230 Volt / 50Hz motor, the log splitter should be connected to standard 230V±10%/50Hz±1%.
Electrical supply which has protection devices of under-voltage, over-voltage, over-current (16 A) as well as a residual current device (RCD) which maximum residual current rated at 0.03A. Electrical connection rubber cables must comply with EN60245 which are always marked with symbol H 07 RN. Cables should be identified, as it is a legal requirement.
6. CONTENTS SUPPLIED
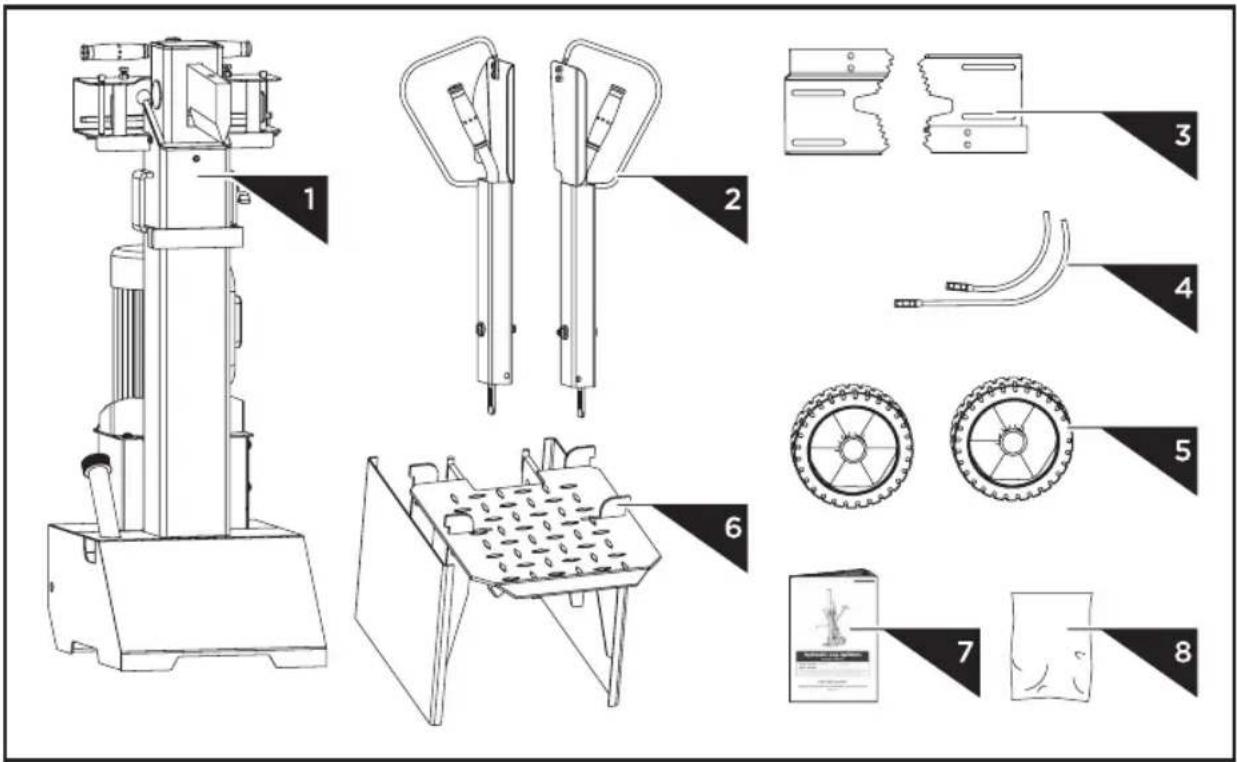
- Log Splitter Frame
- Control Lever and Guard Assy (1 pair)
- Adjustable Log Holder (1 pair)
- Retainer 1 and Retainer 2
- Wheels (1 pair)
- Support Table
- Operator's Manual
- Hardware Bag, including

7. ASSEMBLY
WHEELS
- Pass the axle through the wheel from outside and put on two washers as shown in the following figure. Slide the axle into the two holes on the base of log splitter and secure it with another washer and R-pin from inside. Put on the wheel cap.
- Repeat the same steps to mount the wheel on the other side.

SUPPORT TABLE
-
Before assembly, loosen the star knob by turning it counterclockwise.
-
Unfold the log support table, make sure the three parts of it at the same surface level.

- Insert the hooks of the log support table into the mount brackets.

- Tighten the star knob.
CONTROL LEVER
Pull Spring Pin (A) to remove the Lock Pin (B). Apply a thin coat of grease to both surfaces of the Control Lever Guard as illustrated. Insert the Control Lever and Guard Assy and make sure the Control Lever End goes into the slot of Connection Bracket (C). Lock the Control Lever and Guard Assy, down with the Lock Pin (B) and Spring Pin (A). Follow the same steps to install the other Control Lever and Guard Assy on the other side.
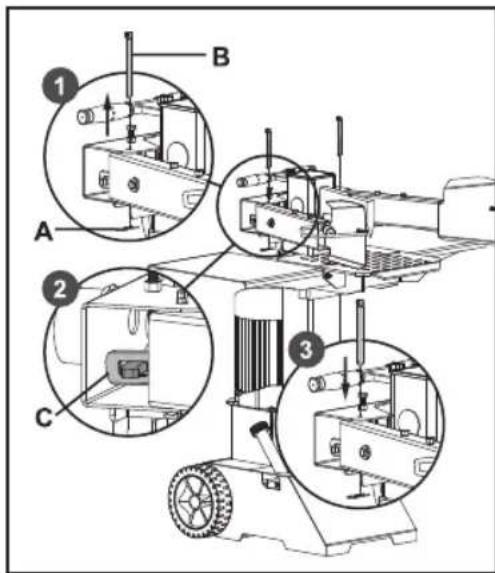

ATTENTION!
Check both sides after assembly. The control levers must be placed in the slots of connection brackets.
ADJUSTABLE LOG HOLDER
Align the holes and assemble the retainer 1 and retainer 2 onto the clamps. Ensure the direction of the retainers as shown in the following picture. Secure the connection with M6×16 bolts, washers and nuts.
Secure the log clamps on the armguards with star knobs and flat washers.

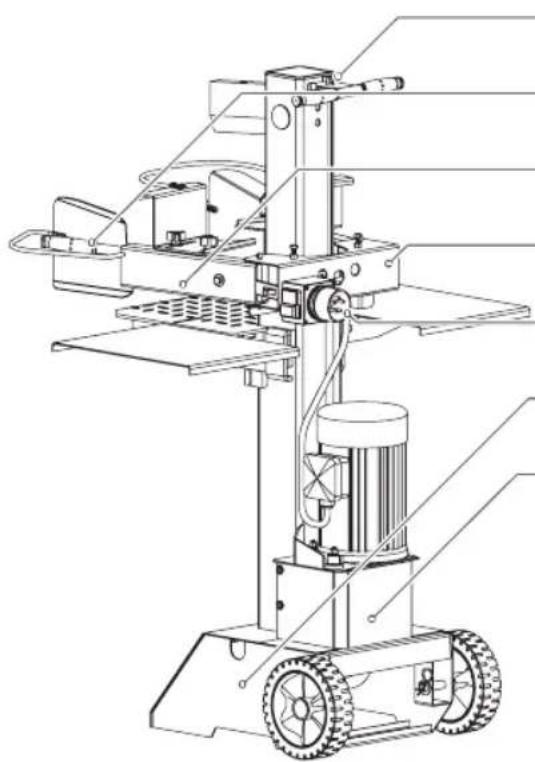
8. KNOW YOUR MACHINE
Transport Handle
Split Wedge
Ram
Log Holder Adjusting Knob
Adjustable Log Holder
Motor
Support Table
Oil Tank Cover / Air Bleeder
Wheels

natural_image
Technical line drawing of a mechanical device with gears and a base mount (no text or symbols)Ram Travel Adjusting Rod
Control Lever
Control Lever Guard
Control Levers Connection Bracket
Plug & switch
Base
Base Cover
natural_image
Technical line drawing of a mechanical device with wheels and control panel (no text or symbols)9. TRANSPORT
The log splitter is equipped with 2 wheels for minor moving. To move the log splitter to the work site. Grip the handle (A) to tilt the log splitter slightly after making sure the oil tank cover is tightened.

natural_image
Technical line drawing of a mechanical device with labeled component A and directional arrows (no text or symbols beyond labels)10. DELIVERING LOG SPLITTER TO WORK SITE
ATTENTION!
If using a crane, lay hoist sling at the lifting point (A).
ATTENTION!
For long distance transport, fasten the log splitter at the position with bundling sign after lifting it into the truck, to avoid free movement during transportation.

natural_image
Technical line drawing of a mechanical device with labeled components and two blue circular icons (no text or symbols)Before operation, fix the machine using Bolts M10×30 on level ground.
-
Plan your work site. Work safely and save effort by planning your work before hand. Have your logs positioned where they can be easily reached. Have a site located to stack the split wood or load it onto a nearby truck or other carrier.
-
Prepare the logs for splitting. This splitter accommodates logs up to 55cm in length. When cutting up limbs and large sections, do not cut sections any longer than 55cm.

ATTENTION!
Do not attempt to split green logs. Dry, seasoned logs split much more easily, and will not jam as frequently as green wood.
- Applying a thin coat of grease to the surfaces of the ram before operation will lengthen the durability of the ram.

natural_image
Technical line drawing of a mechanical device with wheels and a cylindrical component (no text or symbols)
natural_image
Technical line drawing of a mechanical device with a 550mm dimension label (no text or symbols on the diagram itself)
-
Route the power cord. Route the cord from the power source to the splitter in a way that safeguards against tripping on the cord, or the cord becoming damaged during the work session. Protect the power cord from impacts, pulling or corrosive materials.
-
Open the Air Bleed. Loosen the oil tank cover a few turns whenever the splitter is being used. Retighten this cover when you have finished.
Only for model #65584:
*6. Make sure the direction of motor rotation. Turn the motor on, the wedge ram should rise to the highest position automatically. If the wedge ram is already at the highest position when the motor starts, grip both control levers and lower them, the wedge ram should start to move downward.

natural_image
Technical line drawing of a mechanical assembly with no visible text or symbolsIn case, no ram motion detected after the motor starts, power off the motor immediately to change motor polarity by turning the pole switching device inside the plug with a screwdriver.
!

Never allow motor running at counter direction. This will damage the pump and will void the warranty.
-
While operating under extremely low temperature, keep the log splitter running under no load for 15 minutes to preheat the hydraulic oil.
-
Before initial operation, check to be sure the two-handed operation is properly functioning by following steps:
(1) Lower both control levers, the splitting wedge will lower to 5cm above the highest table position.
(2) Release either of the levers, splitting wedge should remain in the original position.
(3) Release both levers, the ram should rise to the highest position automatically.
- To set wedge ram stroke, take the following steps:
(1) Move splitting wedge to desired position.
The upper position of the ram wedge travel should be about 3 \~ 5cm over the logs to be split.
(2) Release a control lever or switch off motor.
(3) Release the Setscrew (A) with L key. Raise Adjusting Rod (B) until Adjusting Rod (B) begins to be stopped by the spring inside. Tighten the Setscrew (A).
(4) Release both control levers or switch on motor.
(5) Check upper position of splitting wedge.

- Place log onto splitter. Place the log onto the support table vertically and sitting flat on the support table. Be sure the wedge and support table will contact the log squarely on the ends. Never attempt to split a log at an angle.

ATTENTION!
Break log in the direction of its growing grain. Do not place log across the log splitter for splitting. It may be dangerous and may seriously damage the machine.
- Adjust the Log Holders (A) according to the diameter of the log to obtain the most comfortable Control Levers angle.

natural_image
Technical line drawing of a mechanical assembly with labeled component A (no text or symbols beyond label)- Hold the log with clamping brackets closely in the control lever guards.
lower levers to start the splitting.
Releasing either lever stops the motion of the splitting wedge.
Releasing both handles to return the splitting wedge to the upper position.

13 Stack as you work. This will provide a safer work area, by keeping it uncluttered, and avoid the danger of tripping, or damaging the power cord.

ATTENTION!
Accumulated split wood and wood chips can create a hazardous work environment. Never continue to work in a cluttered work area which may cause you to slip, trip or fall.
12. REPLACING HYDRAULIC OIL
The hydraulic system is a closed system with oil tank, oil pump and control valve.
Check oil level regularly with dipstick.
Low oil levels can damage the oil pump.
Oil Level should measure approx. 1 \~ 2 cm lower than the upper surface of the oil tank.
The oil should be completely changed once a year.
Make sure moving parts stop and the log splitter is unplugged.
Make sure that no dirt or debris finds its way into the oil tank.
Collect used oil and responsibly recycle.
* Following an oil change, activate the log splitter a few times without actually splitting.
Following hydraulic oils or equivalent are recommend for the log splitter's hydraulic transmission system:
SHELL Tellus 22
MOBIL DTE 11
ARAL Vitam GF 22
BP Energol HLP-HM 22

Use a drain pan to aid in the removal of all used oil and particles.
Remove oil drain plug to drain oil from the hydraulic tank. Examine oil for metal chips as a precaution to future problems.
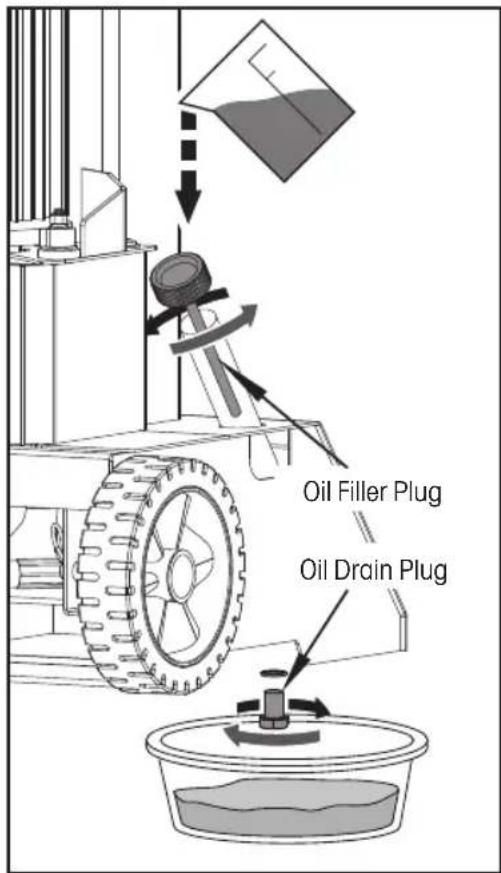
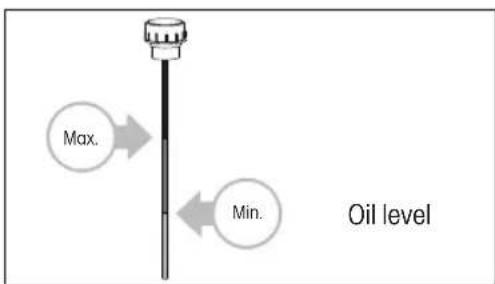

ATTENTION!
Read dipstick to determine the maximum and minimum of the oil level. Low oil can damage the oil pump. Overfilling can result in excessive temperature in the hydraulic transmission system.
This log splitter is equipped with a reinforced splitting wedge and has a blade which is specially treated. After long periods of operation, and when required; sharpen the wedge using a fine-toothed file removing any burrs or flat spots on the edge.
14. TROUBLE SHOOTING
| PROBLEM PROBABLE CAUSE REMEDY SUGGESTED | ||
| Motor does not start. No current in the | e socket. Check mains fuse. | |
| Electrical extension line defective. Unplug, Check and replace. | ||
| Incorrect connection line 3~400V. 5-line connection at 1.5mm ^2 diameter. | ||
| Switch defective. Have checked by Electrician. | ||
| Incorrect motor rotation direction. Incorrect connection. Change pole switching device in the plug with a screw driver. | ||
| Log Splitter does not work while motor running. | Valve is not opened owing to the connection parts loosening. | Check and tighten the parts. |
| Control Levers or Connection parts bent. | Repair the bent parts. | |
| Lower hydraulic oil level. Check and refill hydraulic oil. | ||
| Log Splitter works with abnormal vibration and noise. | Lower hydraulic oil level. Check and refill hydraulic oil. | |
ATTENTION!
ALL REPAIR WORK MUST BE DONE BY A SPECIALIST FOR THIS PRODUCT.
15. WIRING DIAGRAM
FOR MODEL #65886:

FOR MODEL #65887, #65887A:
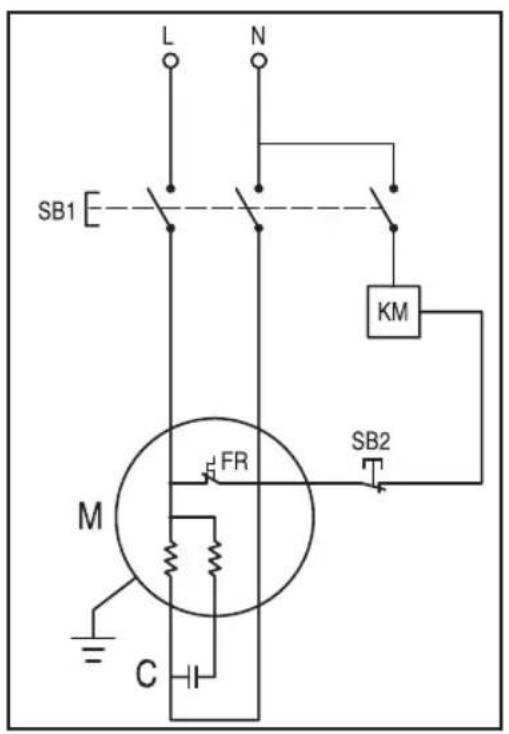
16. HYDRAULIC SYSTEM DIAGRAM

17. PARTS SCHEMATIC
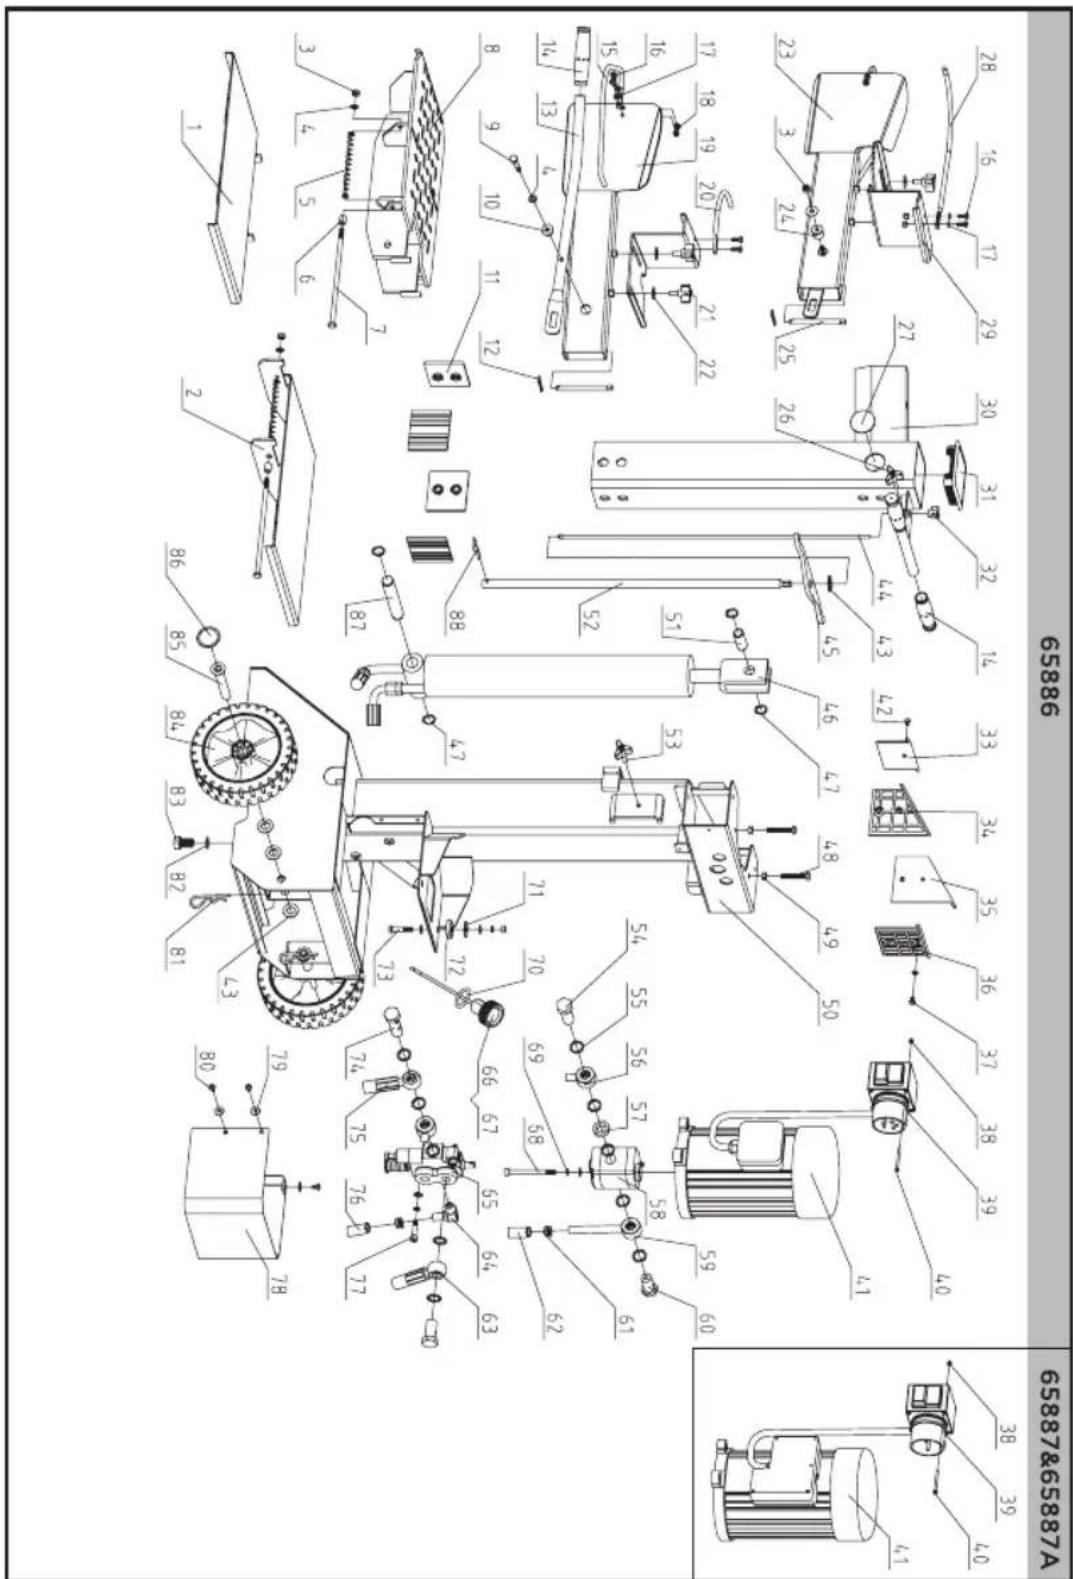
PARTS LIST
| No. | Description Q'ty | |
| 1 | Side Log Support 2 1 | |
| 2 | Side Log Support 1 1 | |
| 3 | Locknut M8 4 | |
| 4 | Washer 8 8 | |
| 5 | Spring 2 | |
| 6 | Bush 2 | |
| 7 | Bolt 8.8 M8×210 2 | |
| 8 | Log Support C1 1 | |
| 9 | Bolt 8.8 M8×60 2 | |
| 10 | Bush 2 2 | |
| 11 | Lining Plate | 4 |
| 12 | Clip 2.5 | 2 |
| 13 | Handle C1 | 2 |
| 14 | Handgrip | 4 |
| 15 | Guard Ring C1 | 2 |
| 16 | Screw M6×16 | 8 |
| 17 | Washer 6 6 | |
| 18 | Locknut M6 8 | |
| 19 | Right Armguard C1 | 1 |
| 20 | Retainer 1 | 1 |
| 21 | Star Knob | 4 |
| 22 | Big Washer 8 | 11 |
| 23 | Left Armguard C1 | 1 |
| 24 | Bush 1 2 | |
| 25 | Pin C1 | 2 |
| 26 | Star Knob M6 | 1 |
| 27 | Cap | 2 |
| 28 | Retainer 2 | 1 |
| 29 | Clamp | 2 |
| 30 | Splitting Pipe G5 | 1 |
| 31 | Square Cap 1 | |
| 32 | Star Knob M5(black) | 1 |
| 33 | Upper Lining Plate 2-C | 1 |
| 34 | Upper Lining Plate 4 | 1 |
| 35 | Upper Lining Plate 3 | 1 |
| 36 | Upper Lining Plate 1 | 1 |
| No. | Description | Q'ty |
| 37 | Screw M6×8 | 1 |
| 38 | Locknut M4 | 2 |
| 39 | Switch 1 | |
| 40 | Screw M4×60 | 2 |
| 41 | Motor | 1 |
| 42 | Screw M6×10 | 1 |
| 43 | Washer 16 | 7 |
| 44 | Pull Rod G5 | 1 |
| 45 | Lever C1 | 1 |
| 46 | Cylinder C1 | 1 |
| 47 | Circlip 22 | 4 |
| 48 | Bolt M8×50 | 2 |
| 49 | Nut M8 | 5 |
| 50 | Main Frame C1 | 1 |
| 51 | Short Shaft D | 1 |
| 52 | Tube C1 | 1 |
| 53 | Star Knob (black) | 1 |
| 54 | Oil Plug A1 | 1 |
| 55 | Washer Groupware 20 | 10 |
| 56 | Oil Hose C1 | 1 |
| 57 | Collar | 1 |
| 58 | Gear Pump C1 | 1 |
| 59 | Nozzle C1 | 1 |
| 60 | Oil Plug A2 | 2 |
| 61 | Hose Clamp 18-23(24) | 4 |
| 62 | Oil Hose 13 | 1 |
| 63 | Oil Hose C1 | 1 |
| 64 | Nozzle A | 1 |
| 65 | CCA Valve | 1 |
| 66 | Oil Cap K | 1 |
| 67 | Oil Dipstick KG | 1 |
| 68 | Screw M8×90 | 2 |
| 69 | Spring Washer 8 | 7 |
| 70 | O-Ring 25×2.65 | 1 |
| 71 | Big Washer 10 | 3 |
| 72 | Motor Support | 3 |
| No. | Description Q'ty | |
| 73 | Bolt 8.8 M8×45 3 | |
| 74 | Oil Plug A6 1 | |
| 75 | Oil Hose C1 1 | |
| 76 | Oil Hose 13 1 | |
| 77 | Screw M8×35 2 | |
| 78 | Shield C1 1 | |
| 79 | Big Washer 6 3 | |
| 80 | Screw M6×10 5 |
| No. | Description Q'ty | |
| 81 | Clip 3 2 | |
| 82 | Washer Groupware 16 | 1 |
| 83 | Bolt M16×25 | 1 |
| 84 | Wheel | 2 |
| 85 | Wheel Axle C1 | 2 |
| 86 | Wheel Cap 2 | |
| 87 | Long Shaft A4 1 | |
| 88 | Clip 4 1 |
18. DISPOSAL
INSTRUCTIONS AND INFORMATION REGARDING THE DISPOSAL OF USED PACKAGING MATERIALS
Dispose of used packaging material at a site designated for waste in your municipality.

The machine and its accessories are manufactured from various materials, e.g. metal and plastic.
Take damaged parts to a recycling centre. Inquire at the relevant government department.
Changes in the text, design and technical specifications may be made without prior notice and we reserve the right to make these changes.
19. DECLARATION OF CONFORMITY
FAST®
FAST ČR, a.s.
U Sanitasu 1621, 251 01 Ríčany, Czech Republic
tel.: +420 323 204 111, fax: +420 323 204 110
EU DECLARATION OF CONFORMITY
Product / brand: Electric Log Splitter / FIELDMANN
Type / model: FZLS 1008V – E as factory model 65887A
AC 230 V, 50Hz, 3000W, working force 8 ton, max pressure 21 Mpa,
Log size diameter max 300mm, max cutting length 550mm, Class I,
IP54, LWA below 70dB(A)
Manufacturer: FAST ČR, a.s.
U Sanitasu 1621, 251 01 Říčany, Czech Republic
VAT no: CZ24777749
This declaration of conformity is issued under the sole responsibility of the manufacturer.
Person in charge of completing the technical documentation: FAST ČR, a.s.
The object of the declaration described above is in conformity with the relevant Union harmonization legislation:
Directive MD 2006/42/EC Directive EMC 2014/30/EU
Directive NEOE 2000/14/EC Directive RoHS 2011/65/EU
The relevant harmonized standards and the other technical specifications:
EN 609-1:2017 EN 55014-1:2017+A11
EN 60204-1:2018 EN 55014-2:2015
EN ISO 12100:2010 EN IEC 61000-3-2:2019
EN IEC 61000-3-11:2019
CE
Place of issuance: Prague
Date of issuance: 09.11.2022
Name: Petr Uher - Responsible Person
Signature:

ICO:24777749, DIC:CZ24777749
Home & Garden Performance
Model /Modell /Modelis:
Conditions of guarantee
This product is warranted for the period of 24 months from the adate aof purchase to the aend-user. Warranty is limited to the following conditions. Warranty is referred only to the customer goods using for common domestic use. The claim forservice can be applied either at dealer's shop where the product was bought, oraat below mentioned authorized service shops. The end-user is obligated to set up a claim immediately when the defects appeared but only till the end of warranty period. The end-user is obligated to cooperate to certify the claiming defects. Only completed and clean (according to hygienic standards) product will be accepted. In case of eligible warranty claim the warranty period will be prolonged by the period from the date of claim application till the date of taking overthe product by end-user, or the date the end-user is obligated to take it over. To obtain the service under this warranty, end-user is obligated to certify his claim with duly completed following documents: receipt, certificate of warranty, certificate of installation ...
This warranty is avoid aespecially if aapply as follows: ■ Defects which were put on sale. ■ Wear-out aor damage caused aby acommon use. ■ The aproduct awas adamaged aby aunprofessional aor wrong installation, used in contrary to the applicable instruction manual, used in contrary to legal enactment and common process of use or used for another purpose which has been designed for. ■ The product was damaged by uncared-for or insufficient maintenance. ■ The product was damaged by dirt, accident of force majeure (natural disaster, fire, flood, ...). ■ Defects on functionality caused by low duality of signal, electromagnetic field interference etc. ■ The product was mechanically damaged (e.g. broken button, fall...). ■ Damage caused by use of unsuitable media, fillings, expendable supplies (batteries) or by unsuitable working conditions (e.g. high temperatures, high humidity, quakes,...). ■ Repair, modification or other failure action to the product by unauthorized person. ■ End-user did not prove enough his right to claim (time and place of purchase). ■ Data on presented documents differs from data on products. ■ Cases when the claiming product can not be identified according to the presented documents (e.g. the serial number or the warranty seal has been damaged).
Home & Garden Performance
- 8T LOG SPLITTER USER'S MANUAL
- TABLE OF CONTENTS
- GENERAL SAFETY INSTRUCTIONS
- Important safety notice
- Packaging
- Operating instructions
- SAFETY INSTRUCTIONS
- ATTENTION!
- Safety in the work area
- Safety when working with power tools
- Safety of people
- Using power tools and their maintenance
- Service
- Storage
- INTRODUCTION
- SYMBOLS
- SAFETY WARNINGS & INSTRUCTIONS
- UNDERSTAND YOUR LOG SPLITTER
- DRUGS, ALCOHOL AND MEDICATION
- AVOID DANGEROUS CONDITIONS
- INSPECT YOUR LOG SPLITTER
- DRESS PROPERLY
- PROTECT YOUR EYES AND FACE
- EXTENSION CORDS
- AVOID ELECTRICAL SHOCK
- PREVENT FIRES
- KEEP BYSTANDERS AWAY
- INSPECT YOUR LOG
- DON'T OVERREACH
- AVOID INJURY FROM UNEXPECTED ACCIDENT
- PROTECT YOUR HANDS
- DON'T FORCE TOOL
- NEVER LEAVE TOOL RUNNING UNATTENDED
- DISCONNECT POWER
- MAINTAIN YOUR LOG SPLITTER WITH CARE
- PROTECT THE ENVIRONMENT
- SPECIAL WARNINGS & INSTRUCTIONS
- APPLICATION CONDITIONS
- ELECTRICAL REQUIREMENTS
- CONTENTS SUPPLIED
- ASSEMBLY
- WHEELS
- SUPPORT TABLE
- CONTROL LEVER
- ADJUSTABLE LOG HOLDER
- KNOW YOUR MACHINE
- TRANSPORT
- DELIVERING LOG SPLITTER TO WORK SITE
- !
- REPLACING HYDRAULIC OIL
- TROUBLE SHOOTING
- WIRING DIAGRAM
- HYDRAULIC SYSTEM DIAGRAM
- PARTS SCHEMATIC
- DISPOSAL
- INSTRUCTIONS AND INFORMATION REGARDING THE DISPOSAL OF USED PACKAGING MATERIALS
- DECLARATION OF CONFORMITY
- FAST®
- EU DECLARATION OF CONFORMITY
- CE
- Home & Garden Performance
- Model /Modell /Modelis:
- Conditions of guarantee
Brand : Fieldmann
Model : FZLS 1008V-E
Category : Log splitter