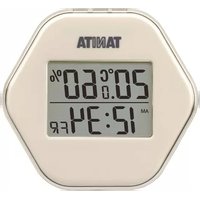
TT-573 - Weather Station TANITA - Free user manual and instructions
Find the device manual for free TT-573 TANITA in PDF.


| Product Type | Weather Station |
| Brand | Tanita |
| Model | TT-573 |
| Dimensions (main unit) | 130 x 90 x 25 mm |
| Weight (main unit) | 180 g |
| Power Supply (main unit) | 2 x AA batteries (not included) |
| Power Supply (outdoor sensor) | 2 x AAA batteries (not included) |
| Indoor Temperature Range | 0°C to +50°C |
| Outdoor Temperature Range | -20°C to +60°C |
| Humidity Measurement Range | 20% to 95% RH |
| Barometric Pressure Range | 600 to 1100 hPa |
| Wireless Range (outdoor sensor) | Up to 100 m (open space) |
| Display Type | LCD with backlight |
| Clock Function | Atomic time sync (DCF/MSF) |
| Alarm Clock | Yes, with snooze |
| Weather Forecast | Sunny, partly cloudy, cloudy, rainy, snowy |
| Moon Phase Display | Yes |
| Memory Functions | Min/Max temperature and humidity |
| Mounting Options | Table stand or wall mount |
| Cleaning Instructions | Wipe with a soft, dry cloth. Do not use solvents |
| Safety Warnings | Keep away from heat sources and direct sunlight |
| Spare Parts / Repairability | Contact Tanita support for spare parts. Not user-serviceable |
| Included Accessories | Main unit, outdoor sensor, user manual |
Frequently Asked Questions - TT-573 TANITA
User questions about TT-573 TANITA
0 question about this device. Answer the ones you know or ask your own.
Ask a new question about this device
Download the instructions for your Weather Station in PDF format for free! Find your manual TT-573 - TANITA and take your electronic device back in hand. On this page are published all the documents necessary for the use of your device. TT-573 by TANITA.
USER MANUAL TT-573 TANITA
Monitoring Your Health
Home use
TT-573/574
Digital Thermo Hygrometer User Manual

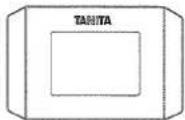
※The illustrations in this manual are for reference only.
Contents
●Safety instruction 2
- Related instructions about usage, storage and maintenance — 2
- Before initial use 3
- Names of parts and accessories 3
- Put in the battery 4
●Battery replacement 5
•Usage method initial setting time setting 7
•Usage method initial setting date setting 8
- Method for confirming maximum and minimum humiture — 9
- Display switch 10
- Other display 11
- Specifications 12
Request
The improper usage method may cause a major accident. Please read this specification carefully and use the product correctly and safely. In addition, in order to use it quickly when necessary, please keep it at hand and store it properly.
Safety instruction
In this manual, drawings will be applied for the safe use of the machine and for the safety concern of your and others' life and property.
| Warning | This sign indicates that there is a risk of death or injury. | |||
| Caution | The sign indicates that there is a risk of injury or damage to the object. | |||
| Prohibition | Indicating prohibited content | Mandatory compliance | Indicating the content that must be observed | |
| Request | Content that is intended to keep the product in the best possible condition. | |||
| Hint | Check for additional information about the use of the product. | |||
| Warning | |
| Prohibition | •Prohibition of placing the battery and this product in a position within children's reach.→The possibility of accidental ingestion.•Prohibition of putting batteries into flames → The possibility of battery burst and injury. |
Related instructions about usage, storage and maintenance
| Caution | |
| Usage and storage | |
| Prohibition | •Prohibition of split products.•Prohibition of excessive shock and vibration. → The possibility of causing product failure. |
| Mandatory compliance | •Since this product is not waterproof, please avoid using it in a damp place. Please avoid using the product in wet hands.•Please do not place the product near the heating equipment, where the temperature and humidity change greatly with more dust.→ The possibility of causing product failure. |
| Maintenance related | |
| Mandatory compliance | •Do not use alcohol, hot water, thinner, thinner, volatile oil, etc.→ The possibility of causing product malfunction, fracture, discoloration, etc.Use soft cloth to clean the surface of the product. |
Before initial use
Rip off the display protection sticker attached to the surface, use the product after putting in the battery.(Please refer to the following graphical representation and note P.4[Put in the battery])
Names of parts

〈Back〉
![[TIME]button [▲]button [MAX/MIN]button Magnet LOCK button Battery cover Stand](/content/2026/05/1042769/images/84b573af2dcfe980a96c3a18fe1eb0110777e9ba875f94a5fe5189c9f90b06ef.jpg)
Accessories
User Manual
☐ Trial battery: CR2032 button shaped lithium battery×1
Put in the battery

- Use the rod to move in the OPEN direction at the switch of the battery cover on the back of the product (follow the arrow indication).

natural_image
Technical line drawing of a device with two components, one above and one below, showing no text or symbols.- Take out battery cover.
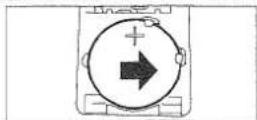
3 Keep the CR2032 lithium battery + pole upward, and put in the battery from the direction indicated by the arrow.

- Put in the battery cover in the direction indicated by the arrow.

- Use the rod to move in the LOCK direction at the switch of the battery cover on the back of the product (follow the arrow indication).
Note
•The attached [trial battery] is available at the time of delivery in the factory, so the battery life is relatively short.
Battery replacement
Please replace the new battery when the display is light. Otherwise, performance may not be guaranteed.
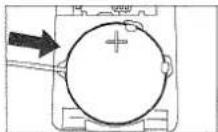
In the illustration section, insert toothpick and other non-electrified rod, after tilting the battery, replace the new battery.
Warning

Prohibition
●Battery must be kept out of reach of infants
→ It is possible to be swallowed by mistake. In case of false swallowing, please seek medical attention immediately.
Caution

Prohibition
- Do not use batteries other than specified batteries (CR2032), in case of the possibility of malfunction.

Mandatory
- Mandatory compliance: Please correctly install the +/- pole of the battery.
→ If you make a mistake, there is a possibility of a malfunction.

Disposal

This is an electronic device. Please dispose of it as an electronic device, not as general household waste. Please follow the regulations in your local region when disposing of this device.

Not allowed to mix batteries with consumer wastes! As consumer you are legally bound to return used or discharged batteries. You can deposit your old batteries at the public collecting points in your town, or wherever the corresponding batteries are sold and specifically marked collecting boxes have been set up. In case of scrapping the apparatus, the batteries should be removed from it and deposited at the collecting points as well.
TANITA Corporation
1-14-2 Maeno-che, Itabashi-ku, Tokyo
174-8630 Japan
TEL:+81-(0)3-3968-7048
FAX: +81-(0)3-3968-2661
www.tanita.co.jp
TANITA Europe S.V.
Hoogoorddroef 56-E. 1101 BE Amsterdam.
the Netherlands
TEL: +31-(0)20-550-2970
FAX: +31-(0)20-550-2988
www.tanita.eu
TANITA Corporation of America, Inc.
2625 South Clearbrook Drive,
Arlington Heights, IL 60005 USA
TEL: +1-847-640-9241
FAX: +1-847-640-9261
www.tanita.com
TANITA Health Equipment H.K. Ltd.
Unit 301-303, 3/F Wing On Plaza,
62 Mody Road, Tsimshutsui East, Kowloon,
Hong Kong
TEL: +852-2834-3917
FAX: +852-2838-8667
www.tarita.asia
TANITA (Shanghai) Trading Co., Ltd.
Room 8005, 877 Huai Hai Zhong Lu.
Shanghai, The People's Republic of China
TEL: +86-21-6474-6803
FAX +86-21-6474-7901
www.tanita.com.cn
TANITA India Private Limited
A-502, Mittal Commercia,
Off. M.V. Road (Andheri Kurla Road).
Mardi, Andheri-East, Mumbai 40059.
Maharashtra, India
TEL: +91-81-697-28173
www.tarita.co.is
©2019 TANITA Corporation TT5737611(0)-1904RA
Usage method initial setting time setting
Usage method initial setting date setting
Set the clock and calendar before use.
※In the setting process, in the absence of any operation, it will return to the clock display in about 30 seconds.
• Time setting (for example, AM 11:58:00)


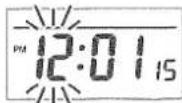


①When the clock is displayed (the display on the left), Press the [TIME] button for more than 3 seconds. ※[12] flickers
②Press the [▲] button to select whether to display in the 12-hour system or the 24-hour system.
[12] HR→ represents the 12-hour system [24] HR→ represents the 24-hour system Press the [TIME] button to confirm
③[H] flickers, press [▲] button to set. ※Long press to forward Press the [TIME]button to determine [H].
④[M] flickers, press [▲] button to set. Press the [TIME]button to determine [M]. ※Set chiming selection when you want to set seconds [M].
For example) If you need to set 30 minutes, set it to [29], press [▲] button, set second.
Go to the next page (set the calendar)
- Setting a calendar (example: February 5, 2018)

①Western Calendar [18] flickers, press [▲] button to set Western Calendar. Press [TIME]button to confirm Western Calendar.
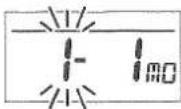
②[Month] flickers, press [▲] button to set. Press [TIME]button to confirm [Month].
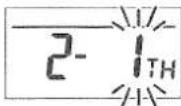
③[Day] flickers, press [▲] button to set. Press [TIME]button to confirm [Day]. ※Automatic week setting.

④Back to the clock display. Take out the battery, clock and calendar will return to the initial settings, please set again. ※The display of the Western Calendar is only displayed in the settings.
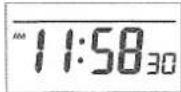
※Clock and calendar can not be returned, please press [▲] button to continue (At 2049 on the Western Calendar, it will return to 2018).
The above clock calendar settings are complete.
•Method for confirming maximum and minimum humiture
This product automatically determines humiture every 20 seconds, and automatically records the maximum and minimum humiture.

①Press [MAX/MIN] button.
※The left side of the temperature and humidity shows [MAX], indicating the maximum temperature and humidity.

②Press [MAX/MIN] button again.
※The left side of the temperature and humidity shows [MIN], showing the lowest temperature and minimum humidity.
③Press [MAX/MIN] button again, return to the humiture display at that time.
•The reset method of maximum and minimum humiture
When [MAX] or [MIN] is displayed, press the [MAX/MIN] button for about 3 seconds, and the current value is reset.
※Unable to be restored after reset.
※The maximum and minimum humiture displayed are recorded from the reset value.
※For the maximum and minimum humiture of the day, reset at the beginning of the day.
- Display switch
- When the hour hand is displayed, press the [▲] button to switch from the [Second] display to the [Week] display. In addition, press the [TIME] button and switch from time display to calendar display.
※The week display is as follows:
SU: Sunday
MO: Monday
TU: Tuesday
WE: Wednesday
TH: Thursday
FR: Friday
SA: Saturday

[▲ button]
[TIME button]
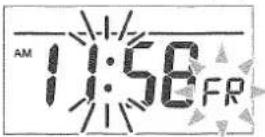
※Colon (:) flickers.
6- 5FR
※After the calendar is displayed for about 8 seconds, return to the clock display.
- Other display
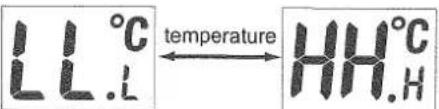
• In the case of temperature and humidity beyond the range of measurement, it is displayed as following.
chemical
Chemical reaction diagram showing temperature change between two molecular structures labeled LL.L and HH.HWhen it is below -5.0 °C
When it is above 50.0 °C

When it is below 20%
When it is above 95%
※When the temperature shows [HH.H] or [LL.L], the humidity is sometimes not measured correctly, so it shows [- -].
Specifications
| Display content | Clock | 12 hours / 24 hours switch display(average monthly difference within±60 seconds) |
| Calendar | Date · week display | |
| Temperature | Minimum display unit: 0.1°C | |
| MAX/MIN display | ||
| Humidity | Minimum display unit: 1% | |
| MAX/MIN display | ||
| Range of measurement | Temperature | -5.0~50.0 °C (LL.L/HH.H is displayed beyond the measurement range) |
| Humidity | 20~95% ( Lo/Hi is displayed beyond the measurement range) | |
| Precision | Temperature | 0.0~40.0°C±1.0°C Other ±2.0°C |
| Humidity | 35~75% ±5% Other ±10% | |
| Measurement interval | Update once every 20 seconds (temperature · humidity) | |
| Power supply | DC 3.0V (1×CR2032 battery) | |
| Battery life | about 1 year | |
| Body size | TT-573 approx width 80 × height 74 × depth 12mmTT-574 approx width 85 × height 55 × depth 12mm | |
| Weight | TT-573 about 50g (including battery)TT-574 about 46g (including battery) | |
| Main material | body: ABS lens: PMMA | |
| Accessories | Battery (1×CR2032).User Manual | |
| Country of origin | China | |
※Design and specification changes may be made without advance notice.

- TT-573/574
- Contents
- Request
- Safety instruction
- Related instructions about usage, storage and maintenance
- Before initial use
- Names of parts
- Accessories
- Put in the battery
- Note
- Battery replacement
- Warning
- Caution
- Disposal
- TANITA Corporation
- TANITA Europe S.V.
- TANITA Corporation of America, Inc.
- TANITA Health Equipment H.K. Ltd.
- TANITA (Shanghai) Trading Co., Ltd.
- TANITA India Private Limited
- Usage method initial setting time setting
- Usage method initial setting date setting
- •Method for confirming maximum and minimum humiture
- •The reset method of maximum and minimum humiture
- - Display switch
- - Other display
Brand : TANITA
Model : TT-573
Category : Weather Station