
MB-FS5077 - Other Kitchen Appliances COMFEE - Free user manual and instructions
Find the device manual for free MB-FS5077 COMFEE in PDF.

| Product Type | Rice Cooker |
| Brand | Comfee |
| Model | MB-FS5077 |
| Capacity (uncooked rice) | 5 cups (approx. 1.0 L) |
| Power | 350 W |
| Voltage | 120 V / 220-240 V (depending on region) |
| Dimensions (L x W x H) | 25.0 x 20.0 x 20.0 cm (approx.) |
| Weight | 1.5 kg (approx.) |
| Color | White / Stainless Steel |
| Inner Pot Material | Non-stick coated aluminum |
| Functions | Cook, Warm, Steam |
| Keep Warm Function | Automatic keep warm after cooking |
| Control Type | Mechanical switch with indicator light |
| Safety Features | Auto shut-off, boil-dry protection |
| Cleaning | Removable inner pot, lid and accessories are dishwasher safe |
| Accessories Included | Measuring cup, rice paddle, steaming basket |
| Qty per Package | 1 unit |
| Warranty | 1 year limited |
| Spare Parts Availability | Inner pot, lid, power cord available via customer service |
| Repairability | Basic parts replaceable; professional repair recommended for electronics |
Frequently Asked Questions - MB-FS5077 COMFEE
User questions about MB-FS5077 COMFEE
0 question about this device. Answer the ones you know or ask your own.
Ask a new question about this device
Download the instructions for your Other Kitchen Appliances in PDF format for free! Find your manual MB-FS5077 - COMFEE and take your electronic device back in hand. On this page are published all the documents necessary for the use of your device. MB-FS5077 by COMFEE.
USER MANUAL MB-FS5077 COMFEE
natural_image
Line drawing of a closed-branded robotic device with lid and mounting bracket (no text or symbols)Instruction Manual
Model: MB-FS5077

Please read the manual before operating your kettle. Retain it for future reference.
IMPORTANT SAFETY INSTRUCTIONS
When using electrical appliances, basic safety precautions should always be followed including the following:
- Read all instructions.
- Do not touch hot surfaces. Use handles or knobs.
- To protect against electrical shock do not immerse cord, plugs, or (state specific part or parts in question) in water or other liquid.
-
Close supervision is necessary when any appliance is used by or near children.
-
Unplug from outlet when not in use and before cleaning. Allow to cool before putting on or taking off parts.
-
Do not operate any appliance with a damaged cord or plug or after the appliance malfunctions or has been damaged in any manner. Return appliance to the nearest authorized service facility for examination, repair, or adjustment.
-
The use of accessory attachments not recommended by the appliance manufacturer may cause injuries.
-
Do not use outdoors
-
Do not let cord hang over edge of table or counter, or touch hot surfaces.
-
Do not place on or near a hot gas or electric burner, or in a heated oven.
-
Extreme caution must be used when moving an appliance containing hot oil or other hot liquids.
-
Always attach plug to appliance first, then plug cord into the wall outlet. To disconnect, turn any control to "off", then remove plug from wall outlet.
-
Do not use appliance for other than intended use.
-
Household Use Only.
-
Do Not Immerse In Water.
-
Caution : To Reduce The Risk Of Electric Shock, Cook Only In Removable Container.
-
Intended for countertop use only.
-
WARNING: Spilled food can cause serious burns. Keep appliance and cord away from children. Never drape cord over edge of counter, never use outlet below counter, and never use with an extension cord.
-
This appliance has a polarized plug (one blade is wider than the other). To reduce the risk of electric shock, this plug is intended to fit into a polarized outlet only one way. If the plug does not fit fully into the outlet, reverse the plug. If it still does not fit, contact a qualified electrician. Do not attempt to modify the plug in any way.
SAVE THESE INSTRUCTIONS
Product Description

Accessories
Serving Spatula Soup Ladle Measuring Cup Steamer


Instructions for Use
- Wipe dry the exterior of cooking pot with cloth and place in the body; rotate the pot around for 2-3 times to ensure close attachment between the pot bottom and heating plate; press the lid until you hear a click. Do not place the cooking pot on other stoves for heating to avoid deformation due to high temperature; do not replace the cooking pot with other containers and operate on the heating plate.
- Plug in the power supply Ensure plugs of the body and power source are properly connected.
- Press function button to select functions as you need and then press the "Start" button to start operation. Or press button of the selected function to directly enter operation mode.

natural_image
Illustration showing a hand holding a bowl and a close-up of its lid with arrows indicating motion (no text or symbols)
Application of function buttons
ON/OFF/START button
Plug in power supply, press "ON/OFF/START" button to turn on the power, LED displays "— —", "ON/OFF/START" light flashes, multi-cooker is on "ON" state (Standby mode). Press "ON/OFF/START" again and return to "OFF" state (ECO mode, the panel has no display). Under the "ON" state (standby mode), select the desired function and press "ON/OFF/START" to start the program.
Warm/Cancel button
- Under the "ON" state (standby mode), press "Warm/Cancel" button to start the temperature preservation program.
- Under the working state: press "Warm/Cancel" button to exit the working state and return to the "ON" state (standby mode).
- Temperature preservation mode will start when cooking is completed, the timer displays from 0 to 12 hours. The LED displays "— —" after 12 hours and returns to the "ON" state (standby mode). Food is best to be consumed within 5 hours after cooking, so that flavor and taste does not deteriorate.
Note: Sauté and Yogurt mode do not have temperature preservation feature.
Application of function buttons
Menu button
Under the "ON" state (standby mode), press the "Menu" button to select various functions. The functions cycle as follow:
Yogurt-Manual/DIY-Oatmeal-Brown Rice/Quinoa-Steam-Soup/Stew-Pasta-Cake.
Browning/Saute button
Under the "ON" state (standby mode), press "Browning/Saute" button, "Browning/Saute" light flashes on, press "Start" button to start the "Browning/Saute" program.
Rice button
Under the "ON" state (standby mode), press "Rice" button, "Rice" light flashes on, press "Start" button to start the "Rice" program.
Slow Cook button
Under the "ON" state (standby mode), press "Slow Cook" button, "Slow Cook" light flashes on, press "Start" button to start the "Slow Cook" program.
A short power-supply cord is used to reduce the risk resulting from it being grabbed by children, becoming entangled in, or tripping over a longer cord.
TIMER/TEMP button
After selecting the function need to pre-set the cooking time, press "TIMER/TEMP" button, both "TIMER/TEMP" and the corresponding function lights flash on, set the time and press "Start" button. The pre-set time is the cooking completion time.
“+” and “-” button
- After selecting the required function, use "+" or "-" buttons to adjust the pre-set timer to set the cooking completion time.
- Under the manual function, use the "+" or "-" buttons to select the temperature value under the temperature setting state.
- Adjust the cooking time.
Steam
- Under the standby mode, press the "Menu" button, select "Steam" function, "Steam" light on.
- Press "+" or "-" button to adjust the steaming time, the default timing is 5 minutes. Time can be adjusted between 5 to 30 minutes.
- Press the "Start" button to start the "Steam" function, "Start" and "Steam" lights stay on, the digital screen displays the "running circle".
- When the water is boiled, the digital screen displays the countdown timer.
- Steam function automatically enters the temperature preservation function when program completes.
Pasta
- Under the standby mode, press the "Menu" button, select "Pasta" function, "Pasta" light on.
- Press "+" and "-" button to adjust Pasta cooking time, the default timing is 10 minutes. Time can be adjusted between 10 to 35 minutes.
- Add water and salt (refer to the proportion table, no more than 5 scales).
- Press the "Start" button to start the "Pasta" function, "Start" and "Pasta" lights stay on, the digital screen displays the "running circle".
- When the water is boiled, the digital screen displays the countdown timer, open the cover, add the corresponding amount of pasta according to water level and start mixing (refer to the proportion table), stir 1 to 2 minutes, close the cover and continue cooking.
- Pasta function automatically enters the temperature preservation function when program completes.
| Proportion Table: | |
| Water volume P | asta (g) |
| 2 cups of water | 100g |
| 4 cups of water | 200g |
| 6 cups of water | 300g |
| 8 cups of water | 400g |
Brown Rice/Quinoa
- Under the standby mode, press the "Menu" button, select "Brown Rice/Quinoa" function, "Brown Rice" light on.
- Press the "Start" button to start the "Brown Rice/Quinoa" program, "Start" and "Brown Rice/Quinoa" lights stay on, and digital screen display "running circle".
Instructions for Use
- The Brown Rice function automatically enters the stew stage after cooking and display countdown timer in the digital screen.
- Brown Rice function automatically enters the temperature preservation function when program completes.
Manual/DIY
- Under the standby mode, press the "Menu" button, select "Manual/DIY" function, "Manual/DIY" light on.
- Press "+" or "-" button to adjust the Manual/DIY program time, the default timing is 1 minute. Time can be adjusted between 1 minute to 4 hours.
- Press the “TEMP” button, “TEMP” light stays on, select cooking temperature, the default temperature is F95 (other options include F95, F105, F120, F140, F160, F175, F195, F210, F230, F250 and F275), when the cooking time is > 2 hours, F250 and F275 are not available. Digital screen displays selected temperature value.
- Press "Start" to start the "Manual/DIY" function. The "Start" and "Manual/DIY" lights stay on. The digital screen displays the "running circle" before reaching the specified cooking temperature. After reaching the specified cooking temperature, the screen displays countdown timer. (Press "TEMP" at this point, the digital screen displays the set cooking temperature and returns to normal screen after 3 seconds)5. Manual function automatically enters the temperature preservation function when program completes.
Yogurt
- In a sauce pan, heat milk to 180^ F on the stovetop, stirring constantly to preventscauldling.
- Allow milk to cool to 115^ F for approximately 1-2 hours. Add yogurt culture. Stir mixture thoroughly.
- Pour milk mixture into the inner pot.
- Be sure inner pot is clean and dry before placing into the rice cooker.
- Under the standby mode, press the "Menu" button, select "Yogurt" function, "Yogurt" light on.
- Press "+" or "-" button to adjust the Yogurt cooking time, the default timing is 8 hours. Time can be adjusted between 6 hours to 12 hours.
- Press the "Start" button to start the "Yogurt" function, "Start" and "Yogurt" lights stay on, and digital screen shows steaming countdown timer.
- The cooker returns to standby mode when Yogurt program completes.
- Once incubation is complete, store the yogurt in an air tight container in the refrigerator. Do not leave in the rice cooker.
Soup/Stew
- Under the standby mode, press the "Soup/Stew" button, select "Soup/Stew" function, "Soup/Stew" light on.
- Press "+" and "-" button to adjust Soup/Stew cooking time, the default timing is 2 hours. Time can be adjusted between 2 to 4 hours.
- Press the "Start" button to start the "Soup/Stew" function, "Start" and "Soup/Stew" lights stay on, the digital screen display Soup/Stew countdown timer.
- Soup/Stew function automatically enters the temperature preservation function when program completes.
Oatmeal
- Under the standby mode, press the "Menu" button, select "Oatmeal" function, "Oatmeal" light on.
- Press "Start" button to start "Oatmeal" function, "Start" and "Oatmeal" lights stay on, the digital screen display Oatmeal countdown timer. Oatmeal timing is 40 minutes.
- Oatmeal function automatically enters the temperature preservation function when program completes.
Cake
- Mix the ingredients of making cake ahead of time, stiring the cake into a paste. The following list can be a reference.
- Under the standby mode, press the "Menu" button, select "Cake" function, "Cake" light on.
- Smear some vegetable oil in the inner wall of the inner pot, then pour the mixed cake batter into the pan.
- Press the "Start" button to start the "Cake" function, "Start" and "Cake" lights stay on, and digital screen display "running circle".
- Cake function automatically enters the temperature preservation function when program completes.
| Proportion Table: | |
| egg | 3 |
| 100mlmilk | |
| 70gvegetable oil | |
| a pack og brownies | about 380g |
Browning/Sauté
-
Under the standby mode, press the "Menu" button and the "Browning/Sauté" light on.
-
Press the "Start" button to start the "Browning/Sauté" function, "Start" light stays on and "Browning/Sauté" light flashes, and digital screen display "running circle". The rice cooker cover is in the open state at this point, add olive oil according to the proportion (refer to the proportion table) and heat for 5 minutes.
-
Once the oil heated, add in Thai fragrant rice, stir fry till the rice turn golden or yellowish (about 10-13 minutes);
-
Add in soup, and then close the cover. The program detects the closed cover and the "Browning/Sauté" light stays on.
-
The cooker enters the stew stage and the digital display shows the countdown timer.
-
The cooker returns to standby mode when Sauté program completes.
| Proportion Table: | |||||
| Water volume (Scale) | Olive oil (ml) | Onion (piece) | Bell pepper (piece) | Salt (gram) | Ketchup (gram) |
| One scale | 40ml 1/3 | piece 1/3 piece | 10g 60g | ||
| Two scales | 60ml 2/3 | piece 2/3 piece | 20g 90g | ||
| Three scales | 80ml 1 p | ece 1 piece | 30g 120g | ||
Rice
-
Under the standby mode, press the "Rice" button, select "Rice" function, "Rice" light on.
-
Press the "Start" button to start the "Rice" function, "Start" and "Rice" lights stay on, digital screen display "running circle".
-
The Rice function automatically enters the stew stage after cooking and display countdown timer in the digital screen.
-
Rice function automatically enters the temperature preservation function when program completes.
Slow Cook
-
Under the standby mode, press the "Slow Cook" button, select "Slow Cook" function, "Slow Cook" light on.
-
Press "+" or "-" button to adjust the slow cook program time, the default timing is 2 hours. Time can be adjusted between 2 to 10 hours.
-
Press the "Start" button to start the "Slow Cook" function, "Start" and "Slow Cook" lights stay on, and digital screen shows slow cook countdown timer.
-
Slow Cook function automatically enters the temperature preservation function when program completes.
Instructions for Use
Cooking time setting method
- Steam Cooking time: default setting is 5 minutes, adjustable between 5 to 30 minutes. Press "+" to increase 1 minute, press "-" to decrease 1 minute.
- Slow Cook Cooking time: t default setting is 2 hours, adjustable between 2 to 10 hours. Press "+" to increase 1 hour, press "-" to decrease 1 hour.
- Manual Cooking time: default setting is 1 minute, adjustable between 1 minute to 4 hours. Press "+" to increase 10 minutes, press "-" to decrease 10 minutes.
- Soup/Stew Cooking time: default setting is 2 hours, adjustable 2 to 4 hours. Press "+" to increase 30 minutes, press "-" to decrease 30 minutes.
- Pasta Cooking time: default setting is 10 minutes, adjustable between 10 to 35 minutes. Press "+" to increase 1 minute, press "-" to decrease 1 minute. After setting the cooking time, press "Start" button to start the program.
- Yogurt Cooking time: default setting is 8 hours, adjustable between 6 to 12 hours. Press "+" to increase 1 hour, press "-" to decrease 1 hour.
Instructions for Use
Timer per-set method (Oatmeal, Brown Rice/Quinoa, Steam, Slow Cook, Soup/Stew, Rice and Pasta)
- Select the function requires pre-set timer, press the "TIMER/TEMP" button, "TIMER/TEMP" light on and enter the setting state. Press "+" or "-" to pre-set the completion time. Press "+" once to increase 1 hour, press "-" once to decrease 1 hour. Long press to increase automatically.
- Press "Start" button to start the pre-set timer function. The screen displays the completion time and starts the countdown.
- Timer can be pre-set up to 24 hours.
- Temperature preservation: Manual/DIY, Oatmeal, Brown Rice/Quinoa, Steam, Soup/Stew, Pasta, Cake, Rice and Slow Cook. The cooker enters to temperature preservation mode once cooking completed. The temperature preservation time is up to 12 hours, cooker returns to standby mode after 12 hours. The shorter the preservation time, the better the taste. Note: Recommended timer pre-setting is no more than 12 hours to avoid food deterioration.
Cleaning and Maintenance
● Wipe the heat preservation cover with wet cloth and do not wash with water.

natural_image
Line drawing of a hand operating a mechanical device with a circular component (no text or symbols)● Wipe dry the water in condensation collector with dry cloth.

natural_image
Illustration of a hand using a tool to lift a circular component (no text or symbols visible)Cleaning and Maintenance
- Clean the multi-cooker with a damp cloth.

natural_image
Illustration of a hand holding a curved object with wires extending outward (no text or symbols)● Wipe the water and rice around and below the cooking pot before placing in.

natural_image
Illustration of a hand holding a folded or wrapped object (no text or symbols)- Clean the water on heating plate (if any) with cloth; polish the burnt rice on the plate (if any) with steel scrubber or sand paper

natural_image
Illustration of a person cleaning a circular object with a loop (no text or symbols)Cover plate cleaning methods
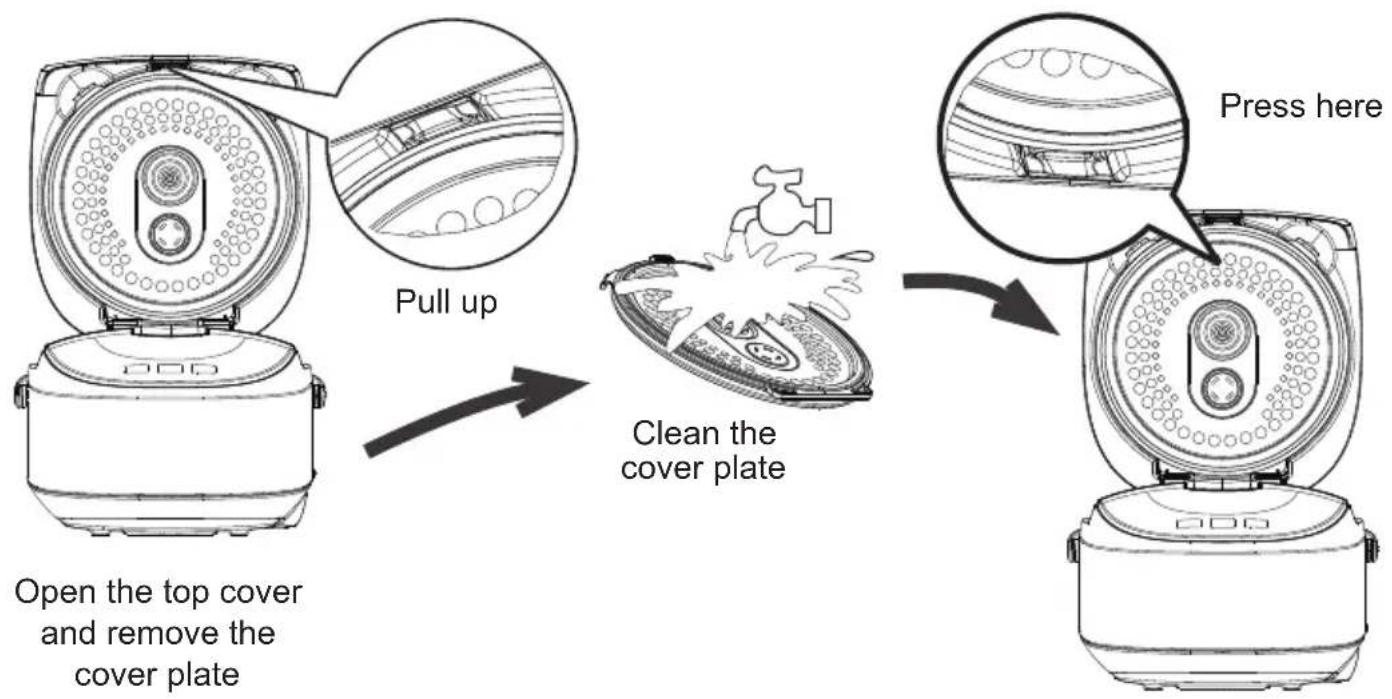
Cleaning and Maintenance
Disassembly, Cleaning and Assembly of Steam Valve.
Note: The valve should be cleaned frequently to ensure smooth venting. Please clean when the appliance cools down to avoid burns.
● Grasp the handle of steam valve and lift upward

natural_image
Line drawing of a rice cooker with hands adjusting its lid (no text or symbols)- Open the valve seat and valve cover in according to the direction indicated on the valve seat

natural_image
Technical line drawing of a device casing with internal components (no text or symbols)Cleaning and Maintenance
● Figure for opening Wash with water

natural_image
Technical line drawing of a mechanical component with no visible text or symbolsNote: Please reattach if the seal ring falls off

natural_image
Line drawing of a mechanical device with a handle and internal components (no text or symbols)- Align the valve cover with the slot of valve seat, close the steam valve in accordance with the instructions, installation completed when heard "Click" sound

- Press down to install the steam valve

natural_image
Line drawing of a hand interacting with a small device on a curved surface (no text or symbols)Circuit Principle Diagram

flowchart
graph LR
    A["L"] --> B["Temperature fuse"]
    C["N"] --> B
    B --> D["Red"]
    D --> E["Black"]
    E --> F["Heating plate"]
    F --> G["Blue"]
    G --> H["Red"]
    H --> I["power board"]
    I --> J["Connecting line"]
    J --> K["Display panel"]
    L["White"] --> M["Bottom sensor"]
    N["Black"] --> O["Top cover sensor"]
Specifications
Product : RICE COOKER
Model : MB-FS5077
Rated voltage : 120V\~
Rated frequency : 60Hz
Rated power : 875W
- Instruction Manual
- IMPORTANT SAFETY INSTRUCTIONS
- SAVE THESE INSTRUCTIONS
- Product Description
- Accessories
- Instructions for Use
- Application of function buttons
- ON/OFF/START button
- Warm/Cancel button
- Menu button
- Browning/Saute button
- Rice button
- Slow Cook button
- TIMER/TEMP button
- “+” and “-” button
- Steam
- Pasta
- Brown Rice/Quinoa
- Manual/DIY
- Yogurt
- Soup/Stew
- Oatmeal
- Cake
- Browning/Sauté
- Rice
- Slow Cook
- Cooking time setting method
- Timer per-set method (Oatmeal, Brown Rice/Quinoa, Steam, Slow Cook, Soup/Stew, Rice and Pasta)
- Cleaning and Maintenance
- Cover plate cleaning methods
- ● Figure for opening Wash with water
- Circuit Principle Diagram
- Specifications
Brand : COMFEE
Model : MB-FS5077
Category : Other Kitchen Appliances