
Upright NEU700 - Vacuum Cleaner EUREKA - Free user manual and instructions
Find the device manual for free Upright NEU700 EUREKA in PDF.


| Product Type | Upright Vacuum Cleaner |
| Brand | Eureka |
| Model | Upright NEU700 |
| Category | Vacuum Cleaner |
| Power Supply | 120V, 60Hz (polarized plug) |
| Floor Modes | Carpet and Hard Floor (selectable) |
| Power Modes | Max and Quiet (adjustable suction/noise) |
| Brushroll | Automatic shut-off when clogged; Whirlwind Technology |
| Dust Cup | Removable with Max Fill line; bottom lid for emptying |
| Pre-Motor Filter | Washable, rinse every 3 months |
| HEPA Filter | Replace yearly; washable with warm water |
| Attachments | Crevice tool, 2-in-1 Dusting brush + Upholstery tool, Motorized Pet & Stair tool |
| Warranty | 5 years limited (original purchaser) |
| Customer Service | 1-800-282-2886 |
| Weight | Approximately 12 lbs |
| Dimensions | Approximately 11.5 x 12.5 x 43 inches |
| Cord Length | 30 feet |
Frequently Asked Questions - Upright NEU700 EUREKA
User questions about Upright NEU700 EUREKA
0 question about this device. Answer the ones you know or ask your own.
Ask a new question about this device
Download the instructions for your Vacuum Cleaner in PDF format for free! Find your manual Upright NEU700 - EUREKA and take your electronic device back in hand. On this page are published all the documents necessary for the use of your device. Upright NEU700 by EUREKA.
USER MANUAL Upright NEU700 EUREKA
Thank you for purchasing your new Innova by Eureka vacuum!
Important instructions
For easy assembly, please take a few moments to read this owner's guide.
If you have questions about your new vacuum, please contact our customer service HELPLINE at 1-800-282-2886.
We're here to help!


natural_image
Black and white photo of a Innovo vacuum cleaner (no visible text or symbols on body)www.eureka.com
Where to find important vacuum information
Keep this information
Write the model, type and serial number here:
Date of purchase (keep your receipt) ____
Model number and type ____
Serial number ____
Find these numbers on a label on the bottom of the vacuum cleaner. Refer to these numbers when ordering parts and accessories, or if service is needed.

natural_image
Close-up of a mechanical vacuum cleaner with a black arrow pointing to the component (no visible text or symbols)This Owner's Guide provides important instructions to prolong the life of your Innova by Eureka vacuum cleaner.
Registration: To register your product use your smartphone to scan the QR code that will take you directly to the product registration page or visit www.eureka.com and click on the 'Register Your Product' link in the top right corner.
Inspection: Carefully unpack and inspect your new Innova by Eureka vacuum cleaner for shipping damage. Each unit is tested and thoroughly inspected before shipping. For instructions regarding any shipping damage, call Eureka Customer Service HELPLINE at 1-800-282-2886 immediately.
Contents
Important safeguards 3
What comes in the carton 4
How to identify parts of your vacuum cleaner 5
How to assemble your vacuum cleaner 6
How to use your vacuum cleaner 7
How to use accessories 8-9
How to maintain dust cup and filters 10-11
How to maintain brushroll 12
How to clear a blockage 13
How to maintain pet turbo brush 14
Thermal cut-off and problem solving 14
The Eureka limited warranty 15
How to order replacement parts 16

Follow caution information wherever you see this symbol.
IMPORTANT SAFEGUARDS
When using an electrical appliance, basic precautions should always be followed, including the following:
READ ALL INSTRUCTIONS BEFORE USING THIS VACUUM CLEANER WARNING

To reduce the risk of fire, electric shock, or injury:
- Do not use outdoors or on wet surfaces.
- Do not leave vacuum cleaner when plugged in. Turn off the switch and unplug the electrical cord when not in use and before servicing.
- Do not allow to be used as a toy. Close attention is necessary when used by or near children.
- Use only as described in this manual. Use only manufacturer's recommended attachments.
- Do not use with damaged cord or plug. If vacuum cleaner is not working as it should, has been dropped, damaged, left outdoors, or dropped into water, call the Eureka Customer Service HELPLINE at 1-800-282-2886.
- Do not pull or carry by cord. Do not use cord as a handle. Do not close a door on cord or pull cord around sharp edges or corners. Do not run vacuum cleaner over cord. Keep cord away from heated surfaces.
- Do not use extension cords or outlets with inadequate current carrying capacity.
- Turn off all controls before unplugging.
- Do not unplug by pulling on cord. To unplug, grasp the plug, not the cord.
- Do not handle plug or vacuum cleaner with wet hands.
- Do not put any object into openings. Do not use with any opening blocked; keep free of dust, lint, hair, and anything that may reduce airflow.
- This vacuum cleaner creates suction and contains a revolving brush roll. Keep hair,
loose clothing, fingers, and all parts of body away from openings and moving parts.
- Do not place vacuum cleaner on furniture or stairs as the brush roll may cause damage. Use extra care when cleaning stairs. Place vacuum cleaner on floor with the handle in storage position while using attachments.
- Do not pick up anything that is burning or smoking, such as cigarettes, matches, or hot ashes.
- Do not use without dust cup, filter, screen and exhaust filter in place.
- Belt pulleys can become hot during normal use. To prevent burns, avoid touching the belt pulley when servicing the drive belt.
- Do not use to pick up flammable or combustible liquids such as gasoline, or use in areas where they may be present.
- Store your vacuum cleaner indoors in a cool, dry area.
- Keep your work area well lit.
- Unplug electrical appliances before vacuuming them.
- Turn off machine before connecting pet turbo brush.
- WARNING: This product can expose you to chemicals including Di(2-ethylhexyl) phthalate (DEHP), which is known to the State of California to cause cancer and to cause birth defects or other reproductive harm. For more information go to www.P65Warnings.ca.gov.
- The hose contains electrical wires. Do not use when damaged, cut, or punctured. Avoid picking up sharp objects.
SAVE THESE INSTRUCTIONS
To reduce the risk of electric shock, this appliance has a polarized plug (one blade is wider than the other). This plug will fit in a polarized outlet only one way. If the plug does not fit fully into the outlet, reverse the plug. If it still does not fit, contact a qualified electrician to install the proper outlet. Do not change the plug in any way.

Motor
Do Not Oil the motor or the brush roll at any time. The bearings are permanently lubricated and sealed.
What comes in the carton
natural_image
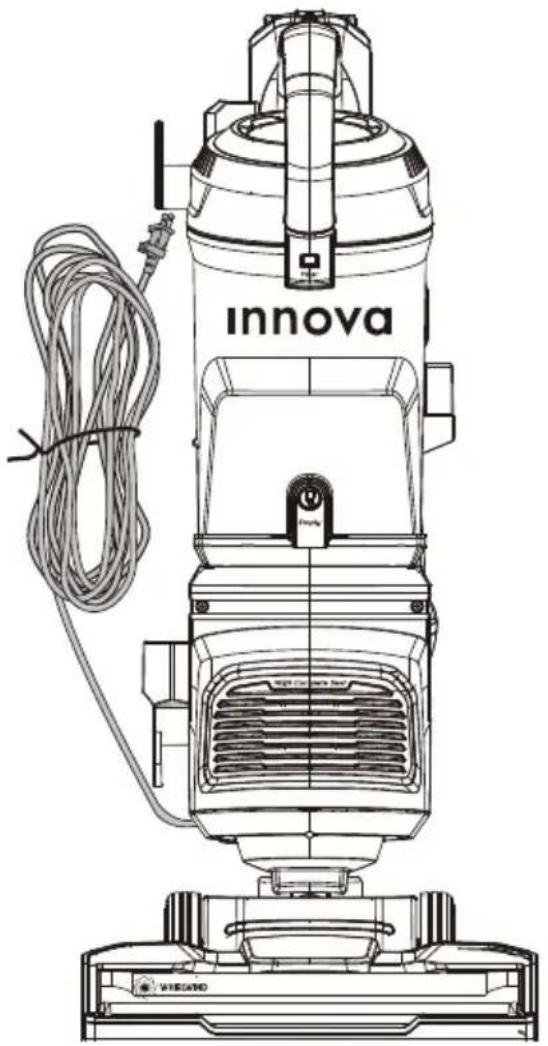
Line drawing of a Innova vacuum cleaner with attached cable and power cord (no text or symbols on the device itself)Vacuum cleaner with dust cup
natural_image
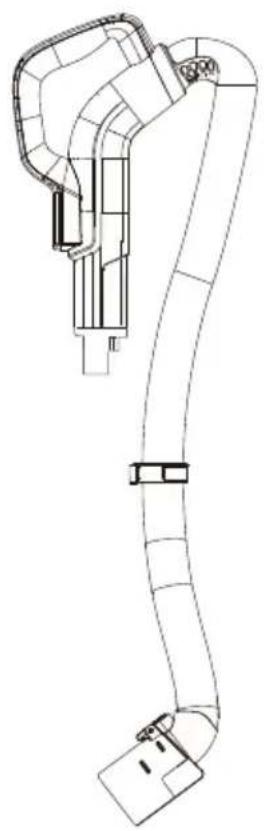
Technical line drawing of a mechanical or electrical component with curved and straight ends (no text or symbols)Handle with hose

natural_image
Pure technical line drawing of a vertical mechanical or electrical component without any text, numbers, or symbolsPole

Important safeguards
natural_image
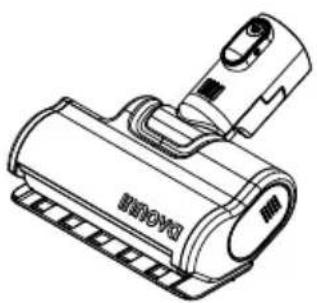
Technical line drawing of a vacuum cleaner component (no text or symbols)Motorized pet & stair tool
natural_image
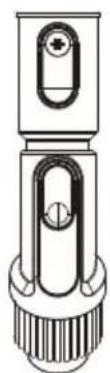
Technical line drawing of a mechanical component with no visible text or symbols2-in-1 Dusting brush + upholstery tool

natural_image
Simple line drawing of a vertical cylindrical object with a pointed tip and base (no text or symbols)Crevice tool
How to identify parts of your vacuum cleaner
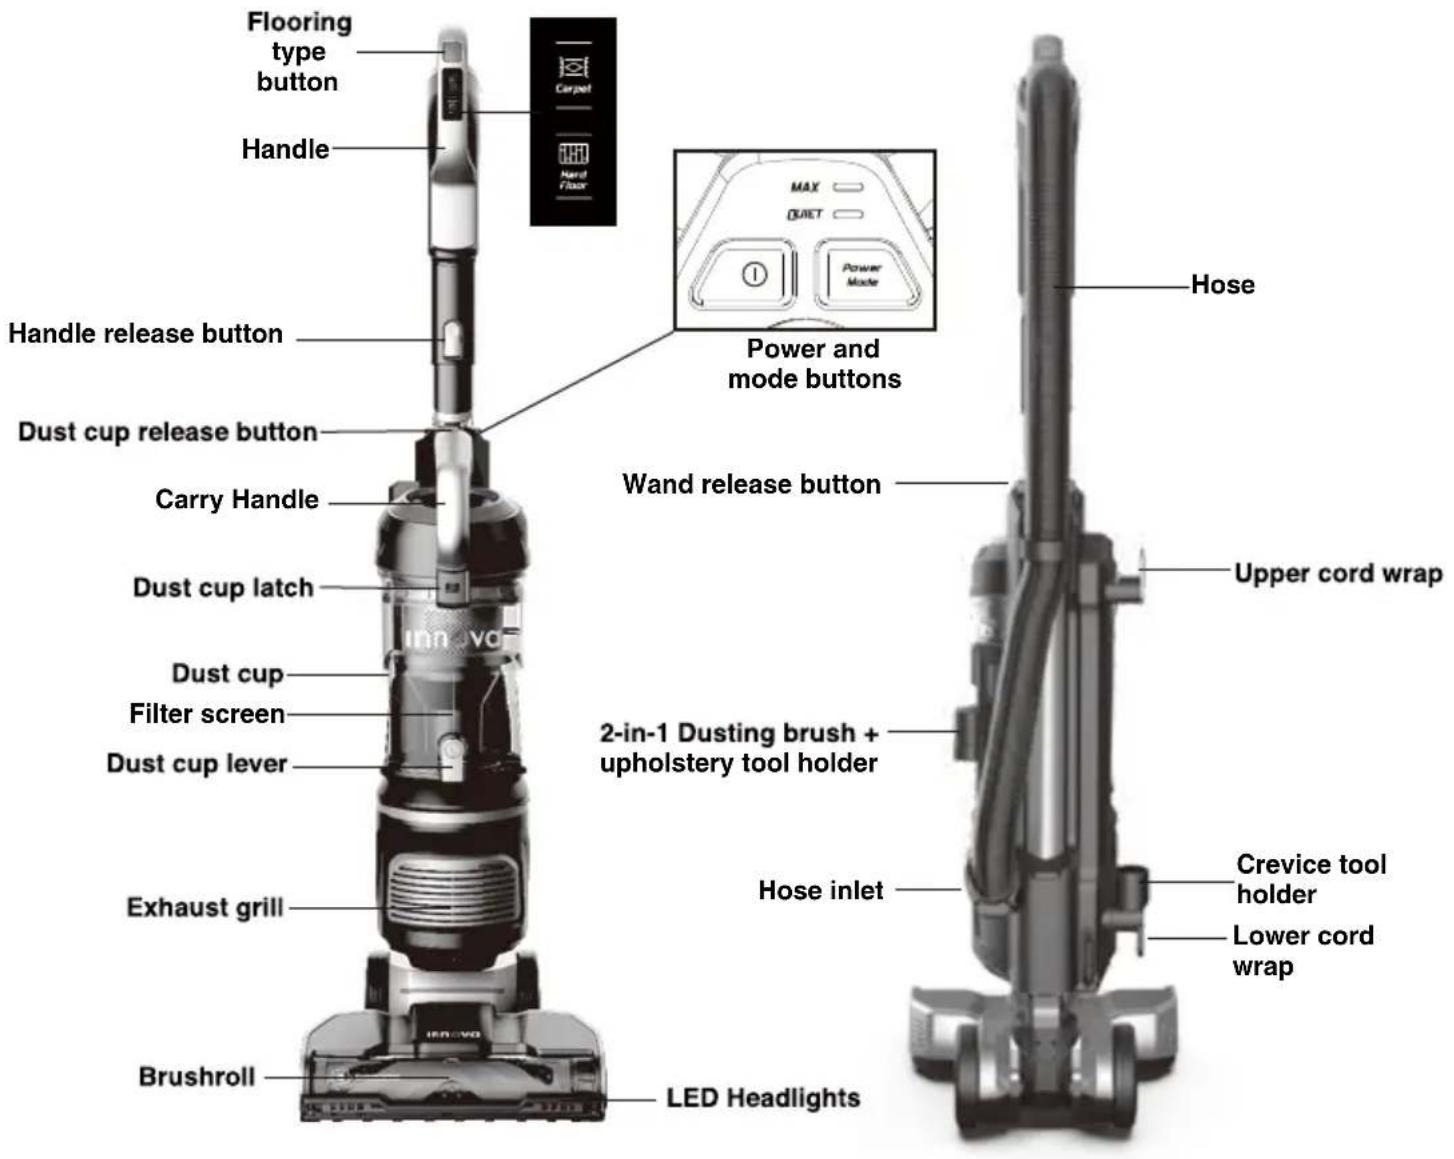
For filter maintenance instructions, see pages 10 and 11

How to assemble your vacuum cleaner
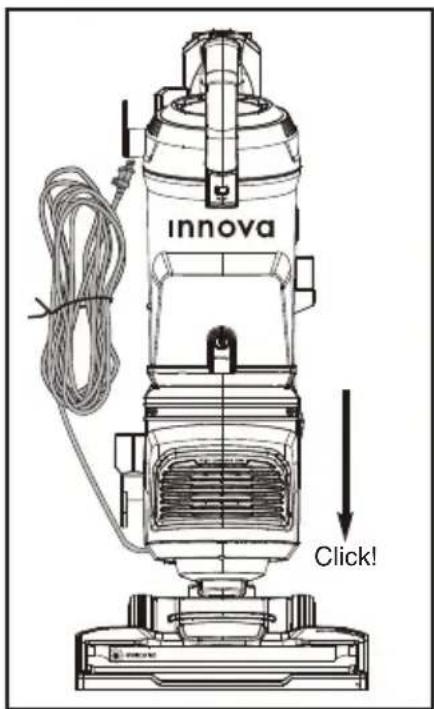
Attach vacuum cleaner main body to floor nozzle until you hear an audible click.

Slide pole onto top of vacuum cleaner. Push down until it clicks.

Slide handle into top of pole. Push down until it clicks into place.

Attach hose. Align end of hose with inlet and push in. Clip will snap to secure in place.

Store crevice tool and 2-in-1 Dusting brush + upholstery tool on posts.

natural_image
Technical line drawing of a mechanical device with hoses and components (no text or symbols)Wrap cord onto upper and lower cord wrap.
How to use your vacuum cleaner
CAUTION
Never operate vacuum cleaner without all filters, filter screen, hose and dust cup in proper position

Plug power cord into outlet. Press power switch to turn on.

natural_image
Technical line drawing of a vehicle's front bumper and seat assembly (no text or symbols)Step on nozzle and lower handle into position for vacuuming floors.

Press FLOOR TYPE button to choose between Carpet or Hard Floor mode. Icon will light up for selected floor mode.
Brushroll will spin only when handle is lowered into position for vacuuming.
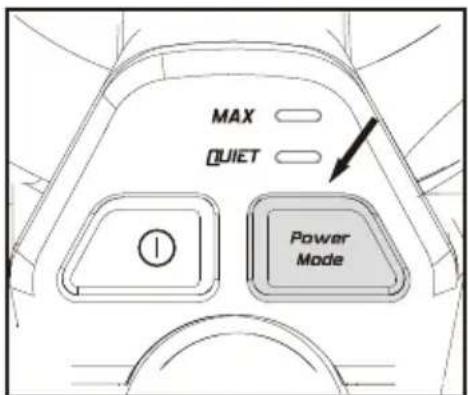
Adjust the suction/noise level but pressing the POWER
MODE button. When light by MAX comes on vacuum is in max suction mode. When light by QUIET comes on vacuum is in low suction mode.
Note: The Quote is ideal for cleaning delicate rugs and above floor cleaning of curtains and upholstery.
Empty dust cup when it reaches the Max Fill line and after every use

natural_image
Illustration of a hand holding a vacuum cleaner next to a handheld vacuum cleaner (no text or symbols present)Press release button and lift off dust cup.
natural_image
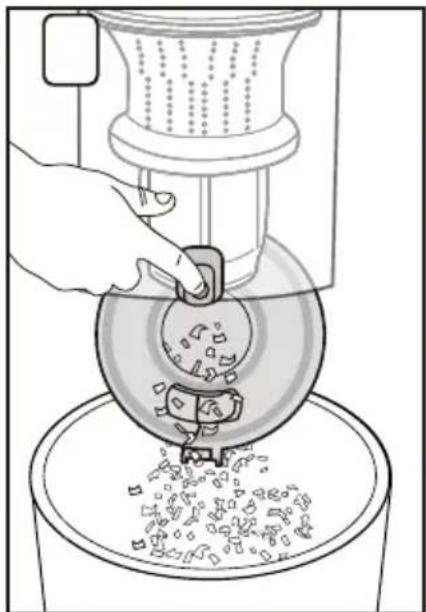
Illustration of a hand pouring liquid into a container with granular material (no text or symbols)To empty debris, press lever to release bottom lid.
How to use accessories
CAUTION
When using tools, always place vacuum in upright position. Make sure vacuum cleaner is turned off while attaching tools.
NOTE: Always keep vacuum in upright position when using accessories.
Using accessories with pole as extension wand
- Press the wand release button and slide out pole (Fig. 1)
- Slide tools onto end of pole until you hear them click into place (Fig. 2).
Using accessories with handle only
- To remove upper handle portion, grasp handle with one hand and press silver button the pole at same time and pull up on the handle (Fig. 3).
- Slide tools onto end of handle until you hear them click into place (Fig. 4).
- When finished using accessories, remove by pressing the silver button on the accessory and pulling it straight off the handle or the pole (Fig. 5).
Note: When finished using the accessories replace the pole and handle back on the vacuum.

natural_image
Diagram of a mechanical assembly with hands and arrows indicating motion or force (no text or symbols)2


natural_image
Technical diagram of a mechanical assembly with directional arrows, no visible text or symbols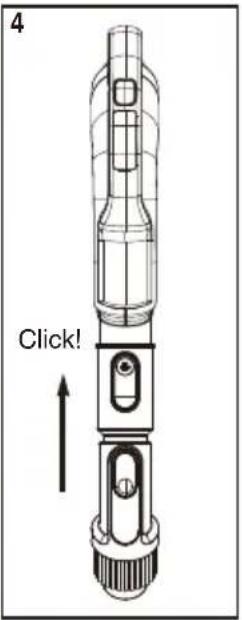

natural_image
Technical line drawing of a mechanical device with internal components and directional arrows (no text or symbols)How to use accessories

natural_image
Line drawing of a cylindrical object with a pointed tip and a curved internal feature (no text or symbols)Crevice tool – Use for baseboard edges, sofas, detailing chairs, dryer vents and tight spaces.
natural_image
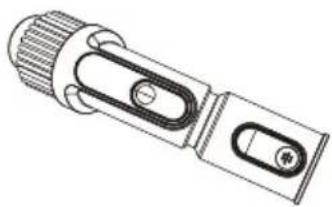
Technical line drawing of a mechanical tool or connector (no text or symbols)2-in-1 Dusting brush + upholstery
tool: Use brush to vacuum blinds, vents or upholstered surfaces. Use felt portion to clean delicate surfaces. To switch between felt and brush portions, press thumb release and slide brush up or down.
natural_image
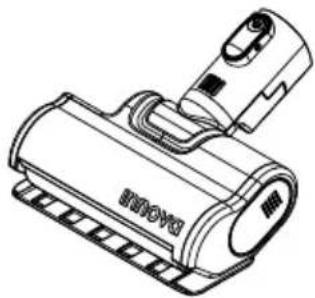
Technical line drawing of a vacuum cleaner component (no text or symbols)Pet & Stair Tool: Use to easily remove pet hair from stairs, carpet or upholstery. Adjust angle of front nozzle to suit different surfaces.

natural_image
Line drawing of a hand holding a handheld device attached to an armchair (no text or symbols)
natural_image
Technical line drawing of a handheld device with layered structure and a hand holding a probe (no text or symbols)
natural_image
Line drawing of a robotic arm gripping a small object on a two-seater sofa (no text or symbols)
CAUTION: Make sure vacuum
cleaner is turned off while attaching turbo brush.
How to maintain dust cup and filters
CAUTION
Never operate vacuum cleaner without pre-motor and HEPA filters, filter screen and dust cup in proper position.
WARNING: Moving parts! Make sure vacuum cleaner is turned off and power cord is unplugged.
Empty dust cup when it reaches the Max Fill line and after every use

natural_image
Illustration of a hand holding a bag next to a vertical cylindrical object, showing mechanical components (no text or symbols)Press release button and lift off dust cup.

natural_image
Illustration of a hand pouring liquid into a container with granular material (no text or symbols)Hold dust cup over wastebasket and press lever to release bottom lid. Debris will empty.

natural_image
Illustration of a hand holding a circular device with a knob, showing a curved arrow labeled 'Click!' (no text or symbols on the device itself)Close bottom lid until it clicks.
Washable dust cup filters – Clean frequently

natural_image
Illustration of a hand pressing down on a portable device with an arrow indicating rotation (no text or symbols)Pull dust cup latch to lift up dust cup lid.

Lift out pre-motor filter and shake off dust frequently. Every three months, rinse filter and dry THOROUGHLY.

natural_image
Illustration of a kitchen sink with a hand using a tool to clean food, accompanied by a sun symbol (no text or labels)Rotate handle up to lift out filter screen. Tap to remove dust. Rinse dust cup and filter screen; dry THOROUGHLY.

natural_image
Illustration of a hand using a tool to press down a container with a downward arrow (no text or symbols)slot on front of dust cup and drop into position. Rotate handle down into position.

natural_image
Illustration of a hand pouring liquid into a container with a lid (no text or symbols)Reinstall pre-motor filter.

Close cover until it clicks.
How to replace HEPA filter
HEPA filter – Replace every year

CAUTION Make sure vacuum cleaner is turned off and power cord is unplugged.

Place vacuum in upright position and remove dust cup. Under where dust cup sits locate HEPA filter cover, grasp cover and turn counterclockwise to the left and lift the cover off.

Grasp tabs on top of HEPA filter and lift it out of vacuum. Note: All filters are washable and can be cleaned by rinsing with warm water. Be sure the filter is THOROUGHLY dry before installing.

natural_image
Technical illustration of a mechanical component with a downward arrow indicating a process (no text or symbols present)Replace HEPA filter by placing back on
vacuum with the tabs facing up. on and turn clockwise to the right to lock in place.

Once HEPA filter is in place put lid back

WARNING: Never operate vacuum cleaner without all filters, filter screen and dust cup in proper position.
How to maintain brushroll
To avoid unnecessary service calls, periodically check brushroll for debris.
CAUTION
Make sure vacuum is turned off and power cord is unplugged. Warning: Do not attempt to remove belt. Call the Eureka Customer Service HELPLINE at 1-800-282-2886.
natural_image
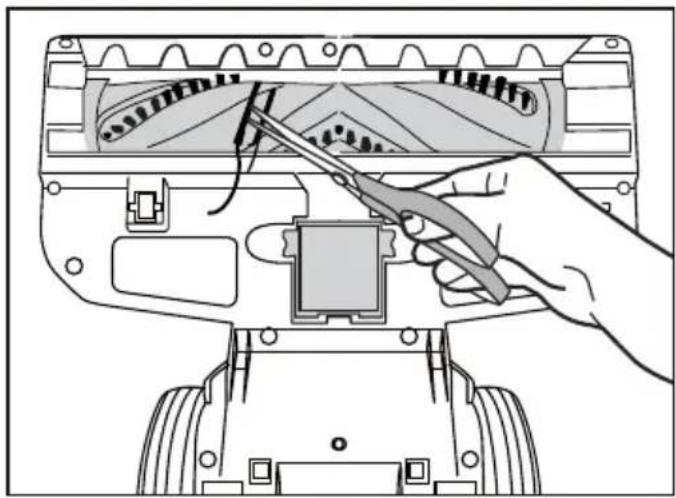
Illustration of a hand using scissors to adjust or install electronic components on a device (no text or symbols visible)If brushroll stops spinning while vacuum is in use (not locked in upright position), this indicates the brushroll is clogged and cannot turn. Brushroll will automatically shut off until clog is removed, vacuum is returned to its upright position and the handle is lowered again.
Step on floor nozzle to lower handle. Turn vacuum face down on floor. Use scissors to clip heavy threads or strings.
How to clear a blockage
CAUTION
Make sure vacuum is turned off and power cord is unplugged.
WARNING: Never operate vacuum cleaner without all filters, filter screen and dust cup in proper position.
If vacuum is not cleaning floors, or if no suction at end of hose, check to be sure air path is not blocked.
- Press release button and lift off dust cup (Fig. 1).
- Empty debris. Hold over wastebasket and press lever to release bottom lid (Fig. 2).
- Check filters and filter screen. Remove any debris and shake off dust. (See maintenance instructions on page 10.)
If still no suction check for blockage in floor nozzle
- Step on floor nozzle to lower handle. vacuum face down on floor.
- Locate access port on bottom of floor nozzle and squeeze tabs in to pull up and remove (Fig. 3).
- Remove any debris or clogs (Fig. 4).
- Replace port cover and ensure it clicks securely back into place
If still no suction, check for blockage in hose.
- Remove hose from vacuum by pressing clip on hose to release and pull away from hose inlet. Also use finger to check air path on vacuum where hose connects to remove any debris. (Fig. 5)
- Use a rod or similar blunt implement to clear any blockages in hose. Flex hose to loosen debris (Fig. 6). Use caution if there is any risk that glass or nails could have become imbedded in hose.
- Reattach the hose. Ensure that filters and dust cup are returned to proper position.

natural_image
Illustration of a hand inserting a component into a vacuum cleaner's airbag (no text or symbols present)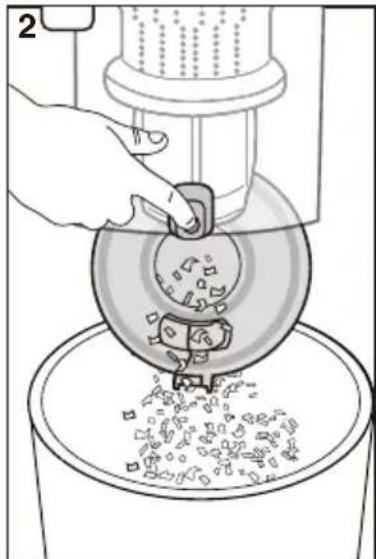
natural_image
Illustration of a hand using a slurrypan to lift contents in a bucket (no text or symbols visible)

natural_image
Illustration of a hand pressing a button on a mechanical component (no text or symbols visible)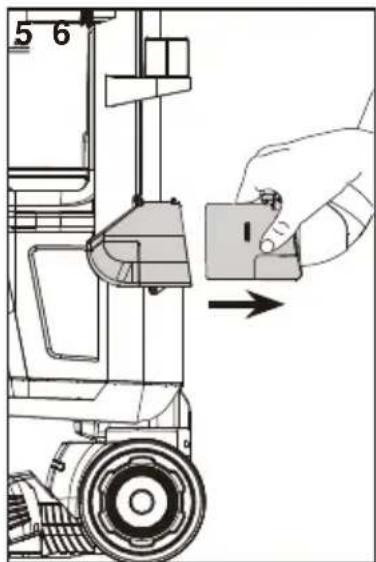

natural_image
Illustration of a medical procedure showing hands using a tool to lift or grip a patient's abdomen (no text or symbols present)NOTICE: Thermal cut-off
This vacuum cleaner has a special thermostat that protects the vacuum in case of motor overheating. If the vacuum suddenly shuts off, proceed as follows: 1) Push the power switch to off and unplug the vacuum. 2) Check the vacuum for a possible source of overheating such as a full dust cup, blocked hose or clogged filter. If these conditions are found, fix them and wait at least 30 minutes before attempting to use the vacuum. 3) After the 30 minute period, plug the vacuum back in and turn on the switch. If the vacuum still does not work, call the Eureka customer service helpline.
| Problem Solution | |
| Motor will not start. | Push plug securely into outlet, try another outlet or check circuit breaker.Press on power switch to turn vacuum on.See detailed “thermal cut-off” instructions above. |
| Vacuum cleaner does not clean carpet or bare floor. | Empty dust cup, clean and/or change filters regularly to maintain suction.Check for and remove any blockages. Pages 12 and 13.Clean brushroll if needed. Page 12. |
| No suction at the end of hose. | See other solutions above.Remove clogs from the hose that restrict the airflow. |
| Motorized Pet & Stair Tool will not spin | Check pet & stair tool for debris. |
| Brush roll stops spinning;LED lights flash off and both Carpet and Hardfloor modes flash the same time. | Check brush roll for debris;Whirlwind Technology brush roll is designed to stop spinning to prevent potential damage in specific circumstances. Using the Hard Floor mode on thick carpet may cause the brush roll to stop spinning. If the brush roll stops spinning, turn the unit Off, wait for 3 seconds and then On and ensure the unit is in Carpet mode. |
The Eureka five-year limited warranty
Midea America Corp. ("Eureka"), subject to the terms and conditions herein, warrants this vacuum cleaner to be free from defects in material and workmanship for a term of five years from the date of original purchase when used in accordance with the Eureka operating and maintenance instructions and under normal household usage. This warranty is granted only to the original purchaser and members of immediate household, and is applicable only to original purchases from Eureka authorized resellers.
What Eureka will do:
Eureka will, at its option, repair or replace a defective vacuum or vacuum part that is covered by this warranty. Repairs may be performed using new or refurbished parts that meet or exceed elects to replace the vacuum, the replacement may be a reconditioned unit. Depending on availability of products, Eureka reserves the right to provide you with a replacement product that is the same or similar, or substitute equivalent of the original product. As a matter of warranty policy, Eureka will not refund the consumer's purchase price.
This warranty does not cover:
- Normal wear and tear of the vacuum and vacuum parts that require replacement under normal use light bulbs, brush-roll, bristles, impellers and cleaning.
- Damages or malfunctions resulting from: improper or unreasonable use or maintenance, abuse, negligence, failure to follow instructions contained in any written materials that accompany the product, deterioration by reason of excess moisture, corrosive atmosphere, lightning, power surges, connections to improper voltage supply, unauthorized alteration, or other external causes such as extremes in temperature or humidity, modifications, scratches or discoloration, accidents, misuse, or acts of God. This warranty also does not cover damage resulting from repair or attempted repair by anyone other than Eureka or an authorized Eureka Warranty Station. This warranty is not applicable to any product that has been altered or on which the serial number has been defacted, modified or removed. Altering, erasing, or forging any proof-of-purchase documents voids any applicable product warranty.
Obtaining warranty service:
To obtain warranty service you must contact the Eureka Service Team, toll free, at 1-800-282-2886 or email customerserviceusa@midea.com, to discuss the warranty claim and procedures to be followed. All warranty claims must include submission of proof-of-purchase documentation. For additional information, you may also visit www.eureka.com.
Shipping charges:
You will be responsible for any initial shipping and insurance charges if the defective product(s) must be shipped for warranty service or warranty evaluation; however, Eureka or a Eureka Authorized Warranty Station will pay the return shipping charges if repairs are covered by the warranty. When returning parts for repair, you must include the model, type and serial number located on the rating plate. If any product submitted for warranty service is found to be ineligible, an estimate of repair cost will be furnished and the repair performed only if requested by the owner and upon receipt of payment or acceptable arrangements for payment.
Further limitations and exclusions:
Any warranty that may be implied in connection with your purchase or use of the vacuum, including any warranty of Merchantability or any warranty of Fitness For A Particular Purpose is limited to the duration of this limited warranty. Some states do not allow limitations on how long an implied warranty lasts, so the above limitations may not apply to you.
Your relief for the breach of this warranty is limited to the relief expressly provided above. In no event shall the manufacturer be liable for any consequential or incidental damages you may incur in connection with your purchase or use of the vacuum. Some states do not allow the exclusion or limitation of incidental or consequential damages, so the above limitation or exclusion may not apply to you.
This warranty gives you specific legal rights. You may also have other rights, which may vary by state.
Midea America Corp. 300 Kimball Avenue Parsippany, NJ 07054 USA
| Image | Part name | Part # (Fits models) |
 | Crevice Tool | I0101 |
 | 2-in-1 Dusting Brush + Upholstery Tool | I0102 |
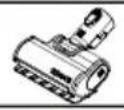 | Motorized Pet & Stair Tool | I0103 |
 | Pre-Motor Filter | I0104 |
 | HEPA Filter | I0105 |


- Important instructions
- Where to find important vacuum information
- Keep this information
- This Owner's Guide provides important instructions to prolong the life of your Innova by Eureka vacuum cleaner.
- Contents
- IMPORTANT SAFEGUARDS
- READ ALL INSTRUCTIONS BEFORE USING THIS VACUUM CLEANER WARNING
- SAVE THESE INSTRUCTIONS
- Motor
- What comes in the carton
- How to assemble your vacuum cleaner
- How to use your vacuum cleaner
- CAUTION
- How to use accessories
- Using accessories with pole as extension wand
- Using accessories with handle only
- 2-in-1 Dusting brush + upholstery
- CAUTION: Make sure vacuum
- How to maintain dust cup and filters
- Empty dust cup when it reaches the Max Fill line and after every use
- Washable dust cup filters – Clean frequently
- How to replace HEPA filter
- HEPA filter – Replace every year
- How to maintain brushroll
- How to clear a blockage
- NOTICE: Thermal cut-off
- The Eureka five-year limited warranty
- What Eureka will do:
- This warranty does not cover:
- Obtaining warranty service:
- Shipping charges:
- Further limitations and exclusions:
Brand : EUREKA
Model : Upright NEU700
Category : Vacuum Cleaner