
HONK809 - Car audio accessory American International - Free user manual and instructions
Find the device manual for free HONK809 American International in PDF.


| Product Type | Electronic Timer/Alarm |
| Brand | American International |
| Model | HONK809 |
| Dimensions | 8 x 5 x 2 cm |
| Weight | 80 g |
| Power Source | 2 x AAA batteries (not included) |
| Display Type | LCD digital |
| Max Timer Duration | 99 minutes 59 seconds |
| Alarm Sound | Beep, adjustable volume |
| Memory Function | Last setting recall |
| Material | ABS plastic |
| Color | White/Black (depending on variant) |
| Operating Temperature | 0°C to 40°C |
| Battery Life | Approximately 6 months (alkaline) |
| Cleaning | Wipe with a soft, dry cloth |
| Safety Warning | Keep away from water and heat sources |
| Spare Parts | Battery compartment cover available |
| Repairability | Battery replacement only; other repairs not recommended |
Frequently Asked Questions - HONK809 American International
User questions about HONK809 American International
0 question about this device. Answer the ones you know or ask your own.
Ask a new question about this device
Download the instructions for your Car audio accessory in PDF format for free! Find your manual HONK809 - American International and take your electronic device back in hand. On this page are published all the documents necessary for the use of your device. HONK809 by American International.
USER MANUAL HONK809 American International
ISO Mounting Brackets
Shaft Brackets

ISO Trim Ring
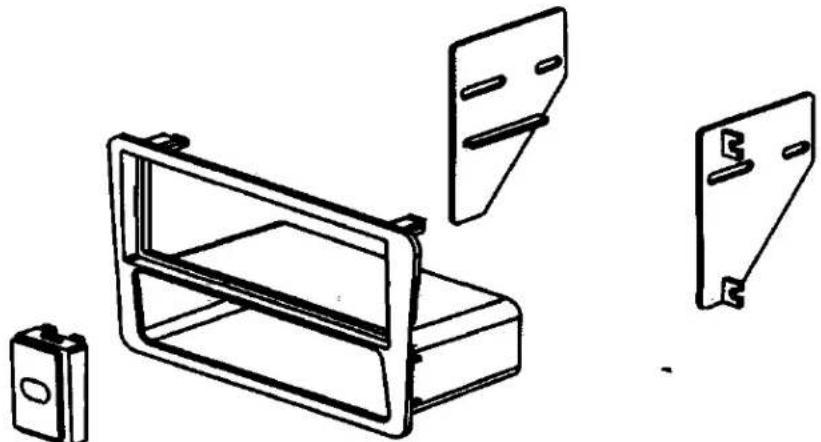
Main Bracket
RADIO MOUNTING KIT INSTALLATION INSTRUCTIONS
©2000 AMERICAN INTERNATIONAL INDUSTRIES, INC
DASH DISASSEMBLY INSTRUCTIONS
1) Carefully unsnap the dash panel below the radio that has the 12 volt power receptacle and pocket
2) Disconnect the 12 volt receptacle harness and remove the dash panel
3) Remove the (2) 5/16 bolts from below the radio
4) Carefully unsnap the radio / climate control assembly from the dash and pull forward
5) Disconnect all harnesses from the radio / climate control assembly and remove
6) Remove the (3) knobs from the climate controls
7) Remove the (3) phillips screws securing the climate controls to the back of the panel and remove the climate control assembly
8) Remove the (4) phillips screws securing the radio to the bracket assembly and remove the factory radio
RADIO INSTALLATION INSTRUCTIONS
FOR ISO MOUNT APPLICATIONS.
1) Remove (4) phillips screws holding the steel support to the dash panel and remove the support
2) Cut off the (2) lower locator posts for the steel support bracket from the backside of the dash panel
3) Sandwich ISO mounting brackets between back of dash panel & steel support using existing screws
4) Mount kit to dash panel
5) Slide radio into kit and mount using screws supplied with radio
6) Adjust radio forward or backward for desired look and tighten all mounting screws
7) Snap on ISO trim ring
8) Re-install climate controls
FOR DIN MOUNT APPLICATIONS
1) Install kit into factory dash panel
2) Slide din sleeve into kit opening and depress locking tabs to secure sleeve to kit
3) Re-install climate control to dash panel
4) Slide / mount radio into sleeve
*NOTE: For a more aesthetically pleasing look we recommend the use of our ISO trim ring in place of the aftermarket radio trim ring whenever possible

Brand : American International
Model : HONK809
Category : Car audio accessory