
95-6518B - Receiver Metra - Free user manual and instructions
Find the device manual for free 95-6518B Metra in PDF.


| Product Type | Car Stereo Receiver |
| Brand | Metra |
| Model | 95-6518B |
| Chassis Size | 2-DIN (approx. 4 x 7 inches) |
| Weight | Approx. 1.5 lbs (0.68 kg) |
| Power Supply | 12V DC (vehicle battery) |
| Max Power Output | 50 Watts x 4 channels |
| RMS Power Output | 22 Watts x 4 channels |
| Tuner Bands | AM / FM |
| Preset Stations | 30 (18 FM / 12 AM) |
| Playback Media | CD, CD-R/RW, MP3, WMA |
| Audio Inputs | Front Aux (3.5mm), USB |
| Audio Outputs | Front / Rear / Subwoofer Pre-outs |
| Bluetooth | Built-in for hands-free calling and audio streaming |
| Display | Dot Matrix LCD with adjustable illumination |
| Remote Control | Included (wired or wireless depending on model) |
| Security | Detachable faceplate |
| Warranty | 1 year limited |
| Compatibility | Most vehicles with standard 2-DIN opening |
Frequently Asked Questions - 95-6518B Metra
User questions about 95-6518B Metra
0 question about this device. Answer the ones you know or ask your own.
Ask a new question about this device
Download the instructions for your Receiver in PDF format for free! Find your manual 95-6518B - Metra and take your electronic device back in hand. On this page are published all the documents necessary for the use of your device. 95-6518B by Metra.
USER MANUAL 95-6518B Metra
Installation instructions for part 95-6518b
APPLICATIONS
Chrysler 200 LX (with a 3.0" screen) 2015-up Jeep Cherokee Sport 2014-up
Ram Trucks (without 8.4 inch touchscreen) 2013-up 95-6518B
KIT FEATURES
• Double DIN radio provision
- Painted matte black
- Note: Modifications to factory radio cavity is required for this installation
KIT COMPONENTS
• A) Radio housing • B) Brackets
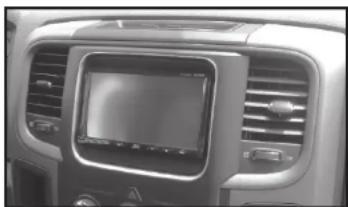
natural_image
Interior view of a car dashboard with air filters and a central touchscreen display (no visible text or symbols)
natural_image
Technical line drawings of three views (A, B, and C) of a mechanical component with mounting brackets and mounting holes (no text or symbols)WIRING & ANTENNA CONNECTIONS (sold separately)
Wiring Harness: • XSVI-6523-NAV
Antenna Adapter: • 40-EU55
Table of Contents
Dash Disassembly
- Chrysler 200 LX (with a 3.0" screen) 2015-up......2
— Jeep Cherokee Sport 2014-up ....3-4
– Ram Trucks 2013-up....5
Kit Assembly
- Double DIN radio provision .... 6
TOOLS REQUIRED
- Panel removal tool
- Phillips screwdriver
- 9/32 Socket removal tool
CAUTION! Metra recommends disconnecting the negative battery terminal before beginning any installation, unless the vehicle manufacturer recommends against so. Please check with your local Dealership for more information. All accessories, switches, climate controls panels, and especially air bag indicator lights must be connected before reconnecting the battery or cycling the ignition. Also, do not remove the factory radio with the key in the on position, or the vehicle running. It would be best to remove the key from the ignition and then wait a few seconds before removing the factory radio.
95-65188
Dash Disassembly
Chrysler 200 LX (with a 3.0" screen) 2015-up
- Unclip the radio trim bezel from the vehicle. (Figure A)
- Remove (4) screws securing the radio to the dash, disconnect the connectors attached, and then remove the radio.
Continue to kit assembly

natural_image
Interior view of a car dashboard with air vent and control knobs (no text or symbols)(Figure A)
95-65188
Dash Disassembly
Jeep Cherokee Sport 2014-up
- Unclip and remove the climate control panel from the vehicle and put to the side. (Figure A)
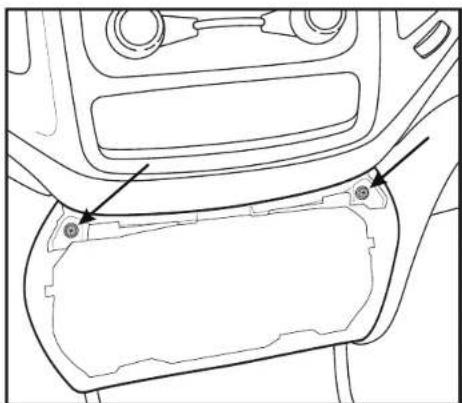
- Remove (2) screws securing the radio trim bezel to the dash. (Figure B)
- Unclip the radio trim bezel from the vehicle. (Figure C)

natural_image
Line drawing of a car dashboard with control panel and directional arrow (no text or symbols)(Figure A)
- Remove (4) screws securing the radio to the dash, disconnect the connectors attached, and then remove the radio.
Continue on next page
natural_image
Technical line drawing of a car interior panel with two mounting points (no text or symbols)(Figure B)

natural_image
Top-down line drawing of a car interior frame with arrows indicating direction (no text or symbols)(Figure C)

95-65188
Dash Disassembly
Jeep Cherokee Sport 2014-up (Continued)
Sub-dash modification:
- Remove the rubber cover from inside the pocket on top of the dash, and then remove (1) screw exposed.
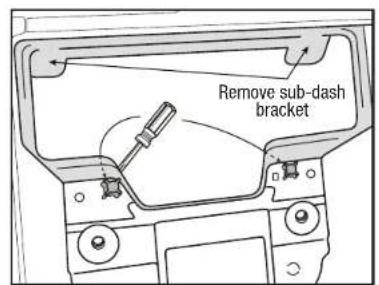
- Remove (2) screws below the radio cavity. (Figure A)
- From inside the radio cavity, remove (2) screws securing the metal, radio sub-dash bracket, and then discard. (Figure B)
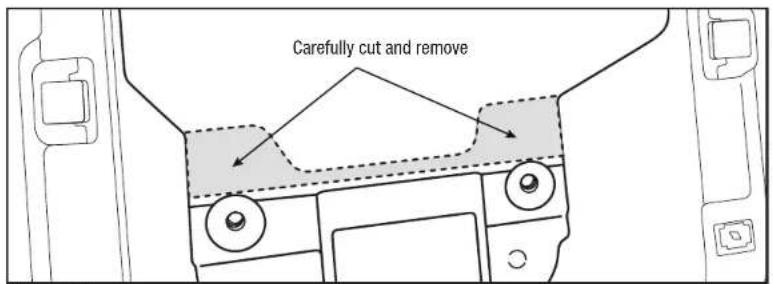
- Carefully cut the plastic from the bottom rear portion of the radio cavity, down to the metal brace. (Figure C)
Continue to kit assembly

(Figure B)(Figure A)
(Figure C)

95-65188
Dash Disassembly
Ram (without a 8.4 inch touchscreen) 2013-up
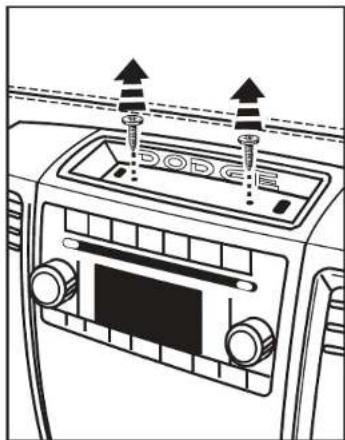
- Remove liner inside tray at the top center of the dash and remove (2) torx screws. (Figure A)
- Unsnap and remove radio panel. (Figure B)
- Remove four screws and remove radio. (Figure C)
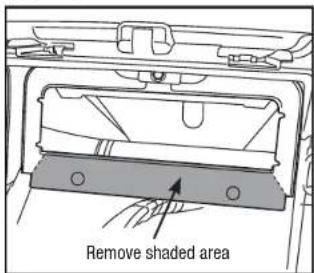
- The factory rear support will need to be cut or removed to allow space for a new radio. The bottom section can be removed with two cuts at the bottom corners. (Figure D)
Continue to kit assembly
natural_image
Diagram of a car air conditioner unit with three directional arrows indicating airflow or movement (no text or symbols present)(Figure A) (Figure B)

natural_image
Line drawing of a car dashboard with air vent and control panel (no text or symbols)
natural_image
Interior view of a car dashboard with air vent and control panel (no text or symbols visible)(Figure C)
(Figure D)

95-65188
Kit Assembly
Double DIN radio provision
Note: For proper orientation, the locating tabs on the Radio Housing are more to the top of the kit than bottom. (Figure A)
- Rotate the brackets into the radio housing. (Figure B)
- Slide the radio into the bracket/radio housing assembly and secure using the screws supplied with the radio. (Figure C)
- Locate the factory wiring harness and antenna plug in the dash. Metra recommends using the proper mating adapters from Metra and/or AXXESS.
- Reassemble the dash in reverse order of disassembly.

(Figure A)

natural_image
Technical line drawing of a mechanical housing component with directional arrows indicating movement (no text or symbols)
(Figure C)(Figure B)

Installation instructions for part 95-6518b

IMPORTANT
If you are having difficulties with the installation of this product, please call our Tech Support line at 1-800-253-TECH. Before doing so, look over the instructions a second time, and make sure the installation was performed exactly as the instructions are stated. Please have the vehicle apart and ready to perform troubleshooting steps before calling.

KNOWLEDGE IS POWER
Enhance your installation and fabrication skills by enrolling in the most recognized and respected
enrolling in the most recognized and respected mobile electronics school in our industry.
Log onto www.installerinstitute.com or ca
800-354-6782 for more information and take steps
toward a better tomorrow.

Metra recommends MECP
certified technicians


- Chrysler 200 LX (with a 3.0" screen) 2015-up Jeep Cherokee Sport 2014-up
- Ram Trucks (without 8.4 inch touchscreen) 2013-up 95-6518B
- KIT FEATURES
- KIT COMPONENTS
- Table of Contents
- Dash Disassembly
- Kit Assembly
- TOOLS REQUIRED
- Chrysler 200 LX (with a 3.0" screen) 2015-up
- Jeep Cherokee Sport 2014-up
- Jeep Cherokee Sport 2014-up (Continued)
- Sub-dash modification:
- Ram (without a 8.4 inch touchscreen) 2013-up
- Double DIN radio provision
- IMPORTANT
Brand : Metra
Model : 95-6518B
Category : Receiver