VR223 - Camcorder CURTIS - Free user manual and instructions
Find the device manual for free VR223 CURTIS in PDF.


| Product Type | Digital Camcorder |
| Brand | Curtis |
| Model | VR223 |
| Image Sensor | 300,000 pixels |
| Lens | F2.4, f=3.6mm |
| Focus Range | 120cm to infinity |
| Digital Zoom | 4× |
| LCD Display | 2.0 inch TFT |
| Video Resolution | VGA 640×480, QVGA 320×240 |
| Photo Resolution | 300,000 pixels (approx. 640×480) |
| File Format | AVI |
| Storage Media | SD card (max. 4GB) |
| USB Port | USB 2.0 |
| TV Output | Yes (composite) |
| Power Source | 2 × AA alkaline batteries |
| Dimensions (L×W×H) | 112.6 × 58.6 × 28.6 mm |
| Weight (without batteries) | 93 g |
| System Requirements | Windows Me/2000/XP/Vista, Mac OS, USB 1.1/2.0 |
| Included Accessories | Installation CD, User manual, TV cable |
| Auto Power Off | After 1 minute of inactivity |
| Low Battery Indication | Red icon flashes before shutdown |
| Lens Cleaning | Blow off dust, use lens tissue with cleaner if needed |
| Safety Warning | Do not open housing; avoid moisture, pressure, collision, heat |
Frequently Asked Questions - VR223 CURTIS
User questions about VR223 CURTIS
0 question about this device. Answer the ones you know or ask your own.
Ask a new question about this device
Download the instructions for your Camcorder in PDF format for free! Find your manual VR223 - CURTIS and take your electronic device back in hand. On this page are published all the documents necessary for the use of your device. VR223 by CURTIS.
USER MANUAL VR223 CURTIS


Contents
Function Description....2
Notice for Use....2
System Requirements....4
Basic operation....7
ArcSoft PhotoImpression, VideoImpression and MediaImpression....12
Product Specifications....28
Standard accessories....29
Function Description:
Welcome! Thank you for purchasing the CURTIS VR223
With this digital video camera, you can take 640 x 480 resolution (VGA format) videos and 300,000 pixels of still photos. With the playback function you can play back the taken video or photos with this digital video camera. In addition, you can download the videos and photos from the VR233 to your PC. The illustrations in this user manual are to visually detail the operation of the VR223.
Notice for use:
General:
- Never open the housing of the digital video camera as some parts may cause electric shock.
- Moisture, pressure, collision and heat may damage this digital video camera.
Memory and storage:
- SD can be used, with a maximum capacity of 4GB.
- When buying an SD card, take the digital video camera with you to ensure compatibility.
- SD cards have a write-protect switch, which can be used to prevent accidental deletion of data. When this switch is pushed to the bottom and locked, the data in the card will be protected. However, when the card is in write-protect state, it cannot be used for shooting or deletion, etc.
-
These memory cards should not be used for permanent storage of data. Files should be transferred and stored in your computer or an external storage device.
-
When storing documents onto the memory or the memory card, make sure that the size of the documents does not exceed the capacity of the memory.
Maintenance and care:
- To clean the lens, blow away the dust on its surface, then use proper cloth or tissue for optical devices to clean the lens. If necessary, use lens cleanser.
- Never touch the lens with fingers.
- When left idle for long periods of time, take out the battery and keep in a dry and dark place.
Other notes:
- When switching image output between LCD display and video devices, be sure to exit from the play or record state.
- Never keep the digital video camera in an extremely hot or damp environment.
- TV programs, movies, music, images and other resources may be protected by copyright; therefore, without prior permission, the shooting/use of these resources may violate copyright laws and regulations related. Please note that the resources under the protection of copyright can be used within the permission of related laws and regulations.
System requirements:
Below are the minimum requirements that your computer needs to operate files for the software included:
| Operation System Microsoft Windows Me, 2000,XP, Vista* | |
| CPU Above Intel PIII667 or CPU of equal performance | |
| Memory Above 128 MB | |
| Sound card and display card DirectX8 or above | |
| CD-ROM 4× speed or above | |
| Hard Disk 300 MB or more useable space | |
| Other One standard USB 1.1 | or USB 2.0 port |
* The VR223 is compatible with all Mac OS.


- Basic operation
2.1 Battery Installation
Slide down the Battery Cover and insert two new AA alkaline batteries. Align with correct polarity of battery terminals. Close Battery Cover.
2.2 Use SD card
Insert the SD memory card into the SD card slot. Push it down until the card stays latched. Do not force – check card's position according to the position mark on the camera.
Push and release inserted card if you wish to remove or replace the card.
Turn your camcorder OFF before inserting / removing the SD Card.
- Note that the SD Card has a tiny LOCK switch on the side. Set the
switch to un-LOCK position to be able to record videos and take still pictures.
2.3 Power on/off
In power-off state, press and hold the power key (💡) to power ON the camera.
In power-on state, press the power key (💡) to power OFF the camera.
In power-on state, if you leave the camera idle for 1 minute it will power off automatically.
In power-on state, when battery level is very low, the red 📋 icon on the bottom left of the screen will flash and the camera will turn off after one second. You must replace the batteries.
2.4 Change mode
After powering on, the camera will always enter video record mode, press mode key to change mode between video record and capture.
In video record or capture mode, press left key or right to enter playback mode.
Press Mode key to exit playback mode and return preview mode
2.5 Change resolution
You can select High or Low resolution for recording videos or taking still pictures.
Slide the Resolution Switch located on camcorder's side and select desired position.
LCD screen will display "Hi" or "Lo" indicating selected resolution.
2.6 Record Video
In video record mode, press shutter key (○) to begin video recording, press the shutter key again to stop recording.
Press up key or down key to zoom in or zoom out the image.
In playback mode, press Shutter key to start or stop video.
2.7 Take a Picture
In capture mode, press the shutter key to take a photo.
2.8 Play back videos and photos
In playback mode, press left or right key (○) to select a file.
Press Shutter key to begin/stop play video, and press up key or down key to on a photo.
- When the inserted memory card is full, the LCD will display "Memory Full," then the camera will stop recording automatically.
- If the SD card is locked, when you press the Shutter key, the LCD will display “Card Locked” and the camera will not record.
- Before insertion or removal of card, please turn off the camera first. In power-on state, the camera will automatically shut down if the memory card is removed.
2.9 TV output
After the camera is powered on, insert the terminal of the TV cable into the TV output port of the camera, and yellow port of the other terminal should be connected to VIDEO IN
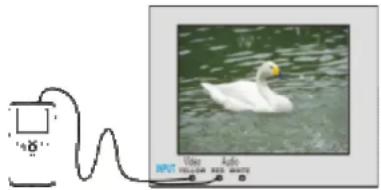
port of TV, red (or white) port of the other terminal should be connected to AUDIO IN port of TV.
2.10 Delete files
Press the delete key once to display "Delete File?" Press the delete key again to carry out deletion. Press any other keys to cancel the deletion.
2.11 Connect to PC
- Slide the USB Switch UP to extend the USB connector and turn the camcorder ON.
- Insert camcorder USB connector into computer's USB port, or use supplied USB extension cable to make the connection.
2.12 Download files from camera to PC
- After connecting to a PC, go to "My Computer" and open the "Removable Disc." The photos or videos will be saved in the DCIM\ 100MEDIA folder in the removable disc. Choose the desired photo/video in the 100MEDIA folder and copy (drag with mouse) it into the target folder in the hard drive of the computer.
- You can use ArcSoft Videolmpression, PhotoImpression and MediaImpression to edit videos and photos.
- ArcSoft VideoImpression, Photolmpression, and Medialmpression can be installed
from the CD included with this device.

Application of Attached ArcSoft Photolmpression, Videolmpression and Medialmpression:
There are three software applications provided on the CD for image processing: PhotoImpression, Videolmpression, and MedialImpression.
Introduction interface for software installation
Put the CD into the CD-ROM of the computer, then the following menu will occur:

If the CD driver does not automatically carry out or close such function, please click autorun.exe program under the root directory of the CD.
Photolmpression 6 Installation and Use:
Install PhotoImpression6:
Click "Install Photolmpression" button, complete the installation as instructed.

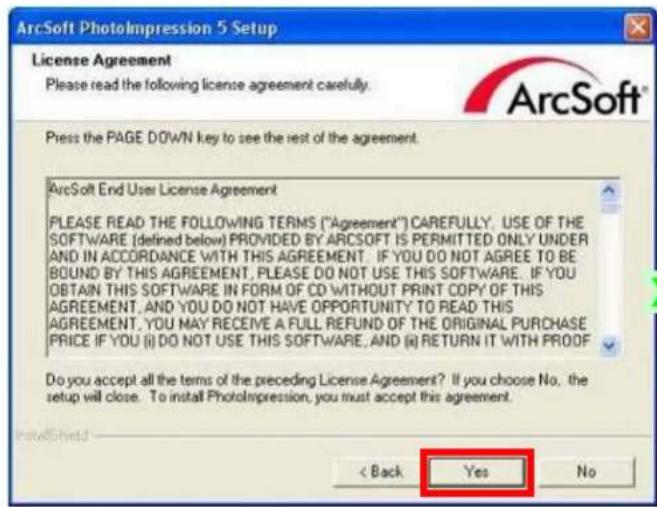


After installation, please restart the computer.
Run PhotolImpression6:
Double click icon on the desktop, or open Photolmpression 6 via "Start→Programs".
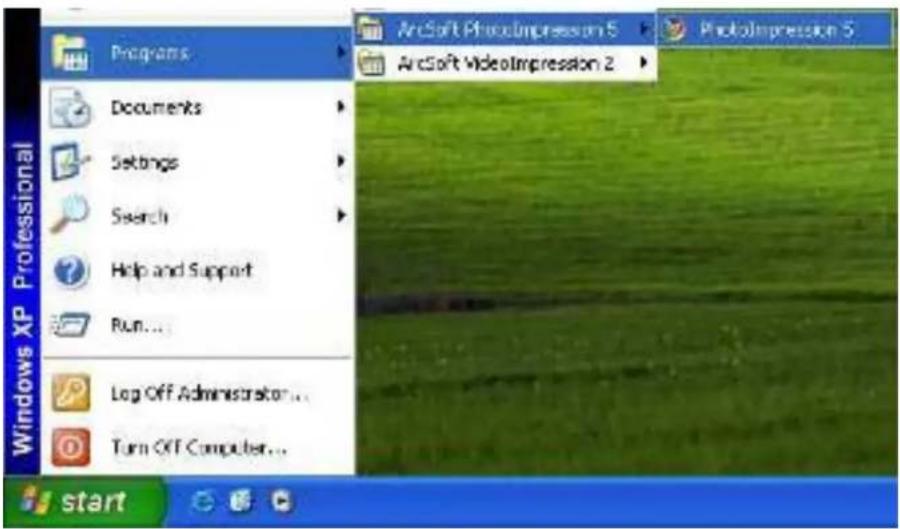
When PhotoImpression6 is opened, you'll see the following window. Click the center of the window with the left key of the mouse to shut the window. After the window is off, you can open PhotoImpression.

After Photolmpression is open, the "Get Photo" window will appear:

After choosing and opening photos in the "Get Photo" window, the chosen photos will be displayed in the center area of the screen. Then you can edit the chosen photos.

For the detailed instructions of PhotoImpression, please refer to the Help menu in the program (as shown in the following figure).
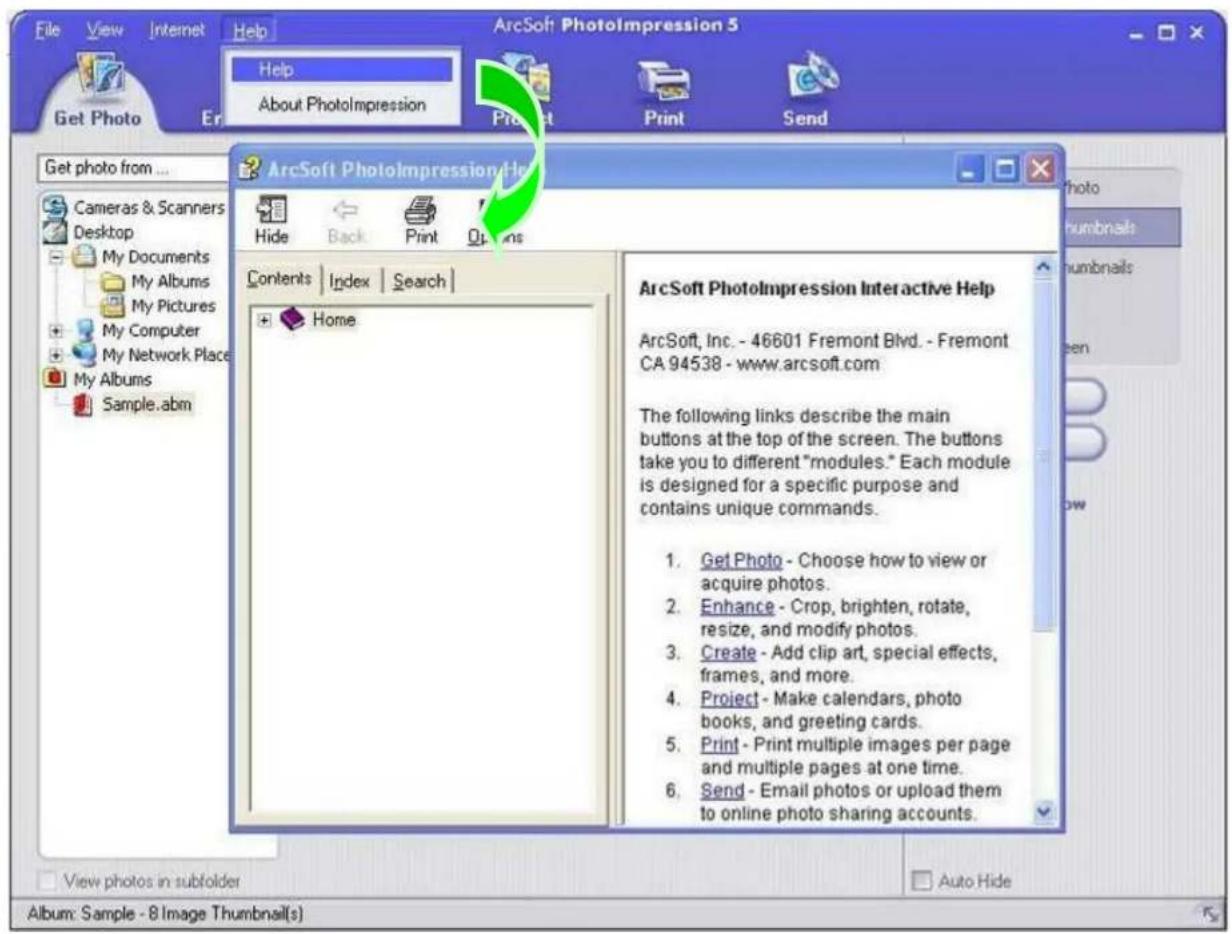
Videolmpression 2 Installation and Use:
Install Videolmpression 2:
Click "Install VideoImpression" button and complete the installation as instructed.
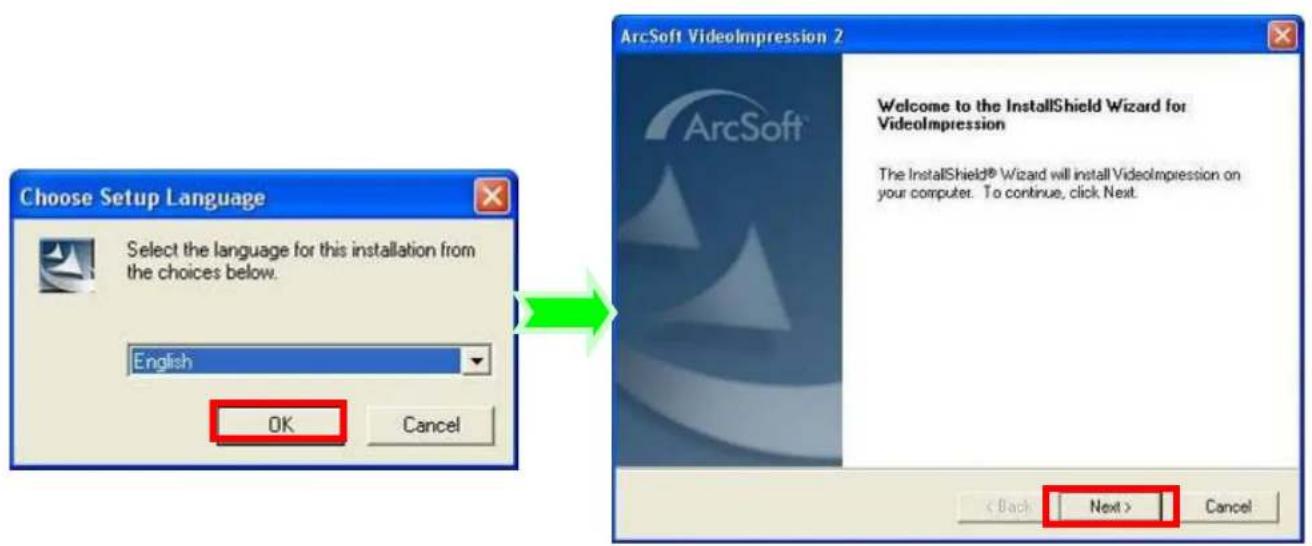


After installation, please restart the computer.
Run VideoImpression 2:

Double click the icon on the
Desktop or follow "Start → Programs" to
open VideoImpression 2.

After starting VideoImpression2, choose to create new video short.
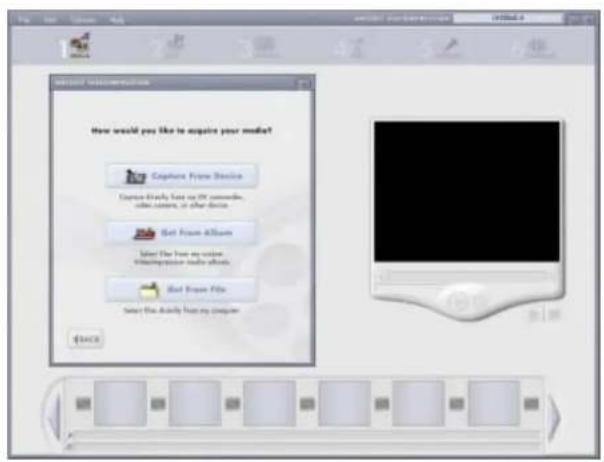
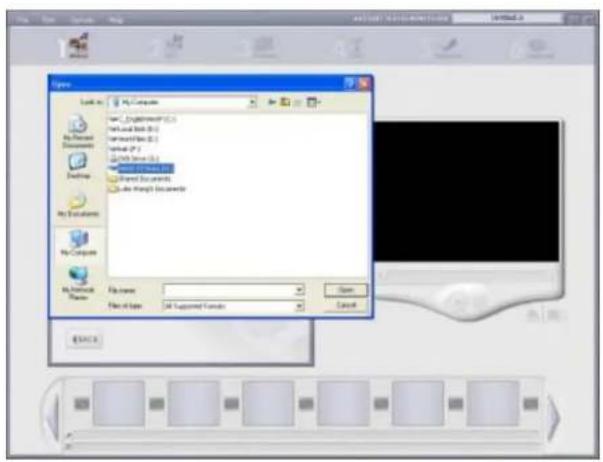
Choose Get From File to find the desired video short.

Choose and insert the desired video short into VideoImpression2.

In Videolmpression, you can edit the video short.
For other detailed operation, press F1 Help menu (as indicated below) to understand more functions of this software.

MedialImpression Installation and Use:
Install MedialImpression:
Click "Install MediaImpression" button and complete the installation as instructed.


Run MedialImpression:
Double click the Impression icon on the
Desktop or follow "Start → Programs" to open MediaImpression.
Click on the media files that you would like to organize.

ArcSoft MedialImpression® enables users to easily, creatively, and productively manage their multimedia with simple workflow and powerful tools. Organize your media easily and create simple projects with editing tools. There are endless ways to present and share; worry-free media file backup & restore.
For other detailed operation, press the F1 Help menu to understand more functions of this software.
Product specifications:
| Image sensor 300,000pixels | |
| Function mode Record, playback, mobile disk, deletion | |
| Lens | F2.4 f=3.6mm |
| Focus range 120cm~infinity | |
| Digital focusing 4× | |
| Shutter Electronic | |
| LCD display 2.0 inch TFT Display | |
| Resolution VGA | 640×480, QVGA 320×240 |
| White balance Automatic | |
| Exposure Automatic | |
| File format AVI | |
| Video out TV out | |
| Storage media | SD card (max. 4GB) |
| USB port | USB 2.0 port |
| Dimension (LxWxH) | 112.6 mm×58.6 mm×28.6mm |
| Weight | 93g (Without Battery) |
Standard accessories:

Installation CD

User manual

TV cable
- CONTENTS
- FUNCTION DESCRIPTION
- NOTICE FOR USE
- GENERAL
- MEMORY AND STORAGE
- MAINTENANCE AND CARE
- OTHER NOTES
- SYSTEM REQUIREMENTS
- 2.1 BATTERY INSTALLATION
- 2.2 USE SD CARD
- 2.3 POWER ON/OFF
- 2.4 CHANGE MODE
- 2.5 CHANGE RESOLUTION
- 2.6 RECORD VIDEO
- 2.7 TAKE A PICTURE
- 2.8 PLAY BACK VIDEOS AND PHOTOS
- 2.9 TV OUTPUT
- 2.10 DELETE FILES
- 2.11 CONNECT TO PC
- 2.12 DOWNLOAD FILES FROM CAMERA TO PC
- APPLICATION OF ATTACHED ARCSOFT PHOTOLMPRESSION, VIDEOLMPRESSION AND MEDIALMPRESSION
- INTRODUCTION INTERFACE FOR SOFTWARE INSTALLATION
- PHOTOLMPRESSION 6 INSTALLATION AND USE
- VIDEOLMPRESSION 2 INSTALLATION AND USE
- MEDIALIMPRESSION INSTALLATION AND USE
- STANDARD ACCESSORIES
Brand : CURTIS
Model : VR223
Category : Camcorder