
HYCM63E - Cement mixer HYUNDAI - Free user manual and instructions
Find the device manual for free HYCM63E HYUNDAI in PDF.


| Product Type | Cement Mixer |
| Brand | Hyundai |
| Model | HYCM63E |
| Drum Capacity | 63 Liters |
| Motor Power | 400 W |
| Voltage | 230 V |
| Frequency | 50 Hz |
| No-Load Speed | 30 RPM |
| Drum Speed | 27-30 RPM |
| Drum Material | Steel with Epoxy Coating |
| Max Concrete Capacity | 45 Liters per batch |
| Weight | 32 kg |
| Dimensions (L x W x H) | 60 x 50 x 55 cm |
| Protection Class | IP44 |
| Power Cable Length | 1.5 m |
| Operating Temperature | -5°C to 40°C |
| Overload Protection | Yes (thermal cut-off) |
| Maintenance | Clean after each use; lubricate bearings monthly |
| Safety Features | Emergency stop switch, drum lock, safety guard |
| Spare Parts Availability | Motors, belts, bearings, drum assembly |
| Warranty | 2 years |
Frequently Asked Questions - HYCM63E HYUNDAI
User questions about HYCM63E HYUNDAI
0 question about this device. Answer the ones you know or ask your own.
Ask a new question about this device
Download the instructions for your Cement mixer in PDF format for free! Find your manual HYCM63E - HYUNDAI and take your electronic device back in hand. On this page are published all the documents necessary for the use of your device. HYCM63E by HYUNDAI.
USER MANUAL HYCM63E HYUNDAI
natural_image
Line drawing of a mechanical device with wheels and a mounted cylindrical component (no text or symbols)Contents
Introduction......3
Safety Information......4-14
Understand Your Machine......4
Personal Safety......4-5
Inspect Your Machine......5
Work Area......6
During Use....7
Batteries....8
Electricity....8-9
Double Insulated Devices....9
Vibrations....10
Noise....10
Residual Risks....10
Intended Use....11
Personal Protective Equipment......12
Symbols On The Machine......13-14
Unboxing....15
In The Box....16
Features....17-18
Assembly....19-28
Assembly Overview....19
Main Frame Assembly....20-21
Lower Drum Assembly....22-23
Upper Drum Assembly....24-25
Locking Plate & Tipping Handle.....26-27
Mounting Motor & Transmission......28
Operation....31-35
Drum Tilting....31
Mixing, Unloading & Storage Positions....32-34
Starting & Stopping......35
Maintenance & Care....36-37
Cleaning The Drum....36
Cleaning The Motor Housing......37
Storage....37
Specifications....38
Recycling & Disposal......39
Declaration Of Conformity......40
Useful Information......41
Our YouTube Channel......41
Warranty....41
Manual Updates....41
Returning Your Product......41
Leaving A Review......41
Ordering Spare Parts....41
Product Record....42
Contact Us....43
Introduction
Thank You For Purchasing Your HYUNDAI Product
We work very hard to give all of our customers the best possible service. If you have any problems, before leaving negative feedback, please contact us to give us a chance to resolve the issue. We would be delighted if you left us positive feedback! Thank you for purchasing this product.
▲ Important!

WARNING: READ THE INSTRUCTION BOOKLET THOROUGHLY BEFORE USING THE MACHINE. Keep for future reference and pass it on if the machine is loaned or sold to another user.
This manual has been produced by Hyundai Power Products and should be kept with the product. Please read and understand these instructions before you use your product. Failure to do this may result in personal injury or damage to the product.
The safety precautions and warnings are to ensure your safety and protect you from harm or damage to the product.
The information contained in this manual was accurate at the time of production, however HYUNDAI Power Products may make modifications to the product without notification.
Safety Information

Understand Your Machine
- WARNING! You must read these instructions carefully before operating the machine. Make sure that you are familiar with the controls and properly operate the machine. You must learn how to stop the machine quickly. If you do not follow the warnings and instructions, it may result in fire and/or serious injury. Make sure to save all warnings and instructions for future reference.
- Read this manual and labels affixed to the machine to understand its limitations and potential hazards.
- Be thoroughly familiar with the controls and their proper operation. Know how to stop the machine and disengage the controls quickly.
- If the unit is to be used by someone other than original purchaser, or is to be loaned, rented, or sold, always provide this manual and any needed safety training before operation. The user can prevent and is responsible for accidents or injuries that may occur to themselves, to other people, or to property.
- Do not force the machine beyond its limits. Use the correct machine for your application.
- Know how to stop the machine quickly in case of emergency. Understand the use of all controls.
- ALL MAINTENANCE other than that listed in this manual, should be carried out by professionally trained and certified personnel.
- When using this machine for the first time and before actual work, you MUST learn how to handle the machine from an experienced or skilled person.

Personal Safety
- WARNING! Never allow children or people unfamiliar with these instructions to use the product. Local regulations can restrict the minimum age of the operator.
- Keep children, pets, and other people not using the unit away from the work area (at least 15m). Be alert and shut off the unit if anyone enters work area. Keep children under the watchful care of a responsible adult.
- Stay alert, watch what you are doing and use common sense when operating the machine. Never operate the machine when unwell or tired, or if you have taken alcohol, medicine, drugs or any substances which may slow your reflexes and compromise judgment. A moment of inattention while operating the machine may result in serious personal injury.
- Appropriate Personal Protective Equipment (PPE), MUST be worn at all times when operating or repairing the machine. Always wear anti-slip and resistant work footwear and long trousers while using the machine. Do not use the machine when barefoot, wearing sandals or similar lightweight footwear. Do not wear chains, bracelets or clothing that is loose fitting or hanging ties or cords. Tie long hair back. Always wear protective earplugs. Loose clothes, jewellery, or long hair can be caught in moving parts. Protect eyes, face, and head from objects that may be thrown from the unit. Always wear safety goggles or safety glasses with side shields when operating.
- Always keep hands and feet away from all moving parts during operation. Moving parts can cut or crush body parts. Always keep hands and feet away from all pinch points.
Safety Information

Personal Safety (Continued)
- Do not touch parts that might be hot from operation. Allow parts to cool before attempting to maintain, adjust, or service.
- Do not overreach. Keep proper footing and balance at all times. This enables better control of the machine in unexpected situations. Extending your body too far can result in a loss of balance and you may fall which will result in injury.
- Never place any part of your body where it would be in danger if movement should occur during assembly, installation, and operation, maintenance, repairing or moving.
- Keep in mind that the operator or user is responsible for accidents, hazards or unexpected events involving the machine that occur to other people or their property. It is the responsibility of the user to assess the potential risk of the area where work is being carried out. The operator or user must take all necessary precautions to ensure their own safety and that of others, especially on slopes or rough, slippery and unstable ground.

Inspect Your Machine
- Check your machine before starting it. Keep guards in place and in working order. Make sure all nuts, bolts, etc., are securely tightened.
- You must check the general condition of the machine before use.
- Never operate the machine when it is in need of repair or is in poor mechanical condition. Replace damaged, missing, or failed parts before using it. Check for fuel leaks. Keep the machine in safe working condition.
- Do not use the machine if the machine's switch does not turn off the machine when running. Any machine that can't be controlled with the switch is dangerous and must be replaced.
- Regularly check to see that keys and adjusting wrenches are removed from the machine area before starting it. A wrench or a key that is left attached to a rotating part of the machine may result in personal injury.
- If the machine should start to vibrate abnormally, stop the machine and check immediately for the cause. Vibration is generally a warning sign of trouble.
- Avoid accidental starting. Be sure the switch is off before transporting the machine or performing any maintenance or service on the unit. Transporting or performing maintenance or service on a machine with its switch on invites accidents.
- Do not tamper with or disable safety systems.
- Only use manufacturer-recommended attachments.
- Before using, always visually inspect to see that the tools are not worn out or damaged. Replace worn out or damaged elements and bolts in set to preserve balance.
- Keep the machine in good operating condition. Operating the machine in poor or questionable condition could result in serious injury.
- Be sure all safety devices are in working order and warning labels are in place. These items are installed for your safety.
Safety Information

Work Area
- You must only work in daylight or with good artificial light in good visibility conditions. Do not work at night, at times of heavy fog, or at any other times when your field of vision might be limited and it would be difficult to gain a clear view of the area.
- Keep people, children and animals away from the working area.
- Operate on flat, level ground.
- DO NOT work on wet ground. If there has been heavy rain on the working site, wait until the ground has dried up.
- Never park the machine in a place with unstable ground which could give way.
- You must be careful near ravines, ditches or embankments.
- Exercise extreme caution when operating on or crossing gravel drives, walks, or roads. Stay alert for hidden hazards or traffic.
- Do not work in the rain, when there is a thunderstorm or lightning risk, at times of strong or gale force winds, or at any other times when the weather conditions might make it unsafe to use this product. If there is bad weather conditions, do not use the machine.
- Any liquid spilled on the floor may result in you slipping.
- DO NOT operate power tools in explosive atmospheres, such as in the presence of flammable liquids, gases or dust. Power tools may create sparks, which may ignite the dust or fumes.
Safety Information

During Use
- Do not operate the machine in confined areas where there may be a risk of crushing the operator between the machine and another object.
- Never attempt to make any adjustments, while the machine is running.
- You must switch off the machine:
- Before checking or working on the machine.
- When transporting the machine.
- Whenever you leave the machine unattended.
- If the machine starts to vibrate abnormally.
- WARNING! If something breaks or an accident happens whilst working, you must turn off the machine immediately and move the machine away to prevent further damage. If an accident happens with injuries or third parties are injured, carry out the first aid measures most suitable for the situation immediately and contact the medical authorities for any necessary health care. Carefully remove any debris that might cause damage or harm persons or animals should it not be seen.
- Never operate the machine without the defective guards or shields, or without safety devices, or if the cord is damaged or worn.
• Always make sure that the power cord is not in the way of your work.

Batteries (Where Present)
Batteries present a risk if they become damaged by the possible leaking of electrolyte. This electrolyte is an acid and can cause serious burn injuries. Care should be taken when working on or near them. NOTE: the electrolyte may be in a liquid or gel form.
Should you come in to contact with electrolyte you should;
- Remove all clothing contaminated with electrolyte. If you cannot remove then saturate them in water.
- Get medical assistance as soon as possible.
You must advise the medical staff of the type of acid.
- Lead/acid battery = dilute sulphuric acid.
- Nickel/cadmium = potassium hydroxide alkali electrolyte.
- Use fresh running water to wash off excess electrolyte, continue this until medical assistance arrives. Make sure that you do not wash the electrolyte to another part of your body or face.
- If electrolyte comes in to contact with Eyes the electrolyte needs to be immediately washed away with large amounts of water. Make sure that you do not wash the electrolyte to another part of your face or body.
- Gasses from charging batteries are highly flammable and great care should be taken to charge in well ventilated areas.

- There is an explosion risk if the battery terminals are short circuited, when connecting/disconnecting ALWAYS exercise great care so that the terminals or battery leads are NOT allowed to touch and cause a spark. ALWAYS use suitable insulated tools.

Electricity (Where Applicable)
DANGER : ELECTRICITY CAN KILL – NEVER WORK ON LIVE / ENERGISED EQUIPMENT.

- Prior to carrying out any maintenance work you MUST identify electrical station methods and isolate all electrical supplies.
- Prior to use and with all electrical supplies isolated, you MUST check all
electrical cables, plugs and connectors for the following;
- Are intact and have no signs of damage, to include but not limited to bare wires, chaffing, cuts and loose wiring.
- If there are any signs of damage, the damaged item MUST be taken out of service until the damage has been repaired by an electrically competent person.
- All trailing cables should be routed so as not to cause any kind of trip hazard.
- NEVER work on or near electricity with wet hands, wet clothing and wet gloves.

Electricity (Continued)
- Power tools plug must match the outlet. Never modify the plug in any way. DO NOT use any adapter plugs with earthed (grounded) power tools. Unmodified plugs and matching outlets will reduce risk of electric shock.
- DO NOT expose this power tool to rain or wet conditions. Water entering a power tool will increase the risk of electric shock. DO NOT abuse the power cord. Never use the cord for carrying, pulling or unplugging the power tool. Keep the cord away from heat, oil and sharp edges or moving parts. Damaged or entangled cords increase the risk of electric shock. When operating a power tool, use an extension cord suitable for outdoor use. Use of a cord suitable for outdoor use reduces the risk of electric shock.
- IMPORTANT: Make sure that the electric circuit is fused, and that the power, voltage and frequency of the motor is supported by your mains supply. Also, make sure that your power supply is earthed. Connect your machine to earth. Never open the ON/OFF switchbox. However, if it should become necessary to do so, contact a qualified electrician. Make sure that you will never touch live contacts, specifically when you plug or unplug your machine. This machine and its power cord must never get into contact with water.
- Avoid body contact with earthed or grounded surfaces such as pipes, radiators, ranges and refrigerators. There is an increased risk of electric shock if your body is earthed or grounded.
- To prevent electric shock, use only with an extension cord suitable for outdoor use. For additional protection, the installation of a residual current device (RCD) having a rated residual operating current not exceeding 30mA is advisable.
- Before use, check that the extension cord is in good condition. When using an extension cord, make sure to use one heavy enough to carry the current your product will draw. An undersized cord will cause a drop in line voltage resulting in loss of power and overheating.
- Do not allow any part of the machine to make contact with water while it is in operation. If the appliance becomes wet while turned off, wipe dry before starting. Do not touch the appliance or its plug with wet hands or while standing in water. Wearing rubber boots offers some protection.
- Before use, check the supply and extension cord for signs of damage or aging. If the cord becomes damaged during use, disconnect the cord from the supply immediately. If the supply cord is damaged, it must be replaced by the manufacturer or a qualified person in order to avoid a hazard.

Double-Insulated Appliances
In a double-insulated appliance, two systems of insulation are provided instead of grounding. No grounding means that it is already provided on a double-insulated appliance. Servicing a double-insulated appliance requires extreme care and knowledge of the system, and should be performed only by qualified service personnel. Replacement parts for a double-insulated appliance must be identical to the parts they replace.
! Vibrations (Where Applicable)
- Prolonged use of hand held (operated) machines will cause the user to feel the effects of/from vibrations. These vibrations can lead to white finger (Raynaud's phenomenon) or carpal tunnel syndrome. This condition reduces the ability of the hand to feel and regulate temperature, causing numbness and heat sensations and may cause nerve damage and circulatory tissue death.
- Not all factors that lead to white finger disease are known, but cold weather, smoking and other diseases that affect blood vessels and blood circulation as well as large and long-lasting impact of shocks are considered factors in the formation of white finger. Note the following to reduce the risk of white finger and carpal tunnel syndrome;
- Wear gloves and keep your hands warm.
• Take regular breaks. - All of the above precautions may help reduce the risk of white finger disease but not rule out the carpal tunnel syndrome. Long-term and regular users are therefore recommended to observe the condition of your hands and fingers. Seek medical attention immediately if any of the above symptoms should occur.
⚠ Noise (Where Applicable)
- The operating noise of the machine can damage your hearing. When wearing protection such as earplugs or ear defenders to protect your hearing. Long-term and regular users are advised to have hearing checked regularly. Be especially vigilant and cautious when wearing ear protection because your ability to hear alarm warnings will be reduced.
- Noise emissions for this equipment is unavoidable. Carry out noisy work at approved times and for certain periods. Limit the working time to a minimum. For your personal protection and protection of people working nearby it is also advisable for them to wear hearing protection.

• See Certificate of Conformity section for Outdoor Noise declaration of Informity.
!Residual Risks
Even when tool is used as prescribed it is not possible to eliminate all residual risk factors. The following hazards may arise in connection with the tool's construction and design:
- Damage to lungs if an effective dust mask is not worn.
- Damage to hearing if effective hearing protection is not worn.
Health defects resulting from vibration emission if the power tool is being used over longer period of time or not adequately managed and properly maintained.

Intended Use
The HYCM63E is an electric concrete mixer from HYUNDAI. The HYCM63E has a maximum drum speed of 27.5rpm, powered by a 220W motor. The drum has a 63L capacity, with a 260mm opening. Maximum mixing volume of 47L and/or 30KG.
This machine is for DIY home and garden use, specifically pedestrian. The machine is manufactured according to the latest safety requirements. Every precaution is only effecting when it is followed exactly.
Intended Use
This machine was designed and manufactured for thorough, even mixing of Concrete and Mortar. Small Aggregate, Cement, Sand and Water are all safe to be mixed by this machine.
User Types
This machine is intended for use by consumers, i.e. non professional operators. The machine is intended for “DIY” and domestic use only.
Improper Use
Any other usage not in keeping with the above mentioned may be hazardous and harm persons and/or cause damage. Larger stones are not suitable to be mixed within this machine, as they may cause damage to the drum.

Personal Protective Equipment
Appropriate Personal Protective Equipment (PPE), MUST be worn at all times when operating or repairing the machine. No protective equipment can ensure 100% protection.
When selecting PPE, make sure it's CE marked and it suits the user in terms of size, fit, etc. If more than one item of PPE is worn at the same time, make sure they can be used together, e.g. wearing safety glasses may disturb the seal of a respirator, causing air leaks.

Hand Protection Must Be Worn
Protective electrically non-conductive gloves are highly recommended when working.

Foot Protection Must Be Worn
Non-skid heavy duty footwear are highly recommended when working.

Hearing Protection Must Be Worn
Suitable safety hearing protection is recommended.

Eye Protection Must Be Worn
Always wear safety glasses/goggles and/or face shields. Everyday eyeglasses have only impact resistant lenses; they are not safety glasses/goggles.

Protective Clothing Must Be Worn
Do not wear loose clothing, gloves, scarfs, neckties or jewellery (rings, wrist watches), which can be caught in moving parts.

Head Protection Must Be Worn
Wear a safety helmet with a safety visor.

Face Shield Must Be Worn
Wear a face shield to protect your face.
Safety Information
!Symbols On The Machine
We have provided safety messages in this manual and on the machine. This information alerts you to potential hazards that could hurt you or others. Please read these messages carefully. However, we may not have listed all of the possible hazards, you must also use your own judgement.
| Symbol | Description | Symbol | Description |
 | Safety alert – Indicates a precaution, a warning or a danger. |  | Eye protection must be worn. |
 | Hand protection must be worn. |  | Do not attempt to move the mixer when it is loaded and/or in operation. |
 | Foot protection must be worn. |  | Do not plug mixer with motor cover off. |
 | Read operator's manual. Class II tools symbol.  | ||
 | The UKCA (UK Conformity Assessed) marking is a UK product marking that is required for goods being placed on the market in Great Britain (England, Wales and Scotland). | 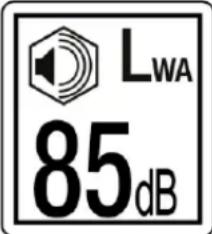 | Sound power level LWA data in dB. |
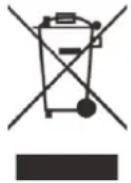 | This product should not be disposed of in domestic waste. Please contact your local recycling centre for disposal service. |  | This product complies with the European directives and an evaluation method of conformity for these directives was done. |
Safety Information
Symbols On The Machine (Continued)
| Symbol | Description | Symbol | Description | ||
 | Do not place any part of your body or any tool, like shovel in the drum during operation. |  | Do not attempt to move the mixer when it is loaded and/or in operation. | ||
 | When operating, do not pass hands through the clearance between frame and support arm or the one between the drum and support arm. |  | Do not start the motor if the drum is fully loaded. Do not turn mixer off while full of concrete. | ||
 | Only use or operate the mixer on solid, flat, level ground that is capable to support the weight of the mixer and its load to prevent the mixer from tipping over. |  | Do not discharge materials into drains, soil or water. | ||
 |  | Check your mixer before turning it on. Keep guards in place and in working order. | |||
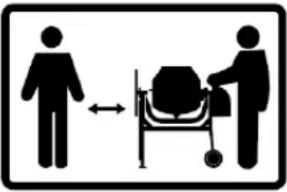 | Keep bystanders at a safe distance away from the work area. | 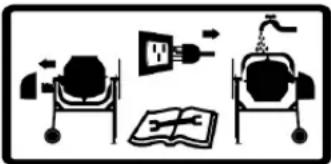 | Disconnect from power supply when not in use, before moving, making adjustments, changing parts, cleaning, or working on the mixer. | ||
Unboxing
WARNING : Unboxing and assembling the machine should be done on a flat, surface with enough room. Disposal of the packaging should be done in accordance with the local regulations in force.
WARNING: Some of the packaging material may be harmful to children. Keep out of reach of children.
- Carefully remove the product from the packaging and examine it for any sign of damage caused during shipping.
- Lay the contents out and check them. If any part is damaged or missing, you must not use the machine. Contact HYUNDAI POWER PRODUCTS immediately.
- You must keep the packaging material in case the machine needs to be returned or repaired.
- Ensure that you have all the accessories and tools you need for assembly and operation including the suitable personal protective equipment.
We recommend that you fill out the information in the 'Product Record' section. If you need to contact an authorised dealer or customer service, you may need to provide this information.
In The Box
\*Not To Scale
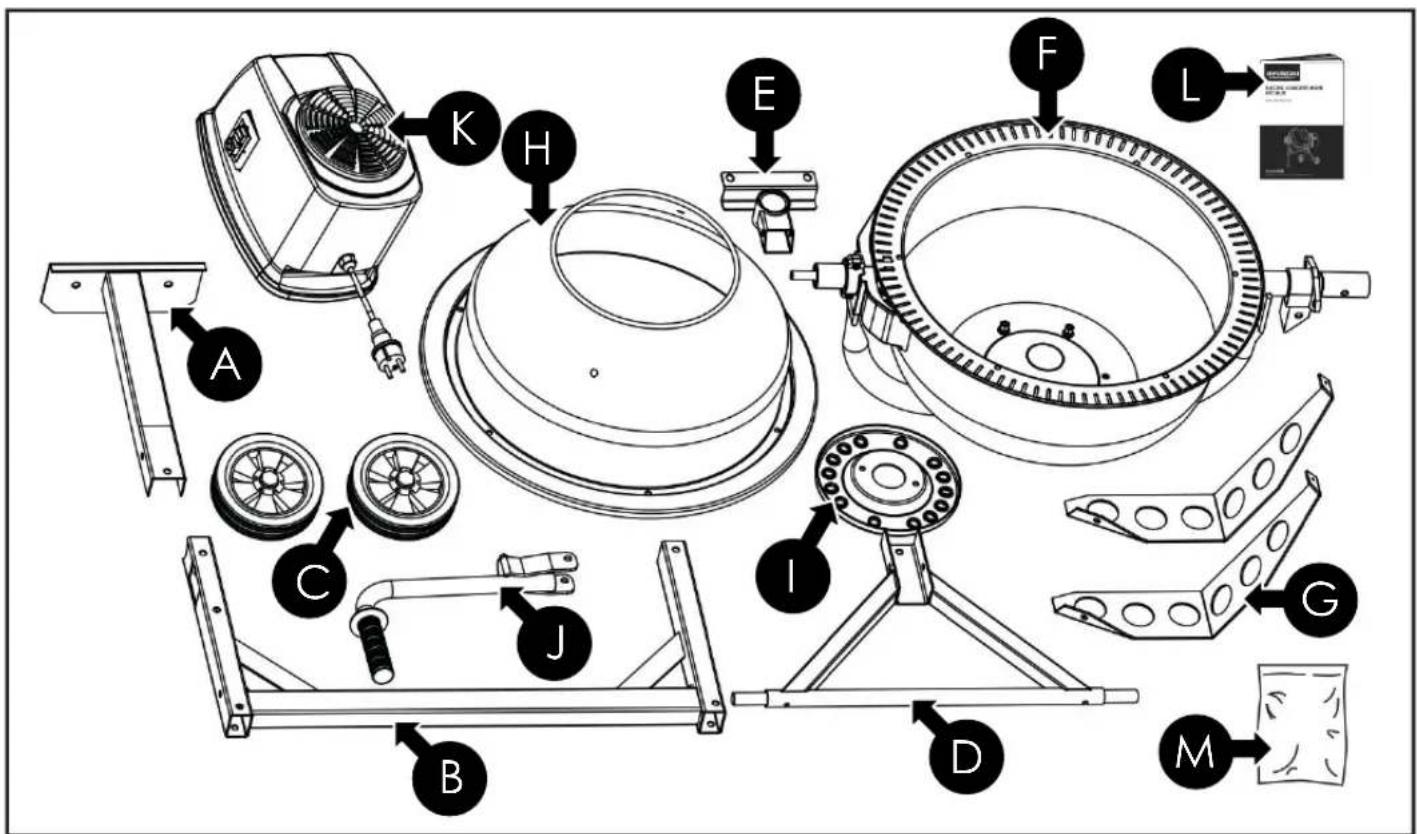

Support Leg

Tipping Handle

Main Frame

Motor Assembly

Wheels

User Manual

Axle Bracket

Bag Of Fixings

Drive Shaft Sleeve

Lower Drum

Mixing Blades

Upper Drum

Locking Plate
Features
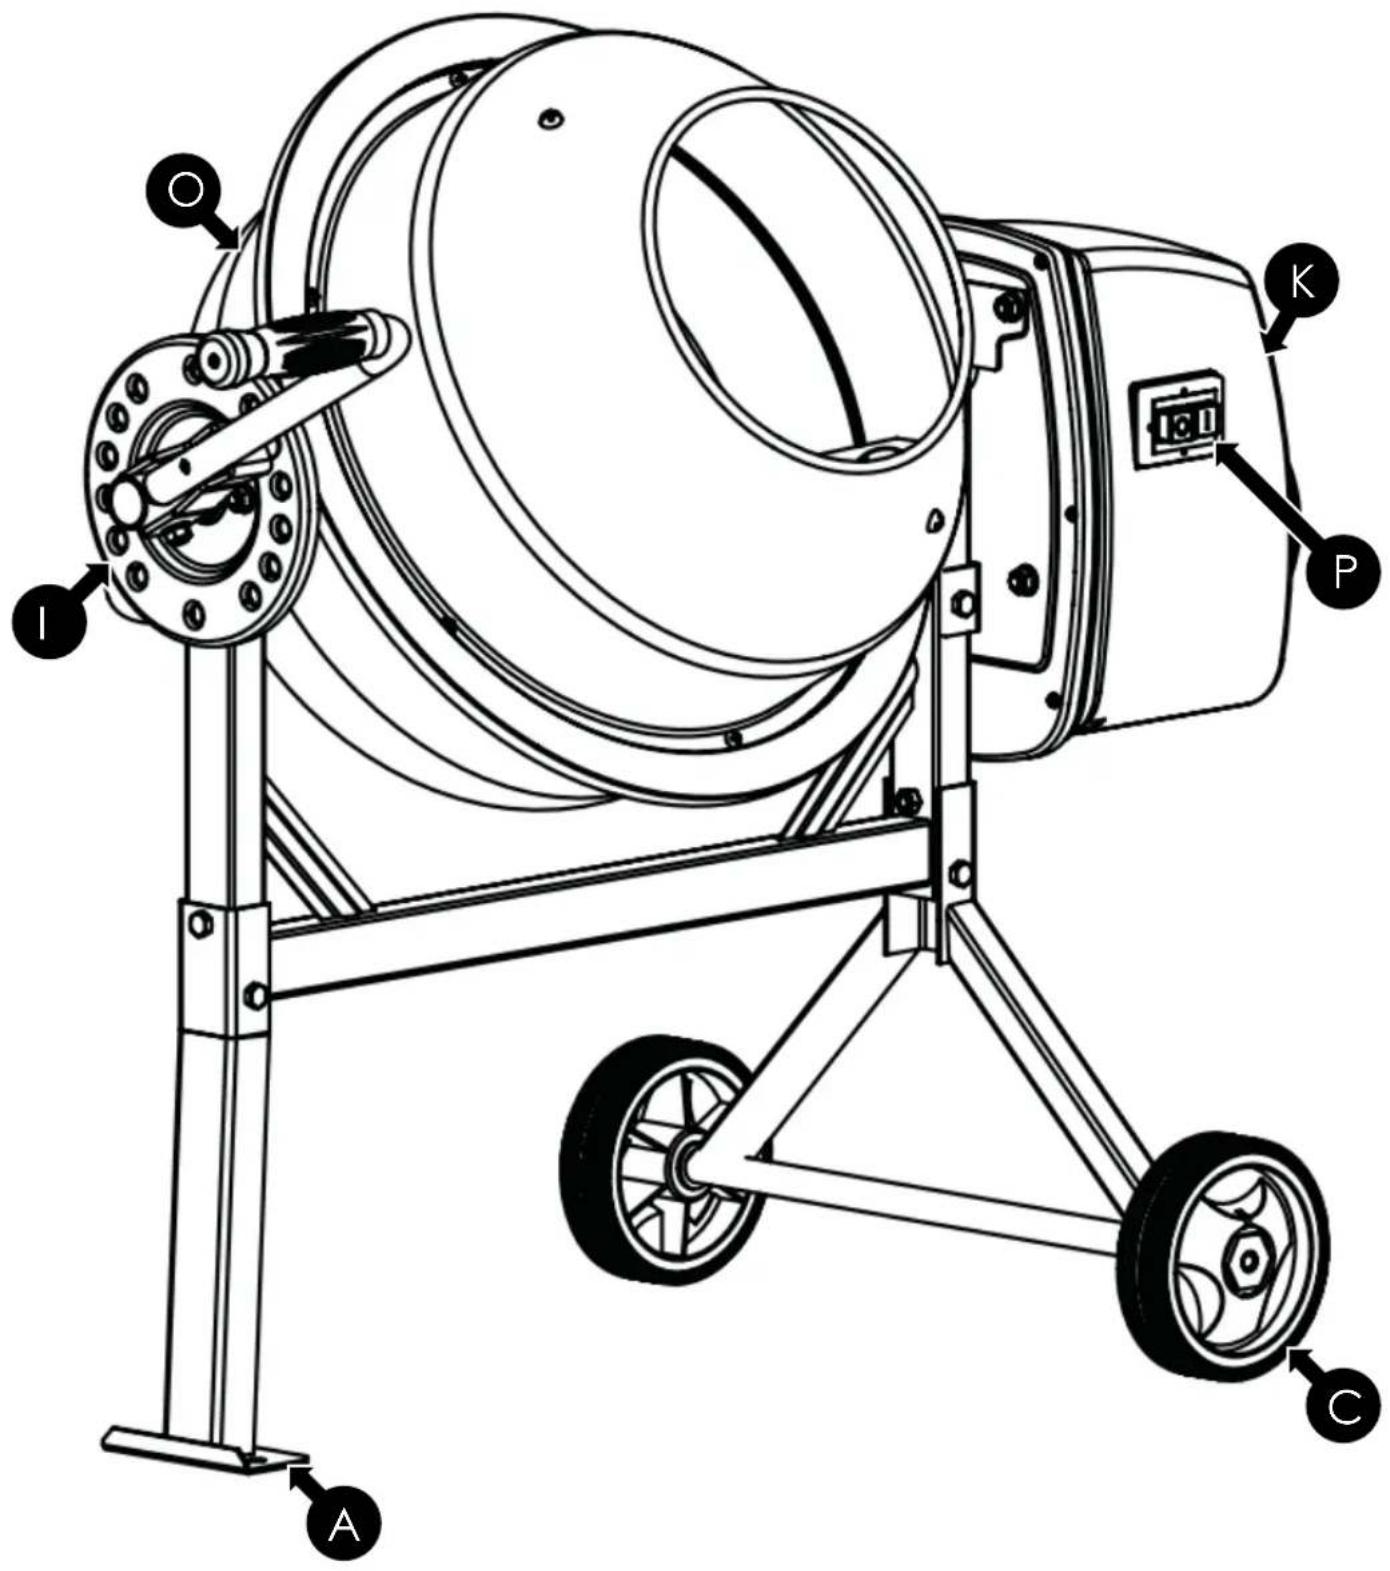
Descriptions on next page

Features
Support Leg
Supports the machine when stationary.
Wheels
Can be used to transport the machine around the work area.
Locking Plate and Tipping Handle
This is used to alter the angle of the drum, to tip out the mixed material.
Motor Assembly
Containing a 220W motor and transmission.
Mixing Drum
A 63L capacity drum, with a 260mm mouth.
On/Off Switch
Used to turn the machine on and off.
Assembly
Assembly Overview
If possible, it's recommended that 2 persons assemble the machine. Make sure the assembly takes place in an open, flat work space.
There are 5 steps to the assembly:
Step 1 : Main Frame Assembly
Step 2: Lower Drum Assembly
Step 3 : Upper Drum Assembly
Step 4: Locking Plate & Tipping Handle
Step 5: Mounting Motor & Transmission
This machine requires the following tools (not included) for construction:
• 10mm Spanner or Socket
• 13mm Spanner or Socket
• 14mm Spanner or Socket
• Large Phillips Head Screwdriver
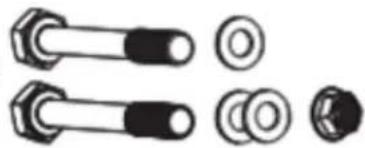
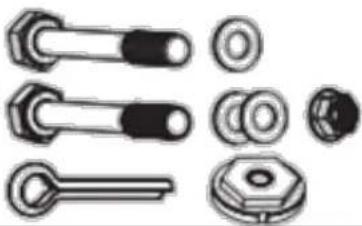
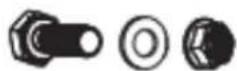
Open the bag of fixings and ensure it contains the following bags:
A. 1M8 × 40 mm
1 M8X60mm
3 M8 Washers
1 M8 Nut
natural_image
Pure mechanical component diagrams without any text, numbers, or symbolsB. 1 M 8 × 40 ~mm
1 M8X60mm
3 M8 Washers
1 M8 Nut
2 Split Pins
2 Dust Caps
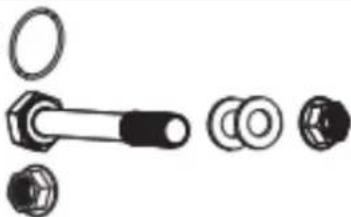
natural_image
Collection of mechanical components including bolts, nuts, and washers (no text or symbols visible)C. 2 M8x55mm
4 M8 Washer
2 M8 Nut
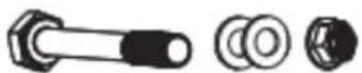
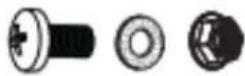
D. 2 M8x20mm
2 M8 Fibre Washers
2 M8 Nuts
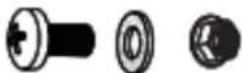
E. 2 M8x16mm
2 M8 Fibre Washers
2 M8 Nuts
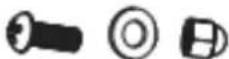
6 M6x16mm
6 M6 Washers
6 M6 Nuts
F. 2 M8x25mm
2 M8 Washers
2 M8 Nut2
G. 1 M8x55mm
2 M8 Washers
1 M8 Nut
1 Spring


H. 31.5x2.2 O-ring
1 M8x60mm
2 M8 Washers
3 M8 Nuts
natural_image
Exploded view diagram of a bolt and nut assembly (no text or labels)Assembly
WARNING! When assembling this machine, ensure it is not plugged into mains power supply.
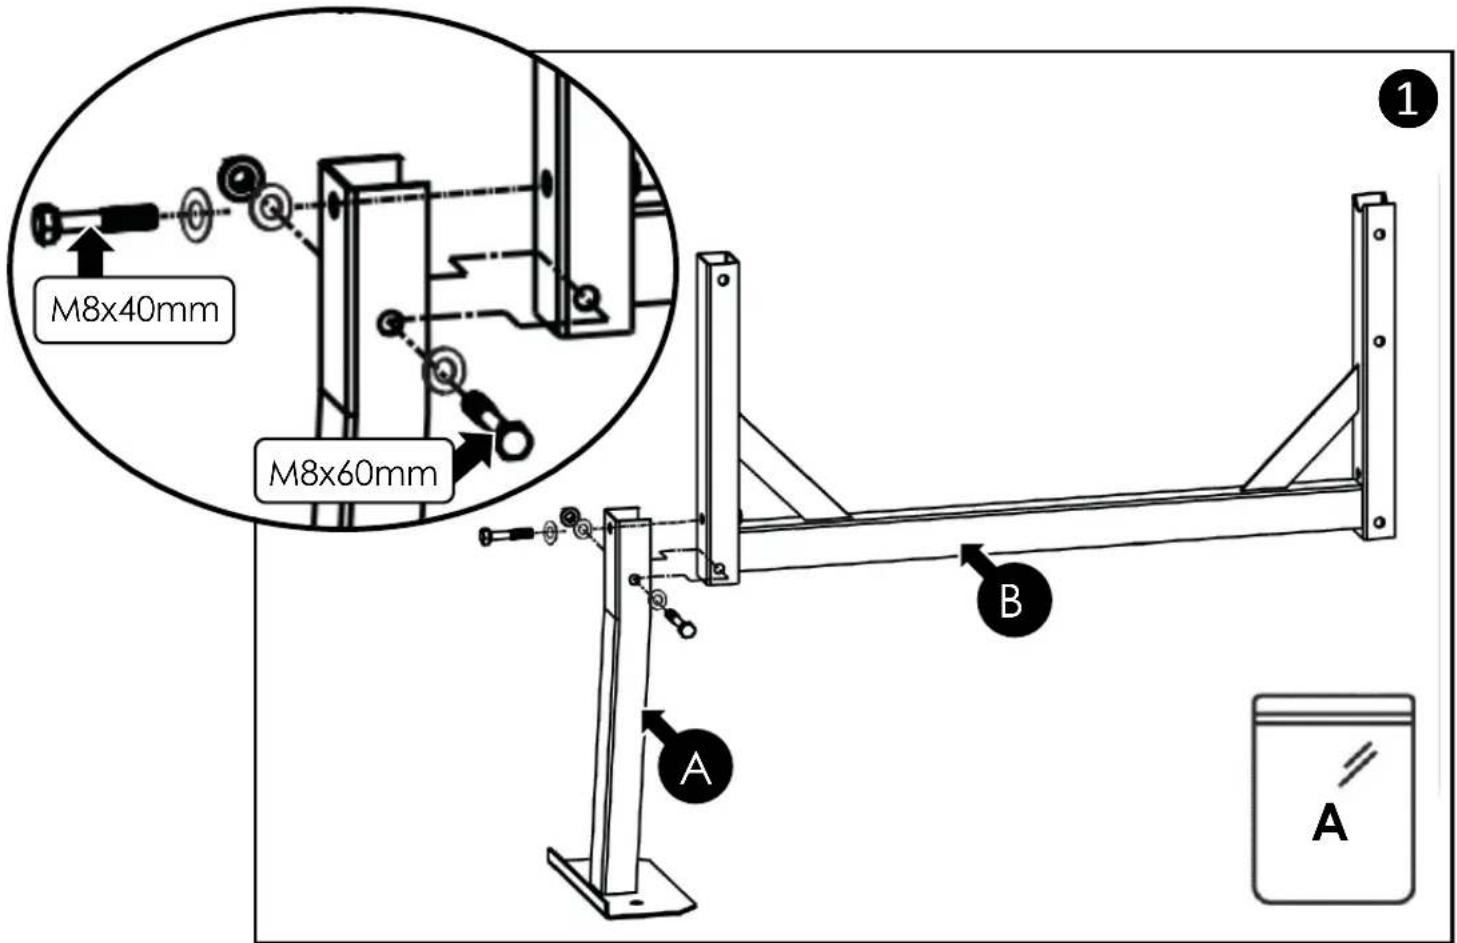
STEP 1 : Main Frame Assembly
This step requires fixing bags A & B.
- Line up the Support Leg (A) with the Main Frame (B) as shown. Insert 1 M8x60 bolt and M8 washer through the side, loosely securing with an M8 washer and bolt on the other side. Screw 1 M8x40 bolt and M8 washer into the frame. Fully tighten both bolts.
Continued on next page

Assembly
STEP 1 : Main Frame Assembly (Continued)
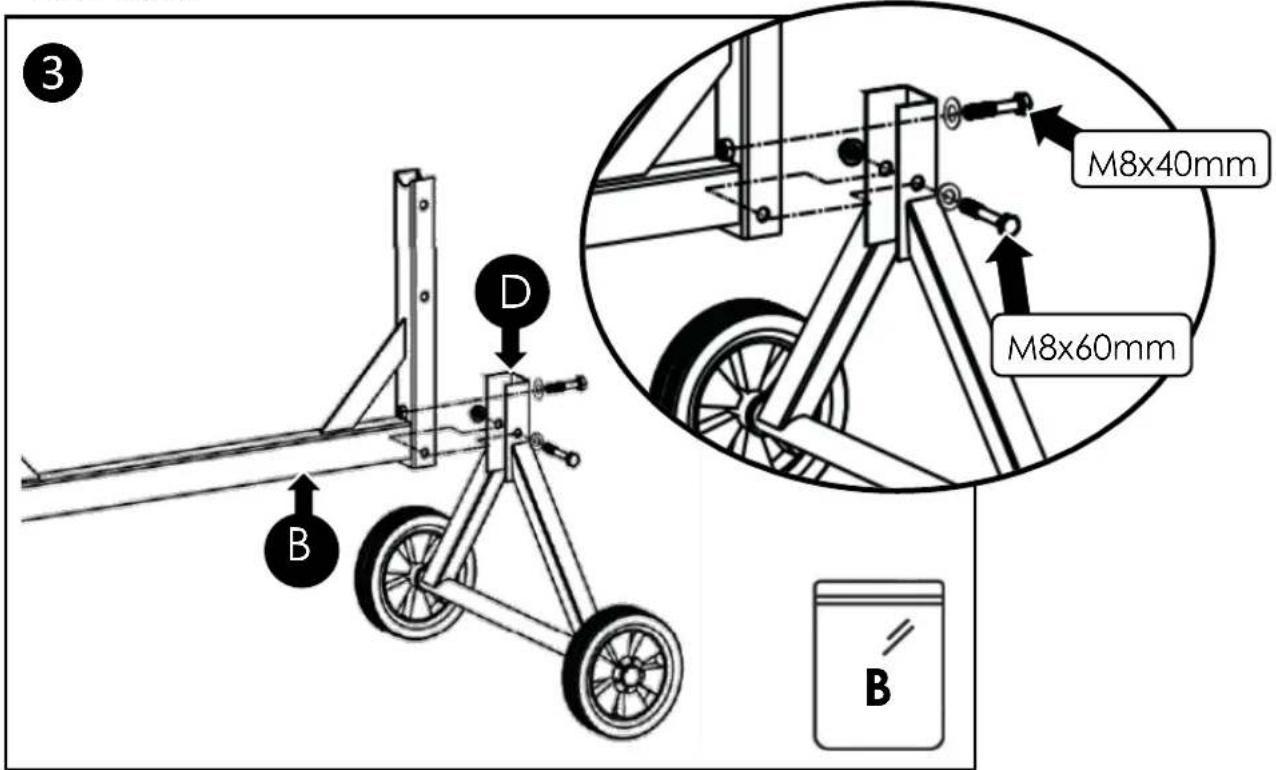
- Place a Wheel (C) on the Axle Bracket (D). Place a split pin through the hole and separate as shown. Cover the split pin with a dust cap. Repeat this on both sides.
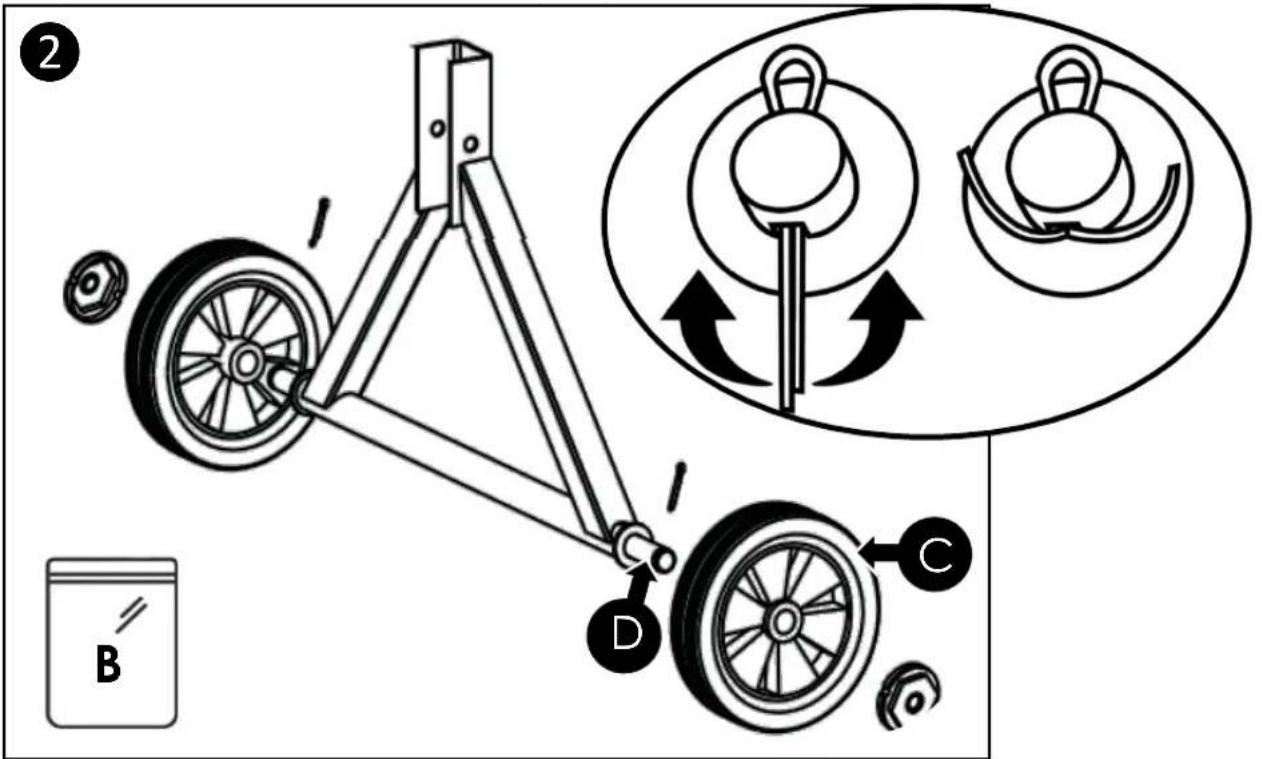
- Line up the Axle Bracket (D) with the Main Frame (B) as shown. Insert 1 M8x60 bolt and M8 washer through the side, loosely securing with an M8 washer and bolt on the other side. Screw 1 M8x40 bolt and M8 washer into the frame. Fully tighten both bolts.
Assembly
STEP 2 : Lower Drum Assembly
This step requires fixing bags C & D.
The following step will be easier and safer to carry out with 2 persons.
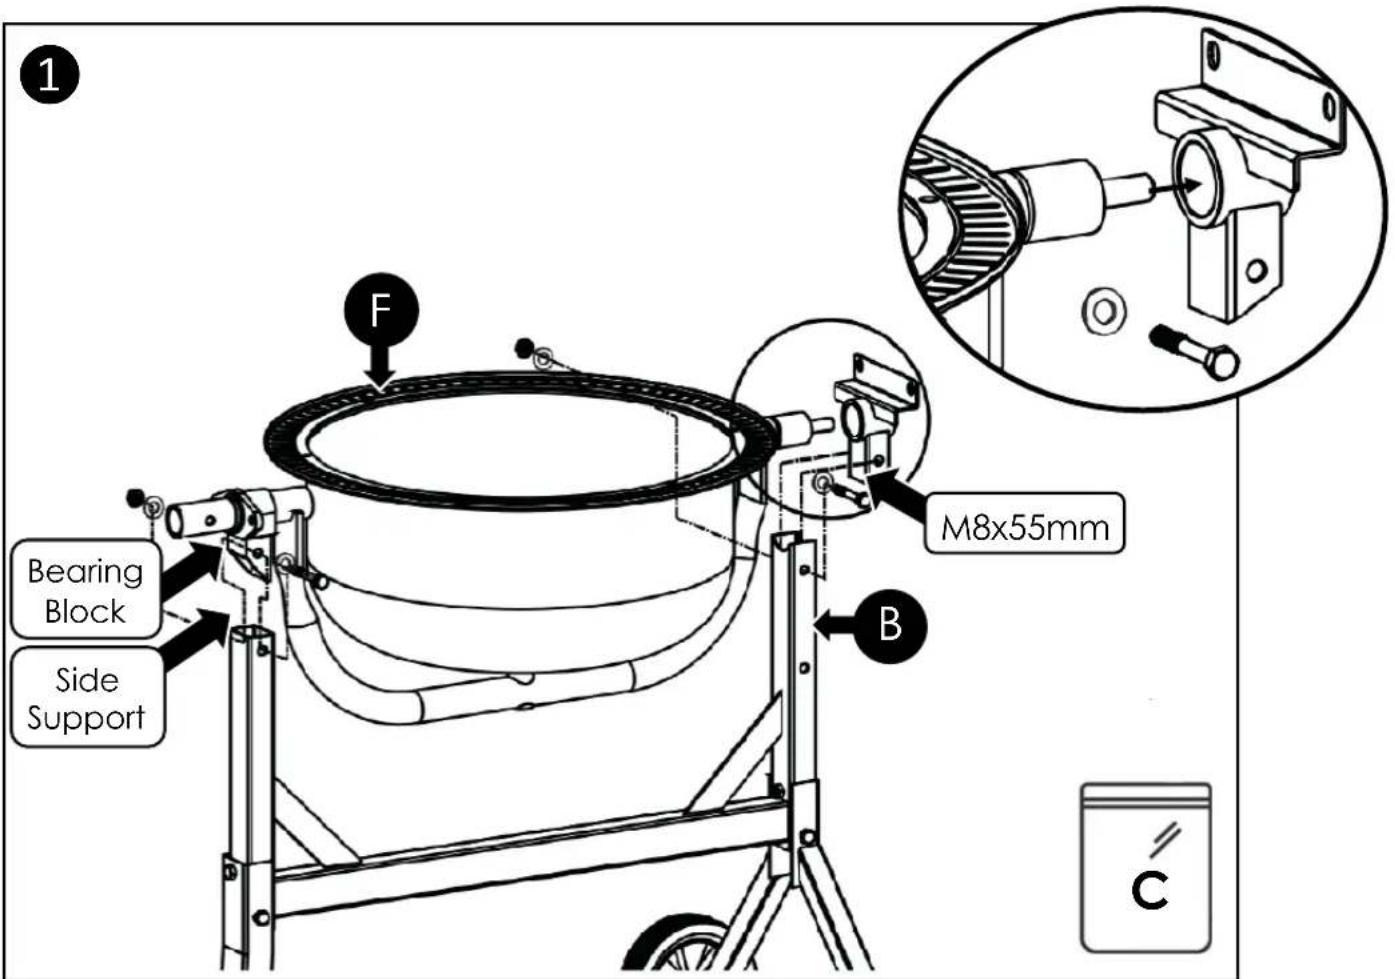
- Slide the Drive shaft sleeve (E) over the open end of the Lower Drum (F).
WARNING! THE DRIVE SHAFT SLEEVES MUST BE INSTALLED AS SHOWN.
At both ends, lift the Lower Drum (F), and slide the bearing blocks into the Side supports of the Main Frame (B) as shown.
Secure both sides by inserting an M8x55 bolt and washer through the side support, securing on the other side with an M8 washer and bolt.
Continued on next page

Assembly
STEP 2 : Lower Drum Assembly (Continued)
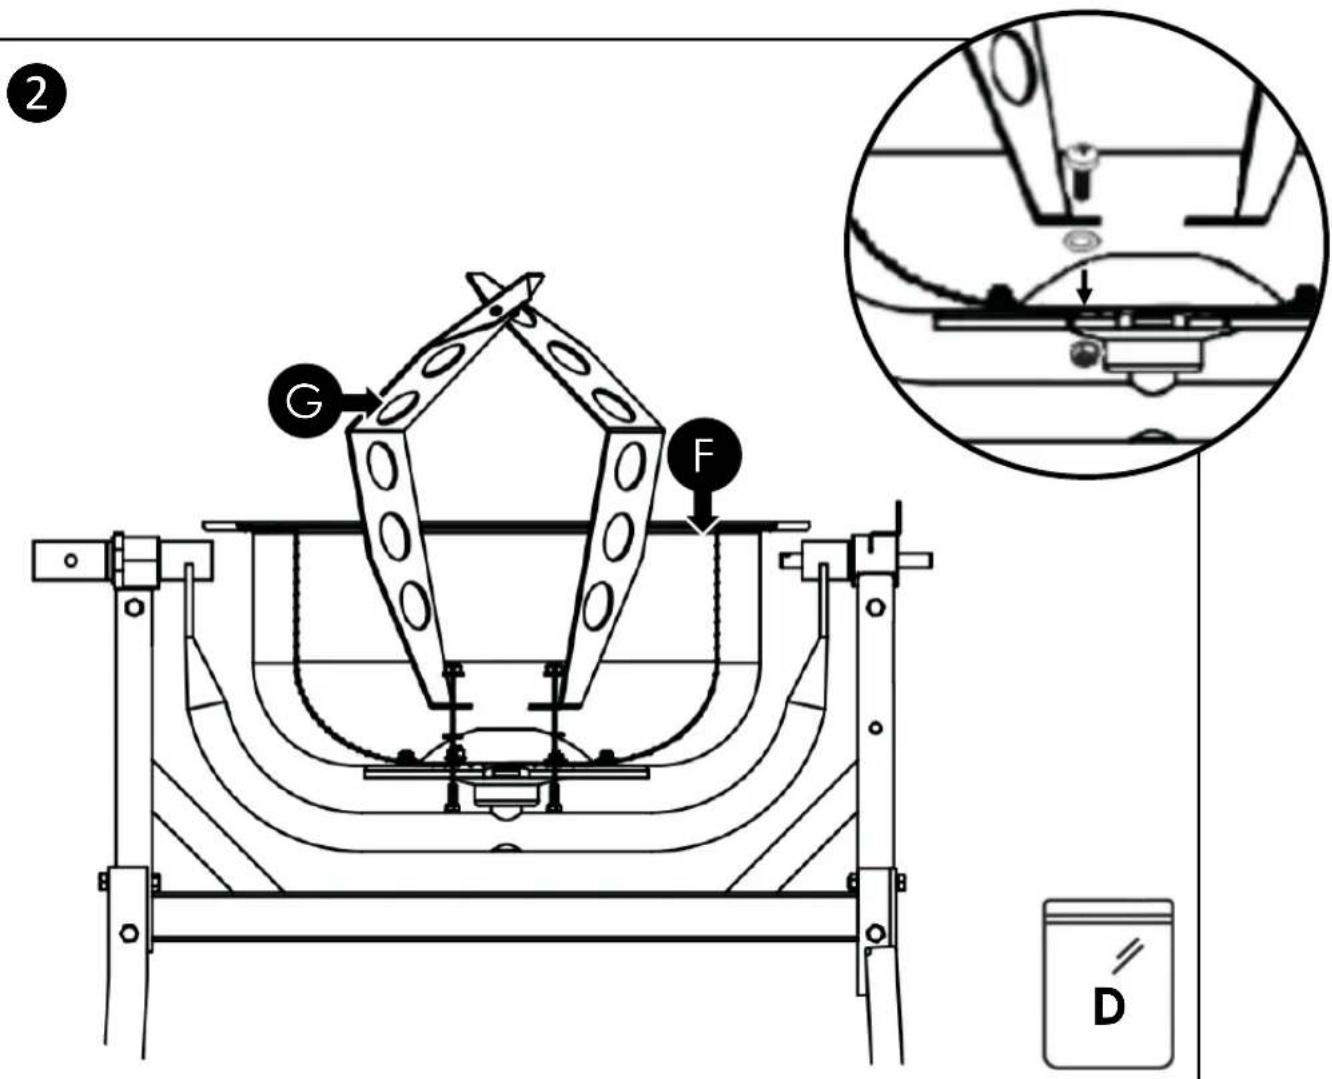
- Insert an M8x20 bolt through a Mixing Blade (G), then add a fibre washer (the fibre washer may need to be screwed on). Place the bolt through one of the holes in the Lower Drum (F) and secure the other side with an M8 bolt. Leave the bolts loose at this stage.
The Lower Drum can be rotated to make access easier. Also using the second person could be beneficial for this step.
WARNING! THE FIBRE WASHER MUST BE BETWEEN THE MIXING BLADE AND UPPER DRUM, OTHERWISE LEAKING WILL OCCUR.
Assembly
STEP 3 : Upper Drum Assembly

This step requires fixing bag E.
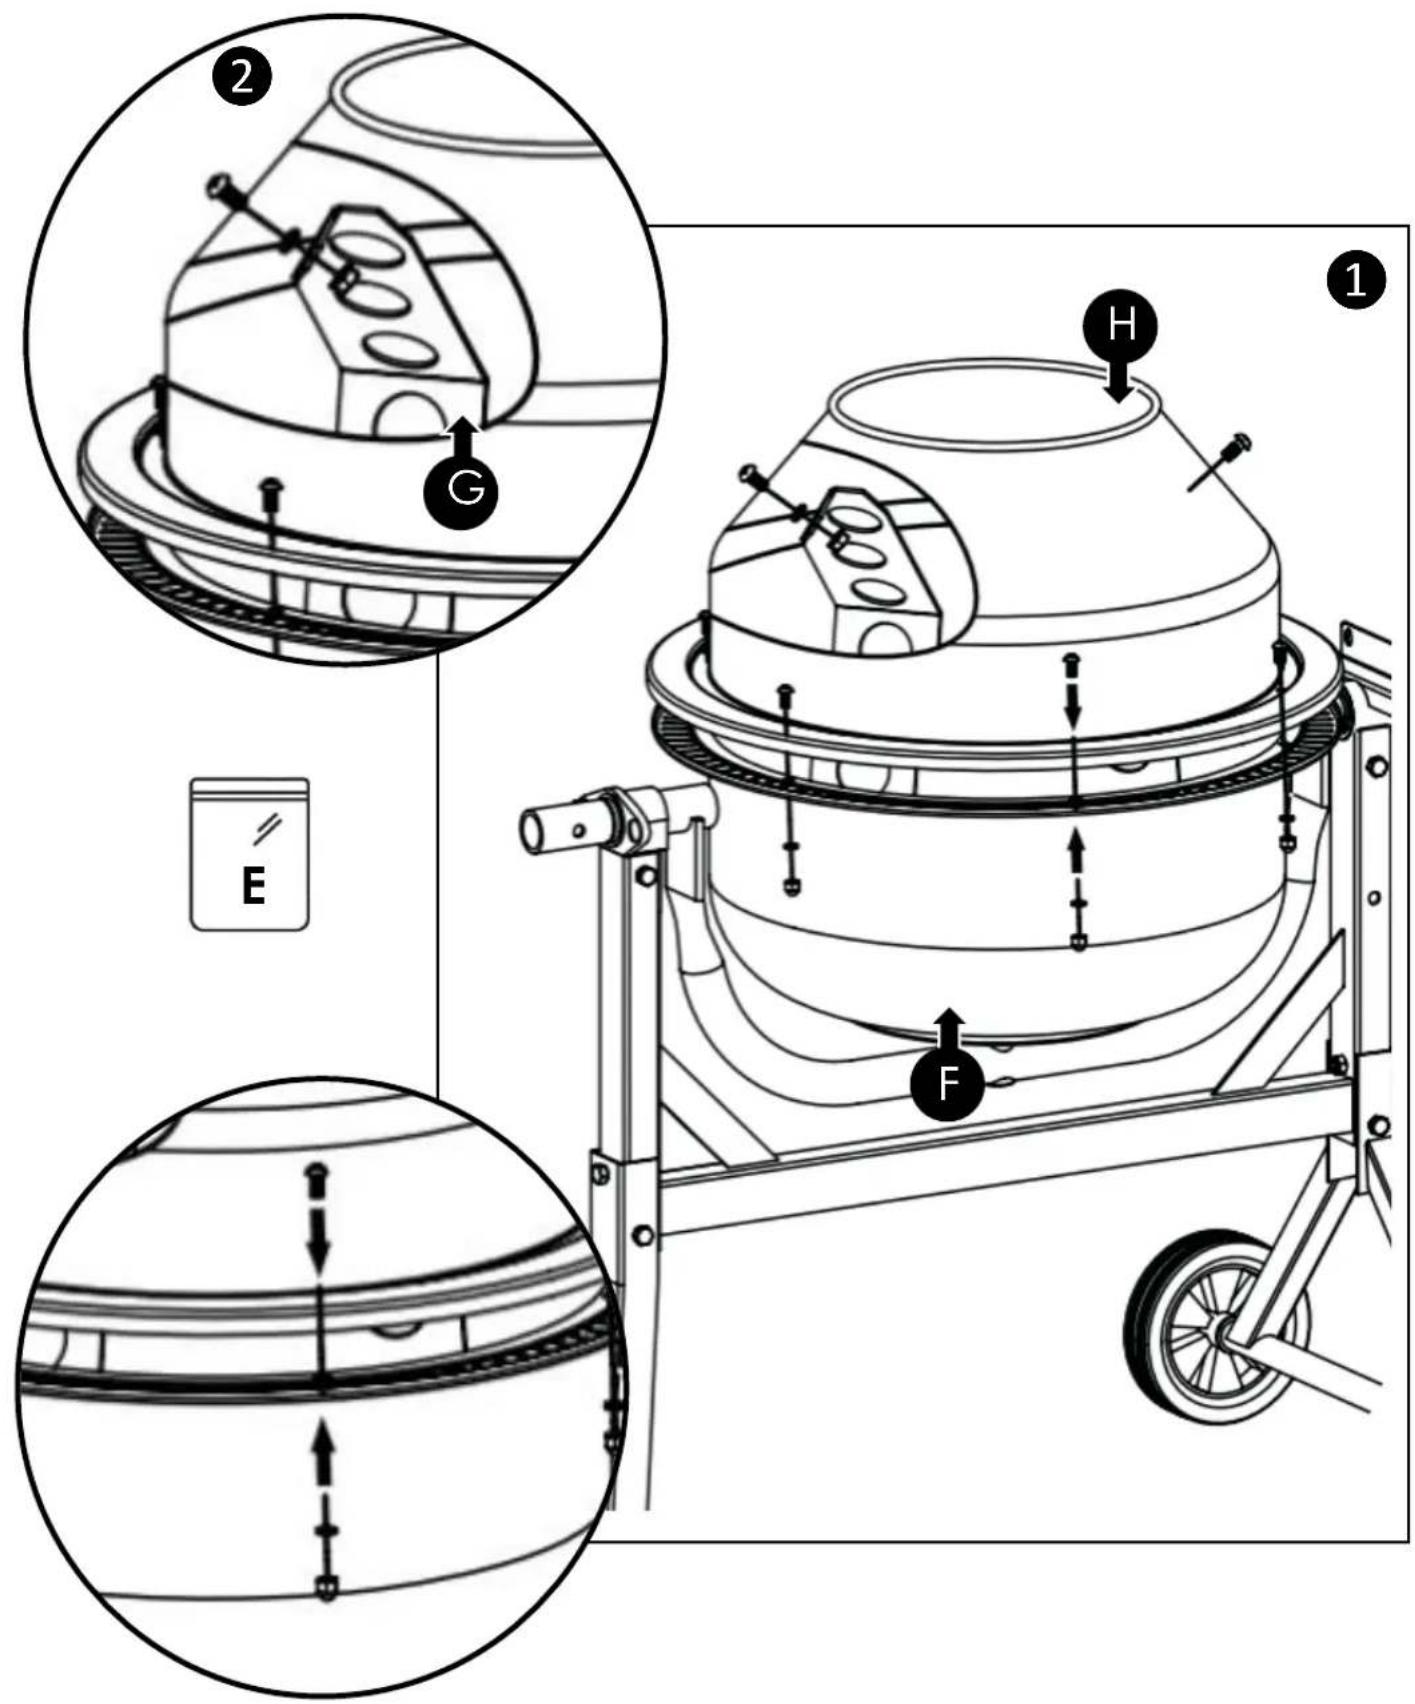
- Place the Upper Drum (H) on top of the Lower Drum (F). There are arrows on both halves of the drums to aid lining them up correctly. Using the indication arrows, ensure the bolt holes line up. Place all 6 M6x16 bolts in each of the holes around the whole circumference of the drum. Secure each of these with an M6 washer and nut.
- Secure the Mixing Blade (G) to the Upper Drum (H) by inserting the two M8x16 bolts from the outside. Next a Fibre washer should be screwed to the bolt, followed by a Mixing Blade. *Some force may be required to position a Mixing Blade over bolt hole. * The blades can then be secured with an M8 nut and tightened. At this stage, ensure the Mixing Blades (G) are secured to the Lower Drum (F) by tightening the bolts left loose in the previous step.

WARNING! THE FIBRE WASHER MUST BE BETWEEN THE MIXING BLADE AND UPPER DRUM, OTHERWISE LEAKING WILL OCCUR.
Images on next page

Assembly
STEP 3 : Upper Drum Assembly (Continued)
Assembly
STEP 4 : Locking Plate & Tipping Handle
This step requires fixing bags F & G.
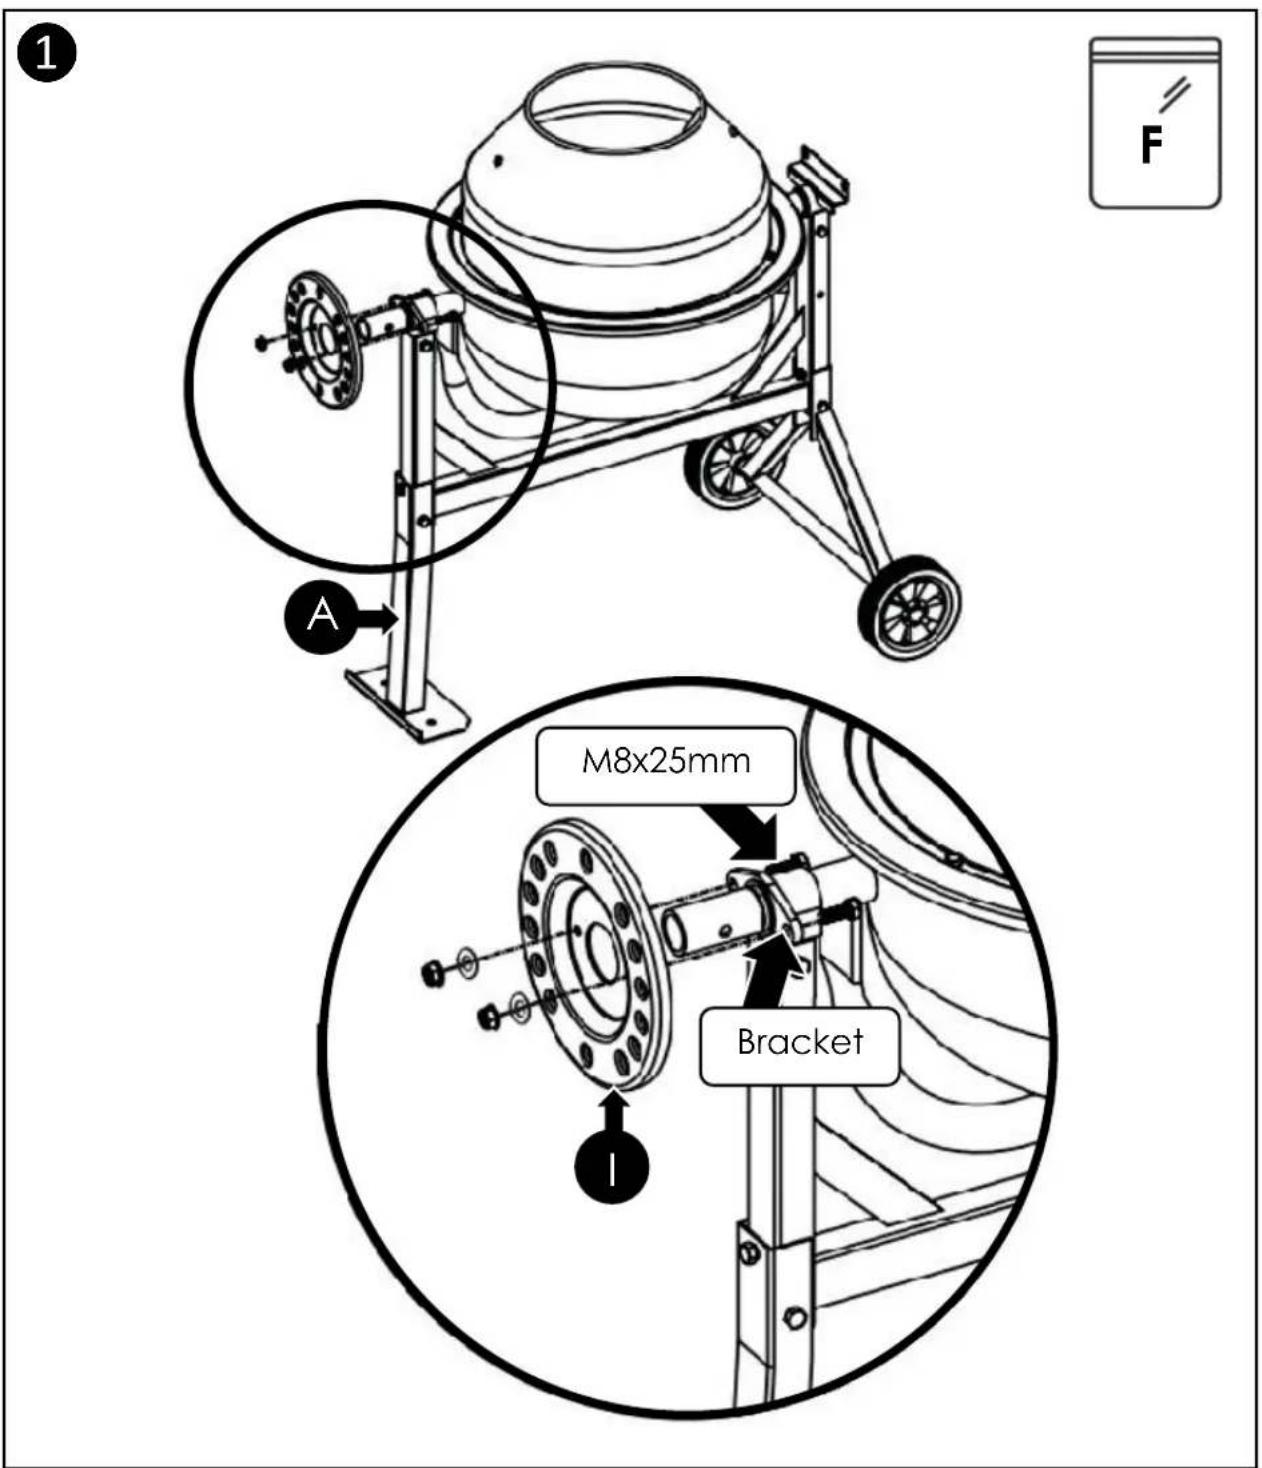
- Slide the Locking Plate (I) over the shaft above the Support Leg (A). Insert an M8x25 bolt through the rear of the bracket and the Locking Plate (I). An M8 washer and nut should then be screwed on to secure together.
Continued on next page

Assembly
STEP 4 : Locking Plate & Tipping Handle (Continued)
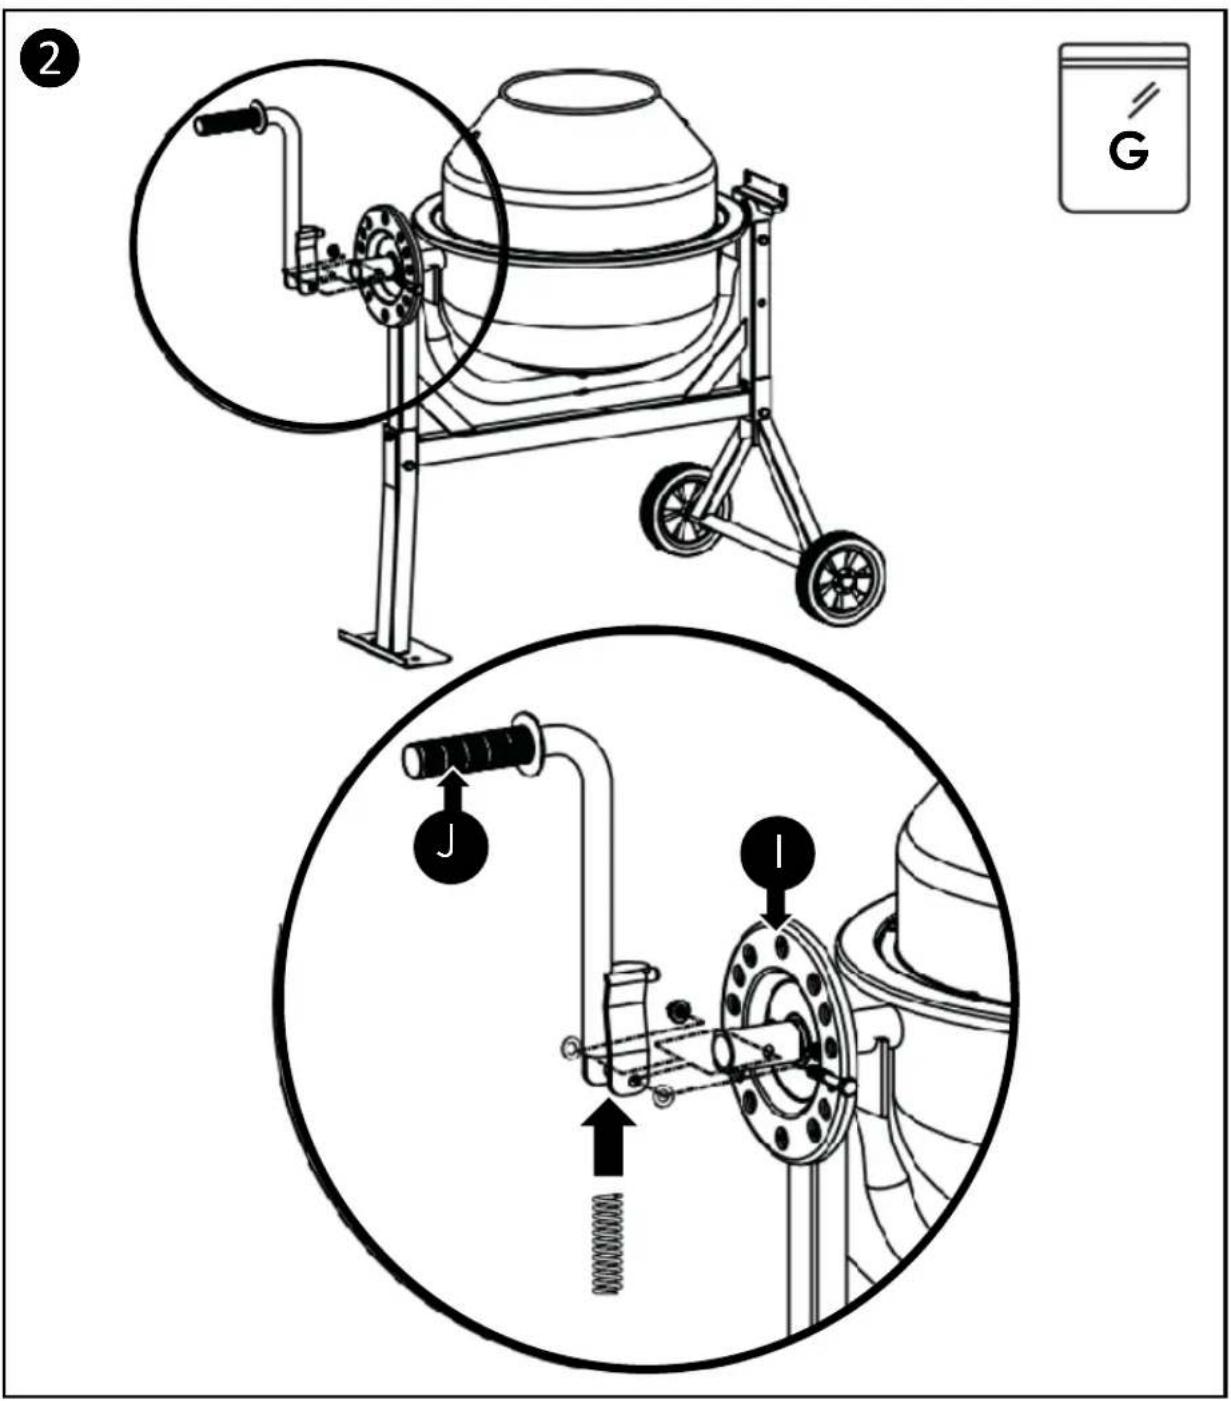
- Place the spring into the cavity of the Tipping Handle (J). With the spring inside, rest the Tipping Handle (J) on the shaft next to the Locking Plate (I), this will stop the spring from falling out.
Use some force to push the Tipping Handle (J) downward, to line up the holes with the shaft below. With M8 washers on either side of the Tipping Handle (J) place an M8x55 bolt through all. Secure the bolt on the other side with an M8 nut.
The bar pivots on the M8x55 bolt, it must be able to engage/disengage the location pin on the locking plate.
Assembly
STEP 5 : Mounting Motor & Transmission
This step requires fixing bag H.
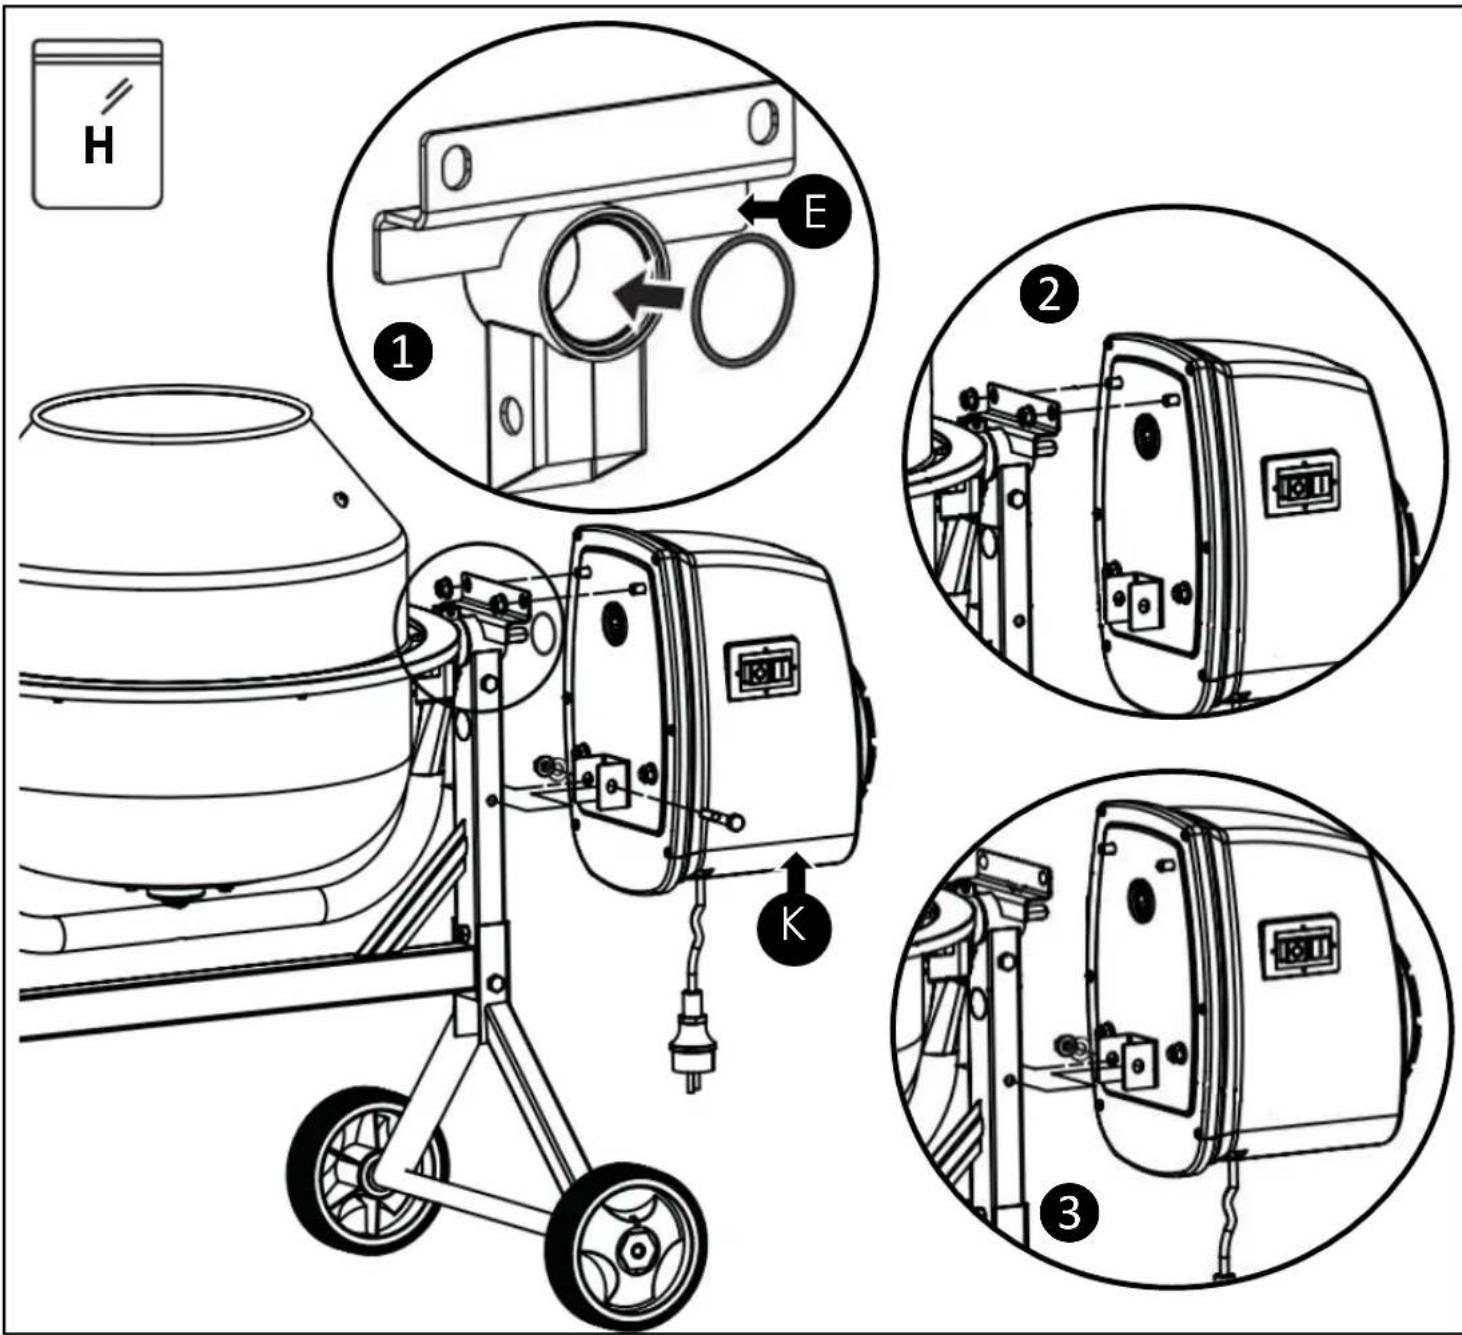
- Place the O-Ring into the groove of the Drive Shaft Sleeve (E). Line-up the Motor Assembly (K) output, to the drive shaft of the Drum.
You can rotate the drum to line up the Motor Assembly (K) Output and the Drum Input shaft if it's proving difficult. - After sliding the Motor Assembly (K) onto the Drum drive shaft, insert the 2 threads on the Motor Assembly casing, through the 2 holes on the Drive Shaft Sleeve (E). Secure both threads with an M8 nut.
WARNING! This machine should not be operated until the user manual is read and understood. Correct PPE and safety measures must be followed.
Mixing Tips
Using The Concrete Mixer
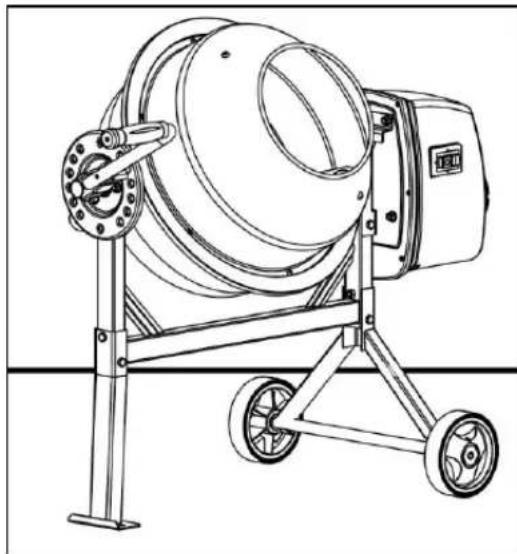
⚠ WARNING! Ensure the mixer is secure on a flat even surface. Uneven or inclined work areas will reduce the efficiency of the Mixing Blades.
WARNING! When loading/unloading the machine, never spray or pour water directly over the motor cove.
natural_image
Technical line drawing of a mechanical mixing press with wheels and a motor (no text or symbols)Loading Material
When loading the drum, put half your measure in at a time i.e. if using a bucket, put half the material in the bucket in the drum, allow to mix for a turn or two, then add the remainder of the material.
Unloading Material
A wheelbarrow can be placed directly beneath the mouth of the drum when unloading to avoid spillage. When unloading it's recommended to keep the machine on, as the rotations will helps the material out of the drum.
WARNING! NEVER load or unload mixer directly with a shovel. The shovel can come into contact with the mixing blades and cause kickback leading to potential damage and/or harm to persons.
General Tips
- When starting the mixer, before adding any material just add a small amount of water. This soaks the walls, and can prevent any material from sticking to the drum.
- On a hot day, more water may be needed in the Mortar/Concrete mix. The heat from the sun can make the binding agent dry quicker, additional water can make it workable for longer.
- Don't mix all the material at once, this is to prevent it from drying before you have used it all. Also if you have made a mix too wet, you can add more dry material to bring it back to the required consistency.
Mixing Tips
Preparing Material
When measuring out material, always use the same method of measure, i.e. a bucket or a level shovel. This will ensure consistency.
Mixing Mortar / Cement
Standard Ration = 4:1
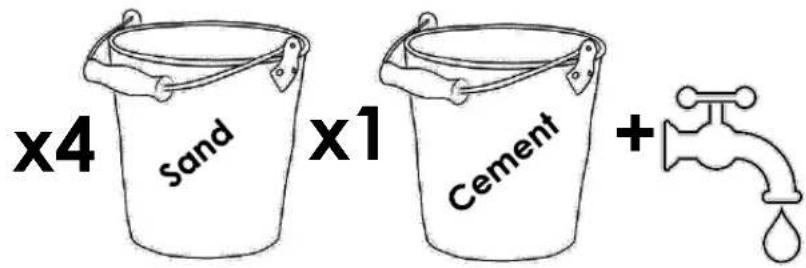
Add water until preferred consistency.
Mixing Concrete
Standard Ratio = 4:2:1
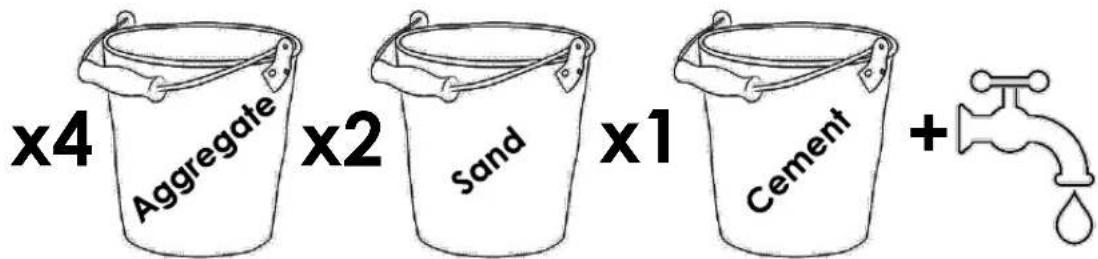
Add water until preferred consistency.
Operation
Drum Tilting
WARNING: To operate this machine, correct PPE MUST BE used.
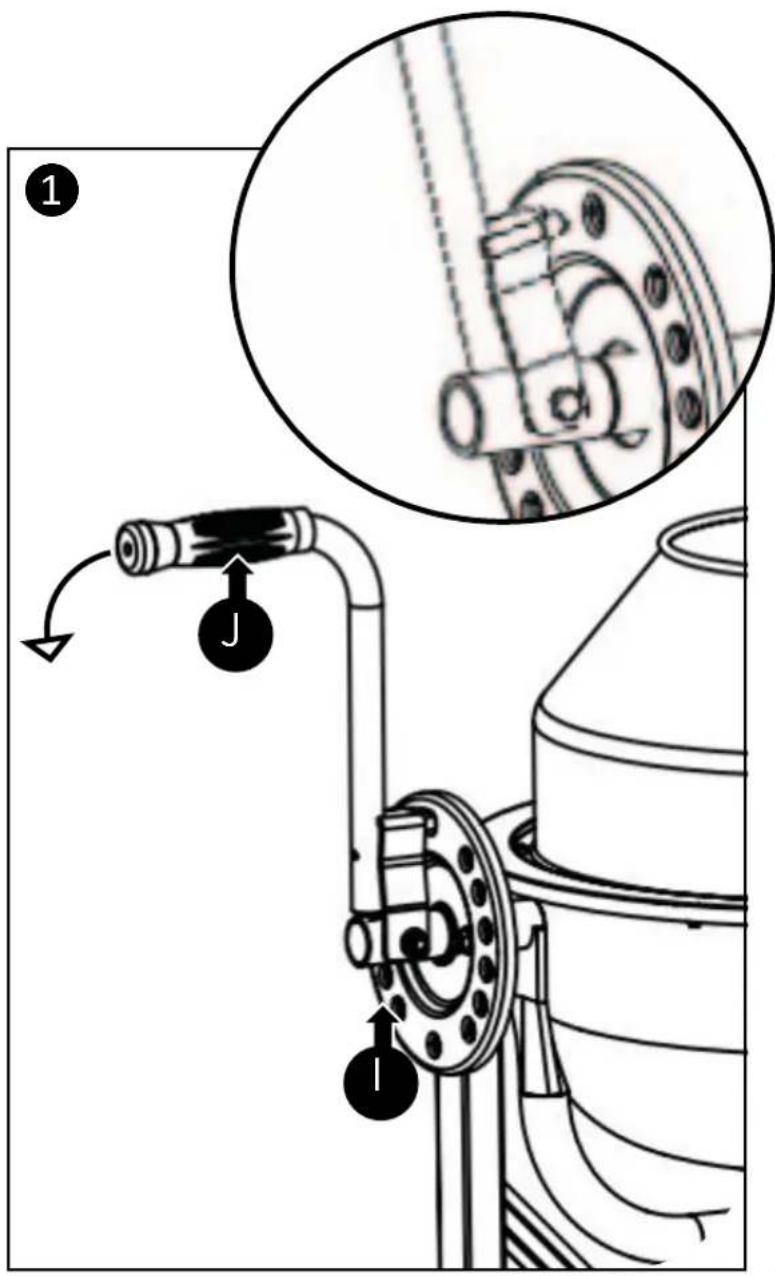
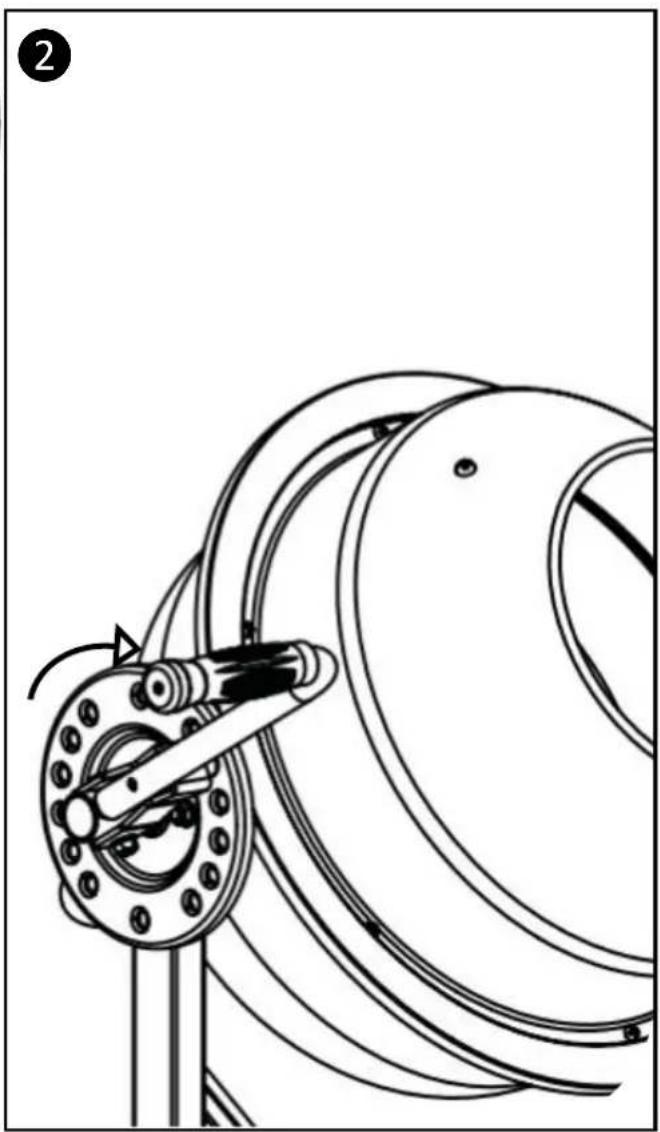
- Apply downward pressure to the Tipping Handle (J), to disengage the location pin.
- Keeping the pressure on, the Drum is now able to tilt both clockwise and anti-clockwise dependent on application. Release pressure from the Tipping Handle (J) and ensure the location pin in engaged in a position on the Locking Plate (I). Repeat this process using the different positions available on the Locking Plate (I).
natural_image
Technical line drawing of a mechanical assembly with rotating components (no text or symbols)Operation
Mixing, Unloading and Storage Positions
1. Mortar Mixing
Put the drum into the first or second position when mixing mortar. This is due to mortar being a runny/wet mix, the higher angle will prevent any overspill or slopping from the mixing blades.
2. Concrete Mixing
The second and third positions are more suitable for concrete. The lower the angle of the drum, the stronger the folding action of the mixing blades. This is idea for concrete. Whilst making concrete, more stone/aggregate may need to be added to the mix. Position 3 will allow easier loading.
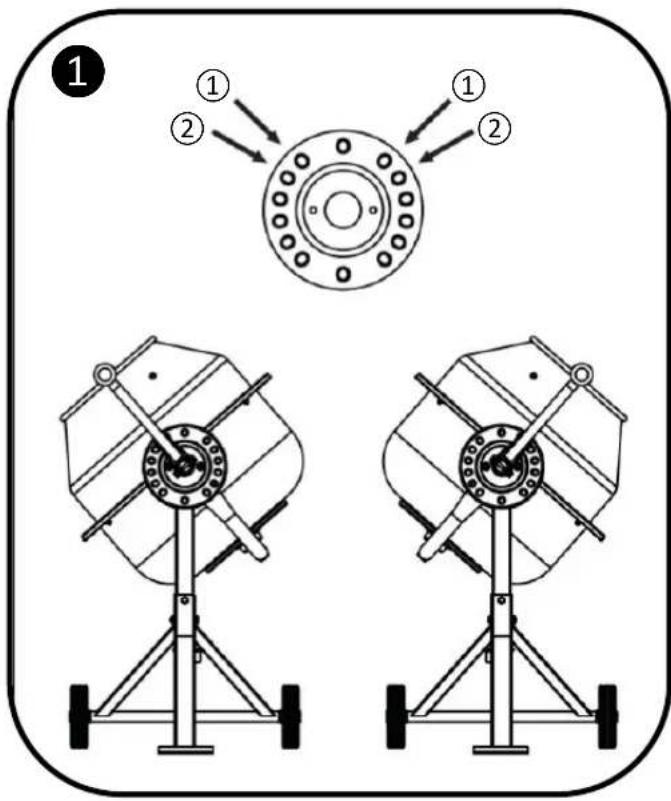
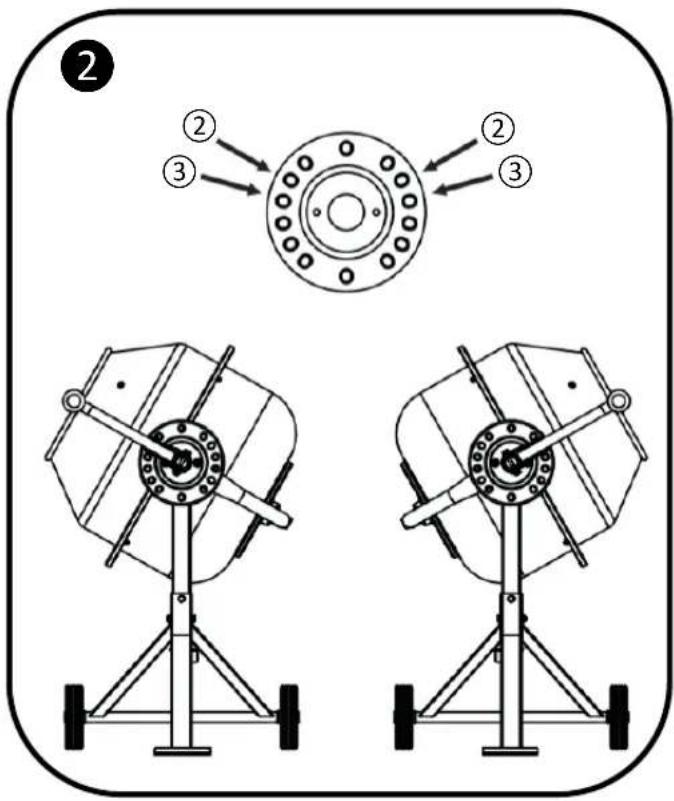
Continued on next page

Operation
Mixing, Unloading and Storage Positions (Continued)
3. Unloading
Position four to six are only suitable for emptying the drum. Dependant on the amount of material in the drum, emptying the material may need to be done in stages.
4. Storage
Put the drum in the bottom position for storage. This is ideal as it provides assistance when drying the drum after being cleaned. Also this prevents any small animals or possessions from being trapped inside.
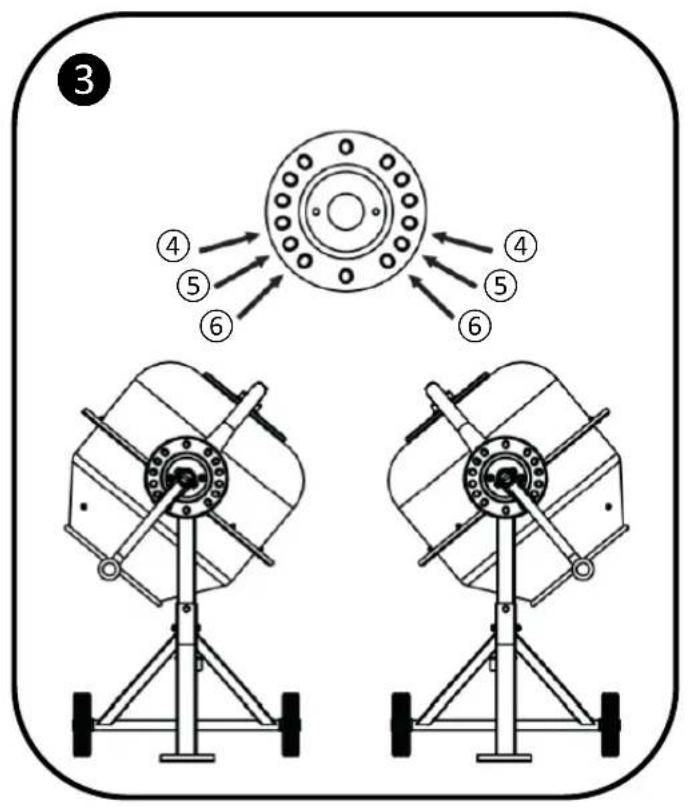
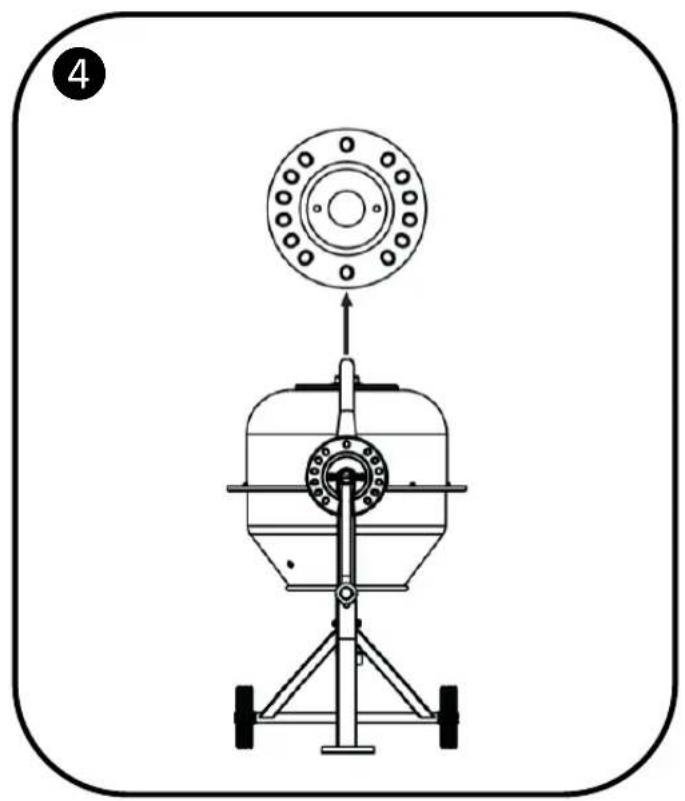
natural_image
Technical line drawing of a mechanical device with a circular component and supporting frame (no text or symbols)Continued on next page

Operation
Mixing, Unloading and Storage Positions (Continued)
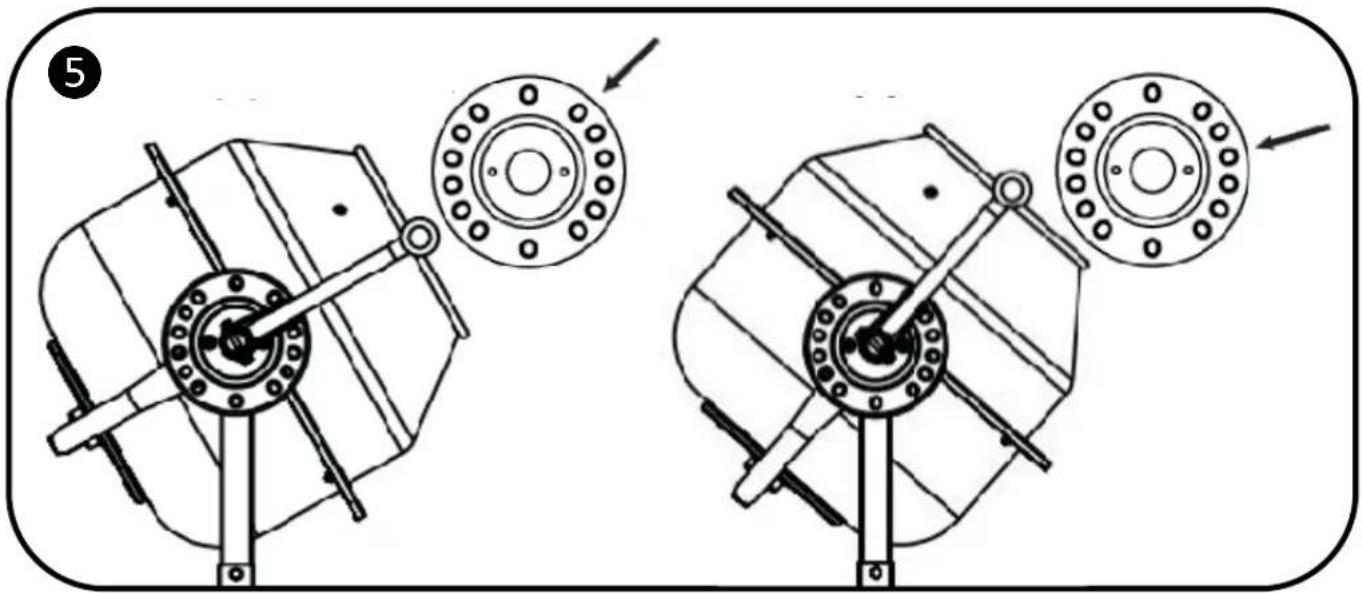
5. Countering Sticking
When mixing, if your material starts to stick to the drum, change to a shallower drum angle. This makes the blades more affective at churning. If sticking still occurs, add some more water directly to the back of the drum.
natural_image
Technical line drawing of a mechanical device with two views showing internal components and mounting holes (no text or symbols)Operation
Starting & Stopping
WARNING! To operate this machine, correct PPE MUST BE used.
-
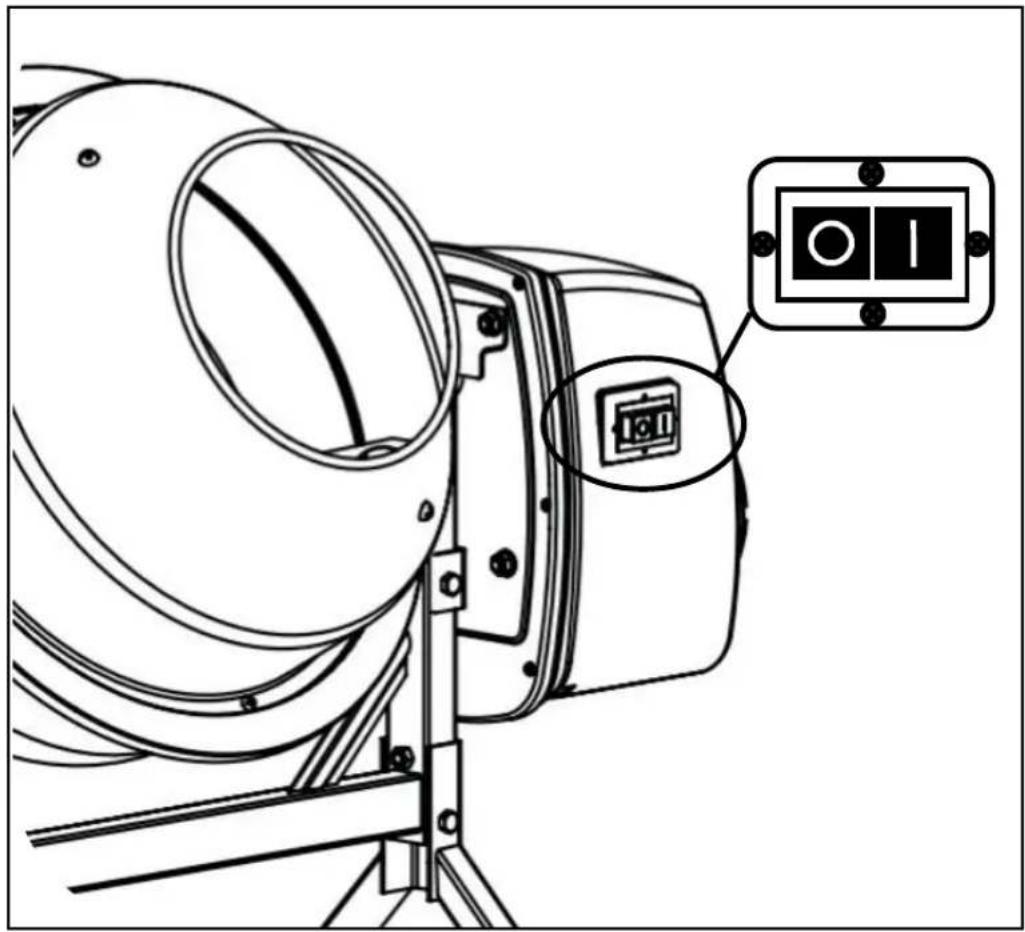
Firstly, ensure the machine is plugged into mains power supply, ensure the socket switch is in the off position when inserting the plug. Turn the socket on, and press the Green button 1. This will start the machine, and the drum will rotate.
-
To stop the machine, press the Red button Ⓞ, the drum will stop rotating. When finished using the machine, unplug from mains power, and store.
WARNING! The machine has an inbuilt thermal protector to prevent the motor overheating. If machine is loaded with too much material overheating it sure to happen. The machine will cut and come to a sudden stop. In this event, allow the machine 5 minutes to cool, and empty the drum of excess material.
Maintenance & Care
Cleaning The Drum
Always remove the electric plug from the mains supply before any cleaning is undertaken.
It is vital when finished with a day's operation, the mixer is thoroughly cleaned. If left soiled after operation, cement and other binding agents will continue to build between uses rendering the machine useless eventually. To clean the drum, scour with 1 inch/2.5 cm gravel and water mixed. Allow to mix for at least 2 minutes emptying when finished.
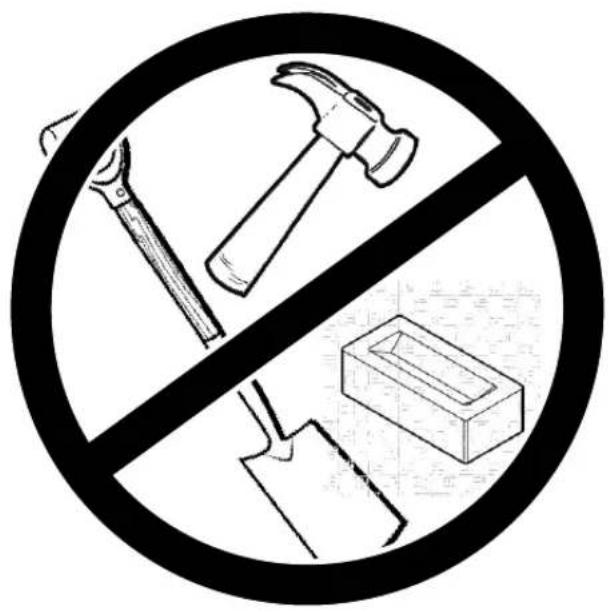
NEVER hit the outside of the drum with shovel, hammer or other tools to try and break off build-up. Also NEVER fill the drum with bricks and heavy rocks to break up the build-up, both these actions will cause damage to the drum, rendering it less efficient, and voiding warranty.
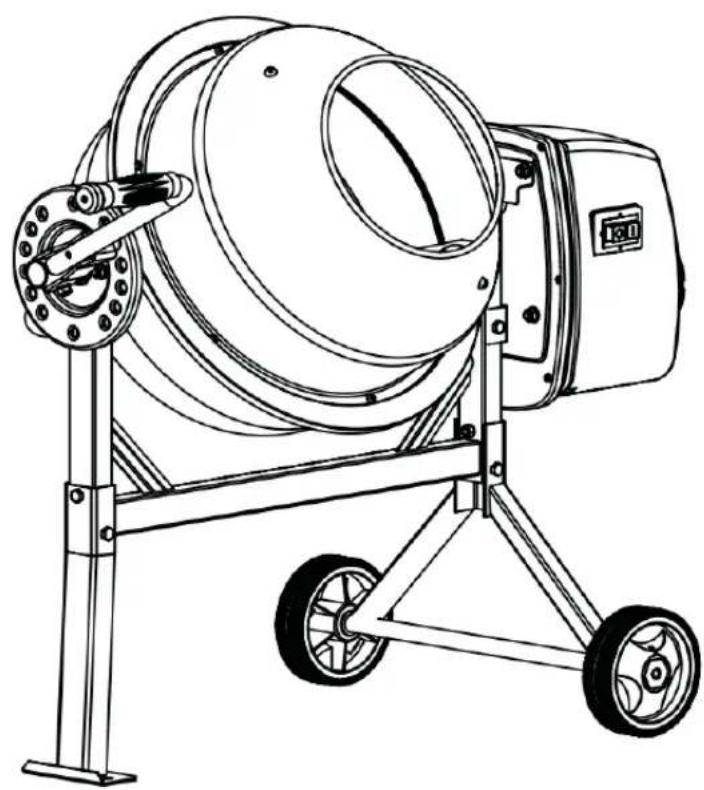
The IP44D protection class construction of the concrete mixer enables you to hose down the drum assembly safely. Ensure you avoid direct contact with the motor housing.
natural_image
Technical line drawing of a cylindrical mechanical device with wheels and a control panel (no text or symbols)Maintenance & Care
Cleaning The Motor Housing
When cleaning the motor housing, avoid using petrol, turpentine, lacquer or paint thinner, dry cleaning fluids or similar products. The use of chemical products or solvents may affect the properties of the cover which was made of high density polyethylene PET.
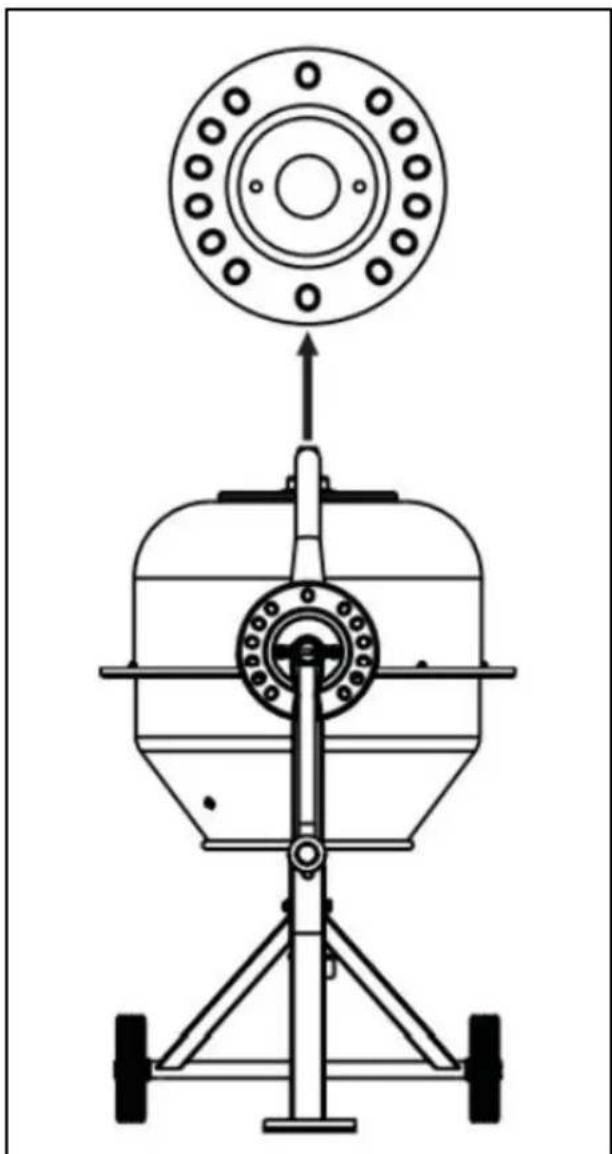
Storage
When finished with operation and cleaning the machine, unplug the machine and store in a covered dry area. Ensure the machine is in the storage position as this will aid any potential extra drying needed.
natural_image
Technical line drawing of a mechanical device with a circular component and supporting legs (no text or symbols)Keep the machine stored in a dry, level area away from damp, moisture and rain fall. Allow the machine to cool down before storing.
• Make sure the machine is clean and dry before storing.
- Ensure the machine is stored in a position, where any persons cannot step on, to attempt to reach items up high, due to risk of movement.
- DO NOT store the machine near an ignition source, such as a wood stove, gas or electric heater, or an appliance or heater with a pilot light.
- Store the machine out of reach of children or anyone who is not familiar with operation.
- DO NOT stack other items on top of the machine when in storage.
- Make sure the machine is stored away from direct sunlight. Store indoors or in a safe, frost-free area during severe weather and winter months.
Technical Data
Specification
| Model HYCM63E | |
| Voltage 230V | |
| Frequency 50Hz | |
| Rated Power 220W | |
| A-Weighted Sound Power Lever LWA 85dB | |
| Drum Speed 27.5/min | |
| Construction Rating IP44D | |
| Net Weight 27kg |
Recycling & Disposal
Recycling & Disposal
We do not offer a takeback scheme for the recovery of Waste Electrical Electronic Equipment (WEEE) & Batteries. Instead the responsibility to dispose of WEEE and/or Batteries is passed onto you by us.
So when it becomes necessary to dispose of your machine you must take it to your local Civic Amenity Site. For further information please contact your local Authority for disposal advice.
You MUST make sure that all unused oil and fuel is disposed of correctly either beforehand or at your local Civic Amenity Site.
- Under NO circumstances must any fuel or oil be put down any drains.
- Certain products contain WEEE waste which should not be disposed of in your domestic waste.
- You MUST recycle WEEE in accordance with your local authority or recycling centre.
- Certain products contain batteries which should not be disposed of in your domestic waste.
- You MUST recycle batteries in accordance with your local authority or recycling centre.
- Unwanted packaging and materials should be stored and taken to a recycling centre so it can be disposed of in a manner which is compatible with the environment.
We are a Member of the VALPAK National Compliance Scheme and our registration number is RM08660. For further information about disposal please contact your Local Authority.
You can also get more advice and guidance about recycling at the following website http://www.recycle-more.co.uk
Should you pass this product on to another user either sold or loaned, you MUST pass on this user manual. This will make sure that all other users can use and maintain this machine safely.
Environmental Protection
- Environmental protection should be a priority of considerable importance when using the machine, for the benefit of both social coexistence and the environment in which we live. Try not to cause any disturbance to the surrounding area.
- You must comply with local regulations and provisions for the disposal of packaging, oils, fuel, filters, damaged parts or any elements which have a strong impact on the environment. This waste must not be disposed of as normal waste. It needs to be separated and taken to specified waste disposal centres where the material will be recycled.
- You must comply with local regulations for the disposal of waste materials after mowing.
- When disposing, do not pollute the environment with the machine, but hand it over to a disposal centre, in accordance with the local laws in force.
EU Declaration Of Conformity
| Importer and Authorised Representative | |
| Genpower LtdIsaac Way, Pembroke Dock, SA72 4RW | |
| Country of Origin: China | |
| Description: Concrete Mixer | |
| SKU Code: HYCM63E | |
| Date of Issue: 12/05/2021 | |
| Regulations and Directives of Compliance | |
| • 2006/42/EC The Machine Directive• 2014/30/EU EMC Directive• 2000/14/EC Noise Emissions• 2011/65/EU RoHS | |
| Statement of Declaration | |
| We the importer and authorised representative of the product described confirm conformity within the provisions of applicable regulations and directives listed within this document. | |
| Signed on Behalf of Genpower Ltd | |
| Place of Issue: Genpower Ltd | |
| Signatory Name: Roland Llewellin | |
| Position: Managing Director | |
 |
Useful Information
Check Out Our YouTube Channel
Our videos on YouTube include:
- Unboxing
• Assembly of your machine
• How to service your machine - Products in use
- 'How To' videos
- Product features
Go to YouTube and search 'Hyundai Power Products'.
Warranty
Proof of purchase will be required before you make a warranty claim. Full warranty terms and conditions can be found on the HYUNDAI POWER PRODUCTS website: www.hyundaipowerproducts.co.uk
Manual Updates
Our manuals are constantly being reviewed and updated. Should you find an error, omission or something unclear, please contact us for assistance. We reserve the right to make any modifications without prior notice whenever necessary. Our latest manuals are also placed online. All our manuals can be downloaded at: www.hyundaipowerproducts.co.uk
Returning Your Product
If you are returning your product, please contact the dealer for their returns policy.
Leaving A Review
We work very hard to give all of our customers the best possible service. If you have any problems, before leaving negative feedback, please contact us to give us a chance to resolve the issue. We would be delighted if you left us positive feedback! To leave a review, please go to: uk.trustpilot.com/review/hyundaipowerequipment.co.uk
Ordering Spare Parts
You can find the spare part you are looking for at power-spares.co.uk
Product Record
Information
As soon as you have purchased the machine, we recommend that you fill out the following. If you need to contact an authorised dealer or customer service for information on servicing, you may need to provide the following information.
Date Of Purchase:
Dealer Name:
Dealer Phone:
Model Number:
Serial/Batch Number:
Contact Us
Need Help? Talk To Our Experts
Our friendly aftersales team will be more than happy to help you.

Phone
Call our team on 01646 687 880

aftersales@hyundaipowerproducts.co.uk

Online Live Chat
Go to www.hyundaipowerproducts.co.uk

Post
Genpower Ltd, Isaac Way, Pembroke Dock, Pembrokeshire, SA72 4RW.

Hyundai Support Website
Go to hyundaisupport.co.uk
HYUNDAI
POWER PRODUCTS
Importer:
GENPOWER LTD
Isaac Way, London Road,
Pembroke Dock, UK, SA72 4RW.
T: +44 (0) 1646 687 880
E: info@hyundaipowerproducts.co.uk
www.hyundaipowerproducts.co.uk
Imported / Distributed by Genpower Ltd for the United Kingdom & Ireland
Licensed by Hyundai Corporation, Korea
- Contents
- Introduction......3
- Safety Information......4-14
- Unboxing....15
- In The Box....16
- Features....17-18
- Assembly....19-28
- Operation....31-35
- Maintenance & Care....36-37
- Specifications....38
- Recycling & Disposal......39
- Declaration Of Conformity......40
- Useful Information......41
- Product Record....42
- Contact Us....43
- Introduction
- Thank You For Purchasing Your HYUNDAI Product
- ▲ Important!
- Safety Information
- Understand Your Machine
- Personal Safety
- Personal Safety (Continued)
- Inspect Your Machine
- Work Area
- During Use
- Batteries (Where Present)
- Electricity (Where Applicable)
- DANGER : ELECTRICITY CAN KILL – NEVER WORK ON LIVE / ENERGISED EQUIPMENT.
- Electricity (Continued)
- Double-Insulated Appliances
- ! Vibrations (Where Applicable)
- ⚠ Noise (Where Applicable)
- !Residual Risks
- Intended Use
- User Types
- Improper Use
- Personal Protective Equipment
- Appropriate Personal Protective Equipment (PPE), MUST be worn at all times when operating or repairing the machine. No protective equipment can ensure 100% protection.
- Hand Protection Must Be Worn
- Foot Protection Must Be Worn
- Hearing Protection Must Be Worn
- Eye Protection Must Be Worn
- Protective Clothing Must Be Worn
- Head Protection Must Be Worn
- Face Shield Must Be Worn
- !Symbols On The Machine
- Symbols On The Machine (Continued)
- Unboxing
- In The Box
- \*Not To Scale
- Features
- Support Leg
- Wheels
- Locking Plate and Tipping Handle
- Motor Assembly
- Mixing Drum
- On/Off Switch
- Assembly
- Assembly Overview
- There are 5 steps to the assembly:
- This machine requires the following tools (not included) for construction:
- Open the bag of fixings and ensure it contains the following bags:
- STEP 1 : Main Frame Assembly
- STEP 1 : Main Frame Assembly (Continued)
- STEP 2 : Lower Drum Assembly
- STEP 2 : Lower Drum Assembly (Continued)
- STEP 3 : Upper Drum Assembly
- STEP 4 : Locking Plate & Tipping Handle
- This step requires fixing bags F & G.
- STEP 4 : Locking Plate & Tipping Handle (Continued)
- STEP 5 : Mounting Motor & Transmission
- Mixing Tips
- Using The Concrete Mixer
- Loading Material
- Unloading Material
- General Tips
- Preparing Material
- Mixing Mortar / Cement
- Mixing Concrete
- Operation
- Drum Tilting
- WARNING: To operate this machine, correct PPE MUST BE used.
- Mixing, Unloading and Storage Positions
- Mortar Mixing
- Concrete Mixing
- Mixing, Unloading and Storage Positions (Continued)
- Unloading
- Storage
- Countering Sticking
- Starting & Stopping
- WARNING! To operate this machine, correct PPE MUST BE used.
- Maintenance & Care
- Cleaning The Drum
- Always remove the electric plug from the mains supply before any cleaning is undertaken.
- Cleaning The Motor Housing
- Storage
- Technical Data
- Recycling & Disposal
- Environmental Protection
- EU Declaration Of Conformity
- Useful Information
- Check Out Our YouTube Channel
- Warranty
- Manual Updates
- Returning Your Product
- Leaving A Review
- Ordering Spare Parts
- Product Record
- Information
- Contact Us
- Need Help? Talk To Our Experts
- Phone
- Online Live Chat
- Post
- Hyundai Support Website
- HYUNDAI
- POWER PRODUCTS
Brand : HYUNDAI
Model : HYCM63E
Category : Cement mixer