
GMT10NCS - Wristwatch Conair - Free user manual and instructions
Find the device manual for free GMT10NCS Conair in PDF.


| Type | Wristwatch |
| Model | GMT10NCS |
| Brand | Conair |
| Display | Analog with GMT hand |
| Movement | Quartz |
| Water Resistance | 50 meters (5 ATM) |
| Case Material | Stainless steel |
| Band Material | Leather or silicone |
| Diameter | 42 mm |
| Thickness | 12 mm |
| Weight | Approx. 80 g |
| Power | 1 CR2016 battery (included) |
| Functions | Time, date, GMT second time zone |
| Crown | Screw-down for water resistance |
| Crystal | Mineral glass |
| Clasp | Tang buckle |
| Care | Rinse with fresh water after saltwater exposure |
| Warranty | 2 years limited |
Frequently Asked Questions - GMT10NCS Conair
User questions about GMT10NCS Conair
0 question about this device. Answer the ones you know or ask your own.
Ask a new question about this device
Download the instructions for your Wristwatch in PDF format for free! Find your manual GMT10NCS - Conair and take your electronic device back in hand. On this page are published all the documents necessary for the use of your device. GMT10NCS by Conair.
USER MANUAL GMT10NCS Conair
TRIMMING YOUR MUSTACHE
- For best results, start with a clean, slightly damp mustache.
- Comb through your mustache in the direction it grows.
- Place the 5-position comb over the facial hair blade and snap it into position. It is a good idea to start with the longest trim setting adjustment. (You can always be back and cut your mustache.) If you are closely with a baster setting.) Always trim your mustache from the top down.
- After your mustache has been trimmed to the desired length, remove the 5-position comb and, using the blade only, define the outline of the bottom of your mustache.
ON/OFF SWITCH
To operate, simply slide switch toward blade; to stop, slide switch away from blade.
CARE OF YOUR TRIMMER
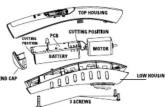
REPLACEMENT (REMOVAL) OF BLADE SET To remove blade set from your trimmer, make sure the trimmer is in the OFF position. Remove the blade set by placing thumb against the smaller cutter and pushing forward, releasing the cutter assembly from the trimmer housing. Replace with new cutting system and reverse the removal procedure, only this time place your thumb on the large cutter and snap into place.
BATTERY REMOVAL
- Using a small Phillips head screwdriver, remove the screws at the back of the trimmer.
- Remove the bottom housing and cut the battery out. Bring the battery to the nearest collection center for proper disposal. DO NOT throw the battery into the normal municipal waste system.

MODEL GMT10RCSB
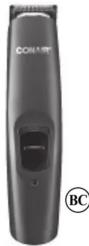
BEARD/MUSTACHE TRIMMER
Facial Hair Blade


2 2 All-PurAll-Purpose pose Multi-Multi-use use BeBeard & Mustache Trimmer

At
LIMITED TWO-YEAR WARRANTY
Conair will repair or replace (at our option) your unit free of charge for 24 months from the date of purchase if the appliance is defective in workmanship or materials.
To obtain service under this warranty, return the defective product to the service center listed on back, together with your purchase receipt and \$3.00 for postage and handling. California residents need only provide proof of purchase and should call 1-800-366-0937 for shipping instructions. In the absence of a purchase receipt, the warranty period shall be 24 months from the date of manufacture.
ANY IMPLIED WARRANTIES, OBLIGATIONS, OR LIABILITIES, INCLUDING BUT NOT LIMITED TO THE IMPLIED WARRANTY OF MERCHANTABILITY AND FITNESS FOR A PARTICULAR PURPOSE, SHALL BE LIMITED IN DURATION TO THE 24-MONTH DURATION OF THIS WRITTEN, LIMITED WARRANTY. Some states do not allow limitations on how long an implied warranty lasts, so the above limitations may not apply to you.
IN NO EVENT SHALL CONAIR BE LIABLE FOR ANY SPECIAL, INCIDENTAL, OR CONSEQUENTIAL DAMAGES FOR BREACH OF THIS OR ANY OTHER WARRANTY, EXPRESS OR IMPLIED, WHATSOEVER. Some states do not allow the exclusion or limitation of special, incidental, or consequential damages, so the above limitation may not apply to you.
This warranty gives you specific legal rights, and you may also have other rights, which vary from state to state.

5POS-189

2JAW-189
Please register this product at www.conair.com/registration
WWW.boscam.com/Registration
[Non-Text]
©2013 Conair Corporation Service Center
Conair Corporation
Service Department 7475 North Glen Harbor Blvd
7475 North Glen Ra Glendale, AZ 85307
13PG140638
TRIMMER REPLACEMENT PARTS & ACCESSORIES ORDER FORM
Pricing in effect through June 1, 2015. Orders postmarked after this date will be accepted, and the customer will be notified if pricing has changed
| ITEM | PART # | PRICE | QUANTITY | AMOUNT |
| 5-Position Comb Attachment | 5POS-189 | 2.25 | ||
| 2 Jawline Combs | 2JAW-189 | 5.50 |

Enclose check or money order made payable to Conair. (We cannot accept cash, stamps or C.O.D. orders I*CT, IL, AZ, and PA residents should add applicable state
sales tax. Minimum order of \10.00 or a \2.00 handling charge will be added to order. All prices include handling and return postage.
Air prices include refracting and return postage. Prices are subject to change without notice.
Prices are valid only for shipments within the continental United States. Please allow 4–6 weeks for delivery.
■ 2011.
To avoid delays, please print clearly. We must have a street address, as UPS cannot deliver to a P.O. box.
NAME
ADDRESS ____ APT. ____
CITY ____ STATE ____ ZI
TELEPHONE ( )____(We call only if we have a question about your order.)
For information on other Chair haircut kit parts call: T-800-S-CUNAH
ALL-IN-ONE
BEARD//MUSTACHE
MMER
Instruction Booklet For your safety and continued enjoyment of this product, always read the instruction booklet carefully before using.

Model GMT10RCSB
IMPORTANT SAFETY INSTRUCTIONS
When using electrical appliances, especially when children are present, basic safety precautions should always be taken, including the following:
READ ALL INSTRUCTIONS BEFORE USING
KEEP AWAY FROM WATER
DANGER — Any appliance is electrically
live, even when the switch is off. To reduce the risk of death or injury by
To reduce the risk of death or injury by electric shock:
- Always unplug appliance from electrical
outlet immediately after using (except when charging unit).
- Do not place or store appliance where it could
fall or be pulled into a tub or sink. 3. Do not use appliance while bathing or in the
-
Do not use appliance while bathing or in the shower.
-
Do not place appliance in, or drop into, water or other liquids
-
If appliance has fallen into water, do not
reach for it. Unplug immediately.
- Unplug this appliance before cleaning
WARNING — To reduce the risk of
burns, electric shock, fire, or injury to persons
- Never leave a plugged-in appliance
unattended.
-
This appliance should not be used by, on, or near children or individuals with certain disabilities.
-
Use appliance only for its intended use as
-
Use appliance only for its intended use as described in this manual. Use only attachments
recommended by the manufacturer. Do not use
an extension cord to operate the appliance. 4. Never operate the appliance if it has a
damaged cord or plug, is not working proper-
ly, has been dropped or damaged, or dropped into water. Return the appliance to a Conair
Service Center for examination and repair.
- Keep the appliance cord away from heated
surfaces.
-
Do not pull, twist or wrap the cord around the appliance.
-
Never drop or insert any object into any
opening of the appliance.
- Do not place the appliance on any surface
while it is operating.
- DO NOT USE THE APPLIANCE WITH A DAMAGED OR BROKEN COMB OR WITH TEETH MISSING FROM THE
blades, as injury may result. Before each use,
make certain the blades are aligned properly and oiled.
- Do not use the appliance outdoors or where
aerosol (spray) products are being used or
oxygen is being administered.
SAVE THESE
SAVE THESE NSTRUCTIONS
INSTRUC OPERATING INSTRUCTIONS
OPERATING INSTRUCTIONS
Before using the Class 2 Power Supply, read these instructions carefully.
Use with adapter CA51
Use with adapter CAST Rated input voltage: 100–240V AC, 50/60Hz
0.2A Max
Rated output: 6.0V DC 70mA
OPERATION
-
For dry location use only. Do not expose to water
-
When not in use, unplug unit completely
-
Unit will become warm during operation.
-
Dry location use only. Do not expose to liquid
-
Dry location also only. Do not expose to liquid vapor, or rain.
-
Ensure jack is plugged into the trimmer unit
before plugging the adapter into the outlet.
-
Do not operate any appliance t damaged output cord or housing
-
Always unplug the unit before cleaning or
when not in use.
-
This power unit is intended to be correctly oriented in a vertical or floor mount position.
-
Be sure voltage is correct before plugging
For connection to a supply not in the U.S.A. use
an attachment plug adapter o
cromguration for power outlet. This device complies with Part 15 of the ECC
This device complies with Part 13 of the Fee Rules. Operation is subject to the following two
conditions: (1) this device may not cause harmful interference, and (2) this device must accept any
interference, and (2) this device must accept any interference received, including interference that
may cause undesired operation.
Warning: Changes or modification to this unit not expressly approved by the party responsible for compliance could void the user's authority to operate the equipment.
TROUBLESHOOTING
If your rechargeable trimmer does not seem to
be taking a charge, take the following trouble-shooting store before returning it for repairs:
-
Be sure the electrical outlet is working by
-
Be sure the electrical outlet is working by plugging in another appliance to test the outl
-
Make sure the electrical plug is not con-
nected to a switch that turns power on when lights are turned off
- Be sure you have inserted the adapter pro
erly into the trimmer, that all connections are
secure, and that the trimmer switch is in the OFF position
OPERATING
OPERATING
INSTRUCTIONS
- Before using the trimmer for the first tim
charge continuously for 16 hours. Maximum
battery capacity will be reached only after charging and discharging cycles.
- Always check to see if the charging light is on
when you firmly connect the unit with the adapter
- Plug the adapter into any wall outlet (at the voltage listed on the label offered to the adapter)
voltage listed on the label anixed to the adapter). Unplug adapter when not in use.
- The adapter may become warm while
charging. This is normal.
- Preserving the batteries: in order to maintain the optimum capacity of the repeatability
the opium capacity of the rechargeable batteries, the trimmer should be recharged for 16
hours approximately every 3 months.
USER MAINTENANCE
INSTRUCTIONS
OILING THE BLADE (oil not included)
About once a month you should oil the trimmer
blade with a light mineral oil. It is best to do this over a piece of newspaper. Turn the trimmer on
and hold it so that the blades are pointed down-
ward. Spread one drop of oil across the blades, then turn the trimmer off and wine away the
excess oil with a soft cloth.
Be careful not to use too much oil and don't oil your trimmer more than necessary, so this could
your thicker more than necessary, as this could damage the motor. (Never attempt to oil the mot
bearing, as it is permanently lubricated.)
BLADE CARE
Because the trimmer blade is precision-made for a very special use, it should always be handled.
a very special use, it should always be handled with care. Each time you finish using the trimmer
brush away any loose hair that has collected in
• • • •
Be especially careful when changing or adjusting the blade. When you have your trimmer serviced
be sure that the blade is sharpened or replaced at
the same time.
To promote the long life of the trimmer, use it only for the purpose intended by the manufacturers.
for the purpose intended by the trim your beard and mustache
GROWING A BEARD AND MUSTACHE
There are three key factors that will determine which board or mustache style is best for you:
-
The shape and dimensions of your face
-
The shape and dimensions of your tube.
-
The natural growth of your beard/mustache.
-
The thickness of your beard/mustache. If you
are unsure about the type of beard or mustache that would most suit your face, snook with a
that would must suit your face, speak with a professional hair stylist and ask for an opinion
on what style would be best. Once your beard
or mustache has been styled, it is essential that you maintain its appearance. To do this, use your
you maintain no appearance? To do this, 600 your trimmer to trim your beard/mustache weekly.
For the best trimming results, your beard should be slightly damp (NOT NET) when using your
be slightly damp (NOT WET) when using your trimmer. This will prevent the trimmer from
removing more hair than desired.
TYPES OF BEARDS/MUSTACHES


GETTING STARTED
-
It is always best to begin with a clean, slightly damp beard.
-
After you have combed through your beard in
the direction it grows naturally, you will want to
outline the desired shape, beginning under your jawline.
- Begin defining your beard's
shape under your chin and work
upward on each side of your face toward your ears. Then
define the upper outline of your beard across
your cheeks, past your sideburns, and toward your hairline.
TRIMMING YOUR BEARD
- The trimmer includes
5-position comb for use with the hair trimming blade
with the half thinning blade (2–10mm) which provides
lengths of 3/32" (shortest) to
3/8" (longest).
- To use the 5-position comb, slide the unit over the trimmer blade and snap it down into
position. At first, until you become familiar with
the adjustments, use the longest trim setting. (You can always go back and make your heard)
(a) can away a little shorter.
- Begin trimming your board using smooth
beard using smooth, even strokes. Start with
your sideburns and work
downward toward your chin. /Never attempt to t
growth of your beard because the hair will be
cut too short.)
- If you decide you want a closer trim, you can
now adjust the 5-position comb attachment to a shorter setting (such as 3/32" or 5/32") and
go over your beard again until you achieve the
BLENDING THE JAWLINE
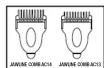
- Two all-purpose attachments, AC14, which
provides lengths of 3mm (shortest) and AC13, which provides lengths of 5mm (longest), will
which provides longa is of 6mm (longout), will help you to achieve a neat, finished trim under
your chin. To use one of the attachments, press it down over the trimmer blades until it clicks into
down over the trimmer position.
- Hold the trimmer in an upright position and
begin trimming under your jawline, using short, even strokes.
- After your beard is blended, turn off the
trimmer and remove the attachment by gently pulling up an axle.
CÓMO CORTAR SU BIGOTE

[Non-Text]
[Non-Text]
[Non-Text]
[Non-Text]
[Non-Text]
[Non-Text]
[Non-Text]
[Non-Text]
[Non-Text]
[Non-Text]
[Non-Text]
[Non-Text]
[Non-Text]
[Non-Text]
[Non-Text]
[Non-Text]
[Non-Text]
[Non-Text]
[Non-Text]
[Non-Text]
[Non-Text]
[Non-Text]
[Non-Text]
[Non-Text]
[Non-Text]
[Non-Text]
[Non-Text]
[Non-Text]
[Non-Text]
[Non-Text]
[Non-Text]
[Non-Text]
[Non-Text]
[Non-Text]
[Non-Text]
[Non-Text]
[Non-Text]
[Non-Text]
[Non-Text]
[Non-Text]
[Non-Text]
[Non-Text]
[Non-Text]
[Non-Text]
[Non-Text]
[Non-Text]
[Non-Text]
[Non-Text]
[Non-Text]
[Non-Text]
[Non-Text]
REMO
REMO
. Retire los t
arte trasera
lestornillador
A. Abes al.
2. Abra el cui
alambres que
ateria al cen
10 tire las be
[Non-Text]
(1)
REMOLE
(六)
[Unreadable]
005 172 85
-
[Non-Text]
[Non-Text]
广力云
1
[NO TEXT]
- TRIMMING YOUR MUSTACHE
- ON/OFF SWITCH
- CARE OF YOUR TRIMMER
- BATTERY REMOVAL
- MODEL GMT10RCSB
- LIMITED TWO-YEAR WARRANTY
- Please register this product at www.conair.com/registration
- TRIMMER REPLACEMENT PARTS & ACCESSORIES ORDER FORM
- ALL-IN-ONE
- IMPORTANT SAFETY INSTRUCTIONS
- READ ALL INSTRUCTIONS BEFORE USING
- KEEP AWAY FROM WATER
- SAVE THESE
- SAVE THESE NSTRUCTIONS
- TROUBLESHOOTING
- USER MAINTENANCE
- INSTRUCTIONS
- BLADE CARE
- GROWING A BEARD AND MUSTACHE
- TYPES OF BEARDS/MUSTACHES
- GETTING STARTED
- TRIMMING YOUR BEARD
- BLENDING THE JAWLINE
- CÓMO CORTAR SU BIGOTE
Brand : Conair
Model : GMT10NCS
Category : Wristwatch