
RO160 - Oven Rival - Free user manual and instructions
Find the device manual for free RO160 Rival in PDF.


| Product Type | Countertop Oven |
| Brand | Rival |
| Model | RO160 |
| Capacity | 16 L |
| Dimensions (H x W x D) | 30 x 45 x 35 cm |
| Weight | 7.5 kg |
| Power Consumption | 1500 W |
| Voltage | 120 V |
| Frequency | 60 Hz |
| Temperature Range | 150°F – 450°F |
| Functions | Bake, Broil, Toast, Keep Warm |
| Control Type | Mechanical dials |
| Timer | 60-minute timer with bell |
| Interior Light | Yes |
| Number of Heating Elements | 4 (2 top, 2 bottom) |
| Rack Positions | 2 |
| Included Accessories | Baking pan, wire rack, crumb tray |
| Material | Stainless steel exterior |
| Cleaning | Wipe with damp cloth; removable crumb tray |
| Safety Features | Automatic shut-off, cool-touch handle |
| Power Cord Length | 90 cm |
| Warranty | 1 year limited |
Frequently Asked Questions - RO160 Rival
User questions about RO160 Rival
0 question about this device. Answer the ones you know or ask your own.
Ask a new question about this device
Download the instructions for your Oven in PDF format for free! Find your manual RO160 - Rival and take your electronic device back in hand. On this page are published all the documents necessary for the use of your device. RO160 by Rival.
USER MANUAL RO160 Rival
natural_image
Rival Roaster Oven with open lid and cooking pot filled with cooked meat (no text or symbols visible)Owner's Guide
READ AND SAVE THESE INSTRUCTION
Visit us at www.rivalproducts.com
1-800-557-4825
IMPORTANT SAFEGUARDS FOR ROASTER OVENS
When using electrical appliances, basic safety precautions should always be followed, including the following:
- Read all instructions before using.
- Do not touch hot surfaces. Use handles or knobs.
- To protect against electrical shock do not immerse roaster base, cord, or plug in water or other liquid.
- Close supervision is necessary when any appliance is used by or near children.
- Unplug from outlet when not in use and before cleaning. Allow to cool before putting on or taking off parts and before cleaning.
- Do not operate roaster oven with a damaged cord or plug or after the appliance malfunctions, or has been damaged in any manner. Contact Rival's Consumer Service Department (see warranty) to return for examination, repair or adjustment.
- The use of accessory attachments not recommended by Rival may cause injuries.
- Do not use outdoors.
- Do not let cord hang over edge of table or counter, or touch hot surfaces, including the stove.
- Do not place on or near a hot gas or electric burner or in a heated oven.
- Extreme caution must be used when moving an appliance containing hot oil or other hot liquids.
- CAUTION: Steam escaping from under cover or food warming pans is hot and can cause burns.
- Do not use appliance for other than its intended use.
-
Use oven mitts to remove the REMOVABLE ROASTING PAN from the roaster oven; or to remove a baking pan or cooked food from the REMOVABLE ROASTING PAN.
-
To disconnect, turn TEMPERATURE CONTROL to OFF, then remove plug from wall outlet.
- Some countertop surfaces such as Corian® and other surfaces are not designed to withstand the prolonged heat generated by certain appliances. We recommend placing a hot plate or trivet under your Rival® product to prevent possible damage to the surface.
SAVE THESE INSTRUCTIONS
• These appliances are for HOUSEHOLD USE ONLY.
- No user-serviceable parts inside. Do NOT attempt to repair or adjust any electrical or mechanical functions on this unit. Doing so will void the Warranty.
- Do not immerse base in water or other liquid.
- A short power supply cord is provided to reduce the hazards resulting from entanglement or tripping over a longer cord. AN EXTENSIONCORDMAYBEUSEDWITHCARE;HOWEVER,THEMARKED ELECTRICALRATINGSHOULDBEATLEASTASGREATASTHEELECTRICAL RATING OF THE ROASTER OVEN. The extension cord should not be allowed to drape over the counter or tabletop where it can be pulled on by children or tripped over.
POLARIZED PLUG
natural_image
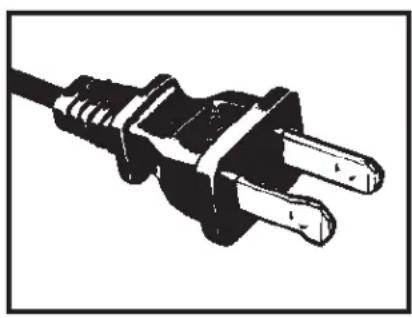
Black and white illustration of a two-pin electrical plug (no text or symbols)These appliances have polarized plugs (one blade is wider than the other). To reduce the risk of electric shock, these plugs are intended to fit into a polarized outlet only one way. If the plug does not fit fully into the outlet, reverse the plug. If it still does not fit, contact a qualified electrician.
Do not attempt to modify the plugs in any way. If the plugs fits loosely into the AC outlet or if the AC outlet feels warm do not use that outlet.
- Carefully unpack the Roaster Oven and remove all packaging materi
- Wash the REMOVABLE ROASTING PAN, REMOVABLE ROASTING RAC REMOVABLE SERVING DISHES (select models only), REMOVABLE SERVING DISH FRAME (select models only), and LID in hot, soapy w using a sponge or soft cloth. Rinse thoroughly. Wipe dry.
- Clean the outside of the ROASTER OVEN BODY with a soft cloth ar warm, soapy water. Wipe dry. Do not use abrasive cleaners.
NOTE: Due to the manufacturing process, some smoke and odor may I noticed during the first use. This should disappear after the first heating Roaster Oven.
TIPS FOR ROASTING
- Always use the REMOVABLE ROASTING PAN in the roaster oven when cooking.
NOTE: Never place food or liquid directly into the ROASTER OVEN BOE - Use caution when removing or lifting the LID as steam is vented along the seam on the top of the LID.
- Significant amounts of heat escape whenever the LID is removed. Instead of removing the LID to check on your food, grasp LID HANDLE and lift just enough to check on or taste the food.
Exercise caution when using this feature, as steam may escape.
- To use the LID REST feature, hold the LID upright by the HANDLE and place the edge of the LID under the metal tabs just above either side HANDLE.
- Convenience foods can be baked in the Roaster Oven. Place container on ROASTING RACK. Follow package directions.
TIPS FOR ROASTING (CONT.)
- Meats roasted in your Roaster Oven will be moist and tender. For additional browning, brush oil or butter over the meat before cooking. In addition, cooking the meat in a traditional oven at 450°. For on Broil for the last 20-30 minutes will result in better browning.
- To create a darker roasted, crispier skin poultry, do not add liquids (with the exception of the basting butter or oil) until there are only 30 minutes left of cooking. Cooking at a higher temperature will result in a faster cooking time, i.e. 375 °F instead of 325 °F.
TIPS FOR USING THE REMOVABLE SERVING DISHES (SELECTMODELS)
CAUTION: Temperature of foods should be kept at 150 °F or above.
- The REMOVABLE ROASTING PAN and REMOVABLE SERVING DISH FRAME must be in place when using the REMOVABLE SERVING DISHES.
- Use only to keep cooked foods warm.
- REMOVABLE SERVING DISHES and REMOVABLE SERVING DISH FRAME are not to be used on the stove top, in an oven, or in a microwave oven.
- When filling REMOVABLE SERVING DISHES with foods that may stick, spray the inside with a non-stick cooking spray.
- If food is dry, add broth or juice to help keep warm.
- NEVER pick-up hot REMOVABLE SERVING DISHES using the REMOVABLE SERVING DISH FRAME.
- Place the REMOVABLE ROASTING PAN into the ROASTER OVEN BOD
- Turn the TEMPERATURE CONTROL to OFF, then plug cord into a 120V AC outlet.
- Turn the TEMPERATURE CONTROL to the desired temperature and preheat for 15 to 20 minutes. Indicator light will shut off when temperature is reached (indicator light is on select models only).
- Place ROASTING RACK into the REMOVABLE ROASTING PAN, arrange food on the ROASTING RACK, and secure the LID on the Roaster Oven. NOTE: Some foods or recipes do not require the ROASTING RACK to be used.
- When finished, turn the TEMPERATURE CONTROL to OFF and unplug Roaster Oven from outlet.
- Use oven mitts or hot pads to remove LID and ROASTING RACK, or when grasping unit by side handles, surfaces are hot during operation.
USING THE REMOVABLE SERVING DISHES (SELECTMODELS)
- Fill the REMOVABLE ROASTING PAN with 8 quarts of water (or 1/2 - 3/4 full) and place inside ROASTER OVEN BODY.
CAUTION: Never add water directly inside the ROASTER OVEN BODY. - Place REMOVABLE SERVING DISH FRAME on top of the REMOVABLE ROASTING PAN. Make sure the REMOVABLE SERVING DISH FRAME is secure and level.
- Add empty REMOVABLE SERVING DISHES, making sure they fit securely in REMOVABLE SERVING DISH FRAME.
USING THE REMOVABLE SERVING DISHES (SELECTMODELS)(CONT.)
- Cover with LID and plug Roaster Oven into a 120V outlet. Preheat on 350 °F for 30 minutes or until water is very hot.
- Remove LID and carefully add hot, cooked food into REMOVABLE SERVING DISHES.
- Cover and turn control to 250 °F setting to keep foods warm. If necessary, adjust temperature.
- Stir occasionally and keep food covered to maintain temperature.
- Periodically, check water level and carefully add more hot water if necessary.
NOTE: Do not immerse the ROASTER OVEN BODY in water or other liquid. Do not put REMOVABLE ROASTING PAN, REMOVABLE SERVING DISHES (select models), or REMOVABLE SERVING DISH FRAME (select models) in dishwasher.
- Turn TEMPERATURE CONTROL to OFF.
- Unplug the Roaster Oven from outlet and allow unit to cool completely before cleaning.
- Wash the REMOVABLE ROASTING PAN, REMOVABLE SERVING DISHES (select models), REMOVABLE SERVING DISH FRAME (select models), LID, and ROASTING RACK in hot, soapy water – using a sponge or cloth. Rinse thoroughly in hot water, then towel dry.
- Wipe the inside and outside of the ROASTER OVEN BODY with a damp cloth.
COOKING TIME AND TEMPERATURE
DETERMINING MEAT DONENESS
It is recommended that you use a meat thermometer to determine doneness when cooking meat and poultry. Insert the thermometer into the center of the thickest portion of the meat. Cook until temperature for desired doneness is reached.
| MEAT | RARE | MEDIUM | WELL DONE |
| BEEF | 140°F | 160°F | 170°F |
| PORK | * | 160°F | 170°F |
| LAMB | 140°F | 160°F | 170°F |
| SMOKEDHAMCook before eatingFully cooked | * | 160°F140°F | |
| POULTRYRoasting ChickenTurkey | * | 180°F180°F |
*Rare pork, ham or poultry is not recommended.
ROASTING MEATS AND POULTRY
Meats will cook more rapidly in the Roaster Oven than a conventional oven. Reducing temperature and increasing time will result in a browner, crispier crust. Times indicated below are approximate and should be used as a guideline only.
| MEAT | WEIGHT (LBS.) | TEMP. | MIN./LB. |
| BEEF ROASTS | |||
| Standing Rib | 4 – 6 | 325 °F | 17 to 21 |
| Sirloin Tip | 3 – 5 | 350 °F | 17 to 21 |
| Tenderloin | 312 - 4 | 450 °F | 7 to 10 |
| Pot Roast | 4 – 6 | 300 °F | 26 to 34 |
| Corned Beef | 312 - 4 | 300 °F | 15 to 17 |
| LAMBLeg 5 – 8 350 °FShoulder, boneless | 20 to 223 – 4 350 °F | 20 to 22 | |
| PORKLoin Roast 3 – 5Rolled Shoulder 4Chops 4 – 5 325Country-Style Ribs | 350 °F 21 to 26– 6 350 °F 30 °F 15 to 178 – 10 450 °F | to brown,then decrease temp. to 250 °F | 15 to 17 |
| SMOKED HAMBone-in, shank 10Boneless 8 – 12 Fully cooked | – 15 325 °F 17 to 21325 °F 15 to 175 – 10 325 °F 13 to 24 | ||
| VEALLoinShoulder | 4 – 6 325 °F 26 to 303 – 5 325 °F 26 to 30 | ||
| POULTRYChicken, wholeChicken, wholeChicken, piecesTurkey, prebastedTurkey, freshTurkey, fresh | 3⁄4 – 56 – 8 350 °F 15 to 176 – 8 350 °F 7 to 910 – 14 375 °F 12 to 1514 – 22 375 °F 13 to 1510 – 14 350 °F 12 to 15 | 350 °F | |
SLOW COOKING
Slow cooking is best for less tender cuts of meat. Heat is gradual with slow cooking and stirring is not necessary. Avoid removing the LID during slow cooking, because heat escapes and may increase the cooking time. When using a standard roasting recipe, slow cook 1 1/2 hours at the 250 °F setting for every 30 minutes of roasting.
BAKING\*
- Always place baking pans on the ROASTING RACK. Do not place pans on bottom of REMOVABLE ROASTING PAN.
- We recommend that you use metal pans in the Roaster Oven, because they provide better heat transfer and browning.
| FOOD | TEMP. SETTING | BAKING TIME (MIN) |
| MUFFINS425° F 15 to 20 | ||
| QUICKBREAD375° F 65 to 75 | ||
| YEASTBREAD400° F 40 to 45 | ||
| YEASTROLLS400° F 18 to 20 | ||
| COOKIES | 350° F 11 to 13 | |
| BROWNIES | 350° F 25 to 30 | |
| CUPCAKES | 350° F 25 to 30 | |
| SHEETCAKE | 350° F 40 to 45 | |
| POUNDCAKE | 350° F 50 to 60 | |
| BUNDTCAKE | 350° F 50 to 60 | |
| CHEESECAKE | 325° F 50 to 60 | |
| FRUITPIE | 425° F 45 to 50 | |
| CUSTARDPIE | 350° F 50 to 60 | |
| PASTRYSHELL | 425° F 10 to 13 | |
| PIZZA (9-inch) | 425° F 20 to 25 | |
| BAKED POTATOES | 350° to 400° F | 50 to 60 |
| SWEET POTATOES | 350° to 400° F | 55 to 65 |
| SCALLOPEDPOTATOES | 350° F 75 to 90 | |
| WINTER SQUASH | 400° F 45 to 60 | |
| BAKED APPLES | 350° F 35 to 45 |
* Always preheat roaster prior to baking
RECIPES
LEMON GARLIC ROAST CHICKEN
4 to 5-lb. chicken 2 tablespoons lemon juice
3 cloves garlic, minced
1 teaspoon salt
12 teaspoon ground black pepper
14 cup butter, softened
Rinse chicken in cold water. Combine remaining ingredients and rub over skin between skin and meat of chicken. Place roasting rack in cooking pan. Place ch on roasting rack and cover. Bake at 350°F /dours or until chicken is done.
BAKED POTATOES
8 to 12 baking potatoes
Wash potatoes and pierce with a fork. Place rack in the pan. Stack potatoes or roasting rack, making sure that they don't touch the sides of cooking pan. Cow and bake at 400°F for 1 to hours.
POT LUCK BEEF STEW
8 -lbs. beef stew meat
2 cups dry bread crumbs
2 teaspoons salt
12 teaspoon pepper
4 large onions, cut into eighths
4 pounds baby carrots
7 stalks celery
15 potatoes, peeled and cubed
2 tablespoons basil
2 cups quick-cooking tapioca
8 cans (4 ounces) sliced mushrooms, undrained
15 cans-0.0each) condensed tomato soup
8 cups beef broth
Toss stew meat with bread crumbs, salt and pepper. Place beef in pan and ado remaining ingredients; stir well. Cover and roast at 250^ F. for 4 to 5 hours or meat and vegetables are tender.
CHILI FOR A CROWD
3 pounds dry pinto beans, soaked and drained
1 can (28-oz.) diced tomatoes
10 pounds ground chuck, browned and drained
12 cups water
2 onions, chopped
2 green peppers, chopped
5 cloves garlic, minced
2 jalapeno peppers, finely chopped
3 tablespoons cumin
^3/_4 cup chili powder
3 cups tomato juice
3 cans ^1/2 (b2. each) tomatoes and chilies
Preheat roaster to 350^ F. Combine first 8 ingredients in roaster. Cover, cook for hours. Add remaining ingredients. Cover and cook an additional 30 minutes to 1 hour.
RECIPES
MEATBALLS
5 pounds ground beef 1 12 teaspoons salt
1 cup Italian seasoned fine, dry bread crumb& teaspoon pepper
5 eggs
Preheat roaster with pan in place to 425° F. Combine all ingredients. Form into inch balls. Place meatballs in pan. Cover; Bake 30 to 45 minutes or until done occasionally to brown on all sides. Makes approximately 75 meatballs.
PEPPER CRUSTED BRAISED SHORT RIBS
6 - 9 pounds beef short ribs 15 cloves garlic, minced
14 cup freshly cracked black pepper 5 (14 12 -oz.) cans beef broth
2 teaspoons salt 1 cup red wine, optional
Preheat roaster to 450° F. Rub ribs on all sides with pepper and garlic. Sprinkle salt. Place ribs in cooking pan and cover. Cook 15-30 minutes, turning to brown on all sides. Pour broth over ribs. Cover, reduce heat to 300° F and cook until tender, 2 to ½ hours.
PORK ROAST
4 - 5 lb. pork loin roast 12 teaspoon pepper
4 cloves garlic, minced 12 cup Italian dressing
1 teaspoon salt ¼ cup Worcestershire sauce
Preheat roaster to 350° F. Place roast on rack. Press minced garlic into surface the roast. Place rack in roaster. Combine dressing and Worcestershire sauce. Brush roast with marinade. Cover; cook for 2 to 2½ hours or until done.
SPAGHETTI SAUCE
1 can (48-oz.) tomato juice 13 cup basil leaves
4 cans (28-oz.) diced tomatoes ¼ cup oregano leaves
2 cans (12-oz.) tomato paste 12 tablespoons parsley
2 tablespoons Worcestershire sauce 1 tablespoon thyme
6 cups water 1 tablespoon salt
5 cloves garlic, minced 1 teaspoon pepper
Turn roaster to 350° F. Add all ingredients to an oven safe dish, stirring well to combine. Cover, cook 3 to 4 hours until thick, adding meatballs during last 1 to 1½ hours. Stir occasionally.
RECIPES
SPICY BEEF ROAST
2 (2½ to 3-lb.) beef tip or rump roast ¼ cup soy sauce
2 - 3 tablespoons cracked black peppercorns 2 tablespoons Worcestershire sauce
4 cloves garlic, minced 1 12 teaspoons dry mustard
3 tablespoons balsamic vinegar 12 teaspoon salt
Preheat roaster to 350^ F. Make several slits in top of roasts. Place roasts on ra rack in roaster. Combine vinegar, soy sauce, Worcestershire sauce and mustard. Brush marinade over roasts. Combine cracked pepper and garlic. Rub over mea Sprinkle with salt. Cover; roast 20 to 25 minutes per pound or until roast reach desired doneness.
BAKED BEANS
2 cans (7-lbs. each) pork and beans
1 ½ cup molasses
1¼ cup ketchup
^3/_4 cup prepared barbecue sauce
12 cup Worcestershire sauce
2 tablespoons dry mustard powder
1 pound bacon, cooked until just crisp and cut up
Combine all ingredients in an oven safe dish and place in roaster pan. Cover a cook at 300^ F for 2 hours or until heated through. Stir occasionally.
1 YEARLIMITEDWARRANTY
Sunbeam Products, Inc. doing business as Jarden Consumer Solutions or if in Canada, Sunbeam Corporation (Canada) Limited doing business as Jarden Consumer Solutions (collectively "JCS") warrants that for a period of one year from the date of purchase, this product will be free from defects in material and workmanship. JCS, its option, will repair or replace this product or any component of the product found to be defective during the warranty period. Replacement will be made with a new or remanufactured product or component. If the product is no longer available, replacement may be made with a similar product of equal or greater value. This is your exclusive warranty. Do NOT attempt to repair or adjust any electrical or mechanical functions on this product. Doing so will void this warranty.
This warranty is valid for the original retail purchaser from the date of initial retail purchase and is not transferable. Keep the original sales receipt. Proof of purchase is required to obtain warranty performance. JCS dealers, service centers, or retail stores selling JCS products do not have the right to alter, modify or any way change the terms and conditions of this warranty.
This warranty does not cover normal wear of parts or damage resulting from any of the following: negligent use or misuse of the product, use on improper voltage or current, use contrary to the operating instructions, disassembly, repair or alteration by anyone other than JCS or an authorized JCS service center. Further, the warranty does not cover: Acts of God, such as fire, flood, hurricanes and tornadoes.
What are the limits on JCS's Liability?
JCS shall not be liable for any incidental or consequential damages caused by the breach of any express, implied or statutory warranty or condition.
Except to the extent prohibited by applicable law, any implied warranty or condition of merchantability or fitness for a particular purpose is limited in duration to the duration of the above warranty.
JCS disclaims all other warranties, conditions or representations, express, implied, statutory or otherwise.
JCS shall not be liable for any damages of any kind resulting from the purchase, use or misuse of, or in a to use the product including incidental, special, consequential or similar damages or loss of profits, or for any breach of contract, fundamental or otherwise, or for any claim brought against purchaser by any other party.
Some provinces, states or jurisdictions do not allow the exclusion or limitation of incidental or consequential damages or limitations on how long an implied warranty lasts, so the above limitations or exclusion may not apply to you.
This warranty gives you specific legal rights, and you may also have other rights that vary from province to province, state to state or jurisdiction to jurisdiction.
How to Obtain Warranty Service
In the U.S.A.
If you have any question regarding this warranty or would like to obtain warranty service, please call 1-800-557 and a convenient service center address will be provided to you.
In Canada
If you have any question regarding this warranty or would like to obtain warranty service, please call 1-800-557 and a convenient service center address will be provided to you.
In the U.S.A., this warranty is offered by Sunbeam Products, Inc. doing business Jarden Consumer Solutions lo in Boca Raton, Florida 33431. In Canada, this warranty is offered by Sunbeam Corporation (Canada) Limited doi business as Jarden Consumer Solutions, located at 20 B Hereford Street, Brampton, Ontario L6Y 0M1. If you h any other problem or claim in connection with this product, please write our Consumer Service Department.
PLEASE DO NOT RETURN THIS PRODUCT TO ANY OF THESE ADDRESSES OR TO THE PLACE OF PURCHASE.

RIVAL®
For product questions:
Jarden Consumer Service
USA: 1.800.557.4825
www.rivalproducts.com
©2008 Sunbeam Products, Inc. doing business as Jarden Consumer Solutions. All rights reserved. Distributed by Sunbeam, Products, Inc. doing business as Jarden Consumer Solutions, Boca Raton, FL 33431 In Canada, imported and distributed by Sunbeam Corporation (Canada) Limited, doing business as Jarden Consumer Solutions, 20 B Hereford Street, Brampton, Ontario L6Y 0M1.

- READ AND SAVE THESE INSTRUCTION
- IMPORTANT SAFEGUARDS FOR ROASTER OVENS
- SAVE THESE INSTRUCTIONS
- POLARIZED PLUG
- TIPS FOR ROASTING
- TIPS FOR ROASTING (CONT.)
- TIPS FOR USING THE REMOVABLE SERVING DISHES (SELECTMODELS)
- USING THE REMOVABLE SERVING DISHES (SELECTMODELS)
- USING THE REMOVABLE SERVING DISHES (SELECTMODELS)(CONT.)
- COOKING TIME AND TEMPERATURE
- DETERMINING MEAT DONENESS
- ROASTING MEATS AND POULTRY
- SLOW COOKING
- BAKING\*
- RECIPES
- LEMON GARLIC ROAST CHICKEN
- BAKED POTATOES
- POT LUCK BEEF STEW
- CHILI FOR A CROWD
- MEATBALLS
- PEPPER CRUSTED BRAISED SHORT RIBS
- PORK ROAST
- SPAGHETTI SAUCE
- SPICY BEEF ROAST
- BAKED BEANS
- YEARLIMITEDWARRANTY
- What are the limits on JCS's Liability?
- How to Obtain Warranty Service
- In the U.S.A.
- In Canada
- RIVAL®
Brand : Rival
Model : RO160
Category : Oven