G51 - Mobile Phone PANASONIC - Free user manual and instructions
Find the device manual for free G51 PANASONIC in PDF.

| Product Type | Mobile Phone |
| Brand | Panasonic |
| Model | G51 |
| Dimensions (H x W x D) | 104 x 47 x 19 mm |
| Weight | 85 g |
| Display Type | Color STN, 65K colors |
| Display Resolution | 128 x 128 pixels |
| Battery Type | Li-Ion 720 mAh |
| Talk Time | Up to 5 hours |
| Standby Time | Up to 200 hours |
| Phonebook Capacity | 200 entries |
| Messaging | SMS, EMS, MMS |
| Internet Connectivity | WAP 1.2.1 |
| Battery Charger | AC adapter (included) |
| Maintenance & Cleaning | Wipe with a soft, dry cloth |
| Safety Precautions | Keep away from water and moisture |
| Spare Parts & Repairability | Replacement battery available; service by authorized center |
| General Information | Manufacturer: Panasonic, Model: G51, Category: Mobile Phone |
Frequently Asked Questions - G51 PANASONIC
User questions about G51 PANASONIC
0 question about this device. Answer the ones you know or ask your own.
Ask a new question about this device
Download the instructions for your Mobile Phone in PDF format for free! Find your manual G51 - PANASONIC and take your electronic device back in hand. On this page are published all the documents necessary for the use of your device. G51 by PANASONIC.
USER MANUAL G51 PANASONIC
Panasonic
EB-G51E
Operating Instructions Part 1
Digital Cellular Phone
GSAA
Before operating this equipment please read these instructions (parts 1 and 2) completely
Contents
Part 2 of these Operating Instructions contains important information which should be read before operating your phone. Please completely read the appropriate section of part 2 before continuing with part 1.
Getting Started ....1
Inserting and Removing the SIM ....1
Attaching and Removing the Battery....1
Charging the Battery 2
Operation of Battery Level Indicator....2
Low Battery Power Warning....2
Keys & Displays....3
Keys 3
Display....4
Status Icons....4
Symbols Used in the Manual....5
Menu Display....5
Menu Structure....6
Shortcut from Idle Screen....7
Phone Basics 8
Phone ON/OFF 8
Displaying Menu....8
Making Calls....9
Answering Calls....11
In-Call Options....12
My Phone Menu Structure....15
My Phone.... 16
Sounds.... 16
Display 19
Language 21
Alert Type.... 22
Profiles 22
User Messages 24
Auto Answer....25
Any Key Answer.... 25
Reset Defaults ....25
Shortcuts....26
My Phonebook 26
T9 Input....26
Games Menu Structure 27
Games.... 28
Selecting Games.... 28
Phone Book Menu Structure 29
Phone Book.... 30
Storing....30
Viewing 32
Options in Phone Book 32
Group Settings ....33
Memory Status....34
My Numbers.... 34
Hot Key Dial 35
My Phonebook 35
Browser Menu Structure.... 36
Browser 37
Server Setting 37
WAP Activating 38
Bookmarks 39
Key Guard....40
Messages Menu Structure 41
Messages....42
SMS 42
Options......47
Broadcast 48
Auto Display....49
Text Entry 50
Shift mode....51
Tegic 51
Text Input 51
Phone Option Menu Structure....53
Phone Option 54
Call Service....54
Call Divert....57
Security 58
Codes.... 59
Network.... 61
CSD Setting 61
GPRS Setting....62
GPRS Info....62
Applications Menu Structure 63
Applications.... 64
Games 64
STK (SIM Tool Kit).... 64
Scheduler.... 65
Clock....66
Calculator.... 68
Currency 69
MelodyComposer....69
Sound Folder 70
Picture Folder....71
Records Menu Structure.... 72
Records 73
Troubleshooting 74
Important Error Messages 76
Glossary of Terms 79
Accessories 81
Personal Settings 82
Index 84
Getting Started
Some services detailed, are network dependent or may only be available on a subscription basis. Some functions are SIM dependent. For more information contact your service provider.
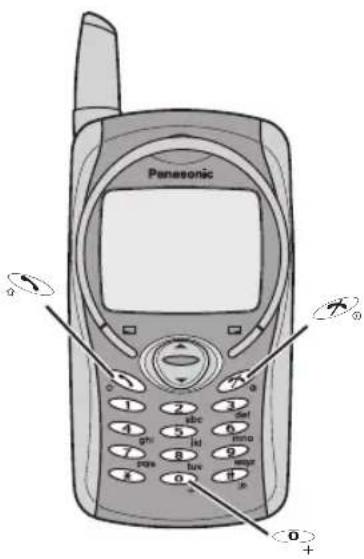
Inserting and Removing the SIM
The SIM is inserted under the battery.
Inserting the SIM
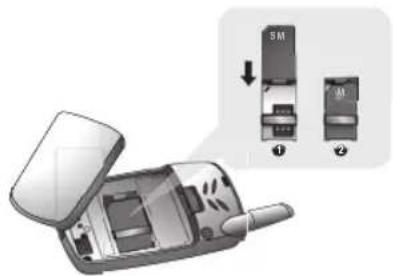
natural_image
Illustration of a mobile phone with open lid and internal components, showing two labeled parts (① and ②) without any text or symbols.Attaching and Removing the Battery
Before removing the battery, ensure that the phone is switched off and the charger is disconnected from the phone.
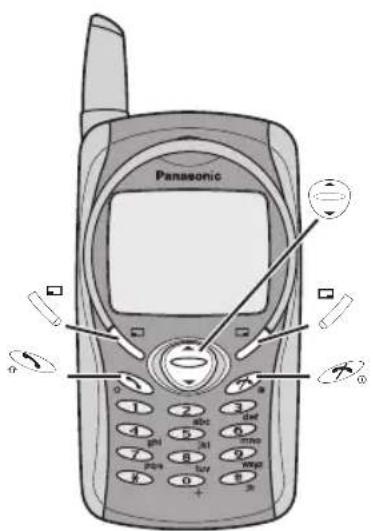
Attaching the battery

natural_image
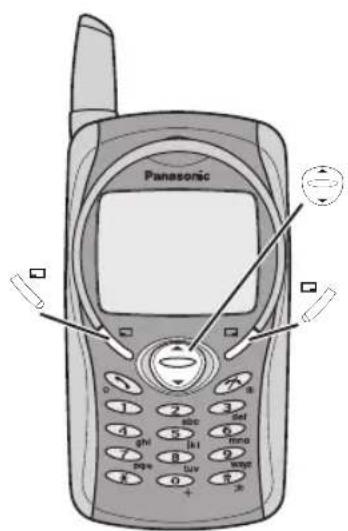
Illustration of a mobile phone with directional arrows indicating movement (no text or symbols)Removing the SIM

natural_image
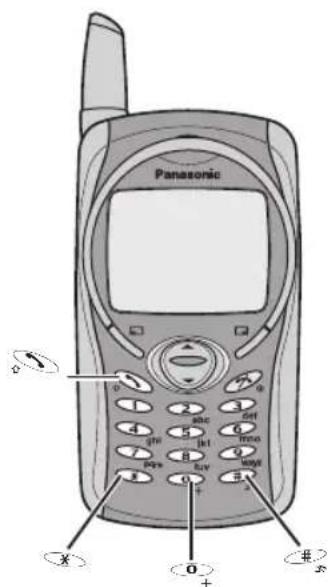
Diagram of a mobile phone device with open lid and internal components, showing two views (① and ②) with no visible text or symbols.Removing the battery

natural_image
Illustration of a handheld device with labeled parts (1, 2), no text or symbols presentCharging the Battery
Connecting and disconnecting the Fast Travel Charger
The battery must be fitted in the phone before the charger is connected. Insert the charger into the Charging Connector and connect the travel charger to the socket-outlet. Then the Battery Level Indicator will start scrolling. It is recommended to charge the battery for a minimum of 4 hours before first use.
NOTE: DO NOT force the connector as this may damage the phone and/or the charger. If the battery has been deeply discharged it may take some time until the charge indicator is displayed.

natural_image
Close-up of a black cable with a connector inserted into a circular device (no visible text or symbols)When charging is complete disconnect the charger from the wall socket before removing the plug from the phone.

Operation of Battery Level Indicator
| While charging | Charging complete | |
| Phone on |  |  |
| Phone off |  |  |
NOTE: When the battery is deeply discharged, it may take some time (2 to 3 minutes) until charging starts.
Low Battery Power Warning
When the battery power is low, Battery Is Low message will be displayed. If this occurs during conversation, finish your call immediately. The power will automatically switch off after the warning tone. Fully recharge the battery. See "Charging the Battery" on this page. (Calls can be made and received while the phone is charging.)
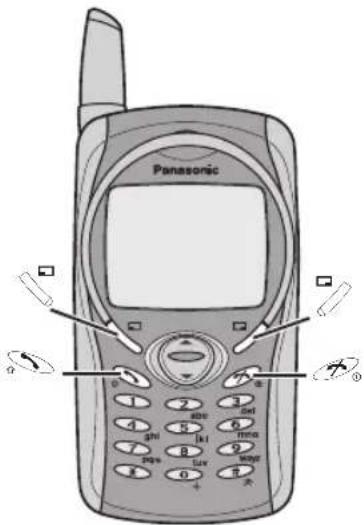
Keys & Displays
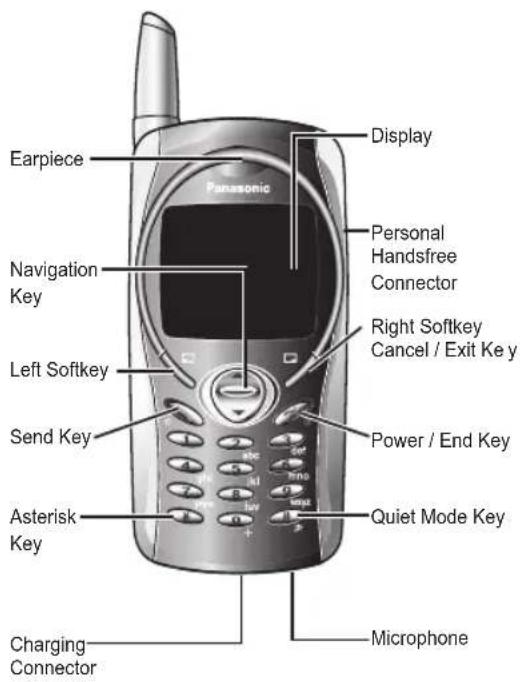
Keys
| Key | Function |
| Navigation Key: Scroll or move through menus, text and contacts. In idle mode, press to enter to the Shortcuts. | |
| Left Softkey: Perform the functions displayed above the key. In idle, press and hold to enter to the SMS menu. | |
| Right Softkey/Cancel or Exit key: Perform the functions displayed above the key. Mainly used to cancel and returned to the previous menu level, or to delete text/number entries. In idle, press and hold to enter the Profiles menu. | |
| Numeric key pads: Enter numbers. Press and hold one of the keys fromto make a Speed Dial. In text entry mode, enter text, numbers and characters. Press and holdto enter a “+” or “P”. When you need to dial an extension number, dial the phone number first and press and holdto add a “P” then enter the extension number. | |
| Send Key: Make a call or answer a call. In idle mode, check the last dialled list. | |
| Power/End Key: End/reject a call. During key operation, press to return to the previous display. In idle mode, press and hold to switch phone on/off. In Browser mode, press and hold to end Browser mode. | |
| Asterisk Key: In idle, press and hold to activate Browser. | |
| Quiet Mode Key: In idle, press and hold to switch the Mute Mode on and off. |
Display Status Icons
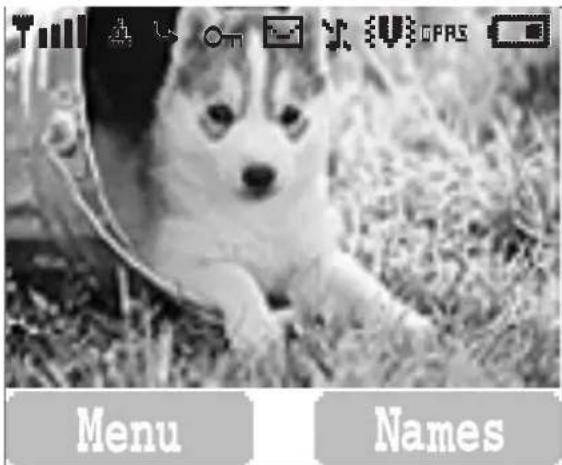
NOTE: All screen images in the manual are simulated.
The status icons are displayed or animated according to the currently activated functions. The Antenna, Signal and Battery icons are displayed when the handset is switched on and connected to a network. In the occasion of that network level is zero, the network icon will not be displayed.
| Icon | Indication |
| Registered to a non-home network - roaming | |
| Call divert is on | |
| Vibration alert is on | |
| Silent Mode is on | |
| Message area is full | |
| (Flashing) | Unread message is stored |
| On | Key Guard is enabled |
| Voice memo (SIM dependent) | |
| Indicates it is possible to make emergency call | |
| SIM supports CPHS and Line1 is selected in Phone Option menu | |
| Signal strength | |
| Battery full level:- low battery | |
| Alarm is set | |
| GPRS | GPRS is active |
| New voicemail message is received |
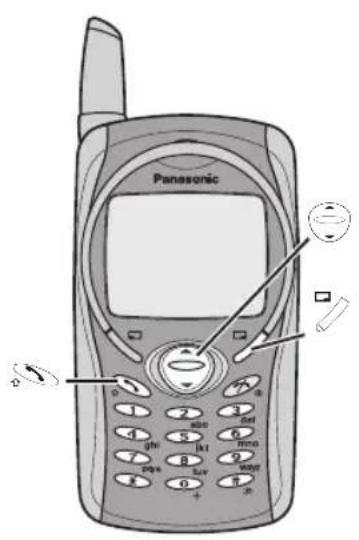
Symbols Used in the Manual Menu Display

Press the Navigation key in the direction indicated by the arrow.

Press Left Soft Key.

Press Right Soft Key.

Press numeric key pads.

Press to answer a call or call a dialled number.

Press to end a call or long press to switch the phone on/off.
The menu system provides the means for accessing the functions which do not have their own dedicated buttons on the keypad.
Entering to the Menu Display
From idle screen
1 (Menu)
The main menu display has 9 menu options.
(See "Menu Structure" on page 6.)
2 required menu (Select)
OR
pressing a numeric key will access a menu option directly.
Back to the Menu Display
_ repeatedly until the display goes back to the Menu display.
Menu Structure
The 9 main menus are as follows.

My Phone
1 Sounds
2 Display
3 Language
4 Alert Type
5 Profiles
6 User Messages
7 Auto Answer
8 Any Key Answer
9 Reset Defaults
10 Shortcuts
11 My Phonebook
12 T9 Input

Games (or STK) ^*
1 Fillip
2 Classic rally

Messages
1 Create
2 Inbox
3 Outbox
4 Archive
5 User Messages
6 Memory Status
7 Options
8 Broadcast

Phone Book
1 Browse
2 Create
3 Group Settings
4 Memory Status
5 My Numbers
6 Hot Key Dial
7 My Phonebook

Phone Option
1 Call Service
2 Call Divert
3 Security
4 Network
5 CSD Setting
6 GPRS Setting
7 GPRS Info

1 Start Browser
2 Bookmarks
3 Settings

Applications
1 Games
2 (STK) ^*
3 Scheduler
4 Clock
5 Calculator
6 Currency
7 Melody Composer
8 Sound Folder
9 Picture Folder

Key GuardBrowser

Records
1 Last Dialled
2 Answered
3 Unanswered
4 Erase Records
*STK(SIM Tool Kit) is SIM dependent.
Shortcut from Idle Screen
It is possible to enter the function directly from the Idle screen by pressing a key.
Short press
| Key | Function |
| [003A] | Menu |
 | Phonebook* (Names) |
| [2YW6] | Shortcuts |
 | Last dialled record list |
*The Phone must be registered with a network.
Long press
| Key | Function |
 | Hot key dial |
 | Browser* |
 | Silent mode |
| [2A5S] | Profile menu |
 | Power on/off |
 | Message Menu |
*The Phone must be registered with a network.
Phone Basics

Phone ON/OFF
1 Press and hold 📄 for 2 to 3 seconds.
2 Phone will display Idle mode.
3 Press and hold 📄 again to turn the power off.
Displaying Menu
From idle mode
to access Menu
Menu will be displayed.
(Menu may change depending on your SIM.)
Making Calls
• To make a call, start in Idle mode.
Standard Dialling
1 Enter phone number

• The dialled number is displayed.
2 When the other party answers, talk into the Microphone.
3 To hang up,

• The length of the call is displayed.
- When Max Cost is on, the remaining units will be displayed.
For setting the Max Cost, see "Setting the Maximum Cost:" on page 56.
Earpiece Volume:
During a call; ☐ to adjust earpiece volume
Phonebook Dialling
1 (Names)
2 required contact

Last Number Dialling
1
2 required contact
International Dialling
The international access code (+) and the destination country/region code should be entered, followed by the area code and phone number.
1 Press and hold + until “+” is displayed then enter country/region code.
2 Enter area code and phone number
NOTE: Many countries/regions include an initial "0" in the area code. This should, in most cases, be omitted when dialling international numbers. If you have difficulties making international calls, contact your service provider.
Emergency Call
To make an emergency call, the antenna ( ) must be present.
When SIM is inserted;
enter emergency number 112
When SIM is not inserted;
enter emergency number 112 OR
NOTE: Making Emergency calls without a SIM is country or network operator dependent.
(SOS) > "Emergency Call" (Yes)
Answering Calls

OR
When "Any Key Answer" is ON,
From Idle menu
press any key except
(See "Setting Any Key Answer" on page 25)
Ring Volume:
From My Phone menu
1 📋 Sounds > Volume 📋 (Select)
2 ⚫ Adjust the volume level ☐ (OK)
Quick Touch Silent Mode:
To quickly set the ring tone off and the vibrator on, press and hold in idle mode.
• (v) and ♪ will be displayed on the idle screen.
One Click Mute on Incoming Call:
To set the ring tone and the vibrator off,
1 (Mute)
If you want to reply the call,
2 (Reply)
- If you want to reject the call, (Reject).
In-Call Options
During a call, (Menu) or (Hold)
| Menu) | Hands Free Switch to Desktop Hands Free. | |
| Conference | Enable to make a conference call. You can talk with up to 5 parties. | |
| Call Transfer | Connect your calling party to the other party you are holding, then disconnect your line. (SIM dependent) | |
| Phone Book Open SIM Phonebook or Mobile Phonebook. | ||
| Messages | Create, check and send a message while you are talking.- see “Messages” on page 42. | |
| Call Status | (End) to disconnect a line with the activating party.(Hold) to put a call on hold with the activating party.To resume,(Back) again. | |
| (Hold) | Hold | Put a call on hold. To resume,(Back). (SIM dependent) |
Desktop Handsfree
Desktop Handsfree allows you to hold a conversation without holding the phone to your ear.
NOTE: Do NOT hold the phone to your ear in Handsfree mode.
During a Handheld call:
1 (Menu) 2 Hands Free (Select)
NOTE: You can also switch between Handheld and Handsfree by pressing and holding
To return to Handheld call:
(Menu) > (Select) to revert for Handheld operation
DTMF Tones
DTMF tones can be sent during conversation. These are often used to access voice mail, paging and computerised home banking. For example, you may need to input a number to access voice mail messages. A phone number may be stored in Phone Book with DTMF tones, allowing the number to be dialled upon recall and the DTMF number to be sent automatically.
Send DTMF Tones During a Call:
Enter digits ( ^0+ \~ ^9xyz , ^#x , ^*y )
Pause Dial
Using pauses allows you to send DTMF tones automatically.
1 Enter phone number.
2 Press and hold ^0+ until a P is displayed at the end of the phone number entered.
3 Enter DTMF digits after the pause, e.g. enter the number to access voice mail messages.
4
When the call is connected DTMF tones will be sent after 3 seconds.
Incoming Call While in a Call
NOTE: Call waiting must be on - see "Setting Call Waiting" on page 54. Call waiting is network dependent.
During a call, you may receive another call:
1 To answer another call, 📄 (First call is placed on hold.)
To disconnect another call, ☐ (Reject)
2 During a conversation with a second caller, (Menu) or (Swap) and select one from the following options:
| Menu) | Hands Free Switch to Desktop Hands Free. | |
| Conference | Enable to make a conference call. You can talk with up to 5 parties | |
| Call Transfer | Connect your calling party to the other party you are holding, then disconnect your line. (SIM dependent) | |
| Phone Book | Open SIM Phonebook or Mobile Phonebook. | |
| Messages | Create, check and send a message while you are talking.- see “Messages” on page 42. | |
| Call Status | (End) to disconnect a line with the activating party.(Hold) to put a call on hold with the activating party.To resume,(Back) again. | |
| (Swap) | Swap Switch | between two connected calls. |
To end a conference call and all connections:
Making a Second Call
During a call:
Enter second phone number or recall it from Phone Book 📋. The first call is put on hold.
NOTE: Making a second call is network dependent.
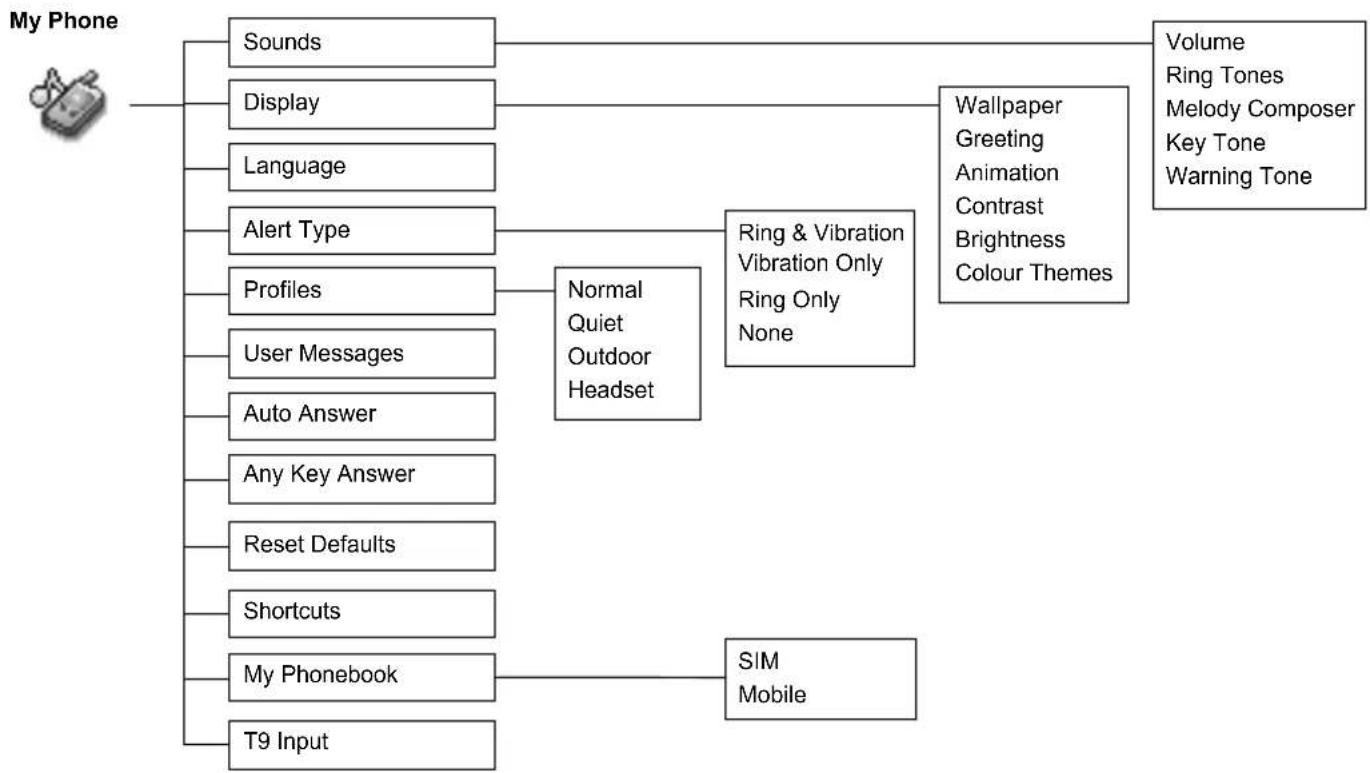
My Phone Menu Structure
flowchart
graph TD
    A["My Phone"] --> B["Sounds"]
    A --> C["Display"]
    A --> D["Language"]
    A --> E["Alert Type"]
    A --> F["Profiles"]
    A --> G["User Messages"]
    A --> H["Auto Answer"]
    A --> I["Any Key Answer"]
    A --> J["Reset Defaults"]
    A --> K["Shortcuts"]
    A --> L["My Phonebook"]
    A --> M["T9 Input"]
    B --> N["Normal Quiet Outdoor Headset"]
    C --> N
    D --> N
    E --> O["Ring & Vibration Vibration Only Ring Only None"]
    F --> O
    G --> O
    H --> O
    I --> P["SIM Mobile"]
    J --> P
    K --> P
    L --> P
    M --> P
    N --> Q["Wallpaper"]
    N --> R["Greeting"]
    N --> S["Animation"]
    N --> T["Contrast"]
    N --> U["Brightness"]
    N --> V Colour Themes
    O --> W["Volume"]
    O --> X["Ring Tones"]
    O --> Y["Melody Composer"]
    O --> Z["Key Tone"]
    O --> AA["Warning Tone"]
My Phone
Sounds
Changing the Volume......
From My Phone menu
1 Sounds (Select)
2 Volume (Select)
3 ⏻ Adjust the volume level 📋 (OK)
Changing the Ring Tone....
From My Phone menu
1 Sounds (Select)
2 Ring Tones (Select)
3 Any Call, Group Calls, Alarm or Messages (Select)
4 required ring tone (Select)
Composing a Melody ....
From My Phone menu
1 Sounds (Select)
2 Melody Composer (Select)
3 required MyMusic (Menu)
4 Edit (Select)
5 required track (Menu)
7 Save (Select)
6 Compose your melody - See the notes chart below > (Menu)
You can arrange the Tempo and select an instrument (Select Instrument) before saving.
Using the following table as reference, enter notes (from the choice of low, middle and high), rests, and duration to generate your composition.
Main Track and Sub Tracks are combined when you return to MyMusic.
| Key | 1 | 2abc | 3def | 4ghi | 5jkl | 6mno | 7pors | 8tuv |
| Func C D E F G A B Rep. | ||||||||
| Key | +O | *X | *# | |
| Func | Dotted note | Rest Duration Low # | Middle #High # | |
Rename a melody:
From My Phone menu
1 Sounds (Select)
2 Melody Composer (Select)
3 required music (Menu)
4 📋 Rename ☐ (Select)
5 Enter a name
• To erase a letter, ☐ (Clear).
- To erase all letters, press and hold 📋 (Clear).
6 (OK)
Set to Ringtone:
From My Phone menu
1 Sounds (Select)
2 Melody Composer (Select)
3 required music (Menu)
4 Set to Ringtone (Select)
Viewing a melody information:
From My Phone menu
1 Sounds (Select)
2 ⏻ Melody Composer 📋 (Select)
3 required music (Menu)
4 Info (Select)
Setting Key Tone....
From My Phone menu
1 📋 Sounds 📋 (Select)
2 Key Tone (On/off)
Setting Warning Tone....
From My Phone menu
1 Sounds (Select)
2 Warning Tone (On/off)
Display
You can change the wallpaper in idle mode.
Setting Wallpaper......
From My Phone menu
1 Display (Select)
2 📋 Wallpaper 📋 (Select)
3 required Wallpaper (Select)
4 (On/off)
You can create a greeting message that is displayed each time the phone is powered on.
You can change animation that comes up on the display when the phone is switch on.
1 📋 Display (Select)
2 Greeting (Edit)
3 Enter the Greeting (OK)
4 (On/off)
Setting Display Animation ....
From My Phone menu
1 📋 Display (Select)
2 📋 Animation □ (Select)
3 required Animation (Select)
Setting Display Contrast....
From My Phone menu
1 ☐ Display (Select)
2 Contrast (Select)
3 ☑ Adjust the contrast ☐ (OK)
Setting Brightness....
From My Phone menu
1 📊 Display (Select)
2 Brightness (Select)
3 required level (Select)
You can change the Colour Themes on the display.
Setting Colour Themes
From My Phone menu
1 ☑ Display □ (Select)
2 Colour Themes (Select)
3 required colour (Select)
Language
It is possible to change the language that the phone uses for display messages.
Changing the Language
From My Phone menu
1 Language (Select)
2 required language (Select)
When required, the phone can be set up to vibrate and/or ring when a call is received. You can change Alert Type:
- Ring & Vibration
- Vibration Only
- Ring Only
- None
You can switch between four profiles in your phone each with a distinct combination of alert method, ring tone, etc. Profiles are set up for use in different environments – for instance you might want to create Normal profile for everyday setting, Quiet profile with ring tone appropriate for formal occasions, Outdoor profile for loud environments and Headset profile with vibrator when it is difficult to hear the ring tone.
Alert Type
Changing Alert Type.
From My Phone menu
1 Alert Type (Select)
2 required Alert type (Select)
Profiles
Activating a profile.
From My Phone menu
1 Profiles (Select)
2 required profile (Menu)
3 ☑ Activate (Select)
Editing profiles.
Ring Volume
From My Phone menu
1 Profiles (Select)
2 required profile (Menu)
3 Change Settings (Select)
4 Ring Volume (Select)
5 ⏻ Adjust volume level 📋 (OK)
Key Tone
From My Phone menu
1 Profiles (Select)
2 required profile (Menu)
3 Change Settings (Select)
4 Key Tone (On/off)
Warning Tone
From My Phone menu
1 Profiles (Select)
2 required profile (Menu)
3 Change Settings (Select)
4 Warning Tone (On/off)
Vibrator
From My Phone menu
1 Profiles (Select)
2 required profile (Menu)
3 Change Settings (Select)
4 Vibrator (On/off)
Brightness
From My Phone menu
1 Profiles (Select)
2 required profile (Menu)
3 Change Settings (Select)
4 Brightness (Select)
5 Medium, High, Maximum or Low (Select)
User Messages
There are 10 pre-set common user messages and 5 empty spaces to create your own messages. You can also set User Messages at User Messages in Message menu. - see "Editing User Messages" on page 43.
Editing User Messages
From My Phone menu
1 User Messages (Select)
2 required message or empty space (Select)
3 Enter your message ☐ (Menu)
• To erase a letter, ☐ (Clear).
- To erase all letters, press and hold 📋 (Clear).
4 Save and Send or Save (Select)
5 When Save and Send is selected, enter destination phone number (OK)
NOTE: If the text is wider than the screen display, the text will scroll.
Auto Answer
Auto Answer can be set on. For use this function, Personal Handsfree Earpiece needs to be connected to the phone.
Setting Auto Answer
From My Phone menu
Auto Answer (On/off)
Any Key Answer
Calls can be answered by pressing any key (except ⚪).
Setting Any Key Answer
From My Phone menu
Any Key Answer (On/off)
Reset Defaults
All personal settings can be returned to their factory default settings.
Reset Defaults
From My Phone menu
1 Reset Defaults (Select)
2 "Restore Factory Settings?" ▼ (No) or ▼ (Yes)
Shortcuts can be selected from the following options: Browser, Games, Phone Book, Language, Alert Type, Sounds, Wallpaper, Profiles, Alarm, Calculator, Scheduler, Inbox, Create, Clock Setting and Currency
You need to select between SIM Phonebook or Mobile Phonebook for your ordinary use. You can also set My Phonebook at My Phonebook in Phonebook. - see "My Phonebook" on page 35.
When you create a text, this function helps to dramatically reduce the number of key presses.
Shortcuts
Setting Shortcuts.
From My Phone menu
1 Shortcuts (Select) 2 required shortcuts (On/off)
Access to Shortcuts:
From Idle mode
required shortcuts (Select)
My Phonebook
Setting SIM or Mobile Phonebook.
From My Phone menu
1 My Phonebook (Select) 2 SIM or Mobile (Select)
T9 Input
Setting T9 Input.
From My Phone menu
1 T9 Input (Select) 2 Set T9 Prefer on (On/off) 3 Input Language (Select) 4 required language (Select)
See "Shift mode" on page 51 for detail.
Games Menu Structure
Games (or STK)*
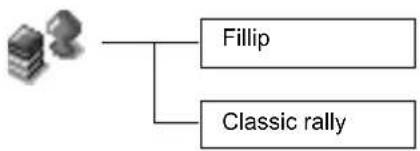
flowchart
graph TD
    A["Computer Icon"] --> B["Fillip"]
    A --> C["Classic rally"]
* STK (SIM Tool Kit) is SIM dependent.
Games
The parts are scattered far and wide and some are stuck in the treetops where aggressive mosquitoes and grouchy birds live, and some have fallen into the water, where they are guarded by fierce piranhas.
The car can slide in the turns if you drive too fast and behaves like a real car. Drive your car as fast as you can. When you pass all the stations, you will get a score.
Selecting Games
From Games menu

required game

(Select) from Fillip and Classic rally.
NOTE: Once the power is turned off, High scores or Best scores are lost.
Fillip ....
Key Operation:
4 ghl (move left), 6 mno (move right), 1 2 abc (jump), 1 (jump left), 3 def (jump right).
Starting Games:
Select Start game by using (or 2 abc (Up) and 8 tuw (Down)), then 5 iki (Select).
Classic rally ....
Key Operation:
^2 abc (Forward), ^4 ghi (Turn Left), ^6 mno (Turn Right), ^8 tuv (Backward) to move the car.
Starting Games:
1 Select Start Game by pressing any numeric key except
2 To choose your car, (or 4 ghi or 6 mno), then 5 jkl (Select).
To choose a race course, (or 4 or 6 ), then 5 (Select)
NOTE: If SIM card provides SIM Tool Kit services, this menu will become the STK Menu. You can still access Games from Applications.
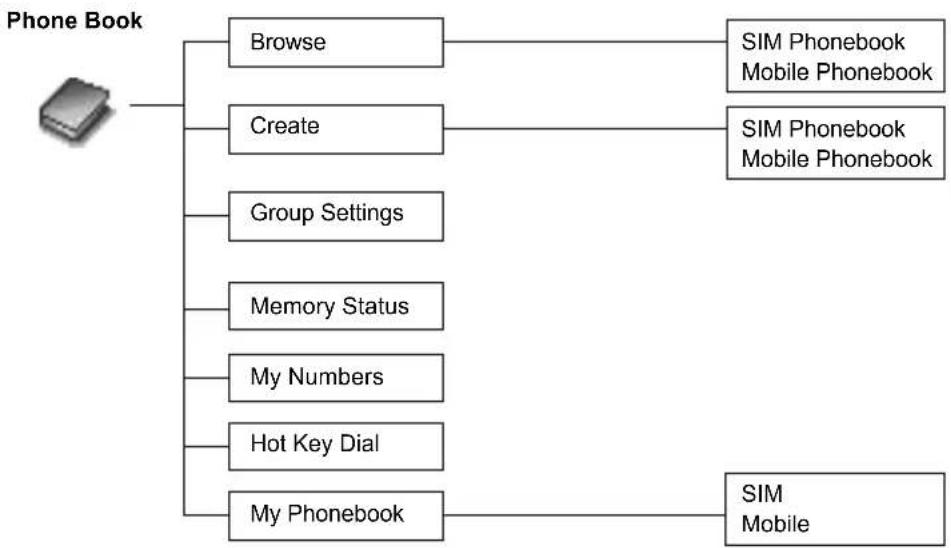
Phone Book Menu Structure
flowchart
graph TD
    A["Phone Book"] --> B["Browse"]
    A --> C["Create"]
    A --> D["Group Settings"]
    A --> E["Memory Status"]
    A --> F["My Numbers"]
    A --> G["Hot Key Dial"]
    A --> H["My Phonebook"]
    B --> I["SIM Phonebook Mobile Phonebook"]
    C --> J["SIM Phonebook Mobile Phonebook"]
    D --> K["SIM Phonebook Mobile Phonebook"]
    E --> L["SIM Phonebook Mobile Phonebook"]
    F --> M["SIM Phonebook Mobile Phonebook"]
    G --> N["SIM Phonebook Mobile Phonebook"]
    H --> O["SIM Phonebook Mobile Phonebook"]
Phone Book
Storing
Phone numbers can be stored in SIM or in your phone. In the SIM, you can store or select:
-Phone number
-Name
If you want to store a fixed dial number, see "Storing a Fixed Dial Number" on page 31.
In the phone, you can store: - Name
-3 Phone Numbers (Phone, office, mobile) -Caller's ID
-Groups
-Melodies
The entries can be grouped together and these are retained even if you damage the SIM.
Storing a Number in SIM
From Phone Book menu
1 Create (Select)
2 SIM Phonebook (Select)
3 Enter Name > Phone
4 (Save)
- "Saved in SIM" is displayed.
NOTE: The length and amount of data is SIM dependent.
Storing a Number in Mobile Phonebook.
From Phone Book menu
1 Create (Select)
2 Mobile Phonebook (Select)
3 Enter Name
4 Enter Phone number (Phone, Tel./office, Tel./mobile)
5 (Set) required Caller's ID Image (Select)
6 (Set) required group (Select)
7 (Set) required melody (Select)
8 When entries are completed, (Save)
- "Saved in Mobile" is displayed.
Fixed Dial is one of the function in SIM Phonebook. Only the numbers stored in FDN can be dialled.
To activate this function, you need to set Fixed Dial on. - see "Setting Fixed Dial" on page 60.
Storing a Fixed Dial Number......
To store a fixed dial number, you need to enter PIN2 code.
From Phone Book menu
1 Create (Select)
2 SIM Phonebook (Select)
3 Enter Name > Phone number
4 Location (Set)
5 FDN (Select)
6 (Save)
7 Enter PIN2 code
8 (OK)
You can search Phonebook by name.
Viewing
Browsing the Phone Book.
From Phone Book menu
1 📋 Browse > SIM Phonebook or Mobile Phonebook 📋 (Select)
2 Search the name you wish to browse 📋 (View)
Options in Phone Book
From Phone Book menu
1 Browse > SIM Phonebook or Mobile Phonebook (Select)
2 required contact (Menu)
The following options are available by pressing ☐ (Select)
| Edit Edit the selected Phone | Book entry. |
| Delete Delete the selected Phone | Book entry. |
| Delete All Delete all Phone | Book entries. |
| Copy to Mobile/SIM Copy a contact to Mobile/SIM Phonebook. | |
| Copy All to Mobile/SIM Copy all Phone Book to Mobile/SIM Phonebook. | |
| Search Search for a desired item in Mobile/SIM Phonebook by entering the name. | |
Group Settings
You can categorize the items stored in the Mobile
Phonebook into 5 groups;
Friends, Colleagues,
Family, Others and VIP.
You can select a particular ring tone for each group to identify the incoming call.
From Phone Book menu
1 Group Settings (Select)
2 required Group (Menu)
The following options are available by pressing ☐ (Select).
| View Group View Phone Book entry in the selected group. | |
| Set Ring Tone Set required | ring tone. |
| Remove Entries Delete all | Phone Book entries in the selected group. |
After selecting required Group in step 2, you can view a Phone Book entries by pressing ↗ (View). When there is no entry has been stored in the selecting group, "List Empty" is displayed.
The following options are available by pressing ☐ (Menu).
| Edit Edit the selected Phone Book entry. |
| Delete Delete the selected Phone Book entry. |
| Search Search for a desired item in the selected group by entering the name. |
Memory status shows how many locations are available in the Phone Book.
My Number is a handy phonebook where your names and phone numbers can be stored and viewed.
Memory Status
Viewing Memory Status.
From Phone Book menu
Memory Status (Select)
My Numbers
Setting My Numbers.
From Phone Book menu
1 My Numbers (Select)
2 required entry (Menu)
3 Edit (Select)
4 Enter your phone number
5 Enter your name ☐ (Save)
Viewing My Numbers
From Phone Book menu
1 My Numbers (Select)
2 required entry (View)
Phone numbers stored at locations 001 - 009 in the Phonebook can be dialled quickly.
Hot Key Dial
Setting Hot Key Dial....
From Phone Book menu
Hot Key Dial (On/off)
NOTE: This function is available only when a SIM is installed.
Making a Call by Using Hot Key Dial ....
From Idle mode
1 Press and hold a digit key (1\~9)
2 Press
My Phonebook
You need to select between SIM Phonebook or Mobile Phonebook for your ordinary use.
From Phone Book menu
1 My Phonebook (Select)
2 SIM or Mobile (Select)
- Please refer to "My Phonebook" on page 26.
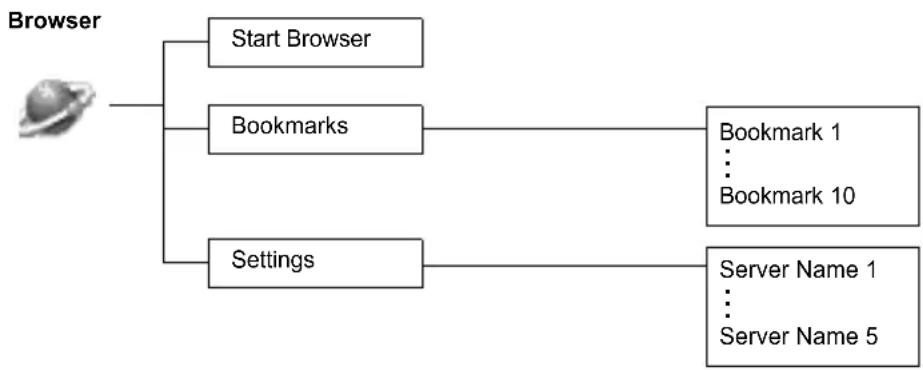
Browser Menu Structure
flowchart
graph TD
    A["Browser"] --> B["Start Browser"]
    A --> C["Bookmarks"]
    A --> D["Settings"]
    C --> E["Bookmark 1"]
    C --> F["..."]
    C --> G["Bookmark 10"]
    D --> H["Server Name 1"]
    D --> I["..."]
    D --> J["Server Name 5"]
Browser
The phone's WAP (Wireless Application Protocol) Browser enables you to access Internet services supported by the network, such as news, weather reports, sport etc.
Server Setting
Before Internet services can be accessed, you need to subscribe to your network operator or Internet Service Provider (ISP) to enable the relevant configuration information. Please contact your network service provider to ensure that your network settings are correct.
NOTE: Modifying previously entered settings can cause failure of the Browser.
From Browser menu
1 Settings (Select)
2 ⏻ to select required server ↗ (Edit)
Five server settings can be set up in the phone. If you find your server's name under the settings option, select the server and ☐ (Edit). If no settings are present contact your Network Service Provider for these settings. (Sever Name, IP Address, IP Port, Homepage, Linger Time, Select Mode)
NOTE: You need to set CSD Setting or GPRS Setting in Phone Option before setting the server information.
Those configuration Options will be given by your network service provider.
Once completing the entry, press 📄 (Save) then press 📄 (Activate).
The first time that the browser is activated there will be no content stored so the Home URL content will be displayed (as defined by the network operator). The Home URL will be recalled from the cache, each time the browser is activated. (Cache is the phone's memory that stores content downloaded in the past).
WAP Activating
From Browser menu
1 Start Browser (Select)
2 Please follow to the instructions on the display.
- While browsing a homepage, press 📋 and you can select the following menus.
• To end Browser, press and hold 📄.
| Home | Jump to the homepage which is set in Settings. |
| Bookmarks Select | one from your setting bookmarks and jump. |
| Save Items Save items in your browsing homepages. | |
| Reload Reload the browsing homepage. | |
| Go To URL Enter a | URL and jump to the homepage. |
| Show URL Display | the URL of the browsing page. |
| SnapShots Capture | the screen of your browsing page. |
| Advanced | Inbox, Restart Browser and About are available to select. |
| Settings | Scroll Mode, Downloads, Security and Send Referrer are available to set. |
Once you bookmark your favourite page, you can quickly jump to the page.
Bookmarks
Setting Bookmark
Entering URL from Browser menu:
From Browser menu
1 Bookmarks (Select)
2 required empty Bookmark (Menu)
3 Edit (Select)
4 Enter Title and URL (Save)
Setting Bookmark from Homepage:
1 > Bookmarks
2 Mark Site
3 Enter Folder and URL
4 (Save)
Browsing Bookmark
From Browser menu
1 Bookmarks (Select)
2 required Bookmark (Launch)
Key Guard
The Key Guard function is used to prevent any keys from being accidentally pressed e.g. when the phone is being carried.
Setting Key Guard
From Key Guard menu
(Yes) or (No)
- When Key Guard is enabled, O_T appears on the display.
• Emergency calls still can be made. - When a call is received Key Guard will be disabled temporarily, then you can answer the call.
NOTE: When making emergency calls with the "Key Guard" enabled, there will be no visual indication that the number is being dialled.
Disabling Key Guard
When On appears on the display,
1 (Free)
2 "Press OK to Free keypad" (OK)
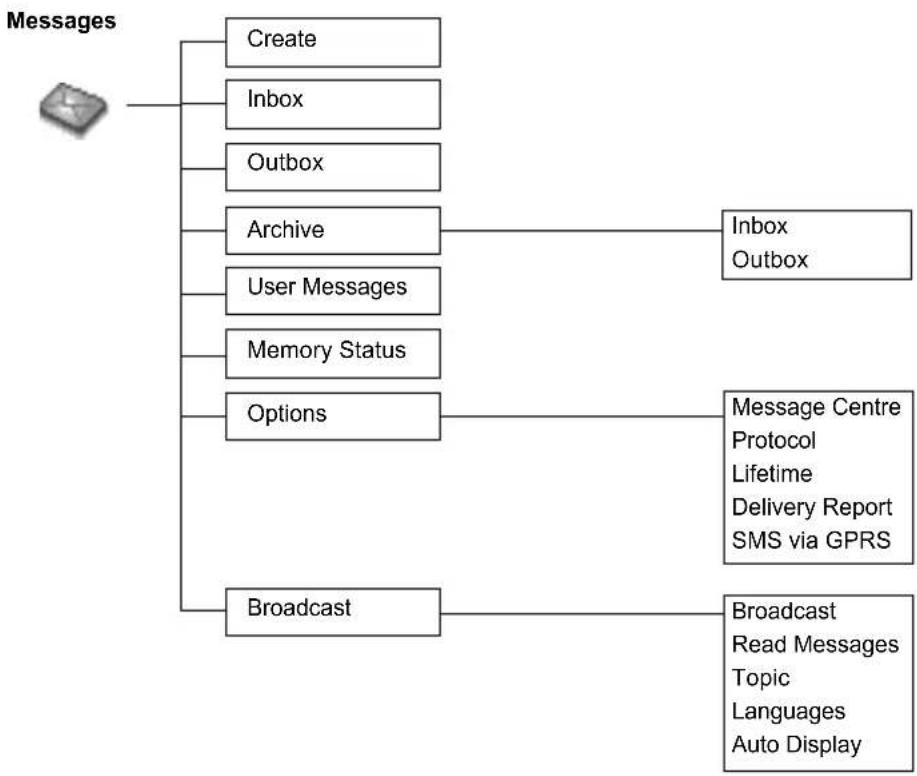
Messages Menu Structure
flowchart
graph TD
    A["Messages"] --> B["Create"]
    A --> C["Inbox"]
    A --> D["Outbox"]
    A --> E["Archive"]
    E --> F["Inbox Outbox"]
    E --> G["User Messages"]
    G --> H["Options"]
    H --> I["Message Centre Protocol Lifetime Delivery Report SMS via GPRS"]
    E --> J["Memory Status"]
    J --> K["Broadcast"]
    K --> L["Broadcast Read Messages Topic Languages Auto Display"]
Messages
It is possible to receive, display, edit and/or send text messages of up to 1520 characters in ten messages (depending on language), to the network that has a roaming agreement (depending on the recipient's phone Options). Before sending a message, you need to enter the Message Centre number into Options.
SMS
Setting the Message Centre Number.
From Messages menu
1 Options > Message Centre (Select)
2 Enter message centre number in international dial format
(see "International Dialling" on page 10) (OK)
NOTE: Your network operator may have pre-installed the number. Do not change this number as it may cause failure of SMS Messaging.
Creating a New Short Text Message
From Messages menu
1 Create (Select)
2 Create your text message – max. 1520 characters
(see "Text Entry" on page 50) (Menu)
3 📊 Send □ (Select)
4 Enter the destination phone number (OK)
OR
Recall a number from the Phonebook ↗ (Names) >
required name (Select) > (OK)
When you create a text, these options are available by 📄 (Menu).
| Send Send a text as Short Text message. | |
| Save Save a text in Outbox in SIM. | |
| Save and Send | Save a text in the Outbox in SIM and send. |
| Picture & Sound Add picture and/or sound to a text. | |
| User Messages Use a short message stored in the phone.For editing the User Message, see “Editing User Messages” below. | |
Editing User Messages....
From Messages menu
1 User Messages (Select)
2 required message (Select)
3 Edit the message (Menu)
Save and Send or Save (Select)
NOTE: When the text is wider than the screen display, the text will scroll.
When a Short Text Message is received, the message indicator will flash on the display and a user preset audible alert will sound. If you are in a call you will be alerted by the vibrator.
☑ashes when an unread message is received in the Inbox. When the Inbox is full, ☑will remain until old messages are deleted.
Reading a Received Message
From Messages menu
1 Inbox (Select)
2 required message (Read)
- Inbox: The received message will be stored in Inbox.
NOTE: If the message indicator is displayed constantly (does not flash), this means that the message area is full and you need to delete old messages in order to receive new messages.
While you are reading a message, the following options are available by ☐ (Menu).
| Delete Delete a message. | |
| Reply Create a replying SMS. | |
| Forward Forward a message to another phone. | |
| Edit Edit a message and save and/or send to another. | |
| Delete All Delete all messages in Inbox. | |
| Extract Number Extract numbers in messages and save in Phonebook. | |
| Move to Archive Move a message into Inbox in Archive. | |
| Hyper Link Link to a URL in a received message. |
Viewing Message Lists in Outbox....
To view message lists that are stored in SIM.
- Outbox: The transmitted message will be stored in Outbox.
From Message menu
1 ☑ Outbox ☐ (Select)
2 required message (Read)
While you are reading a message, the following options are available by 📄 (Menu).
| Delete Delete a message. | |
| Edit Edit a message and save and/or send to another. | |
| Send Send a SMS message after entering a recipient number. | |
| Delete All Delete all messages in Outbox. | |
| Extract Number | Extract numbers in messages and save in Phonebook. |
| Move to Archive Move a message from Outbox to Outbox in Archive. | |
Memory status shows how many locations are left to store messages in the Inbox.
Viewing Message Lists in Archive ....
To view message lists which are stored in Archive.
- Inbox: When a message in Inbox is saved, the message will be saved to Inbox in Archive.
- Outbox: When a transmitted message in Outbox is saved, the message will be saved to Outbox in Archive.
From Message menu
1 Archive (Select)
2 Inbox/Outbox (Select)
3 required message (Select)
While you are reading a message, the following options are available by ☐ (Menu).
| Delete Delete a message. | |
| Edit Edit a message and save and/or send to another. | |
| Forward (Inbox)/Send (Outbox) | Forward/Send a message to another phone. |
| Delete All Delete all messages in Inbox. | |
Viewing Memory Status....
From Messages menu
Memory Status (Select)
Options
Setting Options
From Messages menu

Options (Select)
NOTE: In the area where GPRS is not supported, SMS may not be sent when SMS via GPRS is on.
The following options are available:
| Message Centre Edit Message Centre number. | |
| Protocol | Select required Message Type from Standard Text, Fax, X.400, Paging, E-mail, ERMES, Voicemail. |
| Lifetime Select maximum or choose a time limit for sending messages. | |
| Delivery Report Request a delivery report on the status of a sent message. | |
| SMS via GPRS Send a Short Text message via GPRS. | |
Broadcast
You can receive your favourite information regularly from your service provider. You need to specify the "topic(s)" of information and the language that you wish to receive. To receive the broadcasts, "Broadcast" needs to be on.
Setting Broadcast.
From Messages menu
1 Broadcast (Select)
2 Broadcast (On/off)
Any topics will not appear without your registration.
Setting Topic.
From Messages menu
1 Broadcast > Topic > Current > (Select)
2 required Topic (Menu)
3 Add or Delete (Select)
Any topics will not appear without your registration.
Setting User defined Topic
From Messages menu
1 Broadcast > Topic > User Defined >
2 Enter Msg ID (OK)
3 Enter Name (OK)
4 Current (Select)
5
6 required Topic (Select)
1 📋 Broadcast > Topic > User Defined >
Setting Language
From Messages menu
1 Broadcast (Select)
2 📋 Languages (Select)
3 required Language (Select)
4 To continue to add languages;
Insert (Select)
To complete adding language;
Add to End (Select)
Viewing Broadcast
From Messages menu
1 Broadcast > Read Messages (Select)
2 To scroll to the available topics 📋 (Next)
NOTE: This function depends on your Network Service Operator.
Auto Display
Setting Auto Display
From Messages menu
1 Broadcast (Select)
2 Auto Display (On/off)
In idle mode, the latest Info Message is displayed on your phone automatically.
Text Entry
You can use alphanumeric characters to enter details into the Phonebook, to create text, etc.
| Key | Text Mode Numeric | ||
| T9®(T9Abc, T9abc, T9ABC)(Input language: English) | Multi tap(Input mode indicator: Abc, abc or ABC) | (0 ~ 9) | |
| Punctuation 1 Space 0 . , ? ! + - = : ¿i ” ; _ 0 | |||
| Punctuation 2 | 1 / ( ) < > [ ] { } % ~ & (1 / ( ) < > [ ] { } % ~ € &) | 1 | |
| A B C (a b c) | A B C 2 Ä (a b c 2 ä à ç) | 2 | |
| D E F (d e f) | D E F 3 É (d e f 3 é è) | 3 | |
| G H I (g h i) | G H I 4 (g h i 4 i) | 4 | |
| J K L (j k l) | J K L 5 (j k l 5) | 5 | |
| M N O (m n o) | M N O 6 Ö Ñ (m n o 6 ö ñ ò) | 6 | |
| P Q R S (p q r s) | P Q R S 7 (p q r s 7 β) | 7 | |
| T U V (t u v) | T U V 8 Ü (t u v 8 ü ù) | 8 | |
| W X Y Z (w x y z) | W X Y Z 9 Æ Ø Å (w x y z 9 æ ø å) | 9 | |
| Shift mode | Shift mode | Shift mode | |
| * Γ Δ Θ Λ ∩ Π Σ Φ Ψ Ω | * Γ Δ Θ Λ ∩ Π Σ Φ Ψ Ω | * | |
| Alternatives / (Hold) Space # £ ¥ α @ ^ | ← | Alternatives / (Hold) Space # £ ¥ α @ \S ^ | ← | # | |
Note: Displayed characters of T9 ^® vary depending on the selected input language.
Shift mode
Shift mode change
The Shift mode changes by pressing (within 1 sec)
| Multi tap Teglc | |
| Abc -> abc -> ABC ->123 T9Abc -> | T9abc -> T9ABC ->123 |
If Input mode is changed, Shift mode is initialised.
Auto capital change.
Auto capital affects Abc and T9Abc.
When Input mode is changed to Abc or T9Abc, the first character is input as upper case and subsequent letters as lower case.
When one of the following characters [. (Period) or ! or ?] is input before a space, the next character is input as upper case.
Tegic
User Dictionary of Tegic
When edit mode is finished, all words in the editor are registered in User Dictionary of Tegic.
Text Input
To switch On/Off T9 mode, press
T9 ^® Text Input
Using this mode of text input dramatically reduces the required number of key presses.
Press a key once for any letter you require on that key. The desired letter may not be displayed. Continue pressing other keys until the end of a word is reached; then check that the word has been typed correctly before continuing on to the next word. If the combination of letters typed has produced a word which is not the one you require, press repeatedly until the correct word is displayed. Continue to the next word.
Example of Text Input in T9 Mode
To type a new message, follow these steps:
-
At the beginning of a new message press and hold ↗ (Clear) to delete previous text, if necessary.
-
Press to change letter case, if necessary
-
Press 2 abc 2 abc 5 jkl 5 jkl "Call" is displayed.
Note that the displayed words change as you type, always type to the end of the word before editing.
T9® Languages can be selected from T9 Input -see "Setting T9 Input" on page 26.
If the word you require is not in the internal dictionary then it should be entered using the Multi tap (ABC) mode.
Other Text Modes
Select text mode (displayed in Information area on screen).
Multi tap mode (Abc, abc or ABC):
Each time a key is pressed in quick succession it displays the next character available on that key. Releasing the key or pressing another key enters the character displayed. The cursor moves to the next position.
In T9 (Abc) or Multi tap (Abc) mode, the first entered letter in a sentence is in upper case.
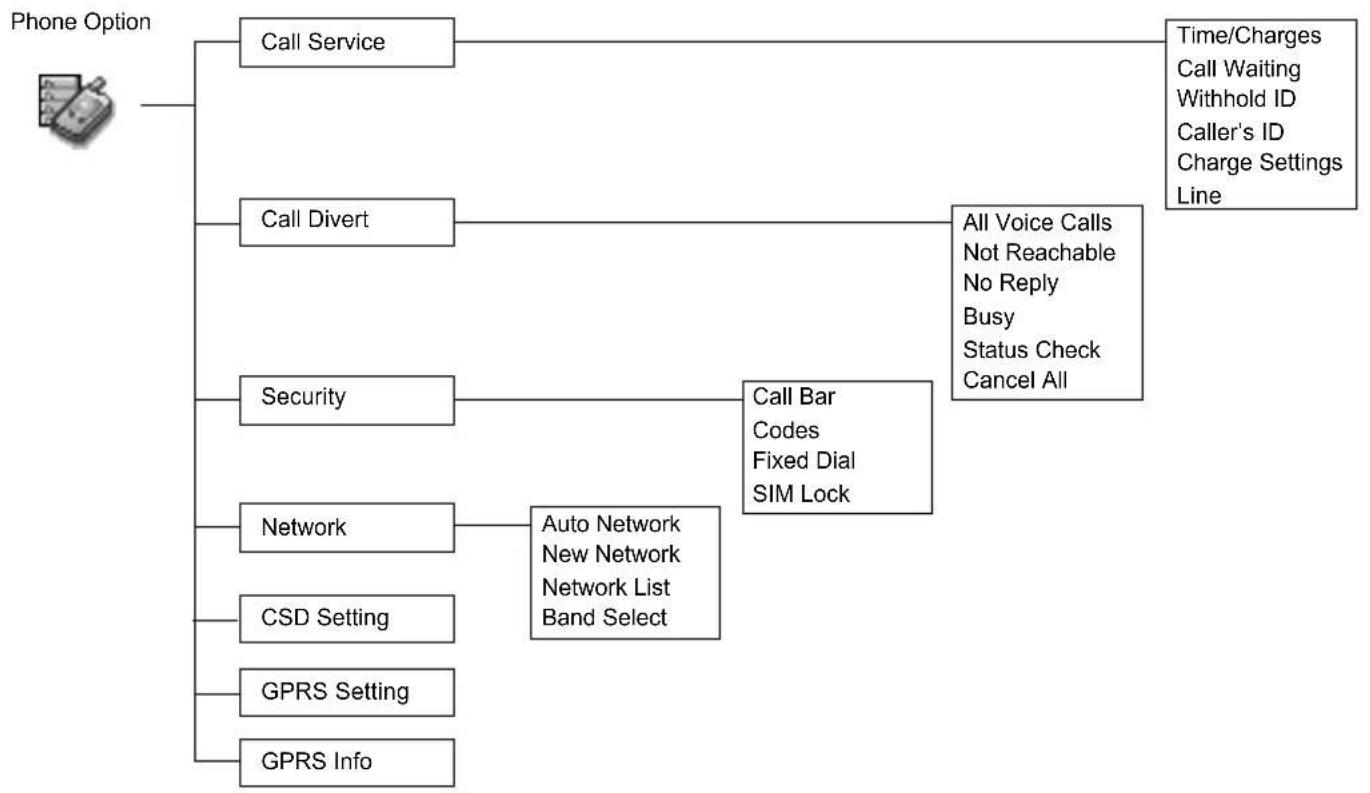
Phone Option Menu Structure
flowchart
graph TD
    A["Phone Option"] --> B["Call Service"]
    A --> C["Call Divert"]
    A --> D["Security"]
    A --> E["Network"]
    A --> F["CSD Setting"]
    A --> G["GPRS Setting"]
    A --> H["GPRS Info"]
    B --> I["Time/Charges\nCall Waiting\nWithhold ID\nCaller's ID\nCharge Settings\nLine"]
    C --> J["All Voice Calls\nNot Reachable\nNo Reply\nBusy\nStatus Check\nCancel All"]
    D --> K["Call Bar\nCodes\nFixed Dial\nSIM Lock"]
    E --> L["Auto Network\nNew Network\nNetwork List\nBand Select"]
Phone Option
Call Service
The duration of the Last Call and All Voice Calls will be displayed. When the Max Cost is on, the remaining units will be displayed.
Viewing Time/Charges
From Phone Option menu
1 Call Service > Time/Charges (Select)
2 required service Last Call, All Voice Calls or Cost Left (Select)
| Last Call Display the duration of Last Call. | |
| All Voice Calls Display the sum of the duration for the all voice calls. | |
| Cost Left | When Max Cost is on, display the remaining units. For setting the Max Cost, see “Setting the Maximum Cost:” on page 56. |
When Call Waiting is switched on, a second call can be received.
Setting Call Waiting
From Phone Option menu
1 Call Service > Call Waiting (Select)
2 Set (Select)
Withhold ID allows you to prevent showing your name and/or number to your calling party. You can also select Cancel or Check Status.
Setting Withhold ID
From Phone Option menu
1 Call Service (Select)
2 ⏻ Withhold ID 📋 (Select)
NOTE: When checking the status the phone must be registered with a network.
Caller's ID allows to display Caller's name and/or number on your display. You can also select Cancel or Check Status.
Setting Caller's ID.
From Phone Option menu
1 Call Service (Select)
2 📋 Caller's ID 📋 (Select)
NOTE: When checking the status the phone must be registered with a network.
Firstly, Personal rate must be entered. This is the cost that the Service Provider charges for one unit of call time.
Charge Settings
Setting Currency:
From Phone Option menu
1 Call Service > Charge Settings (Select)
2 Currency (Select)
Current Setting is displayed
3 (Set) > Enter PIN2 code (OK)
4 Enter currency units (max.3 characters) (OK)
NOTE: Charge Setting is SIM dependent.
In Idle mode, the latest Incoming call is displayed on your phone automatically.
NOTE: When you set the unit price, you will be asked to enter your PIN2.
NOTE: This function is SIM dependent.
You can set the maximum cost of calls allowed.
NOTE: The duration of one unit may vary between peak and off-peak times. Call charges can be calculated according to the calling time. However, the actual tariffs charged from your service provider may not be reflected in the calculation.
NOTE: This function is SIM dependent.
Setting Personal Rate:
From Phone Option menu
1 Call Service > Charge Settings > Personal Rate (Select)
2 (Set)
3 Enter PIN2 code (OK)
4 Press required personal rate (OK)
Setting the Maximum Cost:
From Phone Option menu
1 Call Service > Charge Settings (Select)
2 Max Cost (Set)
- Current setting is displayed.
3 (Edit) > Enter PIN2 code (OK)
4 ☐ (Set) > ⏻ On ☐ (Select)
5 Enter Credit Limit > (OK)
Setting Auto Display
From Phone Option menu
1 Call Service > Charge Settings (Select)
2 Auto Display (On/off)
This menu can be selected only when your SIM supports CPHS and Line 1/2.
NOTE: This function is SIM dependent.
Voice calls can be diverted using different situations and to different numbers. For example, you may wish voice calls to be diverted to voicemail box when the phone is switched off.
appears when you have received new voice mail messages. This service depends on your service provider.
Setting Phone Line
From Phone Option menu
1 Call Service > Line (Select)
2 Line 1/Line 2 (Select)
Call Divert
Setting Call Divert
From Phone Option menu
1 Call Divert (Select)
2 Select the circumstances to initiate the divert (Select) 3 required operation from Set, Clear, or Check Status (Select)
4 Enter phone number to divert to
- When a divert situation is enabled the divert icon () is displayed.
- When updating or checking the status of Call Divert the phone must be registered with a network. (T)
| All Voice Calls Divert all incoming voice calls. |
| Not Reachable When phone is disconnected, divert incoming voice calls. |
| No Reply If call is not answered, divert incoming voice calls. |
| Busy When a call is in progress, divert incoming voice calls. |
| Status Check Check the current Call Divert status. |
| Cancel All Cancel all Call Divert settings. |
Call Barring restricts certain outgoing and/or incoming calls using a password supplied by your service provider. When updating/checking the status of Call Bar the phone must be registered with a network.
Security
Setting Call Bar
From Phone Option menu
1 Security > Call Bar (Select)
2 required setting from the menus showing below (Set) or (Select)
3 required operation from Set, Clear or Check Status (Select)
4 Enter required password ☐ (Select)
| All Outgoing All Outgoing calls are barred. |
| Outgo Internat International Outgoing calls are barred. |
| Out.int.xhome International Outgoing calls except home are barred. |
| All Incoming All Incoming calls are barred. |
| When Roaming All internal incoming calls when roaming outside the home PLMN. |
| Status Check Call bar status is displayed. |
| Cancel All Cancel all Call Bar settings. |
| Password Change Call Bar Password. |
Codes
The PIN protects your SIM against unauthorised use. If you enable the PIN, every time the phone is switched on you will be prompted to enter the PIN.
The PIN2 controls security for the Fixed Dial Store, Call Charge metering and Barred Dial.
If either PIN/PIN2 is entered incorrectly 3 times the phone will be locked and you will need to enter the PUK/PUK2 code.
Contact the service provider for the PUK/PUK2 code.
NOTE: To enter PUK code for PIN, enter **05# you will then be prompted to enter the PUK code, then follow the on-screen instructions.
To enter PUK2 code for PIN2, enter **052# you will then be prompted to enter the PUK2 code, then follow the on-screen instructions.
Change Phonecode
From Phone Option menu
1 Security > Codes (Select)
2 Change Phonecode (Select) > Enter the current Phonecode, if needed (OK)
3 E n t New Phonecode (OK) > Repeat the entry (OK)
Enabling/Disabling the PIN
From Phone Option menu
1 Security > Codes (Select)
2 PIN Control (Set)
3 E n t RIN number (OK) > Repeat the entry (OK)
Changing the Security Code.
From Phone Option menu
1 Security > Codes (Select)
2 Change PIN or Change PIN2 (Select)
3 Enter the current code (OK)
4 Enter the new code (OK)
5 Enter the new code to verify (OK)
NOTE: If the PUK/PUK2 code is entered incorrectly 10 times, the phone will cease to operate permanently. All information stored in the SIM will be lost and the SIM will need to be replaced. Contact the service provider for more details.
Fixed Dial is one of the functions in SIM Phonebook. Only numbers stored in your SIM Phonebook can be selected for FDN dialling. To enter fixed dial numbers, see "Storing a Fixed Dial Number" on page 31.
Setting Fixed Dial
From Phone Option menu
1 Security (Select)
2 Fixed Dial (Select)
3 Enter PIN2 code (OK)
4 ☐ (FDN) > ⏱ On
5 (OK)
- Any manually dialled phone numbers must be the same as the numbers in the Fixed Dial Store.
- A phone number may be stored, edited or deleted. You will be prompted for your PIN2 code.
Setting SIM Lock
From Phone Option menu
1 Security (Select)
2 SIM Lock (Select)
3 Enter Phonecode (OK)
NOTE: You are advised to write down your Phonecode. In case you forget your phonecode, you will need to contact your service provider to unlock the SIM.
Network
You can select a network that is available in your current location.
NOTE: This function is AWS SIM dependent.
Network setting
From Phone Option menu
| 1 | Network (Select) |
| 2 | required option (On/off) or (Select) |
| Auto Network Set “Auto Network” On or Off. | |
| New Network | When “Auto Network” is on; Search an available network automatically. When “Auto Network” is off; Select a network manually. |
| Network List Create and edit a network list according to your preferences. | |
| Band Select Choose a network band: 900/1800, 900/1900, 900, 1800, 1900MHz. | |
You need to complete CSD setting before setting your server.
- see "Server Setting" on page 37.
CSD Setting
Connection Setting
You can set CSD setting when connecting to network.
From Phone Option menu
| 1 | CSD Setting | (Select) |
| 2 | required setting | (Select) |
| 3 | when all the data are entered, | (Save) |
| Server Name Enter Server Name. | |
| Call Type Select ISDN | or Analogue. |
| Dial Number Enter the | common numbers in Digital and Analogue. |
| Login Name Enter Login ID. | |
| Password Enter Password. | |
GPRS Setting
You need to complete GPRS setting before setting your server. - see "Server Setting" on page 37.
Connection Setting
You can set GPRS setting when connecting to network.
From Phone Option menu
1 GPRS Setting (Select)
2 required setting (Select)
3 when all the data are entered, (Save)
- When GPRS setting is completed, the GPRS icon ( ) is displayed.
| Server Name Enter Server Name. |
| GPRS APN Enter Access Point Name. |
| Login Name Enter Login ID. |
| Password Enter Password. |
| Authentication Select Active or Deactive. |
GPRS Info
Viewing GPRS Information.
From Phone Option menu
1 GPRS Info (Select)
2 To reset GPRS Info;
☐ (Reset) > ☐ (Yes)
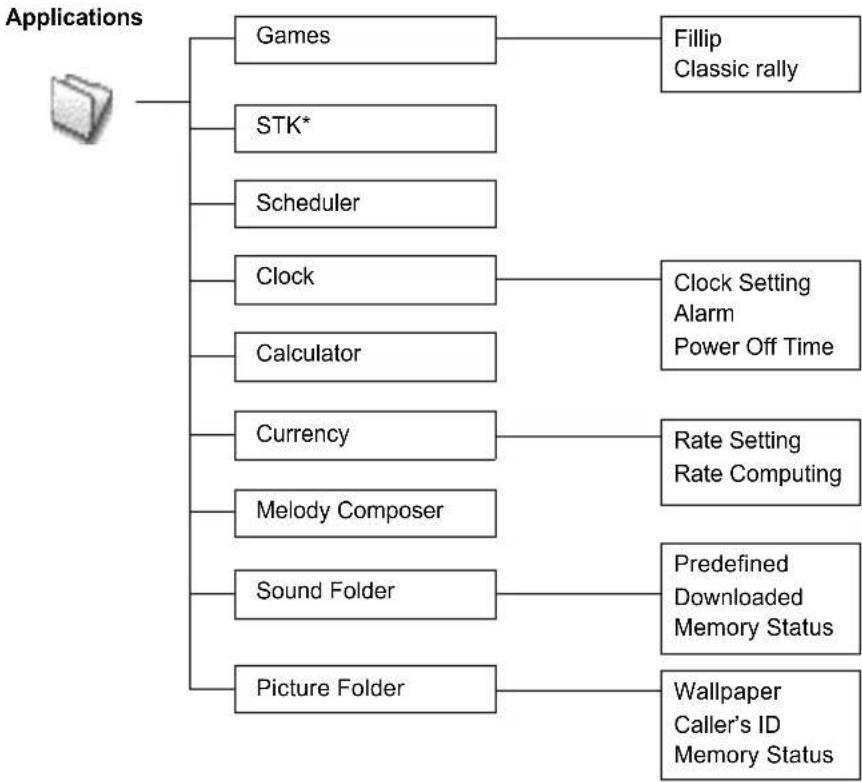
Applications Menu Structure
flowchart
graph TD
    A["Applications"] --> B["Games"]
    A --> C["STK*"]
    A --> D["Scheduler"]
    A --> E["Clock"]
    A --> F["Calculator"]
    A --> G["Currency"]
    A --> H["Melody Composer"]
    A --> I["Sound Folder"]
    A --> J["Picture Folder"]

    B --> K["Fillip Classic rally"]
    C --> L["Clock Setting Alarm Power Off Time"]
    D --> M["Rate Setting Rate Computing"]
    E --> N["Predefined Downloaded Memory Status"]
    F --> O["Wallpaper Caller's ID Memory Status"]
    G --> P["Rate Setting Rate Computing"]
    H --> Q["Predefined Downloaded Memory Status"]
    I --> R["Wallpaper Caller's ID Memory Status"]
    J --> S["Wallpaper Caller's ID Memory Status"]
*NOTE: STK (SIM Tool Kit) is SIM dependent.
Applications
Games
From Applications menu
1 Games (Select)
2 required game (Select).
- Please refer to "Games" on page 28.
STK (SIM Tool Kit)
This function is SIM dependent.
Scheduler
You can organize your schedule to remind your personal event, such as planning holiday period. You need to set clock first before entering to the scheduler. In the Scheduler, you can store:
-Type (Memo or Meeting)
-Description
-Start Date
-Start Time
-End Date
-End Time
NOTE: Ensure that the setting of the Scheduler will not contravene any regulations whereby it may automatically power on when in an aircraft or medical facility, etc. - see Important Information in Part 2.
Entering a Schedule ....
From Applications menu
1 📋 Scheduler (Select)
2 to select Week or Month format
3 To select a day, press numerical keys 2, 8, 4 and 6 to move the cursor , , and , or to move the cursor or to set a day. > (Agenda)
4
5 E n t required information
6 (Save)
Viewing / Editing Scheduler
From Applications menu
1 Scheduler (Select)
2 to select Week or Month format
3 When Month format is selected:
Select a day marked in blue by using the numerical keys (2, 8, 4 and 6) > (Agenda)
When Week format is selected:
Schedule icon(s) will be shown corresponding to a period of time selected by pressing ⏻.
(Period of time: 4=0:01-4:00, 8=4:01-8:00, 12=8:01-12:00, 16=12:01-16:00, 20=16:01-20:00, 24=20:01-0:00)
Select a day by using the numeric keys (2, 8, 4 and 6) > (Agenda)
required schedule (View)
5 To return to the previous display, (OK)
To edit, ☐ (Edit) edit required information ☐ (Save)
Clock
Before setting Time & Date, set Time Zone of your region or the city which has same time zone as your region. When travelling abroad, your home time can be changed to your destination time.
Time Zone Setting..
From Applications menu
1 Clock > Clock Setting > Time Zone (Select)
2 required region (Select)
3 (Yes) or (No) to select "Day Light Saving?"
4 " Set This City to Local" (OK)
5 "Success!" (OK)
Time & Date Setting
From Applications menu
1 Clock > Clock Setting > Time & Date (Select)
2 ☐ (Set) enter the digits for the time ☐ (OK)
Time and date can be shown on the display in idle mode.
Time Display Setting
From Applications menu
1 Clock > Clock Setting (Select)
2 📋 Display Time 📋 (On/off)
Display format for time and date can be selected.
Date Format/Time Format....
From Applications menu
1 Clock > Clock Setting > Date Format or Time Format (Select)
2 required format (Select)
Alarm Setting ....
From Applications menu
1 Clock > Alarm (Select)
2 ☐ (Set) > Enter the digits for the time (24 hour clock) ☐ (OK)
3 Select from Repeat Daily, Once or Disabled (Select)
4 "Alarm Time Has Been Updated!" (OK)
• Alarm set indicator appears on idle display.
- When the set time is reached, the alarm will sound. When in a call the phone will vibrate.
To end alarm:
Press any key or (OFF) OR (Pause) to pause the alarm and start again after 5 minutes
NOTE: Ensure that the setting of the Alarm will not contravene any regulations whereby it may automatically power on when in an aircraft or medical facility etc. - see Important Information in Part 2.
The phone can be set to turn itself off automatically at a specified time using the Power Off feature. The procedure for setting/adjusting the Power Off automatically is similar to the setting of Alarm.
Power Off Time
From Applications menu
1 Clock > Power Off Time (Select)
2 Enter the digits for the time (24 hour clock) (OK)
3 Select from Repeat Daily, Once or Disabled (Select)
4 " Power Off Time Setting Updated!" (OK)
Calculator
The four function calculator will enable the user to perform simple arithmetic calculations (addition, subtraction, multiplication and division).
From Applications menu
1 📋 Calculator 📋 (Select)
2 Enter a number (maximum 7 digits) and it will be displayed on the upper right of the display. When a decimal point is required, press 第 , when a minus sign is needed press * .
3 to select the arithmetic operation
4 Enter a number (maximum 7 digits) and it will be displayed next to the operation symbol.
If is used to select another arithmetical operation to perform, an intermediate calculation will be performed and the result displayed on the top line.
5 (=) to calculate
Currency
The currency convertor enables you to convert from/to a home currency using a conversion rate that you enter.
Setting the currency value
From Applications menu
1 Currency (Select)
2 Rate Setting (Select)
3 On the right side of the screen, enter your home currency rate to the currency which you want to convert with (OK)
4 (Save)
Rate Computing.
From Applications menu
1 Currency (Select)
2 Rate Computing (Select)
3 E n t ter amount of currency which you want to convert into your
home currency (Convert)
Melody Composer
Please refer to "Composing a Melody" on page 17.
The Sound Folder contains predefined sound files and any downloaded sound files. You can play the sound and set one as your Ringtone.
The memory status is dependant on file sizes stored in the Melody Composer, Picture Folder and Sound Folder.
Sound Folder
Setting Ringtone:
From Applications menu
1 Sound Folder (Select)
2 Predefined or Downloaded (Select)
3 required sound (Menu)
• To see the information of the selected Ringtone, Info (Select)
• To return to the previous menu, (OK)
4 Set to Ringtone (Select)
Viewing Memory Status:
From Applications menu
1 Sound Folder (Select)
2 Memory Status (Select)
• Free Space and Total Used are displayed.
• To return to the previous menu, (OK)
Picture Folder
You can find lists of predefined pictures and downloaded pictures in both Wallpaper folder and Caller ID folder. You can view those pictures, and also set one of them for the idle screen.
The memory status is dependant on file sizes stored in the Melody Composer, Picture Folder and Sound Folder.
Setting Wallpaper:
From Applications menu
1 📋 Picture Folder 🎥 (Select) > 🌐 Wallpaper 🎥 (Select)
2 Predefined or Downloaded (Select)
3 required picture (Menu)
• To see the large picture, ☑ View ☐ (Select)
- To return to the previous menu, 📋 (Back)
4 Set to Wallpaper (Select)
Viewing Picture of Caller's ID:
From Applications menu
1 📋 Picture Folder 🖱️ (Select) > 🔺 Caller's ID 🖱️ (Select)
2 Predefined or Downloaded (Select)
3 required picture (Menu)
4 View or Info (Select)
- To return to the previous menu, 📋 (Back)
Viewing Memory Status:
From Applications menu
1 Picture Folder (Select)
2 Memory Status (Select)
• Free Space and Total Used are displayed.
• To return to the previous menu, (OK)
Records Menu Structure
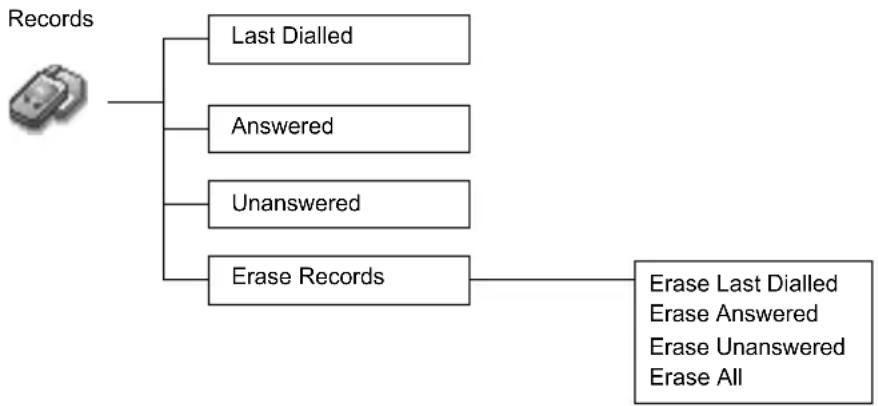
flowchart
graph TD
    A["Records"] --> B["Last Dialled"]
    A --> C["Answered"]
    A --> D["Unanswered"]
    A --> E["Erase Records"]
    E --> F["Erase Last Dialled\nErase Answered\nErase Unanswered\nErase All"]
Records
Recently dialled phone numbers will be stored in Last Dialled. (Max 50)
If an Incoming call with Caller ID is answered the number will be stored in Answered. (Max 50)
If an Incoming call with Caller ID is not answered the number will be stored in Unanswered. (Max 20)
Calling for the Last Dialled/Answered/Unanswered number......
From Records menu
1 Choose one menu from Last Dialled, Answered or Unanswered (Select)
2 required phone number (or name) you wish to redial
OR
In idle, ⚡ to view the last dialled numbers directly.
To save a record in Phonebook:
After selecting desired number,
Menu) > Save (Select) > SIM Phonebook or Mobile Phonebook (Select) Enter Name and Phone number (Save).
NOTE: When the store is full the next phone number will overwrite the oldest.
Erasing Records
From Records menu
1 ÷ Erase Records (Select)
2 Choose one menu from Erase Last Dialled, Erase Answered,
Erase Unanswered or Erase All (Select).
3 (Yes)
Troubleshooting
Should any problem persist contact your dealer.
| Problem Cause Remedy | ||
| Phone will not switch on. | ____ | Check that the battery is fully charged and correctly connected to the phone. |
| Extremely short battery life for a new battery. | The network you are using and the condition of the battery can affect battery life. | ____ |
| Short battery life for an old battery. | The battery has worn out. Replace with a new | fully charged battery. |
| The charging indicator does not light, the battery level indicator does not appear and the phone cannot be switched on when charging. | The battery is not attached to the phone or when the battery has been deeply discharged the phone will take a short time until the indicator lights. | Leave the phone charging the battery for a few minutes before the indicator is lit and attempting to switch it on. |
| Battery fails to charge. | The battery is not attached to the phone. | Ensure the battery is fitted to the phone prior to commencing charging. |
| Battery has been connected to the phone after the Fast Travel Charger has been switched on. | ||
| Calls cannot be made. | The phone is locked. Unlock the phone. | |
| Outgoing calls are barred. | Disable the outgoing call barring or barred dial. | |
| The phone is not registered to a network. | Move to a coverage area and operate your phone after it has registered with a network. | |
| Calls cannot be made from Fixed Dial Store. | —— | Check whether your SIM supports Fixed Dial.Check if the Fixed Dial is switched on.Check whether the phone number is stored in the Fixed Dial. |
| Calls cannot be received. | The phone is not switched on. Switch the phone on. | |
| Incoming calls are barred. Disable the incoming call barring. | ||
| The phone is not registered to a network. | Move to a coverage area and operate your phone after it has registered with a network. | |
| Emergency calls cannot be made. | You are not in a GSM coverage area. | Check that the antenna symbol ⬆ is displayed – move to a coverage area and operate your phone when the antenna symbol is displayed. |
| Phone numbers cannot be recalled from Phonebook. | The phone is locked. Unlock the phone. | |
| Phone number has been restricted. Switch off restriction. | ||
Important Error Messages
These are some of the most important error messages which may be displayed:
| Please Insert SIM Card SIM card is not inserted, or is not inserted correctly. Please insert the SIM card correctly. | |
| New Codes Not Same When you change your password, you have to enter the new password twice to confirm. The two codes you entered are not same. Please enter same code twice. | |
| Password Invalid! When you change your password, you have to enter the new password twice to confirm. The two codes you entered are not same. Please enter same code twice. | |
| Can’t Access Network The service network you selected manually is inaccessible. Please contact your service provider. | |
| Unable to Select Network The service network you selected manually refuse your access. Please contact your service provider. | |
| No Service There is no network within range or the received signal is weak. Move to an area which has stronger signal. | |
| PIN Blocked! Please Enter PUK You entered your PIN or PIN2 incorrectly three times in a row. To unblock the PIN, please enter PUK1 or PUK2. | |
| PIN2 Blocked! Please Enter PUK2 You entered your PIN or PIN2 incorrectly three times in a row. To unblock the PIN, please enter PUK1 or PUK2. | |
| New PIN Not Accepted Your new PIN code is not accepted. Please try again. | |
| New PIN2 Not Accepted Your new PIN2 code is not accepted. Please try again. | |
| Incorrect Entry! You entered wrong PIN or PIN2. Please enter the correct one. | |
| Entries Do Not Match! When you change your password, you have to enter the new password twice to confirm. The two codes you entered are not same. Please enter same code twice. | |
| SIM Card Error Make sure the SIM card is inserted correctly. Clean the SIM card with a dry cloth or check if it is damaged. Contact your service provider. | |
| Function Unsupported The function you selected is not supported your service provider.Please contact your service provider. | |
| Invalid Password The password that you entered is not valid. Please enter the correct password. | |
| Not Available The function you selected is not supported by your service provider. Please contact your service provider. | |
| Service Not Available The function you selected is not supported by your service provider. Please contact your service provider. | |
| Wrong PUK! You entered wrong PUK. Please enter the correct one. | |
| SIM Full! Please Delete Old Message! | The SIM storage area for SMS is full. Please delete old messages. |
| SIM Not Enough Space! Continue? | The SIM storage area is FULL. If you continue data may be lost. Please delete old records. |
| Not Enough Space! Continue? | The message storage area is FULL. If you continue data may be lost. Please delete old records. |
| SIM Service Not Support The SIM function you selected is not supported by your service provider. Please contact your service provider. | |
| Unregistered SIM Card Your SIM card is not registered to your service provider. Please contact your service provider. | |
| Authentication Failure Your SIM card is not registered to your service provider. Please contact your service provider. | |
| Blocked Your SIM card is blocked. Please contact your service provider. | |
Glossary of Terms
| APN Access Point | Name. Directs the user to the gateway or the required service. |
| CHAP | Challenge Handshake Authentication Protocol. A security feature for the GPRS network. |
| CSD | Circuit Switched Data. A communication method used to transmit data over telephone connections. |
| DTMF Tones | Dual Tone Multi-Frequency tones allow you to communicate with computerised phone systems, voice mailboxes, etc. |
| EMS | Enhanced Messaging Services. One of the mail systems which use the cellular phone, and service by which data of e-mail of the text, etc. can be transmitted and received. |
| GPRS | General Packet Radio Service. A GSM transmission technique that transmits and receives data in packets rather than setting up a continuous channel. It makes very efficient use of available radio spectrum and users pay only for volume of data sent and received. |
| GSM | Global System for Mobile communications. The name given to the advanced digital technology that your phone uses. |
| Network Operator | The organization responsible for operating a GSM network. |
| PAP Password Authentication Protocol. A security feature in the GPRS network. | |
| Password Used for the control of Call Bar. Supplied by your service provider. | |
| PIN | Personal Identification Number used for SIM security. Supplied by your service provider. If the PIN is entered incorrectly 3 times, the PIN will be blocked. |
| PIN2 | Personal Identification Number used for the control of Fixed Dial Store and Call Charge metering. If the PIN2 is entered incorrectly 3 times, the PIN2 will be blocked. |
| PUK/PUK2 | PIN/PIN2 Unblocking Key. Used to unblock the PIN/PIN2. Supplied by your service provider. If the PUK/PUK2 is entered incorrectly 10 times, the PUK/PUK2 will be blocked. |
| Registration | The act of locking on to a GSM/GPRS network. This is usually performed automatically by your phone. |
| Roaming The ability to use your phone on networks other than your Home network. | |
| Service Provider | The organization responsible for providing access to the GSM/GPRS network. |
| SIM | Subscriber Identity Module. A small smart-card which stores unique subscriber and user-entered information such as Phonebook and Short Messages. Supplied by your service provider. |
| SMS | Short Message Service. A basic mail system used for cellular phones. This service allows sending/receiving short text messages. |
| WAP | Wireless Application Protocol. The communication standard which enables you to download resources from the Internet to your phone. |
Accessories
Li-Ion Battery (EB-BSG50S)

Double your talk time by having a spare battery.
Fast Travel Charger (EB-CAD55UK)
natural_image
Pure electrical plug and connector diagram without any text or symbolsCarry a lightweight portable charger wherever you go to ensure you always have power to talk.
Fast Travel Charger (EB-CAD55EU)
natural_image
Pure electrical plug and connector diagram without any text or symbolsHow to Identify a Genuine Panasonic Accessory
Panasonic produces some of the most advanced mobile phones available. So, as you'd expect from this class leader, the range of accessories are second to none. Most genuine Panasonic accessories will have a label showing an "EB-XXX00" model number.
NOTE: Accessories are subject to change without notice.
Personal Settings
| Item Provisioning Information Setting No. 1 | Provisioning Information Setting No. 2 | Provisioning Information Setting No. 3 | Provisioning Information Setting No. 4 | Provisioning Information Setting No. 5 |
| Profile Name | ||||
| Server Name | ||||
| IP Address | ||||
| IP Port | ||||
| Homepage | ||||
| Linger Time | ||||
| Circuit Switched (CSD) | ||||
| Server Name | ||||
| Call Type | ||||
| Dial Number | ||||
| Login Name | ||||
| Password | ||||
| Packet Switched (GPRS) | ||||
| Server Name | ||||
| GPRS APN | ||||
| Login Name | ||||
| Password | ||||
| Authentication | ||||
| The Serial Number can be found on the outside of the phone under the battery. For your convenience we recommend that you note the following details as a record of your purchase. | |
| Part Number | |
| Serial Number | |
| Dealer Name | |
| Purchase Date | |
Index
A
Access to Shortcuts 26
Accessories 81
Activating a profile 22
Alarm Setting 67
Alert Type 22
Answering Calls 11
Any Key Answer 25
APN 79
Applications 64
Applications Menu Structure 63
Attaching and Removing the Battery 1
Auto Answer 25
Auto capital change 51
Auto Display 49
B
Back to the Menu Display 5
Battery 1
Bookmarks 39
Brightness 24
Broadcast 48
Browser 37
Browser Menu Structure 36
Browsing Bookmark 39
Browsing the Phone Book 32
C
Calculator 68
Call Divert 4,57
Call Service 54
Changing Alert Type 22
Changing the Language 21
Changing the Ring Tone 16
Changing the Security Code 59
Changing the Volume 16
Charge Settings 55
Charger 2
Charging the Battery 2
Classic rally 28
Clock 66
Codes 59
Composing a Melody 17
Connection Setting 61, 62
Connectivity 61, 62
Creating a New Short Text Message 42
CSD Settings 61, 62
D
Date Format/Time Format 67
Disabling Key Guard 40
Display 4,24
E
Editing profiles 22
Editing Scheduler 65
Editing User Message 43
Editing User Messages 24
Emergency call 4
Enabling/Disabling the PIN 59
Entering to the Menu Display ....5
F
Fillip 28
Fitting and Removing the Battery ....1
G
Game Menu Structure ......27
Games 28,64
Getting Started ....1
H
Headset 22
Hot Key Dial 35
K
Key Guard 40
Key Operation 28
Key Tone 23
Keys 3
Keys & Displays ....3
L
Long press 7
Low Battery Warning 2
M
Making a Call by Using Hot Key Dial 35
Melody Composer 69
Memory Status 34
Menu Display 5
Menu Structure 6
Messages 42
Messages Menu Structure 41
My Numbers 34
My Phone 16
My Phone Menu Structure 15
My Phonebook 26,35
N
Network 61
Network setting 61
Normal 22
Numeric key pads 3
0
Operation of Battery Level Indicator 2
Options 46
Options in Phone Book 32
Outdoor 22
P
Phone Book 30
Phone Book Menu Structure 29
Phone Menu Structure 53
Phone Option 54
Picture 71
Picture Folder 71
Power Off Time 68
Profile Setting 22
Q
Quiet 22
R
Rate Computing 69
Reading a Received Message 44
Reset Defaults 25
Right Softkey 3
Ring Volume 22
Roaming 4
s
Scheduler 65
Security 58
Selecting Games 28
Server Setting 37
Setting Any Key Answer 25
Setting Auto Answer 25
Setting Auto Display 49, 56
Setting Bookmark 39
Setting Brightness 21
Setting Broadcast 48
Setting Call Bar 58
Setting Call Divert 57
Setting Call Waiting 54
Setting Colour Themes 21
Setting Currency 55
Setting Display Animation 20
Setting Display Contrast 20
Setting Fixed Dial 60
Setting Greeting 20
Setting Hot Key Dial 35
Setting Key Guard 40
Setting Key Tone 19
Setting Language 49
Setting My Number 34
Setting Options 47
Setting Personal Rate 56
Setting Phone Line 57
Setting Shortcuts 26
Setting SIM Lock 60
Setting SIM or Mobile Phonebook 26
Setting T9 Text Input 26
Setting the Maximum Cost 56
Setting the Message Centre Number 42
Setting Warning Tone 19
Short press 7
Shortcut 7
Shortcut from Idle Screen 7
SIM 1
SMS 42
Sound Folder 70
Sound Setting 16
Starting Games 28
Status Icons 4
Storing 30
Storing a Number in Mobile Phonebook 30, 31
Swap 14
T
T9 Text Input 26
Time & Date Setting 66
Time Display Setting 66
Time Zone Setting 66
To end alarm 67
Topic 48
V
Vibration alert 4
Vibrator 23
Viewing 32
Viewing Broadcast 49
Viewing Memory Status 34, 46
Viewing Message Lists in Mobile 46
Viewing Message Lists in SIM 45
Viewing My Numbers 34
Viewing Time/Charges 54
Volume 22
W
WAP Activating 38
Warning Tone 23
Withhold ID /Caller's ID 55