
9100 - Washing machine ZANKER - Free user manual and instructions
Find the device manual for free 9100 ZANKER in PDF.


| Brand | Zanker |
| Model | 9100 |
| Product Type | Freestanding Washing Machine |
| Drum Capacity | 7 kg |
| Maximum Spin Speed | 1200 rpm |
| Energy Efficiency Class | A++ |
| Dimensions (H x W x D) | 85 x 60 x 55 cm |
| Weight | 65 kg |
| Power Supply | 220-240 V, 50 Hz |
| Power Consumption | 0.8 kWh per cycle |
| Water Consumption | 45 L per cycle |
| Number of Programs | 15 |
| Key Programs | Cotton, Synthetics, Delicates, Wool, Quick Wash, Eco, Rinse & Spin |
| Noise Level (Wash) | 55 dB |
| Noise Level (Spin) | 75 dB |
| Safety Features | Child Lock, Overflow Protection, Unbalanced Load Detection |
| Maintenance | Clean lint filter monthly; run drum clean cycle every 3 months |
| Spare Parts Availability | Spare parts available for 10 years after production |
| Repairability Index | 8.2/10 |
| Door Type | Front-load, left hinged |
Frequently Asked Questions - 9100 ZANKER
User questions about 9100 ZANKER
0 question about this device. Answer the ones you know or ask your own.
Ask a new question about this device
Download the instructions for your Washing machine in PDF format for free! Find your manual 9100 - ZANKER and take your electronic device back in hand. On this page are published all the documents necessary for the use of your device. 9100 by ZANKER.
USER MANUAL 9100 ZANKER
natural_image
Industrial gas cylinder assembly with mechanical components (no visible text or symbols)
natural_image
Industrial robotic arm connecting two white plastic bottles, no visible text or symbols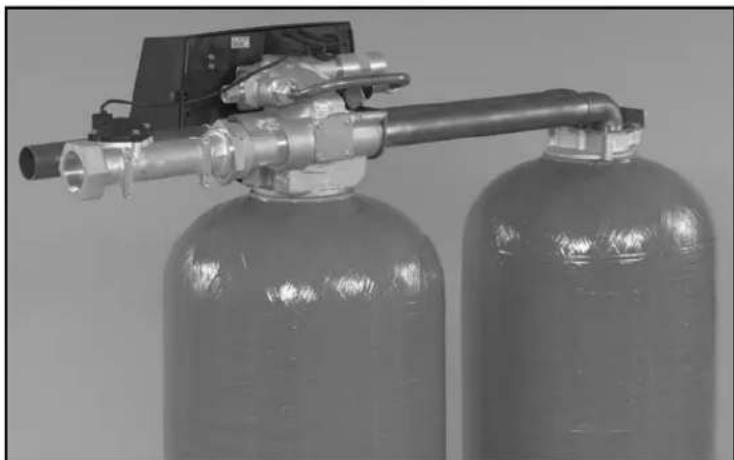
natural_image
Exterior view of a fire extinguisher with attached pipe and valve (no text or symbols visible)Table of Contents
Job Specifications Sheet ...... 3
General and Commercial Installation Checklist 4
General and Commercial Installation Checklist 6
Regeneration Cycle Program Setting Procedure 9
Time Brine Refill and Meter Setting Procedure 10
ETTimer Installation And Start-Up Procedures 12
ETTimer Control Start-Up Procedure 14
ETTimer Control Operation 15
SETimer Control Start-Up Procedures 18
ET and SE Timer Assemblies 21
9000/9100/9500 Electro Mechanical Timer Assembly 22
9000/9100/9500 Power Head 24
9000/9100/9500 Power Head 25
9000 Control Valve Assembly 26
9100Control Valve Assembly 28
9500 Control Valve Assembly 30
9500Brine Valve Systems (1600 and 1700 Series) 31
9000/9100/9500 Second Tank Assemblies 32
9000/9100/9500 Meter Assemblies 34
9000/9100 Bypass Valve 36
2310 Safety Brine Valve 37
9500, 2350 Safety Brine Valve 38
2300 Safety Brine Valve 39
Water Conditioner Flow Diagrams 40
Troubleshooting 44
Mechanical Timer Valve Wiring 46
ETTimer Valve Wiring 47
SETimer Valve Wiring 48
9000 Control Dimensions 49
9100 Control Dimensions 50
9500 Control Dimensions 51
Meter Flow Data 52
Injector Flow Data 54
Job Specifications Sheet
Job Number ____
Model Number ____
Water Test ____
Capacity Of Unit ____ Max. ____ Per Regeneration
Brine Tank Size ____
Salt Setting Per Regeneration ____
Control Valve Specifications
1. Type of Timer
A. 82 minute available regeneration time, 1/15 RPM
B. 164 minute available regeneration time, 1/30 RPM
2. Type of Meter
Mechanical Valves
(gallon settings)
Meter Standard Range Extended Range
3/4" 125-2,125 625-10,625
1" 310-5,270 1,150-26,350
1-1/2" 625-10,625 3,125-53,125
Electrical Timers
(minutes per cycle)
| Meter ET | SE | |
| (0–999.9 minutes per cycle) | (0–99 minutes per cycle) | |
| 3/4" | 9,999,999 | 9,999 |
| 1" | 9,999,999 | 9,999 |
| 1-1/2" | 9,999,999 | — |
- Timer Gallon Setting ____ gal.
- Regeneration Program Setting
A. Backwash ____ min.
B. Brine and Slow Rinse ____ min.
C. Rapid Rinse ____ min.
D. Brine Tank Refill ____ min.
- Drain Line Flow Control ____ gpm
- Brine Refill Rate ____ gpm
- Injector Size ____
General and Commercial Installation Checklist
Water Pressure
A minimum of 25 lbs of water pressure is required for regeneration valve to operate effectively.
Electrical Facilities
An uninterrupted alternating current (A/C) supply is required. Make sure:
- Voltage supply is compatible with unit before installation.
- Current supply is always hot and cannot be turned off with another switch.
Existing Plumbing
Condition of existing plumbing should be free from lime and iron buildup. Replace piping that has heavy lime and/or iron build-up. If piping is clogged with iron, install a separate iron filter unit ahead of the water softener.
Location of Softener and Drain
Locate the softener close to a clean working drain and connect according to local plumbing codes.
Bypass Valves
Always provide for the installation of a bypass valve if unit is not equipped with one.

CAUTION
- Do not exceed water pressure of 125 psi.
- Do not exceed 110^ water temperature.
- Do not subject unit to freezing conditions.
Equipment Configuration

Figure 1: 9000/9100

Figure 2: 9500
General and Commercial Installation Checklist
- Place the softener tank where you want to install the unit.
NOTE: Be sure the tank is level and on a firm base.
-
During cold weather it is recommended that the installer warm the valve to room temperature before operating.
-
Perform all plumbing according to local plumbing codes.
— Use a 1/2" minimum pipe size for the drain.
— Use a 3/4" drain line for backwash flow rates that exceed 7 gpm or length that exceeds 20' (6 m).
-
Both tanks must be the same height and diameter and filled with equal amounts of media.
-
The distributor tube must be flush with the top of each tank. Cut if necessary. Use only non-aerosol silicone lubricant.
-
Lubricate the distributor o-ring seal and tank o-ring seal. Place the main control valve on one tank and the tank adapter on the second tank.
NOTE: If required, solder copper tubing for tank interconnection before assembling on the main control valve and tank adapter. Maintain a minimum of 1" distance between tanks on final assembly.
-
Solder joints near the drain must be done before connecting the Drain Line Flow Control fitting (DLFC). Leave at least 6" (152 mm) between the DLFC and solder joints when soldering pipes that are connected on the DLFC. Failure to do this could cause interior damage to DLFC.
-
Use only Teflon tape on the drain fitting.
-
Be sure the floor under the salt storage tank is clean and level.
-
Place approximately 1" (25 mm) of water above the grid plate. If a grid is not utilized, fill to the top of the air check in the salt tank. Do not add salt to the brine tank at this time.
-
On units with a bypass, place in Bypass position.
— Turn on the main water supply.
— Open a cold soft water tap nearby and let water run a few minutes or until the system is free of foreign material (usually solder) resulting from the installation. Close the water tap when water runs clean.
- Place the bypass In Service position and let water flow into the mineral tank. When water flow stops, slowly open a cold water tap nearby and let water run until air is purged from the unit. Then close tap.
Electrical
-
Make all electrical connections according to codes. Plug the valve into an approved power source. Do not insert meter cable into the meter yet.
-
Tank one has control valve and tank two has adapter. See Figure 1, page 5 or Figure 2, page 5.
-
Look on the right side of the control valve, it has indicators showing which position the control valve is in during Regeneration and which tank is In Service.
— Figure 3, page 7 shows the valve In Service position with tank one supplying conditioned water and tank two on standby.
NOTE: Make sure the meter cable is not inserted in the meter dome. Swing the timer out to expose the program wheel (to swing timer out) grab onto the lower right corner of timer face and pull outward. See Figure 5, page 8.
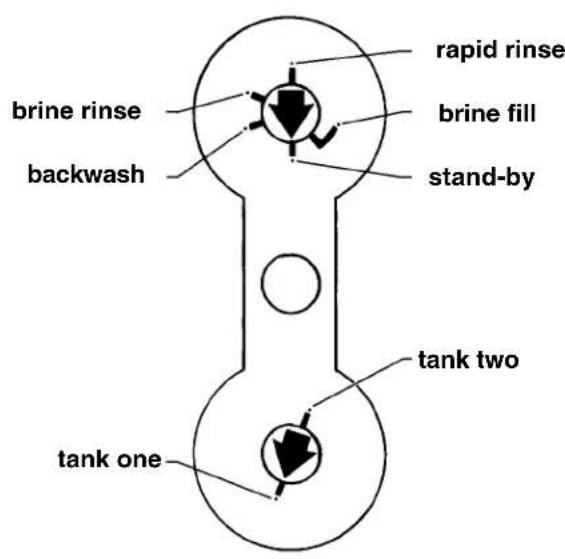
DF175-0
Figure 3: Control Valve Position Indicators
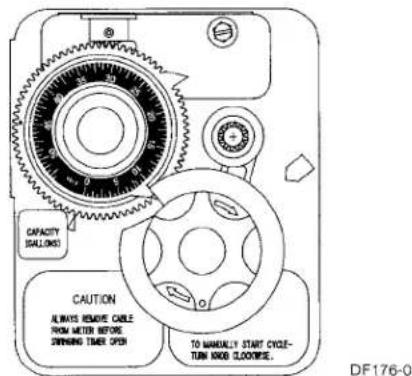
Figure 4: Timer
- Cycle timer into backwash position. Turn manual knob so that the micro switch rides on the first set of pins.
— In this position the tanks switch (lower piston) and the control valve moves to the backwash position (upper piston).
— Wait until the positioning of upper and lower pistons stops before advancing the timer further. If advanced too fast the control will not home into the In Service position (it will not advance to any other position). To correct this, rotate the manual knob back to In Service and start again into backwash.
NOTE: Once valve positions itself into the backwash cycle, the homing circuit locks in.
- With all the air backwashed, slowly cycle the timer to the brine position; rapid rinse; and brine tank refill. Wait for the control drive motor to position itself in each cycle and stop, before advancing on to the next position.
- Once back in the In Service position, cycle the control valve again into the backwash position. The tanks switch again, and air head backwashes out of the other tank. Cycle the control back to the In Service position. Leave the timer in the open position. DO NOT insert meter cable yet.
pin storage
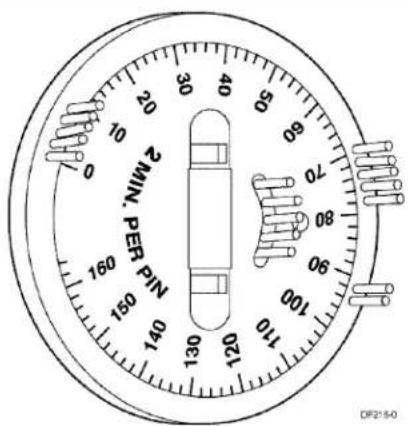
Figure 5: Program Wheel
NOTE: Two motors are available:
1/15 RPM has 82 minute Regeneration Time.
1/30 RPM has 164 minute Regeneration Time. See Figure 5.
Regeneration Cycle Program Setting Procedure
Setting the Regeneration Cycle Program
The Regeneration cycle program on the water conditioner is preset at the factory. However, portions of the cycle or program time may be lengthened or shortened for local conditions or system design.
- Expose cycle program wheel by grasping timer in lower right hand corner and pulling. This releases snap retainer and swings timer to the left
NOTE: Meter cable must be removed from meter dome before opening timer.
- Remove the program wheel by grasping program wheel and squeezing protruding lugs towards center. Lift program wheel off timer.
— Switch arms may require movement to facilitate removal.
- Return timer to closed position by engaging snap retainer in back plate.
— Make certain all electrical wires locate above snap retainer post.
Changing Length of the Backwash Time
The program wheel in Figure 5 is In Service position. Looking at the numbered side of the program wheel, the group of pins starting at zero determines the length of time the unit backwashes.
Example: If there are six pins in this section, the time of backwash is 12 minutes (2 minutes per pin). To change the length of backwash time, add or remove pins as required.
— The number of pins multiplied by two equals minutes of backwash.
Changing Length of Brine and Rinse Time
The group of holes between the last pin in the backwash section and the second group of pins determines the length of time that a unit will brine and rinse (2 minutes per hole).
To change the length of brine and rinse time, add or remove pins in the rapid rinse group of pins to increase or decrease the number of holes in the brine and rinse section.
— The number of holes multiplied by two equals minutes of brine and rinse.
Changing Length Of Rapid Rinse
The second group of pins on the program wheel determines the length of time the water conditioner rapid rinses (2 minutes per pin). To change the length of rapid rinse time, add or remove pins at the higher numbered end of this section as required.
— The number of pins multiplied by two equals minutes of rapid rinse.
NOTE: Program wheels with 0–82 minute cycle times, use one minute per pin or hole to set Regeneration times. The layout of pins and holes on the program wheel follow the same procedure as on this page.
Changing Length of Brine Tank Refill Time
The second group of holes on the program wheel determines the length of time the water conditioner refills the brine tank (2 minutes per hole).
To change the length of refill time, move the two pins at the end of the second group of holes as required.
The Regeneration cycle is complete when the two pin set at end of the brine tank refill section trips the outer micro-switch. The program wheel, however, continues to rotate until the inner micro-switch drops into the notch on the program wheel.
Time Brine Refill and Meter Setting Procedure
Programming
- The control valve is set at the factory for backwash; brine and slow rinse; rapid rinse and brine tank fill times. Change any of these times by repositioning the pins and holes or adding more pins.
NOTE: Two speed timer motors are available 1/15 RPM has 82 minute Regeneration Time and each pin or hole equals one minute. 1/30 RPM has 164 minute Regeneration Time and each pin or hole equals two minutes.
- The control valve has a separate brine tank fill cycle.
— Calculate the desired salt setting using the brine line flow control rate of refill (in gpm) multiplied by the timer setting. Then, using one gallon of fresh water dissolving approximately 3 lbs salt, calculate the refill time.
Example: A desired 30 lbs salt setting:
The unit has a 1.0 gpm refill rate so a 10 gallon fill is required.
$$ 1 0 \text { gallons } \times 3 \text { lbs / gals } = 3 0 \text { lbs salt } $$
Set the timer refill section at 10 minutes.
$$ 1 0 \text { minutes } \times 1. 0 \mathrm{gpm} = 1 0 \text { gallon fill } $$
NOTE: There must always be two pins at the end of a refill time to stop the fill cycle.
With the Regeneration times set, place timer back to its original position, making sure the lower right hand corner snaps back into the backplate and the meter cable slides through the backplate and does not bind.
- Setting the gallon wheel.
Knowing the amount of resin in each tank and the salt setting per Regeneration, calculate the gallons available, using the following capacities as a guide:
$$ \frac {\text {(capacity per ft} ^ {3} \times \text {ft} ^ {3} \text {of resin per tank)}}{\text {compensated hardness of H} _ {2} \mathrm{O}} = \text {gallons available} $$
NOTE: Based on tank size:
More resin increases capacity, less resin decreases capacity.
More salt increases capacity, less salt decreases capacity.
Example:
tank diameter = 16" compensated hardness = 35 grains per gal (tested sample)
ft^3 resin (based on flow rate) = 4
lbs of salt = 8
capacity per ft ^3 = 24,000
$$ \frac {(2 4 , 0 0 0 \times 4 \mathrm{ft} ^ {3} \text { of resin per tank) }}{3 5 \text { grains }} = 2 7 4 0 \text { gallons available before regeneration } $$
DO NOT SET THIS FIGURE - GO TO STEP 4
— Because the control valve regenerates with soft water from the other tank, subtract the water used for Regeneration. Take each Regeneration cycle and calculate the water used.
Example: Unit is set for a 16" diameter tank with 4 ft ^3 of resin and salted at 8 lbs. per ft ^3 , 7 gpm backwash, #3 injector, 1.0 gpm brine refill, and 60 psi and timer set for 10 min. backwash, 60 min. brine and rinse, 10 min. rapid rinse, 10 min. brine tank fill.
Backwash 10 minutes x 7.0 gpm = 70.0 gallons
Brine and Rinse 60 minutes x 1.0 gpm = 60.0 gallons
Rapid Rinse 10 minutes x 7.0 gpm = 70.0 gallons
Brine Tank Fill 10 minutes x 1.0 gpm = 10.0 gallons
Total Regeneration Water = 210.0 gallons
With the 2740 gallons available calculated in Step 3, subtract the Regeneration water used from the total water available.
2740 gallons available - 210 gallons used = 2530 gallons
(in Regeneration, Step 4)
- Set meter wheel at approximately 2530 gallons. Lift the inner dial of the meter program wheel so that you can rotate it freely. Position the white dot opposite the 2530 gallon setting.
NOTE: There is a slight delay between the time the meter zeros out and the cycle starts. Units using the:
1/15 RPM motor, 82 minute Regeneration Time has a 9 minute delay
1/30 RPM motor, 180 minute Regeneration Time has an 18 minute delay.
This delay period is not critical on residential equipment. However, take this factor into consideration for commercial applications by subtracting continuous flows for 9 minutes or 18 minutes from water available.
-
Insert meter cable into meter.
-
Check bypass.
-
Plug in unit.
ET Timer Installation And Start-Up Procedures
- In Normal Operation the Time Of Day and, if flow meter equipped, the Volume Remaining displays appear alternately. Set the Time Of Day display. Press the Up or Down set button to display the correct time.
Example:
12:59 P.M.
Valve In Service
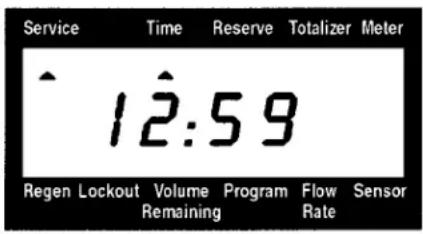
ET002-0
Figure 6
- Flow Meter Equipped Valves Only: The Volume Remaining Display displays the volume of water in gallons (including any reserve capacity) remaining prior to Regeneration. When there is no water usage the Meter arrow should not appear or not change. Open a soft water tap. The Meter arrow begins flashing at a rate that varies with flow rate. Close the tap after 3–5 gallons of water flow.
Example:
125 gallons of water remaining
Valve In Service
No water flow
Volume below reserve capacity
Reserve arrow flashing
Example:
0 gallons of water remaining
Valve In Service
Water flowing
Volume below reserve capacity
Reserve arrow flashing


ET003-0
Figure 7
- Manually initiate a Regeneration cycle and allow water to run to drain for 3 to 4 minutes. Press and release the Extra Cycle button. With Immediate Regeneration timers the control goes into Regeneration immediately. With Delayed Regeneration timers the In Service arrow flashes immediately and a Regeneration occurs at the preset Regeneration Time. Press and hold the Extra Cycle button for 5 seconds. The control goes into Regeneration immediately.
- Manually step the valve through a Regeneration cycle, checking valve operation in each step. During Regeneration the control displays the Regeneration step number to which the valve is advancing or has reached and the time remaining in that step.
Example:
Valve advancing to Regeneration Step #1
1 flashing
Regeneration arrow on
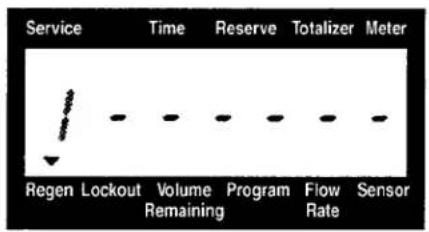

ET065-0
Figure 8
— When the first cycle step is reached, a red LED turns on indicating the current Regeneration cycle step.
Example:
Regeneration Step #1 reached
10.0 minutes remain in Step #1
Regeneration arrow on


ET067-0
Figure 9
— Press the Extra Cycle button during a Regeneration step to immediately advance the valve to the next Regeneration step position.
— Press the Up or Down set buttons during a Regeneration step to adjust the time remaining in the current Regeneration step. Programmed Regeneration step times are not changed.
— Once all Regeneration cycle steps are complete, the valve returns to In Service and resumes normal operation.
- Manually step the valve to the Brine Draw position (see Step #15) and allow the valve to draw water from the brine tank until it stops.
*NOTE: The air check checks at approximately the midpoint of the screened intake area.
-
Manually step the valve to the Brine Refill position and allow the valve to return to In Service automatically.
-
Make sure the brine refill time (salt dosage) is set as recommended by the manufacturer.
-
With the valve In Service, check that there is about 1" of water above the grid in the brine tank, if one is used.
-
Fill the brine tank with salt.
NOTE: It is recommended a 9V Alkaline Battery be installed at all times for proper valve operation. The Low Battery LED turns on when the battery needs to be replaced.
ET Timer Control Start-Up Procedure
Display ET

In Normal operation the Time Of Day display alternates with the Volume Remaining display. The meter arrow flashes in direct relation to the water flow rate through the unit. As treated water is used, the Volume Remaining display counts down from a maximum value to the calculated reserve capacity. The Reserve arrow flashes when the reserve capacity is being used. At the preset Regeneration Time, a Regeneration cycle initiates.
Example:
125 gallons of water remaining
Valve In Service
No water flow
Volume is below reserve capacity
Example:
0 gallons of water remaining
Valve In Service
Water flowing
Meter arrow flashing
Volume is below reserve capacity


ET007-0
Figure 11
ET Timer Control Operation
Timeclock Regeneration Valves
When the number days since the last Regeneration reaches the preset number of days, a Regeneration cycles initiates at the preset Regeneration Time.
Flow Meter Equipped Immediate Regeneration Valves
The Time Of Day display alternates with the Volume Remaining display. The Meter arrow flashes in direct relation to the water flow rate through the unit. As treated water is used, the Volume Remaining display counts down from a maximum value to zero and initiates a Regeneration cycle.
Example:
525 gallons of water remaining
Valve In Service
Water flowing
Meter arrow flashing
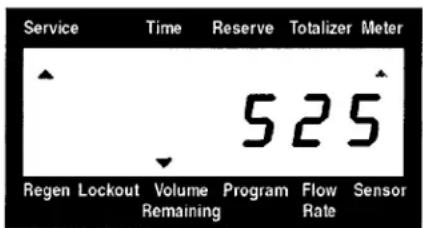
ET008-0
Figure 12
Sensor Immediate Regeneration Valves
When the control receives a valid sensor input signal, a Regeneration cycle initiates. The Sensor Input arrow flashes until the signal is determined to be valid.
Sensor Delayed Regeneration Valves
When the control receives a valid sensor input signal, a Regeneration cycle initiates at the preset Regeneration Time. The Sensor Input arrow flashes until the signal is determined to be valid. The Reserve arrow flashes when the reserve capacity is being used.
Example:
12:58 A.M. with invalid sensor signal
Valve In Service
Sensor arrow flashing
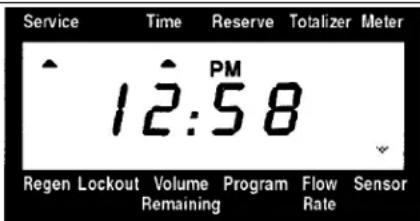
Example:
12:59 A.M. with valid sensor signal
Valve In Service
Sensor arrow on
Reserve arrow flashing
Delayed regeneration
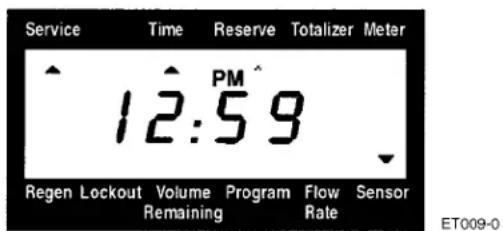
ET009-0
Figure 13
Lockout Input Operation
The lockout arrow turns on whenever the control sends a lockout signal. Any requests for Regeneration are delayed until this signal is removed. Regeneration then proceeds normally.
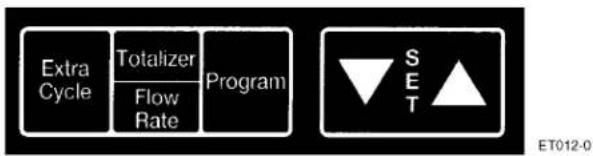
flowchart
graph TD
    A["Extra Cycle"] --> B["Totalizer"]
    B --> C["Flow Rate"]
    C --> D["Program"]
    D --> E["SET Symbol"]
    style E fill:#fff,stroke:#000
    style_F["ET012-0"]
Figure 14
Start an Extra Cycle
Press the Extra Cycle button to start an Extra Regeneration tonight. Press and hold the Extra Cycle button for 5 seconds to start an Extra Cycle immediately.
Totalizer/Flow Rate
Press the Totalizer Flow Rate button to display the flow rate.
Press the button a second time to display the total accumulation of water flow through the valve since the last reset.
Press the button a third time to return the display to Time Of Day or Volume Remaining.
— Press and hold the button for 25 seconds to reset the Totalizer display. During the 25 seconds, the Totalizer arrow flashes indicating that the display is resetting properly.
Low Battery Indicator

Figure 15
The red Low Battery LED turns on whenever the 9V Alkaline Battery (not included) requires replacement. The battery is used for memory backup and is stored against the valve backplate. In the event of a power outage, the battery maintains the current operating displays for approximately 24 hours at maximum battery capacity.
Immediate Regeneration Valves With Days Between Regeneration Override Set
When the valve reaches its set Days Since Regeneration Override value, a Regeneration cycle initiates immediately. This event occurs regardless of the Volume Remaining display reaching zero gallons.
Delayed Regeneration Valves With Days Between Regeneration Override Set
When the valve reaches its set Days Since Regeneration Override value, a Regeneration cycle initiates at the preset Regeneration Time. This event occurs regardless of the Volume Remaining display reaching the calculated reserve capacity.
Control Operation During Regeneration
In Regeneration the control displays a special Regeneration display. The control shows the current Regeneration step number to which the valve is advancing or has reached, and the time remaining in that step. The displayed step number flashes until the valve completes driving to the Regeneration step position. Once all Regeneration steps are complete the valve returns to In Service and resumes normal operation.
Example:
Less than 10 minutes remaining in Regeneration
Step #1

ET067-0

Backwash
Figure 16
Press the Extra Cycle button during a Regeneration cycle to immediately advances the valve to the next cycle step position and resume normal step timing.
Control Operation During Programming
The control enters Program Mode with the valve In Service. While in Program Mode the control continues to operate normally, monitoring water usage and keeping all displays up to date. Control programming is stored in memory permanently. There is no need for battery backup power.
Control Operation During A Power Failure
During a power failure all control displays and programming are stored for use upon power re-application. The control retains these values for years, if necessary, without loss. The control is fully inoperative and any calls for Regeneration are delayed. The control, upon power re-application, resumes normal operation from the point that it was interrupted. An inaccurate or flashing Time of Day display indicates that a power outage has occurred.
SE Timer Control Start-Up Procedures
Display SE

Figure 17: SE Timer Display
In normal operation the Time Of Day display alternates with Volume Remaining and Tank in In Service displays (9000SE Timer only). As treated water is used, the Volume Remaining display counts down (in gallons) from a maximum value to zero or (----). Once this occurs a Regeneration cycle initiates immediately or delayed to the set Regeneration Time. Water flow through the valve is indicated by the flashing Flow Dot Indicator.
Time Of Day
In Service

Flow
833 Gallons of Treated Water Remaining
In Service
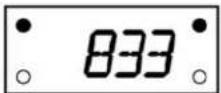
Flow
0 Gallons of Treated Water Remaining
In Service

Flow
Tank #1 in Service
In Service

Flow
Program
P.M.
ET024-1
Figure 18: SE Timer Display During Normal Operation
Set Time of Day

ET025-C
When the valve is In Service, press either the Set Up or Set Down button once to adjust the Time Of Day by one digit. Press and hold to adjust by several digits.
Start an Extra Regeneration Cycle

ET026-0
Press the Extra Regeneration button to start an Extra Regeneration tonight. Press and hold the Extra Regeneration button for 5 seconds to start an Extra Regeneration immediately.
Set Control Programming
- Press and hold both the Set Up and Set Down buttons for 5 seconds.

ET027-0
- Set the Treated Water Capacity. Using the Set Up or Set Down buttons, set the amount of treated water to flow through the unit before a Regeneration is required.

- Press the Extra Regeneration button.
ET026-C
- Set the Regeneration Time. Use the Set Up or Set Down buttons to set the desired time of day for Regeneration to occur.
NOTE: This does not display if Regeneration occurs immediately.

- Press the Extra Regeneration button.
ET026-0
- Set Regeneration Day Override. Use the Set Up or Set Down buttons to set the maximum number of days before a Regeneration cycle must occur.

- Press the Extra Regeneration button to exit the program.*

ET026-C
NOTE: If setting up the system for the first time, perform the following Fast Cycle Regeneration:
- Press the Extra Regeneration button for 5 seconds to force an Extra Regeneration immediately.
- Once the valve reaches Regen Step #1, let water run to drain for approximately 5 minutes.
- Press the Extra Regeneration button once to advance valve to Regen Step #2.
- Press the Extra Regeneration button once to advance valve to Regen Step #3 (if active).
- Press the Extra Regeneration button once to advance valve to Regen Step #4 (if active).
- Press the Extra Regeneration button once to advance valve to Regen Step #5 (if active).
- Press the Extra Regeneration button once more to advance the valve back to In Service.
Immediate Regeneration Valves With Days Between Regeneration Override Set
When the valve reaches its set Days Since Regeneration Override value, a Regeneration cycle initiates immediately. This event occurs regardless of the Volume Remaining display reaching zero gallons.
Delayed Regeneration Valves With Days Between Regeneration Override Set
When the valve reaches its set Days Since Regeneration Override value a Regeneration cycle initiates at the preset Regeneration Time. This event occurs regardless of the Volume Remaining display reaching zero gallons.
Control Operation During Regeneration
In Regeneration the control displays a special Regeneration display. While in Regeneration the control shows the current Regeneration step number to which the valve is advancing or has reached, and the time remaining in that step. The displayed step number flashes until the valve completes driving to this Regeneration step position. Once all Regeneration steps are complete the valve returns to In Service and resumes normal operation.
Example:
Less Than 6 Minutes Remaining in Regen Step #1
Service Program

Flow P.M.
ET032-0
Figure 19
Pressing the Extra Cycle button during a Regeneration cycle immediately advances the valve to the next cycle step position and resumes normal step timing.
Control Operation During Programming
The control only enters the Program Mode with the valve In Service. While in the Program Mode the control continues to operate normally monitoring water usage and keeping all displays up to date. Control programming is stored in memory permanently. There is no need for battery backup power.
Control Operation During A Power Failure
During a power failure all control displays and programming are stored for use upon power re-application. The control retains these values for years, if necessary, without loss. The control is fully inoperative and any calls for Regeneration are delayed. The control, upon power re-application, resumes normal operation from the point that it was interrupted. An inaccurate or flashing Time of Day display indicates that a power outage has occurred.
ET and SE Timer Assemblies

Figure 20
Item Quantity Part Number Description
1 1 configured item
2 1 configured item
3 1 40427-03 wire harness
ETtimer assembly
SEtimer assembly
9000/9100/9500 Electro Mechanical Timer Assembly

Figure 21
9000/9100/9500 Electro Mechanical Timer Assembly
Item Quantity Part Number Description
1 1 13870-03 timer housing assembly.
2 1 17870 label, capacity gallons
3 1 15465 label, Caution
4 1 16930 label, Instruction
5 1 15227 actuator plate
6 1 10300 screw, hex washer #8
7 1 17513 spring clip
8 1 15407 washer, plain #4
9 1 15228 spring
10 1 16270-10 gallon wheel assembly 3/4" standard range meter
16270-50 gallon wheel assembly 3/4" extended range meter
16270-30 gallon wheel assembly 1" standard range meter
16270-40 gallon wheel assembly 1" extended range meter
16270-50 gallon wheel assembly 1-1/2" standard range meter
16270-60 gallon wheel assembly 1-1/2" extended range meter
11 1 13806 program wheel retainer
12 1 13748 screw, flathead #6-20
13 2 11999 button decal
14 1 15223 cycle actuator gear
15 1 13886-01 knob
16 4 13296 screw, hex washer #6-20
17 1 17724 drive pinion
18 1 17723 drive pinion clutch
19 1 14276 spring, meter clutch
20 1 14253 retainer
21 3 14087 insulator
22 1 15314 switch
23 1 15320 switch
24 2 11413 screw, pan head #4-40
25 1 13018 idler shaft
26 1 18563 spring, idler shaft
27 1 13017 idler gear
28 1 13164 drive gear
29 1 13887 motor mounting plate
30 1 18743 motor, 120V 60 Hz.-1/30 RPM
18824 motor, 220V 50 Hz.-1/30 RPM
19170 motor, 120V 60 Hz.-1/15 RPM
18825 motor, 220V 50 Hz.-1/15 RPM
31 2 13278 screw, #6-32
32 1 14265 spring clip
33 1 15055 main drive gear
34 1 19210-02 program wheel, 90 minute
19210-05 program wheel, 180 minute
35 23 15493 roll pin
36 1 15203 harness
37 2 12681 wire nut
38 1 60320-02 auxiliary timer switch kit (not shown)
9000/9100/9500 Power Head

Figure 22
9000/9100/9500 Power Head
Item Quantity Part Number Description
1 2 18728 nut, clip #8-32
2 1 11838 power cord, 6' U.S. 120V
11839 power cord, 12' U.S.120V
40084-12 power cord, 12' U.S. 120V ( ET)
11545-01 power cord, 5' European 220V
14678 power cord, 6' U.S. 220V
19303-01 power cord, Australian 8' 220V
40085-12 power cord, 12' U.S. 220V ( ET)
19674 transformer, U.S., 110V to 24V
25651 transformer, European, 220V to 24V
3 1 15202 wire harness, mechanical
14822 wire harness auxiliary drive switch
40041-06 wire harness, low voltage ( ET)
4 1 15134 drive gear assembly, lower
5 1 15135 drive gear assembly
6 1 14896 geneva wheel
7 2 40422 wire connector
8 2 19367 cover screw
9 1 15175 position decal
10 2 14917 retaining ring
11 1 15199 ground plate
12 1 14430 screw, hex washer #6
13 2 19160 screw, motor mounting
14 1 18737 drive motor, 24V, 50/60 Hz (red wires)
1 18738 drive motor, 120V, 60 Hz (black wires)
1 18739 drive motor, 220V, 50 Hz (yellow wires)
15 1 15131 backplate, mechanical and SE
17784-05 backplate, ET
17784-06 backplate, ET
16 2 15172 screw, flat head #4-40
17 2 10340 washer, lock #4
18 10218 micro switch (homing)
19 1 10339 nut, micro switch
20 1 15331 screw, valve mounting
21 2 15133 drive gear assembly, upper
22 1 13547 strain relief
23 1 15810 retaining ring, drive gear
24 1 15132 triple cam (9000/9100)
17331 triple cam ( 9500)
17765 triple cam ( 9500 auxiliary switch)
25 1 15638 cable guide (9000/9100)
1 17337 cable guide (9500)
26 2 15372 washer, thrust
27 1 15216 meter cable, 15.25", 1" meter, mechanical
15425 meter cable, 13.25", 3/4" meter, mechanical
17744 meter cable, 20.75", 1-1/2" meter, mechanical
19121-01 meter cable, 1" meter, SE
19121-05 meter cable, 3/4" and 1" meter, ET
19791-01 meter cable, 1" meter, SE
28 2 15692 spacer
29 1 16433 micro switch (program)
30 1 10302 insulator
31 2 15173 screw
Not Shown
32 1 60232-110 cover, black
1 60232-112 cover, black - left window
33 1 60320-09 optional auxiliary drive switch ( 9000/9100)
1 60320-10 optional auxiliary drive switch (9500)
9000 Control Valve Assembly
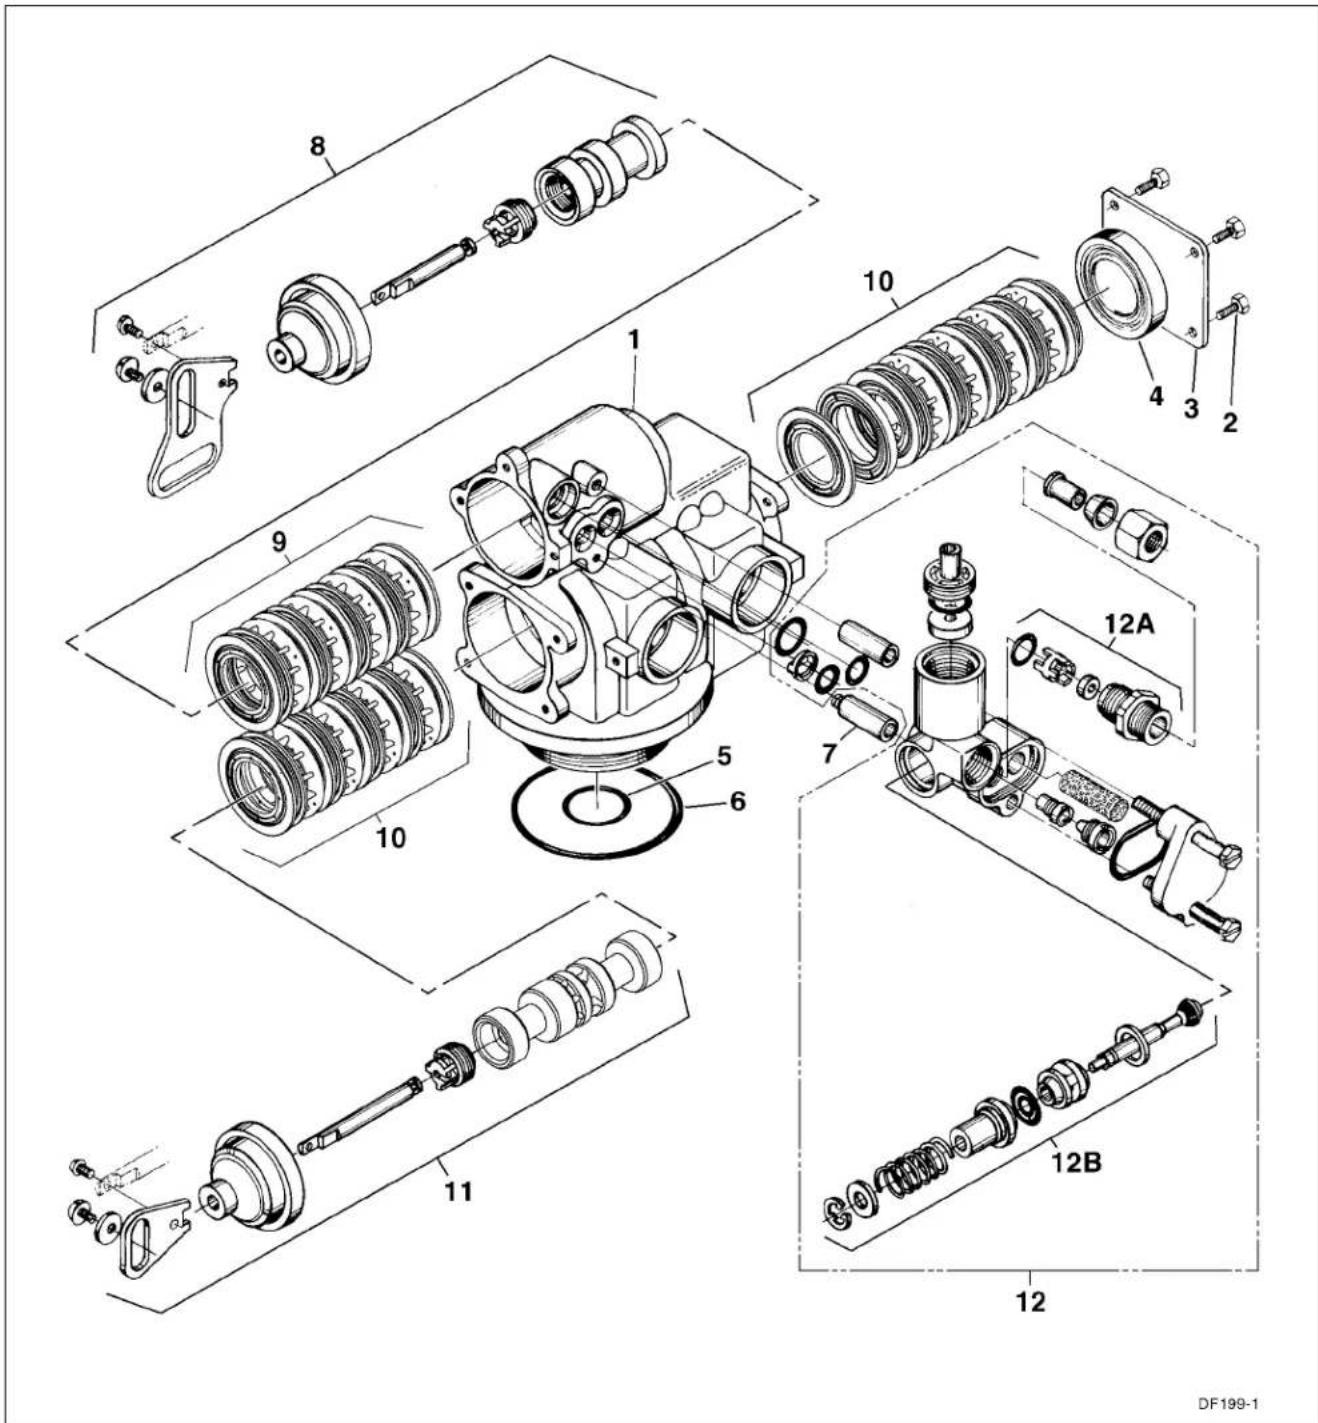
Figure 23
9000 Control Valve Assembly
Item Quantity Part Number Description
1 1 14861-01 valve body, machined
1 14861-01NP valve body, machined (nickel plated)
2 4 15137 screw, hex washer #10-24 x 3/8"
3 1 14906 end plate
4 1 14928 end plug
5
6
7 1 15471 stand off
8 1 60400 piston assembly, top
1 60400-01 piston assembly, top (hot water)
9 1 60125 seal and spacer kit, top
60125-HW seal and spacer kit, top (hot water)
60125-20 seal and spacer kit, top (559PE)
10 1 60421 seal and spacer kit, bottom
60421-HW seal and spacer kit, bottom (hot water)
60421-20 seal and spacer kit, (559PE)
11 1 60401 piston assembly, bottom
60401-01 piston assembly, bottom (hot water)
12 1 60385-XXXX injector assembly
(see chart for dash numbers)
| injector | number | DLFC | number | BLFC | number |
| red #0 | 00 | Blank | 0 | Blank | 0 |
| white #1 | 01 | 1.2 | 1 | 0.25 | 1 |
| blue #2 | 02 | 1.5 | 2 | 0.50 | 2 |
| yellow #3 | 03 | 2.0 | 3 | 1.00 | 3 |
| green #4 | 04 | 2.4 4 |
| 3.0 | 5 |
| 3.5 | 6 |
| 4.0 | 7 |
| 5.08 |
| 7.0 | 9 |
12A 1 60022-12 brine line flow control assembly, 0.125 gpm
60022-25 brine line flow control assembly, 0.250 gpm
60022-50 brine line flow control assembly, 0.500 gpm
60022-100 brine line flow control assembly, 1.00 gpm
12B 1 60350 brine valve assembly
Not Shown
13 12763 seal and space stuffer tool
14 13061 spacer puller tool
15 13759 DLFC retainer tool
9100 Control Valve Assembly

Figure 24
9100 Control Valve Assembly
Item Quantity Part Number Description
1 1 40688 valve body assembly
2 4 15137 screw, hex washer #10-24 x 3/8"
3 1 14906 end plate
4 1 14928 end plug
5 1 19054 O-ring, 124
6 1 18303 O-ring, 336
7 1 40538 retainer, 32mm
8 1 60400 piston top assembly
9 1 60125 seal and spacer kit, top 1 60125-20 seal and spacer kit, top (559PE)
10 1 60421 seal and spacer kit, bottom
1 60421-20 seal and spacer kit, bottom (559PE)
11 1 60401 piston assembly, bottom
12 1 60385-XXXX injector assembly
(see following chart for dash numbers)
injector number DLFC number BLFC number
| red #0 | 00 | Blank | 0 | Blank | 0 |
| white #1 | 01 | 1.2 1 | 0.25 1 | ||
| blue #2 | 02 | 1.5 | 2 | 0.50 | 2 |
| yellow #3 | 03 | 2.0 | 3 | 1.00 | 3 |
| green #4 | 04 2.4 | 4 | |||
| 3.0 | 5 | ||||
| 3.5 6 | |||||
| 4.0 | 7 | ||||
| 5.0 8 | |||||
| 7.0 | 9 |
12A 1 60022-12 brine line flow control assembly, 0.125 gpm
60022-25 brine line flow control assembly, 0.250 gpm
60022-50 brine line flow control assembly, 0.500 gpm
60022-100 brine line flow control assembly, 1.00 gpm
12B 1 60350 brine valve assembly
13 1 61419 distributor adapter kit, 1.05"
Not Shown
| 14 | 12763 seal and space stuffer tool |
| 15 | 13061 spacer puller tool |
| 16 | 13759 DLFC retainer tool |
9500 Control Valve Assembly

Figure 25
Item Quantity Part Number Description
| 1 1 16919-01 valve body | 9500 NPT, mechanical base | |
| 16919-01NP valve body | 9500 NPT, mechanical base, nickel-plated | |
| 16919-21 valve body | 9500 BSP/Metric, mechanical base | |
| 16919-21NP valve body | 9500 BSP/Metric, mechanical base, nickel-plated | |
| 2 1 60080-XX injector assembly (see chart for dash numbers) | ||
| 3 1 60039-XX injector assembly (see chart for dash numbers) | ||
| injector | number | |
| blue #2 | 02 | |
| yellow #3 | 03 | |
| green #4 | 04 | |
| white #5 | 05 | |
| 4 1 60134 seal and spacer kit, top | ||
| 60134-01 seal and spacer kit, top, hot water | ||
| 60134 seal and spacer kit, top, silicone | ||
| 5 1 60108 piston assembly, top | ||
| 60108-01 piston assembly, top, hot water | ||
| 6 1 60109 piston assembly, bottom | ||
| 60109-01 piston assembly, bottom, hot water | ||
| 7 1 60133 seal and spacer kit, bottom | ||
| 60133-01 seal and spacer kit, bottom, hot water | ||
| 60133-10 seal and spacer kit, bottom, silicone | ||
| 8 1 16455 O-ring, 347 | ||
| 9 1 13577 O-ring, 226 | ||
| 10 1 16955 end plug | ||
| 11 1 16394 O-ring, 029 | ||
| 12 1 14906 end plate | ||
| 13 4 15137 screw, hex washer machine, 1-24 x 3/8 | ||
| 17657 screw, hex M5-40, Metric | ||
| Not Shown | ||
| 14 16516 tool, seal and spacer stuffer | ||
| 15 17623 tool, spacer puller | ||
9500 Brine Valve Systems (1600 and 1700 Series)
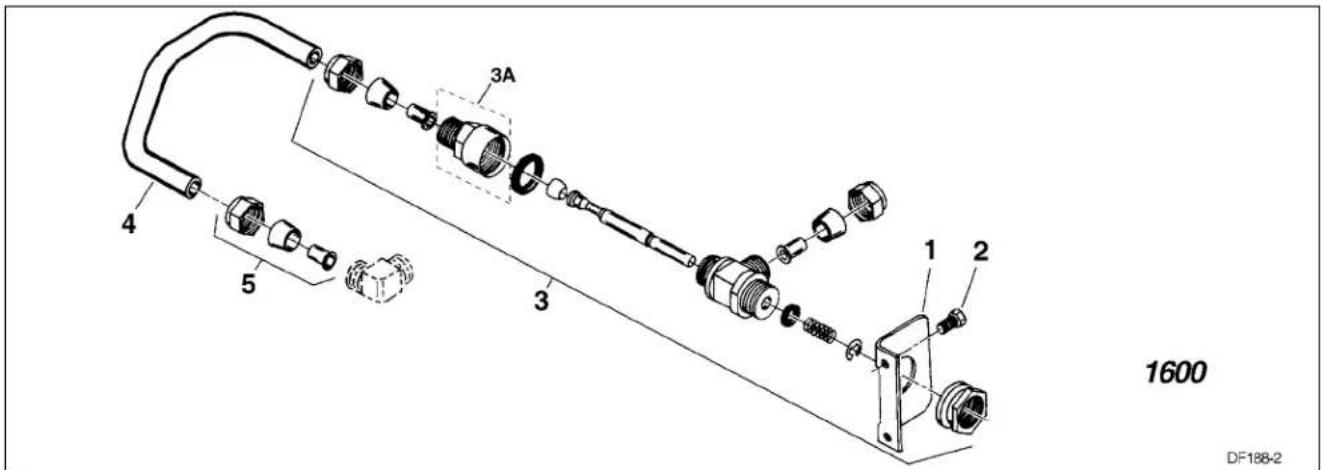
Figure 26

Figure 27
Item Quantity Part Number Description
1 1 16922 bracket, brine valve
2 2 15137 screw, brine valve bracket
3 1 60037-610 brine valve assembly, 0.25 gpm
60020-620 brine valve assembly, 0.50 gpm
60020-630 brine valve assembly, 1.00 gpm
60020-690 brine valve assembly, blank
60037HW brine valve assembly, hot water
3A 1 60020-25 brine line flow control assembly, 0.25 gpm
60020-50 brine line flow control assembly, 0.50 gpm
60020-100 brine line flow control assembly, 1.00 gpm
4 1 tube, brine valve
5 1 adapter kit
6 1 16922 bracket, brine valve
7 2 15137 screw, brine valve bracket
8 2 15414 nut, tube
9 1 16959 tube, brine valve
10 1 60039-00 brine valve assembly, blank
60039-10 brine valve assembly, 1.0 gpm
60039-12 brine valve assembly, 1.2 gpm
60039-15 brine valve assembly, 1.5 gpm
60039-20 brine valve assembly, 2.0 gpm
60039-24 brine valve assembly, 2.4 gpm
60039-30 brine valve assembly, 3.0 gpm
60039-35 brine valve assembly, 3.5 gpm
60039-40 brine valve assembly, 4.0 gpm
1600 Series Brine System
1700 Series Brine System
9000/9100/9500 Second Tank Assemblies

Figure 28

Figure 29

Figure 30
9000/9100/9500 Second Tank Assemblies
Item Quantity Part Number Description
9000 second tank assembly
1 4 14202-01 screw, hex head #8-32
2 4 13255 clip, hold-down
3 4 15078-01 coupling assembly,
4 1 14864-01 second tank adapter assembly,
14864-01NP second tank adapter assembly,
9000
9000, nickel-plated
5 1 15823-06 yoke assembly 6" tanks, 6" tubes
15823-06NP yoke assembly 6" tanks, 6" tubes, nickel-plated
15823-12 yoke assembly 12" tanks, 8-1/2" tubes
15823-12NP yoke assembly 12" tanks, 8-1/2" tubes, nickel-plated
15823-14 yoke assembly 14" tanks, 10-1/2" tubes
15823-14NP yoke assembly 14" tanks, 10-1/2" tubes, nickel-plated
15823-16 yoke assembly 16" tanks, 12-1/2" tubes
15823-16NP yoke assembly 16" tanks, 12-1/2" tubes, nickel-plated
9100 second tank assembly
6 1 60425-12 plastic tube assembly,
9100, up to 12" tanks
60425-16 plastic tube assembly,
9100, up to 16" tanks
7 1 14865 second tank adapter assembly,
9100
8 1 61419 distributors adapter kit,
9100, 1.05"
9500 second tank assembly
9 1 16919-01 second tank adapter assembly,
9500
16919-01NP second tank adapter assembly,
9500, nickel-plated
16919-21 second tank adapter assembly,
9500, BSP/Metric
16919-21NP second tank adapter assembly,
9500, BSP/Metric, nickel-plated
10 1 60715-16 tube assembly 16" tanks
60715-16NP tube assembly 16" tanks, nickel-plated
60715-20 tube assembly 20" tanks
60715-20NP tube assembly 20" tanks, nickel-plated
60715-24 tube assembly 24" tanks
60715-24NP tube assembly 24" tanks, nickel-plated
9000/9100/9500 Meter Assemblies
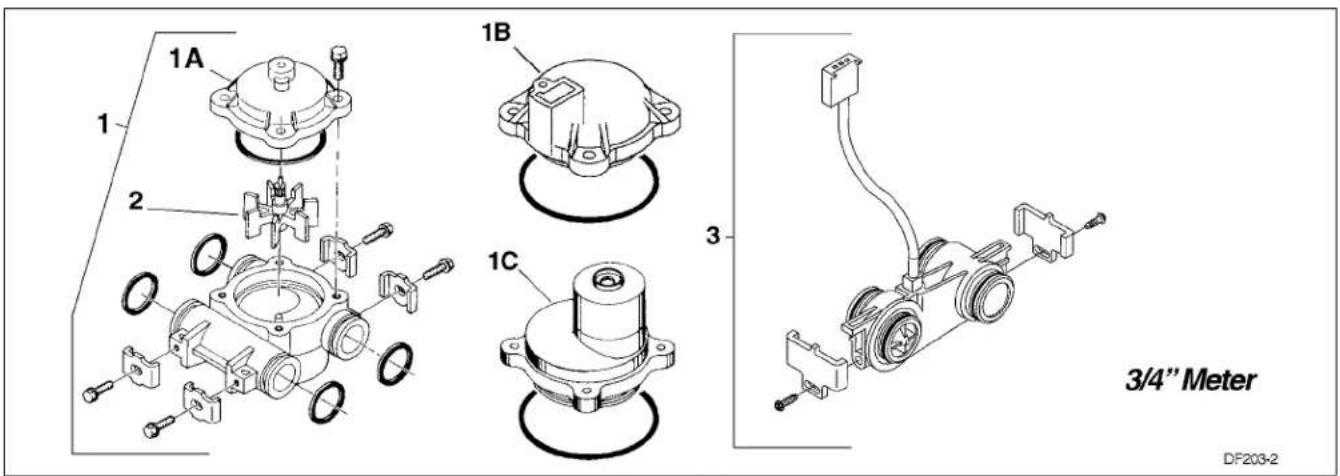
Figure 31
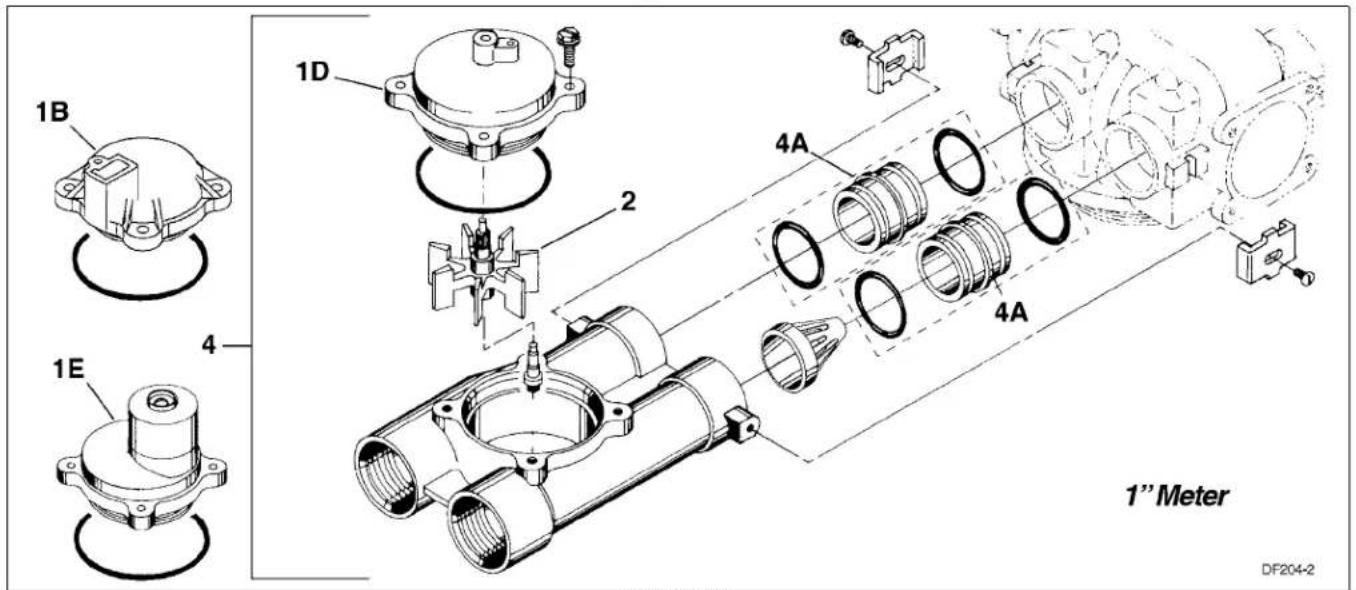
Figure 32

Figure 33
9000/9100/9500 Meter Assemblies
Item Quantity Part Number Description
9000 meter assembly
| 1 1 60086 3/4" meter assembly, standard range | ||
| 60086-50 3/4" meter assembly, electronic ( ET) | ||
| 60087 3/4" meter assembly, extended range | ||
| 1A 1 14038 meter cap assembly, standard range | ||
| 1B 14716 meter cap assembly, electronic ( ET) | ||
| 1C 15150 meter cap assembly, extended range | ||
| 1D 1 15218 meter cap assembly, brass standard range | ||
| 15218NP meter cap assembly, brass nickel-plated standard range | ||
| 1E 15237 meter cap assembly, brass extended range | ||
| 15237NP meter cap assembly, brass nickel-plated extended range | ||
| 2 1 13509 impeller | ||
| 13509-01 impeller, hot water | ||
| 3 1 19797 3/4" turbine meter assembly, less clips and screws | ||
| 60626 3/4" turbine meter assembly with clips, screws, meter cable | ||
| 60626-01 3/4" turbine meter assembly, with clips and screws | ||
| 4 1 60389 1" meter assembly, standard range | ||
| 60389NP 1" meter assembly, standard range | ||
| 1 60389-20 1" meter assembly, standard range, BSP | ||
| 60390 1" meter assembly, extended range | ||
| 60390NP 1" meter assembly, extended range, nickel-plated | ||
| 60390-20 1" meter assembly, extended range, BSP | ||
| 60612 1" meter assembly, standard range, hot water | ||
| 60622 1" meter assembly, electronic | ||
| 4A 1 15078 1" adapter coupling | ||
| 5 | 1 60610-01 1-1/2" meter assembly, standard range | |
| 60610-01NP 1-1/2" meter assembly, standard range, nickel-plated | ||
| 60610-02 1-1/2" meter assembly, extended range | ||
| 60610-02NP 1-1/2" meter assembly, extended range, nickel-plated | ||
| 60610-21 1-1/2" meter assembly, standard range, BSP | ||
| 60610-21NP 1-1/2" meter assembly, standard range, BSP, nickel-p | ||
| 60610-22 1-1/2" meter assembly, extended range, BSP | ||
| 60610-22NP 1-1/2" meter assembly, extended range, BSP, nickel-p | ||
| 60611-01 1-1/2" meter assembly, standard range, with 1" sleeve | ||
| 60611-01NP 1-1/2" meter assembly, standard range, with 1" sleeve | ||
| 60611-02 1-1/2" meter assembly, extended range, with 1" sleeve | ||
| 60611-02NP 1-1/2" meter assembly, extended range, with 1" sleeve | ||
| Not Shown | ||
| 6* | 17790 | 1-1/2" meter sleeve reduced to 1" |
| 7 | 60460 | meter checker kit, standard range |
| 8 | 60461 | meter checker kit, extended range |
* when reducing 1-1/2" meter to 1" program wheel and timer settings must be changed to 1" meter size
9000/9100 Bypass Valve

Figure 34
Item Quantity Part Number Description
1 1 60040SS 3/4" bypass valve NPT
60040-10 3/4" bypass valve BSP
60041SS 1" bypass valve NPT
60041-10 1" bypass valve BSP
2 1 60049 plastic bypass valve
Not Shown
3 40157 plastic bypass T-handle wrench
2310 Safety Brine Valve

Figure 35
Item Quantity Part Number Description
| 1 1 60014 | 2310 safety brine valve |
| 2 1 60068 | 2310 float assembly |
| 60026-30 float assembly red/white (float fill) | |
| 3 1 60002 #500 air check |
9500, 2350 Safety Brine Valve
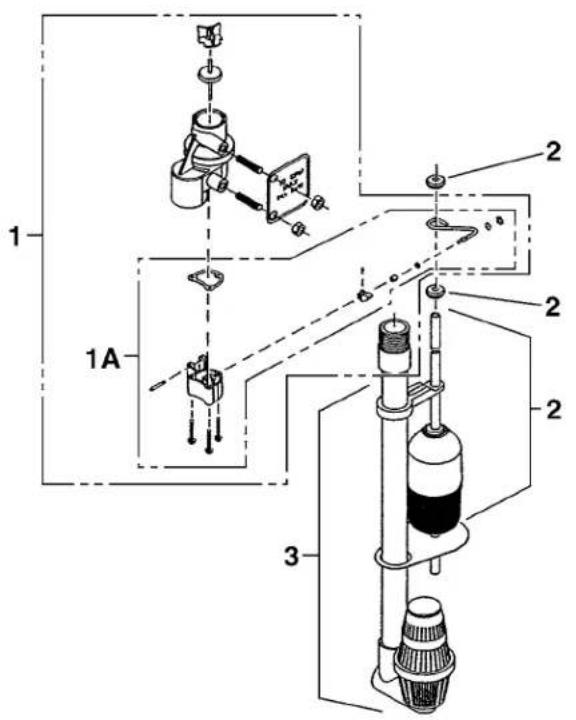
DF213-0
Figure 36
Item Quantity Part Number Description
| 1 1 60038 | 2350 safety brine valve |
| 1A 1 61024 | 2350 actuator assembly |
| 2 1 60026-30 float assembly red/white | |
| 60076-30SAN float assembly green/green (hot water) | |
| 3 1 60009-00 #900 air check | |
| 1 60009-01 #900 air check hot water | |
Not Shown
4 18603
5 18604 #900 fittings for
2350 fittings for 1700 brine system
1700 brine system
2300 Safety Brine Valve

DF044-1
Figure 37
Item Quantity Part Number Description
| 1 1 60027-FFA | 2300 safety brine valve, fitting facing arm |
| 60027-FFS | 2300 safety brine valve, fitting facing stud |
| 2 1 60028-30 float assembly blue/white | |
| 60026-30SAN float assembly green/green, hot water | |
| 3 1 60002 #500 air check | |
| 60003 #500 air check, hot water | |
Water Conditioner Flow Diagrams
In Service Position
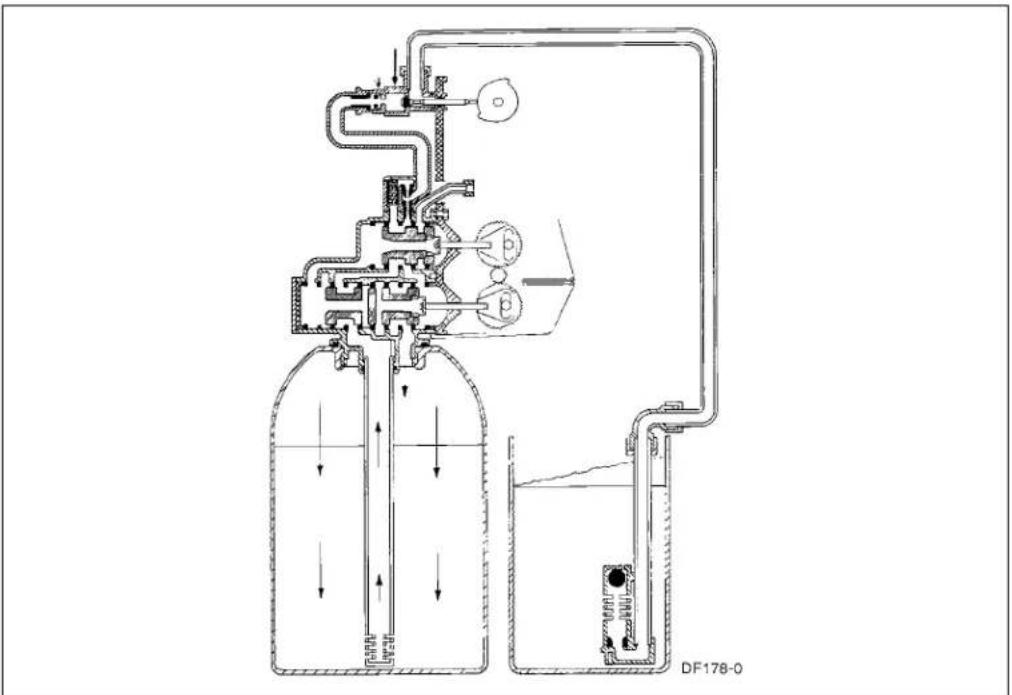
Figure 38: In Service Position
Tanks Switching

Figure 39: Tanks Switching, Meter Initiated Regeneration
Backwash
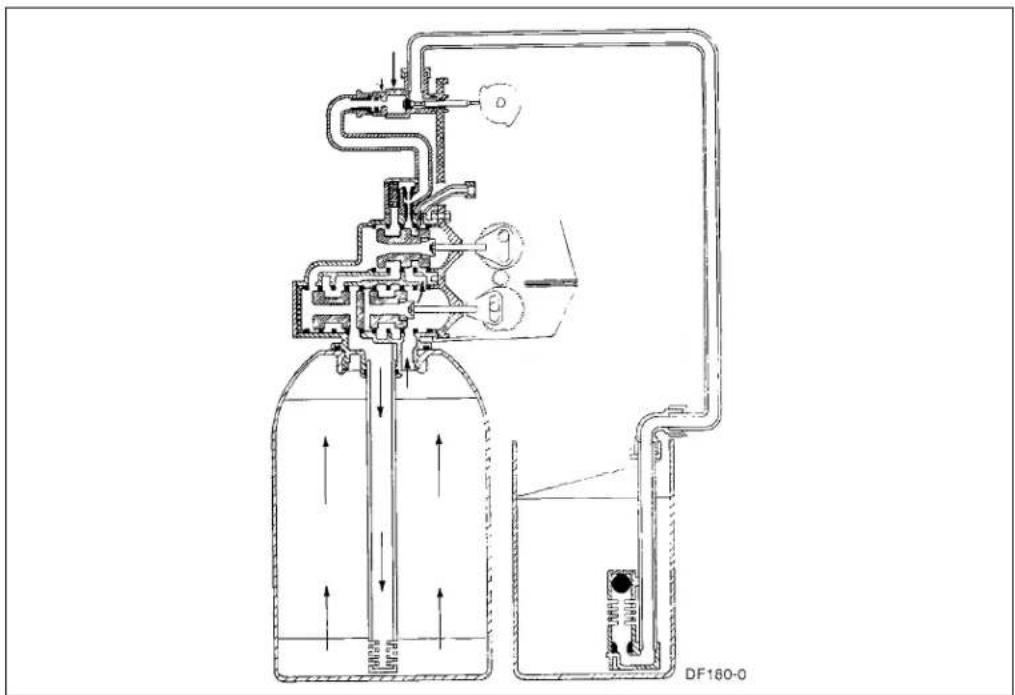
Figure 40: Backwash Position
Brine Draw
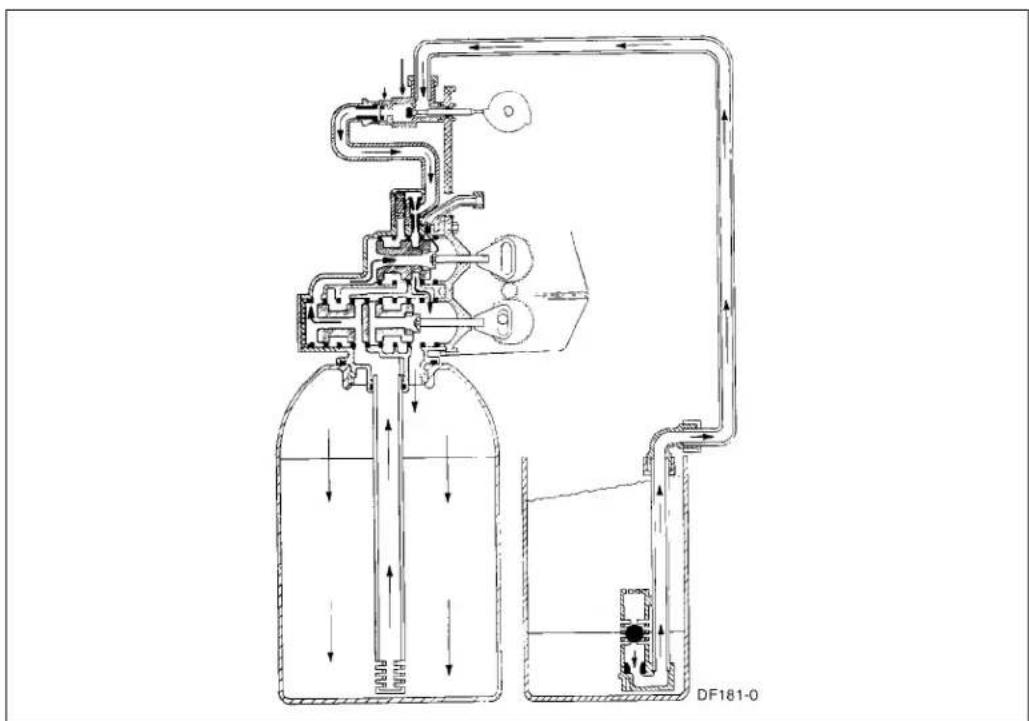
Figure 41: Brine Draw
Slow Rinse

Figure 42: Slow Rinse
Rapid Rinse
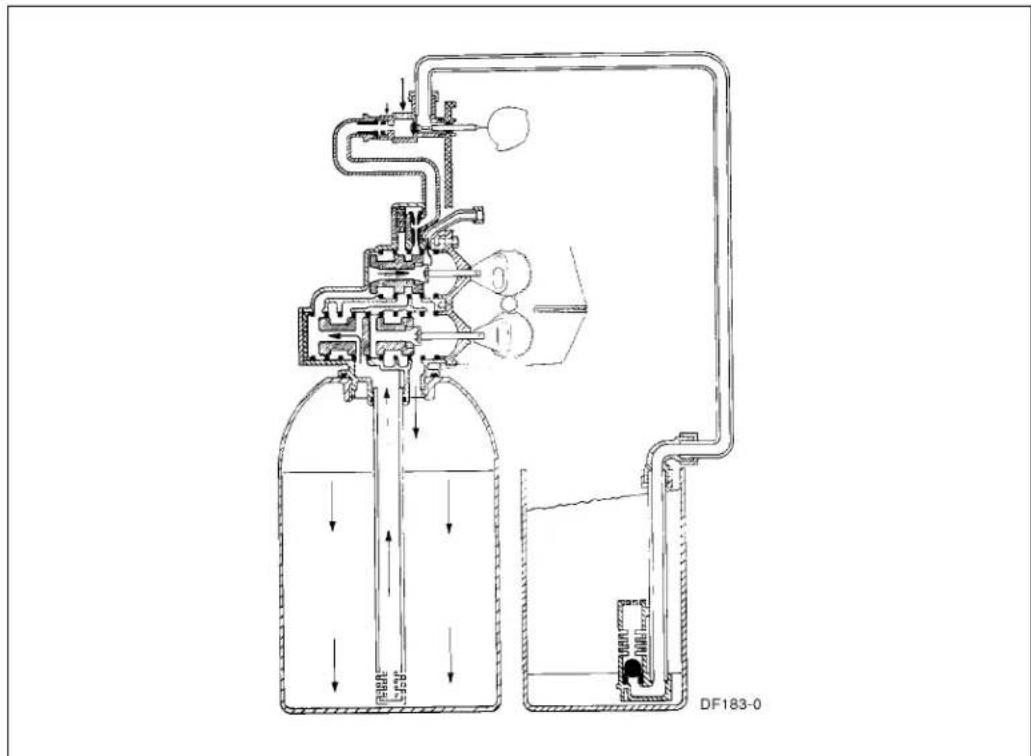
Figure 43: Rapid Rinse
Brine Tank Fill Position

Figure 44: Brine Tank Fill Position
In Service, Tanks Switched

Figure 45: In Service, Tanks Switched
Troubleshooting
| PROBLEM CAUSE CORRECTION | ||
| 1. Softener fails to regenerate. A. Electrical service to unit has been interrupted. | A. Assure permanent electrical service (check fuse, plug, pull chain or switch). | |
| 2. Hard water. A. Bypass valve is open. | B. Replace timer. | |
| A. Close bypass valve. | ||
| B. Add Salt to brine tank and maintain salt level above water level. | ||
| C. Clean injector screen. | ||
| D. Check brine tank fill time and clean brine line flow control if plugged. | ||
| E. Repeated flushing of the hot water tank is required. | ||
| F. Make sure distributor tube is not cracked. Check O-Ring and tube pilot. | ||
| G. Replace seals and spacers and/or piston. | ||
| 3. Unit used too much salt. A. Improper salt setting. | A. Check salt usage and salt setting. | |
| B. See Problem No. 7. | ||
| 4. Loss of water pressure. A. Iron buildup in line to water conditioner. | A. Clean line to water conditioner. | |
| B. Clean control and add mineral cleaner to mineral bed. Increase frequency of regeneration and/or backwash time. | ||
| C. Remove pistons and clean control. | ||
| 5. Loss of mineral through drain line. | A. Air in water system. | A. Assure that well system has proper air eliminator control. Check for dry well condition. |
| B. Drain line flow control too large. | B. Check to ensure drain line flow control is sized properly for your mineral tank. | |
| 6. Iron in conditioned water. | A. Fouled mineral bed. | A. Check backwash, brine draw and brine tank fill. Increase frequency of regeneration. |
| 7. Excessive water in brine tank. | A. Plugged drain line flow control. | A. Check flow control. |
| B. Plugged injector system. | B. Clean injector and screen. | |
| C. Timer not cycling. | C. Replace timer. | |
| D. Foreign material in brine valve. | D. Replace brine valve seat and clean valve. | |
| E. Foreign material in brine line flow control. | E. Clean brine line flow control. | |
| F. Power loss during brine fill. | F. Check power source. | |
Model 9000/9100/9500
| PROBLEM CAUSE CORRECTION | ||
| 8. Softener fails to draw brine. A. Drain | line flow control is plugged.B. Injector is plugged.C. Injector screen plugged.D. Line pressure is too low.E. Internal Control Leak | A. Clean drain line flow control.B. Clean injector.C. Clean screen.D. Increase line pressure to 25 psi min.E. Change seals, spacers and piston assembly. |
| 9. Control cycles continuously. A. Broken or shorted switch. A. Determine if switch or timer is faulty and replace it, or replace complete power head. | ||
| 10. Drain flows continuously. A. Valve is not programming correctly.B. Foreign material in control.C. Internal control leak. | A. Check timer program and positioning of control. Replace power head assembly if not positioning properly.B. Remove power head assembly and inspect bore, remove foreign material and check control in various regeneration positions.C. Replace seals and piston assembly. | |
General Service Hints
Problem: Softener delivers hard water
| PROBLEM CAUSE CORRECTION | ||
| Softener delivers hard water. | Reserve capacity has been exceeded. | Check salt dosage requirements and reset program wheel to provide additional reserve. |
| Program wheel is not rotating with meter output. | Pull cable out of meter cover and rotate manually. Program wheel must move without binding and cycle actuator must start the cycle before the clutch releases. | |
| Meter is not measuring flow. | Check output by observing rotation of small gear on front of timer(Note: Program wheel must not be against regeneration stop for this check)Each tooth is approximately 75 gallons on 1-1/2" installations. If not performing properly, replace meter. | |
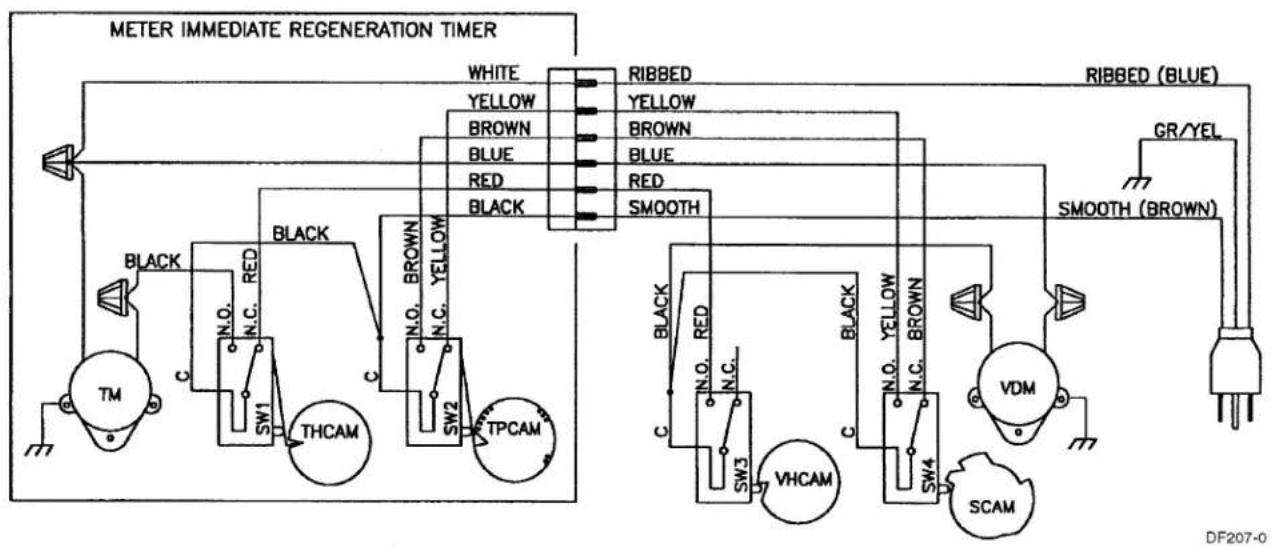
Mechanical Timer Valve Wiring
flowchart
graph TD
    A["METER IMMEDIATE REGENERATION TIMER"] --> B["WHITE"]
    A --> C["RIBBED"]
    A --> D["GR/YEL"]
    A --> E["SMOOTH (BROWN)"]
    B --> F["YELLOW"]
    B --> G["BROWN"]
    B --> H["BLE"]
    B --> I["RED"]
    B --> J["BLACK"]
    C --> K["YELLOW"]
    C --> L["BROWN"]
    C --> M["BLE"]
    C --> N["RED"]
    C --> O["SMOOTH"]
    D --> P["GR/YEL"]
    E --> Q["SMOOTH (BROWN)"]
    F --> R["TM"]
    G --> S["N.C. RED"]
    H --> T["N.C. YELLOW"]
    I --> U["N.C. YELLOW"]
    J --> V["N.C. YELLOW"]
    R --> W["THCAM"]
    S --> X["TPCAM"]
    T --> Y["SW1"]
    U --> Z["SW2"]
    V --> AA["SW3"]
    W --> AB["Black"]
    X --> AC["Black"]
    Y --> AD["Black"]
    Z --> AE["VHCAM"]
    AA --> AF["SCAM"]
TM - TIMER MOTOR
VDM - VALVE DRIVE MOTOR
SW1 - TIMER HOMING SWITCH
SW2 - TIMER PROGRAM SWITCH
SW3 - VALVE HOMING SWITCH
SW4 - VALVE PROGRAM SWITCH
THCAM - TIMER HOMING CAM
TPCAM - TIMER PROGRAM CAM
Figure 46
line
| PSI | Total | Rinse | Brine Draw | | --- | --- | --- | --- | | 20 | 0.20 | 0.18 | 0.05 | | 40 | 0.30 | 0.25 | 0.10 | | 60 | 0.40 | 0.30 | 0.15 | | 80 | 0.45 | 0.35 | 0.14 | | 100 | 0.50 | 0.40 | 0.13 | | 120 | 0.55 | 0.45 | 0.12 |Injector # 3

line
| PSI | Total | Rinse | Brine Draw | | ---- | ----- | ----- | ---------- | | 20 | 1.00 | 0.80 | 0.30 | | 40 | 1.50 | 1.20 | 0.40 | | 60 | 2.00 | 1.50 | 0.50 | | 80 | 2.25 | 1.75 | 0.60 | | 100 | 2.50 | 2.00 | 0.70 | | 120 | 2.75 | 2.25 | 0.80 |Injector # 0
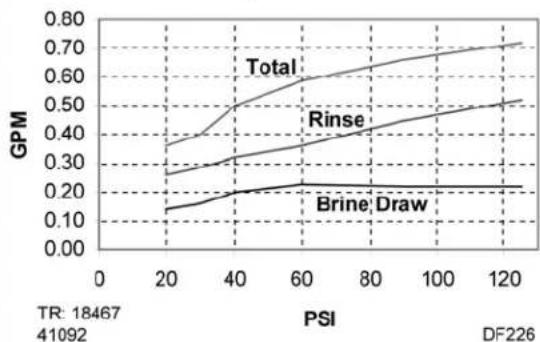
line
| PSI | Total | Rinse | Brine,Draw | | ---- | ----- | ----- | ---------- | | 20 | 0.35 | 0.25 | 0.15 | | 40 | 0.50 | 0.30 | 0.20 | | 60 | 0.60 | 0.35 | 0.25 | | 80 | 0.65 | 0.40 | 0.25 | | 100 | 0.70 | 0.45 | 0.25 | | 120 | 0.75 | 0.50 | 0.25 |Injector # 4

line
| PSI | Total | Rinse | Brine Draw | | ---- | ----- | ----- | ---------- | | 20 | 1.00 | 1.00 | 0.25 | | 40 | 1.50 | 1.50 | 0.35 | | 60 | 2.00 | 2.00 | 0.45 | | 80 | 2.50 | 2.50 | 0.55 | | 100 | 3.00 | 3.00 | 0.65 | | 120 | 3.50 | 3.50 | 0.75 |Injector # 1

line
| PSI | Total | Rinse | Brine Draw | | --- | --- | --- | --- | | 20 | 0.40 | 0.35 | 0.15 | | 40 | 0.60 | 0.45 | 0.20 | | 60 | 0.75 | 0.55 | 0.25 | | 80 | 0.85 | 0.65 | 0.28 | | 100 | 0.90 | 0.70 | 0.30 | | 120 | 0.95 | 0.75 | 0.32 |Figure 55: 9000/9100—1600 Series Injectors
9500
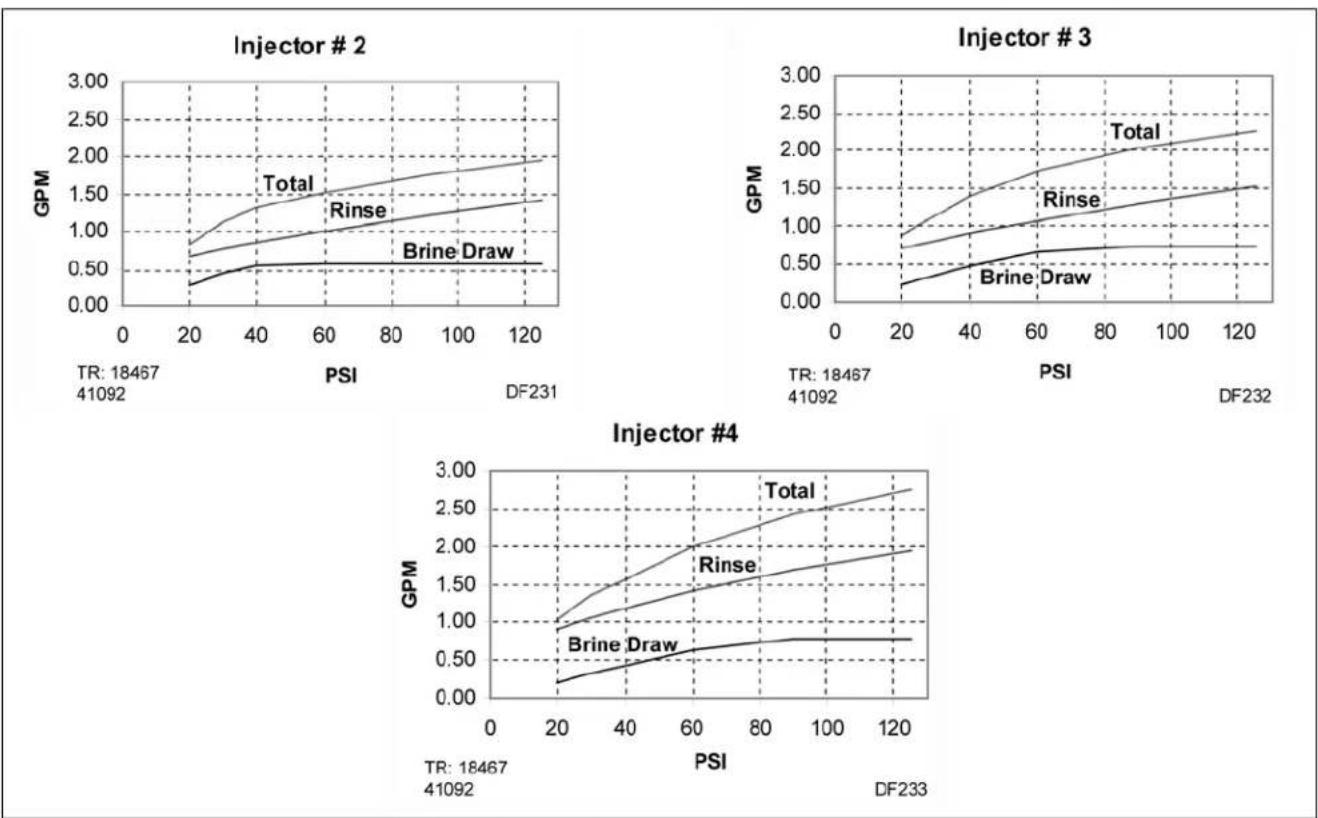
Figure 56: 9500—1600 Series Injectors

Figure 57: 9500—1700 Series Injectors
- Table of Contents
- Job Specifications Sheet
- Control Valve Specifications
- Type of Timer
- Type of Meter
- Mechanical Valves
- (gallon settings)
- Meter Standard Range Extended Range
- Electrical Timers
- (minutes per cycle)
- General and Commercial Installation Checklist
- Water Pressure
- Electrical Facilities
- Existing Plumbing
- Location of Softener and Drain
- Bypass Valves
- CAUTION
- Equipment Configuration
- Electrical
- Regeneration Cycle Program Setting Procedure
- Setting the Regeneration Cycle Program
- Changing Length of the Backwash Time
- Changing Length of Brine and Rinse Time
- Changing Length Of Rapid Rinse
- Changing Length of Brine Tank Refill Time
- Time Brine Refill and Meter Setting Procedure
- Programming
- Example:
- DO NOT SET THIS FIGURE - GO TO STEP 4
- ET Timer Installation And Start-Up Procedures
- gallons of water remaining
- Valve advancing to Regeneration Step #1
- flashing
- Regeneration Step #1 reached
- ET Timer Control Start-Up Procedure
- Display ET
- ET Timer Control Operation
- Timeclock Regeneration Valves
- Flow Meter Equipped Immediate Regeneration Valves
- Sensor Immediate Regeneration Valves
- Sensor Delayed Regeneration Valves
- Lockout Input Operation
- Start an Extra Cycle
- Totalizer/Flow Rate
- Low Battery Indicator
- Immediate Regeneration Valves With Days Between Regeneration Override Set
- Delayed Regeneration Valves With Days Between Regeneration Override Set
- Control Operation During Regeneration
- Control Operation During Programming
- Control Operation During A Power Failure
- SE Timer Control Start-Up Procedures
- Set Time of Day
- Start an Extra Regeneration Cycle
- Set Control Programming
- ET and SE Timer Assemblies
- Item Quantity Part Number Description
- 9000/9100/9500 Electro Mechanical Timer Assembly
- 9000/9100/9500 Power Head
- Control Valve Assembly
- Control Valve Assembly
- Control Valve Assembly
- Brine Valve Systems (1600 and 1700 Series)
- 9000/9100/9500 Second Tank Assemblies
- second tank assembly
- second tank assembly
- second tank assembly
- 9000/9100/9500 Meter Assemblies
- 9000/9100 Bypass Valve
- 9500, 2350 Safety Brine Valve
- Water Conditioner Flow Diagrams
- In Service Position
- Tanks Switching
- Model 9000/9100/9500
- General Service Hints
- Mechanical Timer Valve Wiring
Brand : ZANKER
Model : 9100
Category : Washing machine