GT-WS-06w - Weather Station Ascot - Free user manual and instructions
Find the device manual for free GT-WS-06w Ascot in PDF.


| Product Type | Weather Station |
| Brand | Ascot |
| Model | GT-WS-06w |
| Dimensions | 150 x 100 x 30 mm |
| Weight | 200 g |
| Power Supply | 2 x AAA batteries (not included) or DC adapter (5V, 1A) |
| Indoor Temperature Range | 0°C to 50°C / 32°F to 122°F |
| Outdoor Temperature Range | -20°C to 60°C / -4°F to 140°F |
| Humidity Range | 20% to 95% RH |
| Barometric Pressure | 600 to 1100 hPa |
| Wireless Range | Up to 100 meters (open area) |
| Frequency | 433 MHz |
| Display Type | LCD with backlight |
| Functions | Indoor/outdoor temperature & humidity, barometric pressure trend, weather forecast, time/date, alarm, moon phase |
| Maintenance | Clean with a soft, dry cloth. Avoid water and solvents. |
| Safety Precautions | Keep out of reach of children. Do not immerse in water. Dispose of batteries properly. |
| Spare Parts / Repairability | Outdoor sensor available for purchase. For repairs, contact Ascot support. |
| General Information | This wireless weather station transmits data from an outdoor sensor to the indoor display unit. The forecast is based on barometric pressure changes. |
Frequently Asked Questions - GT-WS-06w Ascot
User questions about GT-WS-06w Ascot
0 question about this device. Answer the ones you know or ask your own.
Ask a new question about this device
Download the instructions for your Weather Station in PDF format for free! Find your manual GT-WS-06w - Ascot and take your electronic device back in hand. On this page are published all the documents necessary for the use of your device. GT-WS-06w by Ascot.
USER MANUAL GT-WS-06w Ascot
Digital Radio-controlled weather station
User's Guide

Now you have purchased an Ascot product.
After Sales Support
Now you have purchased a Ascot product you can rest assured in the knowledge that as well as your 3 year parts and labour warranty you have the added peace of mind of dedicated helplines and web support.

Contents
3 Introduction
3 Safety
6 This is what the weather station offers
7 Overview of weather station
10 Initial use
13 About the time signal
16 Select location
21 Displays
23 Time functions
25 Weather data
31 Moon phases
32 Other functions
35 Cleaning
36 Faults and rectification
37 Technical data
38 Conformity declaration
38 Disposal
39 Warranty card
HELPLINE No. U K / NIRELAND 0800 328 60 20 REP. IRELAND 00800 44 67 58 88 WEB SUPPORT info@dariolondon.com
Introduction
Congratulations on choosing to buy a Ascot product. By doing so you now have the assurance an peace of mind that comes with purchasing a product made by one of Europe's leading manufacturer.
All products brought to you by Ascot are manufactured to the highest standards of performance and safety, an, as part of our philosophy of customer service and satisfaction, are backed by our comprehensive 3 Year Warranty.
Please fill in an return the Warranty Card to the adress provided. We hope you will enjoy using youy purchase for many years to come.
Safety

Please read carefully through the following information and keep these instructions, in case you need to refer to them later. If you pass the product on to someone else, please also include these instructions.
Designated use
The weather station - comprised of the base station and radio sensor - displays various weather data (air pressure, temperature, etc.) from the vicinity. From the measured weather data, the weather station determines a weather forecast. The weather station also displays the date, time and moon phases and also has an alarm function. The weather station is unsuitable for commercial use in weather forecasting or in weather data measurement.
HELPLINE No. UK / NJRELAND 0800 328 60 20 REP. IRELAND 00 800 44 67 58 88 WEB SUPPORT info@dariolondon.com
Hazards for children
- Batteries can be lifter endangering if swallowed. Therefore, keep the weather station, radio sensor and batteries out of reach of small children. If a battery has been swallowed, medical assistance must immediately be sought.
- Keep children away from packaging material and the small parts in the scope of delivery. Suffocation hazard if swallowed.
Injury hazard
- Caution: Explosion hazard with improper handling of batteries. Batteries must not be charged, reactivated with other means, dismantled, thrown into fire or short-circuited.
- Avoid contact with skin, eyes and mucous membranes. When coming into contact with battery acid, immediately rinse the affected areas with plenty of clear water and immediately contact a doctor.
Caution – property damage
- Protect the base station and radio sensor from dust, impact, extreme temperatures and direct sunshine.
- Protect the base station from moisture. Exclusively position base station in a dry, enclosed space.
- The radio sensor is protected from moisture, but must be protected from direct moisture, e.g. rain.
- Rubberized feet to prevent slipping are located on the bottom of the base station. As the furniture/floor surfaces are made of diverse materials and are treated with diverse care products, it cannot be entirely ruled out that some of these materials contain components, which could attack and soften the rubber lining. If necessary, place a non-slip base under the base station.
HELPLINE No. U K / NIRELAND 0800 328 60 20 REP. IRELAND 00 800 44 67 58 88 WEB SUPPORT info@dariolondon.com
- Remove the battery is from the base station and radiation sensor if they become depleted or if you are not using the weather station for a longer period of time. This way, you avoid damage that could result from leakage.
- Do not expose the batteries to any extreme conditions by e.g. laying them on a radiator or under direct sunlight. Increased leakage hazard!
- Clean the battery and appliance contacts prior to insertion, if required.
- Only use batteries of the same type, do not use different types or used and new batteries together.
- Do not carry out any changes to the device. Only allow repairs to be carried out by a professional workshop and pay attention to the guarantee conditions.
- Do not use harsh or abrasive detergents for cleaning the weather station. This could scratch the surfaces.
Contents of delivery
• Weather station, comprised of the base station and radio sensor
• 2 batteries type LR6 (AA) / 1.5 V (base station)
• 2 batteries type R03 (AAA) / 1.5 V (radio sensor)
- Operating instructions with guarantee
• Quick Reference Guide
HELPLINE No. U K / NIRELAND 0800 328 60 20 REP. IRELAND 00 800 44 67 58 88 WEB SUPPORT info@dariolondon.com
This is what the event has a statement offers
Weather station
- Precise time through reception of a time indicator signal
• 12-hour or 24-hour display for two time zones
• Date and day of week display
• Inside temperature display in °C/°F - Outside temperature display in ^ / ^ with up to three sensors at various measuring points
• Inside and outside humidity display - Minimum/maximum display for temperature, atmospheric humidity and barometric pressure
• Weather trend display and temperature trend display
• Current and historical air pressure trend display
• Symbols for the weather forecast - Moon phase display
- Battery control display
Sensor
• Temperature display in °C/°F
• Humidity display
• Range of up to 100 metres (in open space)
HEUPLINE No. U K / NIRELAND 0800 328 60 20 REP. IRELAND 00 800 44 67 58 88 WEB SUPPORT info@dariolondon.com
Overview of weather station
Base station - view from front and top


HELPLINE No UK / NIRELAND 0800 328 60 20 REP IRELAND 00 800 44 67 58 88 WEB SUPPORT info@daribionfon.com
Base station - right side view

HELPLINE No. UK / NIRELAND 0800 328 60 20 REP. IRELAND 00B00 44 57 58 88 WEB SUPPORT info@dariolondon.com
Base station - back


natural_image
White electronic device with a stand and screen, no visible text or symbolsWith the other type of weather station, the BARO buttons are on the left side.
HELPLINE No. U.K / NIRELAND 0800 328-60 20 REP. IRELAND 00800 44 57 58 86 WEB SUPPORT info@daribondon.com
Radio sensor
Battery compartment

natural_image
Interior view of a white rectangular electronic device casing with internal components and mounting holes (no visible text or symbols)Change degree of measurement for temperature
Set sensor number (transmission channel)
Accelerate radio transmission to base station manually
Initial lusee
Inserting batteries
i
Proceed in the order shown and first insert the batteries into the radio sensor and only afterwards into the base station. Only this way, can the weather station function faultlessly.
HELPUNE No U.K / NJRELAND0800 328 60 20 REP IRELAND 00.800 44 67 58 98 WEB SUPPORT info@darjolondon.com
Radio sensor

natural_image
Close-up of a screwdriver holding a small electronic device with a circular arrow indicating rotation (no text or symbols visible)- Remove the battery compartment lid on the back of the radio sensor.
- Insert two type R03 (AAA) / 1.5 V batteries, as shown on the base of the battery compartment. Pay attention to the correct polarity (+/-) of the batteries.
- Reattach the battery compartment lid.
Using additional radio sensors
The weather station is supplied with one radio sensor. However, you can operate the weather station with up to three radio sensors. Additional radio sensors are available through our Service centre, see page 46.
• The radio sensors can be situated in different rooms or outdoors.
• Each sensor must have its own sensor number (sensor number = number of the transmission channel) allocated to it (1 to 3).
- For the snow and frost warning, the weather station only evaluates the data of the sensor with the lowest number (default is 1).
HEPLINE No. UK / NIRELAND 0800 328 60 20 REP. IRELAND 00 800 44 57 58 88 WEB SUPPORT info@durabiondon.com
Procedure:
- Remove the battery compartment lid on the back of the radio sensors.
- Set a dedicated sensor number for each radio sensor using the slide switches.
- Reattach the battery compartment lids onto the radio sensors.
- Keep the CHANNEL button pressed on the base station until the display for weather data OUT flashes.
The base station will now access the weather data for all available radio sensors.
Base station
- Fold open the battery compartment lid.
- Insert two type LR6 / 1.5 V batteries, as shown on the base of the battery compartment. Pay attention to the correct polarity (+/-).
- Reattach the battery compartment lid and fold it shut.
- Wait for approx. 30 minutes. The base station requires this time in order to gather all of the weather data and receive radio signals from the time indicator signal.
Setting air pressure
The air pressure depends on the altitude, i.e. in the mountains, there is lower air pressure than in lowlands.
For the proper function of your weather station, you therefore need to enter the current air pressure value of your device location. You can obtain information on this on the Internet or from the local authorities of your town or municipality. When you have entered the current (related to sea level) air pressure in the weather station, this always shows the sea-level-related air pressure of the location.
- Keep the SET/BARO button pressed until the display that shows the air pressure begins to flash.
HELPLINE No. UK / NIRELAND.O80D 328 60 20 REP. IRELAND.OG.B0D 44 67 5B 8B WEB SUPPORT info@dariolondon.com
-
Using the BAROO/ BAROO buttons set the air pressure. Pay attention to what is shown in the display.
-
Then, press SET/BARO again.
i
If you keep the BARO-/BARO+ pressed, the values move forward more quickly.
About the time signal
General
The radio-controlled clock that is integrated into the weather station receives its radio signals from the time indicator signal MSF.
As soon as the base station is supplied with power by the batteries, it switches onto receiving and searches for the signal from transmitter MSF. If the time signal has been received through the ferrite bar antenna built into the radio-controlled alarm clock at a sufficient strength, the date and time will be shown in the display.
The base station switches on several times a day and synchronises its time with the radio signal from transmitter MSF. In the case of non-receipt, e.g. with strong lightning storms, the device continues to run accurately and only switches to receiving automatically at the next designated time.
Start radio reception manually
When the batteries are inserted in the base station, all indications will briefly been shown in the display. The display will also briefly illuminate and sound a beep tone.
HELPLINE No. U X / NIRELAND 0800 32B 60 20 REP IRELAND 00 800 44 67 58 88 WEB SUPPORT info@darlobonden.com

After this, the device switches to receiving, whereby the radio wave number shows the quality of the reception: The more radio waves are displayed, the better the reception.
As soon as the signal is received with sufficient strength, the relevant data is shown in the display and the transmitter tower symbol is constantly displayed. This process can take a few minutes.
Effective immediately, the weather station switches to receiving several times a day and compares the displayed time with that from the time signal transmitter.
If a week signal is received the base station will stop the receiving process and the tower symbol will not be shown. The receiving process will start again later.
In this case, the time continues to run normally, from the start time of "00:00".
- First, check whether the location of the base station is suitable, see page 16.
- You can restart the receiving process again manually, see page 15, or
- Wait until the base station automatically switches to receiving again later. Reception is usually better during the night.
- If reception is not possible at your location, you can set the time and date manually, see next chapter.
Set time and date manually
- Keep the MODE/SET, pressed until the year flashes in the display.
- Using the +/ð or -/°/ZONE buttons, set the year.
- Press the MODE/SET. button to save the setting. The month flashes in the display.
- Using the +/ or -/ /ZONE buttons, set the month.
HELPUNE No. UK / NIRELAND 0800 328 60 20 REP. IRELAND 00 800 44 67 58 88 WEB SUPPORT info@dariolondon.com
-
Press the MODE/SIE. To button to save the setting. The date flashes in the display.
-
Using the +/△ or -/°/ZONE buttons, set the date.
-
Press the MODE/SET. button to save the setting. The hour flashes in the display.
-
Using the +/△ or -/° /ZONE buttons, set the correct hour.
-
Press the MODE/SET. button to save the setting. The minute flashes in the display.
-
Using the +/△ or -/°/ZONE buttons, set the correct minute.
-
Press the MODE/SET. button to save the setting. In the display, the 12-hour and 24-hour time format flashes.
i
With the 12-hour format, the afternoon hours are identified in the display with PM.
- Using the +/△ or -/°/ZONE buttons to set the required time format.
- Press the MODE/SET. button to save the setting. In the display, the zone setting (+11/-11) flashes.
- Using the +/ or -/ /ZONE buttons, set the time difference to another metropolis or region (if required).
- For additional information regarding the time zone function, see page 34.
- Press the MODE/SET. button to end the process.
Start radio reception manually

If the adjacent radio signal symbol is no longer displayed, the radio signals of the time signal transmitter are no longer being received. The time display nevertheless continues to run accurately.
HELPLINE No. UK / NIRELAND 0800 328 60 20 REP. IRELAND 00 800 44 67 58 88 WEB SUPPORT info@daribionlon.com
In order to start the reception of the time signal manually, keep the -/ZONE button pressed until the radio signal symbol is displayed again and the weather station is switched to reception.
Please note:
- If the reception was not successful, the reception symbol disappears after several minutes and the time in the display continues to run normally.
- With successful reception, the radio-controlled alarm clock sets itself to the time of the time signal transmitter. If you have already carried out manual time and date settings, these are automatically adjusted.
Select location

ATTENTION
- Protect the base station and radio sensor from dust, impact, extreme temperatures and direct sunshine.
- Protect the base station from moisture. Exclusively position base station in a dry, enclosed space.
- The radio sensor is protected from moisture, but must be protected from direct moisture, e.g. rain.
General
The base station and radio sensor exchange data through a radio frequency. Therefore, the location is crucial to the range of the radio connection.
HELPLINE No. UK / NIRELAND 0800 328 60 20 REP. IRELAND 00 800 44 67 58 86 WEB SUPPORT info@dariolondon.com
Please note:
- The maximum allowable distance between the base station and the sensor is 100 metres. However, this range is only possible with "direct visible contact".
- Blocking building materials, e.g. reinforced concrete reduce or prevent radio reception between the base station and radio sensor.
• Devices, such as televisions, cordless telephones, computers and neon tubes can also disrupt the radio reception. - Do not place the base station and radio sensor directly on the ground. This limits the range.
- At low temperatures during the winter, the performance of the radio sensor batteries can fall significantly. This reduces the transmission range.
Regarding the radio reception between the time signal transmitter and the base station, please note the following points:
• Preferably set up the base station near a window.
- Keep a distance to televisions, PCs and monitors. Base stations of cordless telephones should also not be in the direct vicinity of the weather station.
- Reception is usually better during the night. If the alarm clock should not have any reception during the daytime, it could be that the signal will immediately be received at night and at full strength.
- The weather, e.g. an intense lighting storm, can cause reception problems.
- The transmitter can occasionally be switched off temporarily, e.g. for maintenance works.
HELPUNE No. UK / NIRELAND 0800 32B 60 20 REP. IRELAND 00 B00 44 67 5B 8B WEB SUPPORT info@dar@iondon.com
Base station

DANGER
When installing on a wall, please ensure that no electric cables, gas and water pipes are not buried beneath the wall surface before drilling any holes.


HELPLINE No U.K / NIRELANDOSO0 328 60 20 REP. IRELAND 00 B00 44 67 58 98 WEB SUPPORT info@darlobondon.com
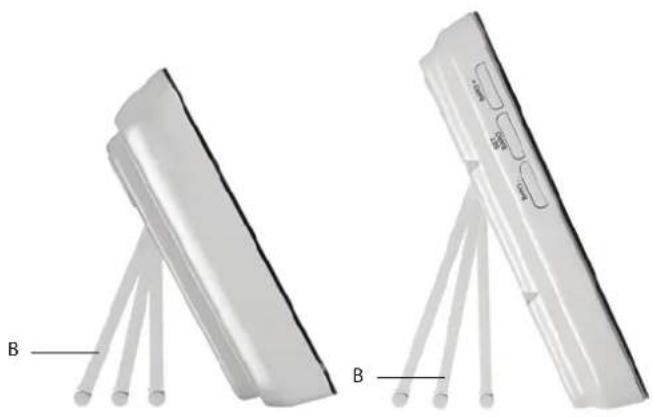
- The base station can be stood up or suspended. The base station has a fold-down stand (A) and two suspension loops (A) for this purpose.
• The stand has three locking positions. - Preferably set up or suspend the base station near a window. This is usually the best reception site.
natural_image
Two views of a cylindrical electronic device with labeled pins (B), shown from different angles (no text or symbols on the device itself)HELPLINE No. U K / NIRELAND 0800 32B 60 20 REP. IRELAND 00 800 44 67 58 88 WEB SUPPORT info@daribondon.com
Radio sensor
- Stand and drop the radioisensor at location where it is protected from direct weather influences (rain, sun, wind, etc.). Suitable locations are e.g. below a canopy or in a carport.

natural_image
Front view of a white outdoor transceiver device with indicator lights and control buttons (no readable text or symbols beyond branding)HELPLINE No UK / NIRELAND 0800 32B 60 20 REP IRELAND 00 B00 44 67 5B 8B WEB SUPPORT info@daribondon.com
Displays
Base station
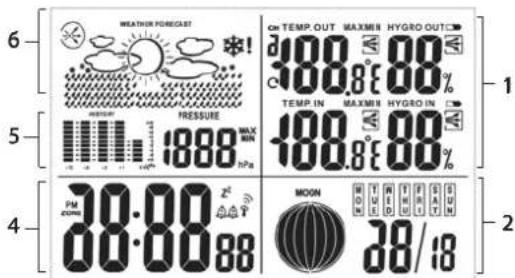

HELPLINE No. UK / NIRELAND 0800 328 60 20 REP, IRELAND 00 800 44 67 58 88 WEB SUPPORT info@dariolondon.com
| 1 | Display, see page 25 |
| 2 | Date and day of week display, see page 23 |
| 3 | Moon phase display, see page 31 |
| 4 | Date and alarm time display, see page 23 |
| 5 | Air pressure display, see page 28 |
| 6 | Weather forecast, see page 29 |
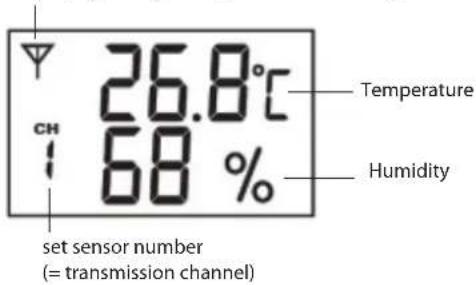
Radio sensor
Symbol for radio link between base station and radio sensor (displayed only during radio transmission)
HEIPLINE No. UK / NIRELAND0800 328 60 20 REP. IRELAND 00 BDO 44 67 58 88 WEB SUPPORT info@daciobondos.com
Time functions
Time and date
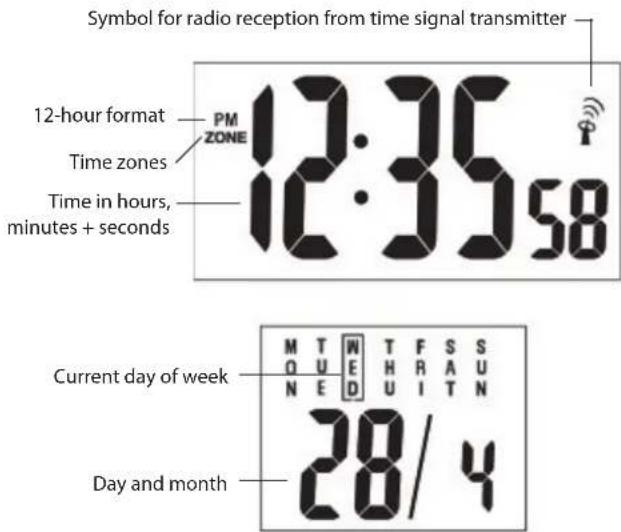
Alarm function
You can set two different alarm times with the base station For example, you can be woken up in the morning and after your afternoon nap, by activating both alarms.
- Select the required alarm time by pressing the MODE/SET. button (A1 or A2).
HELPLINE No UK / NIRELAND.0800 328 60 20 REP. IRELAND 00.800 44 67 58 88 WEB SUPPORT info@dariboklton.com
- Keep the MODE/SET. Toped (for approx 2 seconds) when you have selected the required alarm time. The hour display of the alarm time (A1 or A2) flashes.
- Using the +/△ or -/°/ZONE buttons, set the required alarm hour.
- Press the MODE/SET. button to save the setting. The minute flashes in the display.
- Using the +/☐ or -/☐ /ZONE buttons, set the required alarm minute.
- Press the MODE/SET. button to save the setting. The alarm time is set and activated.
Switch alarm function on and off
The alarm function is switched on an off using the +/button.
- Press 1x: A1 is active is displayed
- Press 2x: A2 is active is displayed
- Press 3x: and A1 and A2 are active is displayed
- Press 4x: and A1 and A2 are no longer active is extinguished
End alarm
At the set time, you will be woken up by an alarm signal, whereby the signal will increase in intensity, the longer the alarm sounds.
- Alarm repeat - Press the LIGHT/SNOOZE button repeatedly, in order to disrupt the alarm for 5 minutes. This process can be repeated several times.
HELPUNE No. UK / NIRELAND 0800 328 60 20 R&P. IRELAND 00 800 44 57 58 88 WEB SUPPORT info@dariolondon.com
- Switch off alarm completely - Press any button on the base station in order to end the alarm.
- Autostop function - If you do not press any button, the alarm will switch off automatically after 2 minutes.
• After 24 hours, the alarm will sound again.
Alarm repeat
Press the LIGHT/SNOOZE button 1x.
The alarm becomes silent for approx. 5 minutes. After this, the devices switches itself back on and wakes you up again. This process can be repeated several times.
Weather data
Temperature and humidity
This area is divided into two parts in the display. The top section OUT [OUTSIDE] shows the values measured by the radio sensor, the bottom section IN [INSIDE] shows the data recorded by the base station. For technical reasons, the relative humidity can only be determined within the temperature range of 0 - 60°C.

If "LL" is shown in the OUT [OUTSIDE] section of the display, the humidity is either a) outside of the measurement range of 20% or b) the outside temperature has fallen below 0°C. In case b), "LL" is displayed for technical reasons.
HELPLINE No. U K / NIRELAND 0800 328 60 20 REP.IRELAND 00 800 44 67 58 88 WEB SUPPORT info@dariolondon.com
Display area Radio sensor
OUT
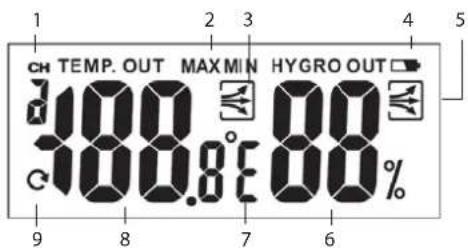
| 1 | Current transmission channel to the base station |
| 2 | Stored maximum and minimum values |
| 3 | Trend for temperature, see page 28 |
| 4 | Battery replacement display, see page 32 |
| 5 | Trend for humidity, see page 28 |
| 6 | Humidity in % |
| 7 | Degree of measurement for temperature °C or °F |
| 8 | Temperature |
| 9 | Indication that the sensors are automatically checked sequentially (only if more than one sensor is being used) |

With the CHANNEL button, you can switch between the radio sensors:
CH1, CH2, CH3 or automatic switching between all sensors. If fewer than three sensors are in use, non-existent radio sensor are skipped with the switching. If only one radio sensor is in use (standard), the auto-switching function is not available.
HEYLINE No UK / NIRELAND 0800 328 60 20 REP. IRELAND 00 800 44 67 5B 86 WEB SUPPORT info@dariolondon.com

| 1 | Stored maximum and minimum values |
| 2 | Trend for temperature, see page 28 |
| 3 | Battery replacement display, see page 32 |
| 4 | Trend for humidity, see page 28 |
| 5 | Humidity in % |
| 6 | Degree of measurement for temperature °C or °F |
| 7 | Temperature |
With the MIN/MAX button, you can obtain a display of the highest and lowest values for the last 24 hours in relation to the temperature and humidity.
• Press 1x: the MAX values are displayed
• Press 2x: the MIN values are displayed
- Press 3x: normal display
The MIN and MAX values are automatically deleted each night at 12:00 a.m.
HELPLINE No. UK / NI RELAND 0800 328-60 20 REP. IRELAND 00 800 44 67 58 88 WEB SUPPORT info@daribondon.com
i
The weather station also has a frost alarm. For additional information on this, see page 30.
Weather trend
For the temperature and humidity values measured by the base station and radio sensor, the trend is shown in the form of an arrow.
trend
Temperature
Humidity
rising constant


falling

Air pressure

bar
| Metric | Value | |---|---| | -12 | 3.5 | | -9 | 4.8 | | -3 | 6.2 | | -1 | 3.0 | | -0.5 | 4.5 | | -0.2 | 3.8 | | -0.1 | 3.2 | | -0.05 | 3.6 | | -0.02 | 3.4 | | -0.01 | 3.7 | | -0.005 | 3.9 | | -0.002 | 4.1 | | -0.001 | 4.3 | | -0.0005 | 4.5 | | -0.0002 | 4.7 | | -0.0001 | 4.9 | | -0.00005 | 5.1 | | -0.00002 | 5.3 | | -0.00001 | 5.5 | | -0.000005 | 5.7 | | -0.000002 | 5.9 | | -0.000001 | 6.1 | | -0.0000005 | 6.3 | | -0.0000002 | 6.5 | | -0.0000001 | 6.7 | | -0.00000005 | 6.9 | | -0.00000002 | 7.1 | | -0.00000001 | 7.3 | | -0.000000005 | 7.5 | | -0.000000002 | 7.7 | | -0.000000001 | 7.9 | | -0.0000000005 | 8.1 | | -0.0000000002 | 8.3 | | -0.0000000001 | 8.5 | | -0.00000000005 | 8.7 | | -0.00000000002 | 8.9 | | -0.00000000001 | 9.1 | | -0.000000000005 | 9.3 | | -0.000000000002 | 9.5 | | -0.000000000001 | 9.7 | | --12 | 34 | | -9 | 44 | | -3 | 64 | | -3 | 74 | | -1 | 84 | | -1 | 94 | | -1 | 1,14 | | -1 | 1,34 | | -1 | 1,54 | | -1 | 1,74 | | -1 | 1,94 | | -1 | 2,14 | | -1 | 2,34 | | -1 | 2,54 | | -1 | 2,74 | | -1 | 2,94 | | -1 | 3,14 | | -1 | 3,34 | | -1 | 3,54 | | -1 | 3,74 | | -1 | 3,94 | | -1 | 4,14 | | -1 | 4,34 | | -1 | 4,54 | | -1 | 4,74 | | -1 | 4,94 | | -1 | 5,14 | | -1 | 5,34 | | -1 | 5,54 | | -1 | 5,74 | | -1 | 5,94 | | -1 | 6,14 | | -1 | 6,34 | | -1 | 6,54 | | -1 | 6,74 | | -1 | 6,94 | | -1 | 7,14 | | -1 | 7,34 | | -1 | 7,54 | | -1 | 7,74 | | -1 | 7,94 | | -1 | 8,14 | | -1 | 8,34 | | -1 | 8,54 | | -1 | 8,74 | | -1 | 8,94 | | -1 | 9,14 | | -1 | 9,34 | | -1 | 9,54 | | -1 | 9,74 | | -1 | 9,94 | | -1 | 1,2 (PRESSURE) hPaThe trend of the air pressure within the last 12 hours is displayed in the form of a bar diagram. The scale goes from -1 (1 hour ago) to -12 (12 hours ago).
Next to the bar diagram, the current air pressure is displayed in hPA (hectopascals).
Press the MIN/MAX button in order to have the highest stored value during the last 12 hours displayed. By pressing again, the lowest measured value is displayed.
HELPLINE No. UK / NIRELAND 0800 328 60 20 REP IRELAND 00 800 44 67 58 88 WEB SUPPORT info@dariolondon.com
The MAX and MIN values are continuously measured bands stored. It is therefore not possible to manually delete these values.
In conjunction with the weather forecast, see next chapter, other weather indications are possible. Two examples:
- Weather forecast shows rain, the air pressure is falling quickly and intensively >> strong rain is likely.
- Weather forecast shows rain, the air pressure has risen during the last 12 hours, but has fallen again during the last 3 hours >> light rain is likely.
Weather forecast
i
After initial operation, the details regarding the weather forecast cannot yet be used for approx. 12 hours, as the weather station needs this time to gather and evaluate the weather data.
The weather forecast results from the gathered weather data and the measured changes in air pressure.
The forecast relates to the area around the weather station with a radius of approx. 30 - 50 km for a period of the next 12 to 24 hours.
The precision of the weather forecast is approximate only.

sunny

slightly cloudy
HELPLINE No. U K / NIRELAND 0800 328 60 20 REP. IRELAND 00 800 44 67 58 88 WEB SUPPORT info@dariolondon.com

cloudy

rainy

snowfall
Frost warning - When the radio sensor measures a temperature of between +1 °C and -1 °C, a risk of frost exists and a snowflake symbol flashes. If the temperature falls below -1 °C for a constant period of time, the snowflake symbol is displayed steadily.
Please note: Even if the temperature alarm is not displayed, there is always a risk of frost/black ice with temperatures around freezing point. The outside sensor can only measure the local temperature at the installation site.
i
Only if a radio sensor is in use. With a frost alarm, the radio sensor with the lowest sensor number is always evaluated.
If the symbols for the weather forecast start to flash and the air pressure falls, this is an indication of weather deterioration, e.g. because of a storm front closing in.
However, the requirement for a correct display is that you have set the air pressure at your location, see page 12.
HELPLIME No: UK / NIRELAND@BDO 328 60 20 REP. IRELAND 00 BDO 44 67 58 88 WEB SUPPORT info@dariblondon.com
When the air pressure rises again, the symbols are displayed constantly again.
In the top section, an arrow indicates the weather trend. If it points up or down, the air pressure has risen or fallen by more than 1 hPa within one hour.

constant air pressure = weather unchanged
rising air pressure = weather improving
falling air pressure = weather deteriorating
Moon phases
The displayed moon phases are automatically updated with the date

HELPLINE No. UK / NIRELAND 0800 32B 60 20 REP. IRELAND 00 B00 44 67 58 88 WEB SUPPORT info@darislondon.com
Otherfunctions
Switch light on
Press the LIGHT/SNOOZZE button in order to switch on the display lighting for several seconds.
Battery replacement display
There is a battery change display for each of the base station and radio sensor.
When the symbol for the battery change is displayed, the inserted batteries in the base station (symbol next to IN)/radio sensor (symbol next to OUT) need to be replaced with new ones. Then, proceed as described from page 10.
Please note:
- The battery replacement display for the radio sensors (symbol next to OUT) indicates the battery replacement for the respective displayed channel number.
- With a battery change, the settings are all lost. After the battery change, proceed as described from page 13.
- Always replace all of the batteries and only use those specified in the "Technical data".
- Pay attention to the correct polarity (+/-) of the batteries when inserting them.
- Dispose of old batteries in an environmentally compatible manner, see page 38.
HELPLINE No. U K / NIRELAND 0800 328 60 20 REP. IRELAND 00 800 44 67 58 88 WEB SUPPORT info@dariolondon.com
Change degree of measurement for temperature
The temperature can only be displayed in either °C or in °F on the base sensor and radio sensor.
Base unit
Keep the MIN/MAX button pressed for approx. 2 seconds, in order to change the displayed unit of measurement.
Radio sensor
- Open the battery panel on the back.
- Press the C/F button 1x.
Reset weather station
If obviously incorrect values are being displayed, you should reset the weather station to its factory settings.
- Remove the batteries from the weather station and reinsert them.
When the batteries are inserted in the base station, all indications will briefly been shown in the display. The display will also briefly illuminate and sound a beep tone.
After approx. 20 seconds, the display begins to flash and the data from the radio sensors is queried. - Pay attention to the displayed values.
- If incorrect values continue to be displayed: Remove the batteries from the radio sensors used and reinsert them.
- Proceed as described from page 10.
HELPLINE No. U K / NJRELAND 0800 32B 60 20 REP. IRELAND 00 800 44 67 58 88 WEB SUPPORT info@dariolondon.com
In order to accelerate the data interchange between the weather station and radio sensor, you can keep CHANNEL pressed on the weather station until the display flashes and press the TX button on the appropriate radio sensor. With this, the weather data will be directly transmitted to the base station.
Have time displayed in a different time zone
The requirement for this is that you have also entered the time in a second time zone, see from page 14.
- Press the -/ /ZONE button if you intend to have the time in a second time zone displayed. Next to the time, ZONE is displayed.
- Press -/ /ZONE again, if the originally displayed time should appear again.
Each country is allocated to a time zone, whereby countries with a very large east-west expansion frequently extend over several time zones.
Russia, for example, extends across 9 time zones, Canada extends over 5 time zones.
HELPLINE No. UK / NIRELAND 0800 328 60 20 REP. IRELAND 00 800 44 57 58 88 WEB SUPPORT info@dariolondon.com

In the western hemisphere, it is earlier than in Europe and in the eastern hemisphere, it is later.
In the diagram, each vertical line represents one our more or one hour less (-).
For example, if you intend to set the time for a country that is 7 hours east of your location, you must enter +7 (hours) as a value.
Cleaning
If required, wipe the weather station with a slightly dampened cloth.
HELPLINE No. UK / NIRELAND 0800 328 60 20 REP, IRELAND 00 800 44 67 58 88 WEB SUPPORT info@dariolondon.com
Faults and creetification
| Fault Possible causes and solution | Possible causes and solution |
| The MSF signal for the time cannot be received. | - Check the location, see page 16.- Start the radio reception manually, if necessary, see page 15.- Set the time manually, see page 14. |
| The temperature display of the sensor appears too high. | - Check whether the sensor is exposed to direct sunlight. |
| The weather station does not receive any sensor signals. | - Ensure that no electrical disruption sources are near the sensor or the base station.- Check the batteries in the sensor.- Start the radio reception manually: Keep the CHANNEL button pressed on the base station until the display for weather data OUT flashes. You can also keep the TX button pressed in the battery compartment of the radio sensor in order to transfer the data to the base station more quickly.- Move the weather station closer to the sensor or vice versa. |
| The display is illegible, the function is unclear or the values are obviously incorrect. | - Reset the weather station to its original factory settings, see page 33. |
HEIPLINE No UK / NIRELAND 0800 328 60 20 REP. IRELAND 00 800 44 67 58 88 WEB SUPPORT info=dariolondon.com
In the display, HH / LL is shown in the display instead of the measured values for temperature/humidity.
- The values are above/below the measurement range, see "Technical data". - The measured outside temperature is less than 0^ C.
Technical data
Base station: GT-WS-07s / GT-FWS-07w / GT-WS-07w GT-WS-06s / GT-WS-06w
Batteries: 2 x LR6 (AA) / 1.5 V
Measurement range
of the temperature 0 °C to +50 °C
Measurement precision: max. +/- 1°C within a measurement range of 0 to 40°C
Resolution: 0.1°C
Measurement range
of humidity: 20% to 90% relative humidity
Measurement precision: +/- 10% relative humidity
Resolution: 1%
Sensor: GT-WT-01
Batteries: 2 x type R03 (AAA) / 1.5 V
Measurement range of
the temperature: -15 °C to +60 °C
Transmission frequency 433 MHz
Range: max. 100 metres (in free space)
As our products are constantly being further developed and improved, design and technical changes are possible.
HELPLINE No. UK / NIRELAND 0800 328 60 20 REP. IRELAND 00 800 44 67 58 88 WEB SUPPORT info@dariolondon.com
Conformitydelelaratidron
Globaltronics GmbH & Co. KG hereby declares that this radio-controlled weather station complies with the basic requirements and other regulations of Directive 1999/5/EC. You can find the full conformity declaration on the Internet at www.gt-support.de.
Disposal

Dispose of the packaging in an environmentally appropriate manner. The appliance must not be disposed of with household waste. If the appliance should no longer usable, remove the batteries from the appliance. Ask the local waste removal association about the necessary disposal measures.

Batteries and rechargeable batteries are not permitted to be disposed of with household waste. Every consumer is legally obligated to submit batteries and rechargeable batteries to the collection centre of his local municipality, district or to retailers. All batteries and rechargeable batteries can thereby disposed of in an environmentally friendly manner.
Cd Hg Pb
Batteries and rechargeable batteries containing toxins are identified with this symbol and with chemical symbols (Cd for cadmium, Hg for mercury, Pb for lead).
HELPLINE No. U K / NIRELAND 0800 328 60 20 REP. IRELAND 00 800 44 67 58 88 WEB SUPPORT info@dariolondon.com

Digital Radio-controlled weather station
3 YEAR
WARRANTY CARD
Name
Adress
Email TelNo
Model No.
Location of purchase
Please send your completed Warranty Card to:
Dario London Service Centre
PO Box 70
Chislehurst
BR7 5YH
UK
Hotline - UK: 0800 / 328 6020
Hotline - Ireland: 00800 / 4467 5888
Mail: info@dariolondon.com
E44059
11/2011
- Digital Radio-controlled weather station
- After Sales Support
- Contents
- Introduction
- Safety
- Designated use
- Hazards for children
- Injury hazard
- Caution – property damage
- Contents of delivery
- This is what the event has a statement offers
- Weather station
- Sensor
- Overview of weather station
- Base station - view from front and top
- Base station - right side view
- Radio sensor
- Initial lusee
- Inserting batteries
- Using additional radio sensors
- Procedure:
- Base station
- Setting air pressure
- About the time signal
- General
- Start radio reception manually
- Set time and date manually
- Select location
- ATTENTION
- Please note:
- DANGER
- Displays
- Time functions
- Time and date
- Alarm function
- Switch alarm function on and off
- End alarm
- Alarm repeat
- Weather data
- Temperature and humidity
- Weather trend
- Air pressure
- Weather forecast
- Moon phases
- Otherfunctions
- Switch light on
- Battery replacement display
- Change degree of measurement for temperature
- Base unit
- Reset weather station
- Have time displayed in a different time zone
- Cleaning
- Technical data
- Conformitydelelaratidron
- Disposal
- YEAR
- WARRANTY CARD
Brand : Ascot
Model : GT-WS-06w
Category : Weather Station