
SQL Server 2008 R2 - Server Software MICROSOFT - Free user manual and instructions
Find the device manual for free SQL Server 2008 R2 MICROSOFT in PDF.

| Product Type | Relational Database Management System (RDBMS) |
| Version | 2008 R2 |
| Edition | Enterprise, Standard, Web, Workgroup, Express, Datacenter, etc. |
| Supported Operating Systems | Windows Server 2003 SP2, Windows Server 2008 SP2, Windows Server 2008 R2, Windows 7, Windows Vista SP2, Windows XP SP3 |
| Architecture | 64-bit (x64), 32-bit (x86) - limited to certain editions |
| System Requirements | Minimum 1 GHz processor, 512 MB RAM (2 GB recommended) |
| Disk Space | At least 2.6 GB for installation (depending on components) |
| Key Features | Data compression, transparent data encryption, PowerPivot, master data services, reporting services |
| Management Tools | SQL Server Management Studio, SQL Server Agent, Business Intelligence Development Studio |
| Maintenance | Regular updates via Windows Update, Service Packs, and Cumulative Updates |
| Security | Role-based access control, encryption, network isolation, audit support |
| Backup & Recovery | Full, differential, transaction log backups; point-in-time restore |
| Spare Parts | Software-only product; no physical spare parts. Licensing components available from Microsoft. |
| Repairability | Reinstallation or repair using original media. Microsoft support available. |
| General Information | End of mainstream support: July 2014; extended support: July 2019. Not recommended for new deployments. |
Frequently Asked Questions - SQL Server 2008 R2 MICROSOFT
User questions about SQL Server 2008 R2 MICROSOFT
0 question about this device. Answer the ones you know or ask your own.
Ask a new question about this device
Download the instructions for your Server Software in PDF format for free! Find your manual SQL Server 2008 R2 - MICROSOFT and take your electronic device back in hand. On this page are published all the documents necessary for the use of your device. SQL Server 2008 R2 by MICROSOFT.
USER MANUAL SQL Server 2008 R2 MICROSOFT
natural_image
Close-up of a metallic tool with a pointed tip against a blue background (no text or symbols visible)Ross Mistry and Stacia Misner
PUBLISHED BY
Microsoft Press
A Division of Microsoft Corporation
One Microsoft Way
Redmond, Washington 98052-6399
Copyright © 2010 by Microsoft Corporation
All rights reserved. No part of the contents of this book may be reproduced or transmitted in any form or by any means without the written permission of the publisher.
Library of Congress Control Number: 2010925075
Printed and bound in the United States of America.
123456789 WCT 543210
Distributed in Canada by H.B. Fenn and Company Ltd.
A CIP catalogue record for this book is available from the British Library.
Microsoft Press books are available through booksellers and distributors worldwide. For further information about international editions, contact your local Microsoft Corporation office or contact Microsoft Press International directly at fax (425) 936-7329. Visit our Web site at www.microsoft.com/mspress. Send comments to mspinput@microsoft.com.
Microsoft, Microsoft Press, Access, ActiveX, DirectX, Expression, Expression Blend, Hotmail, IntelliSense, Internet Explorer, MS, MSDN, MS-DOS, MSN, SharePoint, Silverlight, SQL Server, Visual Basic, Visual C#, Visual Studio, Win32, Windows, Windows Live, Windows NT, Windows Server, and Windows Vista are either registered trademarks or trademarks of the Microsoft group of companies. Other product and company names mentioned herein may be the trademarks of their respective owners.
The example companies, organizations, products, domain names, e-mail addresses, logos, people, places, and events depicted herein are fictitious. No association with any real company, organization, product, domain name, e-mail address, logo, person, place, or event is intended or should be inferred.
This book expresses the author's views and opinions. The information contained in this book is provided without any express, statutory, or implied warranties. Neither the authors, Microsoft Corporation, nor its resellers, or distributors will be held liable for any damages caused or alleged to be caused either directly or indirectly by this book.
Acquisitions Editor: Devon Musgrave
Developmental Editor: Karen Szall
Project Editor: Maria Gargiulo
Editorial Production: Online Training Solutions, Inc.
Technical Reviewer: Rozanne Whalen; Technical Review Services provided by Content Master, a member of CM Group, Ltd.
Cover: Tom Draper Design
I dedicate this book to my wife and children, who make it all worthwhile.
—Ross MISTRY
I dedicate this book to my husband and best friend, Gerry.
—STACIA MISNER
Contents at a Glance
Introduction xvii
PART I DATABASE ADMINISTRATION
CHAPTER 1 SQL Server 2008 R2 Editions and Enhancements 3
CHAPTER 2 Multi-Server Administration 21
CHAPTER 3 Data-Tier Applications 41
CHAPTER 4 High Availability and Virtualization Enhancements 63
CHAPTER 5 Consolidation and Monitoring 85
PART II BUSINESS INTELLIGENCE DEVELOPMENT
CHAPTER 6 Scalable Data Warehousing 109
CHAPTER 7 Master Data Services 125
CHAPTER 8 Complex Event Processing with StreamInsight 145
CHAPTER 9 Reporting Services Enhancements 165
CHAPTER 10 Self-Service Analysis with PowerPivot 189
Contents
Introduction xvii
PART I DATABASE ADMINISTRATION
CHAPTER 1 SQL Server 2008 R2 Editions and Enhancements 3
SQL Server 2008 R2 Enhancements for DBAs ....3
Application and Multi-Server Administration Enhancements 4
Additional SQL Server 2008 R2 Enhancements for DBAs 8
Advantages of Using Windows Server 2008 R2 ....10
SQL Server 2008 R2 Editions....11
Premium Editions 12
Core Editions 12
Specialized Editions 13
Hardware and Software Requirements....14
Installation, Upgrade, and Migration Strategies ..... 16
The In-Place Upgrade 16
Side-by-Side Migration 18
CHAPTER 2 Multi-Server Administration 21
The SQL Server Utility....21
SQL Server Utility Key Concepts 23
UCP Prerequisites 25
UCP Sizing and Maximum Capacity Specifications 25
What do you think of this book? We want to hear from you!
Microsoft is interested in hearing your feedback so we can continually improve our books and learning resources for you. To participate in a brief online survey, please visit:
microsoft.com/learning/booksurvey
Creating a UCP 26
Creating a UCP by Using SSMS 26
Creating a UCP by Using Windows PowerShell 28
UCP Post-Installation Steps 29
Enrolling SQL Server Instances....29
Managed Instance Enrollment Prerequisites 30
Enrolling SQL Server Instances by Using SSMS 30
Enrolling SQL Server Instances by Using Windows PowerShell 32
The Managed Instances Dashboard 32
Managing Utility Administration Settings 33
Connecting to a UCP 33
The Policy Tab 34
The Security Tab 37
The Data Warehouse Tab 39
CHAPTER 3 Data-Tier Applications 41
Introduction to Data-Tier Applications....41
The Data-Tier Application Life Cycle 42
Common Uses for Data-Tier Applications 43
Supported SQL Server Objects 44
Visual Studio 2010 and Data-Tier Application Projects .....45
Launching a Data-Tier Application
Project Template in Visual Studio 2010 45
Importing an Existing Data-Tier
Application Project into Visual Studio 2010 47
Extracting a Data-Tier Application with
SQL Server Management Studio....49
Installing a New DAC Instance with the
Deploy Data-Tier Application Wizard 52
Registering a Data-Tier Application....55
Deleting a Data-Tier Application 56
Upgrading a Data-Tier Application 59
CHAPTER 4 High Availability and Virtualization Enhancements 63
Enhancements to High Availability with Windows Server 2008 R2 ..... 63
Failover Clustering with Windows Server 2008 R2....64
Traditional Failover Clustering 65
Guest Failover Clustering 67
Enhancements to the Validate A Configuration Wizard 68
The Windows Server 2008 R2 Best Practices Analyzer 71
SQL Server 2008 R2 Virtualization and Hyper-V....72
Live Migration Support Through CSV 72
Windows Server 2008 R2 Hyper-V System Requirements 73
Practical Uses for Hyper-V and SQL Server 2008 R2 74
Implementing Live Migration for SQL Server 2008 R2....75
Enabling CSV 76
Creating a SQL Server VM with Hyper-V 76
Configuring a SQL Server VM for Live Migration 79
Initiating a Live Migration of a SQL Server VM 83
CHAPTER 5 Consolidation and Monitoring 85
SQL Server Consolidation Strategies 85
Consolidating Databases and Instances 86
Consolidating SQL Server Through Virtualization 87
Using the SQL Server Utility for Consolidation and Monitoring .....89
Using the SQL Server Utility Dashboard....90
Using the Managed Instances Viewpoint 95
The Managed Instances List View Columns 96
The Managed Instances Detail Tabs 97
Using the Data-Tier Application Viewpoint .....100
The Data-Tier Application List View 102
The Data-Tier Application Tabs 102
CHAPTER 6 Scalable Data Warehousing 109
Parallel Data Warehouse Architecture .....109
Data Warehouse Appliances 109
Processing Architecture 110
The Multi-Rack System 110
Hub-and-Spoke Architecture 115
Data Management 115
Shared Nothing Architecture 115
Data Types 120
Query Processing 121
Data Load Processing 121
Monitoring and Management 122
Business Intelligence Integration 123
Integration Services 123
Reporting Services 123
Analysis Services and PowerPivot 123
CHAPTER 7 Master Data Services 125
Master Data Management 125
Master Data Challenges 125
Key Features of Master Data Services 126
Master Data Services Components 127
Master Data Services Configuration Manager 128
The Master Data Services Database 128
Master Data Manager 128
Data Stewardship 129
Model Objects 129
Master Data Maintenance 131
Business Rules 132
Transaction Logging 134
Integration....135
Importing Master Data 135
Exporting Master Data 136
Administration....137
Versions 137
Security 138
Model Deployment 142
Programmability....142
The Class Library 142
Master Data Services Web Service 143
Matching Functions 143
CHAPTER 8 Complex Event Processing with StreamInsight 145
Complex Event Processing....145
Complex Event Processing Applications 145
StreamInsight Highlights 146
StreamInsight Architecture....146
Data Structures 147
The CEP Server 147
Deployment Models 149
Application Development....150
Event Types 150
Adapters 151
Query Templates 154
Queries 155
Query Template Binding 162
The Query Object 163
The Management Interface....163
Diagnostic Views 163
Windows PowerShell Diagnostics 164
CHAPTER 9 Reporting Services Enhancements 165
New Data Sources....165
Expression Language Improvements....165
Combining Data from More Than One Dataset 166
Aggregation 168
Conditional Rendering Expressions 169
Page Numbering 170
Read/Write Report Variable 170
Layout Control....171
Pagination Properties 172
Data Synchronization 173
Text Box Orientation 174
Data Visualization....175
Data Bars 175
Sparklines 176
Indicators 176
Maps 177
Reusability 178
Shared Datasets 179
Cache Refresh 179
Report Parts 180
Atom Data Feed 182
Report Builder 3.0....183
Edit Sessions 183
The Report Part Gallery 183
Report Access and Management....184
Report Manager Improvements 184
Report Viewer Improvements 186
Improved Browser Support 186
RDL Sandboxing 186
SharePoint Integration....187
Improved Installation and Configuration 187
RS Utility Scripting 187
SharePoint Lists as Data Sources 187
SharePoint Unified Logging Service 188
CHAPTER 10 Self-Service Analysis with PowerPivot 189
PowerPivot for Excel....190
The PowerPivot Add-in for Excel 190
Data Sources 191
Data Preparation 193
PowerPivot Reports 196
Data Analysis Expressions 199
PowerPivot for SharePoint....201
Architecture 201
Content Management 204
Data Refresh 205
Linked Documents 205
The PowerPivot Web Service 205
The PowerPivot Management Dashboard ....206
Index 207
About the Authors 215
What do you think of this book? We want to hear from you!
Microsoft is interested in hearing your feedback so we can continually improve our books and learning resources for you. To participate in a brief online survey, please visit:
microsoft.com/learning/booksurvey
Acknowledgments
I would like to first acknowledge Shirmattie Seenarine for assisting me on this title. I couldn't have written this book without your assistance in such a short timeframe with everything else going on in my life. Your hard work, contributions, edits, and perseverance are much appreciated.
Thank you to fellow SQL Server MVP Kevin Kline for introducing me to the former SQL Server product group manager Matt Hollingsworth, who started the chain of events that led up to this book. In addition, I would like recognize Ken Jones, former product planner at Microsoft Press, for taking on this project. I would also like to thank my coauthor, Stacia Misner, for doing a wonderful job in writing the second portion of this book, which focuses on business intelligence (BI). I appreciate your support and talent in the creation of this title.
I would also like to recognize the folks at Microsoft Press for providing me with this opportunity and for putting the book together in a timely manner. Special thanks goes to Maria Gargiulo, project editor, and Karen Szall, developmental editor, for driving the project and bringing me up to speed on the "Microsoft Press" way. Maria, your attention to detail and organizational skills during the multiple rounds of edits and reviews is much appreciated. Also, thanks to all the folks on the production team at Online Training Solutions, Inc. (OTSI): Jean Trenary, project manager; Kathy Krause, copy editor; Rozanne Whalen, technical reviewer; and Kathleen Atkins, proofreader.
This book would not have been possible without the support and assistance of numerous individuals working for the SQL Server, High Availability, Failover Clustering, and Virtualization product groups at Microsoft. To my colleagues on the product team, thanks for your assistance in responding to my questions and providing chapter reviews:
■ SQL Server Manageability Dan Jones, Principal Group Program Manager; Omri Bahat, Senior Program Manager; Morgan Oslake, Senior Program Manager; Alan Brewer, Senior Programming Writer; and Tai Yee, Program Manager II
■ Clustering, High Availability, Virtualization, and Consolidation
Symon Perriman, Program Manager II; Ahmed Bisht, Senior Program Manager; Max Verun, Senior Program Manager; Tai Yee, Program Manager; Justin Erickson, Program Manager II; Zhen-Yu Zhao, SDET II; Madhan Arumugam, Program Manager Lead II; and Steven Ekren, Senior Program Manager
■ General Overview and Enhancements Sabrena McBride, Senior Product Manager
And last but not least, I would like to thank my Microsoft mentors who assisted with my career development and transition to the Microsoft Technology Center in Silicon Valley: Kelly Oliver, Alex Viera, Buck Woody, Kevin Tsai, and Burzin Patel.
—Ross Mistry
The chapters of Part II covering the BI features of Microsoft SQL Server 2008 R2 are more complete and more accurate thanks to the efforts of the members of each product team who graciously participated in the review process. I'd like to thank the following people for their contributions:
■ SQL Server 2008 R2 Parallel Data Warehouse Barbara Kess, Senior Technical Writer; Christian Kleinerman, Principal Product Unit Manager; Paul Dyke, Principal Architect; Richard Tkachuk, Principal Program Manager; Sadek Noureddine, Software Development Engineer; and Edward Melomed, Senior Program Manager
■ SQL Server 2008 R2 Master Data Services John McAllister, Principal Group Program Manager; Reagan Templin, Technical Writer; and Val Lovicz, Principal Program Manager
■ SQL Server StreamInsight Mark Simms, Senior Program Manager, Application Platform Customer Advisory Team
■ SQL Server 2008 R2 Reporting Services Thierry D'Hers, Group Program Manager; Neeraja Divakaruni, Program Manager; Carolyn Chau, Principal Program Manager Lead; Lukasz Pawlowski, Senior Program Manager; Yi Liao, Senior Program Manager; Prash Shirolkar, Program Manager; Sean Boon, Senior Program Manager; and Robert Bruckner, Senior Software Development Engineer
■ SQL Server PowerPivot Dave Wickert, Principal Program Manager
I'd also like to thank Sabrena McBride, Senior Product Manager, for her review of the entire book.
Last, but not least, I'd like to thank Ken Jones, former product planner, for inviting me to this project; Karen Szall, developmental editor, for helping us get started; and Maria Gargiulo, project editor, for patiently but firmly guiding us through the remainder of the project. I also thank Kathy Krause, Rozanne Whalen, and Kathleen Atkins for their roles during the copyediting, technical review, and proofreading processes. And finally, my thanks go also to Ross Mistry for his work on the chapters of Part I and his encouragement during the inevitable challenges related to working with pre-release software on a tight schedule.
Please accept our apologies if we missed anyone.
—Stacia Misner
Introduction
Our purpose in Introducing Microsoft SQL Server 2008 R2 is to point out both the new and the improved in the latest version of SQL Server. Because this version is Release 2 (R2) of SQL Server 2008, you might think the changes are relatively minor—more than a service pack, but not enough to justify an entirely new version. However, as you read this book, we think you will find that there are a lot of exciting enhancements and new capabilities engineered into SQL Server 2008 R2 that will have a positive impact on your applications, ranging from improvements in operation to those in management. It is definitely not a minor release!
Who Is This Book For?
This book is for anyone who has an interest in SQL Server 2008 R2 and wants to understand its capabilities. In a book of this size, we cannot cover every feature that distinguishes SQL Server from other databases, and consequently we assume that you have some familiarity with SQL Server already. You might be a database administrator (DBA), an application developer, a power user, or a technical decision maker. Regardless of your role, we hope that you can use this book to discover the features in SQL Server 2008 R2 that are most beneficial to you.
How Is This Book Organized?
SQL Server 2008 R2, like its predecessors, is more than a database engine. It is a collection of components that you can implement either separately or as a group to form a scalable data platform. In broad terms, this data platform consists of two types of components—those that help you manage data and those that help you deliver business intelligence (BI). Accordingly, we have divided this book into two parts to focus on the new capabilities for each of these areas.
Part I, "Database Administration," is written with the DBA in mind and introduces readers to the numerous innovations in SQL Server 2008 R2. Chapter 1, "SQL Server 2008 R2 Editions and Enhancements," discusses the key enhancements, what's new in the different editions of SQL Server 2008 R2, and the benefits of running SQL Server 2008 R2 on Windows Server 2008 R2. In Chapter 2, "Multi-Server Administration," readers learn how centralized management capabilities
are improved with the introduction of the SQL Server Utility Control Point. Step-by-step instructions show DBAs how to quickly designate a SQL Server instance as a Utility Control Point and enroll instances for centralized multi-server management. Chapter 3, "Data-Tier Applications," focuses on how to streamline deployment and manage and upgrade database applications with the new data-tier application feature. Chapter 4, "High Availability and Virtualization Enhancements," covers high availability enhancements and includes step-by-step implementations for ensuring business continuity with SQL Server 2008 R2, Windows Server 2008 R2, and Hyper-V Live Migration. Finally, in Chapter 5, "Consolidation and Monitoring," a discussion on consolidation strategies teaches readers how to improve resource optimization. This chapter also explains how to use the new dashboard and viewpoints to gain insight into application and database utilization, and it also covers how to use capacity policy violations to help identify consolidation opportunities, maximize investments, and ultimately maintain healthier systems.
In Part II, "Business Intelligence Development," readers discover components new to the SQL Server data platform, as well as significant enhancements to the reporting component. Chapter 6, "Scalable Data Warehousing," introduces the data warehouse appliance known as SQL Server 2008 R2 Parallel Data Warehouse by explaining its architecture, reviewing data layout strategies for optimal query performance, and describing the integration points with SQL Server BI components. In Chapter 7, "Master Data Services," readers learn about master data management concepts and the new Master Data Services component. Chapter 8, "Complex Event Processing with StreamInsight," describes scenarios that benefit from complex event analysis, and it illustrates how to develop applications that use the SQL Server StreamInsight engine for complex event processing. Chapter 9, "Reporting Services Enhancements," reviews all the new features available in SQL Server 2008 R2 Reporting Services that support self-service reporting and address common report design problems. Last, Chapter 10, "Self-Service Analysis with PowerPivot," continues the theme of self-service by explaining how users can integrate disparate data for analysis by using SQL Server PowerPivot for Excel, and how to centralize and share the results of this analysis by using SQL Server PowerPivot for SharePoint.
Pre-Release Software
To help you get familiar with SQL Server 2008 R2 as early as possible after its release, we wrote this book using examples that work with the Release Candidate 0 (RC0) version of the product. Consequently, the final version might include new features, and features we discuss might change or disappear. Refer to the "What's
New" topic in SQL Server Books Online at http://msdn.microsoft.com/en-us/library/bb500435(SQL.105).aspx for the most up-to-date list of changes to the product. Be aware that you might also notice some minor differences between the RTM version of the product and the descriptions and screen shots that we provide.
Support for This Book
Every effort has been made to ensure the accuracy of this book. As corrections or changes are collected, they will be added to a Microsoft Knowledge Base article accessible via the Microsoft Help and Support site. Microsoft Press provides support for books, including instructions for finding Knowledge Base articles, at the following Web site:
http://www.microsoft.com/learning/support/books/
If you have questions regarding the book that are not answered by visiting this site or viewing a Knowledge Base article, send them to Microsoft Press via e-mail to mspinput@microsoft.com.
Please note that Microsoft software product support is not offered through these addresses.
We Want to Hear from You
We welcome your feedback about this book. Please share your comments and ideas via the following short survey:
http://www.microsoft.com/learning/booksurvey
Your participation will help Microsoft Press create books that better meet your needs and your standards.
NOTE We hope that you will give us detailed feedback via our survey. If you have questions about our publishing program, upcoming titles, or Microsoft Press in general, we encourage you to interact with us via Twitter at http://twitter.com/MicrosoftPress. For support issues, use only the e-mail address shown above.
PART I
Database Administration
Ross MISTRY
CHAPTER 1 SQL Server 2008 R2 Editions and Enhancements 3
CHAPTER 2 Multi-Server Administration 21
CHAPTER 3 Data-Tier Applications 41
CHAPTER 4 High Availability and Virtualization Enhancements 63
CHAPTER 5 Consolidation and Monitoring 85
SQL Server 2008 R2 Editions and Enhancements
Microsoft SQL Server 2008 R2 is the most advanced, trusted, and scalable data platform released to date. Building on the success of the original SQL Server 2008 release, SQL Server 2008 R2 has made an impact on organizations worldwide with its groundbreaking capabilities, empowering end users through self-service business intelligence (BI), bolstering efficiency and collaboration between database administrators (DBAs) and application developers, and scaling to accommodate the most demanding data workloads.
This chapter introduces the new SQL Server 2008 R2 features, capabilities, and editions from a DBA's perspective. It also discusses why Windows Server 2008 R2 is recommended as the underlying operating system for deploying SQL Server 2008 R2. Last, SQL Server 2008 R2 hardware and software requirements and installation strategies are also identified.
SQL Server 2008 R2 Enhancements for DBAs
Now more than ever, organizations require a trusted, cost-effective, and scalable database platform that offers efficiency and managed self-service BI. These organizations face ever-changing business conditions in the global economy, IT budget constraints, and the need to stay competitive by obtaining and utilizing the right information at the right time.
With SQL Server 2008 R2, they can meet the pressures head on to achieve these demanding goals. This release delivers an award-winning enterprise-class database platform with robust capabilities that improve efficiency through better resource utilization, end-user empowerment, and scaling out at lower costs. Enhancements to scalability and performance, high availability, enterprise security, enterprise manageability, data warehousing, reporting, self-service BI, collaboration, and tight integration with Microsoft Visual Studio 2010, Microsoft SharePoint 2010, and SQL Server PowerPivot for SharePoint make it the best database platform available.
SQL Server 2008 R2 is considered to be a minor version upgrade of SQL Server 2008. However, for a minor upgrade it offers a tremendous amount of new, breakthrough capabilities that DBAs can take advantage of.
Microsoft has made major investments in the SQL Server product as a whole; however, the new features and breakthrough capabilities that should interest DBAs the most are the advancements in application and multi-server administration. This section introduces some of the new features and capabilities.
Application and Multi-Server Administration Enhancements
The SQL Server product group has made sizeable investments in improving application and multi-server management capabilities. Some of the main application and multi-server administration enhancements that allow organizations to better manage their SQL Server environments include
■ The SQL Server Utility This is a new manageability feature used to centrally monitor and manage database applications and SQL Server instances from a single management interface known as a Utility Control Point (UCP). Instances of SQL Server, data-tier applications, database files, and volumes are managed and viewed within the SQL Server Utility.
■ The Utility Control Point (UCP) As the central reasoning point for the SQL Server Utility, the Utility Control Point collects configuration and performance information from managed instances of SQL Server every 15 minutes. After data has been collected from the managed instances, the SQL Server Utility dashboard and viewpoints in SQL Server Management Studio (SSMS) provide DBAs with a health summary of SQL Server resources through policy evaluation and historical analysis. For more information on the SQL Server Utility, Utility Control Points, and managing instances of SQL Server, see Chapter 2, "Multi-Server Administration."
- Data-tier applications A data-tier application (DAC) is a single unit of deployment containing all of the database's schema, dependant objects, and deployment requirements used by an application. A DAC can be deployed in one of two ways: it can be authored by using the SQL Server data-tier application project in Visual Studio 2010, or it can be created by extracting a DAC definition from an existing database with the Extract Data-Tier Application Wizard in SSMS. Through the use of DACs, the deployment of data applications and the collaboration between data-tier developers and DBAs is significantly improved. For more information on authoring, deploying, and managing data-tier applications, see Chapter 3, "Data-Tier Applications."
■ Utility Explorer dashboards The dashboards in the SQL Server Utility offer DBAs tremendous insight into resource utilization and health state for managed instances of SQL Server and deployed data-tier applications across the enterprise. Before the introduction of the SQL Server Utility, DBAs did not have a powerful tool included with SQL Server to assist them in monitoring resource utilization and health state. Most organizations purchased third-party tools, which resulted in additional costs associated with
the total cost of ownership of their database environment. The new SQL Server Utility dashboards also assist with consolidation efforts. Figure 1-1 illustrates SQL Server Utility dashboard and viewpoints for providing superior insight into resource utilization and policy violations.

pie
| Category | Value | | --- | --- | | Overutilized Instance CPU | 0/14 | | Overutilized Database Files | 0/14 | | Overutilized Storage Volumes | 6/14 | | Overutilized Computer CPU | 0/14 | | Underutilized Instance CPU | 0/14 | | Underutilized Database Files | 0/14 | | Underutilized Storage Volumes | 0/14 | | Underutilized Computer CPU | 0/14 | | Data-tier Applications with Overutilized Resources | 0/9 | | Overutilized Data-tier Application CPU | 0/9 | | Overutilized Database Files | 0/9 | | Overutilized Storage Volumes | 2/9 | | Overutilized Computer CPU | 0/9 | | Data-tier Applications with Underutilized Resources | 0/9 | | Underutilized Data-tier Application CPU | 0/9 | | Underutilized Database Files | 0/9 | | Underutilized Storage Volumes | 0/9 | | Underutilized Computer CPU | 0/9 | | Utility Storage Utilization History Interval: 1 Day, 1 Week, 1 Month, 1 Year | 145.3 GB, 116.3 GB, 87.2 GB, 58.1 GB, 29.1 GB, 0.0 GB, 6:00 PM, 12:00 AM, 6:00 AM, 12:00 PM | | Utility Storage Utilization: Used space 145.3 GB, Free space 104.5 GB | (unlabeled segment) |FIGURE 1-1 Monitoring resource utilization with the SQL Server Utility dashboard and viewpoints
■ Consolidation management Organizations can maximize their investments by consolidating SQL Server resources onto fewer systems. DBAs, in turn, can bolster their consolidation efforts through their use of SQL Server Utility dashboards and viewpoints, which easily identify underutilized and overutilized SQL Server resources across the SQL Server Utility. As illustrated in Figure 1-2, dashboards and viewpoints make it simple for DBAs to realize consolidation opportunities, start the process toward eliminating underutilization, and resolve overutilization issues to create healthier, pristine environments.
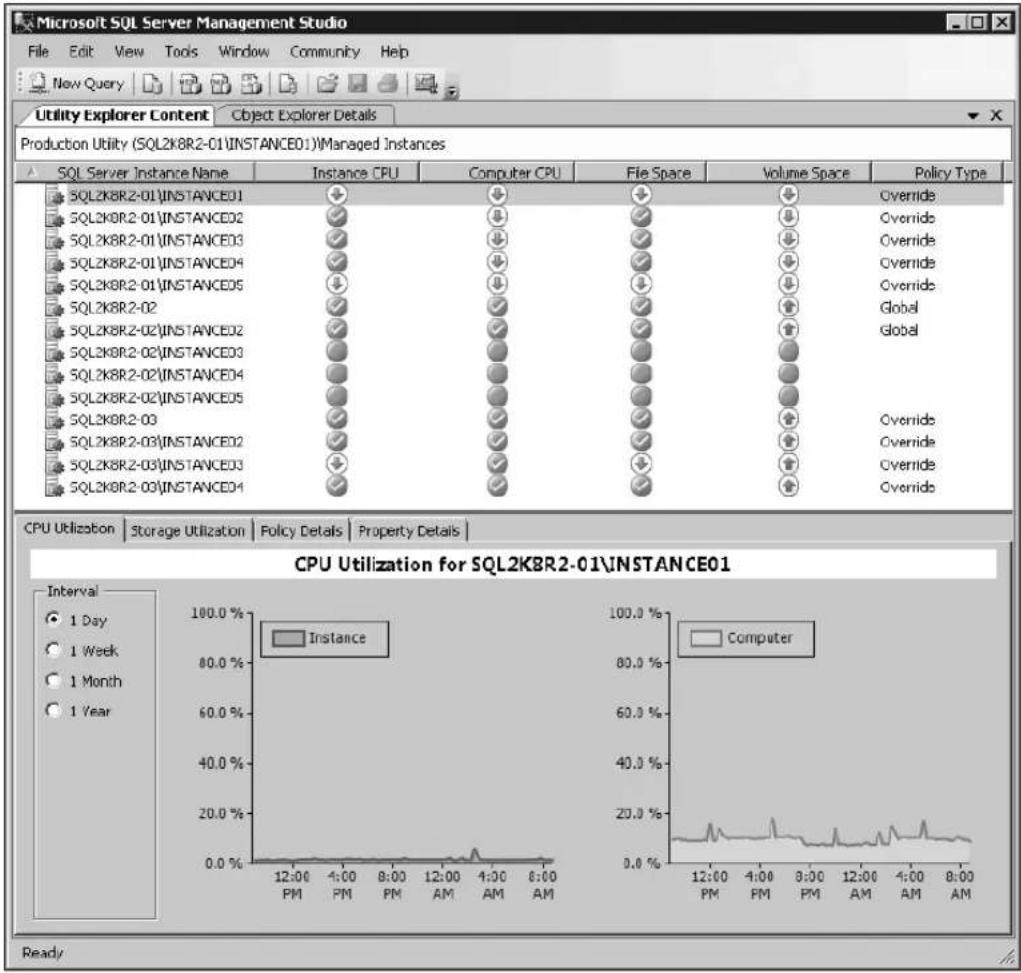
bar
CPU Utilization for SQL2K8R2-01\INSTANCE01 | Time | CPU Utilization (%) | |---|---| | 12:00 PM | 0.0% | | 4:00 PM | 0.0% | | 8:00 PM | 0.0% | | 12:00 AM | 0.0% | | 4:00 AM | 0.0% | | 8:00 AM | 0.0% | | 12:00 PM | 100.0% | | 4:00 PM | 100.0% | | 8:00 PM | 100.0% | | 12:00 AM | 100.0% | | 4:00 AM | 100.0% | | 8:00 AM | 100.0% |FIGURE 1-2 Identifying consolidation opportunities with the SQL Server Utility dashboard and viewpoints
- Customization of utilization thresholds and policies DBAs can customize the utilization threshold and policies for managed instances of SQL Server and deployed data-tier applications to suit the needs of their environments. For example, DBAs can specify the CPU utilization policies, file space utilization policies, computer CPU utilization policies, and storage volume utilization policies for all managed instances of SQL Server. Furthermore, they can customize the global utilization policies for data-tier applications. For example, a DBA can specify the CPU utilization policies and file space utilization policies for all data-tier applications. The default policy setting for overutilization is 70 percent, whereas underutilization is set to 0 percent. By customizing the utilization threshold policies, DBAs can maintain higher service levels for their SQL Server environments.
Figure 1-3 illustrates the SQL Server Utility. In this figure, a Utility Control Point has been deployed and is collecting health state and resource utilization data from managed instances of SQL Server and deployed data-tier applications. A DBA is making use of the SQL Server Utility dashboards and viewpoints included in SSMS to proactively and efficiently manage the database
environment. This can be done at scale, with information on resource utilization throughout the managed database environment, as a result of centralized visibility. In addition, a data-tier developer is building a data-tier application with Visual Studio 2010; the newly created DAC package will be deployed to a managed instance of SQL Server through the Utility Control Point.

flowchart
graph TD
    A["Utility dashboard to monitor health state"] --> B["Managed instance"]
    B --> C["Upload collection data set"]
    C --> D["Managed instance"]
    D --> E["Upload collection data set"]
    E --> F["Utility Control Point"]
    F --> G["DBA"]
    F --> H["SSMS"]
    F --> I["UMDW"]
    F --> J["Developer"]
    F --> K["Visual Studio 2010"]
    F --> L["DAC"]
    L --> M["Delivery DAC package onto managed instance"]
    M --> N["Managed instance"]
    N --> O["Output"]
FIGURE 1-3 The SQL Server Utility, including a UPC, managed instances, and a DAC
In the example in Figure 1-4, a DBA has optimized hardware resources within the environment by modifying the global utilization policies to meet the needs of the organization. For example, the global CPU overutilization policies of a managed instance of SQL Server and computer have been configured to be overutilized when the utilization is greater than 85 percent. In addition, the global file space and storage volume overutilization policies for all managed instances of SQL Server have been changed to 65 percent.
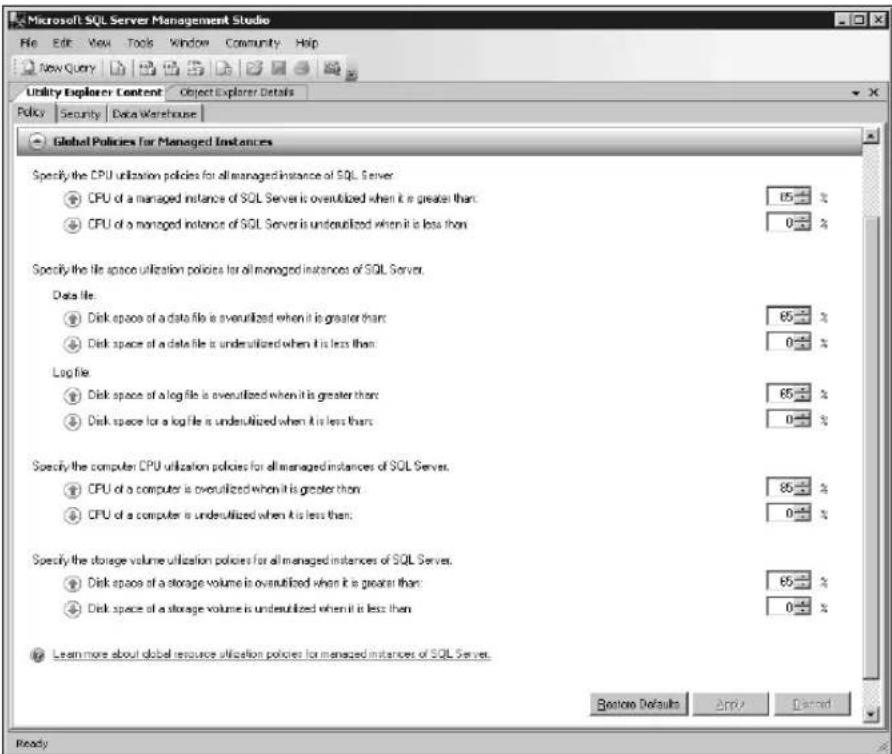
FIGURE 1-4 Configuring overutilization and underutilization global policies for managed instances
For more information on consolidation, monitoring, using the SQL Server Utility dashboards, and modifying policies, see Chapter 5, "Consolidation and Monitoring."
Additional SQL Server 2008 R2 Enhancements for DBAs
This section focuses on the SQL Server 2008 R2 enhancements that go above and beyond application and multi-server administration. DBAs should be aware of the following new capabilities:
- Parallel Data Warehouse Parallel Data Warehouse is a highly scalable appliance for enterprise data warehousing. It consists of both software and hardware designed to meet the needs of the largest data warehouses. This solution has the ability to massively scale to hundreds of terabytes with the use of new technology, referred to as massively parallel processing (MPP), and through inexpensive hardware configured in a hub-and-
spoke (control node and compute nodes) architecture. Performance improvements can be attained with Parallel Data Warehouse's design approach because it partitions large tables over several physical nodes, resulting in each node having its own CPU, memory, storage, and SQL Server instance. This design directly eliminates issues with speed and provides scale because a control node evenly distributes data to all compute nodes. The control node is also responsible for gathering data from all compute nodes when returning queries to applications. There isn't much a DBA needs to do from an implementation perspective—the deployment and maintenance is simplified because the solution comes preassembled from certified hardware vendors.
■ Integration with Microsoft SQL Azure The client tools included with SQL Server 2008 R2 allow DBAs to connect to SQL Azure, a cloud-based service. SQL Azure is part of the Windows Azure platform and offers a flexible and fully relational database solution in the cloud. The hosted database is built on SQL Server technologies and is completely managed. Therefore, organizations do not have to install, configure, or deal with the day-to-day operations of managing a SQL Server infrastructure to support their database needs. Other key benefits offered by SQL Azure include simplification of the provisioning process, support for Transact-SQL, and transparent failover. Yet another enhancement affiliated with SQL Azure is the Generate And Publish Scripts Wizard, which now includes SQL Azure as both a source and a destination for publishing scripts. SQL Azure has something for businesses of all sizes. For example, startups and medium-sized businesses can use this service to create scalable, custom applications, and larger businesses can use SQL Azure to build corporate departmental applications.
■ Installation of SQL Server with Sysprep Organizations have been using the System Preparation tool (Sysprep) for many years now to automate the deployment of operating systems. SQL Server 2008 R2 introduces this technology to SQL Server. Installing SQL Server with Sysprep involves a two-step procedure that is typically conducted by using wizards on the Advanced page of the Installation Center. In the first step, a stand-alone instance of SQL Server is prepared. This step prepares the image; however, it stops the installation process after the binaries of SQL Server are installed. To initiate this step, select the Image Preparation Of A Stand-Alone Instance For Sys-Prep Deployment option on the Advanced page of the Installation Center. The second step completes the configuration of a prepared instance of SQL Server by providing the machine, network, and account-specific information for the SQL Server instance. This task can be carried out by selecting the Image Completion Of A Prepared Stand-Alone Instance step on the Advanced page of the Installation Center. SQL Server 2008 R2 Sysprep is recommended for DBAs seeking to automate the deployment of SQL Server while investing the least amount of their time.
■ Analysis Services integration with SharePoint SQL Server 2008 R2 introduces a new option to individually select which feature components to install. SQL Server PowerPivot for SharePoint is a new role-based installation option in which PowerPivot for SharePoint will be installed on a new or existing SharePoint 2010 server to support
PowerPivot data access in the farm. This new approach promises better integration with SharePoint while also enhancing SharePoint's support of PowerPivot workbooks published to SharePoint. Chapter 10, "Self-Service Analysis with PowerPivot," discusses PowerPivot for SharePoint.
NOTE In order to use this new installation feature option, SharePoint 2010 must be installed but not configured prior to installing SQL Server 2008 R2.
- Premium Editions SQL Server 2008 R2 introduces two new premium editions to meet the needs of large-scale data centers and data warehouses. The new editions, Datacenter and Parallel Data Warehouse, will be discussed in the "SQL Server 2008 R2 Editions" section later in this chapter.
- Unicode Compression SQL Server 2008 R2 supports compression for Unicode data types. The data types that support compression are the unicode compression and the fixed-length nchar(n) and nvarchar(n) data types. Unfortunately, values stored off row or in nvarchar(max) columns are not compressed. Compression rates of up to 50 percent in storage space can be achieved.
■ Extended Protection SQL Server 2008 R2 introduces support for connecting to the Database Engine by using Extended Protection for Authentication. Authentication is achieved by using channel binding and service binding for operating systems that support Extended Protection.
Advantages of Using Windows Server 2008 R2
The database platform is intimately related to the operating system. Because of this relationship, Microsoft has designed Windows Server 2008 R2 to provide a solid IT foundation for business-critical applications such as SQL Server 2008 R2. The combination of the two products produces an impressive package. With these two products, an organization can achieve maximum performance, scalability, reliability, and availability, while at the same time reducing the total cost of ownership associated with its database platform.
It is a best practice to leverage Windows Server 2008 R2 as the underlying operating system when deploying SQL Server 2008 R2 because the new and enhanced capabilities of Windows Server 2008 R2 can enrich an organization's experience with SQL Server 2008 R2. The new capabilities that have direct impact on SQL Server 2008 R2 include
■ Maximum scalability Windows Server 2008 R2 is capable of achieving unprecedented workload size, dynamic scalability, and across-the-board availability and reliability. For instance, Windows Server 2008 R2 supports up to 256 logical processors and 2 terabytes of memory in a single operating system instance. When SQL Server 2008 R2 runs on Windows Server 2008 R2, the two products together can support more intensive database and BI workloads than ever before.
■ Hyper-V improvements Building on the approval and success of the original Hyper-V release, Windows Server 2008 R2 delivers several new capabilities to the Hyper-V platform to further improve the SQL Server virtualization experience. First, availability can be stepped up with the introduction of Live Migration, which makes it possible to move SQL Server virtual machines (VMs) between Hyper-V hosts without service interruption. Second, Hyper-V can make use of up to 64 logical processors in the host processor pool, which allows for consolidation of a greater number of SQL Server VMs on a single Hyper-V host. Third, Dynamic Virtual Machine Storage, a new feature, allows for the addition of virtual or physical disks to an existing VM without requiring the VM to be restarted.
■ Windows Server 2008 R2 Server Manager Server Manager has been optimized in Windows Server 2008 R2. It is usually used to centrally manage and secure multiple server roles across SQL Server instances running Windows Server 2008 R2. Remote management of connections to remote computers is achievable with Server Manager. Server Manager also includes a new Best Practices Analyzer tool to report best practice violations.
■ Best Practices Analyzer (BPA) Although there are only a few roles on Windows Server 2008 R2 that the BPA can collect data for, this tool is still a good investment because it helps reduce best practice violations, which ultimately helps fix and prevent deterioration in performance, scalability, and downtime.
Windows PowerShell 2.0 Windows Server 2008 R2 ships with Windows PowerShell 2.0. In addition to allowing DBAs to run Windows PowerShell commands against remote computers and run commands as asynchronous background jobs, Windows PowerShell 2.0 features include new and improved Windows Management Instrumentation (WMI) cmdlets, a script debugging feature, and a graphical environment for creating scripts. DBAs can improve their productivity with Windows PowerShell by simplifying, automating, and consolidating repetitive tasks and server management processes across a distributed SQL Server environment.
SQL Server 2008 R2 Editions
SQL Server 2008 R2 is available in nine different editions. The editions were designed to meet the needs of almost any customer and are broken down into the following three categories:
■ Premium editions
■ Core editions
■ Specialized editions
Premium Editions
The premium editions of SQL Server 2008 R2 are meant to meet the highest demands of large-scale datacenters and data warehouse solutions. The two editions are
- Datacenter For the first time in the history of SQL Server, a datacenter edition is offered. SQL Server 2008 R2 Datacenter provides the highest levels of security, reliability, and scalability when compared to any other edition. SQL Server 2008 R2 Datacenter delivers an enterprise-class data platform that provides maximum levels of scalability for organizations looking to run very large database workloads. In addition, this edition offers the best platform for the most demanding virtualization and consolidation efforts. It offers the same features and functionality as the Enterprise edition; however, it differs by supporting up to 256 logical processors, more than 25 managed instances of SQL Server enrolled into a single Utility Control Point, unlimited virtualization, multi-instance dashboard views and drilldowns, policy-based resource utilization evaluation, high-scale complex event processing with Microsoft SQL Server StreamInsight, and the potential to sustain up to the maximum amount of memory the operating system will support.
- Parallel Data Warehouse New to the family of SQL Server editions is SQL Server 2008 R2 Parallel Data Warehouse. It is a highly scalable appliance for enterprise data warehousing. SQL Server 2008 R2 Parallel Data Warehouse uses massively parallel processing (MPP) technology and hub-and-spoke architecture to support the largest data warehouse and BI workloads, from tens or hundreds of terabytes to more than 1 petabyte, in a single solution. SQL Server 2008 R2 Parallel Data Warehouse appliances are pre-built from leading hardware vendors and include both the SQL Server software and appropriate licenses.
Core Editions
The traditional Enterprise and Standard editions of SQL Server are considered to be core edition offerings in SQL Server 2008 R2. The following section outlines the features associated with both SQL Server 2008 R2 Enterprise and Standard:
■ Enterprise SQL Server 2008 R2 Enterprise delivers a comprehensive, trusted data platform for demanding, mission-critical applications, BI solutions, and reporting. Some of the new features included in this edition include support for up to eight processors, enrollment of up to 25 managed instances of SQL Server into a single Utility Control Point, PowerPivot for SharePoint, data compression support for UCS-2 Unicode, Master Data Services, support for up to four virtual machines, and the potential to sustain up to 2 terabytes of RAM. It still provides high levels of availability, scalability, and security, and includes classic SQL Server 2008 features such as data and backup compression, Resource Governor, Transparent Data Encryption (TDE), advanced data mining algorithms, mirrored backups, and Oracle publishing.
- Standard SQL Server 2008 R2 Standard is a complete data management and BI platform that provides medium-class solutions for smaller organizations. It does not include all the bells and whistles included in Datacenter and Enterprise; however, it continues to offer best-in-class ease of use and manageability. Backup compression, which was an enterprise feature with SQL Server 2008, is now a feature included with the SQL Server 2008 R2 Standard. Compared to Datacenter and Enterprise, Standard supports only up to four processors, up to 64 GB of RAM, one virtual machine, and two failover clustering nodes.
Specialized Editions
SQL Server 2008 R2 continues to deliver specialized editions for organizations that have unique sets of requirements.
■ Developer Developer includes all of the features and functionality found in Datacenter; however, it is strictly meant to be used for development, testing, and demonstration purposes only. It is worth noting that it is possible to transition a SQL Server Developer installation that is used for testing or development purposes directly into production by upgrading it to SQL Server 2008 Enterprise without reinstallation.
- Web At a much more affordable price compared to Datacenter, Enterprise, and Standard, SQL Server 2008 R2 Web is focused on service providers hosting Internet-facing Web serving environments. Unlike Workgroup and Express, this edition doesn't have a small database size restriction, and it supports four processors and up to 64 GB of memory. SQL Server 2008 R2 Web does not offer the same premium features found in Datacenter, Enterprise, and Standard; however, it is still the ideal platform for hosting Web sites and Web applications.
■ Workgroup Workgroup is the next SQL Server 2008 R2 edition and is one step below the Web edition in price and functionality. It is a cost-effective, secure, and reliable database and reporting platform meant for running smaller workloads than Standard. For example, this edition is ideal for branch office solutions such as branch data storage, branch reporting, and remote synchronization. Similar to Web, it supports a maximum database size of 524 terabytes; however, it supports only two processors and up to 4 GB of RAM. It is worth noting that it is possible to upgrade Workgroup to Standard or Enterprise.
■ Express This free edition is the best entry-level alternative for independent software vendors, nonprofessional developers, and hobbyists building client applications. This edition is integrated with Visual Studio and is great for individuals learning about databases and how to build client applications. Express is limited to one processor, 1 GB of memory, and a maximum database size of 10 GB.
- Compact SQL Server 2008 R2 Compact is typically used to develop mobile and small desktop applications. It is free to use and is commonly redistributed with embedded and mobile independent software vendor (ISV) applications.
NOTE Review "Features Supported by the Editions of SQL Server 2008 R2" at http://msdn.microsoft.com/en-us/library/cc645993(SQL.105).aspx for a complete comparison of the key capabilities of the different editions of SQL Server 2008 R2.
Hardware and Software Requirements
The recommended hardware and software requirements for SQL Server 2008 R2 vary depending on the component you want to install, the load anticipated on the servers, and the type of processor class that you will use. Tables 1-1 and 1-2 describe the hardware and software requirements for SQL Server 2008 R2.
Because SQL Server 2008 R2 supports many processor types and operating systems, Table 1-1 strictly covers the hardware requirements for a typical SQL Server 2008 R2 installation. Typical installations include SQL Server 2008 R2 Standard and Enterprise running on Windows Server operating systems. If you need information for Itanium-based systems or compatible desktop operating systems, see "Hardware and Software Requirements for Installing SQL Server 2008 R2" at http://msdn.microsoft.com/en-us/library/ms143506(SQL.105).aspx.
TABLE 1-1 Hardware Requirements
HARDWARE COMPONENT REQUIREMENTS
| Processor Processor type: (64-bit) x64 |
| Minimum: AMD Opteron, AMD Athlon 64, Intel Xeon with Intel EM64T support, Intel Pentium IV with EM64T support |
| Processor speed: minimum 1.4 GHz; 2.0 GHz or faster recommended |
| Processor type: (32-bit) |
| Intel Pentium III-compatible processor or faster |
| Processor speed: minimum 1.0 GHz; 2.0 GHz or faster recommended |
Memory (RAM) Minimum: 1 GB
Recommended: 4 GB or more
Maximum: Operating system maximum
HARDWARE COMPONENT REQUIREMENTS
| Disk Space Database Engine: 280 MB | |
| Analysis Services: 90 MB | |
| Reporting Services: 120 MB | |
| Integration Services: 120 MB | |
| Client components: 850 MB | |
| SQL Server Books Online: 240 MB | |
TABLE 1-2 Software Requirements
SOFTWARE COMPONENT REQUIREMENTS
| Operating system Windows Server 2003 SP2 x64 Datacenter, Enterprise, or Standard edition | |
| or | |
| The 64-bit editions of Windows Server 2008 SP2 Datacenter, Datacenter without Hyper-V, Enterprise, Enterprise without Hyper-V, Standard, Standard without Hyper-V, or Windows Web Server 2008 | |
| or | |
| Windows Server 2008 R2 Datacenter, Enterprise, Standard, or Windows Web Server | |
| .NET Framework Minimum: Microsoft .NET Framework 3.5 SP1 | |
| SQL Server support tools and software | SQL Server 2008 R2 - SQL Server Native Client |
| SQL Server 2008 R2 - SQL Server Setup Support Files | |
| Minimum: Windows Installer 4.5 | |
| Internet Explorer Minimum: Windows Internet Explorer 6 SP1 | |
| Virtualization Windows Server 2008 R2 | |
| or | |
| Windows Server 2008 | |
| or | |
| Microsoft Hyper-V Server 2008 | |
| or | |
| Microsoft Hyper-V Server 2008 R2 | |
NOTE Server hardware has offered both 32-bit and 64-bit processors for several years, however, Windows Server 2008 R2 is 64-bit only. Please take this into consideration when planning SQL Server 2008 R2 deployments on Windows Server 2008 R2.
Installation, Upgrade, and Migration Strategies
Like its predecessors, SQL Server 2008 R2 is available in both 32-bit and 64-bit editions, both of which can be installed either with the SQL Server Installation Wizard or through a command prompt. As was briefly mentioned earlier in this chapter, it is now also possible to use Sysprep in conjunction with SQL Server for automated deployments with minimal administrator intervention.
Last, DBAs also have the option to upgrade an existing installation of SQL Server or conduct a side-by-side migration when installing SQL Server 2008 R2. The following sections elaborate on the different strategies.
The In-Place Upgrade
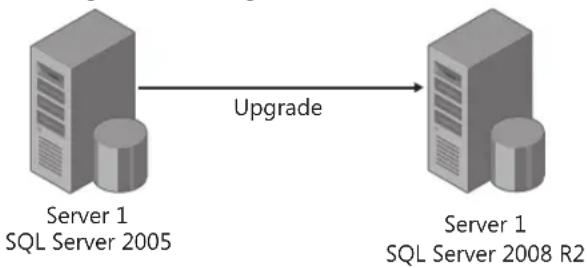
An in-place upgrade is the upgrade of an existing SQL Server installation to SQL Server 2008 R2. When an in-place upgrade is conducted, the SQL Server 2008 R2 setup program replaces the previous SQL Server binaries with the new SQL Server 2008 R2 binaries on the same machine. SQL Server data is automatically converted from the previous version to SQL Server 2008 R2. This means that data does not have to be copied or migrated. In the example in Figure 1-5, a DBA is conducting an in-place upgrade on a SQL Server 2005 instance running on Server 1. When the upgrade is complete, Server 1 still exists, but the SQL Server 2005 instance, including all of its data, is now upgraded to SQL Server 2008 R2.
Pre-migration Post-migration
flowchart
graph LR
    A["Server 1 SQL Server 2005"] -->|Upgrade| B["Server 1 SQL Server 2008 R2"]
FIGURE 1-5 An in-place upgrade from SQL Server 2005 to SQL Server 2008 R2
NOTE SQL Server 2000, SQL Server 2005, and SQL Server 2008 are all supported for an in-place upgrade to SQL Server 2008 R2. Unfortunately, earlier editions, such as SQL Server 7.0 and SQL Server 6.5, cannot be upgraded to SQL Server 2008 R2.
In-Place Upgrade Pros and Cons
The in-place upgrade strategy is usually easier and considered less risky compared to the side-by-side migration strategy. Upgrading is also fairly quick, and additional hardware is not required. Because the names of the server and instances do not change during the upgrade process, applications still point to the old instances. As a result, this strategy is less time consuming, because there is no need to make changes to application connection strings.
The disadvantage is that there is less granular control over the upgrade process. For example, when running multiple databases or components, a DBA does not have the flexibility to choose individual items for upgrade. Instead, all databases and components are upgraded to SQL Server 2008 R2 at the same time. Note also that the instance remains offline during the in-place upgrade. This means that if a mission-critical database, an application, or an important line-of-business application is running, a planned outage is required. Furthermore, if a disaster transpires during the upgrade, the rollback strategy can be a complex and time-consuming affair. A DBA might have to install the operating system from scratch, and then install SQL Server and restore all of the SQL Server data.
SQL Server 2008 R2 High-Level In-Place Strategy
The high-level in-place upgrade strategy for upgrading to SQL Server 2008 R2 consists of the following steps:
- Ensure that the instance of SQL Server you plan to upgrade meets the hardware and software requirements for SQL Server 2008 R2.
- Review the deprecated and discontinued features in SQL Server 2008 R2. Refer to "SQL Server Backward Compatibility" at http://msdn.microsoft.com/en-us/library/cc707787(SQL.105).aspx for more information.
- Ensure that the version and edition of SQL Server that will be upgraded is supported. To review all the upgrade scenarios supported for SQL Server 2008 R2, see "Version and Edition Upgrades" at http://msdn.microsoft.com/en-us/library/ms143393(SQL.105).aspx.
- Run the SQL Server Upgrade Advisor for SQL Server 2008 R2. The Upgrade Advisor is a tool included with SQL Server 2008 R2 or downloaded directly from the Microsoft Web site. It analyzes the installed components on the SQL Server instance you plan to upgrade to ensure that the system supports SQL Server 2008 R2. The Upgrade Advisor generates a report identifying anomalies that require fixing or attention before the upgrade can begin.
- Install the SQL Server 2008 R2 prerequisites.
- Begin the upgrade to SQL Server 2008 R2 by running Setup.
Side-by-Side Migration
The term side-by-side migration describes the deployment of a brand-new SQL Server 2008 R2 instance alongside a legacy SQL Server instance. When the SQL Server 2008 R2 installation is complete, a DBA migrates data from the legacy SQL Server database platform to the new SQL Server 2008 R2 database platform. Side-by-side migration is depicted in Figure 1-6.
NOTE It is possible to conduct a side-by-side migration to SQL Server 2008 R2 by using the same server. You can also use the side-by-side method to upgrade to SQL Server 2008 on a single server.

flowchart
graph TD
    A["Pre-migration\nServer 1\nSQL Server 2005"] -->|Migration| B["Post-migration\nServer 1\nSQL Server 2005"]
    B --> C["Server 2\nSQL Server 2008 R2"]
    B --> D["Data is migrated from SQL Server 2005 on Server 1 to SQL Server 2008 R2 on Server 2"]
FIGURE 1-6 Side-by-side migration from SQL Server 2005 to SQL Server 2008 R2
Side-by-Side Migration Pros and Cons
The biggest benefit of a side-by-side migration over an in-place upgrade is the opportunity to build out a new database infrastructure on SQL Server 2008 R2 and avoid potential migration issues with an in-place upgrade. The side-by-side migration also provides more granular control over the upgrade process because it is possible to migrate databases and components independent of one another. The legacy instance remains online during the migration process. All of these advantages result in a more powerful server. Moreover, when two instances are running in parallel, additional testing and verification can be conducted, and rollback is easy if a problem arises during the migration.
However, there are disadvantages to the side-by-side strategy. Additional hardware might need to be purchased. Applications might also need to be directed to the new SQL Server 2008 R2 instance, and it might not be a best practice for very large databases because of the duplicate amount of storage that is required during the migration process.
SQL Server 2008 R2 High-Level Side-by-Side Strategy
The high-level side-by-side migration strategy for upgrading to SQL Server 2008 R2 consists of the following steps:
- Ensure that the instance of SQL Server you plan to migrate to meets the hardware and software requirements for SQL Server 2008 R2.
- Review the deprecated and discontinued features in SQL Server 2008 R2 by referring to "SQL Server Backward Compatibility" at http://msdn.microsoft.com/en-us/library/cc707787(SQL.105).aspx.
- Although you will not upgrade a legacy instance to SQL Server 2008 R2, it is still beneficial to run the SQL Server 2008 R2 Upgrade Advisor to ensure that the data being migrated to the new SQL Server 2008 R2 is supported and that there is nothing suggesting that a break will occur after migration.
- Procure hardware and install the operating system of your choice. Windows Server 2008 R2 is recommended.
- Install the SQL Server 2008 R2 prerequisites and desired components.
- Migrate objects from the legacy SQL Server to the new SQL Server 2008 R2 database platform.
- Point applications to the new SQL Server 2008 R2 database platform.
- Decommission legacy servers after the migration is complete.
Multi-Server Administration
Over the years, an increasing number of organizations have turned to Microsoft SQL Server because it embodies the Microsoft Data Platform vision to help organizations manage any data, at any place, and at any time. The biggest challenges organizations face with this increase of SQL Server installations have been in management.
With the release of Microsoft SQL Server 2008 came two new manageability features, Policy-Based Management and the Data Collector, which drastically changed how database administrators managed SQL Server instances. With Policy-Based Management, database administrators can centrally create and enforce polices on targets such as SQL Server instances, databases, and tables. The Data Collector helps integrate the collection, analysis, troubleshooting, and persistence of SQL Server diagnostic information. When introduced, both manageability features were a great enhancement to SQL Server 2008. However, database administrators and organizations still lacked manageability tools to help effectively manage a multi-server environment, understand resource utilization, and enhance collaboration between development and IT departments.
SQL Server 2008 R2 addresses concerns about multi-server management with the introduction of a new manageability feature, the SQL Server Utility. The SQL Server Utility enhances the multi-server administration experience by helping database administrators proactively manage database environments efficiently at scale, through centralized visibility into resource utilization. The utility also provides improved capabilities to help organizations maximize the value of consolidation efforts and ensure the streamlined development and deployment of data-driven applications.
The SQL Server Utility
The SQL Server Utility is a breakthrough manageability feature included with SQL Server 2008 R2 that allows database administrators to centrally monitor and manage database applications and SQL Server instances, all from a single management interface. This interface, known as a Utility Control Point (UCP), is the central reasoning point in the
SQL Server Utility. It forms a collection of managed instances with a repository for performance data and management policies. After data is collected from managed instances, Utility Explorer and SQL Server Utility dashboard and viewpoints in SQL Server Management Studio (SSMS) provide administrators with a view of SQL Server resource health through policy evaluation and analysis of trending instances and applications throughout the enterprise. The following entities can be viewed in the SQL Server Utility:
■ Instances of SQL Server
■ Data-tier applications
■ Database files
Volumes
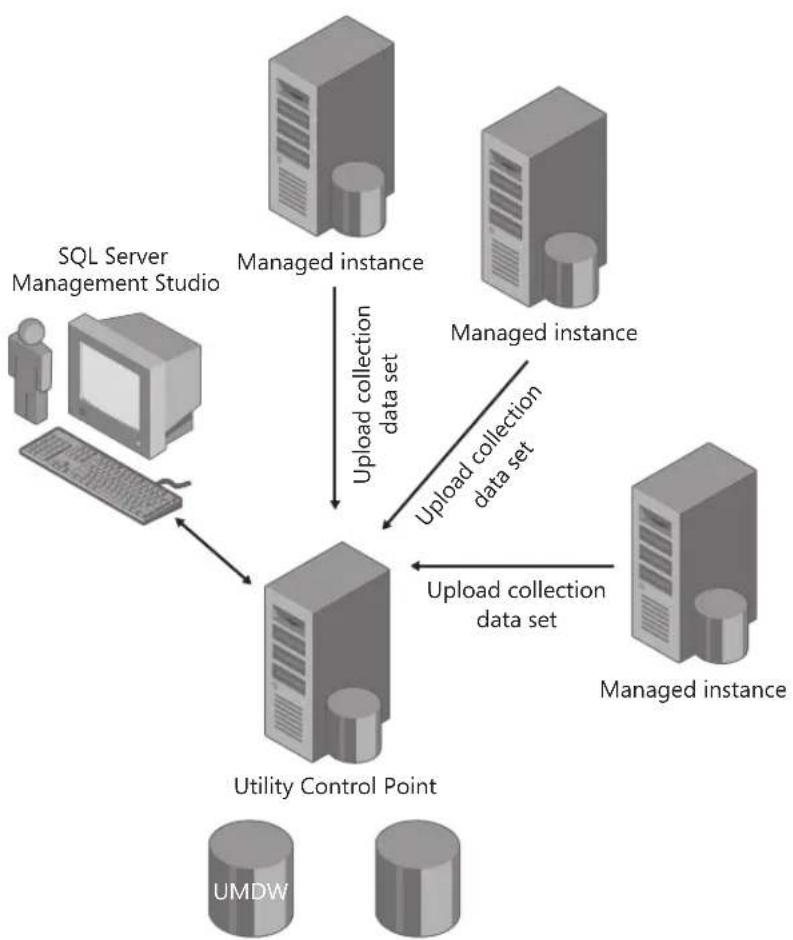
Figure 2-1 shows one possible configuration using the SQL Server Utility, which includes a UCP, many managed instances, and a workstation running SSMS for managing the utility and viewing the dashboard and viewpoints. The UCP stores configuration and collection information in both the UMDW and msdb databases.
flowchart
graph TD
    A["SQL Server Management Studio"] -->|Upload collection data set| B["Utility Control Point"]
    C["Managed instance"] -->|Upload collection data set| B
    D["Managed instance"] -->|Upload collection data set| B
    E["Managed instance"] -->|Upload collection data set| B
    F["Managed instance"] -->|Upload collection data set| B
    G["UMDW"] --> B
FIGURE 2-1 A SQL Server Utility Control Point (UCP) and managed instances
Many organizations that participate in the Microsoft SQL Server early adopter program are currently either evaluating SQL Server 2008 R2 or already using it in their production infrastructure. The consensus is that organizations should design a SQL Server Utility solution that factors in a SQL Server Utility with every deployment. The SQL Server Utility allows you to increase visibility and control, optimize resources, and improve overall efficiencies within your SQL Server infrastructure.
SQL Server Utility Key Concepts
Although many database administrators may be eager to implement a UCP and start proactively monitoring their SQL Server environment, it is beneficial to take a few minutes and become familiar with the new terminology and components that make up the SQL Server Utility.
- The SQL Server Utility This represents an organization's SQL Server-related entities in a unified view. The SQL Server Utility supports actions such as specifying resource utilization policies that track the utilization requirements of an organization. Leveraging Utility Explorer and SQL Server Utility viewpoints in SSMS can give you a holistic view of SQL Server resource health.
■ The Utility Control Point (UCP) The UCP provides the central reasoning point for the SQL Server Utility by using SSMS to organize and monitor SQL Server resource health. The UCP collects configuration and performance information from managed instances of SQL Server every 15 minutes. Information is stored in the Utility Management Data Warehouse (UMDW) on the UCP. SQL Server performance data is then compared to policies to help identify resource bottlenecks and consolidation opportunities.
■ The Utility Management Data Warehouse (UMDW) The UMDW is a relational database used to store data collected by managed instances of SQL Server. The UMDW database is automatically created on a SQL Server instance when the UCP is created. Its name is sysutility_mdw, and it utilizes the Simple Recovery model. By default, the collection upload frequency is set to every 15 minutes, and the data retention period is set to 1 year.
■ The Utility Explorer user interface A component of SSMS, this interface provides a hierarchical tree view for managing and controlling the SQL Server Utility. Its uses include connecting to a utility, creating a UCP, enrolling instances, deploying data-tier applications, and viewing utilization reports affiliated with managed instances and data-tier applications. You launch Utility Explorer from SSMS by selecting View and then choosing Utility Explorer.
■ The Utility Explorer dashboard and list views These provide a summary and detailed presentations of resource health and configuration details for managed instances of SQL Server, deployed data-tier applications, and host resources such as CPU utilization, file space utilization, and volume space utilization. This allows superior insight into resource utilization and policy violations and helps identify consolidation opportunities, maximizes the value of hardware investments, and maintains healthy systems. The utility dashboard is depicted in Figure 2-2.

pie
| Category | Value | |---|---| | Managed Instances Health | 3 | | Well Utilized (5) | 11 | | Overutilized (11) | 0 | | Underutilized (3) | 0 | | No Data Available (3) | 0 | | Data-Tier Application Health | 0 | | Well Utilized (0) | 0 | | Overutilized (0) | 0 | | Underutilized (0) | 0 | | No Data Available (0) | 0 | | Managed Instances with Overutilized Resources | 0/14 | | Overutilized Database Files | 0/14 | | Overutilized Storage volumes | 6/14 | | Overutilized Computer CPU | 11/14 | | Data-Tier Applications with Overutilized Resources | 0/0 | | Overutilized Data-Tier Application CPU | 0/0 | | Overutilized Database Files | 0/0 | | Overutilized Storage volumes | 0/0 | | Overutilized Computer CPU | 0/0 | | Managed Instances with Underutilized Resources | 0/14 | | Underutilized Database Files | 0/14 | | Underutilized Storage volumes | 0/14 | | Underutilized Computer CPU | 0/14 | | Data-Tier Applications with Underutilized Resources | 0/0 | | Underutilized Data-Tier Application CPU | 0/0 | | Underutilized Database Files | 0/0 | | Underutilized Storage volumes | 0/0 | | Underutilized Computer CPU | 0/0 | | Utility Storage Utilization History Interval: 1 Day, 1 Week, 1 Month, 1 Year | 141.8 GB, 113.5 GB, 85.1 GB, 56.7 GB, 28.4 GB, 0.8 GB, 8:00 PM, 12:00 AM, 6:00 AM, 12:00 PM, 8:00 PM, 12:00 AM, 12:00 PM, 12:00 PM, 12:00 PM, 12:00 PM, 12:00 PM, 12:00 PM, 12:00 PM, 12:00 PM, 12:00 PM, 12:00 PM, 12:00 PM, 12:00 PM, 12:00 PM, 14:58 GB Free space 108.0 GBFIGURE 2-2 The SQL Server Utility dashboard
UCP Prerequisites
As with other SQL Server components and features, the deployment of a SQL Server UCP must meet the following specific prerequisites and requirements:
■ The SQL Server version running the UCP must be SQL Server 2008 R2 or higher. (SQL Server 2008 R2 is also referred to as version 10.5.)
■ The SQL Server 2008 R2 edition must be Datacenter, Enterprise, Evaluation, or Developer.
■ The SQL Server system running the UCP must reside within a Windows Active Directory domain.
■ The underlying operating system must be Windows Server 2003, Windows Server 2008, or Windows Server 2008 R2. If Windows Server 2003 is used, the SQL Server Agent service account must be a member of the Performance Monitor User group.
It is recommended that the collation settings affiliated with the Database Engine instance hosting the UCP be case-insensitive.
NOTE The Database Engine instance is the only component that can be managed by a UCP. Other components, such as Analysis Services and Reporting Services, are not supported.
After all these prerequisites are met, you can deploy the UCP. However, before installing the UCP, it is beneficial to size the UMDW accordingly and understand the maximum capacity specifications associated with a UCP.
UCP Sizing and Maximum Capacity Specifications
The wealth of information captured during capacity planning sessions can help an organization better understand its environment and make informed decisions when designing the UCP implementation. In the case of the SQL Server Utility, it is helpful to know that each SQL Server UCP can manage and monitor up to 100 computers and up to 200 SQL Server Database Engine instances. Both computers and instances can be either physical or virtual. Additional UCPs should be provisioned if there is a need to monitor more computers and instances.
Disk space consumption is another area you should look at in capacity planning. For instance, the disk space consumed within the UMDW is approximately 2 GB of data per year for each managed instance of SQL Server, whereas the disk space used by the msdb database on the UCP instance is approximately 20 MB per managed instance of SQL Server. Last, a SQL Server UCP can support up to a total of 1,000 user databases.
The UCP is relatively easy to set up and configure. You can deploy it either by using the Create Utility Control Point Wizard in SSMS or by leveraging Windows PowerShell scripts.
The high-level steps for creating a UCP include specifying the instance of SQL Server in which the UCP will be created, choosing the account to run the utility control set, ensuring that the instance is validated and passes the conditions test, reviewing the selections made, and finalizing the UCP deployment.
Although the setup is fairly straightforward, the following conditions must be met to successfully deploy a UCP:
■ You must have administrator privileges on the instance of SQL Server.
■ The instance of SQL Server must be SQL Server 2008 R2 or higher.
■ The SQL Server edition must support UCP creation.
■ The instance of SQL Server cannot be enrolled with any other UCP.
■ The instance of SQL Server cannot already be a UCP.
■ There cannot be a database named sysutility_mdw on the specified instance of SQL Server.
■ The collection sets on the specified instance of SQL Server must be stopped.
■ The SQL Server Agent service on the specified instance must be started and configured to start automatically.
■ The SQL Server Agent proxy account cannot be a built-in account such as Network Service.
■ The SQL Server Agent proxy account must be a valid Windows domain account on the specified instance.
Creating a UCP by Using SSMS
It is important to understand how to effectively use the Create Utility Control Point Wizard in SSMS to create a SQL Server UCP. Follow these steps when using SSMS:
-
In SSMS, connect to the SQL Server 2008 R2 Database Engine instance in which the UCP will be created.
-
Launch the Utility Explorer by selecting View and then selecting Utility Explorer.
- On the Getting Started tab, click the Create A Utility Control Point (UCP) link or click the Create Utility Control Point icon on the Utility Explorer toolbar.
-
The Create Utility Control Point Wizard is now invoked. Review the introduction message, and then click Next to begin the UCP creation process. If you want, you can select the Do Not Show This Page Again check box.
-
On the Specify The Instance Of SQL Server page, click the Connect button to specify the instance of SQL Server in which the new UCP will be created, and then click Connect in the Connect To Server dialog box.
- Specify a name for the UCP, as illustrated in Figure 2-3, and then click Next to continue.

FIGURE 2-3 The Specify The Instance Of SQL Server page
NOTE Using a meaningful name is beneficial and easier to remember, especially when you plan on implementing more than one UCP within your SQL Server infrastructure. For example, to easily distinguish between multiple UCPs you might name the UCP that manages the production servers "Production Utility" and the UCP for Test Servers "Test Utility." When connected to the UCP, users will be able to distinguish between the different control points in Utility Explorer.
-
On the Utility Collection Set Account page, there are two options available for identifying the account that will run the utility collection set. The first option is a Windows domain account, and the second option is the SQL Server Agent service account. Note that the SQL Server Agent service account can only be used if the SQL Server Agent service account is leveraging a Windows domain account. For security purposes, it is recommended that you use a Windows domain account with low privileges. Indicate that the Windows domain account will be used as the SQL Server Agent proxy account for the utility collection set, and then click Next to continue.
-
On the next page, the SQL Server instance is compared against a series of prerequisites before the UCP is created. Failed conditions are displayed in a validation report. Correct all issues, and then click the Rerun Validation button to verify the changes against the validation rules. To save a copy of the validation report for future reference, click Save Report, and then specify a location for the file. To continue, click Next.
NOTE As mentioned in the prerequisite steps before these instructions, SQL Server Agent is, by default, not configured to start automatically during the installation of SQL Server 2008 R2. Use the SQL Server Configuration Manager tool to configure the SQL Server Agent service to start automatically on the specified instance.
- Review the options and settings selected on the Summary Of UCP Creation page, and click Next to begin the installation.
- The Utility Control Point Creation page communicates the steps and report status affiliated with the creation of a UCP. The steps involve preparing the SQL Server instance for UCP creation, creating the UMDW, initializing the UMDW, and configuring the SQL Server Utility collection set. Review each step for success and completeness. If you wish, save a report on the creation of the UCP operation. Next, click Save Report and choose a location for the file. Click Finish to close the Create Utility Control Point Wizard.
Creating a UCP by Using Windows PowerShell
Windows PowerShell can be used instead of SSMS to create a UCP. The following syntax (available in the article "How To: Enroll an Instance of SQL Server (SQL Server Utility)," online at http://msdn.microsoft.com/en-us/library/ee210563(SQL.105).aspx), illustrates how to create a UCP with Windows PowerShell. You will need to change the elements inside the quotes to reflect your own desired arguments.
NOTE When working with Windows Server 2008 R2, you can launch Windows PowerShell by clicking the Windows PowerShell icon on the Start Menu taskbar. For more information on SQL Server and Windows PowerShell, see "SQL Server PowerShell Overview" at http://msdn.microsoft.com/en-us/library/cc281954.aspx.
\(UtilityInstance = new-object -Type Microsoft.SqlServer.Management.Smo.Server "ComputerName\UCP-Name";\)
\(SqlStoreConnection = new-object -Type Microsoft.SqlServer.Management.Sdk.Sfc.SqlStoreConnection \(UtilityInstance.ConnectionContext.SqlConnectionObject;\)
\(Utility = [Microsoft.SqlServer.Management.Utility.Utility]::CreateUtility("Utility", \(SqlStoreConnection, "ProxyAccount", "ProxyAccountPassword");\)
UCP Post-Installation Steps
When the Create Utility Control Point Wizard is closed, the Utility Explorer is invoked, and you are automatically connected to the newly created UCP. The UCP is automatically enrolled as a managed instance. The data collection process also commences immediately. The dashboards, status icons, and utilization graphs associated with the SQL Server Utility display meaningful information after the data is successfully uploaded.
NOTE Do not become alarmed if no data is displayed in the dashboard and viewpoints in the Utility Explorer Content pane; it can take up to 45 minutes for data to appear at first. All subsequent uploads generally occur every 15 minutes.
A beneficial post-installation task is to confirm the successful creation of the UMDW. This can be done by using Object Explorer to verify that the sysutility_mdw database exists on the SQL Server instance. At this point, you can modify database settings—such as the initial size of the database, autogrowth settings, and file placement—based on the capacity planning exercises discussed in the "UCP Sizing and Maximum Capacity Specifications" section earlier in this chapter.
Enrolling SQL Server Instances
After you have established a UCP, the next task is to enroll an instance or instances of SQL Server into a SQL Server Control Point. Similar to deploying a Utility Control Point, this task is accomplished by using the Enroll Instance Wizard in SSMS or by leveraging Windows PowerShell. The high-level steps affiliated with enrolling instances into the SQL Server UCP include choosing the UCP to utilize, specifying the instance of SQL Server to enroll, selecting the account to run the utility collection set, reviewing prerequisite validation results, and reviewing your selections. The enrollment process then begins by preparing the instance for enrollment. The cache directory is created for the collected data, and then the instance is enrolled into the designated UCP.
IMPORTANT A UCP created on SQL Server 2008 R2 Enterprise can have a maximum of 25 managed instances of SQL Server. If more than 25 managed instances are required, then you must utilize SQL Server 2008 R2 Datacenter.
Managed Instance Enrollment Prerequisites
As with many of the other tasks in this chapter, certain conditions must be satisfied to successfully enroll an instance:
■ You must have administrator privileges on the instance of SQL Server.
■ The instance of SQL Server must be SQL Server 2008 R2 or higher.
■ The SQL Server edition must support instance enrollment.
■ The instance of SQL Server cannot be enrolled with any other UCP.
■ The instance of SQL Server cannot already be a UCP.
■ The instance of SQL Server must have the utility collection set installed.
■ The collection sets on the specified instance of SQL Server must be stopped.
■ The SQL Server Agent service on the specified instance must be started and configured to start automatically.
■ The SQL Server Agent proxy account cannot be a built-in account such as Network Service.
■ The SQL Server Agent proxy account must be a valid Windows domain account on the specified instance.
Enrolling SQL Server Instances by Using SSMS
The following steps should be followed when enrolling a SQL Server instance via SSMS:
- In Utility Explorer, connect to the desired SQL Server Utility (for example, Production Utility), expand the UCP, and then select Managed Instances.
- Right-click the Managed Instances node, and select Enroll Instance.
- The Enroll Instance Wizard is launched. Review the introduction message, and then click Next to begin the enrollment process. If you want, you can select the Do Not Show This Page Again check box.
- On the Specify The Instance Of SQL Server page, click the Connect button to specify the instance of SQL Server to enroll in the UCP.
- Supply the SQL Server instance name, and then click Connect in the Connect To Server dialog box.
- Click Next to proceed. The Utility Collection Set Account page is invoked.
-
There are two options available for specifying an account to run the utility collection set. The first option is a Windows domain account, and the second option is the SQL Server Agent service account. You can use the SQL Server Agent service account only if the SQL Server Agent service account is leveraging a Windows domain account. For security purposes, it is recommended that you use a Windows domain account with low privileges. Specify the Windows domain account to be used as the SQL Server Agent proxy account for the utility collection set, and then click Next to continue.
-
As shown in Figure 2-4, a series of conditions will be evaluated against the SQL Server instance to ensure that it passes all of the prerequisites before the instance is enrolled. If there are any failures preventing the enrollment of the SQL Server instance, correct them and then click Rerun Validation. To save the validation report, click Save Report and specify a location for the file. Click Next to continue.
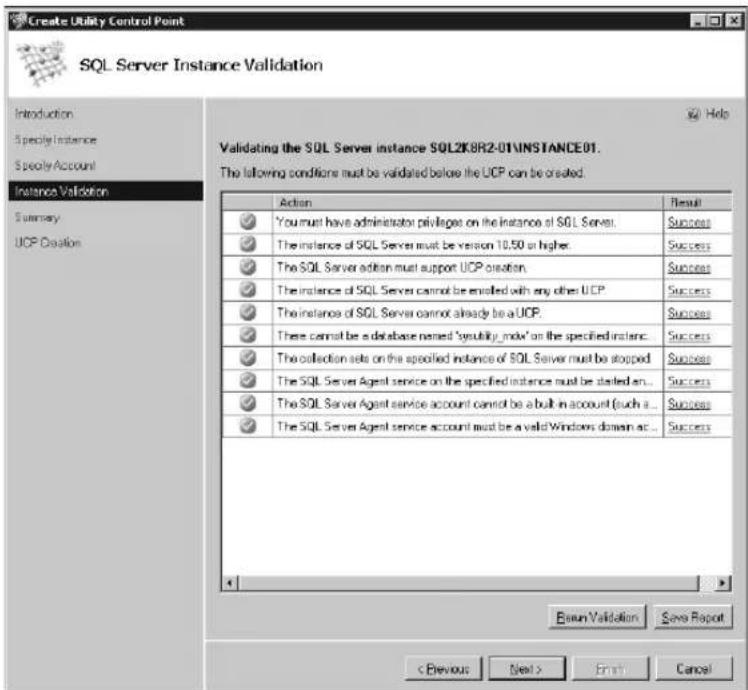
FIGURE 2-4 The SQL Server Instance Validation screen
- Review the Summary Of Instance Enrollment page, and then click Next to enroll your instance of SQL Server.
- The following actions will be automatically completed on the Enrollment Of SQL Server Instance page: the instance will be prepared for enrollment, the cache directory for the collected data will be created, and the instance will be enrolled. Review the results, and click Finish to finalize the enrollment process.
- Repeat the steps to enroll additional instances.
Enrolling SQL Server Instances by Using Windows PowerShell
Windows PowerShell can also be used to enroll instances. In fact, scripting may be the way to go if there is a need to enroll a large number of instances into a SQL Server UCP. Let's say you need to enroll 200 instances, for example. Using the Enroll Instance Wizard in SSMS can be very time consuming, because the wizard is a manual process in which you can enroll only one instance at a time. In contrast, you can enroll 200 instances with a single script by using Windows PowerShell. The following syntax illustrates how to create a UCP by using Windows PowerShell. Change the elements in the quotes to match your environment.
UtilityInstance = new-object -Type Microsoft.SqlServer.Management.Smo.Server "ComputerName-Name"; SqlStoreConnection = new-object -Type Microsoft.SqlServer.Management.Sdk.Sfc.SqlStoreConnection UtilityInstance.ConnectionContext.SqlConnectionObject; Utility = [Microsoft.SqlServer.Management.Utility.Utility]::Connect(SqlStoreConnection);Instance = new-object -Type Microsoft.SqlServer.Management.Smo.Server "ComputerName\ManagedInstanceName";InstanceConnection = new-object -Type Microsoft.SqlServer.Management.Sdk.Sfc.SqlStoreConnectionInstance.ConnectionContext.SqlConnectionObject;ManagedInstance = Utility.EnrollInstance(InstanceConnection, "ProxyAccount", "ProxyPassword");$
The Managed Instances Dashboard
After you have enrolled all of your instances associated with a UCP, you can review the Managed Instances dashboard, as illustrated in Figure 2-5, to gain quick insight into the health and utilization of all of your managed instances. The Managed Instances dashboard is covered in Chapter 5, "Consolidation and Monitoring."

bar
CPU Utilization for SQL2K8R2-01\INSTANCE01 | Time | Instance (%) | Computer (%) | |---|---|---| | 4:00 PM | 100.0 | 100.0 | | 8:00 PM | 80.0 | 80.0 | | 12:00 AM | 60.0 | 60.0 | | 4:00 AM | 40.0 | 40.0 | | 8:00 AM | 20.0 | 20.0 | | 12:00 PM | 0.0 | 0.0 | | 4:00 PM | 100.0 | 100.0 | | 8:00 PM | 80.0 | 80.0 | | 12:00 AM | 60.0 | 60.0 | | 4:00 AM | 40.0 | 40.0 | | 8:00 AM | 20.0 | 25.0 | | 12:00 PM | 0.0 | 15.0 | | 4:00 PM | 100.0 | 100.0 | | 8:00 PM | 80.0 | 85.0 | | 12:00 AM | 60.0 | 75.0 | | 4:00 AM | 40.0 | 65.0 | | 8:00 AM | 20.0 | 55.0 | | 12:00 PM | 0.0 | 35.0 | The chart displays a single bar chart with two data series: 'Instance' and 'Computer'. The values in the table represent the percentage of CPU utilization for each system (e.g., SQL2K8R2-01\INSTANCE) at specific time points (e.g., 4:00 PM, 8:00 PM). The 'Instance' series is shown in a red box, and the 'Computer' series in a blue box. The 'Storage Utilization' and 'Policy Details' are not explicitly labeled but are included in the legend.FIGURE 2-5 The Managed Instances dashboard
Managing Utility Administration Settings
After you are connected to a UCP, use the Utility Administration node in the Utility Explorer navigation pane to view and configure global policy settings, security settings, and data warehouse settings across the SQL Server Utility. The configuration tabs affiliated with the Utility Administration node are the Policy, Security, and Data Warehouse tabs. The following sections explore the Utility Administration settings available within each tab. You must first connect to a SQL Server UCP before modifying settings.
Connecting to a UCP
Before managing or configuring UCP settings, a database administrator must connect to a UCP by means of Utility Explorer in SSMS. Use the following procedure to connect to a UCP:
- Launch SSMS and connect to an instance of SQL Server.
-
Select View and then Utility Explorer.
-
On the Utility Explorer toolbar, click the Connect To Utility icon.
-
In the Connect To Server dialog box, specify a UCP instance, and then click Connect.
- After you are connected, you can deploy data-tier applications, manage instances, and configure global settings.
NOTE It is not possible to connect to more than one UCP at the same time. Therefore, before attempting to connect to an additional UCP, click the Disconnect From Utility icon on the Utility Explorer toolbar to disconnect from the currently connected UCP.
The Policy Tab
You use the Policy tab to view or modify global monitoring settings. Changes on this tab are effective across the SQL Server Utility. You can view the Policy tab by connecting to a UCP through Utility Explorer and then selecting Utility Administration. Select the Policy tab in the Utility Explorer Content pane. Policies are broken down into three sections: Global Policies For Data-Tier Applications, Global Policies For Managed Instances, and Volatile Resource Policy Evaluation. To expand the list of values for these options, click the arrow next to the policy name or click the policy title.
Global Policies For Data-Tier Applications
Use the first section on the Policy tab, Global Polices For Data-Tier Applications, to view or configure global utilization policies for data-tier applications. You can set underutilization or overutilization policy thresholds for data-tier applications by specifying a percentage in the controls on the right side of each policy description. For example, it is possible to configure underutilized and overutilized settings for CPU utilization and file space utilization for data files and logs. Click the Apply button to save changes, or click the Discard or Restore Default buttons as needed. By default, the overutilized threshold is 70 percent, and the underutilized threshold is 0 percent.
Global Policies For Managed Instances
Global Policies For Managed Instances is the next section on the Policy tab. Here you can set global SQL Server managed instance application monitoring policies for the SQL Server Utility. As illustrated in Figure 2-6, you can set underutilization and overutilization thresholds to manage numerous issues, including processor capacity, file space, and storage volume space.

FIGURE 2-6 Modifying global policies for managed instances
Volatile Resource Policy Evaluation
The final section on the Policy tab is Volatile Resource Policy Evaluation. This section, displayed in Figure 2-7, provides strategies to minimize unnecessary reporting noise and unwanted violation reporting in the SQL Server Utility. You can choose how frequently the CPU utilization policies can be in violation before reporting the CPU as overutilized. The default evaluation period for processor overutilization is 1 hour; 6 hours, 12 hours, 1 day, and 1 week can also be selected. The default percentage of data points that must be in violation before a CPU is reported as being overutilized is 20 percent. The options range from 0 percent to 100 percent.
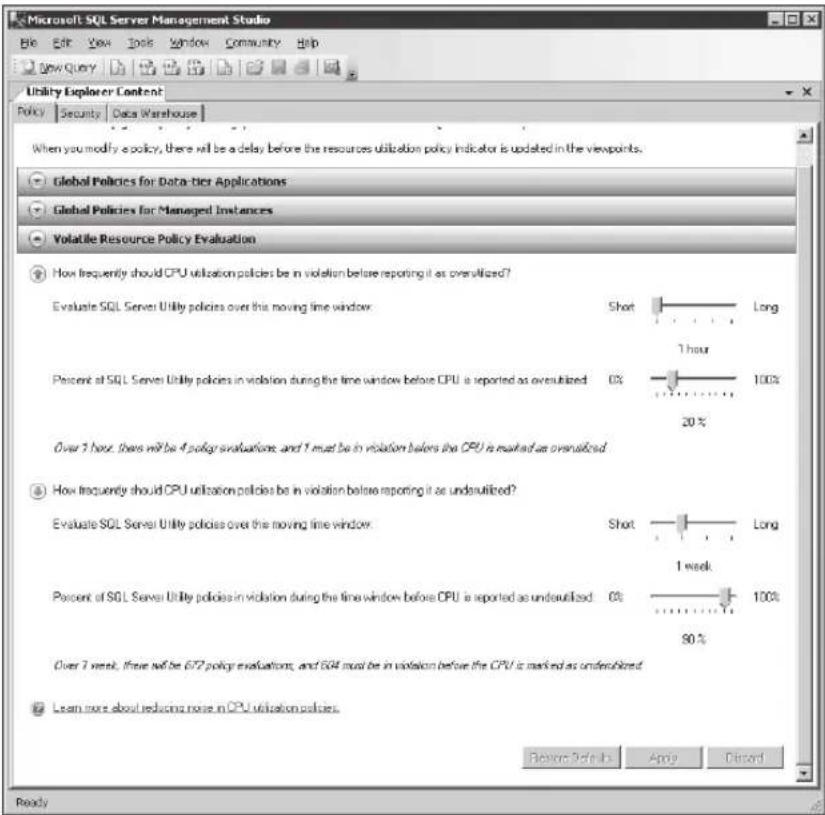
FIGURE 2-7 Volatile resource policy evaluation
The next set of configurable elements allows you to determine how frequently CPU utilization policies should be in violation before the CPU is reported as being underutilized. The default evaluation period for processor underutilization is 1 week. Options range from 1 day to 1 month. The default percentage of data points that must be in violation before a CPU is reported as being underutilized is 90 percent. You can choose between 0 percent and 100 percent.
To change policies, use the slider controls to the right of the policy descriptions, and then click Apply. You can also restore default values or discard changes by clicking the buttons at the bottom of the display pane.

REAL WORLD
Let's say you configure the CPU overutilization policies by setting the Evaluate SQL Server Utility Polices Over This Moving Time Window setting to 12 hours and the Percent Of SQL Server Utility Policies In Violation During The Time Window Before CPU Is Reported As Overutilized setting to 30 percent. Over 12 hours, there will be 48 policy evaluations. Fourteen of these must be in violation before the CPU is marked as overutilized.
The Security Tab
From a security and authorization perspective, there are two security roles associated with a UCP. The first role is the Utility Administrator, and the second role is the Utility Reader. The Utility Administrator is ultimately the "superuser" who has the ability to manage any setting or view any dashboard or viewpoint associated with the UCP. For example, a Utility Administrator can enroll instances, manage settings in the Utility Administration node, and much more. The second security role is the Utility Reader, which has rights to connect to the SQL Server Utility, observe all viewpoints in Utility Explorer, and view settings on the Utility Administration node in Utility Explorer.
You can use the Security tab in the Utility Administration node of Utility Explorer to view and provide Utility Reader privileges to a SQL Server login. By default, logins that have sysadmin privileges on the instance running the UCP automatically have full administrative privileges over the UCP. A database administrator must use a combination of both Object Explorer and the Security Tab in Utility Administration to add or modify login settings affiliated with the UCP.
For example, the following steps grant a new user the Utility Administrator role by creating a new SQL Server login that uses Windows Authentication:
-
Open Object Explorer in SSMS, and expand the folder of the server instance that is running the UCP in which you want to create the new login.
-
Right-click the Security folder, point to New, and then select Login.
-
On the General page of the Login dialog box, enter the name of a Windows user in the Login Name box.
-
Select Windows Authentication.
-
On the Server Roles page, select the check box for the sysadmin role.
-
Click OK.
By default, this user is now a Utility Administrator, because he or she has been granted the sysadmin role.
The next example will grant a standard SQL Server user the Utility Reader read-only privileges for the SQL Server Utility dashboard and viewpoints.
- Open Object Explorer in SSMS, and expand the folder of the server instance that is running the UCP in which you want to create the new login. For this example, SQL2K8R2-01\test2 will be used.
MORE INFO Review the article "CREATE LOGIN (Transact-SQL)" at the following link for a refresher on how to create a login in SQL Server: http://technet.microsoft.com/en-us/library/ms189751.aspx.
-
Right-click the Security folder, point to New, and then select Login.
-
On the General page, enter the name of a Windows user in the Login Name box.
- Select Windows Authentication.
- Click OK.
NOTE Unlike in the previous example, do not assign this user the sysadmin role on the Server Role page. If you do, the user will automatically become a Utility Administrator and not a Utility Reader on the UCP.
-
In Utility Explorer, connect to the UCP instance in which you created the login (SQL2K8R2-01\Test2).
-
Select the Utility Administration node, and then select the Security tab in the Utility Explorer Content pane.
- Next to the newly created user (SQL2K8R2-01\Test2), as shown in Figure 2-8, grant the Utility Reader privilege, and then click Apply.

FIGURE 2-8 Configuring read-only privileges for the SQL Server Utility

REAL WORLD
Many organizations have large teams managing their SQL Server infrastructures because they have hundreds of SQL Server instances within their environment. Let's say you wanted to grant 50 users the read-only privilege for the SQL Server Utility dashboard and viewpoints. It would be very impractical to grant every single database administrator the read-only privilege. Therefore, if you have many database administrators and you want to grant them the read-only role for the SQL Server Utility within your environment, you can take advantage of a Role Based Access model to streamline the process.
For example, you can create a security group within your Active Directory domain called Utility Readers and then add all the desired database administrators and Windows administrator accounts into this group. Then in SSMS, you create a new login and select the Active Directory security group called Utility Readers. The final step involves adding the Utility Reader role to the Utility Reader security group on the Security tab in the Utility Administration node within Utility Explorer. By following these steps, you provide access to all of your database administrators in a fraction of the time. In addition, the use of RBA makes it quite easier to manage the ongoing maintenance of security of the SQL Server Utility.
The Data Warehouse Tab
You view and modify the data retention period for utilization information collected for managed instances of SQL Server on the Data Warehouse tab in the Utility Administration node in Utility Explorer. In addition, the UMDW Database Name and Collection Set Upload Frequency elements can be viewed; however, they cannot be modified in this version of SQL Server 2008 R2. There are plans to allow these settings to be modified in future versions of SQL Server. The following steps illustrate how to modify the data retention period for the UMDW:
- Launch SSMS and connect to a UCP through Utility Explorer.
- Select the Utility Administration node in Utility Explorer.
-
Click the Data Warehouse tab in the Utility Explorer Content pane.
-
In the Utility Explorer Content pane, select the desired data retention period for the UMDW, as displayed in Figure 2-9. The options are 1 month, 3 months, 6 months, 1 year, or 2 years.

FIGURE 2-9 Configuring the data retention period
- Click the Apply button to save the changes. Alternatively, click the Discard Changes or Restore Defaults buttons as needed.
Data-Tier Applications
Ask application developers or database administrators what it was like to work with data-driven applications in the past, and most probably do not use adjectives such as "easy," "enjoyable," or "wonderful" when they describe their experience. Indeed, the development, deployment, and even the management of data-driven applications in the past were a struggle. This was partly because Microsoft SQL Server and Microsoft Visual Studio were not really outfitted to handle the development of data-driven applications, the ability to create deployment policies did not exist, and application developers couldn't effortlessly hand off a single package to database administrators for deployment. After a data-driven application was deployed, developers and administrations found making changes to be a tedious process. Much later in the life cycle of data-driven applications, they came to the stark realization that there was no tool available to centrally manage a deployed environment. Obviously, many challenges existed throughout the life cycle of a data-driven application.
Introduction to Data-Tier Applications
With the release of Microsoft SQL Server 2008 R2, the SQL Server Manageability team addressed these struggles by introducing support for data-tier applications to help streamline the deployment, management, and upgrade of database applications. A data-tier application, also referred to as a DAC, is a single unit of deployment that contains all the elements used by an application, such as the database application schema, instance-level objects, associated database objects, files and scripts, and even a manifest defining the organization's deployment requirements.
The DAC improves collaboration between data-tier developers and database administrators throughout the application life cycle and allows organizations to develop, deploy, and manage data-tier applications in a much more efficient and effective manner than ever before, mainly because the DAC file functions as a single unit. Database administrators can now also centrally manage, monitor, deploy, and upgrade data-tier applications with SQL Server Management Studio and view DAC resource utilization across the SQL Server infrastructure in Utility Explorer at scale.
The Data-Tier Application Life Cycle
There are two common methods for generating a DAC. One is to author and build a DAC using a SQL Server data-tier application project in Microsoft Visual Studio 2010. In the second method, you can extract a DAC from an existing database by using the Extract Data-Tier Application Wizard in SQL Server Management Studio. Alternatively, a DAC can be generated with Windows PowerShell commands.
Figure 3-1 illustrates the data-tier application generation and deployment life cycle for both a new data-tier application project in Visual Studio 2010 and an extracted DAC created with the Extract Data-Tier Application Wizard in SQL Server Management Studio (SSMS). In the illustration, the DAC package is deployed to the same instance of SQL Server 2008 R2 in both methodologies.

flowchart
graph TD
    A["SQL Server"] --> B["Extract"]
    C["Visual Studio"] --> D["Build"]
    B --> E[".dacpac"]
    D --> F[".dacpac"]
    E --> G["Deploy"]
    F --> H["Deploy"]
    I["DBA"] --> J["Utility Control Point"]
    K["SQL Server Management Studio"] --> J
    L["Managed instances"] --> M["SQL Server 2008 R2"]
    M --> N["Upload collection data set"]
FIGURE 3-1 The data-tier application life cycle
Data-tier developers using a data-tier application project template in Visual Studio 2010 first build a DAC and then deploy the DAC package to an instance of SQL Server 2008 R2. In contrast, database administrators using the Extract Data-Tier Application Wizard in SQL Server Management Studio generate a DAC from an existing database. The DAC package is then deployed to a SQL Server 2008 R2 instance. In both methods, the deployment creates a DAC definition that is stored in the msdb system database and a user database that stores the objects identified in the DAC definition. Finally, the applications connect to the database associated with the DAC. Database administrators use the Utility Control Point and Utility Explorer in SQL Server Management Studio to centrally manage and monitor data-tier applications at scale.
Common Uses for Data-Tier Applications
Data-tier applications are used in a multitude of ways to serve many different needs. For example, organizations may use data-tier applications when they need to
■ Deploy a data-tier application for test, staging, and production instances of the Database Engine.
■ Create DAC packages to tighten integration handoffs between data-tier developers and database administrators.
■ Move changes from development to production.
■ Upgrade an existing DAC instance to a newer version of the DAC by using the Upgrade Data-Tier Wizard.
■ Compare database schemas between two data-tier applications.
■ Upgrade database schemas from older versions of SQL Server to SQL Server 2008 R2—for example, to extract a data-tier application from SQL Server 2000 and then deploy the package on SQL Server 2008 R2.
- Consider next generation development, which is achieved by importing an existing version of a DAC into Visual Studio and then modifying the schema, objects, or deployment strategies.
■ Author database objects by using source code control systems such as Team Foundation Server.
■ Integrate data-tier applications with Microsoft SQL Azure. Currently, it is possible to deploy, register, and delete. Upgrading of data-tier applications with SQL Azure is likely to be supported in future releases.

Real World
Organizations looking to accelerate and standardize deployment of database applications within their database environments should leverage data-tier applications included in SQL Server 2008 R2. By utilizing data-tier applications, an organization captures intent and produces a single deployment package, providing a more reliable and consistent deployment experience than ever before. In addition, data-tier applications facilitate streamlined collaboration between development and database administrator teams, which improves efficiency.
Supported SQL Server Objects
Every DAC contains objects used by the application, including schemas, tables, and views. However, some objects are not supported in data-tier applications. The following list can help you become acquainted with some of the SQL Server objects that are supported.
- Database role
■ Function: Inline Table-valued
■ Function: Multistatement Table-valued
■ Function: Scalar
■ Index: Clustered
■ Index: Non-clustered
■ Index: Unique
■ Login
Schema
■ Stored Procedure: Transact-SQL
■ Table: Check Constraint
Table: Collation
■ Table: Column, including computed columns
■ Table: Constraint, Default
■ Table: Constraint, Foreign Key
■ Table: Constraint, Index
■ Table: Constraint, Primary Key
■ Table: Constraint, Unique
■ Trigger: DML
■ Type: User-defined Data Type
■ Type: User-defined Table Type
User
View
Database administrators do not have to worry about looking for unsupported objects. This laborious task is accomplished with the Extract Data-Tier Application Wizard. Unsupported objects such as DDL triggers, service broker objects, and full-text catalog objects are identified and reported by the wizard. Unsupported objects are identified with a red icon that represents an invalid entry. Database administrators must also pay close attention to objects with a yellow icon, because this communicates a warning. A yellow icon usually warns database administrators that although an object is supported, it is linked to and quite reliant on an unsupported object. Database administrators need to review and address all objects with red and yellow icons. The wizard does not create a DAC package until unsupported objects are removed. For a list of some common supported objects, review the topic "SQL Server Objects Supported in Data-tier Applications" at http://msdn.microsoft.com/en-us/library/ee210549(SQL.105).aspx.
Visual Studio 2010 and Data-Tier Application Projects
By leveraging the new project DAC template in Visual Studio 2010, data-tier developers can create new data-tier applications from scratch or edit existing data-tier applications by importing them directly into a project. Data-tier developers then add database objects such as tables, views, and stored procedures to the data-tier application project. Data-tier developers can also define specific deployment requirements for the data-tier application. When the data-tier application project is complete, the data-tier developer creates a single unit of deployment, known as a DAC file package, from within Visual Studio 2010. This package is delivered to a database administrator, who deploys it to one or more SQL Server 2008 R2 instances. Alternatively, database administrators can use the DAC package to upgrade an existing data-tier application that has already been deployed.
Launching a Data-Tier Application Project Template in Visual Studio 2010
The following steps describe how to launch a data-tier application project template in Visual Studio 2010:
- Launch Visual Studio 2010.
- In Visual Studio 2010, select File, and then select New Project.
-
In the Installed Templates list, expand the Database node, and then select SQL Server.
-
In the Project Template pane, select Data-Tier Application.
-
Specify the name, location, and solution name for the data-tier application, as shown in Figure 3-2, and click OK.

FIGURE 3-2 Selecting the Data-Tier Application project template in Visual Studio 2010
- Select Project, and then click Add New Item to add and create a database object based on the Data-Tier Application project template. Some of the database objects included in the template are scalar-valued function, schema, table, index, login, stored procedure, user, user-defined table type, view, table-valued function, trigger, user-defined data type, database role, data generation plan, and inline function.
Figure 3-3 illustrates the syntax for creating a sample Employees table schema for a data-tier application in Visual Studio 2010. The Solution Explorer pane also includes the other schema objects—specifically the tables associated with the data-tier application.
![Database1 - Microsoft Visual Studio (Administrator) File Edit View Project Build Debug Team Date Tools Architecture Test Analyze Window Help New Query 3/4 Database SQL Card Source Employee TABLE.sql - not connected X Categorical TABLE.sql CREATE TABLE [dbo].[Employees){ [ EmployeeID ] [int] IDENTITY(1,1) NOT NULL, [ LastName ] [mvarchar](20) COLLATE SQL_Latin1_General_CP1_CI_AS NOT NULL, [ FirstName ] [mvarchar](10) COLLATE SQL_Latin1_General_CP1_CI_AS NOT NULL, [ Title ] [mvarchar](30) COLLATE SQL_Latin1_General_CP1_CI_AS NULL, [ TitleOfCourtesy ] [mvarchar](25) COLLATE SQL_Latin1_General_CP1_CI_AS NULL, [ BirthDate ] [datetime] NULL, [ HireDate ] [datetime] NULL, [ Address ] [mvarchar](60) COLLATE SQL_Latin1_General_CP1_CI_AS NULL, [ City ] [mvarchar](15) COLLATE SQL_Latin1_General_CP1_CI_AS NULL, [ Region ] [mvarchar](15) COLLATE SQL_Latin1_General_CP1_CI_AS NULL, [PostalCode ] [mvarchar](10) COLLATE SQL_Latin1_General_CP1_CI_AS NULL, [ Country ] [mvarchar](15) COLLATE SQL_Latin1_General_CP1_CI_AS NULL, [ HomePhone ] [mvarchar](24) COLLATE SQL_Latin1_General_CP1_CI_AS NULL, [ Extension ] [mvarchar](4) COLLATE SQL_Latin1_General_CP1_CI_AS NULL, [ Photo ] [Image] NULL, [ Notes ] [ntext] COLLATE SQL_Latin1_General_CP1_CI_AS NULL, [ ReportsTo ] [int] NULL, [ PhotoPath ] [mvarchar](255) COLLATE SQL_Latin1_General_CP1_CI_AS NULL, CONSTRAINT [PK_Employees] PRIMARY KEY CLUSTERED [ [ EmployeeID ] ASC WITH (PAD_INDEX = OFF, STATISTICS_MORECOMPUTE = OFF, IGNORE_DUP_KEY = OFF, ALLOW_MON_LOCKS = ON, ALLOW_PAGE_LOCKS = ON), CONSTRAINT [FK_Employees_Employees] FOREIGN_KEY([ReportsTo]) REFERENCES [employees] ([EmployeeID]), CONSTRAINT [CK_Birthdate] CHECK ([BirthDate] < getdate())) ) Solution Explorer Team Explorer Ready Ln:8 Col:9 Ch:6 INS](/content/2026/05/1028715/images/736eef3eab2c9a44d1bd594f058b289c4e3af99b0790ccf3b5d6b88eb4b25687.jpg)
FIGURE 3-3 The Create Table schema and the Solution Explorer pane in a Visual Studio 2010 DAC project
Importing an Existing Data-Tier Application Project into Visual Studio 2010
Instead of creating a DAC from the ground up in Visual Studio 2010, a data-tier developer can choose to import an existing data-tier application into Visual Studio 2010 and then either edit the DAC or completely reverse-engineer it. The following steps enable you to import objects from a data-tier application package to a data-tier application project in Visual Studio 2010:
-
Create a new data-tier application project in Visual Studio.
-
In the Visual Studio Solution Explorer pane, navigate to the node for the desired data-tier application project.
-
Right-click the node for the desired data-tier application project, and then select the Import Data-Tier Application Wizard.
-
Review the information on the Welcome page, and then click Next.
-
On the Specify Import Options page, select the option that allows you to import from a data-tier application package.
- Click the Browse button, and navigate to the folder in which you placed the .dacpac to import. Select the file, and then click Open. Click Next to continue.
- Review the report that shows the status of the import actions, as illustrated in Figure 3-4, and then click Finish.

FIGURE 3-4 Reviewing the results when importing an existing DAC into Visual Studio 2010
- In Schema View, navigate to the dbo schema, navigate to the Tables, Views, and Stored Procedures nodes, and verify that the objects created are now in the data-tier application.
Data-tier developers and database administrators interested in working in Visual Studio to initiate any of the actions mentioned in this section, such as importing or creating a data-tier application, can refer to the article "Creating and Managing Databases and Data-tier Applications in Visual Studio" at http://msdn.microsoft.com/en-us/library/dd193245(VS.100).aspx.
Extracting a Data-Tier Application with SQL Server Management Studio
The Extract Data-Tier Application Wizard is another tool that you can use for creating a new data-tier application. The wizard is in SQL Server 2008 R2 Management Studio. In this method, the wizard works its way into an existing SQL Server database, reads the content of the database and the logins associated with it, and ensures that the new data-tier application can be created. Finally, the wizard either creates a new DAC package or communicates all errors and issues that need to be addressed before one can be created. This approach comes with a big advantage. The extraction process can be applied to many versions of SQL Server, not just SQL Server 2008 R2. For example, database administrators can use the wizard to generate a DAC package from SQL Server 2000, SQL Server 2005, SQL Server 2008, or SQL Server 2008 R2 databases.
IMPORTANT DAC definitions remain unregistered when you use the Extract Data-Tier Application Wizard. Database administrators must use the Register Data-Tier Application Wizard in SQL Server 2008 R2 Management Studio to register a DAC definition. For additional information on registering a DAC definition, see the "Registering a Data-Tier Application" section later in this chapter.
Follow these steps to extract a data-tier application:
- In Object Explorer, connect to a SQL Server instance containing the database that houses the data-tier application to be extracted.
- Expand the Database folder, and select a database to extract.
- Invoke the Extract Data-Tier Application Wizard by right-clicking the desired database, selecting Tasks, and then selecting Extract Data-Tier Application.
- Review the information on the Introduction page, and then click Next to begin the extraction process. Select the Do Not Show This Page Again check box if you do not want the Introduction page displayed in the future when using the wizard.
- On the Set Properties page, illustrated in Figure 3-5, complete the DAC properties by typing in the application name, version, and description, as described here:
■ Application name This refers to the name of the DAC. Although this name can be different from the DAC package file, it is recommended that you make it similar enough so that it still identifies the application.
■ Version The DAC version identification helps developers manage changes when working in Visual Studio. In addition, the version information helps identify the DAC package version used during deployment. The DAC version information is stored in the msdb database and can be viewed in SQL Server Management Studio in the data-tier applications node.
■ Description This property is optional. Use it to describe the DAC. If this section is completed, the information is saved in the msdb database under the data-tier applications node in Management Studio.
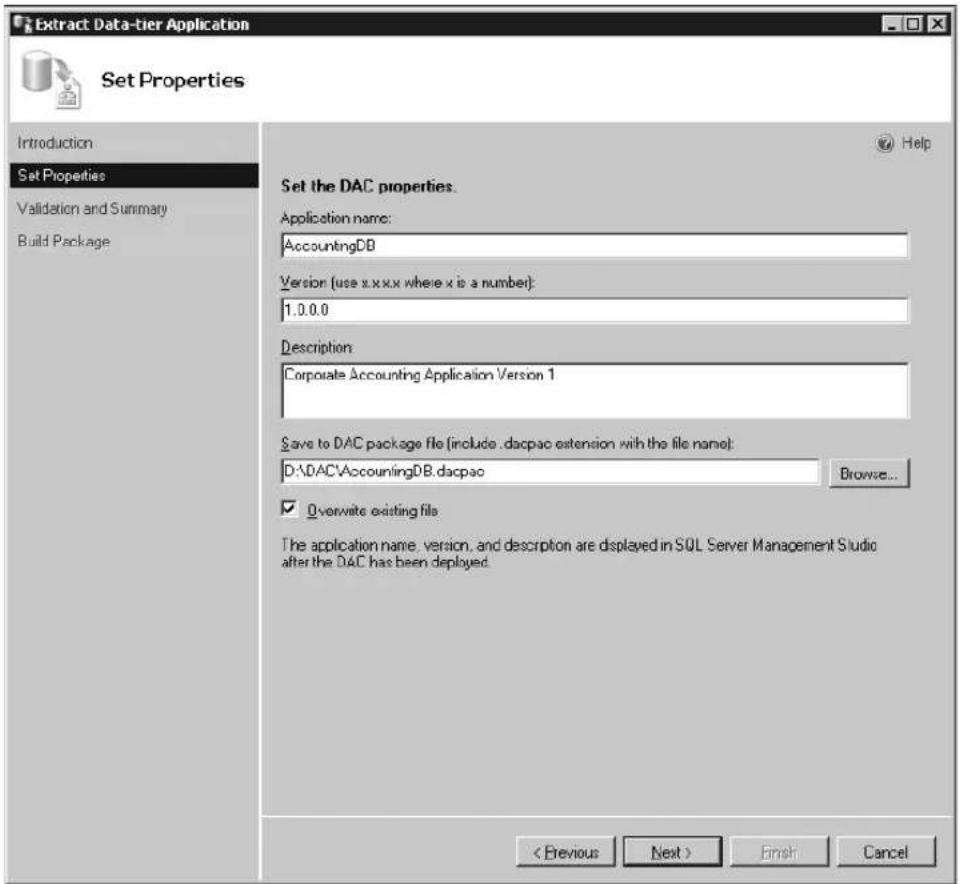
FIGURE 3-5 Specifying DAC properties when using the Extract Data-Tier Application Wizard
-
Next, indicate where the DAC package file is to be saved. Remember to use the appropriate extension, .dacpac. Alternatively, click the Browse button and identify the name and location for the DAC package file.
-
You also have the option to select the Overwrite Existing File check box to replace a DAC package with the same name. If you choose a name that already exists for a DAC package, the existing file is not automatically overwritten. Instead, an exclamation mark appears next to the Browse button. The Next button on the page is also disabled until you change the name you specified or select the Overwrite Existing File check box.
-
After you have entered all the DAC properties, click Next to continue.
-
On the Validation And Summary page, illustrated in Figure 3-6, review the information presented in the DAC properties summary tree because these settings are used to extract the DAC you specified. The wizard checks and validates object dependencies,
confirms that the information is supported by the DAC, and displays DAC object issues, DAC object warnings, and DAC objects that are supported. If there are no issues, click Next to continue. You also have the option to click Save Report to capture the entire report.
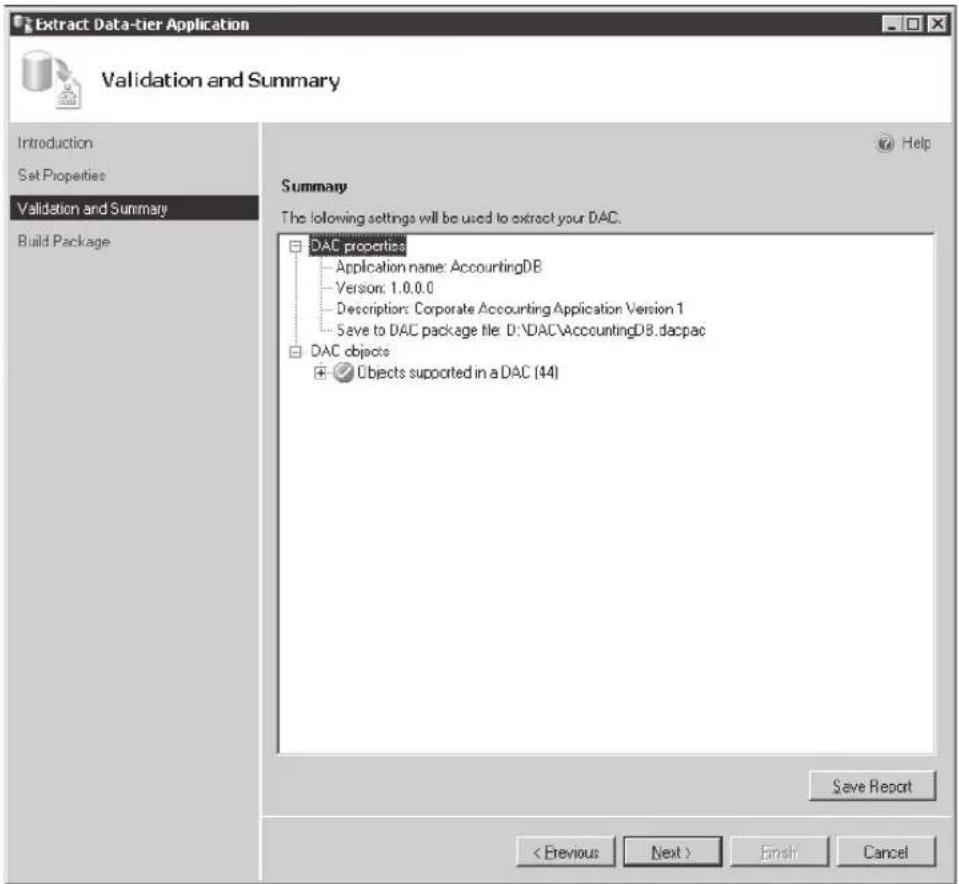
FIGURE 3-6 The Extract Data-Tier Application Wizard's Validation And Summary page
NOTE The Next button is disabled on the Validation And Summary page if one or more objects are not supported by the DAC. These items need to be addressed before the wizard can proceed. You usually remedy these issues by removing the unsupported objects from the database and rerunning the wizard.
- The Build Package page is the final screen and is used to monitor the status of the extraction and build process affiliated with the DAC package file. The wizard extracts a DAC from the selected database, creates the package in memory, and saves the file to the location specified in the previous steps. You can also click the links in the Result column to review the outcome and any additional corresponding steps if required, and then click Save to capture the entire report. Click Finish to complete the data-tier application extraction process.
Installing a New DAC Instance with the Deploy Data-Tier Application Wizard
After the DAC package has been created using the data-tier application project template in Visual Studio 2010, the Extract Data-Tier Application Wizard in SQL Server Management Studio, or Windows PowerShell commands, the next step is to deploy the DAC package to a Database Engine instance running SQL Server 2008 R2. This can be achieved by using the Deploy Data-Tier Application Wizard located in SQL Server Management Studio.
During the deployment process, the wizard registers a DAC instance by storing the DAC definition in the msdb system database, creates the new database, and then populates the database with all the database objects defined in the DAC. If a DAC is installed on a managed instance of the Database Engine, the Data-Tier Application is monitored by the SQL Server Utility. The DAC can be viewed in the Deployed Data-Tier Applications node of the Management Studio Utility Explorer and reported in the Deployed Data-Tier Applications details page.
NOTE Data-tier applications can be deployed only on Database Engine instances of SQL Server running SQL Server 2008 R2. Unfortunately, SQL Server 2008, SQL Server 2005, and SQL Server 2000 are not supported when you are deploying data-tier applications. However, upcoming SQL Server cumulative updates or service packs will include functionality for down-level support.
Follow these steps to deploy a DAC package to an existing SQL Server 2008 R2 Database Engine instance:
-
In Object Explorer, connect to the SQL Server instance in which you plan to deploy the Data-Tier Application.
-
Expand the SQL Server instance, and then expand the Management folder.
-
Right-click the Data-Tier Applications node, and then select Deploy Data-Tier Application to invoke the Deploy Data-Tier Application Wizard.
-
Review the information in the Introduction page, and then click Next to begin the deployment process. Select the Do Not Show This Page Again check box if you do not want the Introduction page displayed in the future when using the wizard.
-
On the Select Package page, specify the DAC package you want to deploy. Alternatively, use the Browse button to specify the location for the DAC package.
-
When the DAC package is selected, verify the DAC details, such as the application name, version number, and description in the read-only text boxes, as shown in Figure 3-7. Click Next to continue.

FIGURE 3-7 Specifying a DAC package to deploy with the Deploy Data-Tier Application Wizard
NOTE If a database with the same name already exists on the instance of SQL Server, the wizard cannot proceed.
-
The wizard then analyzes the DAC package to ensure that it is valid. If the DAC package is valid, the Update Configuration page is automatically invoked. Otherwise, an error is displayed. You need to address the error(s) and start over again.
-
On the Update Configuration page, specify the database deployment properties. The options include
■ Name Specify the name of the deployed DAC and database.
■ Data File Path Accept the default location or use the Browse button to specify the location and path where the data file will reside.
■ Log File Path Accept the default location or use the Browse button to specify the location and path where the transaction log file will reside.
- The next page includes a summary of the settings that are used to deploy the data-tier application. Review the information displayed in the Summary page and DAC properties tree to ensure that the actions taken are correct, and then click Next to continue.
- The Deploy DAC page, shown in Figure 3-8, includes results such as success or failure based on each action performed during the deployment process. These actions include preparing system tables in msdb, preparing deployment scripts, creating the database, creating schema objects affiliated with the database, renaming the database, and registering the DAC in msdb. Review the results for every action to confirm success. You can also click Save Report to capture the entire report. Then click Finish to complete the deployment.
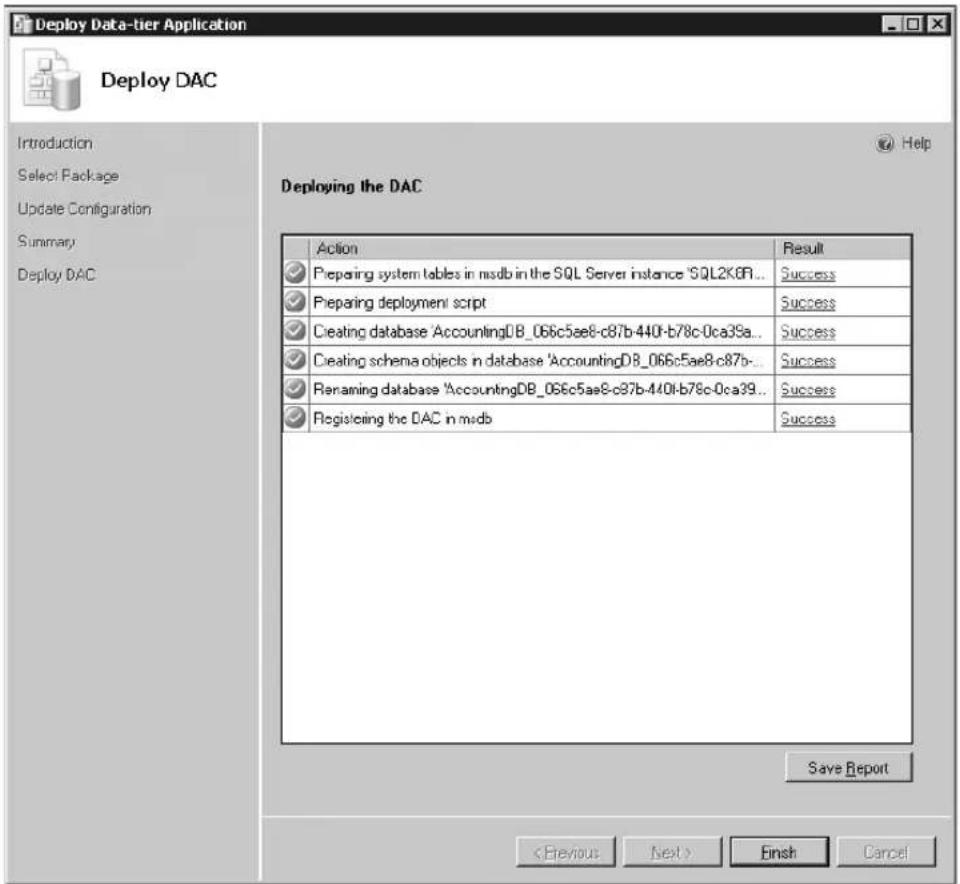
FIGURE 3-8 Viewing the deployment and results page associated with deploying the DAC
NOTE Throughout this chapter, you can also use Windows PowerShell scripts in conjunction with data-tier applications to do many of the tasks discussed, such as
■ Creating data-tier applications.
■ Creating server objects.
■ Loading DAC packages from a file.
■ Upgrading data-tier applications.
■ Deleting data-tier applications.
If you are interested in learning more about building Windows PowerShell scripts for data-tier applications, you can find more information in the white paper "Data-tier Applications in SQL Server 2008 R2" at http://go.microsoft.com/fwlink/?LinkID=183214.
Registering a Data-Tier Application
There may be situations in which a database administrator needs to create a data-tier application based on an existing database and then register and store the newly created DAC definition for the database in the msdb system database. This execution, often referred to as creating a DAC in place, is achieved by using either the Register Data-Tier Application Wizard or Windows PowerShell. Unlike the Extract Data-Tier Application Wizard, which creates a .dacpac file from an existing database, the Register Data-Tier Application Wizard creates a DAC in place by registering the DAC definition and metadata in the msdb system database. A DAC registration can be performed only on a Database Engine instance running SQL Server 2008 R2.
Use the following steps to register a data-tier application from an existing database by using the Register Data-Tier Application Wizard in Management Studio:
- In Object Explorer, connect to a SQL Server instance containing the database you want to register as a data-tier application.
- Expand the SQL Server instance, and then expand the Databases folder.
- Invoke the Register Data-Tier Application Wizard by right-clicking the desired database, selecting Tasks, and then selecting Register As Data-Tier Application.
-
Review the information on the Introduction page, and then click Next to begin the registration process. Select the Do Not Show This Page Again check box if you do not want the Introduction page displayed in the future when using the wizard.
-
On the Set Properties page, complete the DAC properties by typing in the application name, version, and description, as described here:
■ Application name This refers to the name of the DAC. This value cannot be altered and is always identical to the name of the database.
■ Version The DAC version identification helps developers working in Visual Studio identify the version in which they are currently working. In addition, creating a version helps identify the version of the DAC package used during deployment. The DAC version information is stored in the msdb database and can be viewed in SQL Server Management Studio in the Data-Tier Applications node.
■ Description This property is optional. Use it to describe the DAC. If this section is completed, the information is saved in the msdb database under the Data-Tier Applications node in Management Studio.
-
On the Validation And Summary page, review the information presented in the DAC properties summary tree because these settings are used to register the specified DAC. The wizard checks and validates SchemaName, ObjectName, and object dependencies, and it confirms that the information is supported by the DAC. Review the summary. It displays DAC object issues, DAC object warnings, and the DAC objects supported. If there are no issues, click Next to continue. You can also click Save Report to capture the entire report.
-
The Register DAC screen indicates whether or not the DAC was successfully registered in the msdb system database. Review the success and failure of each action, and then click Finish to conclude the registration process.
The data-tier application can now be viewed under the Data-Tier Applications node in SQL Server Management Studio. Moreover, if a database resides on a utility-managed instance, resource utilization associated with the data-tier application can be viewed in Utility Explorer after you connect to a Utility Control Point.
Deleting a Data-Tier Application
Database administrators may encounter occasions when they need to delete a data-tier application from an instance of SQL Server. This is accomplished by using the Delete Data-Tier Application Wizard in SQL Server Management Studio. Database administrators should be aware that they will be prompted by the wizard to choose one of three predefined options for handling the database linked to the application before the DAC is deleted. The three options are
■ Delete Registration This method keeps the associated database and login in place while deleting the DAC metadata from the instance.
■ Detach Database This method detaches the associated database and removes the DAC metadata. Detaching the associated database means that although the data files, log files, and logins remain in place, the database can no longer be referenced by an instance of the Database Engine.
■ Delete Database The DAC metadata and the associated database are dropped. The data and log files are deleted. Logins are not removed.
To delete the DAC, follow these steps:
-
In Object Explorer, connect to a SQL Server instance containing the data-tier application you plan to delete.
-
Expand the SQL Server instance, and then expand the Management folder.
-
Expand the Data-Tier Applications node, right-click the data-tier application you want to delete, and then select Delete Data-Tier Application.
-
Review the information in the Introduction page, and then click Next to begin the deletion process. Select the Do Not Show This Page Again check box if you do not want the Introduction page displayed in the future when using the wizard.
-
On the Choose Method page, specify the method you want to use to delete the data-tier application, as illustrated in Figure 3-9. The options are Delete Registration, Detach Database, and Delete Database. Click Next to continue.
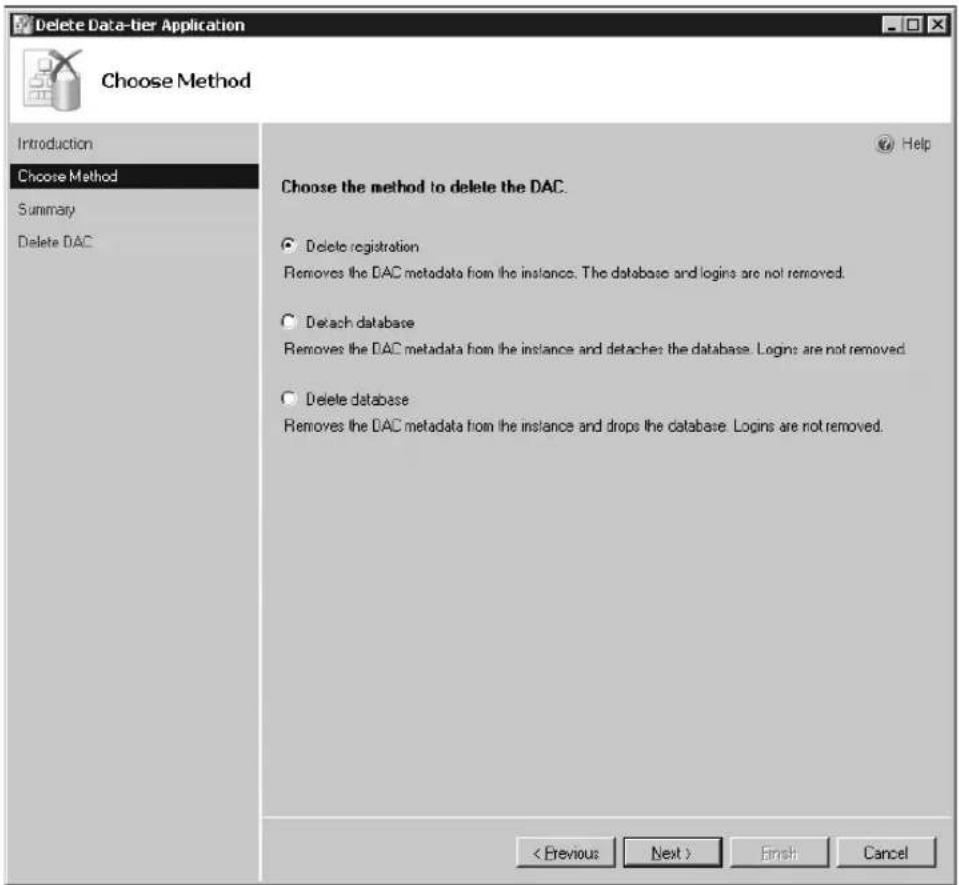
FIGURE 3-9 Choosing the method with which to delete the DAC with the Delete Data-Tier Application Wizard
- Review the information displayed in the Summary page, as shown in Figure 3-10.

FIGURE 3-10 Viewing the Summary page when deleting a DAC
Ensure that the application name, database name, and delete method are correct. If the information is correct, click Next to continue.
- On the Delete DAC page, take a moment to review the information. This page communicates which actions failed or succeeded. Unsuccessful actions have a link next to them in the Result column. Click the link for detailed information about the error. In addition, you can click Save Report to save the results on the Delete DAC page to an HTML file. Click Finish to complete the deletion process and close the wizard.
Let us recall the past for a moment, when updating changes to existing database schemas and database applications was a noticeably challenging task. Database administrators usually created scripts that included the new or updated database schema changes to be deployed. The other option was to use third-party tools. Both processes could be expensive, time consuming, and challenging to manage from a release or build perspective. Today, with SQL Server 2008 R2, database administrators and developers can upgrade their existing deployed data-tier applications to a new version of the DAC by simply building a new DAC package that contains the new or updated schema and properties.
The upgrade can be accomplished by using Windows PowerShell commands or the Upgrade Data-Tier Application Wizard in SQL Server Management Studio. The tools are intended to upgrade a deployed DAC to a different version of the same application. For example, an organization may want to upgrade the Accounting DAC from version 1.0 to version 2.0. The upgrade wizard first preserves the database that will be upgraded by making a copy of it. It then creates a new database that includes the schema and objects of the new version of the DAC. The original database's mode is then set to read-only, and the data is copied to the new version. After the data transfer is complete, the new DAC assumes the original database name. The renamed DAC remains on the SQL Server instance.
There are a few actions that data-tier developers and database administrators should always perform before a data-tier application upgrade. First, the schema associated with the original DAC should be compared to the new DAC. Second, database administrators must confirm that the amount of data held in the existing DAC does not exceed the size limit of the new DAC database. To upgrade a data-tier application by using the Upgrade Data-Tier Application Wizard, follow these steps:
- In Object Explorer, connect to a SQL Server instance containing the DAC you want to upgrade.
- Expand the SQL Server instance, and then expand the Management folder.
- Expand the data-tier applications tree and select the data-tier application that you want to upgrade.
- Right-click the data-tier application, and select Upgrade Data-Tier Application. This starts the Upgrade Data-Tier Application Wizard.
-
Review the information on the Introduction page, and then click Next to begin the upgrade process. Select the Do Not Show This Page Again check box if you do not want the Introduction page displayed in the future when using the wizard.
-
On the Select Package page, specify the DAC package that contains the new DAC version to upgrade to. Alternatively, you can use the Browse button to specify the location of the DAC package. When the DAC package is selected, you can verify the DAC details, such as the application name, version number, and description in the read-only text boxes.
IMPORTANT Ensure that the DAC package and the original DAC have the same name.
- When invoked, the Detect Change page starts off by displaying a progress bar while the wizard verifies differences between the current schema of the database and the objects in the DAC definition. The change detection results indicate whether the database objects have changed or remain the same. If the database has changed, you are warned that there may be data loss if you proceed with the upgrade, as illustrated in Figure 3-11. Select the Proceed Despite Possible Loss Of Changes check box, and click Next to continue.

FIGURE 3-11 The Detect Change page of the Upgrade Data-Tier Application Wizard
NOTE If the database has changed, it is a best practice to review the potential data losses before you proceed and verify that this is the outcome you want for the upgraded database. However, the original database is still preserved, renamed, and maintained on the SQL Server instance. Any data changes can be migrated from the original database to the new database after the upgrade is complete.
- The next page includes a summary of the settings that will be used to upgrade the data-tier application. Review the information displayed in the Summary page and the DAC properties tree to ensure that the actions to be taken are correct, and then click Next to continue.
-
The Upgrade DAC page, shown in Figure 3-12, includes results, such as the success or failure of each action performed during the upgrade process. Some of the actions tested include
-
Validating the upgrade.
■ Preparing system tables in msdb.
■ Preparing the deployment script.
■ Creating the new database.
■ Creating schema objects in the database.
■ Setting the source database as read-only.
■ Disconnecting users from the existing source database.
■ Preparing scripts to copy data from the database.
■ Disabling constraints on the database.
■ Setting the database to read/write.
■ Renaming the database.
■ Upgrading the DAC metadata in msdb to reflect the new DAC version.
Review the result for every action. You can also click Save Report to capture the entire report. Then click Finish to complete the upgrade.
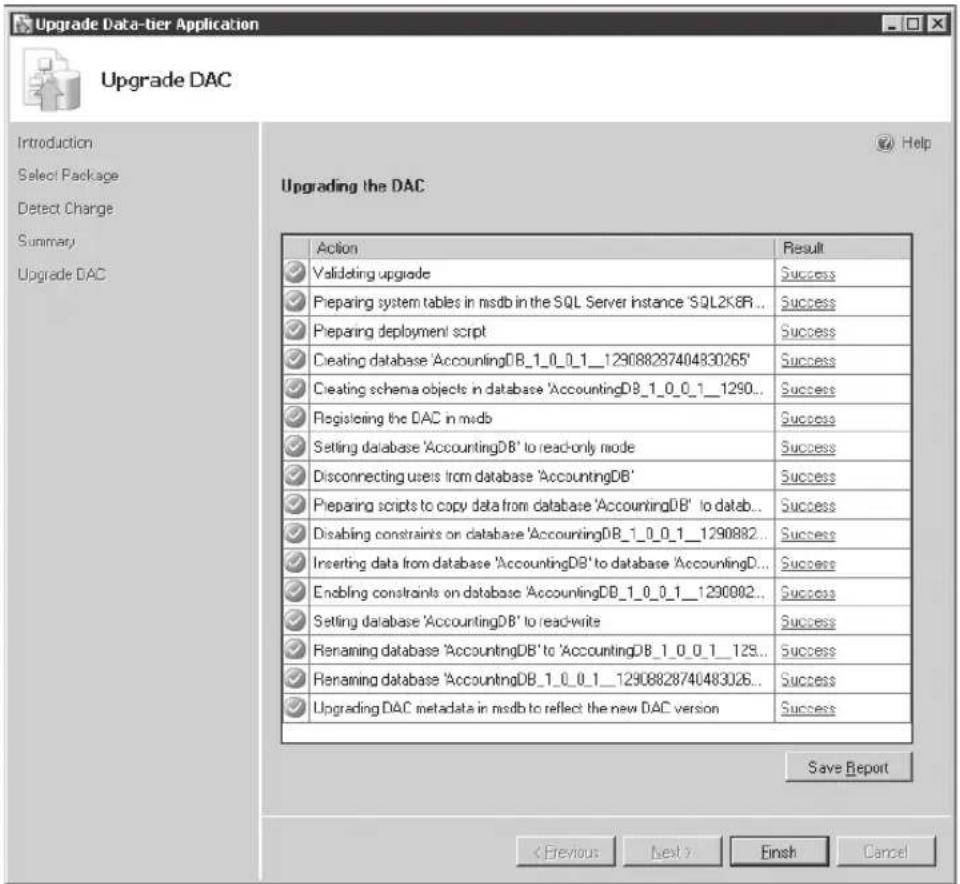
FIGURE 3-12 Reviewing the result information on the Upgrade DAC page
NOTE Data-tier applications are a large and intricate subject. See the following sources for more information:
■ "Designing and Implementing Data-tier Applications" at http://msdn.microsoft.com/en-us/library/ee210546(SQL.105).aspx
■ "Creating and Managing Data-tier Applications" at http://msdn.microsoft.com/en-us/library/ee361996(VS.100).aspx
■ Tutorials at http://msdn.microsoft.com/en-us/library/ee210554(SQL.105).aspx
■ "Data-tier Applications in SQL Server 2008 R2" white paper at http://go.microsoft.com /fwlink/?LinkID=183214
High Availability and Virtualization Enhancements
Microsoft SQL Server 2008 R2 delivers several enhancements in the areas of high availability and virtualization. Many of the enhancements are affiliated with the Windows Server 2008 R2 operating system and the Hyper-V platform. Windows Server 2008 R2 builds on the successes and foundation of Windows Server 2008 by expanding on the existing high availability technologies, while adding new features that allow for maximum availability and reliability for SQL Server 2008 R2 implementations. This chapter discusses the enhancements to high availability that significantly contribute to the capabilities of SQL Server 2008 R2 in both physical and virtual environments.
Enhancements to High Availability with Windows Server 2008 R2
In the following list are a few of the improvements that will appeal to SQL Server and Windows Server professionals looking to gain maximum high availability within their database infrastructures.
■ Hot add CPU and memory When using SQL Server 2008 R2 in conjunction with Windows Server 2008 R2, database administrators can upgrade hardware online by dynamically adding processors and memory to a system that supports dynamic hardware partitioning. This is a very convenient feature for organizations that cannot endure downtime for SQL Server systems running in mission-critical environments.
■ Failover clustering Greater high availability is achievable for SQL Server R2 with failover clustering on Windows Server 2008 R2. Windows Server 2008 R2 enhances the failover cluster installation experience by increasing the number of validation tests within the Cluster Validation Wizard. Moreover, Windows Server 2008 R2 introduces a Best Practices Analyzer tool to help database administrators reduce best practice violations. Similar to its predecessor, Windows Server 2008 R2 continues to supports up to 16 nodes within a failover cluster and organizations can also protect their applications from site failures with SQL Server multi-site failover cluster support by using stretched VLANs built on Windows Server support for multi-site clusters.
Windows Server 2008 R2 Hyper-V The Hyper-V virtualization technology improvements in Windows Server 2008 R2 were the most sought-after and anticipated enhancements for Windows Server 2008 R2. It is now possible to virtualize heavy SQL Server workloads because Windows Server 2008 R2 scales far beyond its predecessors. In addition, database administrators can achieve increased virtualization availability by leveraging new technologies, such as Clustered Shared Volumes (CSV) and Live Migration, both of which are included in Windows Server 2008 R2. Guest clustering with SQL Server 2008 R2 in Windows Server 2008 R2 Hyper-V is also supported.
■ Live Migration and Hyper-V By leveraging Live Migration and CSV—two new technologies included with Hyper-V and failover clustering on Windows Server 2008 R2—it is possible to move virtual machines between Hyper-V hosts within a failover cluster without downtime. It is worth noting that CSV and Live Migration are independent technologies; CSV is not required for Live Migration.
■ Cluster Shared Volumes (CSV) CSV enables multiple Windows servers running Hyper-V to access Storage Area Network (SAN) storage using a single consistent namespace for all volumes on all hosts. This provides the foundation for Live Migration and allows for the movement of virtual machines between Hyper-V hosts.
■ Dynamic virtual machine (VM) storage It is possible to add or remove virtual hard disk (VHD) files and pass-through disks while a VM is running. Support for hot plugging and hot removal of storage is based on Hyper-V. This is very handy when you are working with dynamic SQL Server 2008 R2 storage workloads, which are continuously evolving.
■ Second Level Address Translation (SLAT) Enhanced processor support and memory management can be achieved with SLAT, which is a new feature supported with Hyper-V in Windows Server 2008 R2. SLAT leverages Intel Virtualization Technology (VT) Extended Page Tables (EPT) and AMD-V Rapid Virtualization Indexing (RVI) technology in an effort to reduce the overhead incurred during mapping of a guest virtual address to a physical address for virtual machines. This significantly reduces hypervisor CPU time and saves memory for each VM, allowing the physical computer to do more work while utilizing fewer system resources.
Failover Clustering with Windows Server 2008 R2
If you're unfamiliar with failover clustering, don't stop reading to run out and purchase a book on the topic—this section begins with an overview of failover clustering. It may surprise some readers to know that SQL Server failover clustering has been available since Microsoft SQL Server 7.0. Back in those days, failover clustering proved to be quite a challenge to set up. It was necessary to install multiple Microsoft products to form the Microsoft cluster environment,
including Internet Information Services (IIS), Cluster Server, SQL Server 7.0 Enterprise Edition, Microsoft Distributed Transaction Coordinator (MSDTC) 2.0, and sometimes the Windows NT 4.0 Option Pack. Moreover, the hardware support, driver support, and documentation were not as forthcoming as they are today. Many IT organizations came to believe that failover clustering was a difficult technology to install and maintain. That has all changed, thanks to the efforts of the SQL Server and Failover Clustering product groups at Microsoft. Today, forming a cluster with SQL Server 2008 R2 on Windows Server 2008 R2 is very easy. In addition, the two technologies combined provide maximum availability compared to previous versions, especially for database administrators who want to virtualize their SQL Server workloads.
Now that you know some of the history behind failover clustering, it's time to take a closer look into what failover clustering is all about and what it means for organizations and database administrators. A SQL Server failover cluster is built on the foundation of a Windows failover cluster, while providing high availability and protecting the whole instance of SQL Server in the event of a server failure. Failover clustering allows organizations to meet their high availability uptime requirements through redundancy in their SQL Server infrastructure by eliminating single points of failure for the clustered application. The server that is used to form a cluster can be either physical or virtual. The next section introduces the different types of failover clusters that can be achieved with these two products (SQL Server 2008 R2 and Windows Server 2008 R2), which work very well with one another.
Traditional Failover Clustering
The traditional SQL Server failover cluster has been around for years. With a traditional failover cluster, there are two or more nodes (servers) connected to shared storage. A quorum is formed between all nodes in the failover cluster, and this quorum determines the health and number of failures the failover cluster can sustain. Communication between cluster nodes is required for cluster operations and is achieved by using two or more independent networks that connect the nodes of a cluster to avoid a single point of failure. SQL Server 2008 R2 is installed on all nodes within a failover cluster. If a node in the cluster fails, the SQL Server instance automatically fails over to a surviving node within the failover cluster. Note that the failover is seamless from an end-user or application perspective. Like its predecessor, SQL Server 2008 R2 delivers single-instance and multiple-instance failover cluster configurations. In addition, SQL Server 2008 R2 on Windows Server 2008 R2 supports up to 16 nodes and a maximum of 23 instances within a failover cluster due to the drive letter limitation.
IMPORTANT When you are configuring a cluster, make sure to connect the nodes by more than one network; otherwise Microsoft Product Support Services does not support the implementation. In addition, it is a best practice to always use more than one network.
Figure 4-1 illustrates a two-node single-instance failover cluster running SQL Server on Windows Server 2008 R2.
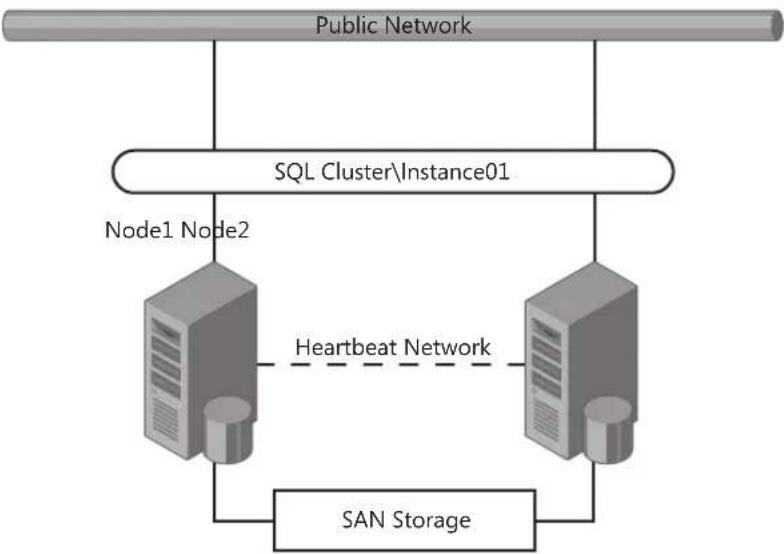
flowchart
graph TD
    A["Public Network"] --> B["SQL Cluster\Instance01"]
    B --> C["Node1 Node2"]
    C --> D["Heartbeat Network"]
    D --> E["SAN Storage"]
    E --> C
FIGURE 4-1 A two-node single-instance failover cluster
Figure 4-2 illustrates a multiple-instance failover cluster running SQL Server on Windows Server 2008 R2.
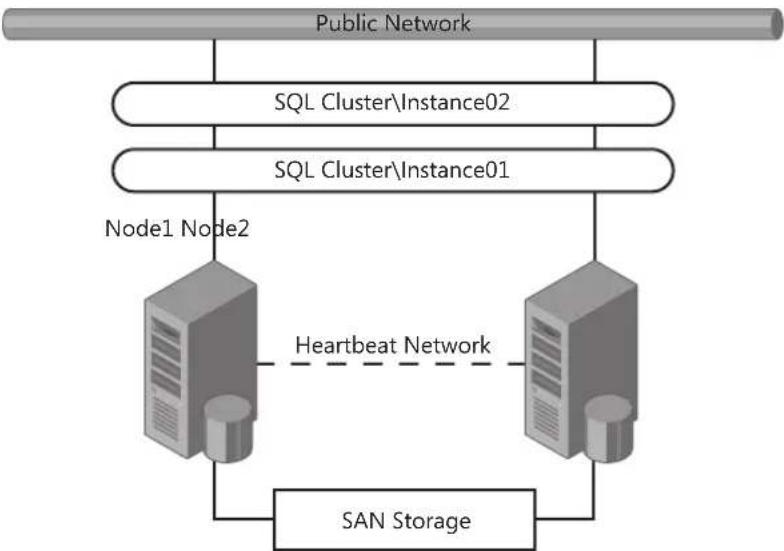
flowchart
graph TD
    A["Public Network"] --> B["SQL Cluster\Instance02"]
    A --> C["SQL Cluster\Instance01"]
    B --> D["Node1 Node2"]
    C --> D
    D --> E["Heartbeat Network"]
    E --> F["SAN Storage"]
    F --> D
FIGURE 4-2 A two-node multiple-instance failover cluster
Guest Failover Clustering
In the past, physical servers were usually affiliated with the nodes in a failover cluster. Today, virtualization technologies make it possible to form a cluster with each node being a guest operating system on virtual servers. This is known as guest failover clustering. To achieve a guest failover cluster, you must have a quorum, a public network, a private network, and shared storage; however, instead of using physical servers for each node in the SQL Server failover cluster, each node is virtualized through Hyper-V. Organizations taking advantage of guest failover clustering with SQL Server 2008 R2 must have the physical host running Hyper-V on Windows Server 2008 R2, and the configurations must be certified through the Server Virtualization Validation Program (SVVP). Likewise, the guest operating system must be Windows Server 2008 R2, and the virtualization environment must meet the requirements of Windows Server 2008 R2 failover clustering, including passing the Validate a Configuration tests.
NOTE When implementing failover clusters, you can combine both physical and virtual nodes in a single failover cluster solution.
Figure 4-3 illustrates a multiple-instance guest failover cluster running SQL Server 2008 R2 on Windows Server 2008 R2. SQLNode1 is a virtual machine running on the server called Hyper-V01, which is a Hyper-V host, and SQLNode2 is a virtual machine running on the Hyper-V02 Hyper-V host.

flowchart
graph TD
    A["Public Network"] --> B["SQL Cluster\Instance02"]
    A --> C["SQL Cluster\Instance01"]
    B --> D["SQL Node1"]
    B --> E["SQL Node2"]
    C --> D
    C --> E
    D --> F["Heartbeat Network"]
    E --> F
    F --> G["Hyper-V01 Hyper-V02"]
    G --> H["P"]
    G --> I["P"]
    H --> J["SAN Storage"]
    I --> J
    J --> K["P = Physical Server\nV = Virtual Server"]
FIGURE 4-3 A two-node guest failover cluster
NOTE Guest clustering is also supported when Hyper-V is on Windows Server 2008.
However, Windows Server 2008 R2 provides Live Migration for moving virtual machines between physical hosts. This is much more beneficial for a virtualized environment running SQL Server 2008 R2.

Real World
When you use guest failover clustering, make sure that the virtualized guest operating systems used for the nodes in the guest failover cluster are not on the same physical Hyper-V host. If this situation exists, you have a physical host running Hyper-V, which means that you have created a single point of failure. For example, if a single physical host running all of the guest operating systems suddenly failed, all the nodes associated with the guest failover cluster would no longer be available, ultimately causing the whole SQL Server failover cluster instance to fail. This could be catastrophic in a mission-critical production environment. This problem can be avoided, however, if you use multiple Hyper-V hosts and Live Migration, and ensure that each guest operating system is running on a separate Hyper-V host.
Enhancements to the Validate A Configuration Wizard
As mentioned earlier in this chapter, organizations in the past found it difficult to implement a SQL Server failover cluster. One thing that clearly stood out was the need for an intuitive tool that could verify whether or not an organization's configuration met the failover clustering prerequisites. This issue was addressed with the introduction of Windows Server 2008, which offered for the first time a tool called the Validate A Configuration Wizard.
Database administrators and Windows administrators used this tool to conduct validation tests to determine whether servers, settings, networks, and storage affiliated with a failover cluster were set up correctly. This tool was also used to verify whether or not prerequisite tasks were met and to confirm that the hardware supported a successful cluster implementation.
The Validate A Configuration Wizard tool included with Windows Server 2008 R2 still delivers inventory, network, storage, and system configuration tests. In addition, the Failover Clustering product team made enhancements to the Validate A Configuration Wizard tool that further improve the testing ability of this tool. Some of the enrichments include the following options:
■ Cluster Configuration
• List Cluster Core Groups
• List Cluster Network Information
• List Cluster Resources
• List Cluster Volumes
• List Cluster Services And Applications
- Validate Quorum Configuration
- Validate Resource Status
- Validate Service Principal Name
- Validate Volume Consistency
■ Network
• List Network Binding Order
- Validate Multiple Subnet Properties
■ System Configuration
- Validate Cluster Service And Driver Settings
- Validate Memory Dump Settings
- Validate System Drive Variable
NOTE The wizard tests configurations and also lists information. See "Failover Cluster Step-by-Step Guide: Validating Hardware for a Failover Cluster," a Knowledge Base article that describes each test in detail, at http://technet.microsoft.com/en-us/library/cc732035(WS.10).aspx.
Running the Validate A Configuration Wizard
Prior to installing a failover cluster for SQL Server 2008 R2 on Windows Server 2008 R2, administrators should run the Validate A Configuration Wizard tool by following these steps:
- Ensure that the failover clustering feature is installed on all the nodes associated with the new cluster being validated.
- On one of the nodes of the cluster, open the Failover Cluster Management snap-in.
- Review the information on the Before You Begin page, and then click Next. You can select the option to hide this page when using the wizard in the future.
- On the Select Servers Or A Cluster page, in the Enter Name field, type either the host name or the fully qualified domain name (FQDN) of a node in the cluster. Alternatively, you can click the Browse button and select one or more nodes in the cluster. Click Next to continue.
-
On the Testing Options page, select Run All Tests or Run Only Test I Select, and then click Next. It is recommended that you choose Run All Tests when using the wizard for the first time. The tests are organized into Inventory, Network, Storage, and System Configuration categories.
-
On the Confirmation page, review the details for each test, and then click Next to begin the validation process. While the validation process is running, status information is continually displayed on the Validating page until all tests are complete. After all tests are complete, the Summary page is displayed, as shown in Figure 4-4. It includes the results of the validation tests and numerous details about the information collected during each test. Any errors or warnings listed in the validation results should be looked into and rectified as soon as possible. It is also possible to proceed without fixing errors; however, the failover cluster will not be supported by Microsoft.
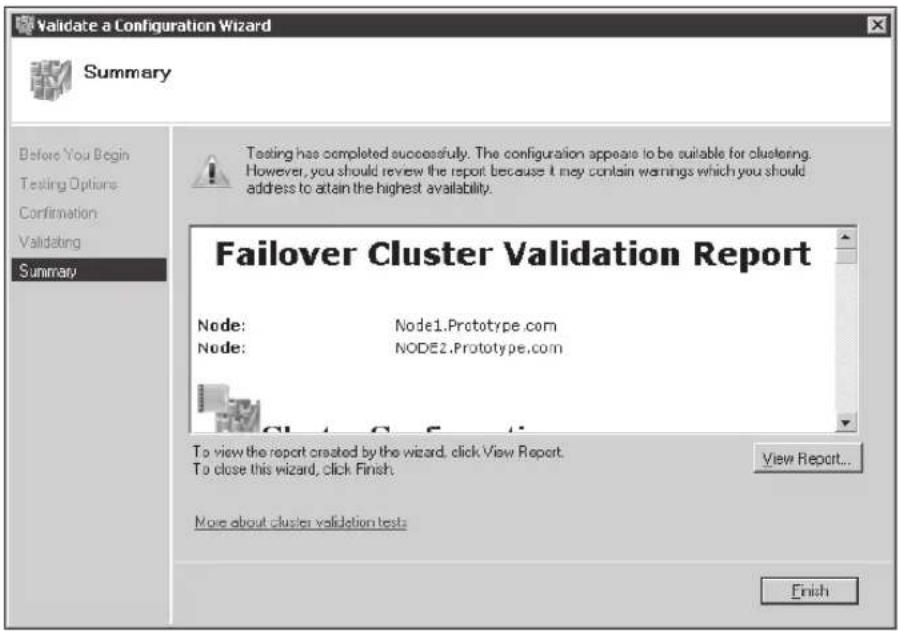
FIGURE 4-4 The Failover Cluster Validation Report
- Click View Report to observe the report in the default Web browser. The report is displayed in Web archive (.mht) format. Click Finish to close the wizard.
NOTE The Validate A Configuration Wizard is quite useful for troubleshooting a failover cluster. Administrators who run tests relating to the specific issues they are experiencing are likely to yield valuable information and answers on how to address their issues. For example, if you are experiencing issues with Multipath I/O (MPIO), a specific driver, or shared storage after a successful implementation of a failover cluster, the wizard would identify the problem for quick resolution.
The Windows Server 2008 R2 Best Practices Analyzer
Another tool available in Windows Server 2008 R2 is a server management tool referred to as the Best Practices Analyzer (BPA). The BPA determines how compliant a server role is by comparing it against best practices in eight categories: security, performance, configuration, policy, operation, pre-deployment, post-deployment, and BPA prerequisites. In each category, the effectiveness, trustworthiness, and reliability of a role is taken into consideration. Each role measured by the BPA will be assigned one of the following three severity levels: Non-compliant, Compliant, or Warning. A server role not in agreement with best practice guidelines is labeled as Noncompliant, and a role in agreement with best practice guidelines is labeled as Compliant. Server roles inherit the Warning severity level when a BPA scan detects compliance but also a risk that the server role will fall out of compliance.
Database administrators find this tool instrumental in achieving success with their failover cluster setup. First, the Windows Server 2008 R2 BPA can help database administrators reduce best-practice violations by scanning one or more roles installed on a server running Windows Server 2008 R2. On completion, the BPA creates a report that itemizes every best-practice violation, from the most severe to the least severe. It is also possible to customize a BPA report. For example, database administrators can omit results they deem unnecessary or unimportant. Last, administrators can also perform BPA tasks by using either the Server Manager GUI or Windows PowerShell cmdlets.
Running the Best Practices Analyzer
The BPA is installed by default on all editions of Windows Server 2008 R2 except the Server Core installation option. If BPA is installed on your edition, run it in Server Manager. Follow these steps:
-
Click Start, click Administrative Tools, and then select Server Manager.
-
Open Roles from the navigation pane. Next, select the role to be scanned with BPA.
-
Open the Summary section in the details pane. Next, open the Best Practices Analyzer area.
-
Click Scan This Role to initiate the scan.
-
When the scan is complete, review the results in the Best Practices Analyzer results window.
Virtualization is one of the hottest topics of discussion in almost every SQL Server architecture design session or executive briefing session, mainly because organizations are beginning to understand the immediate and long-term benefits virtualization can offer them. SQL Server virtualization not only promises to be very positive and rewarding from an environmental perspective—reducing power and thermal costs which translate to green IT—it also promises to help organizations achieve strategic business objectives and consolidation goals, including lower hardware costs, smaller data centers, and less management associated with SQL Server.
As a result, increasing numbers of organizations are showing interest in virtualizing their SQL Server workloads, including their test, staging, and even production environments. This trend toward virtualization has undoubtedly become stronger with the release of Windows Server 2008 R2, which includes Live Migration and Cluster Shared Volumes (CSV). By leveraging Live Migration and CSV, organizations can achieve high availability for SQL Server virtual machines (VMs). In addition, it is possible to move virtualized SQL Server 2008 R2 guest operating systems between physical Hyper-V hosts without any perceived downtime.
Live Migration Support Through CSV
Live Migration is a new Hyper-V feature in Windows Server 2008 R2 that is used to increase high availability of SQL Server VMs. By leveraging the new Live Migration feature, organizations can transparently move SQL Server 2008 R2 VMs from one Hyper-V physical host to another Hyper-V physical host within the same cluster, without disrupting the services of the guest operating system or SQL Server application running on the VM. This is achieved via an intricate process. First, all VM memory pages are transferred from the source Hyper-V physical host to the destination Hyper-V physical host. Second, any VM modifications to the VMs memory pages on the source Hyper-V physical host are tracked. These tracked and modified pages are transferred to the physical Hyper-V target computer. Third, the storage handles for the VMs' VHD files are moved to the Hyper-V target computer. Finally, the destination VM is brought online.
The Live Migration feature is supported only when Hyper-V is run on Windows Server 2008 R2. Live Migration can take advantage of the new CSV feature within failover clustering in Windows Server 2008 R2. The CSVs let multiple nodes in the same failover cluster concurrently access the same logical unit number (LUN). Equally important, because a Hyper-V cluster must be formed as a prerequisite task, Live Migration requires the failover clustering feature to be added and configured on all of the servers running Hyper-V. In addition, the Hyper-V cluster hosts require shared storage for the cluster nodes. This can be achieved by either an iSCSI, Serial Attached SCSI (SAS) or Fibre Channel Storage Area Network (SAN).
Figure 4-5 illustrates a four-node Hyper-V failover cluster with two CSVs and eight SQL Server guest operating systems. With Live Migration, running SQL Server VMs can be seamlessly moved between Hyper-V hosts.
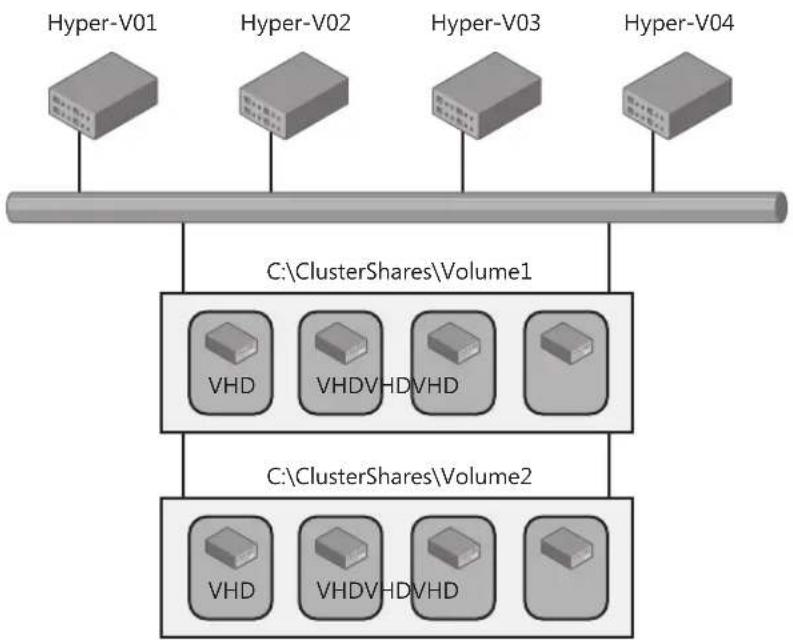
flowchart
graph TD
    A["Hyper-V01"] --> B["C:\ClusterShares\Volume1"]
    C["Hyper-V02"] --> B
    D["Hyper-V03"] --> B
    E["Hyper-V04"] --> B
    B --> F["VHD"]
    B --> G["VHDVHDVHD"]
    B --> H["VHD"]
    B --> I["VHDVHDVHD"]
    B --> J["VHD"]
    B --> K["VHDVHDVHD"]
FIGURE 4-5 A Hyper-V cluster and Live Migration
Windows Server 2008 R2 Hyper-V System Requirements
Table 4-1 below outlines the minimum requirements, along with the recommended system configuration, for using Hyper-V on Windows Server 2008 R2.
TABLE 4-1 Hyper-V System Requirements
| MINIMUM RECOMMENDED | |
| Processor x64-compatible processor withIntel VT or AMD-V technologyenabled | — |
| CPU speed 1.4 GHz 2.0 GHz or faster—additional CPUsare required for each guest operating system | |
| RAM 1 GB—additional RAM is requiredfor each guest operating system | 2 GB or higher—additional RAM isrequired for each guest operating system |
| Disk space 8 GB—additional disk space isneeded for each guest operating system | 20 GB or higher—additional diskspace is needed for each guestoperating system |
NOTE System requirements vary based on an organization's virtualization requirements. Organizations should size their workloads to ensure that the Hyper-V hosts can successfully accommodate all of the virtual servers and associated workloads from a CPU, memory, and disk perspective.
Practical Uses for Hyper-V and SQL Server 2008 R2
Hyper-V on Windows Server 2008 R2 is capable of accomplishing almost the same successes as dedicated servers, including the same kinds of peak load handling and security. Knowing this, you might wonder when Hyper-V on Windows Server 2008 R2 should be employed from a SQL Server 2008 R2 perspective. Hyper-V on Windows Server 2008 R2 can be utilized for
■ Consolidating SQL Server databases or instances on a single physical server.
■ Virtualizing SQL Server infrastructure workloads with low utilization.
■ Achieving high availability for SQL Server VMs by using Live Migration or guest clustering.
■ Maintaining different versions of SQL Server and the operating system on the same physical server.
■ Virtualizing test and development environments to reduce total cost of ownership.
■ Reducing licensing, power, and thermal costs.
■ Extending physical space when the data center lacks it.
■ Repurposing and extending the life of old SQL Server hardware by conducting a physical-to-virtual (P2V) migration.
■ Migrating legacy SQL Server editions off hardware that is old and that has expired warranties.
- Generating self-contained SQL Server environments, also known as sandboxes.
■ Taking advantage of the rapid deployment capabilities of SQL Server VMs by using Microsoft System Center Virtual Machine Manager (VMM) 2008 R2.
■ Storing and managing SQL Server VMs in VMM libraries.
By using virtual servers, organizations can take advantage of powerful features such as multi-core technology, and they can achieve better handling of disk access and greater memory support. In addition, Hyper-V improves scalability and performance for a SQL Server VM.
NOTE The Microsoft Assessment and Planning Toolkit can be used to identify whether or not an organization's SQL Server systems are good candidates for virtualization. The toolkit also includes tools for SQL Server inventory, assessments, and intuitive reporting. A download of the Microsoft Assessment and Planning Toolkit is available on the Microsoft Download Center at http://www.microsoft.com/downloads/details.aspx?FamilyID=67240b76-3148-4e49-943d-4d9ea7f77730&displaylang=en.
Implementing Live Migration for SQL Server 2008 R2
Follow these steps to take advantage of Live Migration for SQL Server 2008 R2 VMs:
- Ensure that the hardware, software, drivers, and components are supported by Microsoft and Windows Server 2008 R2.
- Set up the hardware, shared storage, and networks as recommended in the failover cluster deployment guides.
NOTE "Hyper-V: Using Hyper-V and Failover Clustering," the TechNet article at the following link, includes step-by-step instructions on how to implement Hyper-V and failover clustering: http://technet.microsoft.com/en-us/library/cc732181(WS.10).aspx. In addition to step-by-step instructions on how to implement Hyper-V and failover clustering, this page also gives information on the requirements for using Hyper-V and failover clustering, which might be helpful because, the steps in the following sections assume that a Hyper-V cluster is already in place.
- For all nodes that you are including in the failover cluster, install Windows Server 2008 R2 (full installation or Server Core installation).
- Enable the Hyper-V role on each node of the failover cluster.
- Install the Failover Clustering feature on each node of the failover cluster.
- Validate the cluster configuration by using the Validate A Configuration Wizard tool located in Failover Cluster Manager.
- Configure CSV.
- Create a SQL Server VM with Hyper-V.
- Set up a SQL Server VM for Live Migration.
- Configure cluster networks for Live Migration.
Enabling CSV
Assuming that the Hyper-V cluster has already been built, the next step is enabling CSV in Failover Cluster Manager. Follow the steps in this section to enable CSV on a Hyper-V failover cluster running on Windows Server 2008 R2.
- On a server in the Hyper-V failover cluster, click Start, click Administrator Tools, and then click Failover Cluster Manager.
- In the Failover Cluster Manager snap-in, verify that CSV is present for the cluster that is being enabled. If it is not in the console tree, right-click Failover Cluster Manager, click Manage A Cluster, and then select or specify the cluster to be configured.
- Right-click the failover cluster, and then choose Enable Cluster Shared Volumes.
- The Enable Cluster Shared Volumes dialog box opens. Read and accept the terms and restrictions associated with CSV. Then click OK.
- In this step, you add storage to the CSV. You can do this either by right-clicking Cluster Shared Volumes and selecting Add Storage or by selecting Add Storage under Actions.
- In the Add Storage dialog box, select from the list of available disks, and then click OK.
- After the disk or disks selected have been added, they appear in the Results pane for Cluster Shared Volumes.
NOTE SystemDrive\ClusterStorage is the CSV storage location for each node associated with the failover cluster. Folders for each volume added to the CSV are stored in this location. Administrators needing to view the list of volumes can do so in Failover Cluster Manager.
Creating a SQL Server VM with Hyper-V
Before leveraging Live Migration, organizations must follow the instructions in this section to create a SQL Server VM with Hyper-V in Windows Server 2008 R2.
- Ensure that the Hyper-V role is installed on the server that you use to create the SQL Server 2008 R2 VM.
- Click Start, click Administrative Tools, and then click Hyper-V Manager.
- In the Action pane, click New, and then click Virtual Machine. The New Virtual Machine Wizard starts.
-
Read the information on the Before You Begin page, and then click Next. You can select the option to hide this page on all future uses of the wizard.
-
On the Specify Name And Location page, enter the name of the SQL Server VM and specify where it will be stored. For example, the name SQLServer2008R2-VM01 and the VM can be stored on Cluster Shared Volume 1, as displayed in Figure 4-6.

FIGURE 4-6 The Specify Name And Location Screen when a new virtual machine is being created
NOTE If a folder is not selected, the SQL Server VM is stored in the default folder configured for the Hyper-V server.
- On the Memory page, enter the amount of memory to be allocated to the SQL Server's VM guest operating system. Click Next.
NOTE With SQL Server 2008 R2, it is recommended that you have 2.048 GB or more of RAM, whereas with Windows Server 2008 R2 a minimum of 512 MB of RAM is recommended. Remember to ensure that SQL Server workloads are sized accordingly, and remember to take into consideration the amount of RAM required for each SQL Server VM. Also, remember that it is possible to shut down the guest operating system and add more RAM to the virtual machine if necessary.
- On the Networking page, connect the network adapter to an existing virtual network by selecting the appropriate network adapter from the menu. Click Next to continue.
- On the Connect Virtual Hard Disk page, as shown in Figure 4-7, specify the name, location, and size to create a virtual hard disk so that you can install an operating system. Click Next to continue.
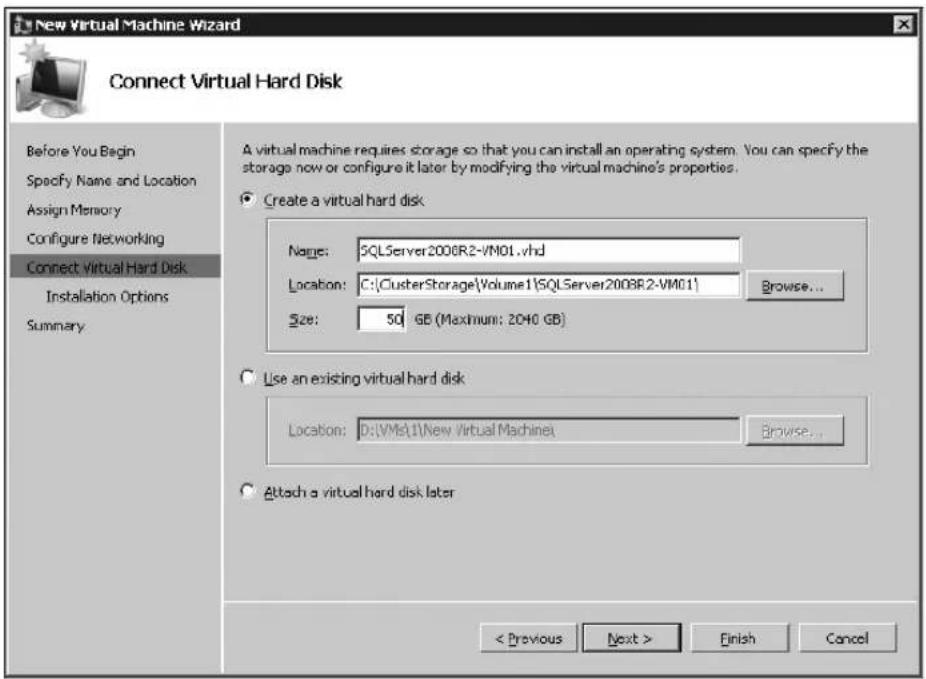
FIGURE 4-7 The Connect Virtual Hard Disk page when a new virtual machine is being created
- On the Installation Options page, choose a method to install the operating system. The options include
■ Installing an operating system from a boot CD/DVD-ROM.
■ Installing an operating system from a boot floppy disk.
■ Installing an operating system from a network-based installation server.
■ Installing an operating system at a later time.
After choosing the method, click Next to continue.
- Review the selections in the Completing The New Virtual Machine Wizard, and then click Finish.
The new VM is created; however, it is in an offline state.
- From the Virtual Machines section of the results pane in Hyper-V Manager, right-click the name of the SQL Server VM you just created, and click Connect. The Virtual Machine Connection tool opens.
- In the Action menu in the Virtual Machine Connection window, click Start.
- Follow the prompts to install the Windows Server 2008 R2 operating system.
- When the operating system installation is complete, install SQL Server 2008 R2.

Real World
After an operating system is set up, best practice guidelines recommend the installation of the Hyper-V Integration Services tools for every VM that was created. The Hyper-V Integration Services tool provides virtual server client (VSC) code, which ultimately increases Hyper-V performance of the VM from an I/O, memory management, and network performance perspective. Hyper-V Integration Services is installed by connecting to the VM and selecting Insert The Integration Services Setup Disk from the Action Menu of the Virtual Machine Connection window. Click Install in the AutoPlay dialog box to install the tools.
Configuring a SQL Server VM for Live Migration
Organizations interested in using Live Migration need to set up a VM for Live Migration. This is accomplished by reconfiguring the automatic start action for the VM and then preparing the VM for high availability by using Failover Cluster Manager. The following steps illustrate this series of actions in more detail:
- Create a SQL Server 2008 R2 VM based on the steps in the previous section. Verify that the VM is using CSV.
- In Hyper-V Manager, under Virtual Machines, highlight the VM created in the previous steps (SQLServer2008R2-VM01 in the example in this chapter). In the Action pane, under the VM name, click Settings.
-
In the left pane, click Automatic Start Action.
-
Under Automatic Start Action, for the What Do You Want This Virtual Machine To Do When The Physical Computer Starts? question, select Nothing, as shown in Figure 4-8. Then click Apply and OK.

FIGURE 4-8 Configuring the Automatic Start Action Setting screen
- Launch Failover Cluster Manager from Administrative Tools on the Start menu.
- In the Failover Cluster Manager snap-in, if the cluster that will be configured is not displayed in the console tree, right-click Failover Cluster Manager. Click Manage A Cluster, and then select or specify the cluster.
- If the console tree is collapsed, expand the tree under the cluster you want.
- Click Services And Applications.
- In the Action pane, click Configure A Service Or Application.
-
If the Before You Begin page of the High Availability Wizard appears, click Next.
-
On the Select Service Or Application page, shown in Figure 4-9, click Virtual Machine, and then click Next.
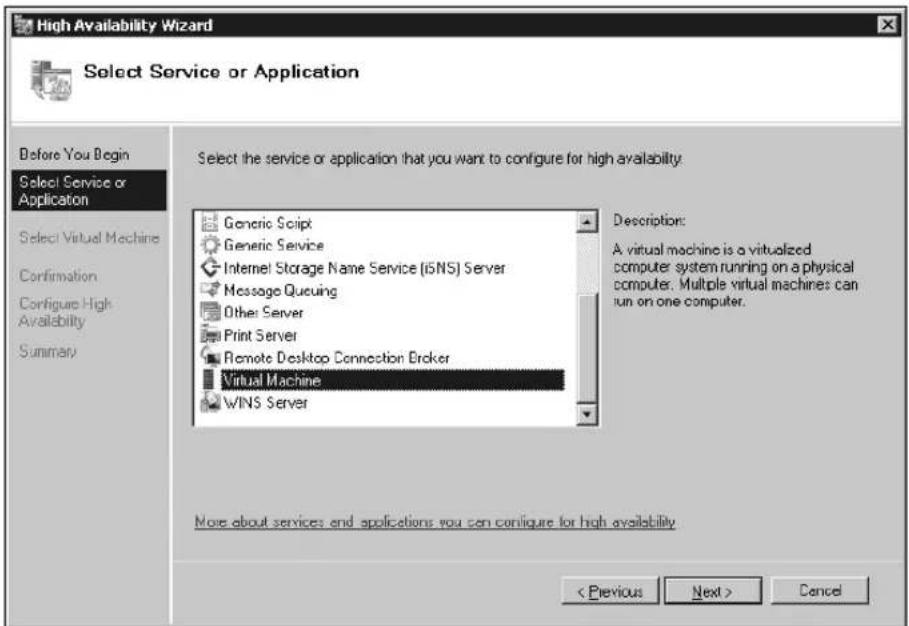
FIGURE 4-9 Selecting the service and application for high availability
- On the Select Virtual Machine page, shown in Figure 4-10, confirm the name of the VM you plan to make highly available. In this example, SQLServer2008R2-VM01 is used. Click Next.

FIGURE 4-10 Configuring a VM for high availability
NOTE To make a VM highly available, you must ensure that it is not running. It must be either turned off or shut down.
- Confirm the selection, and then click Next.
- The wizard configures the VM for high availability and provides a summary. To view the details of the configuration, click View Report. To close the wizard, click Finish.
- To verify that the virtual machine is now highly available, look in one of two places in the console tree:
■ Expand Services And Applications, shown in Figure 4-11. The VM should be listed under Services And Applications.
■ Expand Nodes. Select the node on which the VM was created. The VM should be listed under Services And Applications in the Results pane.
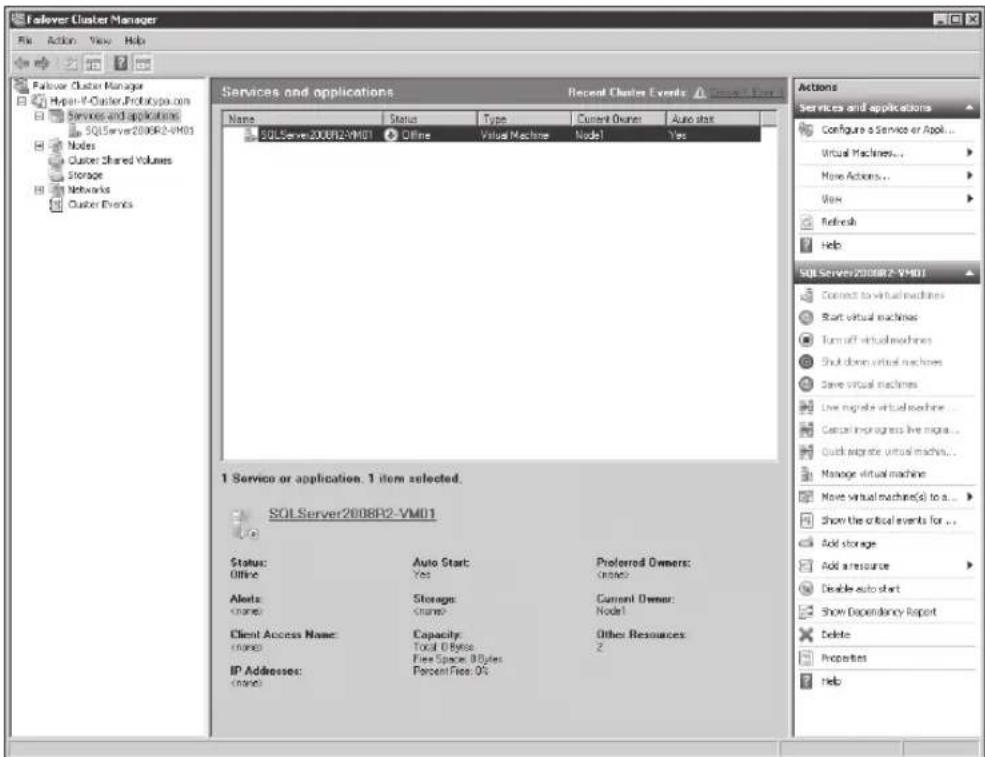
FIGURE 4-11 Verifying that the VM is now highly available
- To bring the VM online, right-click it under Services And Applications, and then click Start Virtual Machine. This action brings the VM online and starts it.
Initiating a Live Migration of a SQL Server VM
After an administrator has enabled CSV, created a SQL Server 2008 R2 VM, configured the automatic start option, and made the VM highly available, it is time to initiate a live migration. Perform the following steps to initiate Live Migration:
- In the Failover Cluster Manager snap-in, if the cluster to be configured is not displayed in the console tree, right-click Failover Cluster Manager.
- Click Manage A Cluster, and then select or specify the cluster. Expand Nodes.
- In the console tree located on the left side, select the node to which Live Migration will move the clustered VM.
- Right-click the VM resource that is displayed in the center pane, and then click Live Migrate Virtual Machine To Another Node.
- Select the node that the VM will be moved to in the migration, as shown in Figure 4-12. After the migration is complete, the VM should be running on the node selected.
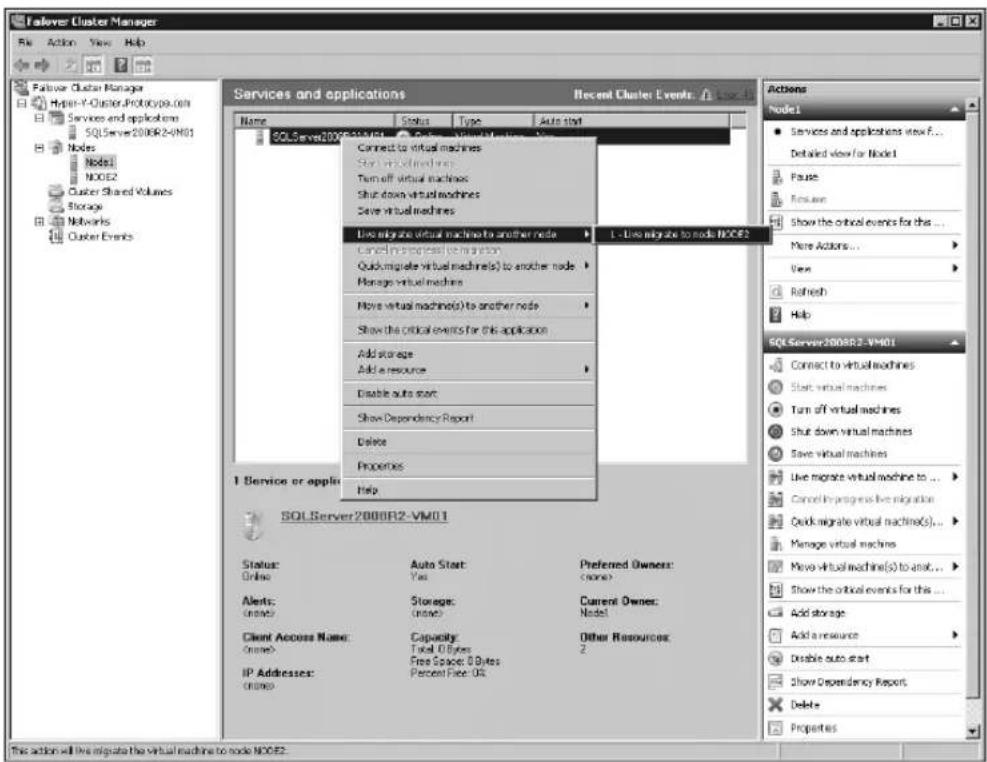
FIGURE 4-12 Initiating Live Migration for a SQL Server VM.
- Verify that the VM successfully migrated to the node selected. The VM should be listed under the new node in Current Owner.
Consolidation and Monitoring
Today's competitive economy dictates that organizations reduce cost and improve agility in their database environments. This means the large percentage of organizations out there running underutilized Microsoft SQL Server installations must take control of their environments in order to experience significant cost savings and increased activity. Thankfully, enhancements in hardware and software technologies have unlocked new opportunities to reduce costs through consolidation. Consolidation reduces the number of physical servers in an organization's environment, directly impacting costs in numerous areas including, but not limited to hardware, administration, power consumption, and licenses. Equally important, by leveraging the new SQL Server Utility feature in Microsoft SQL Server 2008 R2, organizations can streamline consolidation efforts because this feature provides database administrators (DBAs) with insight into resource utilization through policy evaluation and historical analysis.
This chapter begins by describing the consolidation options available to DBAs. It then explains how DBAs can take advantage of viewpoints and dashboards in the SQL Server Utility to identify consolidation opportunities, which is done by monitoring resource utilization and health state for SQL Server instances, databases, and deployed data-tier applications.
SQL Server Consolidation Strategies
The goal of SQL Server consolidation is to identify underutilized hardware and improve utilization by choosing an appropriate consolidation strategy. With SQL Server, hardware could be considered to be underutilized when workloads are using less than 30 percent of server resources. However, underutilization thresholds vary based on the hardware utilized for SQL Server and the organization. Some compelling reasons for organizations to consolidate are to reduce costs, improve efficiency, address lack of physical space in the data center, create more effective service levels, standardize, and centralize management. Some common consolidation strategies organizations can apply are described in the rest of this section.
Consolidating Databases and Instances
A very common SQL Server consolidation strategy involves placing many databases on a single instance of SQL Server. This approach offers organizations improved operations through centralized management, standardization, and improved performance. For example, multiple databases belonging to the same SQL Server instance facilitates shared memory optimization, and database consolidation helps to reduce overhead due to fixed resource costs per instance. There are some limitations with database-level consolidation, however. For example, in this scenario, all databases share the same service account, maintain the same global settings, and share a single tempdb database for processing temporary workloads.
Figure 5-1 shows many databases being consolidated onto a single physical host running one instance of SQL Server.
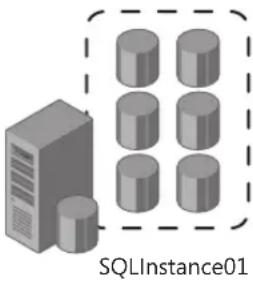
FIGURE 5-1 Consolidating many databases onto a single physical host running one instance of SQL Server
Many times, it is not possible to consolidate all of your databases onto a single instance, possibly because additional service isolation is required or a single instance cannot sustain the workload of all of the databases. In addition, a single tempdb database could be a performance bottleneck. Your organization might also find this scenario problematic if it has requirements to maintain different service level agreements for each database, if there are too many databases consolidated on the system, if databases need to be isolated for security and regulatory compliance reasons, or if databases require different collation settings.
You can still consolidate databases if you have these types of requirements; however, you may need more instances or physical hosts to support your consolidation needs. For example, the diagram in Figure 5-2 illustrates the consolidation of many databases onto a single physical host running three instances of SQL Server, whereas the diagram in Figure 5-3 represents an alternative, in which many databases are consolidated onto many instances residing on two separate physical hosts.
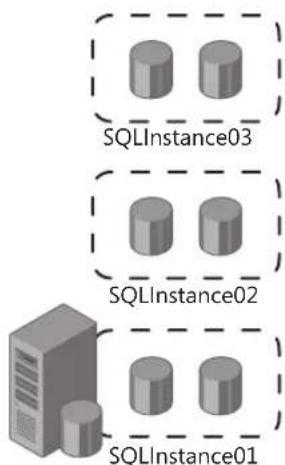
FIGURE 5-2 Consolidating many databases onto a single physical host running three instances of SQL Server
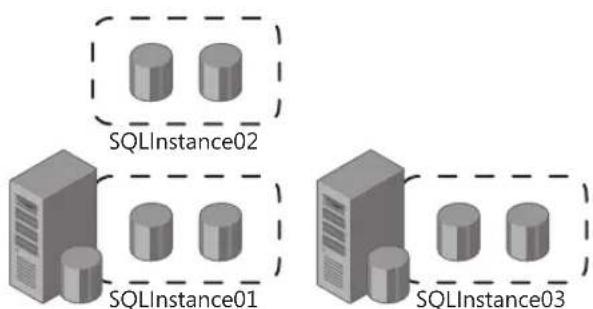
flowchart
graph TD
    A["Database 1"] --> B["Database 2"]
    C["Database 3"] --> D["Database 1"]
    E["Database 4"] --> F["Database 2"]
FIGURE 5-3 Consolidating many databases onto multiple physical hosts running multiple instances of SQL Server
Consolidating SQL Server Through Virtualization
Another SQL Server consolidation strategy attracting interest is virtualization. Virtualization's growing popularity is based on many factors, including its ability to significantly reduce total cost of ownership (TCO) and the number of physical servers within an infrastructure. Benefits include the need for fewer physical servers, as well as lower licensing costs. At the heart of all the excitement over virtualization is Live Migration. This new, built-in feature is a Windows Server 2008 R2 Hyper-V enhancement. Live Migration increases high availability and improves service by reducing planned outages. It allows DBAs to move SQL Server virtual machines (VMs) between physical Hyper-V hosts without any perceived interruption in service. Hyper-V on Windows Server 2008 R2 also allows for maximum scalability because it supports up to 64 logical processors. As a result, it is possible to virtualize and consolidate numerous SQL Server instances, databases, and workloads onto a single host. Another benefit is that Live Migration allows an organization to not only completely isolate its operating system with virtualization but also to host multiple editions of SQL Server while running both 32-bit
and 64-bit versions within a single host. In addition, physical SQL Servers can easily be virtualized by using the physical-to-virtual (P2V) migration tool included with System Center Virtual Machine Manager 2008 R2. Figure 5-4 illustrates a consolidation strategy in which many databases, instances, and physical SQL Server systems are virtualized on a single Hyper-V host.

flowchart
graph TD
    A["Server 1"] --> B["Server 2"]
    B --> C["Server 3"]
    C --> D["Hyper-V host"]
    style A fill:#f9f,stroke:#333
    style B fill:#f9f,stroke:#333
    style C fill:#ccf,stroke:#333
    style D fill:#cff,stroke:#333
FIGURE 5-4 Consolidating many databases, instances, and physical hosts with virtualization
No matter what consolidation strategy an organization adapts, the benefits are significant without any sacrifice of scalability and overall performance. Now that the consolidation strategies have been explained, it is time to explore how an organization can quickly recognize whether its database environment is a candidate for consolidation and can ultimately streamline its consolidation efforts by monitoring resource utilization.
Using the SQL Server Utility for Consolidation and Monitoring
The SQL Server Utility is the center of operations for monitoring managed instances of SQL Server, databases, and deployed data-tier applications. By using the dashboards and viewpoints included in the SQL Server Utility, DBAs can proactively monitor and view resource utilization, health state, and health policies for managed instances, databases, and deployed data-tier applications at scale. The results obtained from monitoring allow DBAs to easily identify consolidation candidates across an organization's database environment. To experience the dashboards and viewpoints yourself, launch the SQL Server Utility by following these steps:
IMPORTANT Before you can carry out these steps, you must have created a Utility Control Point, and you must enroll at least one instance of SQL Server. For more information on how to do this, see Chapter 2, "Multi-Server Administration."
- In SQL Server Management Studio, connect to the SQL Server 2008 R2 Database Engine instance in which the UCP was created.
- Launch Utility Explorer by clicking View and then selecting Utility Explorer.
-
In the Utility Explorer navigation pane, click the Connect To Utility icon.
-
In the Connect To Server dialog box, specify the SQL Server instance running the UCP, select the type of authentication, and then click Connect.
-
Connection to a Utility Control Point is complete. Begin monitoring the health state and resource utilization by viewing the dashboards and viewpoints.
Utility Explorer in SQL Server Management Studio provides a tree view that includes nodes for monitoring and managing settings within the SQL Server Utility. The summary dashboard is automatically displayed in the Utility Explorer Content pane when you connect to a UCP. You can view additional dashboards and viewpoints by clicking the Managed Instances node or the Deployed Data-Tier Applications node in the Utility Explorer navigation pane, as displayed in Figure 5-5.

FIGURE 5-5 Utility Explorer and the navigation tree
The three main dashboards for monitoring and managing resource utilization and consolidation efforts are discussed in the next sections. These dashboards and viewpoints are
■ The SQL Server Utility dashboard.
■ The Managed Instance viewpoint.
■ The Data-Tier Applications viewpoint.
Using the SQL Server Utility Dashboard
The SQL Server Utility dashboard is the starting place for obtaining summary information about managed instances of SQL Server and deployed data-tier applications in the SQL Server Utility. The summary of the data, as illustrated in Figure 5-6, is sectioned into nine parts and can be viewed in the Utility Explorer Content pane by clicking a Utility Control Point, which is the top node in the Utility Explorer tree.

pie
Utility Explorer Content | Category | Value | |---|---| | Managed Instance Health | 3 | | Well Utilized (5) | 5 | | Overutilized (6) | 0 | | Underutilized (0) | 0 | | No Data Available (3) | 0 | | Utility Summary | 14 | | Data-ter Application Health | 2 | | Well Utilized (7) | 7 | | Overutilized (2) | 0 | | Underutilized (0) | 0 | | No Data Available (0) | 0 | | Category | Value | |---|---| | Managed Instances with Overutilized Resources | 0/14 | | Overutilized Database Files | 0/14 | | Overutilized Storage Volumes | 6/14 | | Overutilized Computer CPU | 0/14 | | Category | Value | |---|---| | Data-ter Applications with Overutilized Resources | 0/9 | | Overutilized Database Files | 0/9 | | Overutilized Storage Volumes | 2/9 | | Overutilized Computer CPU | 0/9 | | Category | Value | |---|---| | Managed Instances with Underutilized Resources | 0/14 | | Underutilized Instance CPU | 0/14 | | Underutilized Database Files | 0/14 | | Underutilized Storage Volumes | 0/14 | | Underutilized Computer CPU | 0/14 | | Category | Value | |---|---| | Data-ter Applications with Underutilized Resources | 0/9 | | Underutilized Database Files | 0/9 | | Underutilized Storage Volumes | 0/9 | | Underutilized Computer CPU | 0/9 | | Category | Value | |---|---| | Utility Storage Utilization | 145.3 GB | | Interval | 145.3 GB | | 1 Day | 116.3 GB | | 1 Week | 87.2 GB | | 1 Month | 58.1 GB | | 1 Year | 29.1 GB | | 0.0 GB | 0.0 GB | | 5:00 PM | 6:00 PM | | 12:00 AM | 12:00 AM | | 5:00 AM | 5:00 AM | | 12:00 PM | 12:00 PM | ReadyFIGURE 5-6 The SQL Server Utility dashboard
The SQL Server Utility dashboard includes the following information:
■ Utility Summary Found in the center of the top row of the Utility Explorer Content pane, this section is the first place to look. It displays the number of managed instances of SQL Server and the number of deployed data-tier applications managed by the SQL Server Utility. Use the Utility Summary section to gain quick insight into the number of objects being managed by the SQL Server Utility. In Figure 5-6, there are 14 managed instances and nine deployed data-tier applications displayed in the Utility Summary section.
NOTE After you have reviewed the summary information, it is recommended that you analyze either the managed instances or deployed data-tier application section in its entirety to gain a comprehensive understanding of its overall health status. For example, the first set of the following bullets interpret the health of managed instances. After managed instances are analyzed and explained, then the health of data-tier applications is reviewed from beginning to end.
■ Managed Instance Health This section is located in the top-left corner of the Utility Explorer Content pane and summarizes the health status of all managed instances of SQL Server in the SQL Server Utility. Health status is illustrated in a pie chart and has four possible designations:
- Well Utilized The number of managed instances of SQL Server that are not violating resource utilization policies is displayed.
- Overutilized A SQL Server instance is marked as overutilized if any of the following conditions are true:
■ CPU resources for the instance of SQL Server are overutilized.
■ CPU resources of the computer that hosts the SQL Server instance are overutilized.
■ The instance contains data or log files with overutilized storage space.
■ The instance contains data or log files that reside on volumes with overutilized storage space.
- Underutilized A SQL Server instance is marked as underutilized if it is not marked as overutilized and any of the following conditions are true:
■ CPU resources allocated to the instance of SQL Server are underutilized.
■ CPU resources of the computer that hosts the SQL Server instance are underutilized.
■ The instance contains data or log files with underutilized storage space.
■ The instance contains data or log files that reside on volumes with underutilized storage space.
- No Data Available Either data has not been uploaded from a managed instance or there is a problem with the collection and upload process.
By viewing the Managed Instance Health section, DBAs are able to quickly obtain an overview of resource utilization across all managed instances within the utility. The example in Figure 5-6 shows that five managed instances are well utilized, six are overutilized, none are underutilized, and data is unavailable for three managed instances in the Managed Instance Health section.
■ Managed Instances With Overutilized Resources This section is found directly under the Managed Instance Health section. It displays overutilization data for managed instances of SQL Server based on the following categories:
- Overutilized Instance CPU This represents the number of managed instances of SQL Server that are violating instance CPU overutilization policies.
- Overutilized Database Files This represents the number of managed instances of SQL Server with database files that are violating file space overutilization policies.
- Overutilized Storage Volumes This represents the number of managed instances of SQL Server with database files on storage volumes that are violating file space overutilization policies.
- Overutilized Computer CPU This represents the number of managed instances of SQL Server running on computers that are violating computer CPU overutilization policies.
Detailed status for each health parameter is listed in a sliding indicator to the right of each element in this section.
■ Managed Instances With Underutilized Resources This section is located under the Managed Instances With Overutilized Resources section and displays underutilization data for managed instances of SQL Server based on the following categories:
- Underutilized Instance CPU This represents the number of managed instances of SQL Server that are violating instance CPU underutilization policies.
- Underutilized Database Files This represents the number of managed instances of SQL Server with database files that are violating volume space underutilization policies.
- Underutilized Storage Volumes This represents the number of managed instances of SQL Server with database files on storage volumes that are violating file space underutilization policies.
- Underutilized Computer CPU This represents the number of managed instances of SQL Server running on computers that are violating computer CPU underutilization policies.
Detailed status for each health parameter is listed in a sliding indicator to the right of each element in this section.
■ Data-Tier Application Health This section is located in the top-right corner of the Utility Explorer Content pane. Health status is illustrated in a pie chart and has four possible designations:
- Well Utilized The number of deployed data-tier applications that are not violating resource utilization policies is displayed.
- Overutilized The number of deployed data-tier applications that are violating resource overutilization policies is displayed. A deployed data-tier application is marked as overutilized if any of the following conditions are true:
■ CPU resources for the deployed data-tier application are overutilized.
■ CPU resources of the computer that hosts the SQL Server instance are overutilized.
■ Storage volumes associated with the deployed data-tier application are overutilized.
- The deployed data-tier application contains data or log files that reside on volumes with overutilized storage space.
- Underutilized The number of deployed data-tier applications that are violating resource underutilization policies is displayed. A deployed data-tier application is marked as underutilized if any of the following conditions are true:
■ CPU resources for the deployed data-tier application are underutilized.
■ CPU resources of the computer that hosts the SQL Server instance are underutilized.
■ Storage volumes associated with the deployed data-tier application are underutilized.
- The deployed data-tier application contains data or log files that reside on volumes with underutilized storage space.
- No Data Available Either data affiliated with deployed data-tier applications has not been uploaded to the Utility Control Point or there is a problem with the collection and upload process.
By viewing the Data-Tier Application Health section, DBAs can quickly obtain a holistic view of resource utilization for all deployed data-tier applications managed by the SQL Server Utility. In Figure 5-6, there are seven well-utilized and two overutilized data-tier applications.
■ Data-Tier Applications With Overutilized Resources This section is found directly under the Data-Tier Application Health section. It displays overutilization data for deployed data-tier applications based on the following categories:
- Overutilized Data-Tier Application CPU This represents the number of deployed data-tier applications that are violating data-tier application CPU overutilization policies.
- Overutilized Database Files This represents the number of deployed data-tier applications with database files that are violating file space overutilization policies.
- Overutilized Storage Volumes This represents the number of deployed data-tier applications with database files on storage volumes that are violating file space overutilization policies.
- Overutilized Computer CPU This represents the number of deployed data-tier applications running on computers that are violating computer CPU overutilization policies.
Detailed status for each health parameter is listed in a sliding indicator to the right of each element in this section.
■ Data-Tier Applications With Underutilized Resources This section is located directly under the Data-Tier Applications With Overutilized Resources section. This section displays underutilization data of individual instances based on the following categories:
- Underutilized Data-Tier Application CPU This represents the number of deployed data-tier applications that are violating data-tier application CPU underutilization policies.
- Underutilized Database Files This represents the number of deployed data-tier applications with database files that are violating file space underutilization policies.
- Underutilized Storage Volumes This represents the number of deployed data-tier applications with database files on storage volumes that are violating file space underutilization policies.
- Underutilized Computer CPU This represents the number of deployed data-tier applications running on computers that are violating computer CPU underutilization policies.
Detailed status for each health parameter is listed in a sliding indicator to the right of each element in this section.
■ Utility Storage Utilization History Located at the bottom-left corner of the Utility Explorer Content pane, this section uses a time graph to display the storage utilization history for the amount of storage the SQL Server Utility is consuming in gigabytes. By using the buttons under the Interval heading, you can view data in the graph by the following intervals:
• 1 Day Displays data in 15-minute intervals
• 1 Week Displays data in one-day intervals
• 1 Month Displays data in one-week intervals
• 1 Year Displays data in one-month intervals
■ Utility Storage Utilization The bottom-right corner shows a pie chart that displays the amount of space used and the amount of free space available on the volume hosting the SQL Server Utility. It is worth noting that the data is refreshed every 15 minutes.
This section explained how to obtain summary information for all managed instances of SQL Server. DBAs seeking more information might be interested in the Managed Instances node in the tree view of Utility Explorer. This node helps database administers gain deeper knowledge of health status and resource utilization data for each managed instances of SQL Server. The next section discusses this dashboard.
TIP When working with the SQL Server Utility dashboard, you can click on a link to reveal additional details about a specific policy.
Using the Managed Instances Viewpoint
DBAs can display the Managed Instances viewpoint in the Utility Explorer Content pane by connecting to a UCP and then selecting the Managed Instances node in the Utility Explorer tree. The Utility Explorer Content pane displays the viewpoint, as shown in Figure 5-7, which communicates the health state and resource utilization information for numerous items including the CPU, storage, and policies for each managed instance of SQL Server.
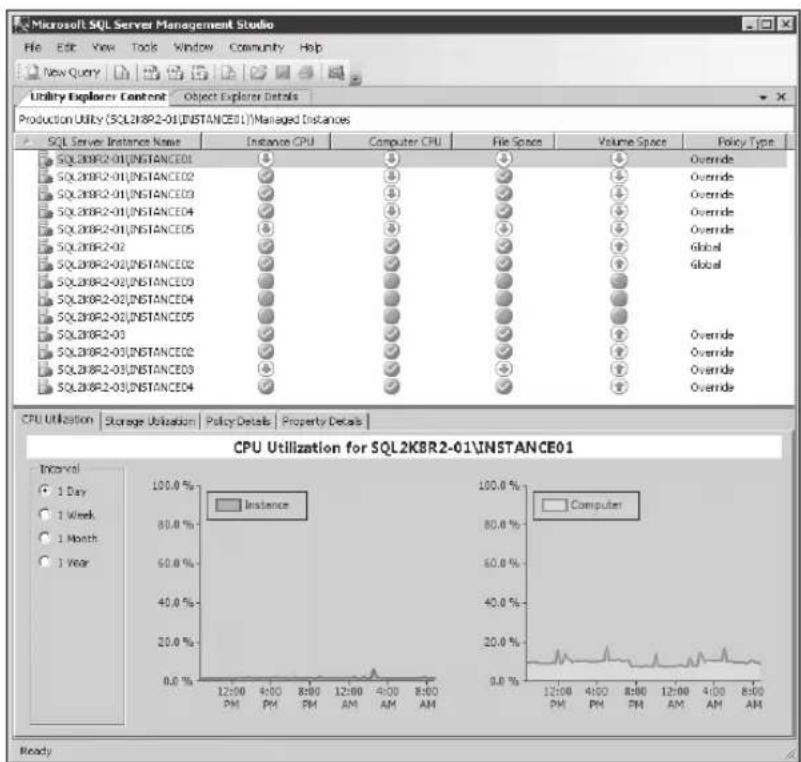
line
| Time | CPU Utilization | | -------- | -------------- | | 12:00 PM | 0.0% | | 4:00 PM | 0.0% | | 8:00 PM | 0.0% | | 12:00 AM | 0.0% | | 4:00 AM | 0.0% | | 8:00 AM | 0.0% |FIGURE 5-7 The Managed Instances viewpoint
Resource utilization for each managed instance of SQL Server is presented in the list view located at the top of the Utility Explorer Content pane. Health state icons appear to the right of each managed instance and provide summary status for each instance of SQL Server based on the utilization category. Three icons are used to indicate the health of each managed instance of SQL Server. A green check mark indicates that an instance is well utilized and does not violate any policies. A red arrow indicates that an instance is overutilized, and a green arrow indicates underutilization. The lower half of the dashboard contains tabs for CPU utilization, storage utilization, policy details, and property details for each managed instance.
In Figure 5-7, the instance CPU, computer CPU, file space, and volume space columns for SQL2K8R2-01\INSTANCE01 and SQL2K8R2-01\INSTANCE05 are all underutilized. In addition, the following other elements are underutilized: the Instance CPU for SQL2K8R2-03\INSTANCE03, Computer CPU for SQL2K8R2-01\INSTANCE02, SQL2K8R2-01\INSTANCE03, SQL2K8R2-01\INSTANCE04 and SQL2K8R2-01\INSTANCE05, File Space for SQL2K8R2-02\INSTANCE03 and Volume Space for SQL2K8R2-01\INSTANCE02, SQL2K8R2-01\INSTANCE03, and SQL2K8R2-01\INSTANCE04. The volume space for SQL2K8R2-02, SQL2K8R2-02\INSTANCE02, SQL2K8R2-03, SQL2K8R2-03\INSTANCE02, SQL2K8R2-03\INSTANCE03, and SQL2K8R2-03\INSTANCE04 are all overutilized, and the remainder of managed instances are well utilized.
The Managed Instances list view columns and utilization tabs are discussed in more detail in the next sections.
The Managed Instances List View Columns
The health status of each managed instance of SQL Server in the Managed Instances list view is analyzed against four types of utilization and the current policy in place for each:
■ Instance CPU This column indicates processor utilization of the managed instance. The health state is determined by the global CPU Utilization For All Managed Instances Of SQL Server policy, which is predetermined for all managed instances of SQL Server. However, by clicking on the Policy Tab in the bottom half of the view, DBAs can override this global policy to configure overutilization and underutilization policies for a single instance. The CPU Utilization tab shows the CPU utilization history for the selected managed instance of SQL Server.
■ Computer CPU This column communicates computer processor utilization where the managed instance resides. Health is based on the settings of two policies: the CPU utilization policy in place for the computer and the configuration setting for the Volatile Resource Evaluation policy. The CPU Utilization tab shows the processor utilization history for a managed instance of SQL Server.
■ File Space The File Space column summarizes file space utilization for all of the databases belonging to a selected instance of SQL Server. The health state for this parameter is determined by global or local file space utilization policies. Because there are many database associated with a managed instance of SQL server, the health state is reported as overutilized if only one database is overutilized. The Storage Utilization tab shows health state information on all other database files.
Volume Space Volume space utilization is summarized in this column for volumes with databases belonging to each managed instance. The health of this parameter is determined by the global or local storage volume utilization policies for managed instances of SQL Server. As with file space reports, the health of a storage volume associated with a managed instance of SQL Server that is overutilized is reported with a red up arrow, and underutilization is reported with a green arrow. The Storage Utilization tab shows additional health information and history for volumes.
■ Policy Type The final column in the list view specifies the type of policy applied to the managed instance of SQL Server. Policy type results are reported as either Global or Override, with Global meaning that default policies are in use, and Override meaning that custom policies are in use.
DBAs can appreciate the value of the information each list view column holds. But, in the case of the Managed Instances view, DBAs can gain an even greater appreciation by also accessing the Managed Instances viewpoint tabs to better understand their present infrastructure and to better prepare for a successful consolidation.
The Managed Instances Detail Tabs
The Managed Instances viewpoint includes tabs for additional viewing. The tabs are located at the bottom of the viewpoint and consist of
■ CPU Utilization The CPU Utilization tab, illustrated earlier in Figure 5-7, displays historical information of CPU utilization for a selected managed instance of SQL Server according to the interval specified on the left side of the display area. DBAs can change the display intervals for the graphs by selecting one of these options:
• 1 Day Displays data in 15-minute intervals
• 1 Week Displays data in one-day intervals
• 1 Month Displays data in one-week intervals
• 1 Year Displays data in one-month intervals
Two linear graphs are presented next to each other. The first graph shows CPU utilization based on the managed instance of the SQL Server, and the second graph displays data based on the computer associated with the managed instance.
■ Storage Utilization The next tab displays storage utilization for a selected managed instance of SQL Server, as depicted in Figure 5-8. Data is grouped by either database or volume. When the Database option button is selected, storage utilization is displayed for each database, filegroup, or a specific database file, which is based on the node selected in the tree view. If the Volume option button is selected, storage utilization history is displayed according to file space used by all data files and all log files located on the storage volume. The tree view also can be expanded to present storage utilization information and history for each volume and database file associated with a volume.
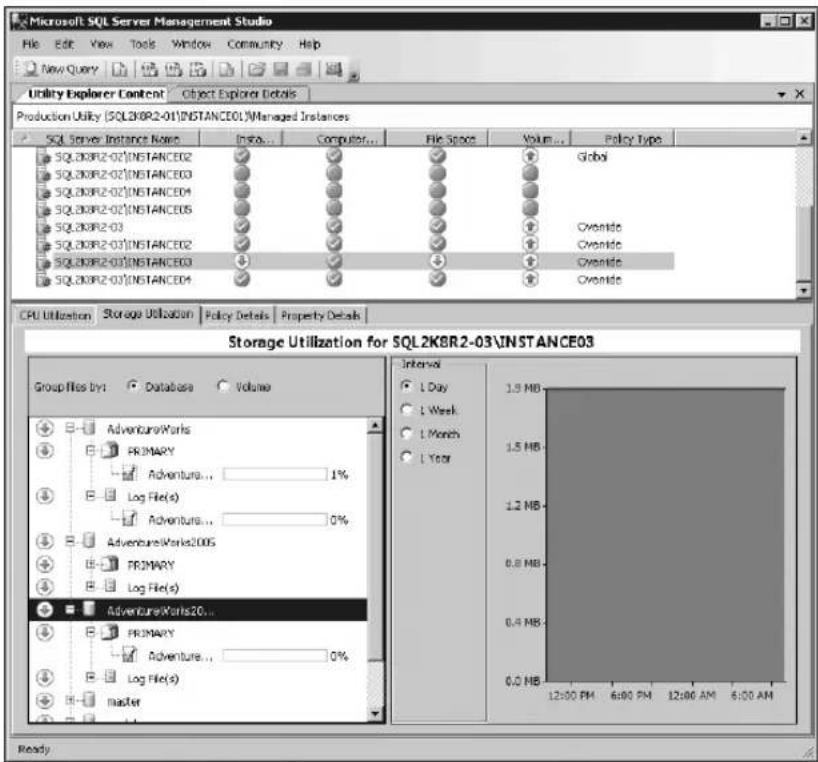
FIGURE 5-8 The Storage Utilization tab on the Managed Instances viewpoint
Independent of how the files are grouped, health status is communicated for every database, filegroup, database file, or volume. For example, the green arrows in Figure 5-8 indicate that all databases, filegroups, and data files are underutilized. No health states are shown as overutilized. Once again, the display intervals for the graphs are changed by selecting one of the following options:
• 1 Day Displays data in 15-minute intervals
• 1 Week Displays data in one-day intervals
• 1 Month Displays data in one-week intervals
• 1 Year Displays data in one-month intervals
■ Policy Details DBAs can use the Policy Details tab, shown in Figure 5-9, to view the global policies applied to a selected managed instance of SQL Server. In addition, the Policy Details tab can be used to create a custom policy that overrides the default global policy applied to a selected managed instance of SQL Server. The display is broken into the following four policies that can be viewed or modified:
- Managed Instance CPU Utilization Policies
- File Space Utilization Policy
• Computer CPU Utilization Policies
• Storage Volume Utilization Policies

FIGURE 5-9 The Policy Details tab on the Managed Instances viewpoint
NOTE To override the global policy for a specific managed instance, select the Override The Global Policy option button. Next, specify the new overutilized and underutilized numeric values in the control boxes to the right of the policy description, and then click Apply. For example, in Figure 5-9, the default global policy for the CPU of a managed instance is to consider the CPU overutilized when its usage is greater than 70 percent. The global policy was overridden, and the new setting is 50 percent. Similarly, the CPU underutilization setting is changed from zero percent to 10 percent.
■ Property Details This tab, shown in Figure 5-10, displays property details for the selected managed instance of SQL Server. The Property detail information displays the processor name, processor speed, processor count, physical memory, operating system version, SQL Server version, SQL Server edition, backup directory, collation information, case sensitivity, language, whether or not the instance of SQL Server is clustered, and the last time data was successfully updated.
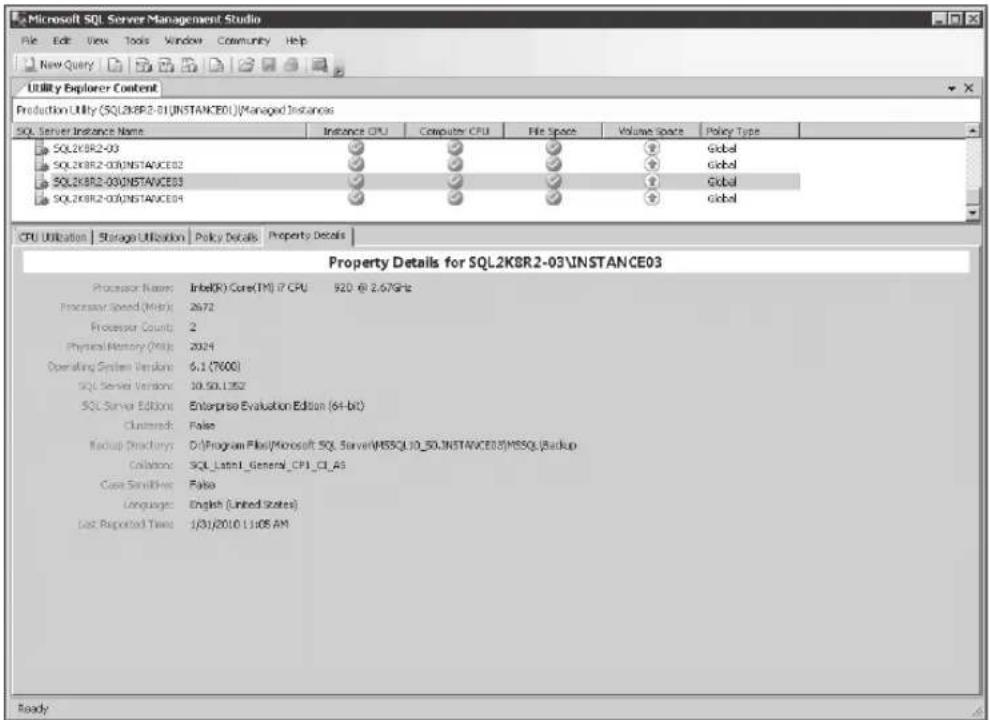
FIGURE 5-10 The Property Details tab on the Managed Instances viewpoint
Using the Data-Tier Application Viewpoint
As it is when you use the Managed Instances viewpoint to monitor health status and resource utilization for managed instances of SQL Server, using the Data-Tier Applications viewpoint enables you to monitor deployed data-tier applications managed by the SQL Server Utility Control Point.
NOTE The viewpoints associated with this section may at first appear identical to the information under the previous section, "The Managed Instances Detail Tab." However, the policies and files in this section do differ from those described previously, sometimes slightly and sometimes significantly.
Similar to the Managed Instance viewpoint, DBAs can access the Data-Tier Applications view and viewpoints in the Utility Explorer Content pane by connecting to a UCP and then selecting the Deployed Data-Tier Application node in the Utility Explorer tree. The Utility Explorer Content pane displays the view, as illustrated in Figure 5-11, that communicates the health and utilization status for the application CPU, the computer CPU, file space, and volume space.
![Microsoft SQL Server Management Studio File Edit View Tools Window Community Help New Query Utility Explorer Content Object Explorer Details Production Utility (SQL2XBR2-01)[INSTANCE01].Deployed Data-tier Applications Name Application CPU Computer CPU File Space Volume Space Policy Type Instance Name AccountingDB AdventureWorks2005 AdventureWorks2008R2 FinanceDB Human Resources Northwind Test Test CPU Utilization Storage Utilization Policy Details Property Details CPU Utilization for AccountingDB Interval 1 Day 3 Week 1 Month 1 Year 100.0 % 80.0 % 50.0 % 40.0 % 20.0 % 0.0 % Deployed Data-tier Application 100.0 % 80.0 % 60.0 % 40.0 % 20.0 % 0.0 % Computer Ready](/content/2026/05/1028715/images/97a3bcf3b7dab82c884486d8af2f4accdc8a9c92a0fdfa394fc5e3a52705b885.jpg)
FIGURE 5-11 The data-tier application viewpoint
Resource utilization for each deployed data-tier application is presented in the list view located at the top of the Utility Explorer Content pane. Health state icons appear at the right of each deployed data-tier application and provide summary status for each deployed data-tier application based on the utilization category. Three icons are used to indicate the health state of each deployed data-tier application. A green check mark indicates that the deployed data-tier application is well utilized and does not violate any policies. A red arrow indicates that the deployed data-tier application is overutilized, and a green arrow indicates underutilization. The lower half of the view contains tabs for CPU utilization, storage volume utilization, access policy definitions, and property details for each data-tier application. For example, the computer CPU and volume space for the AccountingDB and FinanceDB data-tier applications shown in Figure 5-11 are underutilized. In addition, the application CPU and the file space utilization for all deployed data-tier applications are well utilized, and the volume space for AdventureWorks2005 and AdventureWorks2008R2 are overutilized.
The data-tier application list view columns and utilization tabs are discussed in the upcoming sections.
The Data-Tier Application List View
The columns presenting the state of health for each deployed data-tier application in the data-tier application list view include
■ Application CPU This column displays the health state utilization of the processor for the deployed data-tier application. The health state is determined by the CPU utilization policy for deployed data-tier applications. The CPU Utilization tab shows CPU utilization history for the selected deployed data-tier application.
■ Computer CPU This column communicates computer processor utilization for deployed data-tier applications. The CPU Utilization tab shows the processor utilization history for the deployed data-tier application.
■ File Space The File Space column summarizes file space utilization for each deployed data-tier application. The health state for this parameter is determined by global or local file space utilization policies. The Storage Utilization tab shows health state information on all other database files.
■ Volume Space Volume space utilization is summarized in this column for volumes with databases belonging to each deployed data-tier application. The health of this parameter is determined by the global or local Storage Volume utilization policies for deployed data-tier application of SQL Server. Similar to File Space reports, the health of a storage volume associated with a deployed data-tier application of SQL Server that is overutilized is reported with a red arrow, and underutilization is reported with a green arrow. The Storage Utilization tab shows additional health information and history for volumes.
■ Policy Type This column in the list view specifies the type of policy applied to a deployed data-tier application of SQL Server. Policy Type results are reported as either Global or Override. Global indicates that default policies are in use, and Override indicates that custom policies are in use.
■ Instance Name The final column in the list view specifies the name of the SQL Server instance to which the data-tier application has been deployed.
The Data-Tier Application Tabs
The Data-Tier Applications viewpoint includes tabs for additional viewing. The tabs are located at the bottom of the viewpoint and consist of
■ CPU Utilization The CPU Utilization tab, illustrated in Figure 5-11, displays historical information on CPU utilization for a selected deployed data-tier application according to the interval specified on the left side of the display area. DBAs can change the display intervals for the graphs by selecting one of the following options:
• 1 Day Displays data in 15-minute intervals
• 1 Week Displays data in one-day intervals
• 1 Month Displays data in one-week intervals
• 1 Year Displays data in one-month intervals
Two linear graphs are presented next to each other. The first graph shows CPU utilization based on the selected deployed data-tier application, and the second graph displays data based on the computer associated with the deployed data-tier application.
■ Storage Utilization The next tab displays storage utilization for a selected deployed data-tier application, as depicted in Figure 5-12. Data is grouped by either filegroup or volume. When the Filegroup option button is selected, storage utilization is displayed for each data-tier application based on the node selected in the tree view. If the Volume option button is selected, storage utilization history is displayed by volume. The tree view also can be expanded to present storage utilization information and history for each volume and filegroup associated with a deployed data-tier application. In Figure 5-12, the volume space for the AdventureWorks2005 deployed data-tier application is shown as overutilized because a red arrow is displayed in the Volume Space column of the Storage Utilization tab.
Once again, the display intervals for the graphs are changed by selecting one of the options available below:
• 1 Day Displays data in 15-minute intervals
• 1 Week Displays data in one-day intervals
• 1 Month Displays data in one-week intervals
• 1 Year Displays data in one-month intervals
![Microsoft SQL Server Management Studio File Edit View Tools Window Community Help New Query Utility Explorer Content Object Explorer Details Production Utility (SQL2005-01)[INSTANCE01]Deployed Data-ter Applications Name Application CPU Computer CPU File Space Volume Space Policy Type Instance Name AccountingDB AdventureWorks2005 AdventureWorks2008R2 FinanceDB Human Resources Northwind Test Test Test CPU Utilization Storage Utilization Path Details Property Details Storage Utilization for AdventureWorks2005 Group files by: Flaggroup Volume (V7)Volume(b4524c1f... C: D: AdventureWorks2... AdventureWorks2... 1 Day 1 Week 1 Month 1 Year 38.0 GB 38.4 GB 22.8 GB 15.2 GB 7.6 GB 0.0 GB 12:00 PM 6:00 PM 12:00 AM 6:00 AM Ready](/content/2026/05/1028715/images/a2485914dbf7cde594856707981dad4e5ddb150027b8f241e8cc7b44f5496f5a.jpg)
FIGURE 5-12 The Storage Utilization tab on the Data-Tier Applications viewpoint
■ Policy Details The Policy Details tab, shown in Figure 5-13, is where a DBA can view the global policies applied to a selected deployed data-tier application. The Policy Details tab can also be used to create a custom policy that overrides the default global policy applied to a deployed data-tier application. For example, by expanding the Data-Tier Application CPU Utilization Policies section, you can observe that the global policy is applied. With this policy, a CPU of a data-tier application is considered to be overutilized when its usage is greater than 70 percent and underutilized when it is less than zero percent. If you wanted to override this global policy for a data-tier application, you would select the Override The Global Policy option button and specify the new overutilized and underutilized numeric values in the box. You would then click Apply to enforce the new policy. In Figure 5-13, the global policy has been modified from its original settings, and the CPU of a data-tier application is now considered to be overutilized when its usage is greater than 30 percent. To override this setting, you would choose the Override The Global Policy option button and set a desired value in the box to the right of the policy description. For this example, the setting was changed from 30 percent to 70 percent.
![Microsoft SQL Server Management Studio File Edit View Tools Window Community Help New Query Object Explorer Details Utility Explorer Content Object Explorer Details Production Utility (SQL2H8P2-01[ISTANCE01]) Deployed Data-Dier Applications Name Application CPU Customer CPU File Space三人velspace Policy Typewerase Instance Name Accounting08 Overside SQL2H8P2-01[ISTANCE05] AdventureWorks2005 Overside SQL2H8P2-01[ISTANCE09] AdventureWorks200BP2 Overside SQL2H8P2-01[ISTANCE09] Finance08 Overside SQL2H8P2-01[ISTANCE04] Human Resources Overside SQL2H8P2-01[ISTANCE04] Northwind Overside SQL2H8P2-01[ISTANCE03] Test Overside SQL2H8P2-01[ISTANCE03] Test Overside SQL2H8P2-01[ISTANCE01] Test Overside SQL2H8P2-01[ISTANCE02] CPU Utilization Storage Utilization Policy Details Property Details Utilization policies for AdventureWorks200BR2 When you modify a policy, there will be a delay before the resource utilization policy indicator is updated in the viewpoints. Data-Dier Application CPU Utilization Policies Use the global policy CPU at a data-tier application is overutilized when it is greater than 30% CPU at a data-tier application is underutilized when it is less than 0% Override the global policy CPU at a data-tier application is overutilized when it is greater than 70% CPU at a data-tier application is underutilized when it is less than 0% File Space Utilization Policies Computer CPU Utilization Policies Storage Volume Utilization Policies Ready](/content/2026/05/1028715/images/1406f45e9e40d9fd5c1df921b38cdd96387906be68c3ccff5a1e8196ae7c9cf2.jpg)
FIGURE 5-13 The Policy Details tab on the Data-Tier Applications viewpoint
The display is broken up into the following four policies, which can be viewed or overridden:
• Data-Tier Application CPU Utilization Policies
• File Space Utilization Policies
• Computer CPU Utilization Policies
• Storage Volume Utilization Policies
■ Property Details The Property Details tab, shown in Figure 5-14, displays generic property details for the selected deployed data-tier application. Property detail information consists of database name, deployed date, trustworthiness, collation, compatibility level, encryption-enabled state, recovery model, and the last time data was successfully updated.
![Microsoft SQL Server Management Studio File Edit View Tools Window Community Help New Query Object Explorer Details Utility Explorer Content Object Explorer Details Production Utility (SQL219B2-01[INSTANCE01]Deployed Data-Der Applications Name Application CPU Computer CPU File Space Volume Space Policy Type Instance Name Accounting08 ✓ ✓ ✓ ✓ ✓ ✓ ✓ ✓ ✓ ✓ ✓ ✓ ✓ ✓ ✓ ✓ ✓ ✓ ✓ ✓ ✓ ✓ ✓ ✓ ✓ ✓ ✓ ✓ ✓ ✓ ✓ ✓ ✓ ✓ ✓ ✓ ✓ ✓ ✓ ✓ ✓ ✓ ✓ ✓ ✓ ✓ ✓ ✓ ✓ ✓ ✓ ✓ ✓ ✓ ✓ ✓ ✓ ✓ ✓ ✓ ✓ ✓ ✓ ✓ ✓ ✓ ✓ ✓ ✓ ✓ ✓ ✓ ✓ ✓ ✓ ✓ ✓ ✓ ✓ ✓ ✓ ✓ ✓ ✓ ✓ ✓ ✓ ✓ ✓ ✓ ✓ ✓ ✓ ✓ ✓ ✓ ✓ ✓ ✓ ✓ AdventureWorks2005 ✓ ✓ ✓ ✓ ✓ ✓ ✓ ✓ ✓ ✓ ✓ ✓ ✓ ✓ ✓ ✓ ✓ ✓ ✓ ✓ ✓ ✓ ✓ ✓ ✓ ✓ ✓ ✓ ✓ ✓ ✓ ✓ ✓ ✓ ✓ AdventureWorks2008R2 Finance08✓✓✓✓✓✓✓✓✓✓✓✓✓✓✓✓✓✓✓✓✓✓✓✓✓✓✓✓✓✓✓✓✓✓✓✓✓✓✓✓✓✓✓✓✓✓✓✓✓✓✓✓✓✓✓✓✓✓✓✓✓✓✓✓✓✓✓✓✓✓✓✓✓✓✓✓✓✓✓✓✓✓✓✓✓✓✓✓✓✓✓✓✓✓✓✓✓✓✓✓ Human Resources Northwind Test Test Test Test CPU Utilization Storage Utilization Policy Details Property Details Property Details for AdventureWorks2008R2 Database Name: AdventureWorks2008R2 Deployed Date: 1/30/2010 1:47 AM Trustworthy: False Collection: SQL_Locnt_General_CPI_CI_AS Compatibility Level: Version00 Encryption Enabled: False Recovery Model: Full Lost Reported Time: 2/3/2010 9:05 AM Ready](/content/2026/05/1028715/images/71b2f5f5cca08363be22f15c0205e40727623e94956ab0a95188745c2eb0a550.jpg)
FIGURE 5-14 The Property Details tab on the Data-Tier Applications viewpoint
PART II
Business Intelligence Development
STACIA MISNER
CHAPTER 6 Scalable Data Warehousing 109
CHAPTER 7 Master Data Services 125
CHAPTER 8 Complex Event Processing with StreamInsight 145
CHAPTER 9 Reporting Services Enhancements 165
CHAPTER 10 Self-Service Analysis with PowerPivot 189
Scalable Data Warehousing
Microsoft SQL Server 2008 R2 Parallel Data Warehouse is an enterprise data warehouse appliance based on technology originally created by DATAllegro and acquired by Microsoft in 2008. In the months following the acquisition, Microsoft revamped the product by changing it from a product that used the Linux operating system and Ingres database technologies to a product based on SQL Server 2008 R2 and the Windows Server 2008 operating system. SQL Server 2008 Enterprise has many features supporting scalability and data warehouse performance that Parallel Data Warehouse uses to its advantage. The combination of SQL Server scalability and performance with a massively parallel processing (MPP) architecture in Parallel Data Warehouse creates a powerful new option for hosting a very large data warehouse.
Parallel Data Warehouse Architecture
Parallel Data Warehouse does not install like other editions of SQL Server. Instead, it is a data warehouse appliance that bundles multiple software and hardware technologies, including SQL Server, into a platform well suited for a very large data warehouse. A key characteristic of this platform is the MPP architecture, which enables fast data loads and high-performance queries. This architecture consists of a multi-rack system, which parallelizes queries across an array of dedicated servers connected by a high-speed network to deliver results at speeds that are typically faster than possible with a traditional symmetric multiprocessing (SMP) architecture.
Data Warehouse Appliances
You purchase a data warehouse appliance as preassembled and preconfigured integrated components with all software preinstalled. When you place an order for an appliance with an authorized vendor, you specify the number of appliance racks that you want to purchase. The vendor works with you to add options, such as an optional backup node, and to optimize the system to meet your requirements for faster query performance and for storage of high data volumes. The vendor then assembles industry-standard hardware components and loads the operating system, SQL Server, and Parallel Data
Warehouse software. When the assembly process is complete, the vendor ships the appliance to you using shockproof pallets. When it arrives, you remove the appliance from the pallets, plug it into a power source, and connect it to your network.
Parallel Data Warehouse is a data warehouse appliance that includes all server, networking, and storage components required to host a data warehouse. In addition, your purchase of Parallel Data Warehouse includes cables, power distribution units, and racks. Furthermore, the components have redundancy to prevent downtime caused by a failure. The vendor installs all software at the factory and configures Parallel Data Warehouse to balance CPU, memory, and disk space. After you receive the Parallel Data Warehouse at your location, you use a configuration tool that Parallel Data Warehouse includes to complete the network setup and configure appliance settings for your environment. You can also install Microsoft or third-party software to use when copying data between your corporate network and the appliance.
Processing Architecture
A traditional data warehouse deployment of SQL Server is an SMP architecture, in which identical processors share memory on a single server. One physical instance of a database processes all queries. You can improve performance by partitioning the data, thereby achieving multi-threaded parallelization. You can add higher powered servers with more CPU, memory, storage, and networking capacity to scale up, but the cost to scale up is high.
By contrast, Parallel Data Warehouse is an MPP architecture that uses multiple database servers that operate together to process queries. Behind the scenes, each database server runs one SQL Server instance with its own dedicated CPU, RAM, storage, and network bandwidth. Each database managed by Parallel Data Warehouse is distributed across multiple database servers that execute Parallel Data Warehouse queries in parallel. Parallel Data Warehouse's architecture includes a controlling server to coordinate these parallel queries and all other database activity across the multiple database servers. This controlling server also presents the distributed database as a single logical database to users. If you need to scale out the MPP hardware, you can simply add inexpensive commodity servers and storage rather than expensive high-end servers and storage.
The Multi-Rack System
Parallel Data Warehouse is configured as a multi-rack system in which there is a control rack and one or more data racks, as shown in Figure 6-1. Each rack is a collection of nodes, each of which has a dedicated role within the appliance. These nodes transfer data among themselves using an InfiniBand network that ships with the appliance. Only the nodes in the control rack communicate with the corporate Ethernet network. The nodes in the data rack can export tables to a corporate SMP SQL Server database by using the InfiniBand network.
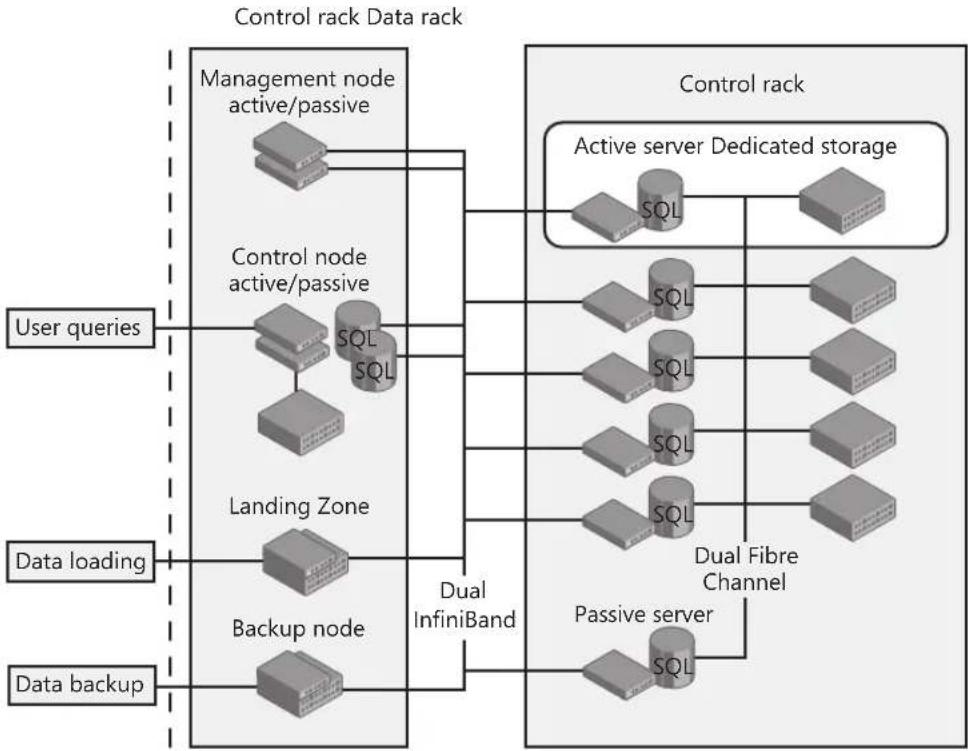
flowchart
graph TD
    A["User queries"] --> B["Management node active/passive"]
    B --> C["Landing Zone"]
    C --> D["Data loading"]
    D --> E["Backup node"]
    E --> F["Data backup"]
    F --> G["Dual InfiniBand"]
    G --> H["Control rack"]
    H --> I["Active server Dedicated storage"]
    I --> J["SQL"]
    I --> K["SQL"]
    I --> L["SQL"]
    I --> M["SQL"]
    I --> N["SQL"]
    I --> O["Dual Fibre Channel"]
    O --> P["Passive server"]
    P --> Q["SQL"]
    style A fill:#f9f,stroke:#333
    style D fill:#f9f,stroke:#333
    style E fill:#f9f,stroke:#333
    style F fill:#f9f,stroke:#333
    style H fill:#ccf,stroke:#333
    style I fill:#ccf,stroke:#333
    style J fill:#ccf,stroke:#333
    style K fill:#ccf,stroke:#333
    style L fill:#ccf,stroke:#333
    style M fill:#ccf,stroke:#333
    style N fill:#ccf,stroke:#333
    style O fill:#ccf,stroke:#333
    style P fill:#ccf,stroke:#333
FIGURE 6-1 The multi-rack system
The Data Rack
All activity related to parallel query processing occurs in the data rack, which is a collection of compute nodes. Each compute node consists of a server with dedicated storage, a SQL Server instance, and additional Parallel Data Warehouse software that provides communication and data transfer functions. Although the compute nodes run separate SQL Server instances in parallel to manage each distributed appliance database, you query the database as if it were a single database.
The number of compute nodes in a data rack varies among the vendors, although each vendor follows a standard architecture specification. For example, each data rack includes a spare server for high availability. If a compute node server fails or needs to be taken offline for maintenance, the compute node server automatically fails over to the spare server. The current connections to the appliance stay intact while the appliance reconfigures itself. Just as with SQL Server failover, queries that were in progress before the failover need to be restarted.
The Control Rack
The control rack is a separate rack that houses the servers, storage, and networking components for the nodes that provide control, management, or interface functions. It contains several types of nodes that Parallel Data Warehouse uses to process user queries, to load and back up data, and to manage the appliance. Some of the nodes serve as intermediaries between the corporate network and the private network that connects the nodes in both the control rack and data rack. You never interact directly with the data rack; you submit a data load or a query to the control rack, which then coordinates the processes between nodes to complete your request.
Most Parallel Data Warehouse activity involves coordination with the control node. To support high availability, the control node is a two-node active/passive cluster. If the active node fails for any reason, the passive node takes over. The redundancy between the two nodes ensures the appliance can recover quickly from a failure.
Parallel Data Warehouse uses multiple networking technologies. The control rack servers connect to the corporate network by using the corporate Ethernet. The compute node servers connect to their dedicated database storage by using a Fibre Channel network. A high-speed InfiniBand network internally connects all the servers in the appliance to one another. Because InfiniBand is much faster than a Gigabit Ethernet network, it is better suited for the Parallel Data Warehouse nodes, which must transfer high volumes of data and be as fast as possible. For high availability, the switching fabric of each network includes redundancy.
The Control Node
The control node is in the control rack and manages client authentication; accepts client connections to Parallel Data Warehouse; manages the query execution process, which it distributes across the compute nodes; and serves as the central point for all hardware monitoring. To support high availability, the control node is a two-node active/passive cluster in which the passive node instantly takes over if the active node fails for any reason. The control node also contains a SQL Server instance.
To support the distributed architecture of Parallel Data Warehouse, the control node contains the MPP Engine, the Data Movement Service (DMS), and Windows Internet Information Services (IIS), as shown in Figure 6-2. The MPP Engine coordinates parallel query processing, storage of appliance-wide metadata and configuration data, and authentication and authorization for the appliance and databases. The DMS, which runs on most appliance nodes, is the communication interface for copying data between appliance nodes. IIS hosts a Web application, called the Admin Console, that you access by using Windows Internet Explorer and use to manage and monitor the appliance status and query performance.
You can connect to the Parallel Data Warehouse control node by using a variety of client access tools. Parallel Data Warehouse integrates with SQL Server 2008 R2 Business Intelligence
Development Studio, SQL Server Integration Services, SQL Server Analysis Services, and SQL Server Reporting Services. The Nexus client is the query editor that you can use to submit queries by using SQL statements to Parallel Data Warehouse. Parallel Data Warehouse also includes DWSQL, a command-line tool for submitting SQL statements to the control node. These client tools use Data Direct's Sequelink client drivers that support the following data access driver types:
ODBC
OLE DB
ADO.NET

flowchart
graph TD
    A["Client access tools"] --> B["SQL Server BI (AS, RS, IS)"]
    A --> C["NEXUS query editor"]
    A --> D["DWSQL"]
    A --> E["OLEDB ODBC ADO.NET"]
    F["Appliance nodes"] --> G["Control rack Management"]
    G --> H["Control IIS Admin Console"]
    G --> I["Data Movement Service (DMS)"]
    G --> J["SQL Server Control database"]
    J --> K["MPP Engine"]
    L["Data rack"] --> M["Compute DMS"]
    L --> N["SQL Server User data"]
    L --> O["Landing Zone Landing tool"]
    L --> P["Backup DMS"]
    Q["SQL Server SMP SQL database"] --> R["Appliance nodes"]
    R --> S["Data rack"]
FIGURE 6-2 Appliance software
The Landing Zone Node
The Landing Zone is a high-capacity data storage node in the control rack that contains terabytes of disk space for temporary storage of user data before loading it into the appliance. Using your ETL processes to move data to the Landing Zone, you can either copy data to the Landing Zone and then load it into the appliance, or you can load data directly without first storing it on the Landing Zone. With either approach, the Landing Zone uses the appliance's high-speed fabric to copy that data in parallel into the data rack. To perform parallel data loading, you can use SQL Server Integration Services or a command-line tool.
The Backup Node
Another node in the control rack is the Backup node that, as the name implies, is dedicated to the backup process, which it can perform at very high speed. The backup node uses SQL Server's native database-level backup and restore functionality and coordinates the backup across nodes. You can create full backups or differential backups of user databases, or backups of the system database that contains information about user accounts, passwords, and permissions. The initial backup takes the longest time because it contains all data in a database, but subsequent differential backups run much faster because they contain only the changes in the data that were made since the last full backup. Furthermore, the backup process runs in parallel across nodes to help performance.
TIP To restore the backup, the destination appliance must have at least as many of compute nodes as the appliance where the backup was created.
The Management Node
The final node in the control rack is the management node, which operates as the hub for software deployment, servicing, and system health and performance monitoring. This node also runs a Windows domain controller to manage authentication within the appliance. It performs functions related to the management of hardware and software in the appliance and is not visible to users. Like the control node, the management node is a two-node active/passive cluster.
NOTE Parallel Data Warehouse does not use the domain controller on the management node for user authentication.
The Compute Node
Each compute node is the host for a single SQL Server instance and runs the DMS to communicate with and transfer data to other appliance nodes. Each compute node stores a subset of each user database. Before parallel query processing begins, Parallel Data Warehouse copies
any necessary data to each compute node so that it can process the query in parallel with other compute nodes without requiring data from other locations during processing. This feature, called data colocation, ensures that each compute node can execute its portion of the parallel query with no effect on the query performance of the other compute nodes.
Hub-and-Spoke Architecture
Rather than using Parallel Data Warehouse exclusively for a data warehouse, you can use a hub-and-spoke architecture to support both a corporate data warehouse and special purpose data marts. These data marts reside on servers outside of the appliance. The data warehouse at the hub is the primary data source for the spokes. A spoke can be a data mart, a host for Analysis Services, or even a development or test environment. You can enforce business rules and data quality standards for all data at the hub, and then you can quickly copy data as needed from the Parallel Data Warehouse to the spokes residing outside the appliance.
Data Management
Loading, processing, and backing up terabytes of data with balanced hardware resources is vitally important in a very large data warehouse. Parallel Data Warehouse uses carefully balanced hardware to maximize the efficiency of each hardware component and avoid the need to over-purchase hardware. Parallel Data Warehouse accomplishes this goal of balancing speed and hardware by using a shared nothing (SN) architecture.
In addition to the shared nothing architecture, there are other differences from other editions of SQL Server to notice. For example, SQL commands to create a database and tables are slightly different from their standard Transact-SQL counterparts. In addition, although Parallel Data Warehouse supports most of the SQL Server 2008 data types, there are a few exceptions. Last, the architecture requires a new approach to query processing and data load processing.
Shared Nothing Architecture
An SN architecture is a type of architecture in which each node of a system uses its own CPU, memory, and storage to avoid performance bottlenecks caused by resource contention with other nodes. In Parallel Data Warehouse, each compute node contains its own data, CPU, and storage to function as a self-sufficient and independent unit. Although the SN architecture is gaining popularity as a data warehousing architecture, performance can still be slow when a parallel query must first move data among the nodes before execution. When a SQL join operation requires data that is not already on the requisite compute nodes, Parallel Data Warehouse copies data to these nodes temporarily for use during query execution.
You design the data layout on the appliance to avoid or minimize data movement for parallel queries by using either a replicated or a distributed strategy for storage. When planning which strategy to implement, you consider the types of joins that the parallel queries require. Some tables require a replicated strategy, whereas others require a distributed strategy.
Replicated Strategy
For best performance, you can add small tables—such as dimension tables in a star schema—to Parallel Data Warehouse by using a replicated strategy. Parallel Data Warehouse makes a copy of the table on each compute node, as shown in Figure 6-3. You then perform the initial load of the table, followed by any subsequent inserts, updates, or deletes, as if you were working with a single table, without the need to manage each copy of the table. Parallel Data Warehouse handles all changes to the table for you. When a query performs a join on a replicated dimension, Parallel Data Warehouse joins the dimension to the portion of the fact table that exists on the same compute node. All compute nodes run the query in parallel and can find data very quickly because the complete dimension table is on each compute node.

flowchart
graph TD
    A["Table"] --> B["All table rows are copied to each compute node"]
    A --> C["Replicated table"]
    B --> D["Compute nodes"]
    C --> D
    D --> E["1"]
    D --> F["2"]
    D --> G["3"]
    D --> H["4"]
    D --> I["5"]
FIGURE 6-3 Replicated strategy
Distributed Strategy
One of the keys to performance in an MPP architecture is the distribution of large tables across multiple nodes, as shown in Figure 6-4. To distribute a fact table, you simply select a column from the table to use as the distribution column, and when data is loaded into the table, Parallel Data Warehouse automatically spreads the rows across all of the compute
nodes in the appliance. There are performance considerations for the selection of a distribution column, such as distinctness, data skew, and the types of queries executed on the system. For a detailed discussion of the choice of distributed tables, refer to the product documentation.
To distribute the rows in the fact table, a hash function assigns each row to one of many storage locations based on the distribution column. Each compute node has 8 storage locations, called distributions, for the hashed rows. If a data rack has 8 compute nodes, the data rack has 64 distributions, which are queried in parallel.

flowchart
graph TD
    A["Table"] --> B["Hash function"]
    B --> C["Compute nodes"]
    C --> D["Distributed table"]
    style A fill:#f9f,stroke:#333
    style B fill:#ccf,stroke:#333
    style C fill:#cfc,stroke:#333
    style D fill:#fcc,stroke:#333
FIGURE 6-4 Distributed strategy
It is not essential that equal numbers of table rows are assigned to each distribution. There will almost always be some data skew among the distributions. If the amount of data skew becomes too large, the parallel system continues to run, but query times might be affected. You might have to experiment with several approaches before finding the best distributed strategy. A distributed strategy does not affect other table options that you might want to implement. For example, you can still define partitions and clustered indexes as needed.
DDL Extensions
To support the MPP architecture, Parallel Data Warehouse includes a SQL language that works with appliance databases. This SQL language includes data definition language (DDL) statements to create and alter databases, tables, views, and other entities on the appliance. You use these statements to operate on these objects as if they were on a single database instance. Behind the scenes, Parallel Data Warehouse allocates space for the objects and instantiates them across nodes.
CREATE DATABASE
The CREATE DATABASE statement has a set of options for supporting distributed and replicated tables. You determine how much space you need in total for the database for replicated tables, distributed tables, and logs. Parallel Data Warehouse manages the database according to your specifications.
Here is an example of the statement you use in Parallel Data Warehouse to create a new database:
CREATE DATABASE DW
WITH (
    AUTOGROW = ON,
    REPLICATED_SIZE = 50,
    DISTRIBUTED_SIZE = 10000,
    LOG_SIZE = 25
);
This statement uses the following options:
■ AUTOGROW This option specifies whether to enable or disable the automatic growth feature. This feature allows Parallel Data Warehouse to manage the growth of data and log files as needed over time.
■ REPLICATED_SIZE This specifies the total space in gigabytes allocated to replicated tables (and associated data) on each compute node. Parallel Data Warehouse stores replicated tables in a SQL Server filegroup on each compute node.
■ DISTRIBUTED_SIZE This specifies the total space in gigabytes allocated to distributed tables on the appliance. Parallel Data Warehouse divides the space among all distributions on the compute nodes and stores each distribution in a separate SQL Server filegroup. In the SN architecture of Parallel Data Warehouse, each distribution has its own set of disks for storage. This set of disks is configured as a logical unit number (LUN).
- LOG_SIZE This option specifies the total space in gigabytes allocated to the transaction log on the appliance. You should plan for the log file size to be large enough to accommodate the largest data load that you expect. The automatic growth feature adjusts the log size as needed if you underestimate the required log file size.
CREATE TABLE
The CREATE TABLE statement syntax varies slightly from its syntax in standard Transact-SQL. For Parallel Data Warehouse, the statement includes options for specifying whether the table uses a replicated or a distributed strategy and whether to store the table with a clustered index or with a heap. You can also use this syntax to create partitions by specifying the partition boundary values.
NOTE Parallel Data Warehouse does not use the Transact-SQL partition schema or partition function. Also, you can create a clustered index only when you use CREATE TABLE. To create a nonclustered index, you use CREATE INDEX.
Here is an example of the syntax to create a replicated table:
CREATE TABLE DimProduct
(
    ProductId BIGINT NOT NULL,
    Description VARCHAR(50),
    CategoryId INT NOT NULL,
    ListPrice DECIMAL(12,2)
) WITH ( DISTRIBUTION = REPLICATE );
This syntax instructs Parallel Data Warehouse to create a table on all compute nodes. Subsequent commands to insert or delete data affect data in each copy of the table.
Here is an example of the syntax to create a distributed table:
CREATE TABLE FactSales
( CustomerId    BIGINT,
    SalesId    BIGINT,
    ProductId    BIGINT,
    SaleDate    DATE,
    Quantity    INT,
    Amount    DECIMAL(15,2)
) WITH (
    DISTRIBUTE = HASH(CustomerId),
    CLUSTERED INDEX(SaleDate),
    PARTITION(SaleDate
    RANGE RIGHT FOR VALUES
    ('2009-01-01','2009-02-01','2009-03-01','2009-04-01','2009-05-01','2009-06-01',
    '2009-07-01','2009-08-01','2009-09-01','2009-10-01','2009-11-01','2009-12-01')
));
The CREATE TABLE statement for Parallel Data Warehouse includes the following items:
■ DISTRIBUTION Specifies the column to hash for distributing rows across all compute nodes in Parallel Data Warehouse
■ CLUSTERED INDEX Specifies the column for a clustered index—if you omit this item from the statement, Parallel Data Warehouse stores the table as a heap
■ PARTITION Specifies the boundary values of the partition and the column to use for partitioning the rows
In addition, you can use a CREATE TABLE AS SELECT statement to create a table from the results of a SELECT statement. You might use this technique when you are redistributing or defragmenting a table.
Here is an example of the syntax for a CREATE TABLE AS SELECT statement:
CREATE TABLE DimCustomer
WITH
    ( CLUSTERED INDEX (CustomerID) )
AS
SELECT * FROM DimCustomer;
Another option for creating tables is the CREATE REMOTE TABLE statement, which you can use to export a table to a non-appliance SQL Server database in an SMP architecture. To use this statement, you must ensure that the target database is available on the appliance's InfiniBand network.
Data Types
Many SQL Server data types supported by SQL Server 2008 are also supported by Parallel Data Warehouse. Character and binary strings are supported, but you must limit the string length to 8,000 characters. Another point to note is that Parallel Data Warehouse uses only Latin1_General_BIN2 collation.
The following data types are supported:
■ Binary and varbinary
Bit
■ Char and varchar
Date
■ Datetime and datetime2
■ Datetimeoffset
- Decimal
- Float and real
■ Int, bigint, smallint, and tinyint
■ Money and smallmoney
■ Nchar and nvarchar
■ Smalldatetime
Time
Query Processing
Query processing in Parallel Data Warehouse is more complex than in an SMP data warehouse because processing must manage high availability, parallelization, and data movement between nodes. In general, Parallel Data Warehouse's control node follows these steps to process a query (shown in Figure 6-5):
- Parse the SQL statement.
- Validate and authorize the objects.
- Build a distributed execution plan.
- Run the execution plan.
- Aggregate query results.
- Send results to the client application.

flowchart
graph TD
    A["Client"] -->|Create query plan| B["Control"]
    B --> C["Management"]
    B --> D["Landing Zone"]
    B --> E["Backup"]
    C --> F["Compute"]
    D --> G["Compute"]
    E --> H["Compute"]
    F --> I["..."]
    G --> J["Compute"]
    H --> K["Compute"]
    L["User query"] --> B
    M["Query results"] --> B
    N["Aggregate query results Compute nodes"] --> B
    O["Process query plan operations in parallel"] --> F
    O --> G
    O --> H
    O --> J
    O --> K
FIGURE 6-5 Query processing steps
A query with a simple join on columns of replicated tables or distribution columns of distributed tables does not require the transfer of data between compute nodes before executing the query. By contrast, a more complex join that includes a nondistribution column of a distributed table does require Parallel Data Warehouse to copy data among the distributions before executing the query.
Data Load Processing
The design of data load processing in Parallel Data Warehouse takes full advantage of the parallel architecture to move data to the compute nodes. You have several options for loading data into your data warehouse. You can use your ETL process to copy files to the Parallel
Data Warehouse's Landing Zone. You then invoke a command-line tool, DWLoader, and specify options to load the data into the appliance. Or you can use Integration Services to move data to the Landing Zone and call the loading functionality directly. To load small amounts of data, you can connect to the control node and use the SQL INSERT statement.
Queries can run concurrently with load processing, so your data warehouse is always available during ETL processing. DWLoader loads table rows in bulk into an existing table in the appliance. You have several options for loading rows into a table. You can add all rows to the end of the table by using append mode. Another option is to append new rows and update existing rows by using upsert mode. A third option is to delete all existing rows first and then to insert all rows into an empty table by using reload mode.
Monitoring and Management
Parallel Data Warehouse includes the Admin Console, a Web-based application with which you can monitor the health of the appliance, query execution status, and view other information useful for tuning user queries. This application runs on IIS on the control node and is accessible by using Internet Explorer.
The Admin Console allows you to view these options:
■ Appliance Dashboard Displays status details, such as utilization metrics for CPUs, disks, and the network, and displays activity on the nodes
■ Queries Activity Displays a list of running queries and queries recently completed, with related errors, if any, and provides the ability to drill down to details to view the query execution plan and node execution information
- Load Activity Displays load plans, the current state of loads, and related errors, if any
■ Backup and Restore Displays a log of backup operations
■ Active Locks Displays a list of locks across all nodes and their current status
■ Active Sessions Displays active user sessions to aid monitoring of resource contention
■ Application Errors Displays error event information
■ Node Health Displays hardware and software alerts and allows an administrator to view the health of specific nodes
To manage database objects, you might need to query the tables or view the objects. The version of SQL Server Management Studio included with SQL Server 2008 R2 is not currently compatible with Parallel Data Warehouse, but you can still use other tools. For example, you can use a command-line utility, Dwsql, to query a table. Using Dwsql is similar to using Sql-cmd. An alternative with a graphical user interface is the Nexus query tool from Coffing Data Warehousing (Coffing DW), which is distributed with each appliance installation. This tool operates much like SQL Server Management Studio (SSMS) by allowing you to navigate through an object explorer to find tables and views and to run queries interactively.
Parallel Data Warehouse integrates with the SQL Server business intelligence (BI) components—Integration Services, Reporting Services, and SQL Server Analysis Services.
Integration Services
Integration Services is the ETL component of SQL Server. You use Integration Services packages to extract and merge data from multiple data sources and to filter and cleanse your data before loading it into the data warehouse. In SQL Server 2008 R2, Integration Services includes the SQL Server Parallel Data Warehouse connection manager and the SQL Server Parallel Data Warehouse Destination as new components that you use in Integration Services packages to load data into Parallel Data Warehouse. This new data destination provides optimized throughput and very fast performance because it loads data directly and quickly into the target database. You also have the option to deploy packages to the Landing Zone.
Reporting Services
You can use Parallel Data Warehouse as a data source for reports that you develop for Reporting Services using the Report Designer in Business Intelligence Development Studio or SQL Server 2008 R2 Report Builder 3.0. The Parallel Data Warehouse data source extension provides support for the graphical query designer, parameterized queries, and basic transactions, but it does not support Windows integrated security or advanced transactions. To use the Parallel Data Warehouse data source extension, you must install the ADO.NET data provider for Parallel Data Warehouse on the report server and each computer on which you create reports.
You can also use Parallel Data Warehouse as a source for report models. By using Report Manager or the report server API, you can generate a model from a Parallel Data Warehouse database. For more precise control of the model, you can use the Model Designer in Business Intelligence Development Studio.
Analysis Services and PowerPivot
Parallel Data Warehouse is also a valid data source for Analysis Services databases and Excel PowerPivot models. Using the OLE DB provider, you can configure an Analysis Services cube to use either multidimensional online analytical processing (MOLAP) or relational online analytical processing (ROLAP) storage. When using MOLAP storage, Analysis Services extracts data from Parallel Data Warehouse and stores it in a separate structure for reporting and analysis. By contrast, when using ROLAP storage, Analysis Services leaves the data in Parallel Data Warehouse. At query time, Analysis Services translates the multidimensional expression (MDX) query into a SQL query, which it sends to the Parallel Data Warehouse control node for query processing.
Master Data Services
Microsoft SQL Server 2008 R2 Master Data Services (MDS) is another new technology in the SQL Server family and is based on software from Microsoft's acquisition of Stratature in 2007. Just as SQL Server Reporting Services (SSRS) is an extensible reporting platform that ships with ready-to-use applications for end users and administrators, MDS is both an extensible master data management platform and an application for developing, managing, and deploying master data models. MDS is included with the Datacenter, Enterprise, and Developer editions of SQL Server 2008 R2.
Master Data Management
In the simplest sense, master data refers to nontransactional reference data. Put another way, master data represents the business entities—people, places, or things—that participate in a transaction. In a data mart or data warehouse, master data becomes dimensions. Master data management is the set of policies and procedures that you use to create and maintain master data in an effort to overcome the many challenges associated with managing master data. Because it's unlikely that a single set of policies and procedures would apply to all master data in your organization, MDS provides the flexibility you need to accommodate a wide range of business requirements related to master data management.
Master Data Challenges
As an organization grows, the number of line-of-business applications tends to increase. Furthermore, data from these systems flows into reporting and analytical solutions. Often, the net result of this proliferation of data is duplication of data related to key business entities, even though each system might maintain only a subset of all possible data for any particular entity type. For example, customer data might appear in a sales application, a customer relationship management application, an accounting application, and a corporate data warehouse. However, there might be fields maintained in one application that are never used in the other applications, not to mention information about customers that might be kept in spreadsheets independent of any application. None of the systems individually provide a complete view of customers, and the multiple systems quite possibly contain conflicting information about specific customers.
This scenario presents additional problems for operational master data in an organization because there is no coordination across multiple systems. Business users cannot be sure which of the many available systems has the correct information. Moreover, even when a user identifies a data quality problem, the process for properly updating the data is not always straightforward or timely, nor does fixing the data in one application necessarily ripple through the other applications to keep all applications synchronized.
Compounding the problems further is data that has no official home in the organization's data management infrastructure. Older data might be archived and no longer available in operational systems. Other data might reside only in e-mail or in a Microsoft Access database on a computer sitting under someone's desk.
Some organizations try their best not to add another system dedicated to master data management to minimize the number of systems they must maintain. However, ultimately they find that neither existing applications nor ETL processes can be sufficiently extended to accommodate their requirements. Proper master data management requires a wide range of functionality that is difficult, if not impossible, to replicate through minor adaptations to an organization's technical infrastructure.
Last, the challenges associated with analytic master data stem from the need to manage dimensions more effectively. For example, analysts might require certain attributes in a business intelligence (BI) solution, but these attributes might have no source in the line-of-business applications on which the BI solution is built. In such a case, the ETL developer can easily create a set of static attributes to load into the BI solution, but what happens when the analyst wants to add more attributes? Moreover, how gracefully can that solution handle changes to hierarchical structures?
Key Features of Master Data Services
The goal of MDS is to address the challenges of both operational and analytical master data management by providing a master data hub to centrally organize, maintain, and manage your master data. This master data hub supports these capabilities with a scalable and extensible infrastructure built on SQL Server and the Windows Communication Foundation (WCF) APIs. By centralizing the master data in an external system, you can more easily align all business applications to this single authoritative source. You can adapt your business processes to use the master data hub as a System of Entry that can then update downstream systems. Another option is to use it as a System of Record to integrate data from multiple source systems into a consolidated view, which you can then manage more efficiently from a central location. Either way, this centralization of master data helps you improve and maintain data quality.
Because the master data hub is not specific to any domain, you can organize your master data as you see fit, rather than force your data to conform to a predefined format. You can easily add new subject areas as necessary or make changes to your existing master data to meet unique requirements as they arise. The master data hub is completely metadata driven, so you have the flexibility you need to organize your master data.
In addition to offering flexibility, MDS allows you to manage master data proactively. Instead of discovering data problems in failed ETL processes or inaccurate reports, you can engage business users as data stewards. As data stewards, they have access to Master Data Manager, a Web application that gives them ownership of the processes that identify and react to data quality issues. For example, a data steward can specify conditions that trigger actions, such as creating a default value for missing data, sending an e-mail notification, or launching a workflow. Data stewards can use Master Data Manager not only to manage data quality issues, but also to edit master data by adding new members or changing values. They can also enhance master data with additional attributes or hierarchical structures quickly and easily without IT support. Using Master Data Manager, data stewards can also monitor changes to master data through a transaction logging system that tracks who made a change, when the change was made, which record was changed, and what the value was both before and after the change. If necessary, the data steward can even reverse a change.
MDS uses Windows integrated security for authentication and a fine-grained, role-based system for authorization that allows administrators to give the right people the direct access they need to manage and update master data. As an administrator, you can grant broad access to all objects in a model, or you can restrict users to specific rows and columns in a data set.
To capture the state of master data at specific points in time, MDS allows administrators to create versions of the master data. As long as a version has an Open status, anyone with access to the model can make changes to it. Then you can lock the version for validation and correction, and commit the version when the model is ready use. If requirements change later, you copy a committed version and start the process anew.
Because MDS is a platform, not simply an application, you can use the API to integrate your existing applications with MDS and automate the import or export processes. Anything that you can do by using Master Data Manager can be built into your own custom application because the MDS API supports all operations. This capability also enables Microsoft partners to quickly build master data support into their applications with domain-specific user interfaces and transparent application integration.
Master Data Services Components
Although MDS is included on the SQL Server installation media, you perform the MDS installation separately from the SQL Server installation by using a wizard interface. The wizard installs Master Data Services Configuration Manager, installs the files necessary to run the Master Data Services Web service, and registers assemblies. After installation, you use the Master Data Services Configuration Manager to create and configure a Master Data Services database in a SQL Server instance that you specify, create the Master Data Services Web application, and enable the Web service.
Master Data Services Configuration Manager
Before you can start using MDS to manage your master data, you use Master Data Services Configuration Manager. This configuration tool includes pages to create the MDS database, configure the system settings for all Web services and applications that you associate with that database, and configure the Master Data Services Web application.
On the Databases page of Master Data Services Configuration Manager, you specify the SQL Server instance to use for the new MDS database and launch the process to create the database. After creating the database, you can modify the system settings that govern all MDS Web applications that you establish on the same server. You configure system settings to set thresholds, such as time-out values or the number of items to display in a list. You can also use system settings to manage application behavior, such as whether users can copy committed model versions or any model version and whether the staging process logs transactions. For e-mail notifications, you can configure system settings to include a URL to Master Data Manager in e-mails, to manage the frequency of notifications, and whether to send e-mails in HTML or text format, among other settings. Most settings are configurable by using Master Data Services Configuration Manager. You can change values for other settings directly in the System Settings table in the MDS database.
On the Web Configuration page of Master Data Services Configuration Manager, you associate the Master Data Services Web application, Master Data Manager, with an existing Web site or create a new Web site and application pool for it. You can also opt to enable the Web service for Master Data Manager to support programmatic access to the application.
The Master Data Services Database
The MDS database is the central repository for all information necessary to support the Master Data Manager application and the MDS Web service. This database stores application settings, metadata tables, and all versions of the master data. In addition, it contains tables that MDS uses to stage data from source systems and subscription views for downstream systems that consume master data.
Master Data Manager
Master Data Manager is a Web application that serves as a stewardship portal for business users and a management interface for administrators. Master Data Manager includes the following five functional areas:
■ Explorer Use this area to change attributes, manage hierarchies, apply business rules to validate master data, review and correct data quality issues, annotate master data, monitor changes, and reverse transactions.
■ Version Management Use this area to create a new version of your master data model and underlying data, uncover all validation issues in a model version, prevent users from making changes, assign a flag to indicate the current version for subscribing systems, review changes, and reverse transactions.
■ Integration Management Use this area to create and process batches for importing data from staging tables into the MDS database, view errors arising from the import process, and create subscription views for consumption of master data by operational and analytic applications.
■ System Administration Use this area to create a new model and its entities and attributes, define business rules, configure notifications for failed data validation, and deploy a model to another system.
■ User And Group Permissions Use this area to configure security for users and groups to access functional areas in Master Data Manager, to perform specific functions, and to restrict or deny access to specific model objects.
Data Stewardship
Master Data Manager is the data stewardship portal in which authorized business users can perform all activities related to master data management. At minimum, a user can use this Web application to review the data in a master data model. Users with higher permissions can make changes to the master data and its structure, define business rules, review changes to master data, and reverse changes.
Model Objects
Most activities in MDS revolve around models and the objects they contain. A model is a container for all objects that define the structure of the master data. A model contains at least one entity, which is analogous to a table in a relational database. An entity contains members, which are like the rows in a table, as shown in Figure 7-1. Members (also known as leaf members) are the master data that you are managing in MDS. Each leaf member of the entity has multiple attributes, which correspond to table columns in the analogy.

FIGURE 7-1 The Product entity
By default, an entity has Name and Code attributes, as shown in Figure 7-1. These two attributes are required by MDS. The Code attribute values must be unique, in the same way that a primary key column in a table requires unique values. You can add any number of additional free-form attributes to accept any type of data that the user enters; the Name attribute of the Product entity shown in Figure 7-1 is one such attribute.
An entity can also have any number of domain-based attributes whose values are members of another related entity. In the example in Figure 7-1, the ProductSubCategory attribute is a domain-based attribute. That is, the ProductSubCategory codes are attribute values in the Product entity, and they are also members of the ProductSubCategory entity. A third type of attribute is the file attribute, which you can use to store a file or image.
You have the option to organize attributes into attribute groups. Each attribute group contains the name and code attributes of the entity. You can then assign the remaining attributes to one or more attribute groups or not at all. Attribute groups are securable objects.
You can organize members into hierarchies. Figure 7-2 shows partial data from two types of hierarchies. On the left is an explicit hierarchy, which contains all members of a single entity. On the right is a derived hierarchy, which contains members from multiple, related entities.


FIGURE 7-2 Product hierarchies
In the explicit hierarchy, you create consolidated members to group the leaf members. For example, in the Geography hierarchy shown in Figure 7-2, North America, United States, and Bikes are all consolidated members that create multiple levels for summarization of the leaf members.
In a derived hierarchy, the domain-based attribute values of an entity define the levels. For example, in the Category hierarchy in the example, Wholesale is in the ProductGroup entity, which in turn is a domain-based attribute of the ProductCategory entity of which Components is a member. Likewise, the ProductCategory entity is a domain-based attribute of the ProductSubCategory entity, which contains Forks as a member. The base entity, Product, includes ProductSubCategory as a domain-based attribute.
Regardless of hierarchy type, each hierarchy contains all members of the associated entities. When you add, change, or delete a member, all hierarchies to which the member belongs will also update to maintain consistency across hierarchies.
A collection is an alternative way to group members by selecting nodes from existing explicit hierarchies, as shown in Figure 7-3. Although this example shows only leaf members, a collection can also contain branches of consolidated members and leaf members. You can combine nodes from multiple explicit hierarchies into a single collection, but all members must belong to the same entity.
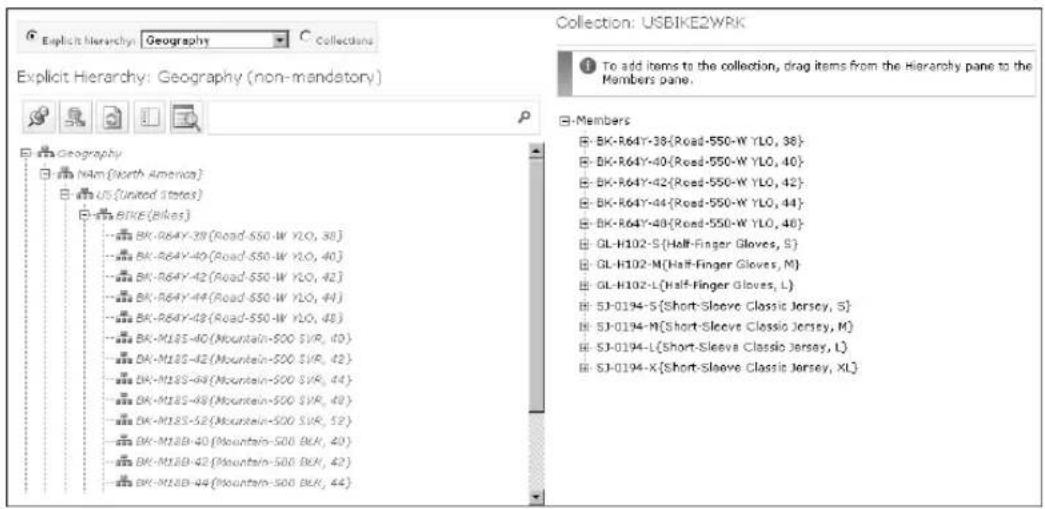
FIGURE 7-3 A collection
Master Data Maintenance
Master Data Manager is more than a place to define model objects. It also allows you to create, edit, and update leaf members and consolidated members. When you add a leaf member, you initially provide values for only the Name and Code attributes, as shown in Figure 7-4. You can also use a search button to locate and select the parent consolidated member in each hierarchy.
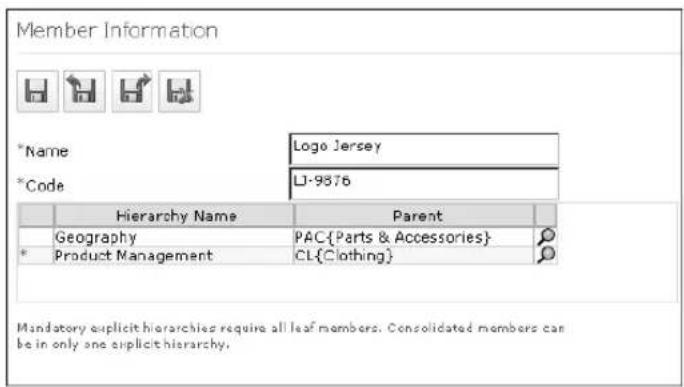
FIGURE 7-4 Adding a new leaf member
After you save your entry, you can edit the remaining attribute values immediately or at a later time. Although a member can have hundreds of attributes and belong to multiple hierarchies, you can add the new member without having all of this information at your fingertips; you can update the attributes at your leisure. MDS always keeps track of the missing information, displaying it as validation issue information at the bottom of the page on which you edit the attribute values, as shown in Figure 7-5.
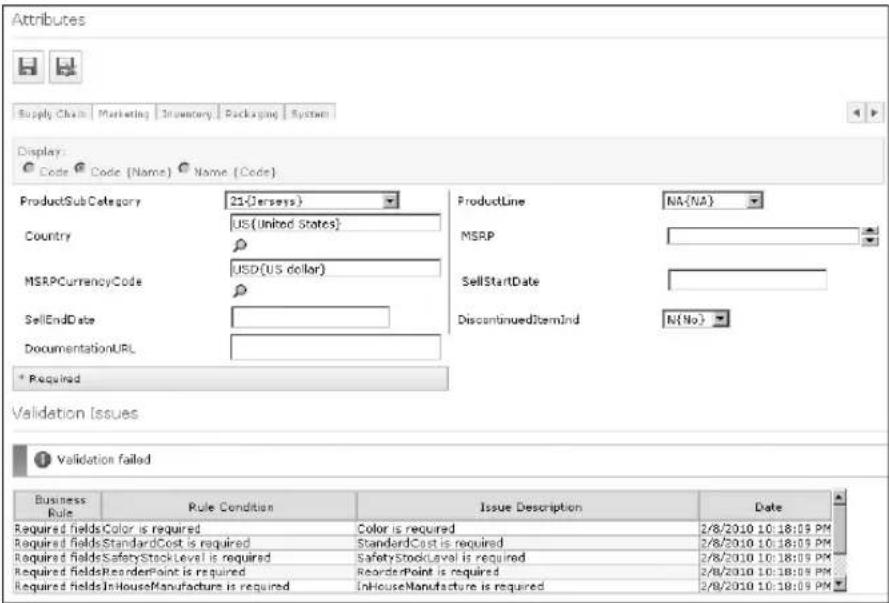
FIGURE 7-5 Attributes and validation issues
Business Rules
One of the goals of a master data management system is to set up data correctly once and to propagate only valid changes to downstream systems. To achieve this goal, the system must be able to recognize valid data and to alert you when it detects invalid data. In MDS, you create business rules to describe the conditions that cause the data to be considered invalid. For example, you can create a business rule that specifies the required attributes (also known as fields) for an entity. A business entity is likely to have multiple business rules, which you can sequence in order of priority, as shown in Figure 7-6.

FIGURE 7-6 The Product entity's business rules
Figure 7-7 shows an example of a simple condition that identifies the required fields for the Product entity. If you omit any of these fields when you edit a Product member, MDS notes a validation issue for that member and prevents you from using the master data model until you supply the missing values.
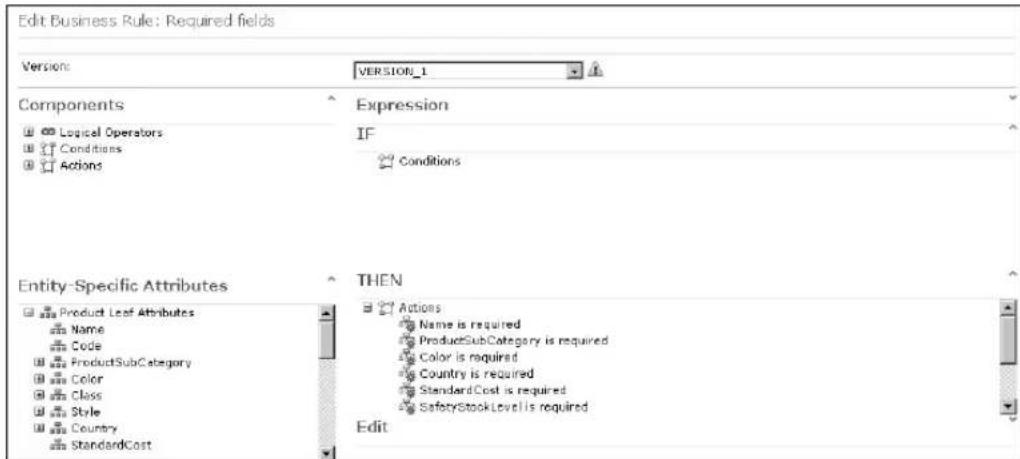
FIGURE 7-7 The Required Fields business rule
When creating a business rule, you can use any of the following types of actions:
■ Default Value Sets the default value of an attribute to blank, a specific value that you supply in the business rule, a generated value that increments from a specified starting value, or a value derived by concatenating multiple attribute values
■ Change Value Updates the attribute value to blank, another attribute value, or a value derived by concatenating multiple attribute values
■ Validation Creates a validation warning and, if you choose, sends a notification e-mail to a specified user or group
■ External Action Starts a workflow at a specified Microsoft SharePoint site or initiates a custom action
Because users can add or edit data only while the master data model version is open, invalid data can exist only while the model is still in development and unavailable to other systems. You can easily identify the members that pass or fail the business rule validation when you view a list of members in Explorer, as shown in Figure 7-8. In this example, the first two records are in violation of one or more of the business rules. Remember that you can see the specific violation issues for a member when you open it for editing.
| Product | ||||||||
| Supply Chain Marketing Inventory Packaging System | ||||||||
| X | Name | Code | SafetyStockLevel | ReorderPoint | DaysToManufacture | StandardCost | ||
| ☐ | Adjustable Race | AR-5381 | 1000 | 750 | 0 | |||
| ☐ | Bearing Ball | BA-8327 | 1000 | 750 | 0 | 0 | ||
| ☐ | √ LL Bottom Bracket | BB-7421 | 500 | 375 | 1 | 23.97 | ||
| ☐ | √ ML Bottom Bracket | BB-9107 | 500 | 375 | 1 | 44.95 | ||
| ☐ | √ HL Bottom Bracket | BB-9100 | 500 | 375 | 1 | 53.94 | ||
FIGURE 7-8 Business rule validation
Transaction Logging
MDS uses a transaction log, as shown in Figure 7-9, to capture every change made to master data, including the master data value before and after the change, the user who made the change (not shown), the date and time of the change, and other identifying information about the master data. You can access this log to view all transactions for a model by version in the Version Management area of Master Data Manager. If you find that a change was made erroneously, you can select the transaction in the log and click the Undo button above the log to restore the prior value. The transaction log also includes the reversals you make when using this technique.
| Type | Explicit Hierarchy | Entity | Attribute | Member Code | Member Type | Prior Value | New Value | Added Date |
| Attribute value specified | Product | StandardCost | AR-5381 | Leaf | 0.00 | 2/7/2010 10:23:55 PM | ||
| Attribute value specified | Product | ProductSubCategory | AR-5381 | Leaf | 38 | 2/7/2010 4:00:18 PM | ||
| Attribute value specified | Product | ProductSubCategory | AR-5381 | Leaf | 38 | 2/7/2010 3:59:55 PM | ||
| Member moved to parent | Product Management | Product | CFT | Consolidated | AC | 2/6/2010 10:10:59 PM | ||
| Member moved to parent | Product Management | Product | ACC | Consolidated | AC | 2/6/2010 10:10:59 PM | ||
| Member moved to parent | Product Management | Product | AC | Consolidated | ROOT | 2/6/2010 10:10:59 PM | ||
| Member moved to parent | Product Management | Product | CL | Consolidated | ROOT | 2/6/2010 10:10:59 PM | ||
| Member moved to parent | Product Management | Product | SL | Consolidated | ROOT | 2/6/2010 10:10:59 PM | ||
| Member moved to parent | Product Management | Product | PL | Consolidated | ROOT | 2/6/2010 10:10:59 PM | ||
| Member moved to parent | Product Management | Product | BK-R19B-S2 | Leaf | PL | 2/6/2010 10:10:59 PM |
FIGURE 7-9 The transaction log
MDS allows you to annotate any transaction so that you can preserve the reasons for a change to the master data. When you select a transaction in the transactions log, a new section appears at the bottom of the page for transaction annotations. Here you can view the complete set of annotations for the selected transaction, if any, and you can enter text for a new annotation, as shown in Figure 7-10.

FIGURE 7-10 A transaction annotation
Master Data Manager also provides support for data integration between MDS and other applications. Master Data Manager includes an Integration Management area for importing and exporting data. However, the import and export processes here are nothing like those of the SQL Server Import And Export wizard. Instead, you use the Import page in Master Data Manager to manage batch processing of staging tables that you use to load the MDS database, and you use the Export page to configure subscription views that allow users and applications to read data from the MDS database.
Importing Master Data
Rather than manually entering the data by using Master Data Manager, you can import your master data from existing data sources by staging the data in the MDS database. You can stage the data by using either the SQL Server Import And Export wizard or SQL Server Integration Services. After staging the data, you use Master Data Manager to process the staged data as a batch. MDS moves valid data from the staging tables into the master data tables in the MDS database and flags any invalid records for you to correct at the source and restage.
You can use any method to load data into the staging tables. The most important part of this task is to ensure that the data is correct in the source and that you set the proper values for the columns that provide information to MDS about the master data. For example, each record must identify the model into which you will load the master data. When staging data, you use the following tables in the MDS database as appropriate to your situation:
- tblSTGMember Use this table to stage leaf members, consolidated members, or collections. You provide only the member name and code in this table.
- tblSTGMemberAttribute Use this table to stage the attribute values for each member using one row per attribute, and include the member code to map the attribute to the applicable member.
■ tblSTGRelationship Use this table to stage parent-child or sibling relationships between members in a hierarchy or a collection.
NOTE For detailed information about the table columns and valid values for required columns, refer to the "Master Data Services Database Reference" topic in SQL Server 2008 R2 Books Online at http://msdn.microsoft.com/en-us/library/ee633808(SQL.105).aspx.
The next step is to use Master Data Manager to create a batch. To do this, you identify the model and the version that stores the master data for the batch. The version must have a status of either Open or Locked to import data from a staging table. On your command to process the batch, MDS attempts to locate records in the staging tables that match the specified model and load them into the tables corresponding to the model and version that you
selected. When the batch processing is complete, you can review the status of the batch in the staging batch log, which is available in Master Data Manager, as shown in Figure 7-11.
| ID | Name | Model | Version | Status | Started | Completed | Records | Errors |
| 1 | ChartOfAccounts | VERSION_1Not Running | 2/6/2010 9:56:57 PM | 2/6/2010 9:57:11 PM | 3519 | 0 | ||
| 2 | Customer | VERSION_1Not Running | 2/6/2010 10:02:58 PM2/6/2010 10:04:25 PM | 103290 | 0 | |||
| 3 | Product | VERSION_1Not Running | 2/6/2010 10:10:26 PM2/6/2010 10:11:00 PM | 13479 | 0 |
FIGURE 7-11 The staging batch log
If the log indicates any errors for the staging batch, you can select the batch in the log and then view the Staging Batch Errors page to see a description of the error for each record that did not successfully load into the MDS database. You can also check the Status_ID column of the staging table to distinguish between successful and failed records, which have a column value of 1 and 2, respectively. At this point, you should return to the source system and update the pertinent records to correct the errors. The next steps would be to truncate the staging table to remove all records and finally to load the updated records. At this point, you can create a new staging batch and repeat the process until all records successfully load.
Exporting Master Data
Of course, MDS is not a destination system for your master data. It can be both a system of entry and a system of record for applications important to the daily operations of your organization, such as an enterprise resource planning (ERP) system, a customer relationship management (CRM) system, or a data warehouse. After you commit a model version, your master data is available to other applications through subscription views in the MDS database. Any system that can consume data from SQL Server can use these views to access up-to-date master data.
To create a subscription view in Master Data Manager, you start by assigning a name to the view and selecting a model. You then associate the view with a specific version or a version flag.
TIP You can simplify the administration of a subscription view by associating it with a version flag rather than a specific version. As the version of a record changes over time, you can simply reset the flag for the versions. If you don't use version flags, a change in version requires you to update every subscription view that you associate with the version, which could be a considerable number.
Next, you select either an entity or a derived hierarchy as the basis for the view and the format of the view. For example, if you select an entity, you can format the view to use leaf members, consolidated members, or collection members and the associated attribute values. When you save the view, it is immediately available in the MDS database to anyone (or any application) with Read access to the database. For example, after creating the Product
subscription view in Master Data Manager as an entity-based leaf member view, you can query the Product view and see the results in SQL Server Management Studio, as shown in Figure 7-12.
| VersionName | VersionNumber | VersionFlag | Name | Code | Product/SubCategory | Product/SubCategory_Name | Color | Color_Name | |
| 1 | VERSION_1 | 1 | NULL | Adjustable Place | AP-5301 | 39 | Parts & Components | NA | NA |
| 2 | VERSION_1 | 1 | NULL | Bearing Ball | BA-8327 | 38 | Parts & Components | NA | NA |
| 3 | VERSION_1 | 1 | NULL | BB Ball Bearing | BE-2349 | 38 | Parts & Components | NA | NA |
| 4 | VERSION_1 | 1 | NULL | Headset Ball Bearings | BE-2908 | 38 | Parts & Components | NA | NA |
| 5 | VERSION_1 | 1 | NULL | Blade | BL-2006 | 38 | Parts & Components | NA | NA |
| 6 | VERSION_1 | 1 | NULL | LL Crankorn | CA-5955 | 38 | Parts & Components | BLK | Black |
| 7 | VERSION_1 | 1 | NULL | ML Crankorn | CA-6738 | 38 | Parts & Components | BLK | Black |
| 8 | VERSION_1 | 1 | NULL | HL Crankorn | CA-7457 | 38 | Parts & Components | BLK | Black |
| 9 | VERSION_1 | 1 | NULL | Chaining Bolti | CB-2903 | 38 | Parts & Components | SVR | Silver |
| 10 | VERSION_1 | 1 | NULL | Chaining Nutl | CN-6137 | 38 | Parts & Components | SVR | Silver |
FIGURE 7-12 Querying the Product subscription view
Administration
Of course, Master Data Manager supports administrative functions, too. Administrators use it to manage the versioning process of each master data model and to configure security for individual users and groups of users. When you need to make a copy of a master data model on another server, as you would when you want to recreate your development environment on a production server, you can use the model deployment feature in Master Data Manager.
Versions
MDS uses a versioning management process to support multiple copies of master data. With versioning, you can maintain an official working copy of master data that no one can change, alongside historical copies of master data for reference and a work-in-progress copy for use in preparing the master data for changing business requirements.
MDS creates the initial version when you create a model. Anyone with the appropriate permissions can populate the model with master data and make changes to the model objects in this initial version until you lock the version. After that, only users with Update permissions on the entire model can continue to modify the data in the locked version to add missing information, fix any business rule violation, or revert changes made to the model. If necessary, you can temporarily unlock the version to allow other users to correct the data.
When all data validates successfully, you can commit the version. Committing a version prevents any further changes to the model and allows you to make the version available to downstream systems through subscriptions. You can use a flag, as shown in Figure 7-13, to identify the current version to use so that subscribing systems do not need to track the current version number themselves. If you require any subsequent changes to the model, you
create a new version by copying a previously committed version and allowing users to make their changes to the new version.

FIGURE 7-13 Model versions
Security
MDS uses a role-based authorization system that allows you to configure security both by functional area and by object. For example, you can restrict a user to the Explorer area of Master Data Manager, as shown in Figure 7-14, while granting another user access to only the Version Management and Integration Management areas. Then, within the functional area, you must grant a user access to one or more models to control which data the user can see and which data the user can edit. You must assign the user permission to access at least one functional area and one model for that user to be able to open Master Data Manager.

FIGURE 7-14 Functional area permissions
You can grant a user either Read-only or Update permissions for a model. That permission level applies to all objects in the model unless you specifically override the permissions for a particular object; the new permission cascades downward to lower level objects. Similarly, you can grant permissions on specific members of a hierarchy and allow the permissions to cascade to members at lower levels of the hierarchy.
To understand how security works in MDS, let's configure security for a sample user and see how the security settings affect the user experience. As you saw earlier in Figure 7-14, the user can access only the Explorer area in Master Data Manager. Accordingly, that is the only functional area that is visible when the user accesses Master Data Manager, as shown in
Figure 7-15. An administrator with full access privileges would instead see the full list of functional areas on the home page.
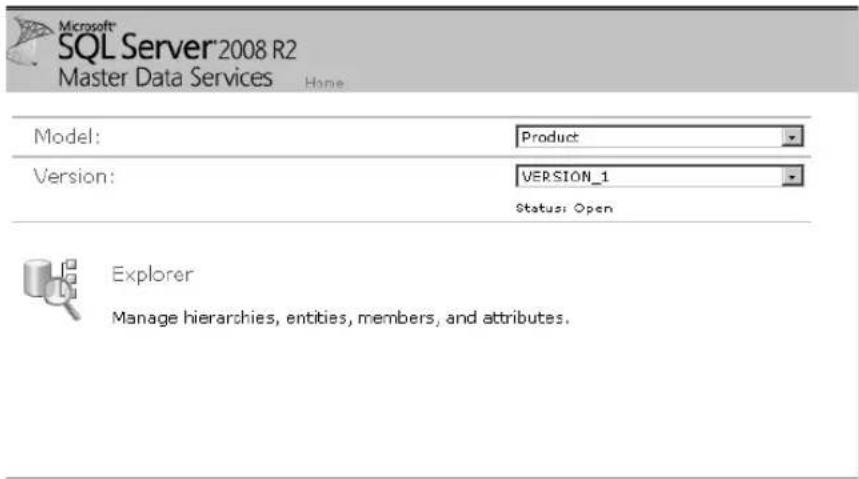
FIGURE 7-15 The Master Data Manager home page for a user with only Explorer permissions
Data security begins at the model level. When you deny access to a model, the user does not even see it in Master Data Manager. With Read-only access, a user can view the model structure and its data but cannot make changes. Update permissions allow a user to see the data as well as make changes to it. To continue the security example, Figure 7-16 shows that this user has Read-only permissions for the Product model (as indicated by the lock icon) and Deny permissions on all other models (as indicated by the stop symbol) in the Model Permissions tree view on the left. In the Model Permissions Summary table on the right, you can see the assigned permissions at each level of the model hierarchy. Notice that the user has Update permission on leaf members of the ProductCategory entity.

FIGURE 7-16 A user's model permissions
With Read-only access to the model, except for the ProductCategory entity, the user can view data for all other entities or hierarchies, such as Color, as shown in Figure 7-17, but cannot edit the data in any way. Notice the lock icons in the Name and Code columns in the
Color table on the right side of the page. These icons indicate that the values in the table are not editable. The first two buttons above the table allow a user with Update permissions to add or delete a member, but those buttons are unavailable here because the user has Read-only permission. The user can also navigate through the hierarchy in the tree view on the left side of the page, but the labels are gray to indicate the Read-only status for every member of the hierarchy.
![Derived Hierarchy: Color Filter Criteria Press CTRL to paste as sibling Root BLK(Black) BLU(Blue) GRV(Green) GRV(Grey) MLT(Mult) Attribute Operator Similarity Level Is equal to Color [All Attributes] X Name: Code: - - Black BLK - - blue BLU - - Green GRN - - Gray GRAY - - Multi MLT - - NA NA 50 1-14 of 10](/content/2026/05/1028715/images/e582527be1009101e4dc8bd9a8060c05b4088c3aecf78ef68dd9504da6a81f4f.jpg)
FIGURE 7-17 Read-only permission on a hierarchy
At this point in the example, the user has Update permission on the ProductCategory entity, which allows the user to edit any member of that entity. However, you can apply a more granular level of security by changing permissions of individual members of the entity within a hierarchy. As shown in Figure 7-18, you can override the Update permission at the entity level by specifying Read-only permission on selected members. The tree view on the left side of the page shows a lock icon for the members to which Read-only permissions apply and a pencil icon for the members for which the user has Update permissions.
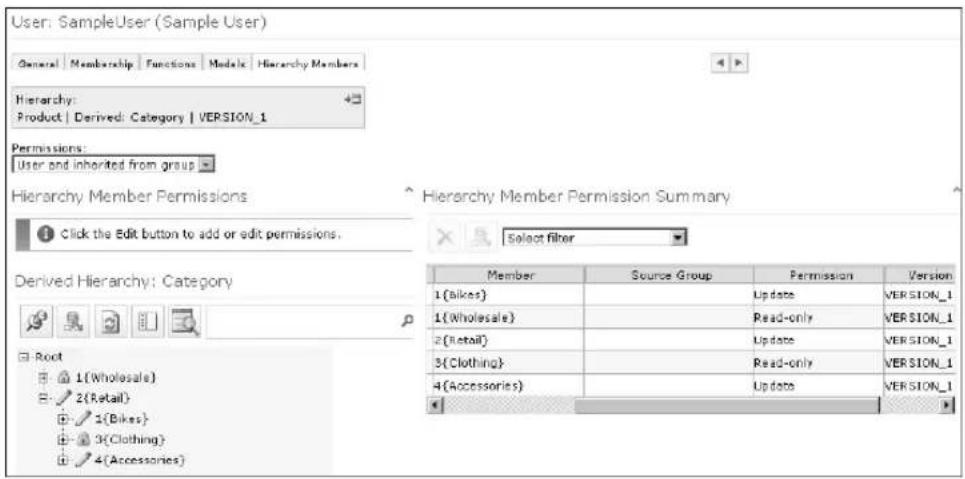
FIGURE 7-18 Member permissions within a hierarchy
More specifically, the security configuration allows this user to edit only the Bikes and Accessories categories in the Retail group, but the user cannot edit categories in the Wholesale group. Let's look first at the effect of these permissions on the user's experience on the ProductCategory page (shown in Figure 7-19). The lock icon in the first column indicates that the Components and Clothing categories are locked for editing. However, the user has Update permission for both Bikes and Accessories, and can access the member menu for either of these categories. The member menu, as shown in the figure, allows the user to edit or delete the member, view its transactions, and add an annotation. Furthermore, the user can add new members to the entity.
![ProductCategory Display: Code Code {Name} Name {Code} [All Attributes] X Name Code ProductGroup ✓ Bikes 1 2 ✓ Components 2 1 ✓ Clothing 3 2 ✓ Accessories 4 2 Edit member Delete member View member transactions Annotate member 50 1-4 of 4](/content/2026/05/1028715/images/6d4acc06c14b27d32aa06fedb915bc8ff72d6f6f55a5dd59ac9f284a69afb96c.jpg)
FIGURE 7-19 Mixed permissions for an entity
Last, Figure 7-20 shows the page for the Category derived hierarchy. Recall from Figure 7-19 that the user has Update permission for the Retail group. The user can therefore modify the Retail member, but not the Wholesale member, as indicated by the lock icon to the left of the Wholesale member in the ProductGroup table. You can also see the color-coding of the labels in the tree view of the Category hierarchy, which indicates whether the member is editable by the user. The user can edit members that are shown in black, but not the members shown in gray. When the user selects a member in the tree view, the table on the right displays the children of the selected member if the user has the necessary permission.
![Derived Hierarchy: Category Press CTRL to paste as sibling Root 1-(W/celears) 1-(Bikes) 2-(Retail) 2-(Clothing) 4-(Accessories) Filter Ctena Attribute Operator Similarity Level Is equal to ProductGroup [All Attributes] Name Code W/o/celears Retail 50 1-2 of 2 4 5 6 7 8 9 10 11 12 13 14 15 16 17 18 19 20 21 22 23 24 25 26 27 28 29 30 31 32 33 34 35 36 37 38 39 40 41 42 43 44 45 46 47 48 49 50 51 52 53 54 55 56 57 58 59 60 61 62 63 64 65 66 67 68 69 70 Product Group](/content/2026/05/1028715/images/f4170531e5f7d5d5bf595672451a19876a412774d52b451deb5aabce0223c8ec.jpg)
FIGURE 7-20 Mixed permissions for a derived hierarchy
Model Deployment
When you have finalized the master data model structure, you can use the model deployment capabilities in Master Data Manager to serialize the model and its objects as a package that you can later deploy on another server. In this way, you can move a master data model from development to testing and to production without writing any code or moving data at the table level. The deployment process does not copy security settings. Therefore, after moving the master data model to the new server, you must grant the users access to functional areas and configure permissions.
To begin the model deployment, you use the Create Package wizard in the System Administration area of Master Data Manager. You specify the model and version that you want to deploy and whether you want to include the master data in the deployment. When you click Finish to close the wizard, Master Data Manager initiates a download of the package to your computer, and the File Download message box displays. You can then save the package for deployment at a later time.
When you are ready to deploy the package, you use the Deploy Package wizard in Master Data Manager on the target server and provide the wizard with the path to the saved package. The wizard checks to see whether the model and version already exist on the server. If so, you have the option to update the existing model by adding new items and updating existing items. Alternatively, you can create an entirely new model, but if you do so, the relationship with the source model is then permanently broken, and any subsequent updates to the source model cannot be brought forward to the copy of the model on the target server.
Programmability
Rather than use Master Data Manager exclusively to perform master data management operations, you might prefer to automate some operations to incorporate them into a custom application. Fortunately, MDS is not just an application ready to use after installation, but also a development platform that you can use to integrate master data management directly into your existing business processes.
TIP For a code sample that shows how to create a model and add entities to the model, see the following blog entry by Brent McBride, a Senior Software Engineer on the MDS team: "Creating Entities using the MDS WCF API," at http://sqlblog.com/blogs/mds_team/archive/2010/01/29/creating-entities-using-the-mds-wcf-api.aspx.
The Class Library
The MDS API allows you to fully customize any or all activities necessary to create, populate, maintain, manage, and secure master data models and associated data. To build your own data stewardship or management solution, you use the following namespaces:
■ Microsoft.MasterDataServices.Services Contains a class to provide instances of the MdsServiceHost class and a class to provide an API for operations related to business rules
■ Microsoft.MasterDataServices.Services.DataContracts Contains classes to represent models and model objects
■ Microsoft.MasterDataServices.Services.MessageContracts Contains classes to represent requests and responses resulting from MDS operations
■ Microsoft.MasterDataServices.Services.ServiceContracts Contains an interface that defines the service contract for MDS operations based on WCF related to business rules, master data, metadata, and security
NOTE For more information about the MDS class libraries, refer to the "Master Data Services Class Library" topic in SQL Server 2008 R2 Books Online at http://msdn.microsoft.com/en-us/library/ee638492(SQL.105).aspx.
Master Data Services Web Service
MDS includes a Web services API as an option for creating custom applications that integrate MDS with an organization's existing applications and processes. This API provides access to the master data model definitions, as well as to the master data itself. For example, by using this API, you can completely replace the Master Data Manager Web application.
TIP For a code sample that shows how to use the Web service in a client application, see the following blog entry by Val Lovicz, Principal Program Manager on the MDS team: "Getting Started with the Web Services API in SQL Server 2008 R2 Master Data Services," at http://sqlblog.com/blogs/mds_team/archive/2010/01/12/getting-started-with-the-web-services-api-in-sql-server-2008-r2-master-data-services.aspx.
Matching Functions
MDS also provides you with several new Transact-SQL functions that you can use to match and cleanse data from multiple systems prior to loading it into the staging tables:
■ Mdq.NGrams Outputs a stream of tokens (known as a set of n-grams) in the length specified by n for use in string comparisons to find approximate matches between strings
■ Mdq.RegexExtract Finds matches by using a regular expression
■ Mdq.RegexIsMatch Indicates whether the regular expression finds a match by using a regular expression
■ Mdq.RegexIsValid Indicates whether the regular expression is valid
■ Mdq.RegexMask Converts a set of regular expression option flags into a binary value
■ Mdq.RegexMatches Finds all matches of a regular expression in an input string
■ Mdq.RegexReplace Replaces matches of a regular expression in an input string with a different string
■ Mdq.RegexSplit Splits an input string into an array of strings based on the positions of a regular expression within the input string
■ Mdq.Similarity Returns a similarity score between two strings using a specified matching algorithm
■ Mdq.SimilarityDate Returns a similarity score between two date values
■ Mdq.Split Splits an input string into an array of strings using specified characters as a delimiter
NOTE For more information about the MDS functions, refer to the "Master Data Services Functions (Transact-SQL)" topic in SQL Server 2008 R2 Books Online at http://msdn.microsoft.com/en-us/library/ee633712(SQL.105).aspx.
Complex Event Processing with StreamInsight
Microsoft SQL Server StreamInsight is a complex event processing (CEP) engine. This technology is a new offering in the SQL Server family, making its first appearance in SQL Server 2008 R2. It ships with the Standard, Enterprise, and Datacenter editions of SQL Server 2008 R2. StreamInsight is both an engine built to process high-throughput streams of data with low latency and a Microsoft .NET Framework platform for developers of CEP applications. The goal of a CEP application is to rapidly aggregate high volumes of raw data for analysis as it streams from point to point. You can apply analytical techniques to trigger a response upon crossing a threshold or to find trends or exceptions in the data without first storing it in a data warehouse.
Complex Event Processing
Complex event processing is the task of sifting through streaming data to find meaningful information. It might involve performing calculations on the data to derive information, or the information might be the revelation of significant trends. As a development platform, StreamInsight can support most types of CEP applications that you might need.
Complex Event Processing Applications
There are certain industries that regularly produce high volumes of streaming data. Manufacturing and utilities companies use sensors, meters, and other devices to monitor processes and alert users when the system identifies events that could lead to a potential failure. Financial trading firms must monitor market prices for stocks, commodities, and other financial instruments and rapidly calculate profits or losses based on changing conditions.
Similarly, there are certain types of applications that benefit from the ability to analyze data as close as possible to the time that the applications capture the data. For example, companies selling products online often use clickstream analysis to change the page layout and site navigation and to display targeted advertising while a user remains connected to a site. Credit card companies monitor transactions for exceptions to normal spending activities that could indicate fraud.
The challenge with CEP arises when you need to process and analyze the data before you have time to perform ETL activities to move the data into a more traditional analytical environment, such as a data warehouse. In CEP applications, the value of the information derived from low-latency processing, defined in milliseconds, can be extremely high. This value begins to diminish as the data ages. Adding to the challenge is the rate at which source applications generate data, often tens of thousands of records per second.
StreamInsight Highlights
StreamInsight's CEP server includes a core engine that is built to process high-throughput data. The engine achieves high performance by executing highly parallel queries and using in-memory caches to avoid incurring the overhead of storing data for processing. The engine can handle data that arrives at a steady rate or in intermittent bursts, and can even rearrange data that arrives out of sequence. Queries can also incorporate nonstreaming data sources, such as master reference data or historical data maintained in a data warehouse.
You write your CEP applications using a .NET language, such as Visual Basic or C#, for rapid application development. In your applications, you embed declarative queries using Language Integrated Query (LINQ) expressions to process the data for analysis.
StreamInsight also includes other tools for administration and development support. The CEP server has a management interface and diagnostic views that you can use to develop applications to monitor StreamInsight. For development support, StreamInsight includes an event flow debugger that you can use to troubleshoot queries. An example of a situation that might require troubleshooting is the arrival of a larger number of events than expected.
StreamInsight Architecture
As with any new technology, you will find it helpful to have an understanding of the StreamInsight architecture before you begin development of your first CEP application. Your application must restructure data streams to a format usable by the processing engine. You use adapters to perform this restructuring before passing the data to queries that run on the CEP server. The way you choose to develop your application also depends on the deployment model you use to implement StreamInsight.
Data Structures
The high-throughput data that StreamInsight requires is known as a stream. More specifically, a stream is a collection of data that changes over time. For example, a Web log contains data about each server hit, including the date, time, page request, and Internet protocol (IP) address of the visitor. If a visitor clicks on several pages in the Web site, the Web log contains multiple lines, or hits, for the same visitor, and each line records a different time. The information in the Web log shows how each user's activity in a Web site changes over time, which is why this type of information is considered a stream. You can query this stream to find the average number of hits or the top five referring sites over time.
StreamInsight splits a stream into individual units called events. An event contains a header and a payload. The event header includes the event kind and one or more timestamps for the event. The event kind is an indicator of a new event or the completeness of events already in the stream. The payload contains the event's data as a .NET data structure.
There are three types of event models that StreamInsight uses. The interval event model represents events with a fixed duration, such as a stock bid price that is valid only for a certain period of time. The edge event model is another type of duration model, but it represents an event with a duration that is unknown at the time the event starts, such as a Web user session. The point model represents events that occur at a specific point in time, such as a Web user's click entry in a Web log.
The CEP Server
The CEP server is a run-time engine and a set of adapter instances that receive and send events, as shown in Figure 8-1. You develop these adapters in a .NET language and register the assemblies on the CEP server, which then instantiates the adapters at run time. Input adapters receive data as a continuous stream from event stores, such as sensors on a factory floor, Web servers, data feeds, or databases. The data passes from the input adapter to the CEP engine, which processes and transforms the data by using standing queries, which are query instances that the CEP engine manages. The engine then forwards the query results to output adapters, which connect to event consumers, such as pagers, monitoring devices, dashboards, and databases. The output adapters can also include logic to trigger a response based on the query results.

flowchart
graph TD
    A["Data feeds Event stores and databases"] --> B["Input Adapters"]
    C["Web servers Devices and sensors"] --> B
    D["Static reference data"] --> E["Output Adapters"]
    F["Event stores and databases"] --> E
    G["KPI dashboards and SharePoint UI"] --> E
    H["Pagers and monitoring devices"] --> E
    I["CEP Application at Run Time"] --> E
    B --> J["CEP Engine Standing Queries"]
    J --> K["Event"]
    J --> L["Event"]
    J --> M["Event"]
    J --> N["Event"]
    J --> O["Event"]
    J --> P["Event"]
    J --> Q["Event"]
    J --> R["Event"]
    J --> S["Event"]
    J --> T["Event"]
    style A fill:#f9f,stroke:#333
    style C fill:#f9f,stroke:#333
    style D fill:#f9f,stroke:#333
    style F fill:#f9f,stroke:#333
    style G fill:#f9f,stroke:#333
    style H fill:#f9f,stroke:#333
    style I fill:#f9f,stroke:#333
    style J fill:#ccf,stroke:#333
    style K fill:#ccf,stroke:#333
    style L fill:#ccf,stroke:#333
    style M fill:#ccf,stroke:#333
    style N fill:#ccf,stroke:#333
    style O fill:#ccf,stroke:#333
    style P fill:#ccf,stroke:#333
    style Q fill:#ccf,stroke:#333
    style R fill:#ccf,stroke:#333
    style S fill:#ccf,stroke:#333
FIGURE 8-1 StreamInsight architecture
Input Adapters
The input adapters translate the incoming events into the event format that the CEP engine requires. You can create a typed adapter if the source produces a single event type only, but you must create an untyped adapter when the payload format differs across events or is unknown in advance. In the case of the typed adapter, the payload format is defined in advance with a static number of fields and data types when you implement the adapter. By contrast, an untyped adapter receives the payload format only when the adapter binds to the query (as part of a configuration specification). In the latter case, the number of fields and data types can vary with each query instantiation.
Output Adapters
The output adapters reverse the operations of the input adapters by translating events into a format that is usable by the target device and then sending the translated data to the device. The development process for an output adapter is very similar to the process you use to develop an input adapter.
Query Instances
Standing queries receive the stream of data from an input adapter, apply business logic to the data (such as an aggregation), and send the results as an event stream to an output adapter. You encapsulate the business logic used by a standing query instance in a query template that you develop using a combination of LINQ and a .NET language. To create the standing query instance in the CEP server, you bind a query template with specific input and output. You can use the same query template with multiple standing queries. After you instantiate a query, you are can start, stop, or manage it.
Deployment Models
You have two options for deploying StreamInsight. You can integrate the CEP server into an application as a hosted assembly, or you can deploy it as a standalone server.
Hosted Assembly
Embedding the CEP server into a host application is a simple deployment approach. You have greater flexibility than you would have with a standalone server because there are no dependencies between applications that you must consider before making changes. Each application and the CEP server run as a single process, which may be easier to manage on your server.
You can use any of the development approaches described later, in the "Application Development" section of this chapter, when hosting the CEP server in your application. However, if you decide later that you want your application to run on a standalone server, you will need to rewrite your application using the explicit server development model.
Standalone Server
You should deploy the CEP server as a standalone server when applications need to share event streams or metadata objects. For example, you can reuse event types, adapter types, and query templates and thereby minimize the impact of changes to any of these metadata objects across applications by maintaining a single copy. You can run the CEP server as an executable, or you can configure it as a Windows service. If you want to run it as a service application, you can use StreamInsightHost.exe as a host process or develop your own host process.
If you choose to deploy CEP as a standalone server, there are some limitations that affect the way you develop applications. First, you can use only the explicit server development model (which is described in the next section of this chapter) when developing CEP applications for a standalone server. Second, you must connect to the CEP server by using the Web service Uniform Resource Identifier (URI) of the CEP server host process.
Application Development
You start the typical development cycle for a new CEP application by sampling the existing data streams and developing functions to process the data. You then test the functions, review the results, and determine the changes necessary to improve the functions. This process continues in an iterative fashion until you complete development.
As part of the development of your CEP application, you create event types, adapters, and query templates. The way you use these objects depends on the development model you choose. When you develop using the explicit server development model, you explicitly create and register all of these objects and can reuse these objects in multiple applications. In the implicit server development model, you concentrate on the development of the query logic and rely on the CEP server to act as an implicit host and to create and register the necessary objects.
TIP You can locate and download sample applications by searching for StreamInsight at CodePlex (http://www.codeplex.com).
Event Types
An event type defines events published by the event source or consumed by the event consumer. You use event types with a typed adapter or as objects in LINQ expressions that you use in query templates. You create an event type as a .NET Framework class or structure by using only public fields and properties as the payload fields, like this:
public class sampleEvent
{
    public string eventId { get; set; }
    public double eventValue { get; set; }
}
An event type can have no more than 32 payload fields. Payload fields must be only scalar or elementary CLR types. You can use nullable types, such as int? instead of int. The string and byte[] types are always nullable.
You do not create an event type when your application uses untyped adapters for scenarios that must support multiple event types. For example, an input adapter for tables in a SQL
Server database must adapt to the schema of the table that it queries. Instead, you provide the table schema in a configuration specification when the adapter is bound to the query. Conversely, an untyped output adapter receives the event type description, which contains a list of fields, when the query starts. The untyped output adapter must then map the event type to the schema of the destination data source, typically in a configuration specification.
Adapters
Input and output adapters provide transformation interfaces between event sources, event consumers, and the CEP server. Event sources can push events to event consumers, or event consumers can pull events from event sources. Either way, the CEP application operates between these two points and intercepts the events for processing. The input adapter reads events from the source, transforms them into a format recognizable by the CEP server, and provides the transformed events to a standing query. As the CEP server processes the event stream, the output adapter receives the resulting new events, transforms them for the event consumers, and then delivers the transformed events.
Before you can begin developing an adapter, you must know whether you are building an input or output adapter. You must also know the event type, which in this context means you must understand the structure of the event payload and how the application timestamps affect stream processing. The .NET class or structure of the event type provides you with information about the event payload if you are building a typed adapter. The information necessary for the management of stream processing, known as event metadata, comes from an interface in the adapter API when it creates an event. In addition to knowing the event payload and event metadata, you must also know whether the shape of the event is a point, interval, or edge model. Having this information available allows you to choose the applicable base class. The adapter base classes are listed in Table 8-1.
TABLE 8-1 Adapter base classes
| ADAPTER TYPE AND EVENT MODEL | INPUT ADAPTER BASE CLASS | OUTPUT ADAPTER BASE CLASS |
| Typed point TypedPointInputAdapter TypedPointOutputAdapter | ||
| Untyped point PointInputAdapter PointOutputAdapter | ||
| Typed interval TypedIntervalInputAdapter TypedIntervalOutputAdapter | ||
| Untyped interval IntervalInputAdapter IntervalOutputAdapter | ||
| Typed edge | TypedEdgeInputAdapter | TypedEdgeOutputAdapter |
| Untyped edge | EdgeInputAdapter | EdgeOutputAdapter |
If you are developing an untyped input adapter, you must ensure that it can use the configuration specification during query bind time to determine the event's field types by inference from the query's SELECT statement. You must also add code to the adapter to populate
the fields one at a time and enqueue the event. The untyped output adapter works similarly, but instead it must be able to use the configuration specification to retrieve query processing results from a dequeued event.
The next step is to develop an AdapterFactory object as a container class for your input and output adapters. You use an AdapterFactory object to share resources between adapter implementations and to pass configuration parameters to adapter constructors. Recall that an untyped adapter relies on the configuration specification to properly handle an event's payload structure. The adapter factory must implement the Create() and Dispose() methods as shown in the following code example, which shows how to create adapters for events in a text file:
public class TextFileInputFactory : IInputAdapterFactory<TextFileInputConfig>
{
    public InputAdapterBase Create(TextFileInputConfig configInfo,
    EventShape eventShape, CepEventType cepEventType)
    {
    InputAdapterBase adapter = default(InputAdapterBase);
    if (eventShape == EventShape.Point)
    {
    adapter = new TextFilePointInput(configInfo, cepEventType);
    }
    else if (eventShape == EventShape.Interval)
    {
    adapter = new TextFileIntervalInput(configInfo, cepEventType);
    }
    else if (eventShape == EventShape.Edge)
    {
    adapter = new TextFileEdgeInput(configInfo, cepEventType);
    }
    else
    {
    throw new ArgumentException(
    string.Format(CultureInfo.InvariantCulture,
    "TextFileInputFactory cannot instantiate adapter with event shape {0}",
    eventShape.ToString()));
    }
    return adapter;
    }

    public void Dispose()
    {
    }
}
The final step is to create a .NET assembly for the adapter. At minimum, the adapter includes a constructor, a Start() method, a Resume() method, and either a ProduceEvents() or ConsumeEvents() method, depending on whether you are developing an input adapter or an output adapter. You can see the general structure of the adapter class in the following code example:
public class TextFilePointInput : PointInputAdapter
{
    public TextFilePointInput(TextFileInputConfig configInfo,
    CepEventType cepEventType)
    { ... }

    public override void Start()
    { ... }

    public override void Resume()
    { ... }

    private void ProduceEvents()
    { ... }
}
Using the constructor method for an untyped adapter, such as TextFilePointInput as in the example, you can pass the configuration parameters from the adapter factory and the event type object that passes from the query binding. The constructor also includes code to connect to the event source and to map fields to the event payload. After the CEP server instantiates the adapter, it invokes the Start() method, which generally calls the ProduceEvents() or ConsumeEvents() method to begin receiving streams. The Resume() method invokes the ProduceEvents() or ConsumeEvents() method again if the CEP server paused the streaming and confirms that the adapter is ready.
The core transformation and queuing of events occurs in the ProduceEvents() method. This method iterates through either reading the events it is receiving from the source or writing events it is sending to the event consumer. It makes calls as necessary to push or pull events into or from the event stream using calls to Enqueue() or Dequeue(). Calls to Enqueue() and Dequeue() return the state of the adapter. If Enqueue() returns FULL or Dequeue() returns EMPTY, the adapter transitions to a suspended state and can no longer produce or consume events. When the adapter is ready to resume, it calls Ready(), which then causes the server to call Resume(), and the cycle of enqueuing and dequeuing begins again from the point in time at which the adapter was suspended.
Another task the adapter must perform is classification of an event. That is, the adapter must specify the event kind as either INSERT or Current Time Increment (CTI). The adapter adds events with the INSERT event kind to the stream as it receives data from the source. It uses the CTI event kind to ignore any additional INSERT events it receives afterward that have a start time earlier than the timestamp of the CTI event.
Query Templates
Query templates encapsulate the business logic that the CEP server instantiates as a standing query instance to process, filter, and aggregate event streams. To define a query template, you first create an event stream object. In a standalone server environment, you can create and register a query template as an object on the CEP server for reuse.
The Event Stream Object
You can create an event stream object from an unbound stream or a user-defined input adapter factory.
You might want to develop a query template to register on the CEP server without binding it to an adapter. In this case, you can use the Create() method of the EventStream class to obtain an event stream that has a defined shape, but without binding information. To do this, you can adapt the following code:
CepStream<PayloadType> inputStream = CepStream<PayloadType>.Create("inputStream");
If you are using the implicit server development model, you can create an event stream object from an input adapter factory and an input configuration. With this approach, you do not need to implement an adapter, but you must specify the event shape. The following example illustrates the syntax to use:
CEPStream<PayloadType> inputStream =
CepStream<PayloadType>.Create (streamName, typeof(AdapterFactory), myConfig, EventShape.Point);
The QueryTemplate Object
When you use the explicit server development model for standalone server deployment, you can create a QueryTemplate object that you can reuse in multiple bindings with different input and output adapters. To create a QueryTemplate object, you use code similar to the following example:
QueryTemplate myQueryTemplate = application.CreateQueryTemplate("myQueryTemplate", outputStream);
Queries
After you create an event stream object, you write a LINQ expression on top of the event stream object. You use LINQ expressions to define the fields for output events, to filter events before query processing, to group events into subsets, and to perform calculations, aggregations, and ranking. You can even use LINQ expressions to combine events from multiple streams through join or union operations. Think of LINQ expressions as the questions you ask of the streaming data.
Projection
The projection operation, which occurs in the select clause of the LINQ expression, allows you to add more fields to the payload or apply calculations to the input event fields. You then project the results into a new event by using field assignments. You can create a new event type implicitly in the expressions, or you can refer to an existing event type explicitly.
Consider an example in which you need to increment the fields x and y from every event in the inputStream stream by one. The following code example shows how to use field assignments to implicitly define a new event type by using projection:
varOutputStream = from e in inputStream
select new {x = e.x + 1, y = e.y + 1};
To refer to an existing event type, you cannot use the type's constructor; you must use field assignments in an expression. For example, assume you have an existing event type called myEventType. You can change the previous code example as shown here to reference the event type explicitly:
varOutputStream = from e in inputStream
select new myEventType {x = e.x + 1, y = e.y + 1};
Filtering
You use a filtering operation on a stream when you want to apply operations to a subset of events and discard all other events. All events for which the expression in the where clause evaluates as true pass to the output stream. In the following example, the query selects events where the value in field x equals 5:
varOutputStream = from e in inputStream
where e.x == 5
select e;
Event Windows
A window represents a subset of data from an event stream for a period of time. After you create a stream of windows, you can perform aggregation, TopK (a LINQ operation described later in this chapter), or user-defined operations on the events that the windows contain. For example, you can count the number of events in each window.
You might be inclined to think of a window as a way to partition the event stream by time. However, the analogy between a window and a partition is useful only up to a point. When you partition records in a table, a record belongs to one and only one partition, but an event can appear in multiple windows based on its start time and end time. That is, the window that covers the time period that includes an event's start time might not include the event's end time. In that case, the event appears in each subsequent window, with the final window covering the period that includes the event's end time. Therefore, you should instead think of a window as a way to partition time that is useful for performing operations on events occurring between the two points of time that define a window.
In Figure 8-2, each unlabeled box below the input stream represents a window and contains multiple events for the period of time that the window covers. In this example, the input stream contains three events, but the first three windows contain two events and the last window contains only one event. Thus, a count aggregation on each window yields results different from a count aggregation on an input stream.
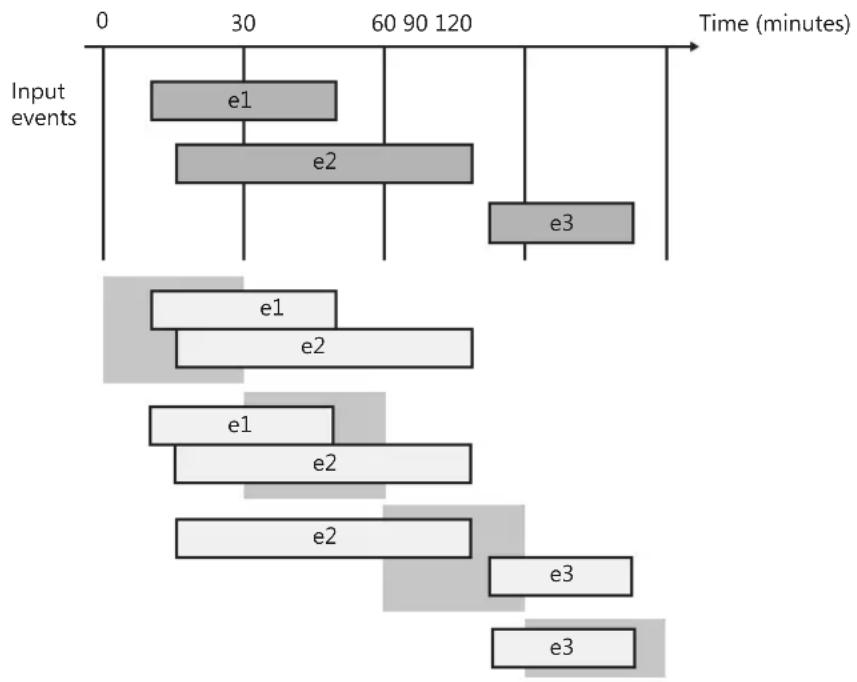
flowchart
graph TD
    A["Input events e1"] --> B["Time 0-30 minutes"]
    C["Input events e2"] --> D["Time 30-60 minutes"]
    E["Input events e3"] --> F["Time 60-90 minutes"]
    G["Input events e1"] --> H["Time 90-120 minutes"]
    I["Input events e2"] --> J["Time 120-150 minutes"]
    K["Input events e1"] --> L["Time 150-180 minutes"]
    M["Input events e2"] --> N["Time 180-210 minutes"]
    O["Input events e3"] --> P["Time 210-240 minutes"]
FIGURE 8-2 Event windows in an input stream
As you might guess, the key to working with windows is to have a clear understanding of the time span that each window covers. There are three types of window streams that StreamInsight supports—hopping windows, snapshot windows, and count windows. In a hopping windows stream, each window spans an equal time period. In a snapshot windows stream, the size of a window depends on the events that it contains. By contrast, the size of a count windows stream is not fixed, but varies according to a specified number of consecutive event start times.
To create a hopping window, you specify both the time span that the window covers (also known as window size) and the time span between the start of one window and the start of the next window (also known as hop size). For example, assume that you need to create windows that cover a period of one hour, and a new window starts every 15 minutes, as shown in Figure 8-3. In this case, the window size is one hour and the hop size is 15 minutes. Here is the code to create a hopping windows stream and count the events in each window:

bar
| Event Type | Event Type | Time (minutes) | |------------|------------|----------------| | e1 | Hopping windows | 120 | | e2 | Hopping windows | 120 | | e3 | Hopping windows | 120 |FIGURE 8-3 Hopping windows
When there are no gaps and there is no overlap between the windows in the stream, hopping windows are also called tumbling windows. Figure 8-2, shown earlier, provides an example of tumbling windows. The window size and hop size are the same in a tumbling
windows stream. Although you can use the HoppingWindow method to create tumbling windows, there is a TumblingWindow method. The following code illustrates how to count events in tumbling windows that occur every half hour.
varOutputStream = from eventWindow in
    inputStream.TumblingWindow(TimeSpan.FromMinutes(30))
    select new { count = eventWindow.Count() };
Snapshot windows are similar to tumbling windows in that the windows do not overlap, but whereas fixed points in time determine the boundaries of a tumbling window, events define the boundaries of a snapshot window. Consider the example in Figure 8-4. At the start of the first event, a new snapshot window starts. That window ends when the second event starts, and a second snapshot window starts and includes both the first and second event. When the first event ends, the second snapshot also ends, and a third snapshot window starts. Thus, the start and stop of an event triggers the start and stop of a window. Because events determine the size of the window, the Snapshot method takes arguments, as shown in the following code, which counts events in each window:
varOutputStream = from eventWindow in inputStream.Snapshot()
    select new { count = eventWindow.Count() };

flowchart
graph TD
    A["Input events"] --> B["e1"]
    B --> C["e2"]
    C --> D["e3"]
    D --> E["Snapshot windows"]
    style A fill:#f9f,stroke:#333
    style B fill:#ccc,stroke:#333
    style C fill:#ccc,stroke:#333
    style D fill:#ccc,stroke:#333
    style E fill:#ccc,stroke:#333
FIGURE 8-4 Snapshot windows
Count windows are completely different from the other window types because the size of the windows is variable. When you create windows, you provide a parameter n as a count of events to fulfill within a window. For example, assume n is 2 as shown in Figure 8-5. The first window starts when the first event starts and ends when the second event starts, because a count of 2 events fulfills the specification. The second event also resets the counter to 1 and starts a new window. The third event increments the counter to 2, which ends the second window.
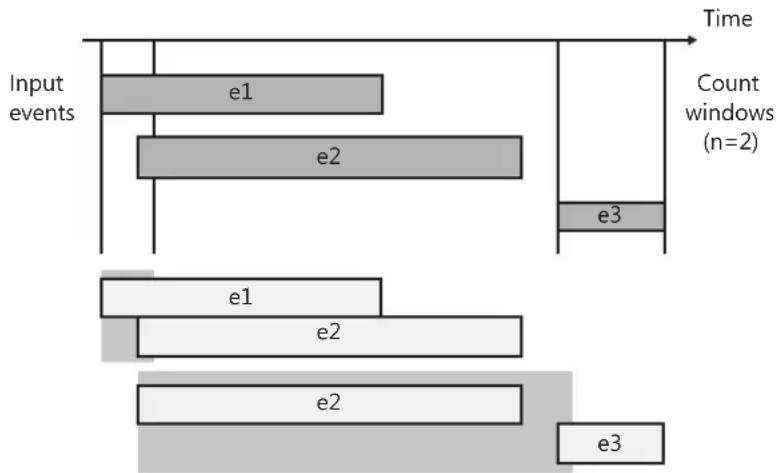
flowchart
graph TD
    A["Input events e1"] --> B["Count windows (n=2)"]
    C["e2"] --> D["Count windows (n=2)"]
    E["e3"] --> F["Count windows (n=2)"]
    G["e1"] --> H["Count windows (n=2)"]
    I["e2"] --> J["Count windows (n=2)"]
    K["e3"] --> L["Count windows (n=2)"]
FIGURE 8-5 Count windows
Aggregations
You cannot perform aggregation operations on event streams directly; instead you must first create a window to group data into periods of time that you can then aggregate. You then create an aggregation as a method of the window and, for all aggregations except Count, use a lambda expression to assign the result to a field.
StreamInsight supports the following aggregation functions:
Avg
Sum
Min
Max
Count
Assume you want to apply the Sum and Avg aggregations to field x in an input stream. The following example shows you how to use these aggregations as well as the Count aggregation for each snapshot window:
varOutputStream = from eventWindow in inputStream.Snapshot()
    select new { sum = eventWindow.Sum(e => e.x),
    avg = eventWindow.Avg(e => e.x),
    count = eventWindow.Count() };
TopK
A special type of aggregation is the TopK operation, which you use to rank and filter events in an ordered window stream. To order a window stream, you use the orderby clause. Then you use the Take method to specify the number of events that you want to send to the output stream, discarding all other events. The following code shows how to produce a stream of the top three events:
varOutputStream = (from eventWindow in inputStream.Snapshot()
    from e in eventWindow
    orderby e.x ascending, e.y descending
    select e).Take(3);
When you need to include the rank in the output stream, you use projection to add the rank to each event's payload. This is accessible through the Payload property, as shown in the following code:
varOutputStream = (from eventWindow in inputStream.Snapshot()
    from e in eventWindow
    orderby e.x ascending, e.y descending
    select e).Take(3, e => new { x = ePAYload.x, y = e.Payload.y, rank = e.Rank });
Grouping
When you want to compute operations on event groups separately, you add a group by clause. For example, you might want to produce an output stream that aggregates the input stream by location and compute the average for field x for each location. In the following example, the code illustrates how to create the grouping by location and how to aggregate events over a specified column:
varOutputStream = from e in inputStream
    group e by e.locationID into eachLocation
    from eventWindow in eachLocation.Snapshot()
    select new { avgValue = eventWindow.Avg(e => e.x), locationId = eachGroup.Key };
Joins
You can use a join operation to match events from two streams. The CEP server first matches events only if they have overlapping time intervals, and then applies the conditions that you specify in the join predicate. The output of a join operation is a new event that combines pay-loads from the two matched events. Here is the code to join events from two input streams, where field x is the same value in each event. This code creates a new event containing fields x and y from the first event and field y from the second event.
varOutputStream = from e1 in inputStream1
    join e2 in inputStream2
    on e1.x equals e2.x
    select new { e1.x, e1.y, e2.y };
Another option is to use a cross join, which combines all events in the first input stream with all events in the second input stream. You specify a cross join by using a from clause for each input stream and then creating a new event that includes fields from the events in each stream. By adding a where clause, you can filter the events in each stream before the CEP server performs the cross join. The following example selects events with a value for field x greater than 5 from the first stream and selects events with a value for field y less than 20 from the second stream, performs the cross join, and then creates a stream of new events containing field x from the first event and field y from the second event:
varOutputStream = from e1 in inputStream1
    from e2 in inputStream2
    where e1.x > 5 && e2.y < 20
    select new { e1.x, e2.y };
Unions
You can also combine events from multiple streams by performing a union operation. You can work with only two streams at a time, but you can cascade a series of union operations if you need to combine events from three or more streams, as shown in the following code:
varOutputStreamTemp = inputStream1.Union(inputStream2);
varOutputStream = OutputStreamTemp.Union(inputStream3);
User-defined Functions
When you need to perform an operation that the CEP server does not natively support, you can create user-defined functions (UDFs) by reusing existing .NET functions. You add a UDF to the CEP server in the same way that you add an adapter. You can then call the UDF anywhere in your query where an expression can be used, such as in a filter predicate, a join predicate, or a projection.
Query Template Binding
The method that the CEP server uses to instantiate the query template as a standing query depends on the development model that you use. If you are using the explicit server development model, you create a query binder object, but you create an event stream consumer object if you are using the implicit server development model.
The Query Binder Object
In the explicit server development model, you first create explicit input and output adapter objects. Next you create a query binder object as a wrapper for the query template object on the CEP server, which in turn you bind to the input and output adapters, and then you call the CreateQuery() method to create the standing query, as shown here:
QueryBinder myQuerybinder = new QueryBinder(myQueryTemplate);
myQuerybinder.BindProducer("querySource", myInputAdapter, inputConf, EventShape.Point);
myQuerybinder.AddConsumer("queryResult", myOutputAdapter, outputConf, EventShape.Point, StreamEventOrder.FullyOrdered);
Query myQuery = application.CreateQuery("query", myQuerybinder, "query description");
Rather than enqueuing CTIs in the input adapter code, you can define the CTI behavior by using the AdvanceTimeSettings class as an optional parameter in the BindProducer method. For example, to send a CTI after every 10 events, set the CTI's timestamp as the most recent event's timestamp, and drop any event that appears later in the stream but has an end timestamp earlier than the CTI, use the following code:
var ats = new AdvanceTimeSettings(10, TimeSpan.FromSeconds(0), AdvanceTimePolicy.Drop);
queryBinder.BindProducer ("querysource", myInputAdapter, inputConf, EventShape.Interval, ats);
The Event Stream Consumer Object
After you define the query logic in an application that uses the implicit server development model, you can use the output adapter factory to create an event stream consumer object. You can pass this object directly to the CepStream.ToQuery() method without binding the query template to the output adapter, as you can see in the following example:
Query myQuery = outputStream.ToQuery<ResultType>(typeof(MyOutputAdapterFactory), outputConf, EventShape.Interval, StreamEventOrder.FullyOrdered);
The Query Object
In both the explicit and implicit development models, you create a query object. With that object instantiated, you can use the Start() and Stop() methods. The Start() method instantiates the adapters using the adapter factories, starts the event processing engine, and calls the Start() methods for each adapter. The Stop() method sends a message to the adapters that the query is stopping and then shuts down the query. Your application must include the following code to start and stop the query object:
query.Start();
// wait for signal to complete the query
query.Stop();
The Management Interface
StreamInsight includes the ManagementService API, which you can use to create diagnostic views for monitoring the CEP server's resources and the queries running on the server. Another option is to use Windows PowerShell to access diagnostic information.
Diagnostic Views
Your diagnostic application can retrieve static information, such as object property values, and statistical information, such as a cumulative event count after a particular point in time or an aggregate count of events from child objects. Objects include the server, input and output adapters, query operators, schedulers, and event streams. You can retrieve the desired information by using the GetDiagnosticView() method and passing the object's URI as a method argument.
If you are monitoring queries, you should understand the transition points at which the server records metrics about events in a stream. The name of a query metric identifies the transition point to which the metric applies. For example, Total Outgoing Event Count provides the total number of events that the output adapter has dequeued from the engine. The following four transition points relate to query metrics:
■ Incoming The event arrival at the input adapter
■ Consumed The point at which the input adapter enqueues the event into the engine
■ Produced The point at which the event leaves the last query operator in the engine
■ Outgoing The event departure from the output adapter
Windows PowerShell Diagnostics
For quick analysis, you can use Windows PowerShell scripts to view diagnostic information rather than writing a complete diagnostic application. Before you can use a Windows PowerShell script, the StreamInsight server must be running a query. If the server is running as a hosted assembly, you must expose the Web service.
You start the diagnostic process by loading the Microsoft.ComplexEventProcessing assembly from the Global Assembly Cache (GAC) into Windows PowerShell by using the following code:
PS C:\>
[System.Reflection.Assembly]::LoadWithPartialName("Microsoft.ComplexEventProcessing")
Then you need to create a connection to the StreamInsight host process by using the code in this example:
PS C:\> $server =
Microsoft.ComplexEventProcessing.Server]::Connect("http://localhost/StreamInsight")
Then you can use the GetDiagnosticView() method to retrieve statistics for an object, such as the Event Manager, as shown in the following code:
PS C:\> dv =server.GetDiagnosticView("cep:/Server/EventManager")
PS C:\> $dv
To retrieve information about a query, you must provide the full name, following the StreamInsight hierarchical naming schema. For example, for an application named myApplication with a query named myQuery, you use the following code:
PS C:\> $dv =
$server.GetDiagnosticView("cep:/Server/Application/myApplication/Query/myQuery")
PS C:\> $dv
NOTE For a complete list of metrics and statistics that you can query by using diagnostic views, refer to the SQL Server Books Online topic "Monitoring the CEP Server and Queries" at http://msdn.microsoft.com/en-us/library/ee391166(SQL.105).aspx.
Reporting Services Enhancements
If you thought Microsoft SQL Server 2008 Reporting Services introduced a lot of great new features to the reporting platform, just wait until you discover what's new in Reporting Services in SQL Server 2008 R2. The Reporting Services development team at Microsoft has been working hard to incorporate a variety of improvements into the product that should make your life as a report developer or administrator much simpler.
New Data Sources
This release supports a few new data sources to expand your options for report development. When you use the Data Source Properties dialog box to create a new data source, you see Microsoft SharePoint List, Microsoft SQL Azure, and Microsoft SQL Server Parallel Data Warehouse (covered in Chapter 6, "Scalable Data Warehousing") as new options in the Type drop-down list. To build a dataset with any of these sources, you can use a graphical query designer or type a query string applicable to the data source provider type.
You can also use SQL Server PowerPivot for SharePoint as a data source, although this option is not included in the list of data source providers. Instead, you use the SQL Server Analysis Services provider and then provide the URL for the workbook that you want to use as a data source. You can learn more about using a PowerPivot workbook as a data source in Chapter 10, "Self-Service Analysis with PowerPivot."
Expression Language Improvements
There are several new functions added to the expression language, as well as new capabilities for existing functions. These improvements allow you to combine data from two different datasets in the same data region, create aggregated values from aggregated values, define report layout behavior that depends on the rendering format, and modify report variables during report execution.
Combining Data from More Than One Dataset
To display data from more than one source in a table (or in any data region, for that matter), you must create a dataset that somehow combines the data because a data region binds to one and only one dataset. You could create a query for the dataset that joins the data if both sources are relational and accessible with the same authentication. But what if the data comes from different relational platforms? Or what if some of the data comes from SQL Server and other data comes from a SharePoint list? And even if the sources are relational, what if you can access only stored procedures and are unable to create a query to join the sources? These are just a few examples of situations in which the new Lookup functions in the Reporting Services expression language can help.
In general, the three new functions, Lookup, MultiLookup, and LookupSet, work similarly by using a value from the dataset bound to the data region (the source) and matching it to a value in a second dataset (the destination). The difference between the functions reflects whether the input or output is a single value or multiple values.
You use the Lookup function when there is a one-to-one relationship between the source and destination. The Lookup function matches one source value to one destination value at a time, as shown in Figure 9-1.
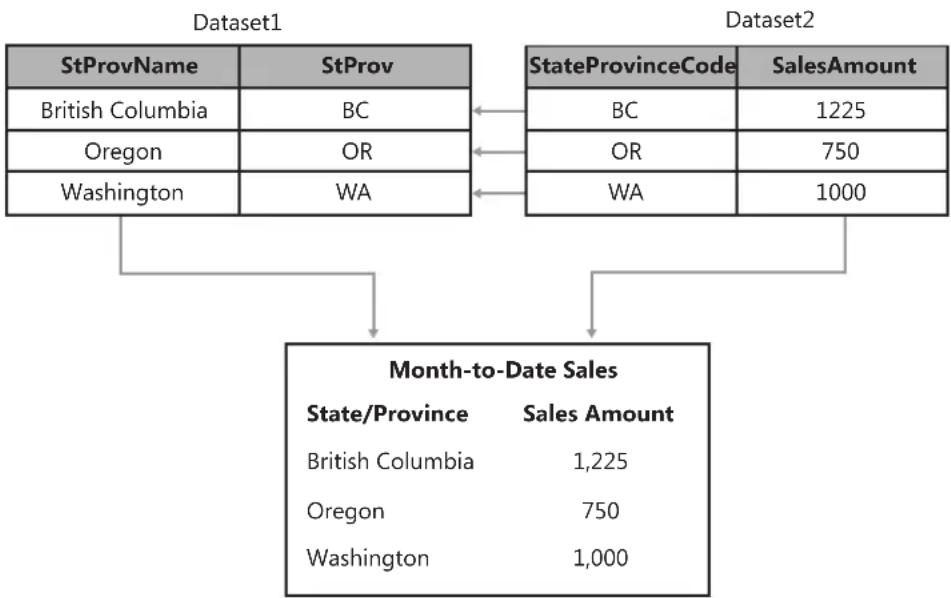
flowchart
graph TD
    A["StProvName"] --> B["British Columbia"]
    A --> C["Oregon"]
    A --> D["Washington"]
    E["StProv"] --> F["BC"]
    E --> G["OR"]
    E --> H["WA"]
    I["StateProvinceCode"] --> J["BC"]
    I --> K["OR"]
    I --> L["WA"]
    M["SalesAmount"] --> N["1225"]
    M --> O["750"]
    M --> P["1000"]
    Q["Month-to-Date Sales"] --> R["State/Province"]
    Q --> S["Sales Amount"]
    R --> T["British Columbia"]
    R --> U["Oregon"]
    R --> V["Washington"]
FIGURE 9-1 Lookup function results
In the example, the resulting report displays a table for the sales data returned for Dataset2, but rather than displaying the StateProvinceCode field from the same dataset, the Lookup function in the first column of the table instructs Reporting Services to match each value in that field from Dataset2 with the StProv field in Dataset1 and then to display the corresponding StProvName. The expression in the first column of the table is shown here:
=Lookup(Fields!StateProvinceCode.Value, Fields!StProv.Value, Fields!StProvName.Value, "Dataset1")
The MultiLookup function also requires a one-to-one relationship between the source and destination, but it accepts a set of source values as input. Reporting Services matches each source value to a destination value one by one, and then returns the matching values as an array. You can then use an expression to transform the array into a comma-separated list, as shown in Figure 9-2.
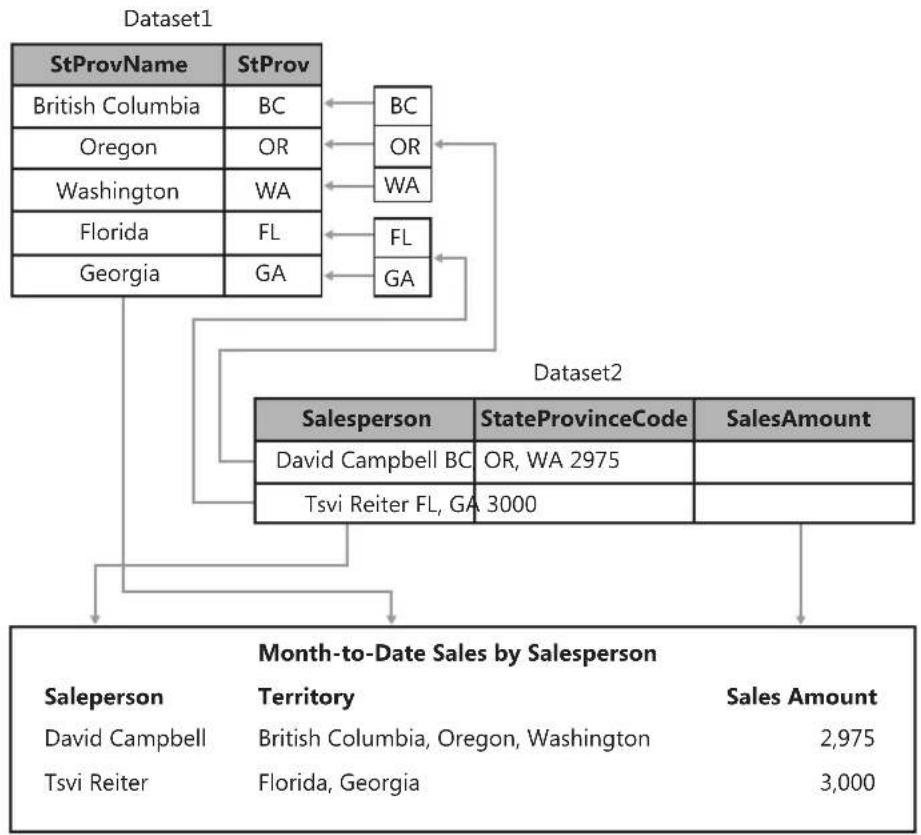
flowchart
graph TD
    A["Dataset1"] --> B["StProvName"]
    A --> C["StProv"]
    B --> D["British Columbia"]
    B --> E["Oregon"]
    B --> F["Washington"]
    B --> G["Florida"]
    B --> H["Georgia"]
    C --> I["BC"]
    C --> J["OR"]
    C --> K["WA"]
    C --> L["FL"]
    C --> M["GA"]
    N["Dataset2"] --> O["Salesperson"]
    N --> P["StateProvinceCode"]
    N --> Q["SalesAmount"]
    O --> R["David Campbell BC"]
    O --> S["Tsvi Reiter FL, GA 3000"]
    P --> T["OR, WA 2975"]
    P --> U["3000"]
    V["Month-to-Date Sales by Salesperson"] --> W["Salesperson"]
    V --> X["Territory"]
    V --> Y["Sales Amount"]
FIGURE 9-2 MultiLookup function results
The MultiLookup function in the second column of the table requires an array of values from the dataset bound to the table, which in this case is the StateProvinceCode field in Dataset2. You must first use the Split function to convert the comma-separated list of values in the StateProvinceCode field into an array. Reporting Services operates on each element of the array, matching it to the StProv field in Dataset1, and then combining the results into an array that you can then transform into a comma-separated list by using the Join function. Here is the expression in the Territory column:
=Join(MultiLookup(Split(Fields!StateProvinceCode.Value, ","), Fields!StProv.Value, Fields!StProvName.Value, "Dataset1"), ", ")
When there is a one-to-many relationship between the source and destination values, you use the LookupSet function. This function accepts a single value from the source dataset as input and returns an array of matching values from the destination dataset. You could then use the Join function to convert the result into a delimited string, as in the example for the MultiLookup function, or you could use other functions that operate on arrays, such as the Count function, as shown in Figure 9-3.
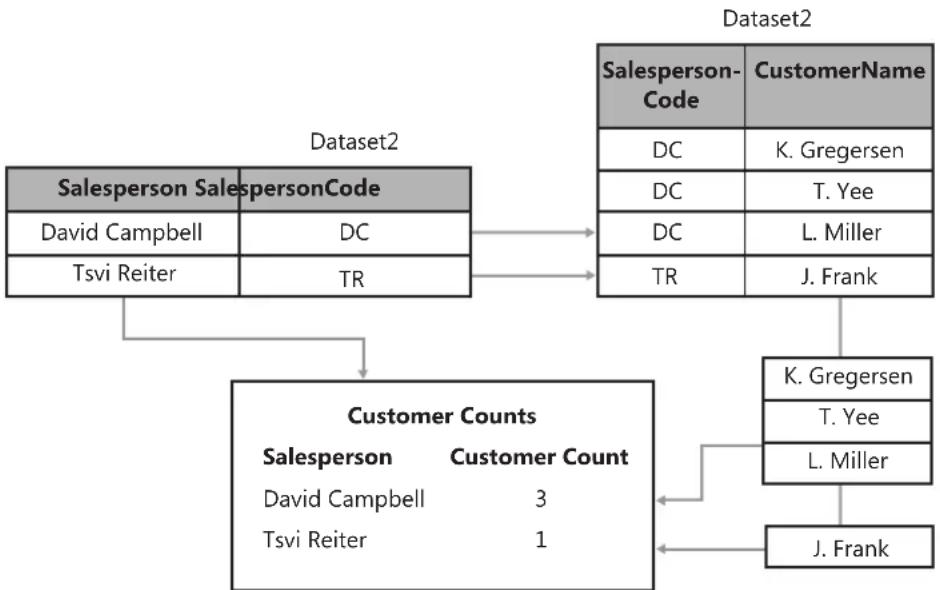
flowchart
graph TD
    A["Salesperson SalespersonCode"] --> B["Customer Counts"]
    C["David Campbell"] --> B
    D["Tsvi Reiter"] --> B
    E["DC"] --> B
    F["TR"] --> B
    G["DC"] --> H["CustomerName"]
    I["DC"] --> J["K. Gregersen"]
    K["TR"] --> L["L. Miller"]
    M["J. Frank"] --> N["K. Gregersen"]
    O["K. Gregersen"] --> P["T. Yee"]
    Q["L. Miller"] --> R["J. Frank"]
    S["David Campbell"] --> T["3"]
    U["Tsvi Reiter"] --> V["1"]
FIGURE 9-3 LookupSet function results
The Customer Count column uses this expression:
LookupSet(Fields!SalespersonCode.Value, Fields!SalesperonCode.Value, Fields!CustomerName.Value, "Dataset2").Length
Aggregation
The aggregate functions available in Reporting Services since its first release with the SQL Server 2000 platform provided all the functionality most people needed most of the time. However, if you needed to use the result of an aggregate function as input for another aggregate function and weren't willing or able to put the data into a SQL Server Analysis Services cube first, you had no choice but to preprocess the results in the dataset query. In other words, you were required to do the first level of aggregation in the dataset query, and then you could perform the second level of aggregation by using an expression in the report. Now, with SQL Server 2008 R2 Reporting Services, you can nest an aggregate function inside another aggregate function. Put another way, you can aggregate an aggregation. The example table in Figure 9-4 shows the calculation of average monthly sales for a selected year. The dataset contains one row for each product, which the report groups by year and by month while hiding the detail rows.
| Date | Sales Amount |
| 2006 | 74,281.39 |
| January | 585.41 |
| February | 2,159.96 |
| March | 2,200.33 |
| April | 1,776.41 |
| May | 5,577.84 |
| June | 4,279.54 |
| July | 7,446.63 |
| August | 13,974.33 |
| September | 11,488.59 |
| October | 7,421.16 |
| November | 9,594.93 |
| December | 7,774.07 |
| Product Average | 83.84 |
| Monthly Average | $6,190.12 |
FIGURE 9-4 Aggregation of an aggregation
Here is the expression for the value displayed in the Monthly Average row:
=Avg(Sum(Fields!SalesAmount.Value,"EnglishMonthName"))
Conditional Rendering Expressions
The expression language in SQL Server 2008 R2 Reporting Services includes a new global variable that allows you to set the values for "look-and-feel" properties based on the rendering format used to produce the report. That is, any property that controls appearance (such as Color) or behavior (such as Hidden) can use members of the RenderFormat global variable in conditional expressions to change the property values dynamically, depending on the rendering format.
Let's say that you want to simplify the report layout when a user exports a report to Microsoft Excel. Sometimes other report items in the report can cause a text box in a data region to render as a set of merged cells when you are unable to get everything to align perfectly. The usual reason that users export a report to Excel is to filter and sort the data, and they are not very interested in the information contained in the other report items. Rather than fussing with the report layout to get each report item positioned and aligned just right, you can use an expression in the Hidden property to keep those report items visible in every export format except Excel. Simply reference the name of the extension as found in the RSReportServer.config file in an expression like this:
=iif(RenderFormat.Name="EXCEL", True, False)
Another option is to use the RenderFormat global variable with the lslnteractive member to set the conditions of a property. For example, let's say you have a report that displays summarized sales but also allows the user to toggle a report item to display the associated details. Rather than export all of the details when the export format is not interactive, you can easily omit those details from the rendered output by using the following expression in the Hidden property of the row group containing the details:
=iif(RenderFormat.IsInteractive, False, True)
Page Numbering
Speaking of global variables, you can use the new Globals!OverallPageNumber and Globals!OverallTotalPages variables to display the current page number relative to the entire report and the total page count, respectively. You can use these global variables, which are also known as built-in fields, in page headers and page footers only. As explained later in this chapter in the "Pagination Properties" section, you can specify conditions under which to reset the page number to 1 rather than incrementing its value by one. The variables Globals!PageNumber and Globals!TotalPages are still available from earlier versions. You can use them to display the page information for the current section of a report. Figure 9-5 shows an example of a page footer when the four global variables are used together.
Section Page 1 of 4 (Overall 1 of 16)
FIGURE 9-5 Global variables for page counts
The expression to produce this footer looks like this:
="Section Page " + CStr(Globals!PageNumber) + " of " + CStr(Globals!TotalPages) + " (Overall " + Cstr(Globals!OverallPageNumber) + " of " + CStr(Globals!OverallTotalPages) +")"
Read/Write Report Variable
Another enhancement to the expression language is the new support for setting the value of a report variable. Just as in previous versions of Reporting Services, you can use a report variable when you have a value with a dependency on the execution time. Reporting Services stores the value at the time of report execution and persists that value as the report continues to process. That way, as a user pages through the report, the variable remains constant even if the actual page rendering time varies from page to page.
By default, a report variable is Read Only, which was the only option for this feature in the previous version of Reporting Services. In SQL Server 2008 R2, you can now clear the Read-Only setting, as shown in Figure 9-6, when you want to be able to change the value of the report variable during report execution.
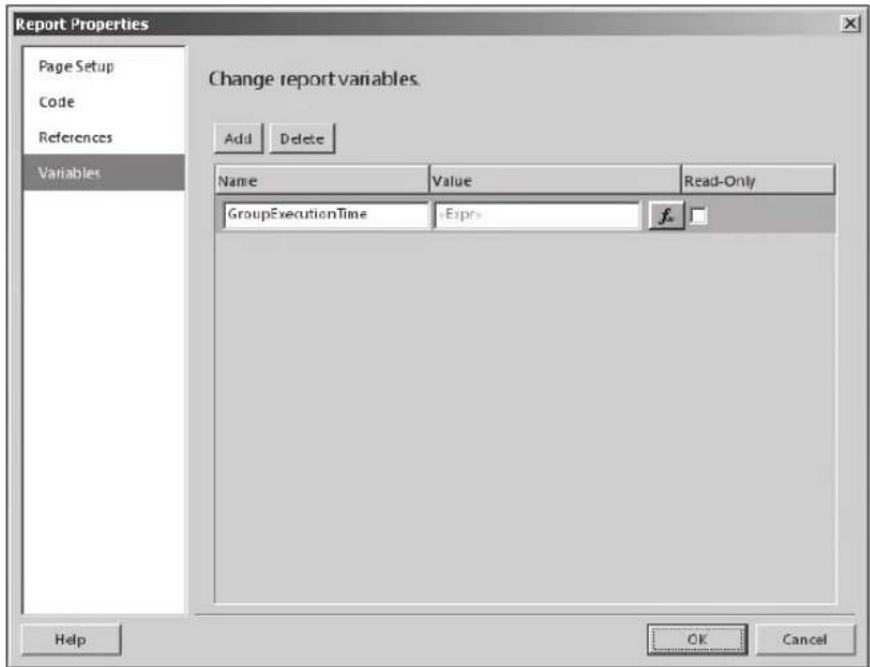
FIGURE 9-6 Changing report variables
To write to your report variable, you use the SetValue method of the variable. For example, assume that you have set up the report to insert a page break between group instances, and you want to update the execution time when the group changes. Add a report variable to the report, and then add a hidden text box to the data region with the group used to generate a page break. Next, place the following expression in the text box to force evaluation of the expression for each group instance:
=Variables!MyVariable.SetValue(Now())
In the previous version of Reporting Services, the report variable type was a value just like any text box on the report. In SQL Server 2008 R2, the report variable can also be a .NET serializable type. You must initialize and populate the report variable when the report session begins, then you can independently add or change the values of the report variable on each page of the report during your current session.
Layout Control
SQL Server 2008 R2 Reporting Services also includes several new report item properties that you can use to control layout. By using these properties, you can manage report pagination, fill in data gaps to align data groupings, and rotate the orientation of text.
Pagination Properties
There are three new properties available to manage pagination: Disabled, ResetPageNumber, and PageName. These properties appear in the Properties window when you select a tablix, rectangle, or chart in the report body or a group item in the Row Groups or Column Groups pane. The most common reason you set values for these properties is to define different paging behaviors based on the rendering format, now that the global variable RenderFormat is available.
For example, assume that you create a tablix that summarizes sales data by year, and group the data with the CalendarYear field as the outermost row group. When you click the CalendarYear group item in the Row Groups pane, you can access several properties in the Properties window, as shown in Figure 9-7. Those properties, however, are not available in the item's Group Properties dialog box.
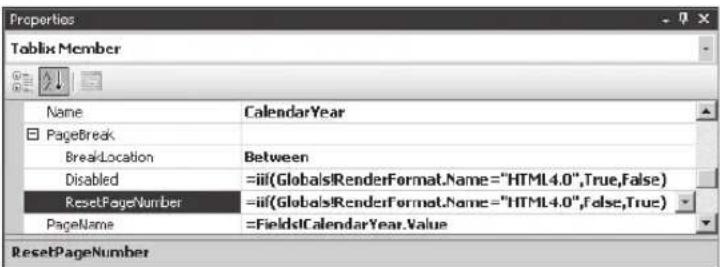
FIGURE 9-7 Pagination properties
Assume also that you want to insert page breaks between each instance of CalendarYear only when you export the report to Excel. After setting the BreakLocation property to Between, you set the Disabled property to False when the report renders as Excel by using the following expression:
=iif(Globals!RenderFormat.Name="EXCEL", False, True)
Reporting Services keeps as many groups visible on one page as possible and adds a soft page break to the report where needed to keep the height of the page within the dimensions specified by the InteractiveSize property when the report renders as HTML. However, when the report renders in any other format, each year appears on a separate page, or on a separate sheet if the report renders in Excel.
Whether or not you decide to disable the page break, you can choose the conditions to apply to reset the page number when the page break occurs by assigning an expression to the ResetPageNumber property. To continue with the current example, you can use a similar conditional expression for the ResetPageNumber property to prevent the page number from resetting when the report renders as HTML and only allow the reset to occur in all other formats. Therefore, in HTML format, the page number of the report increments by one as you page through it, but in other formats (excluding Excel), you see the page number reset each time a new page is generated for a new year.
Last, consider how you can use the PageName property. As one example, instead of using page numbers in an Excel workbook, you can assign a unique name to each sheet in the workbook. You might, for example, use the group expression that defines the page break as the PageName property. When the report renders as an Excel workbook, Reporting Services uses the page break definition to separate the CalendarYear groups into different sheets of the same workbook and uses the PageName expression to assign the group instance's value to the applicable sheet.
As another example, you can assign an expression to the PageName property of a rectangle, data region, group, or map. You can then reference the current value of this property in the page header or footer by using Globals!PageName in the expression. The value of Globals!PageName is first set to the value of the InitialPageName report property when report processing begins and then resets as each report item processes if you have assigned an expression to the report item's PageName property.
Data Synchronization
One of the great features of Reporting Services is its ability to create groups of groups by nesting one type of report item inside another type of report item. In Figure 9-8, a list that groups by category and year contains a matrix that groups by month. Notice that the months in each list group do not line up properly because data does not exist for the first six months of the year for the Accessories 2005 group. Each monthly group displays independently of other monthly groups in the report.
Accessories 2005
| July | August | September | October | November | December |
| 1,696 | 3,693 | 3,250 | 1,938 | 5,491 | 4,268 |
Accessories 2006
| January | February | March | April | May | June | July | August | September |
| 535 | 2,160 | 2,200 | 1,776 | 5,578 | 4,280 | 10,478 | 18,552 | 15,329 |
Accessories 2007
| January | February | March | April | May | June | July | August | September |
| 4,727 | 5,963 | 5,333 | 9,635 | 12,388 | 10,631 | 31,152 | 54,405 | 54,756 |
Accessories 2008
| January | February | March | April | May | June |
| 16,722 | 19,135 | 19,052 | 27,585 | 40,731 | 38,559 |
FIGURE 9-8 Unsynchronized groups
A new property, DomainScope, is available in SQL Server 2008 R2 Reporting Services to fix this problem. This property applies to a group and can be used within the tablix data region, as shown in Figure 9-9, or in charts and other data visualizations whenever you need to fill gaps in data across multiple instances of the same grouping. You simply set the property value to the name of the data region that contains the group. In this example, the MonthName group's DomainScope property is set to Tablix1, which is the name assigned to the list. Each instance of the list's group—category and year—renders an identical set of values for MonthName.
Accessories 2005
| January | February | March | April | May | June | July | August | September |
| 1,686 | 3,593 | 3,250 |
Accessories 2006
| January | February | March | April | May | June | July | August | September |
| 585 | 2,160 | 2,200 | 1,776 | 5,578 | 4,280 | 10,478 | 18,552 | 15,329 |
Accessories 2007
| January | February | March | April | May | June | July | August | September |
| 4,727 | 6,583 | 5,333 | 9,835 | 12,388 | 10,631 | 31,152 | 54,405 | 54,756 |
Accessories 2008
| January | February | March | April | May | June | July | August | September |
| 16,722 | 19,135 | 19,052 | 27,585 | 40,731 | 38,569 |
FIGURE 9-9 Synchronized groups
Text Box Orientation
Each text box has a WritingMode property that by default displays text horizontally. There is also an option to display text vertically to accommodate languages that display in that format. Although you could use the vertical layout for other languages, you probably would not be satisfied with the result because it renders each character from top to bottom. An English word, for example, would have the bottom of each letter facing left and the top of each letter facing right. Instead, you can set this property to a new value, Rotate270, which also renders the text in a vertical layout, but from bottom to top, as shown in Figure 9-10. This feature is useful for tablix row headers when you need to minimize the width of the tablix.
| Sales Amount | ||
| Accessories | 2005 | 20,235 |
| 2006 | 92,735 | |
| 2007 | 296,533 | |
| 2008 | 161,794 | |
| Bikes | 2005 | 7,395,349 |
| 2006 | 19,956,015 | |
| 2007 | 25,551,775 | |
| 2008 | 13,399,243 | |
| Clothing | 2005 | 34,376 |
| 2006 | 485,587 | |
| 2007 | 871,864 | |
| 2008 | 386,013 | |
| Components | 2005 | 615,475 |
| 2006 | 3,610,092 | |
| 2007 | 5,482,497 | |
| 2008 | 2,091,012 | |
FIGURE 9-10 Text box orientation
Data Visualization
Prior to SQL Server 2008 R2 Reporting Services, your only option for enhancing a report with data visualization was to add a chart or gauge. Now your options have been expanded to include data bars, sparklines, indicators, and maps.
Data Bars
A data bar is a special type of chart that you add to your report from the Toolbox window. A data bar shows a single data point as a horizontal bar or as a vertical column. Usually you embed a data bar inside of a tablix to provide a small data visualization for each group or detail group that the tablix contains. After adding the data bar to the tablix, you configure the value you want to display, and you can fine-tune other properties as needed if you want to achieve a certain look. By placing data bars in a tablix, you can compare each group's value to the minimum and maximum values within the range of values across all groups, as shown in Figure 9-11. In this example, Accessories 2005 is the minimum sales amount, and Bikes 2007 is the maximum sales amount. The length of each bar allows you to visually assess whether a group is closer to the minimum or the maximum or some ratio in between, such as the Bikes 2008 group, which is about half of the maximum sales.
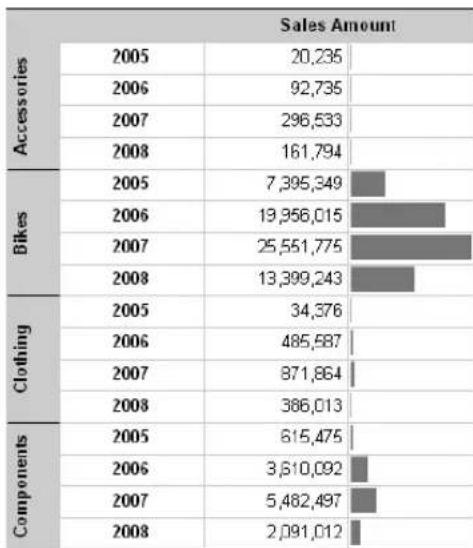
FIGURE 9-11 Data bars
Sparklines
Like data bars, sparklines can be used to include a data visualization alongside the detailed data. Whereas a data bar usually shows a single point, a sparkline shows multiple data points over time, making it easier to spot trends.
You can choose from a variety of sparkline types such as columns, area charts, pie charts, or range charts, but most often sparklines are represented by line charts. As you can see in Figure 9-12, sparklines are pretty bare compared to a chart. You do not see axis labels, tick marks, or a legend to help you interpret what you see. Instead, a sparkline is intended to provide a sense of direction by showing upward or downward trends and varying degrees of fluctuation over the represented time period.
| Sales Amount | |||
| Accessories | 2005 | 20,235 | |
| 2006 | 92,735 | ||
| 2007 | 296,533 | ||
| 2008 | 161,794 | ||
| Bikes | 2005 | 7,395,349 | |
| 2006 | 19,956,015 | ||
| 2007 | 25,551,775 | ||
| 2008 | 13,399,243 | ||
| Clothing | 2005 | 34,376 | |
| 2006 | 485,587 | ||
| 2007 | 871,864 | ||
| 2008 | 386,013 | ||
| Components | 2005 | 615,475 | |
| 2006 | 3,610,092 | ||
| 2007 | 5,482,497 | ||
| 2008 | 2,091,012 | ||
FIGURE 9-12 Sparklines
Indicators
Another way to display data in a report is to use indicators. In previous versions of Reporting Services, you could produce a scorecard of key performance indicators by uploading your own images and then using expressions to determine which image to display. Now you can choose indicators from built-in sets, as shown in Figure 9-13, or you can customize these sets to change properties such as the color or size of an indicator icon, or even by using your own icons.

FIGURE 9-13 Indicator types
After selecting a set of indicators, you associate the set with a value in your dataset or with an expression, such as a comparison of a dataset value to a goal. You then define the rules that determine which indicator properly represents the status. For example, you might create an expression that compares SalesAmount to a goal. You could then assign a green check mark if SalesAmount is within 90 percent of the goal, a yellow exclamation point if it is within 50 percent of the goal, and a red X for everything else.
Maps
A map element is a special type of data visualization that combines geospatial data with other types of data to be analyzed. You can use the built-in Map Gallery as a background for your data, or you can use an ESRI shapefile. For more advanced customization, you can use SQL Server spatial data types and functions to create your own polygons to represent geographical areas, points on a map, or a connected set of points representing a route. Each map can have one or more map layers, each of which contains spatial data for drawing the map, analytical data that will be projected onto the map as color-coded regions or markers, and rules for assigning colors, marker size, and other visualization properties to the analytical data. In addition, you can add Bing Maps tile layers as a background for other layers in your map.
Although you can manually configure the properties for the map and each map layer, the easiest way to get started is to drag a map from the Toolbox window to the report body (if you are using Business Intelligence Development Studio) or click the map in the ribbon (if you are using Report Builder 3.0). This starts the Map Wizard, which walks you through the configuration process by prompting you for the source of the spatial data defining the map itself and the source of the analytical data to display on the map. You then decide how the report should display this analytical data—by color-coding elements on the map or by using a bubble to represent data values on the map at specified points. Next, you define the relationship between the map's spatial data and the analytical data by matching fields from each dataset. For example, the datasets for the map shown in Figure 9-14 have matching fields for the two-letter state codes. In the next step, you specify the field in your analytical data to display on the map, and you configure the visualization rules to apply, such as color ranges. In the figure, for example, the rule is to use darker colors to indicate a higher population.
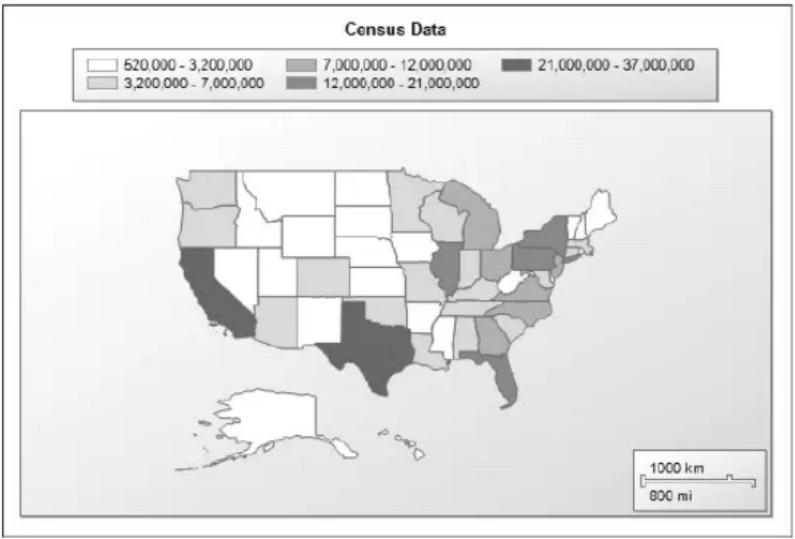
geo
Census Data | Region | Census Range | |---|---| | California | 520,000 - 3,200,000 | | Texas | 7,000,000 - 12,000,000 | | Florida | 21,000,000 - 37,000,000 | | New York | 3,200,000 - 7,000,000 | | Pennsylvania | 12,000,000 - 21,000,000 | | Illinois | 7,000,000 - 12,000,000 | | Ohio | 12,000,000 - 21,000,000 | | Georgia | 12,000,000 - 21,000,000 | | North Carolina | 7,000,000 - 12,000,000 | | Michigan | 520,000 - 3,200,000 | | New Jersey | 3,200,000 - 7,000,000 | | Virginia | 7,000,000 - 12,000,000 | | Washington | 520,000 - 3,200,000 | | Arizona | 12,000,000 - 21,000,000 | | Massachusetts | 12,000,000 - 21,000,00 | | Tennessee | 7,000,000 - 12,000,00 | | Indiana | 520,000 - 3,200,00 | | Maryland | 3,200,000 - 7,666,666 | | Missouri | 7,666,666 - 12,666,666 | | Wisconsin | 524,666 - 3,244,666 | | Colorado | 524,666 - 3,244,666 | | Minnesota | 524,666 - 3,244,666 | | Iowa | 524,666 - 3,244,666 | | Nebraska | 524,666 - 3,244,666 | | Kansas | 524,666 - 3,244,666 | | Oklahoma | 524,666 - 3,244,666 | | Texas | 524,666 - 3,244,666 | | Louisiana | 524,666 - 3,244,666 | | Arkansas | 524,666 - 3,244,666 | | Mississippi | 524,666 - 3,244,666 | | West Virginia | 524,666 - 3,244,666 | | Kentucky | 524,666 - 3,244,666 | | Alabama | 524,666 - 3,244,666 | | Louisiana | 524,666 - 3,244,666 | | Oklahoma | 524,666 - 3,244,666 | | Texas | 524,666 - 3,244,666 | | Utah | 524,666 - 3,244,666 | | Idaho | 524,666 - 3,244,666 | | Nevada | 524,666 - 3,244,666 | | New Hampshire | 524,666 - 3,244,666 | | Maine | 524,666 - 3,244,666 | | Hawaii | 524,666 - 3,244,666 | | Alaska | 524,666 - 3,244,666 | | Hawaii | 524,999 - 378888888888888888888888888888888888888888888888888888888888888888888888888888888888888888888888888888FIGURE 9-14 A map using colors to show population distribution
Reusability
SQL Server 2008 R2 Reporting Services has several new features to support reusability of components. Report developers with advanced skills can build shared datasets and report parts that can be used by others. Then, for example, a business user can quickly and easily pull together these preconstructed components into a personalized report without knowing how to build a query or design a matrix. To help the shared datasets run faster, you can configure a cache refresh schedule to keep a copy of the shared dataset in cache. Last, the ability to share report data as an Atom data feed extends the usefulness of data beyond a single source report.
Shared Datasets
A shared dataset allows you to define a query once for reuse in many reports, much as you can create a shared datasource to define a reusable connection string. Having shared datasets available on the server also helps SQL Server 2008 R2 Report Builder 3.0 users develop reports more easily, because the dataset queries are already available for users who lack the skills to develop queries without help. The main requirement when creating a shared dataset is to use a shared data source. In all other respects, the configuration of the shared dataset is just like the traditional embedded dataset used in earlier versions of Reporting Services. You define the query and then specify options, query parameter values, calculated fields, and filters as needed. The resulting file for the shared dataset has an .rsd extension and uploads to the report server when you deploy the project. The project properties now include a field for specifying the target folder for shared datasets on the report server.
NOTE You can continue to create embedded datasets for your reports as needed, and you can convert an embedded dataset to a shared dataset at any time.
In Report Manager, you can check to see which reports use the shared dataset when you need to evaluate the impact of a change to the shared dataset definition. Simply navigate to the folder containing the shared dataset, click the arrow to the right of the shared dataset name, and select View Dependent Items, as shown in Figure 9-15.

FIGURE 9-15 The shared dataset menu
Cache Refresh
The ability to configure caching for reports has been available in every release of Reporting Services. This feature is helpful in situations in which reports take a long time to execute and the source data is not in a constant state of change. By storing the report in cache, Reporting
Services can respond to a report request faster, and users are generally happier with the reporting system. However, cache storage is not unlimited. Periodically, the cache expires and the next person that requests the report has to wait for the report execution process to complete. A workaround for this scenario is to create a subscription that uses the NULL delivery provider to populate the cache in advance of the first user's request.
In SQL Server 2008 R2 Reporting Services, a better solution is available. A new feature called Cache Refresh allows you to establish a schedule to load reports into cache. In addition, you can configure Cache Refresh to load shared datasets into cache to extend the performance benefit to multiple reports. Caching shared datasets is not only helpful for reports, but also for any dataset that you use to populate the list of values for a parameter. To set up a schedule for the Cache Refresh, you must configure stored credentials for the data source. Then you configure the caching expiration options for the shared dataset and create a new Cache Refresh Plan, as shown in Figure 9-16.
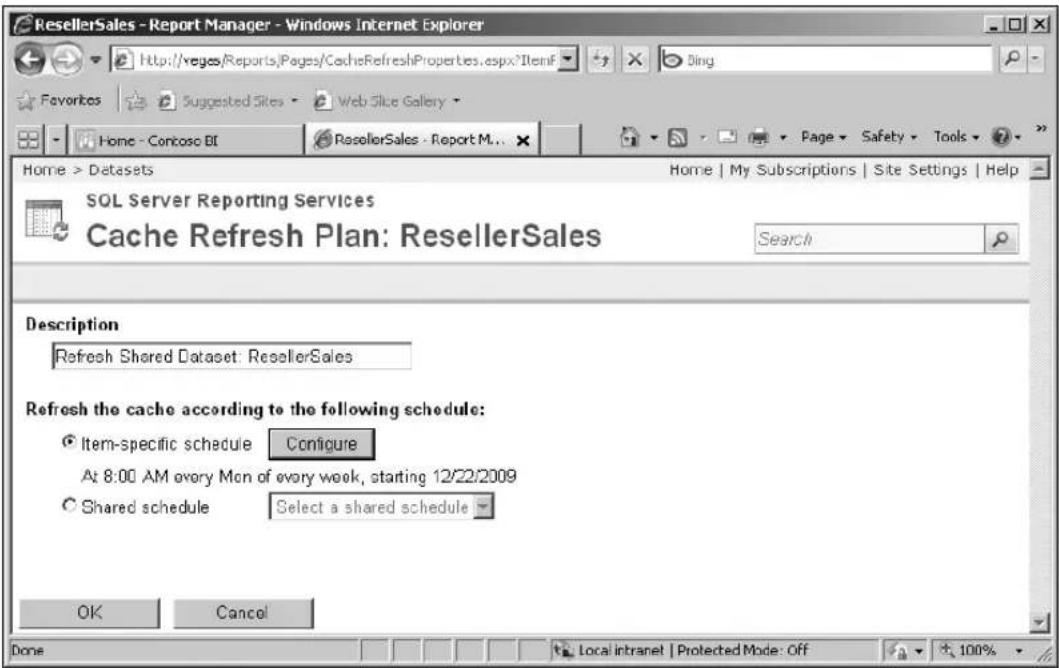
FIGURE 9-16 The Cache Refresh Plan window
Report Parts
After developing a report, you can choose which report items to publish to the report server as individual components that can be used again later by other report authors who have permissions to access the published report parts. Having readily accessible report parts in a central location enables report authors to build new reports more quickly. You can publish any of the following report items as report parts: tables, matrices, rectangles, lists, images, charts, gauges, maps, and parameters.
You can publish report parts both from Report Builder 3.0 and Report Designer in Business Intelligence Development Studio. In Report Designer, the Report menu contains the Publish Report Parts command. In the Publish Report Parts dialog box, shown in Figure 9-17, you select the report items that you want to publish. You can replace the report item name and provide a description before publishing.

FIGURE 9-17 The Publish Report Parts dialog box
When you first publish the report part, Reporting Services assigns it a unique identifier that persists across all reports to which it will be added. Note the option in the Publish Report Parts dialog box in Report Designer (shown in Figure 9-15) to overwrite the report part on the report server every time you deploy the report. In Report Builder, you have a different option that allows you to choose whether to publish the report item as a new copy of the report. If you later modify the report part and publish the revised version, Reporting Services can use the report part's unique identifier to recognize it in another report when another report developer opens that report for editing. At that time, the report author receives a notification of the revision and can decide whether to accept the change.
Although you can publish report parts in Report Designer and Report Builder 3.0, you can only use Report Builder 3.0 to find and use those report parts. More information about Report Builder 3.0 can be found later in this chapter in the "Report Builder 3.0" section.
Atom Data Feed
SQL Server 2008 R2 Reporting Services includes a new rendering extension to support exporting report data to an Atom service document. An Atom service document can be used by any application that consumes data feeds, such as SQL Server PowerPivot for Excel. You can use this feature for situations in which the client tools that users have available cannot access data directly or when the query structures are too complex for users to build on their own. Although you could use other techniques for delivering data feed to users, Reporting Services provides the flexibility to use a common security mechanism for reports and data feeds, to schedule delivery of data feeds, and to store report snapshots on a periodic basis.
The Atom service document contains at least one data feed per data region in the report if a report author has not disabled this feature. Depending on the structure of the data, a matrix that contains adjacent groups, a list, or a chart might produce multiple data feeds. Each data feed has a URL that you use to retrieve the content.
To export a report to the Atom data feed, you click the last button on the toolbar in the Report Viewer, as shown in Figure 9-18.

FIGURE 9-18 Atom Data Feed
The Atom service document is an XML document containing a connection to each data feed that is defined as a URL, as shown in the following XML code:
<?xml version="1.0" encoding="utf-8" standalone="yes" ?>
<service xmlns:atom="http://www.w3.org/2005/Atom"
    xmlns:app="http://www.w3.org/2007/app" xmlns="http://www.w3.org/2007/app">
    <workspace>
    <atom:title>Reseller Sales</atom:title>
    <collection
    href="http://yourserver/ReportServer%2fExploring+Features%2fReseller+Sales&rs%3aCommand=Render&rs%3aFormat=ATOM&rc%3aDataFeed=xAx0x0">
    <atom:title>Tablix1</atom:title>
    </collection>
    </workspace>
</service>
Report Builder 1.0 was the first release of a report development tool targeted for business users. That version restricted the users to queries based on a report model and supported limited report layout capabilities. Report Builder 2.0 was released with SQL Server 2008 and gave the user expanded capabilities for importing queries from other report definition files or for writing a query on any data source supported by Reporting Services. In addition, Report Builder 2.0 included support for all layout options of Report Definition Language (RDL). Report Builder 3.0 is the third iteration of this tool. It supports the new capabilities of SQL Server 2008 R2 RDL including maps, sparklines, and data bars. In addition, Report Builder 3.0 supports two improvements intended to speed up the report development process—edit sessions and the Report Part Gallery.
Edit Sessions
Report Builder 3.0 operates as an edit session on the report server if you perform your development work while connected to the server. The main benefit of the edit session is to speed up the preview process and render reports faster. The report server saves cached datasets for the edit session. These datasets are reused when you preview the report and have made report changes that affect the layout only. If you know that the data has changed in the meantime, you can use the Refresh button to retrieve current data for the report. The cache remains available on the server for two hours and resets whenever you preview the report. After the two hours have passed, the report server deletes the cache. An administrator can change this default period to retain the cache for longer periods if necessary.
The edit session also makes it easier to work with server objects during report development. One benefit is the ability to use relative references in expressions. Relative references allow you to specify the path to subreports, images, and other reports that you might configure as targets for the Jump To action relative to the current report's location on the report server. Another benefit is the ability to test connections and confirm that authentication credentials work before publishing the report to the report server.
The Report Part Gallery
Report Builder 3.0 includes a new window, the Report Part Gallery, that you can enable from the View tab on the ribbon. At the top of this window is a search box in which you can type a string value, as shown in Figure 9-19, and search for report parts published to the report server where the name or the description of the report part contains the search string. You can also search by additional criteria, such as the name of the creator or the date created. To use the report part, simply drag the item from the list onto the report body. The ability to find and use report parts is available only within Report Builder 3.0. You can use Report Designer to create and publish report parts, but not to reuse them in other reports.

FIGURE 9-19 The Report Part Gallery
Report Access and Management
In this latest release of Reporting Services, you can benefit from a few enhancements that improve access to reports and to management operations in Report Manager, in addition to an additional feature that supports sandboxing of the report server environment.
Report Manager Improvements
When you open Report Manager for the first time, you will immediately notice the improved look and feel. The color scheme and layout of this Web application had not changed since the product's first release, until now. When you open a report for viewing, you notice that more screen space is allocated to the Report Viewer, as shown in Figure 9-20. All of the space at the top of the screen has been eliminated.
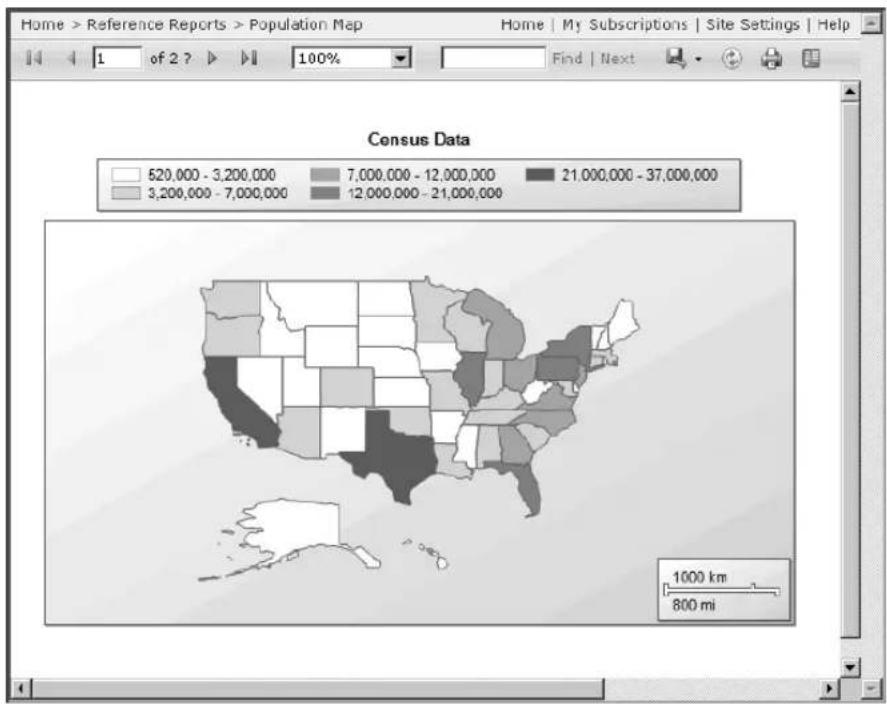
FIGURE 9-20 Report Viewer
Notice also that the Report Viewer does not include a link to open the report properties. Rather than requiring you to open a report first and then navigate to the properties pages, Report Manager gives you direct access to the report properties from a menu on the report listing page, as shown in Figure 9-21. Another direct access improvement to Report Manager is the ability to test the connection for a data source on its properties page.

FIGURE 9-21 The report menu
Report Viewer Improvements
The display of reports is also improved in the Report Viewer available in this release of SQL Server, which now supports AJAX (Asynchronous JavaScript and XML). If you are familiar with earlier versions of Reporting Services, you can see the improvement that AJAX provides by changing parameters or by using drilldown. The Report Viewer no longer requires a refresh of the entire screen, nor does it reposition the current view to the top of the report, which results in a much smoother viewing experience.
Improved Browser Support
Reporting Services no longer supports just one Web browser, as it did when it was first released. In SQL Server 2008 R2, you can continue to use Windows Internet Explorer 6, 7, or 8, which is recommended for access to all Report Viewer features. You can also use Firefox, Netscape, or Safari. However, these browsers do not support the document map, text search within a report, zoom, or fixed table headers. Furthermore, Safari 3.0 does not support the Calendar control for date parameters or the client-side print control and does not correctly display image files that the report server retrieves from a remote computer.
If you choose to use a Web browser other than Internet Explorer, you should understand the authentication support that the alternative browsers provide. Internet Explorer is the only browser that supports all authentication methods that you can use with Reporting Services—Negotiated, Kerberos, NTLM, and Basic. Firefox supports Negotiated, NTLM, and Basic, but not Kerberos authentication. Safari supports only Basic authentication.
NOTE Basic authentication is not enabled by default in Reporting Services. You must modify the RSReportServer.config file by following the instructions in SQL Server Books Online in the topic "How to: Configure Basic Authentication in Reporting Services" at http://msdn.microsoft.com/en-us/library/cc281309.aspx.
RDL Sandboxing
When you grant external users access to a report server, the security risks multiply enormously, and additional steps must be taken to mitigate those risks. Reporting Services now supports configuration changes through the use of the RDL Sandboxing feature on the report server to isolate access to resources on the server as an important part of a threat mitigation strategy. Resource isolation is a common requirement for hosted services that have multiple tenants on the same server. Essentially, the configuration changes allow you to restrict the external resources that can be accessed by the server, such as images, XLST files, maps, and data sources. You can also restrict the types and functions used in expressions by namespace and by member, and check reports as they are deployed to ensure that the restricted types are not in use. You can also restrict the text length and the size of an expression's return value when a report executes. With sandboxing, reports cannot include custom code in their code blocks, nor can reports include SQL Server 2005 custom report items or references to named parameters in expressions. The trace log will capture any activity related to sandboxing and should be monitored frequently for evidence of potential threats.
SQL Server 2008 R2 Reporting Services continues to improve integration with SharePoint. In this release, you find better options for configuring SharePoint 2010 for use with Reporting Services, working with scripts to automate administrative tasks, using SharePoint lists as data sources, and integrating Reporting Services log events with the SharePoint Unified Logging Service.
Improved Installation and Configuration
The first improvement affects the initial installation of Reporting Services in SharePoint integrated mode. Earlier versions of Reporting Services and SharePoint require you to obtain the Microsoft SQL Server Reporting Services Add-in for SharePoint as a separate download for installation. Although the add-in remains available as a separate download, the prerequisite installation options for SharePoint 2010 include the ability to download the add-in and install it automatically with the other prerequisites.
After you have all components installed and configured on both the report server and the SharePoint server, you need to use SharePoint 2010 Central Administration to configure the General Application settings for Reporting Services. As part of this process, you can choose to apply settings to all site collections or to specific sites, which is a much more streamlined approach to enabling Reporting Services integration than was possible in earlier versions.
Another important improvement is the addition of support for alternate access mappings with Reporting Services. Alternate access mappings allow users from multiple zones, such as the Internet and an intranet, to access the same report items by using different URLs. You can configure up to five different URLs to access a single Web application that provides access to Reporting Services content, with each URL using a different authentication provider. This functionality is important when you want to use Windows authentication for intranet users and Forms authentication for Internet users.
RS Utility Scripting
Report server administrators frequently use the rs.exe utility to perform repetitive administrative tasks, such as bulk deployment of reports to the server and bulk configuration of report properties. Lack of support for this utility in integrated mode had been a significant problem for many administrators, so having this capability added to integrated mode is great news.
SharePoint Lists as Data Sources
Increasing numbers of companies use SharePoint lists to store information that needs to be shared with a broader audience or in a standard report format. Although there are some creative ways you could employ to get that data into Reporting Services, custom code was always part of the solution. SQL Server 2008 R2 Reporting Services has a new data extension provider that allows you to access SharePoint 2007 or SharePoint 2010 lists. After you
create the data source using the Microsoft SharePoint List connection type and provide credentials for authentication, you must supply a connection string to the site or subsite in the form of a URL that references the site or subsite. That is, use a connection string such as http://MySharePointWeb/MySharePointSite or http://MySharePointWeb/MySharePointSite/Subsite. A query designer is available with this connection provider, as shown in Figure 9-22, allowing you to select fields from the list to include in your report.

FIGURE 9-22 SharePoint list Query Designer
SharePoint Unified Logging Service
In SharePoint integrated mode, you now have the option to view log information by using the SharePoint Unified Logging Service. After you enable diagnostic logging, the log files capture information about activities related to Reporting Services in Central Administration, calls from client applications to the report server, calls made by the processing and rendering engines in local mode, calls to Reporting Services Web pages or the Report Viewer Web Part, and all other calls related to Reporting Services within SharePoint. Having all SharePoint-related activity, including the report server, in one location should help the troubleshooting process.
Self-Service Analysis with PowerPivot
Many business intelligence (BI) solutions require access to centralized, cleansed data in a data warehouse, and there are many good reasons for an organization to continue to maintain a data warehouse for these solutions. There are even self-service tools available that allow users to build ad hoc reports from this data. But for a variety of reasons, business users cannot limit their analyses to data that comes from the corporate data warehouse. In fact, their analyses often require data that will never be part of the data warehouse, such as miscellaneous spreadsheets or text files prepared for specific needs or data obtained from third parties that might be used only once.
Users can spend a great deal of time gathering data from disparate sources and then manually consolidating and integrating the data in the form of one or more Microsoft Excel workbooks. PivotTables and PivotCharts are popular tools for performing analyses, but Excel requires all the data for these objects to be consolidated first into a single table or to be available in the form of a cube in a SQL Server Analysis Services database. What does the user do when the insight is so useful that the spreadsheet needs to be shared with others on a frequent basis with fresh data?
Sometime users are also constrained by the volume of data that they want to analyze. Excel 2007 can support one million rows of data, but what if the user has data that is more than a million rows? These users need a tool that enables them to analyze huge sets of data without dependence on IT support.
Microsoft SQL Server 2008 R2 comes to the rescue for these users with two new features to meet these needs—SQL Server PowerPivot for Excel 2010 and SQL Server PowerPivot for SharePoint 2010. PowerPivot for Excel gives analysts a way to integrate large volumes of data outside of a corporate data warehouse, whether they are creating reports to support decision making or prototyping solutions that will eventually be part of a larger BI implementation. To provide multiple users with centralized access to reports developed with PowerPivot for Excel, information technology staff can implement PowerPivot for SharePoint. This server-side PowerPivot product provides the necessary infrastructure to manage, secure, refresh, and monitor these PowerPivot reports efficiently.
PowerPivot for Excel is an add-in that extends the functionality of Excel 2010 to support analysis of large, related datasets on your computer. After installing the add-in, you can import data from external data sources and integrate it with local files, and then develop the presentation objects, all within the Excel environment. You save all your work in a single file that is easy to manage and share.
The PowerPivot Add-in for Excel
To create your own PowerPivot workbooks or to edit workbooks that others have created, you must first install the PowerPivot add-in for Excel 2010.
Modifications to Excel
When you install the add-in, several changes are made to Excel. First, the installation adds the PowerPivot menu to the Excel ribbon. Second, it adds the PowerPivot window, a design environment for working with PowerPivot data within Excel. You can use this design environment to import millions of rows of data, which you can later view as summarized results in Excel worksheets.
When you are ready to create a PowerPivot workbook, you click the PowerPivot tab on the Excel ribbon and click the PowerPivot Window button in the Launch group (shown in Figure 10-1) to open the PowerPivot window. The PowerPivot window opens separately from the Excel window, which allows you to switch back and forth as necessary between working with your PowerPivot data and working with the presentation of that data in Excel worksheets.
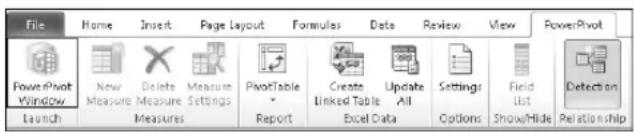
FIGURE 10-1 The PowerPivot Window button in the Excel window
The Local Analysis Services Engine
The add-in also installs a local Analysis Services engine on your computer. Installation also adds the client providers necessary for connecting to Analysis Services. PowerPivot uses the Analysis Services engine to compress and process large volumes of data, which Analysis Services loads into workbook objects.
The Analysis Services engine runs exclusively in-process in Excel, which means that there is no need to manage a separate Windows service running on your computer. This version of Analysis Services uses the new VertiPaq storage mode, which works efficiently with large volumes of columnar data in memory. For example, VertiPaq mode allows you to very quickly sort and filter millions of rows of data. Furthermore, you can store workbooks on your local drive because VertiPaq compresses the data by tenfold on average.
The Atom Data Feed Provider
Last, the add-in installs an Atom data feed provider to allow you to import data from Atom data feeds into a PowerPivot workbook. A data feed provides data to a client application on request. The structure remains the same each time you request data, but the data can change between requests. Usually, you identify the online data source as a URL-addressable HTTP endpoint. The online data source, or data service, responds to requests at this endpoint by returning an atomsvs document that describes how to retrieve the data feed. When you open an atomsvc document, the PowerPivot Atom data feed provider detects the file type and prompts you to load data into PowerPivot. When you confirm the load operation, the provider connects to the data service, which in turn encapsulates the data in XML by using the Atom 1.0 format and sends the data to the provider.
Data Sources
Your first step in the process of developing a PowerPivot workbook is to create data sources and import data into the workbook. You can import data from a variety of external data sources, including relational or multidimensional databases, text files, and Web services. You can also import data by linking to tables in Excel, or simply by copying and pasting data. Each data source that you add to the workbook becomes a separate table.
External Data
When your data comes from an external data source, you use the applicable button in the Get External Data group of the ribbon in the PowerPivot window, as shown in Figure 10-2. The button you choose launches the Table Import Wizard for the type of data that you are importing.

FIGURE 10-2 The Get External Data group in the PowerPivot window
You can choose from a wide variety of data sources:
■ Databases
- SQL Server 2005, SQL Server 2008, SQL Server 2008 R2, and Windows Azure
• Microsoft Office Access 2003, Access 2007, and Access 2010 - SQL Server 2005 Analysis Services, SQL Server 2008 Analysis Services, and SQL Server 2008 R2 Analysis Services
• Oracle 9i, Oracle 10g, and Oracle 11g
• Teradata V2R6 and Teradata V12 -
Informix
-
IBM DB2 8.1
- Sybase
- Any database that can be accessed by using an OLE DB provider or an ODBC driver
■ Files
- Delimited text files (.txt, .tab, and .csv)
- Files from Excel 97 through Excel 2010
- PowerPivot workbooks published to a PowerPivot-enabled Microsoft SharePoint Server 2010 farm
■ Data feeds
• SQL Server 2008 R2 Reporting Services Atom data feeds
- SharePoint lists
• ADO.NET Data Services
- Commercial datasets, such as Microsoft Codename "Dallas" (http://pinpoint.com/en-US/Dallas)
TIP A new feature in SQL Server 2008 R2 Reporting Services is the ability to export an Atom data feed for any report, whether you export from a native mode or from an integrated mode report server. If the PowerPivot client is installed on your computer when you perform the export, PowerPivot detects the document type and opens a wizard for you to use to import the data directly into a table. You might find it beneficial to get some of your data integrated in a report first and take advantage of Reporting Services' support for calculations, aggregations, data sources, and refresh schedules before you bring the data into PowerPivot.
The wizard walks you through the process of specifying connection information for the source and selecting data to import. If your source is a database, you can choose to select either tables or views or to provide a query for the data selection. Regardless of the data source type, the wizard gives you two options for filtering the data before you import it. First, you can select specific columns rather than importing every column from the source table. Second, you can apply a filter to a column to select the row values to include in the import. By applying these filtering options, you can eliminate unnecessary overhead in your workbook, reducing both the file size of the workbook and the amount of time necessary to refresh and recalculate the workbook.
TIP When you are working with large datasets, you should use the filtering options to import only the columns you need for analysis. By limiting the workbook to the essential columns, you can import more rows of data.
Linked Tables
If your data is in an Excel table already, or if you convert a range of data into an Excel table, you can add the table to your workbook in the Excel window and then use the Create Linked Table button to import the data into the PowerPivot window. You can find this button on the PowerPivot ribbon in the Excel window, as shown in Figure 10-3. After the data is available in the PowerPivot window, you can then enhance it by defining relationships with other tables or by adding calculations.

FIGURE 10-3 The Create Linked Table button
One of the benefits of using an Excel table as a source for a PowerPivot table is the ability to change the data in the Excel table to immediately update the PowerPivot table. Because you cannot make changes to data in the PowerPivot window, a linked table is the quickest and easiest way to edit the data in a PowerPivot table. It is also a great way to try out different values in "what-if" scenarios or to use variable values in a calculation.
Another reason you might consider using a linked table is to support Time Intelligence functions in PowerPivot's formula language. Examples of Time Intelligence functions include TotalMTD, StartOfYear, and PreviousQuarter. Often, source data includes dates and times but does not have the corresponding attributes to describe these dates and times, such as month, quarter, or year. You can create your own table in Excel with the necessary attributes, link it to PowerPivot, and then use Time Intelligence functions to support analysis involving comparative time periods.
Copying and Pasting
If you do not need to change data after importing into PowerPivot, you can copy the data from another Excel workbook and then in the PowerPivot window, click the Paste button in the Clipboard group of the PowerPivot ribbon. The Paste preview dialog box displays to shows the data to be pasted into PowerPivot. Although you cannot directly edit the data after adding it to PowerPivot, you can replace it by pasting in fresh data or add to it by appending additional data. To do this, you use the Paste Replace or Paste Append button, respectively.
Data Preparation
After importing data into tables, your next step is to prepare the data for analysis by defining relationships between tables. You can also choose to enhance the data by applying filters and modifying column properties.
Relationships
By building relationships between the data, you can analyze the data as if it all came from a common source. Relationships enable you to use related data in the same PivotTable even though the underlying data actually comes from different sources. Defining relationship between columns into two PowerPivot tables is similar to defining a foreign key relationship between two columns in a relational database. Excel power users can understand defining relationships as analogous to using the VLOOKUP function to reference data elsewhere.
In addition to consolidating data for PivotTables, there are other benefits of building relationships. You can filter data in a table based on data found in related columns, or you can use the formula language to perform a lookup of values in a related column. These techniques provide alternative ways to eliminate data redundancy, which keeps the workbook smaller.
When you import related tables at the same time, the Table Import Wizard automatically detects that they are related and creates the detected relationships. You can also manually create relationships by using the Create Relationship button on the Design tab of the Power-Pivot ribbon, as shown in Figure 10-4.
NOTE A column cannot participate in more than one relationship, and you cannot create circular relationships.

FIGURE 10-4 The Create Relationship button
Filters
After you import data into PowerPivot, you cannot delete rows from the resulting PowerPivot table. To keep your workbook as small as possible, you should apply filters during the import process to exclude unneeded rows right away. After completing the import, you can modify the table properties to add a filter, and then update the table to keep only rows that meet the filter criteria.
You can also apply filters to the imported data if you want the data to be available for other purposes later, while hiding specific rows from the presentation layer in the current report. You can filter by name in the same way that you normally filter in Excel, by selecting from a list of values in a column to identify the rows that you want to keep. As an alternative, you can filter a numeric column by value, as shown in Figure 10-5. For example, you can use the Between operator to apply a filter that will select rows with a value in a range that you specify.
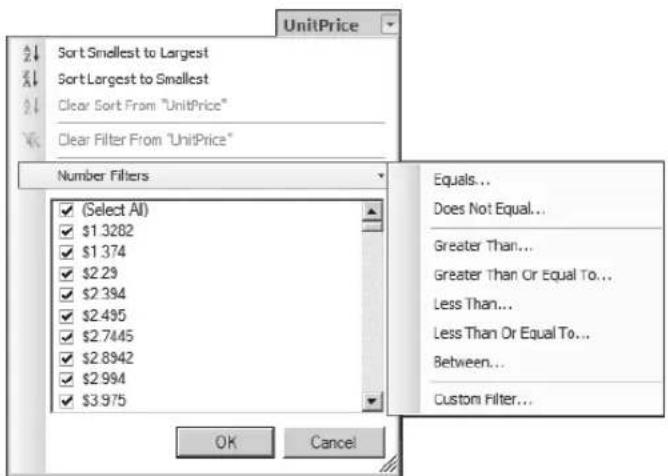
FIGURE 10-5 Filtering a numeric column by value
IMPORTANT Use of a filter is not a security measure. Although a filter effectively hides data from a presentation, anyone who can open the Excel workbook can also clear the filters and view the data if he or she has installed the PowerPivot add-in.
Columns
As part of the data preparation process, you might need to make changes to column properties. On the Home tab of the PowerPivot ribbon, you can access tools to make some of these changes, as shown in Figure 10-6. For example, you can select a column in the table and then use the ribbon buttons to change the formatting of the column. You can also change the width of the column for better viewing of its contents, or you can freeze a column to make it easier to explore the data as you scroll horizontally.

FIGURE 10-6 The Home tab of the PowerPivot ribbon
Although the Table Import Wizard detects and sets column data types, you can use the Data Type drop-down list on the ribbon to change a data type if necessary. You might need to adjust data types to create a relationship between two tables, for example. PowerPivot supports only the following data types:
Currency
■ Decimal Number
Text
■ TRUE/FALSE
■ Whole Number
You can use the Hide and Unhide button on the Design tab (shown in Figure 10-4) to control the appearance of a column in the PowerPivot window and also in the PivotTable Field List. For example, you might choose to display a column in the PowerPivot window, but hide that column in the PivotTable window because you want to use it in a formula for a calculated column.
PowerPivot Reports
A PowerPivot report is an Excel worksheet that presents your PowerPivot data in a summarized form by using at least one PivotTable or PivotChart. You can convert a PivotTable to a collection of cube function formulas if you prefer a free-form layout of your PowerPivot data. Regardless of which layout you choose for the report, you can add slicers to support interactive filtering.
PivotTables
You create a report by selecting a layout template from the PivotTable menu (available from the PivotTable button on the PowerPivot ribbon, as shown in Figure 10-7) and specifying a target worksheet in the Excel workbook. You can create a layout independently of the available templates by selecting Single PivotTable or Single PivotChart as many times as you need and targeting a different location on the same worksheet for each object.
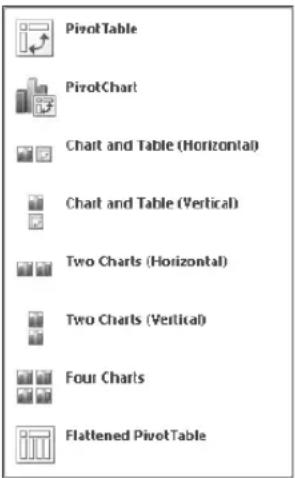
FIGURE 10-7 Report layout templates
NOTE The standard Excel ribbon also includes buttons for building a PivotTable or PivotChart, but you must use the buttons on the PowerPivot ribbon when you want to use PowerPivot data.
Assume that you select the Chart And Table (Horizontal) template. Placeholders for the chart and table appear on the worksheet, and a new worksheet appears in the workbook to
store the data that you selected for the chart. Just as you do with a standard PivotTable or PivotChart, you select the placeholder and then use the associated field list to select and arrange fields for the selected object, as shown in Figure 10-8.
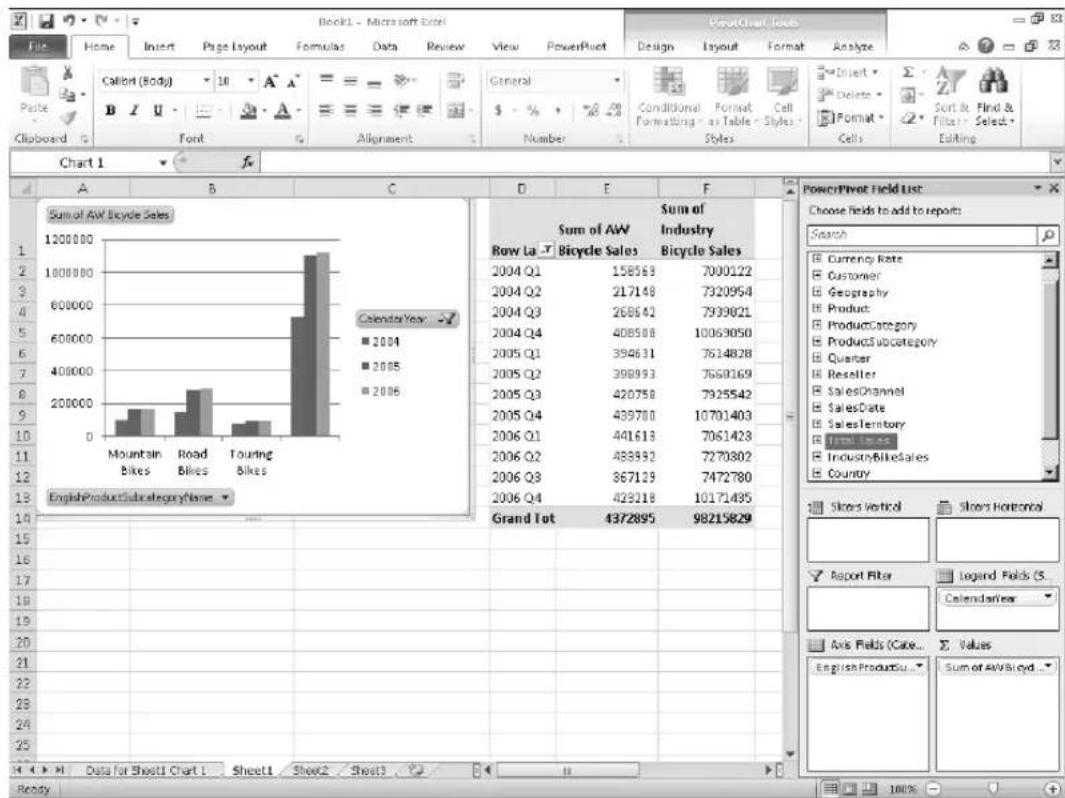
bar
| Year | Mountain Bikes | Road Bikes | Touring Bikes | | :--- | :--- | :--- | :--- | | 2004 | 158563 | 7000122 | 2004 Q1 | | 2004 | 217148 | 7320954 | 2004 Q2 | | 2004 | 268642 | 7939821 | 2004 Q3 | | 2004 | 408508 | 10063050 | 2004 Q4 | | 2005 | 394631 | 7614828 | 2005 Q1 | | 2005 | 398993 | 7669169 | 2005 Q2 | | 2005 | 420758 | 7925542 | 2005 Q3 | | 2005 | 439780 | 10701403 | 2005 Q4 | | 2006 | 441613 | 7061423 | 2006 Q1 | | 2006 | 488992 | 7277382 | 2006 Q2 | | 2006 | 367129 | 7472780 | 2006 Q3 | | 2006 | 429218 | 10171495 | 2006 Q4 | Grand Tot: 4372895, 98215829 Sum of AW Industry Bicycle Sales Sum of AW Industry Bicycle Sales EnglishProductSubcategoryName PowerPrivat Field List: Choose fields to add to report: Search Currency Rate Customer Geography Product ProductCategory ProductSubcategory Quarter Reseller SalesChannel SalesDate SalesTerritory Total Sales IndustryBikesSales Country Slices Vertical Slices Horizontal Report Filter Legend Fields (S) CalendarView Axis Fields (Cake... English Productsu... Sum of AWBlycyld Data for Sheet1 Chart I Sheet1 Sheet2 Sheet3FIGURE 10-8 A PivotChart and PivotTable report
Cube Functions
As an alternative to the symmetrical layout of a PivotTable, you can use cube functions in cell formulas to arrange PowerPivot data in a free-form arrangement of cells. Cube functions, introduced in Excel 2007, allow you to query an Analysis Services database and return metadata or values from a cube. Because PowerPivot creates an in-memory version of an Analysis Services database, you can also use cube functions with your PowerPivot data.
Although you can create a formula that uses a cube function in any cell in your PowerPivot workbook, the simplest way to get started with these functions is to convert an existing PivotTable. To do this, click the OLAP Tools button on the Options tab under PivotTable Tools, and click Convert To Formulas. The conversion replaces the row and column labels with a formula using the CUBEMEMBER function and replaces values with the CUBEVALUE function, as shown in Figure 10-9. The first argument of either of these functions references the data connection, which by default is Sandbox for embedded PowerPivot data. All other arguments are pointers to dimension member names that define the coordinates of the value to retrieve from the in-memory cube.

FIGURE 10-9 The CUBEVALUE function
Slicers
The task pane for PowerPivot is similar to the one you use for an Excel PivotTable, but it includes two additional drop zones for slicers. Slicers are a new feature in Excel 2010 that can be associated with PowerPivot. Slices work much like report filters but link to multiple objects, such as a PivotTable and a PivotChart, so that the slicer selection can filter an entire report. If two slicers are related, a selection of items in one slicer automatically highlights and filters the related items in the second slicer. For example, if you select a year in one slicer, the quarters related to that year in a second slicer will also be selected, as shown in Figure 10-10.
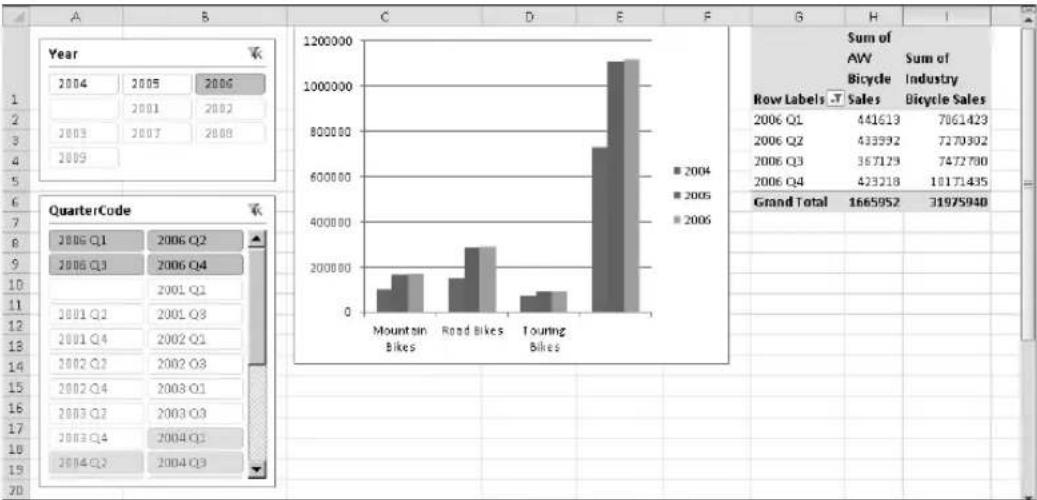
bar
| Year | Month | Mountain Bikes | Road Bikes | Touring Bikes | | :--- | :--- | :--- | :--- | :--- | | 2004 | Q1 | 100000 | 180000 | 720000 | | 2004 | Q2 | 150000 | 300000 | 1120000 | | 2004 | Q3 | 80000 | 90000 | 1120000 | | 2004 | Q4 | 100000 | 100000 | 1120000 | | 2005 | | 180000 | 300000 | 1120000 | | 2005 | | 150000 | 350000 | 1120000 | | 2005 | Q1 | 180000 | 350000 | 1120000 | | 2005 | Q2 | 150000 | 350000 | 1120000 | | 2005 | Q3 | 85000 | 95555 | 112555 | | 2005 | Q4 | 185555 | 185555 | 112555 | | 2006 | | 185555 | 355555 | 112555 | | 2006 | Q1 | 185555 | 355555 | 112555 | | 2006 | Q2 | 185555 | 355555 | 112555 | | 2006 | Q3 | 185555 | 355555 | 112555 | | 2006 | Q4 | 185555 | 355555 | 112555 | Grand Total: 1665952 (3197594)FIGURE 10-10 Selecting Year slicer values also selects QuarterCode slicer values.
Data Analysis Expressions
The ability to combine data from multiple sources into a single PivotTable is amazingly powerful, but you can create even more powerful reports by enriching the PowerPivot data with Data Analysis Expressions (DAX) to add custom aggregations, calculations, and filters to your report. DAX is a new expression language for use with PowerPivot for Excel. DAX formulas are similar to Excel formulas. However, rather than working with cells, ranges, or arrays as in Excel, DAX works only with tables and columns. You can use DAX either to create calculated columns or to create new measures.
Calculated Columns
A calculated column is the set of values resulting from an expression that you apply to a table column or another calculated column. For example, you can concatenate values from two separate columns to produce a single string value that displays in a third column. You can also perform mathematical operations, manipulate strings, look up values in related tables, or compare values to produce results in a calculated column. To add a calculated column, click an empty cell under the Add Column column heading and type an expression in the formula bar. In your report, you can use the new calculated column just like any other column from your PowerPivot data. An expression that calculates gross profit looks like this:
=[Sales Amount]-[Total Product Cost]
Measures
A measure is a dynamic calculation that is displayed in the value area of the PivotTable. Its value depends on the current selection of items in rows and columns and in the report filter. A measure differs from a calculated column in that the calculated column values persist in the PowerPivot data whereas the measure values calculate at query time and do not persist in the data store. The calculated column values are scalar, and the measure values are aggregates. Last, a calculated column may contain string values or numeric values, but a measure is always a numeric value.
As an example, consider a calculated column that shows gross profit. The PowerPivot table would include a gross profit value for each sales transaction, which a PivotTable can later aggregate. However, if you create a calculated column to store a gross profit margin percentage value, the aggregate in the PivotTable will not be correct because percentage values are not additive.
To create a measure, you must first create a PivotTable or PivotChart. In the Excel window, select the PivotTable or PivotChart, and then click the New Measure button on the Power-Pivot tab of the ribbon. You then provide a name for the measure for all PivotTables in the
report, provide a name for the current PivotTable if you want, and then specify the formula for the measure, as shown in Figure 10-11.
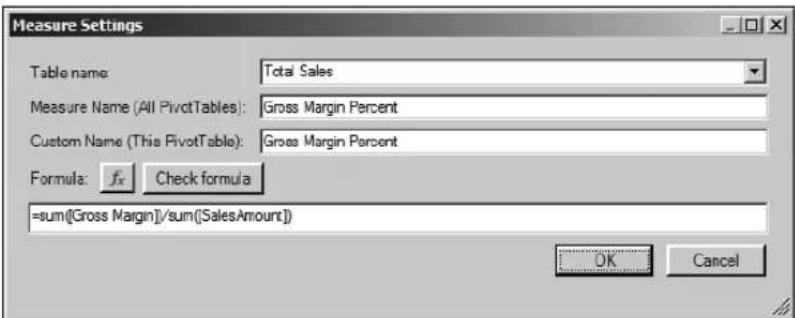
FIGURE 10-11 Measure settings
DAX Functions
The examples shown for a calculated column and a measure are very basic, although representative of the common ways that you would use DAX. Table 10-1 lists the types of functions that DAX provides:
TABLE 10-1 DAX Function Types
| FUNCTION TYPE EXAMPLE DESCRIPTION | ||
| Date and time | =WEEKDAY([OrderDate],1) | Returns the number of the weekday where Sunday = 1 and Saturday = 7 |
| Filter and value | =FILTER(ProductSubcategory,[EnglishProductSubcategoryName] = "Road Bikes") | Returns a subset of a table based on the filter expression |
| Information | =IsNumber([OrderQuantity]) | Returns TRUE if the value is numeric and FALSE if it is not |
| Logical | =IF([OrderQuantity]<10,"low",IF([OrderQuantity]<100,"medium","high")) | Returns the second argument's value if the first argument's condition is TRUE and otherwise returns the third argument's value |
| Math and trig | =ROUND([SalesAmount] *[DiscountAmount],2) | Returns the value of the first argument rounded to the number of digits specified in second argument |
FUNCTION TYPE EXAMPLE DESCRIPTION
| Statistical | =AVERAGEX(ResellerSales,[SalesAmount]-[TotalProductCost]) | Evaluates the expression in thesecond argument for each row ofthe table in the first argument, andthen calculates the arithmetic mean |
| Text | =CONCATENATE([FirstName],[LastName]) | Returns a string that joins two textitems |
| Time Intelligence | =DATEADD([OrderDate],10,day) | Returns a table of dates obtainedby adding the number of daysspecified in the second argument(or other period as specified bythe third argument) to the columnspecified in the first argument |
PowerPivot for SharePoint
PowerPivot for SharePoint provides server-side support for PowerPivot workbooks by extending the capabilities of SharePoint and Excel Services in SharePoint. SharePoint provides centralized management of the PowerPivot workbooks, and Excel Services manages data queries and the rendering of the query results in the browser. Installation of PowerPivot for SharePoint adds services to the SharePoint farm and includes a document library template, content types, dashboards, and Web parts that provide access to PowerPivot reports and support monitoring their usage.
Architecture
PowerPivot for SharePoint requires SharePoint Enterprise Edition and Excel Services. You must install Analysis Services with SharePoint Integration on a SharePoint Web front end. In SharePoint Central Administration, you configure the PowerPivot System Service and activate the PowerPivot feature on the target site collection. PowerPivot for SharePoint uses a scalable architecture (shown in Figure 10-12) that allows you to add or remove instances as needed when you require more or less processing capacity. When you add an instance, the SharePoint autodiscovery feature ensures that the new instance can be found, and the PowerPivot System Service has a load balancing feature that will use the new instance when possible.

flowchart
graph TD
    A["Browser-View reports"] --> B["Web front end Application server"]
    C["Excel 2010 with PowerPivot-View or create reports"] --> B
    B --> D["PowerPivot System Service"]
    B --> E["Analysis Services-VertiPaq Mode"]
    D --> F["PowerPivot database"]
    E --> F
    B --> G["Excel Web Access"]
    B --> H["Excel Web Service"]
    B --> I["PowerPivot Web Service"]
    G --> J["Excel Calculation Services"]
FIGURE 10-12 PowerPivot for SharePoint Architecture
Analysis Services in VertiPaq Mode
To support users without the PowerPivot for Excel client, Excel Services connects to a server instance of Analysis Services in VertiPaq mode to process PowerPivot workbooks and respond to user queries. This type of Analysis Services server instance enables in-memory data storage on a large scale for multiple users and provides rapid processing of large PowerPivot data sets. Just like the in-memory version of VertiPaq mode on the client, the server version uses data compression and columnar storage. Unlike a standard Analysis Services instance that you manage using SQL Server Management Studio, you manage Analysis Services in VertiPaq mode exclusively in SharePoint Central Administration.
In response to requests for PowerPivot data, Analysis Services loads the cube into memory where it stays until no longer required or until SharePoint monitoring detects that contention for resources has reached a threshold requiring action. You can monitor system performance through usage data, as explained later in this chapter. Analysis Services loads the PowerPivot data from the workbook as raw, unaggregated data into the cube, compresses the data, and dynamically restructures the data based on the user's actions.
The PowerPivot System Service
The PowerPivot service runs as a service application on SharePoint called PowerPivot System Service. A service application is configurable independently of other service applications and isolates service application data. You can install one physical instance of a server but then create multiple service applications to isolate data at the application level. Another benefit of the service application model is the ability to delegate administration.
The PowerPivot System Service listens for requests for PowerPivot data, connects to Analysis Services to manage the loading and unloading of PowerPivot data, collects usage data, and monitors system health and availability of Analysis Services servers. It also provides load
balancing across servers for query processing if multiple servers are available. Furthermore, the PowerPivot System Service manages the connections for active, reusable, and cached connections to PowerPivot workbooks, as well as administrative connections to other PowerPivot System Services on the SharePoint farm.
To speed up access to data, the PowerPivot System Service caches a local copy of a work-book and stores it in Program Files\Microsoft SQL Server\MSAS10_50.POWERPIVOT\OLAP\Backup. The service unloads this copy of the workbook from memory if no one has accessed the workbook after 48 hours and deletes it from the folder after an additional 72 hours of inactivity. If a user updates the workbook in SharePoint and a copy of the workbook already exists in the cache, the PowerPivot System Service also removes the older cache copy.
The PowerPivot Database
Each service application has its own relational database, called the PowerPivot database. In particular, this PowerPivot database stores the load or cache status of workbooks, server usage information, and schedule information for data refresh operations. More specifically, the application database stores an instance map that identifies whether a workbook is currently loaded on the server or in the cache. Usage information in the application database applies to connections, query response times, load and unload events, and other information pertinent to server health statistics. The data refresh schedule information includes details about data sources, users, and the workbooks associated with a schedule. None of the workbook content is in the PowerPivot database. Instead, workbooks are stored in the SharePoint content database.
The PowerPivot Web Service
The PowerPivot Web Service is a thin middle-tier connection manager implemented as a Windows Communication Foundation (WCF) Web service that runs on a SharePoint Web front end. The Web service listens on the port assigned to a Web application enabled for PowerPivot, and responds to requests by coordinating the request-response exchange between client applications and PowerPivot for SharePoint instances in the farm. This Web service requires no separate configuration or management.
The PowerPivot Managed Extension
The PowerPivot Managed Extension is an assembly in the Analysis Services OLE DB provider client. This provider client is installed on a client computer when you install the PowerPivot for Excel add-in, and on the SharePoint server when you install PowerPivot for SharePoint. For managed connections, the Web service and the managed extension operate the same way. The query processing request determines which one is used.
Content Management
Content management for PowerPivot is quite simple because the data and the presentation layout are kept in the same document. If they weren't, you would have to maintain separate files in different formats and then manually integrate them each time one of the files required replacement with fresh data. By storing the PowerPivot workbooks in SharePoint, you can reap the benefits applicable to any content type, such as workflows, retention policies, and versioning. For example, you can copy data to a new location by copying the document. Or if you need to formally approve data before allowing others to access it, you can easily set up a document approval workflow.
The PowerPivot Gallery
The PowerPivot Gallery is a special type of document library that provides document management capabilities for PowerPivot workbooks. You can use it to preview and open PowerPivot workbooks from a central location. In the PowerPivot Gallery, shown in Figure 10-13, you can see all available sheets in the workbook as thumbnails with current data, without opening the workbook. A snapshot service creates the thumbnail images by periodically reading the workbooks file.

FIGURE 10-13 The PowerPivot Gallery
In addition to the default Gallery view, the PowerPivot Gallery also includes the Theater and Carousel views, which are most useful when you want to highlight a small number of workbooks. In Theater view, you can see a central preview area, and thumbnails of the other reports in the workbook display at the bottom of the page. In Carousel view, the thumbnails appear to the left and right of the preview area. In either of these views, you can click the left
or right arrow to bring a different thumbnail into the preview area. You can also switch to All Documents view, which allows you to see all the workbooks in a standard document library view. You can then download a document, check documents in or out, or perform any other activity that is permissible within a document library.
The Data Feed Library
A special type of document library is available for the storage of Atom svc documents, also known as data service documents. You can share these documents for the use of other PowerPivot authors who want to import data feeds into PowerPivot tables. You can create a data service document in the document library by specifying the URL request to the data service or Web application that serves data on request. The URL request should include a parameter that requests data in the Atom 1.0 format.
Data Refresh
In addition to the content management support, another good reason to share a PowerPivot workbook in SharePoint is to manage the data refresh process. Usually, data that appears in a PowerPivot table changes from time to time. To keep the workbook up to date and relevant, you must periodically update the data. You can automate this process by assigning a refresh schedule to each data source in the workbook.
The data refresh feature is not enabled by default. When you enable data refresh, a timer job runs every minute on the PowerPivot server. This job is a trigger for the PowerPivot System service, which in turn reads the predefined schedule found in the PowerPivot database. When a schedule to run is found, the PowerPivot System Service gets the list of data sources and the credentials to use, and initiates the data refresh. If the workbook is not checked out or in edit mode, the data refresh job saves the new data to the workbook.
Linked Documents
Your PowerPivot workbook can be used as a data source for other report types. When viewing the workbooks in the PowerPivot Gallery, you can use the Create Linked Document button to create either a Reporting Services report or a PowerPivot report in Excel. You must have the appropriate client application for the report type that you choose. That is, to build a Reporting Services report, you must first install SQL Server 2008 R2 Report Builder 3.0, and to build a PowerPivot report, you must install the PowerPivot for Excel add-in. The query designer in Report Builder and the Field List in Excel display only the fields presented in the source workbook rather than all fields available in that workbook's embedded data.
The PowerPivot Web Service
Another way to use a PowerPivot workbook as a data source is by using the PowerPivot Web Service to connect to the embedded data. That way, you can reuse the data in multiple places without having to duplicate all the effort required to create the initial workbook. Any client
application that can connect to Analysis Services directly can use the PowerPivot Web Service. You simply use the SharePoint URL for the workbook instead of an Analysis Services server name in the connection string of the provider. For example, if you have a workbook named Bike Sales.xlsx in the PowerPivot Gallery located at http://
The PowerPivot Management Dashboard
PowerPivot for SharePoint includes several tools for configuring the service application and for monitoring usage in a management dashboard. All management tools are accessible to farm and service administrators in Central Administration. The easiest way to access settings related to PowerPoint for SharePoint is to use the PowerPivot Management Dashboard.
The PowerPivot Management Dashboard displays data for one service application at a time. In this dashboard, you can see a collection of Web parts and PowerPivot reports that display data that is collected daily from multiple sources. One of the Web parts displays a chart showing CPU and memory usage over time to help you determine whether the server is running at maximum capacity or whether it is underutilized. Another Web part shows trending of query response times, which you can use to determine whether queries are responding within configurable thresholds. The dashboard page includes links to the PowerPivot reports that provide the source data for these Web parts. These reports consist of data from an internal reporting database that in turn collects data from the PowerPivot database, SharePoint usage log data, and other sources. You can build new reports using this internal reporting database as a source, but you cannot change it.
In addition to giving you information about the state of the server, the dashboard also provides insight into the usage of published workbooks. An interactive chart allows you to monitor which workbooks users access most frequently and which workbooks have recent activity. You can view this information at the daily or weekly level.
One section of the dashboard provides information about data refresh activity, providing a single location from which you can verify whether data refreshes are occurring as scheduled. One Web part in this section lists recent activity for data refresh jobs by workbook and also includes the job duration. Another Web part lists the workbooks for which the data refresh job fails, and displays the data refresh error message as a tooltip.
The dashboard is also extensible. It includes a link to add new items, which you can use to add more workbooks to access from the dashboard page. For example, you can create a new PowerPivot workbook by using the Usage workbook as a data source, and then upload your workbook to the same document library.
Last, the dashboard page includes links to pages in Central Administration that you can use to check or reconfigure the settings for PowerPivot. One link takes you to the service settings page, where you can schedule database timeouts, data refresh hours, and query response time thresholds. You can use another link to review timer job settings for data refresh, dashboard processing, PowerPivot configuration, and the health statistics collector. A third link takes you to the settings page for usage log collection.
Index
A
adapter base classes, 151
AdapterFactory objects, 152
adapters, for CEP applications, 151-154
Admin Console, 122
aggregate functions, 168
AJAX, 186
Analysis Services engine, 123, 190
annotating transactions in MDS, 134
application errors, monitoring, 122
applications, data-tier. See DACs (data-tier applications)
arrays, converting comma-separated lists of values into, 167
Atom data feed
exporting reports to, 182
importing data into PowerPivot workbook, 191
authentication
Extended Protection for, 10
in MDS (Master Data Services), 127
authorization (MDS), 138
Azure, 9
B
Backup node, 114
Best Practices Analyzer (BPA)
overview of, 11
running, 71
binding query templates, 162
Bing Maps tile layers as backgrounds, 177
browser support for Reporting Services, 186
built-in fields, 170
business intelligence (BI) integration, 123
business rules (MDS), 132-133
C
Cache Refresh (reports), 179-180
calculated columns, 199
capacity planning, 25
Carousel view (PowerPivot Gallery), 204-205
class library (MDS), 142-143
Cluster Shared Volumes (CSV). See CSV (Cluster Shared Volumes)
collections (MDS), 130
comma-separated lists of values, converting into arrays, 167
Compact edition, 14
complex event processing (CEP). See also StreamInsight adapters, 151-154
application development cycle, 150
application language, 146
applications for, 145-146
defined, 145
diagnostic views, 163
filtering operation, 155
input adapters, 148
output adapters, 149
overview of, 145
projection operation, 155
query instances, 149
query templates, 154
server, 147-149
compression, Unicode, 10
compute node, 114-115, 118
connecting to UCPs, 33-34, 89
consolidation
of databases, 86
goals of, 85
management strategies, 5
with virtualization, 87-88
control node, 112-113
control racks, 112
count windows, 159
CPU
overutilized, 92
upgrading online, 63
CREATE DATABASE statement, 118
Create Package wizard, 142
CREATE REMOTETABLE statement, 120
CREATE TABLE statement, 118-120
Create Utility Control Point Wizard, 26-28
CSV (Cluster Shared Volumes). See also failover clustering
adding storage to, 76
enabling, 76
overview of, 64
storage location, 76
cube functions, 197
D
DAC file packages, 45
DACs (data-tier applications)
benefits of, 44
configuration options, 53
defined, 41
definition registration, 49
definition storage, 43
deleting, 56-58
deploying, 4, 45, 52-55
detaching database, 56
extracting, 49-51
generating, 43
importing, 47-48
life cycle of, 42-43
monitoring, 93-94, 100-105
project templates, 45-46
properties, setting, 49-50
red or yellow icons, 45
registering, 55-56
SQL Server objects supported in, 44-45
upgrading, 59-61
uses for, 43
Visual Studio deployment of, 45-46
dashboard, PowerPivot, 206
Data Analysis Expressions (DAX), 199-201
data bars, 175
data colocation, 114-115
data feed, Atom
exporting reports to, 182
importing data into PowerPivot workbook, 191
data feed libraries, 205
Data Movement Service (DMS), 112
data racks, 111
data sources
joining, 166-168
for PowerPivot for Excel, 191-193
data stewards, 127
data types
supported in Parallel Data Warehouse, 120
supported in PowerPivot, 195
data warehouse appliances, 109-110. See also Parallel
Data Warehouse
database consolidation, 86
database creation, 118
database objects, managing, 122
Datacenter edition, 12
datasets. See also PowerPivot for Excel; PowerPivot for SharePoint
combining data from multiple, 166-168
importing large, 192
shared, 179
data-tier applications (DACs). See DACs (data-tier applications)
Data-Tier Applications viewpoint (Utility Explorer), 100-105
DAX (Data Analysis Expressions), 199-201
DDL extensions, 117
default policies, restoring, 36
definitions, DAC
registering, 49
storing, 43
Delete Data-Tier Application Wizard, 56-58
Deploy Data-Tier Application Wizard, 52-55
deploying DACs, 45
configuration options, 53
with Deploy Data-Tier Application Wizard, 52-55
overview of, 4
report for, 54
in Visual Studio 2010, 45-46
deploying StreamInsight, 149-150
deploying UCPs
with Create Utility Control Point Wizard, 26-28
prerequisites for, 25, 26
report, saving, 28
with Windows PowerShell, 28
detaching DAC database, 56
Developer edition, 13
diagnostic views (StreamInsight), 163
disconnecting from UCPs, 34
disk space consumption, 25
disk space requirements, 15
DMS (Data Movement Service), 112
document libraries, 204-205
DomainScope property (reports), 173
DWLoader, 122
Dwsql, 122
dynamic report formatting, 169-170, 172-173
dynamic virtual machine storage, 64
E
edge event model, 147
edit sessions, 183
enrolling instances, 29-32
enterprise data warehousing. See Parallel Data Warehouse
Enterprise edition, 12, 29
entities (MDS), 129-130
event classification, 154
event stream objects, 154 aggregation operations, 159-160 consumer objects, 162
event types, 150-151
event windows, 156-159
Excel add-ins. See PowerPivot for Excel
Excel tables, linking to PowerPivot tables, 193
Excel workbooks, 173, 193
exporting master data, 136-137
exporting tables, 120
Express edition, 13
expression language, 165-171. See also Data Analysis Expressions (DAX)
expressions, 183
Extended Protection for Authentication, 10
Extract Data-Tier Application Wizard, 45, 49-51
extracting DACs (data-tier applications), 49-51
F
Failover Cluster Manager, 80
failover clustering. See also CSV (Cluster Shared Volumes) benefits of, 65
best practices compliance, testing, 11, 71
connecting by multiple networks, 65
enhancements in Windows Server 2008, 63
guest model, 67-68
history of, 64-65
traditional model, 65
troubleshooting, 70
validating prerequisites for, 68-70
feedback on book, xix
file space utilization monitoring, 96
filtering operation, 155
filtering PowerPivot data, 192, 194
formatting reports dynamically, 169-170, 172-173
free edition. See Express edition
functions
aggregate, 168
cube, 197
Lookup, 166
LookupSet, 168
MultiLookup, 167
Split, 167
Time Intelligence, 193
Transact-SQL, 143-144
G
Generate And Publish Scripts Wizard, 9
global monitoring settings, 34
guest failover clustering, 67-68
H
hardware, upgrading online, 63
hardware requirements, 14-15
headers and footers, 170
high availability enhancements, 63-64
hopping windows stream, 157
hot adding hardware, 63
hub-and-spoke architecture, 115
Hyper-V. See also Live Migration; virtualization benefits of, 74
on guest failover clustering, 67-68
improvements in, 11
overview of, 64
system requirements for, 73-74
uses for, 74
virtual machines, creating with, 76-79
Hyper-V Integration Services tool, 79
|
importing master data, 135
indicators in reports, 176-177
InfiniBand network, 110, 112
in-place upgrades, 16-17
input adapters, base classes, 151
installing MDS (Master Data Services), 127
instances. See also managed instances; SQL Server instances
enrolling, 29-32
utilization, monitoring, 91
validating, 31
viewing, 91
Integration Services, 123
InteractiveSize property (reports), 172
Internet Explorer requirement, 15
interval event model, 147
J
join operations, 161
L
Landing Zone node, 114
linked documents, 205
linked tables, 193
LINQ expressions, 155
Live Migration. See also Hyper-V
benefits of, 87-88
configuring virtual machines for, 79-82
implementing, 75
initiating, 83
overview of, 64, 72
load activity, monitoring, 122
look-and-feel properties, 169-170
Lookup function, 166
LookupSet function, 168
M
managed instances. See also instances; SQL Server instances
global policies for, 34
health status of, 91
maximum number of, 29
overutilized resources, 92
processor utilization, 96
underutilized resources, 92
viewing, 91
Managed Instances viewpoint (Utility Explorer), 95-100
management node, 114
management utilities. See Best Practices Analyzer (BPA); SQL Server Utility
ManagementService API, 163
maps, 177-178
massively parallel processing (MPP), 9
master data, 125-126
Master Data Manager
areas in, 128-129
batch creation, 135-136
data maintenance with, 131
data stewards, 127
model deployment, 142
subscription view, creating, 136
Master Data Services Configuration Manager, 128
MDS (Master Data Services)
API, 127, 142-143
authentication, 127
authorization, 138
business rules, 132-133
class library, 142-143
configuring, 128
data stewards, 127
database, 128
as development platform, 142
exporting master data, 136-137
flexibility of, 126
importing master data, 135
installing, 127
locking data in, 139-140
master data hub, 126
overview of, 125
permissions, 138
tables in, 135
transaction logs, 131-134
Transact-SQL functions, 143-144
versioning, 127-128, 137-138
Web services API, 143
measures (PivotTables), 199-200
members (MDS), 129-130
memory, upgrading online, 63
memory requirements, 14
Microsoft Assessment and Planning Toolkit, 75
Microsoft Press support Web site, xix
Microsoft SQL Azure, 9
migrating SQL Server installations, 18-19
migrating virtual machines. See Live Migration
models (MDS)
defined, 129
deploying, 142
security settings, 139-140
monitoring, with SQL Server Utility, 89
monitoring DACs, 100-105
monitoring settings, 34
MPP architecture, 110
msdb database
creation of, 52
disk space consumption, 25
MultiLookup function, 167
multi-rack system
Backup node, 114
compute node, 114-115
control node, 112-113
control rack, 112
data racks, 111
Landing Zone node, 114
management node, 114
overview of, 110
N
naming UCPs, 27
nesting aggregate functions, 168
.NET Framework requirement, 15
New Virtual Machine Wizard, 76-77
Nexus query tool, 122
non-transactional reference data, 125-126
0
objects, SQL Server, 45
operating system requirements, 15
output adapters, 151
overutilized instances, 91
overutilized threshold default, 34
P
page headers and footers, 170
page numbering in reports, 170
PageName property (reports), 173
pagination, report, 172-173
Parallel Data Warehouse
Admin Console, 122
architecture of, 109-115
automatic growth feature, toggling, 118
configuring, 110
control node, 112-113
creating tables, 118-120
data load processing, 121-122
data types supported in, 120
DDL extensions, 117
distributed strategy, 116-117
networking technologies, 112
overview of, 9, 109
query processing, 121
replicated strategy, 116
shared nothing (SN) architecture, 115-120
Parallel Data Warehouse edition, 12
pasting data into PowerPivot, 193
PivotCharts, creating, 196
PivotTables. See also tables
converting to formulas, 197
creating, 196
measures, 199-200
point model, 147
policies
changing, 36
defaults, restoring, 36
managing, 34
violation reporting settings, 35
PowerPivot database, 203
PowerPivot for Excel
Analysis Services engine, 190
Atom data feed, importing, 191
columns, formatting, 195
copying and pasting data into, 193
creating databases, 118
cube functions, 197
data sources, creating, 191-193
data types, changing, 195
filtering data, 194
hiding columns, 196
installing, 190
modifications made by, 190
overview of, 189
relationships in, 194
slicers, 198
Time Intelligence functions, 193
VertiPaq storage mode, 202
workbook, creating, 190
PowerPivot for SharePoint
application database, 203
architecture of, 201
caching, 203
content management, 204
data feed libraries, 205
data refreshing in, 205
linked documents, creating, 205
overview of, 10, 189, 201
Parallel Data Warehouse and, 123
prerequisites for, 201
System Service, 202-203
PowerPivot Gallery, 204-205
PowerPivot Managed Extension, 203
PowerPivot Management Dashboard, 206
PowerPivot reports, 196-198
PowerPivot Web Service, 203, 205-206
PowerShell. See Windows PowerShell
premium editions. See Datacenter edition; Parallel Data Warehouse edition
processor requirements, 14
projection operation, 155
publishing reports, 180-182
Q
query objects, 163
query processing (Parallel Data Warehouse), 121
query templates, 154, 162
QueryTemplate object, 154
R
RAM requirements, 14
registering DAC definitions, 49, 55-56
relationships, in PowerPivot, 194
relative references in expressions, 183
RenderFormat global variable, 169-170
replicated tables, creating, 118-120
Report Builder 3.0, 183
Report Designer, 123
Report Manager, 184-186
Report Part Gallery, 183
report variables, 170-171
Report Viewer, 186
Reporting Services, 186-188. See also reports
reports
alternate access mappings, 187
cache configuring, 179-180
on DAC deployment, 54
data synchronization, 173
data visualization enhancements, 175-178
edit sessions, 183
exporting to Atom data feed, 182
layout, dynamic, 169-170, 172-173
naming pages in, 173
nesting items in, 173
page numbering, 170
pagination, managing, 172-173
parts, searching for, 183
PowerPivot, 196-198
publishing in parts, 180-182
reusability of components in, 178-182
sandboxing, 186
text box orientation, 174
on UCP creation, 28
on validation, 28, 31
ResetPageNumber property (reports), 172
resource isolation, 186
resource utilization monitoring, 95-99
reusability of report components, 178-182
Role-Based Access security model, 39
rs.exe, 187
S
sandboxing reports, 186
scalability, 10
Second Level Address Translation (SLAT), 64
security
in MDS (Master Data Services), 138-141
Role-Based Access model, 39
SequeLink client drivers, 112-113
Server Manager, 11
shared datasets, 179
shared nothing (SN) architecture, 115-120
SharePoint, Reporting Services integration, 187-188
SharePoint Unified Logging Service, 188
shell access. See Windows PowerShell
side-by-side migration, 18-19
SLAT (Second Level Address Translation), 64
slicers, 198
SMP architecture, 110
snapshot windows, 158
software requirements, 15
sparklines, 176
Split function, 167
SQL Azure, 9
SQL Server editions, 11. See also specific editions
SQL Server instances. See instances; managed instances
SQL Server Management Studio, 49-51
SQL Server objects, 44-45
SQL Server PowerShell. See Windows PowerShell
SQL Server Utility. See also Utility Control Points (UCPs); Utility Explorer
dashboard, 89-95
monitoring with, 89
overview of, 4, 21-23
Standard edition, 13
StreamInsight
aggregation functions, 159-160
core engine, 146
deploying, 149-150
development support, 146
event models, 147
event windows, 156-159
events, 147
as hosted assembly, 149
join operations, 161
ManagementService API, 163
overview of, 145
query objects, 163
as standalone server, 149-150
streams, 147
TopK operation, 160
union operations, 161
subscription views (MDS), 136
support for book, xix
Sysprep, 9
sysutility_mdw. See Utility Management Data Warehouse (UMDW)
T
tables. See also PivotTables
calculated columns in, 199
exporting, 120
loading rows into, 122
measures in, 199-200
text box orientation in reports, 174
Theater view (PowerPivot Gallery), 204-205
Time Intelligence functions (PowerPivot), 193
TopK operation, 160
transaction logs
for MDS, 131-134
space allocation, 118
Transact-SQL functions, 143-144
troubleshooting failover clustering, 70
tumbling windows, 157-158
U
UCPs (Utility Control Points). See Utility Control Points (UCPs)
UMDW (Utility Management Data Warehouse). See Utility Management Data Warehouse (UMDW)
underutilization thresholds
default, 34
variance in, 85
underutilized instances, 91
Unicode compression, 10
union operations, 161
upgrading data-tier applications (DACs), 59-61
upgrading hardware online, 63
upgrading SQL Server
in-place upgrades, 16-17
side-by-side migration, 18-19
user-defined functions (UDFs), 161
Utility Administrator, 37
utility collection set account, specifying, 27, 30
Utility Control Points (UCPs), 21-22
capacity specifications, 25
connecting to, 33-34, 89
creating, 26-29
disconnecting from, 34
enrollment of, 29
frequency of data collection, 23
managed instances, maximum number of, 29
msdb database, 25, 52
naming, 27
overview of, 4, 23
prerequisites for deployment, 25-26
report on creation of, 28
SQL Server edition required for, 26
validating, 28
Utility Explorer. See also SQL Server Utility dashboard and list views, 5, 24 data refreshing in, 29 Data-Tier Applications viewpoint, 100-105 launching, 24 Managed Instances viewpoint, 95-99 user interface, 24 Utility Administration node, 33-36
Utility Management Data Warehouse (UMDW), 23 collection upload frequency, 23 data retention period, modifying, 39-40 disk space consumption, 25 verifying, 29
Utility Reader, 37-38 utility storage utilization history, 94-95 utilization policies, 6, 34-35
V
Validate A Configuration Wizard, 68-70
validating failover clustering setup, 68-70
validating instances, 31
validating UCPs, 28
validation reports, 28, 31
VertiPaq storage mode, 190, 202
violation reporting settings, 35
virtual machines
automatic start action, configuring, 79-80
configuring for Live Migration, 79-82
creating with Hyper-V, 76-79
high availability, configuring, 81-82
live migration of. See Live Migration
virtualization. See also Hyper-V consolidation with, 87-88 technology for, 72
Visual Studio 2010
deploying DACs from, 45-46
importing DACs into, 47-48
volume space utilization monitoring, 97
W
Web browser support for Reporting Services, 186
Web edition, 13
windows, event, 156-159
Windows Communication Foundation (WCF) Web services, 203
Windows domain accounts, 27, 30
Windows PowerShell
deploying UCPs with, 28
diagnostics, 164
enrolling instances with, 32
improvements in, 11
launching, 28
Windows Server 2008 integration, 10-11
workbooks, 173, 192
Workgroup edition, 13
WritingMode property (reports), 174
About the Authors

natural_image
Portrait of a smiling man with short hair and beard, wearing a dark collared shirt (no text or symbols visible)Ross Mistry is a technical architect at the Microsoft Technology Center (MTC) in Silicon Valley. Ross provides executive briefings, architectural design sessions, and proof of concept workshops to organizations located in the Silicon Valley. His core specialty is Microsoft SQL Server, although he also focuses on Windows Active Directory, Microsoft Exchange, and Windows Server Hyper-V.
Ross's latest books include Windows Server 2008 R2 Unleashed and Microsoft SQL Server 2008 Management and Administration. He was a contributing writer on Microsoft Exchange Server 2010 Unleashed, Micro-
soft SharePoint 2007 Unleashed, and Windows Server 2008 Hyper-V Unleashed. He frequently writes for TechTarget and is currently working on a series of SQL Server virtualization white papers, which will be published shortly. Ross is a former SQL Server MVP, is well known in the worldwide SQL Server community, and frequently speaks at technology conferences and user groups around the world. He has recently spoken at the North American PASS Community Summit, SQL Connections, European PASS, SQL BITS, and Microsoft.
Prior to joining Microsoft, Ross was a managing partner and principal consultant at Convergent Computing (CCO), where he was responsible for designing and implementing technology solutions for organizations with a global presence. Some of his customers included eBay, McAfee, Yahoo!, Gilead Sciences, Ross Stores, The Sharper Image, McDonald's, CIBC, Radio Shack, Wells Fargo, and TD Waterhouse.
You can follow and contact Ross on Twitter @RossMistry.

natural_image
Black-and-white portrait of a smiling woman with shoulder-length hair (no text or symbols visible)Stacia Misner is the founder of Data Inspirations (www.datainspirations.com), which delivers global business intelligence (BI) consulting and education services. She is a consultant, educator, mentor, and author specializing in business intelligence and performance management solutions that use Microsoft technologies. Stacia has more than 25 years of experience in information technology and has focused exclusively on Microsoft BI technologies since 2000. She is the author of Microsoft SQL Server 2000 Reporting Services Step by Step, Microsoft SQL Server 2005 Reporting Services Step by Step, Microsoft SQL Server 2005 Express Edition: Start Now!, and Microsoft SQL Server 2008 Reporting Services Step
by Step and the coauthor of Business Intelligence: Making Better Decisions Faster, Microsoft SQL Server 2005 Analysis Services Step by Step, and Microsoft SQL Server 2005 Administrator's Companion. She is also a Microsoft Certified IT Professional-BI and a Microsoft Certified Technology Specialist-BI. Stacia lives in Las Vegas, Nevada, with her husband, Gerry. You can contact Stacia via e-mail at smisner@datainspirations.com.
What do you think of this book?
We want to hear from you!
To participate in a brief online survey, please visit:
microsoft.com/learning/booksurvey
Tell us how well this book meets your needs —what works effectively, and what we can do better. Your feedback will help us continually improve our books and learning resources for you.
Thank you in advance for your input!
Microsoft Press
Stay in touch!
To subscribe to the Microsoft Press® Book Connection Newsletter—for news on upcoming books, events, and special offers—please visit:
microsoft.com/learning/books/newsletter


- Contents at a Glance
- PART I DATABASE ADMINISTRATION
- PART II BUSINESS INTELLIGENCE DEVELOPMENT
- Contents
- CHAPTER 1 SQL Server 2008 R2 Editions and Enhancements 3
- CHAPTER 2 Multi-Server Administration 21
- CHAPTER 3 Data-Tier Applications 41
- CHAPTER 4 High Availability and Virtualization Enhancements 63
- CHAPTER 5 Consolidation and Monitoring 85
- CHAPTER 6 Scalable Data Warehousing 109
- CHAPTER 7 Master Data Services 125
- CHAPTER 8 Complex Event Processing with StreamInsight 145
- CHAPTER 9 Reporting Services Enhancements 165
- CHAPTER 10 Self-Service Analysis with PowerPivot 189
- Acknowledgments
- Introduction
- Who Is This Book For?
- How Is This Book Organized?
- Pre-Release Software
- Support for This Book
- We Want to Hear from You
- PART I
- Database Administration
- SQL Server 2008 R2 Editions and Enhancements
- SQL Server 2008 R2 Enhancements for DBAs
- Application and Multi-Server Administration Enhancements
- Additional SQL Server 2008 R2 Enhancements for DBAs
- Advantages of Using Windows Server 2008 R2
- SQL Server 2008 R2 Editions
- Premium Editions
- Core Editions
- Specialized Editions
- Hardware and Software Requirements
- Installation, Upgrade, and Migration Strategies
- The In-Place Upgrade
- In-Place Upgrade Pros and Cons
- SQL Server 2008 R2 High-Level In-Place Strategy
- Side-by-Side Migration
- Side-by-Side Migration Pros and Cons
- SQL Server 2008 R2 High-Level Side-by-Side Strategy
- Multi-Server Administration
- The SQL Server Utility
- SQL Server Utility Key Concepts
- UCP Prerequisites
- UCP Sizing and Maximum Capacity Specifications
- Creating a UCP by Using SSMS
- Creating a UCP by Using Windows PowerShell
- UCP Post-Installation Steps
- Enrolling SQL Server Instances
- Managed Instance Enrollment Prerequisites
- Enrolling SQL Server Instances by Using SSMS
- Enrolling SQL Server Instances by Using Windows PowerShell
- The Managed Instances Dashboard
- Managing Utility Administration Settings
- Connecting to a UCP
- The Policy Tab
- Global Policies For Data-Tier Applications
- Global Policies For Managed Instances
- Volatile Resource Policy Evaluation
- REAL WORLD
- The Security Tab
- The Data Warehouse Tab
- Data-Tier Applications
- Introduction to Data-Tier Applications
- The Data-Tier Application Life Cycle
- Common Uses for Data-Tier Applications
- Supported SQL Server Objects
- Visual Studio 2010 and Data-Tier Application Projects
- Launching a Data-Tier Application Project Template in Visual Studio 2010
- Importing an Existing Data-Tier Application Project into Visual Studio 2010
- Extracting a Data-Tier Application with SQL Server Management Studio
- Installing a New DAC Instance with the Deploy Data-Tier Application Wizard
- Registering a Data-Tier Application
- Deleting a Data-Tier Application
- High Availability and Virtualization Enhancements
- Enhancements to High Availability with Windows Server 2008 R2
- Failover Clustering with Windows Server 2008 R2
- Traditional Failover Clustering
- Guest Failover Clustering
- Enhancements to the Validate A Configuration Wizard
- ■ Network
- ■ System Configuration
- Running the Validate A Configuration Wizard
- The Windows Server 2008 R2 Best Practices Analyzer
- Running the Best Practices Analyzer
- Live Migration Support Through CSV
- Windows Server 2008 R2 Hyper-V System Requirements
- Practical Uses for Hyper-V and SQL Server 2008 R2
- Implementing Live Migration for SQL Server 2008 R2
- Enabling CSV
- Creating a SQL Server VM with Hyper-V
- Configuring a SQL Server VM for Live Migration
- Initiating a Live Migration of a SQL Server VM
- Consolidation and Monitoring
- SQL Server Consolidation Strategies
- Consolidating Databases and Instances
- Consolidating SQL Server Through Virtualization
- Using the SQL Server Utility for Consolidation and Monitoring
- Using the SQL Server Utility Dashboard
- Using the Managed Instances Viewpoint
- The Managed Instances List View Columns
- The Managed Instances Detail Tabs
- Using the Data-Tier Application Viewpoint
- The Data-Tier Application List View
- The Data-Tier Application Tabs
- PART II
- Business Intelligence Development
- Scalable Data Warehousing
- Parallel Data Warehouse Architecture
- Data Warehouse Appliances
- Processing Architecture
- The Multi-Rack System
- The Data Rack
- The Control Rack
- The Control Node
- The Landing Zone Node
- The Backup Node
- The Management Node
- The Compute Node
- Hub-and-Spoke Architecture
- Data Management
- Shared Nothing Architecture
- Replicated Strategy
- Distributed Strategy
- DDL Extensions
- CREATE DATABASE
- CREATE TABLE
- Data Types
- Query Processing
- Data Load Processing
- Monitoring and Management
- Integration Services
- Reporting Services
- Analysis Services and PowerPivot
- Master Data Services
- Master Data Management
- Master Data Challenges
- Key Features of Master Data Services
- Master Data Services Components
- Master Data Services Configuration Manager
- The Master Data Services Database
- Master Data Manager
- Data Stewardship
- Model Objects
- Master Data Maintenance
- Business Rules
- Transaction Logging
- Importing Master Data
- Exporting Master Data
- Administration
- Versions
- Security
- Model Deployment
- Programmability
- The Class Library
- Master Data Services Web Service
- Matching Functions
- Complex Event Processing with StreamInsight
- Complex Event Processing
- Complex Event Processing Applications
- StreamInsight Highlights
- StreamInsight Architecture
- Data Structures
- The CEP Server
- Input Adapters
- Output Adapters
- Query Instances
- Deployment Models
- Hosted Assembly
- Standalone Server
- Application Development
- Event Types
- Adapters
- Query Templates
- The Event Stream Object
- The QueryTemplate Object
- Queries
- Projection
- Filtering
- Event Windows
- Aggregations
- TopK
- Grouping
- Joins
- Unions
- User-defined Functions
- Query Template Binding
- The Query Binder Object
- The Event Stream Consumer Object
- The Query Object
- The Management Interface
- Diagnostic Views
- Windows PowerShell Diagnostics
- Reporting Services Enhancements
- New Data Sources
- Expression Language Improvements
- Combining Data from More Than One Dataset
- Aggregation
- Conditional Rendering Expressions
- Page Numbering
- Read/Write Report Variable
- Layout Control
- Pagination Properties
- Data Synchronization
- Text Box Orientation
- Data Visualization
- Data Bars
- Sparklines
- Indicators
- Maps
- Reusability
- Shared Datasets
- Cache Refresh
- Report Parts
- Atom Data Feed
- Edit Sessions
- The Report Part Gallery
- Report Access and Management
- Report Manager Improvements
- Report Viewer Improvements
- Improved Browser Support
- RDL Sandboxing
- Improved Installation and Configuration
- RS Utility Scripting
- SharePoint Lists as Data Sources
- SharePoint Unified Logging Service
- Self-Service Analysis with PowerPivot
- The PowerPivot Add-in for Excel
- Modifications to Excel
- The Local Analysis Services Engine
- The Atom Data Feed Provider
- Data Sources
- External Data
- ■ Files
- ■ Data feeds
- Linked Tables
- Copying and Pasting
- Data Preparation
- Relationships
- Filters
- Columns
- PowerPivot Reports
- PivotTables
- Cube Functions
- Slicers
- Data Analysis Expressions
- Calculated Columns
- Measures
- DAX Functions
- PowerPivot for SharePoint
- Architecture
- Analysis Services in VertiPaq Mode
- The PowerPivot System Service
- The PowerPivot Database
- The PowerPivot Web Service
- The PowerPivot Managed Extension
- Content Management
- The PowerPivot Gallery
- The Data Feed Library
- Data Refresh
- Linked Documents
- The PowerPivot Management Dashboard
- Index
- A
- B
- C
- D
- E
- F
- G
- H
- |
- J
- L
- M
- N
- 0
- P
- Q
- R
- S
- T
- U
- V
- W
- About the Authors
- What do you think of this book?
- Stay in touch!
Brand : MICROSOFT
Model : SQL Server 2008 R2
Category : Server Software